1
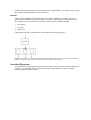
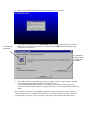
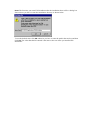
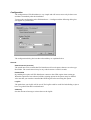
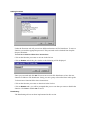
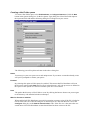
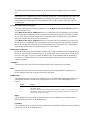
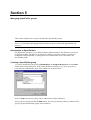
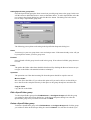
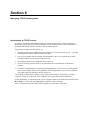
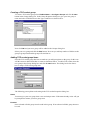
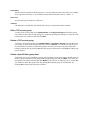
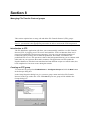
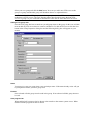
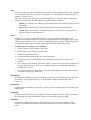
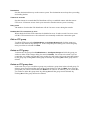
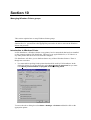
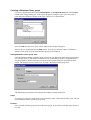
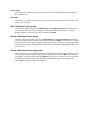
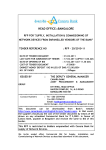
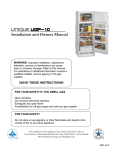
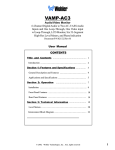
File Distributor
User’s Guide
Version 1
File Distributor User’s Guide
Version 1
PUBLISHED BY
Graphic Prepress Solutions
Copyright © 1999–2000 by Graphic Prepress Solutions.
Adobe, Acrobat, the Acrobat logo, Adobe Garamond, Carta, Distiller, FrameMaker, Illustrator, Minion, PhotoShop,
the PhotoShop logo, Poetica, PostScript, and the PostScript logo are registered trademarks of Adobe Systems
Incorporated. AdobePS and InDesign are trademarks of Adobe Systems Incorporated. Apple, Macintosh, Mac, and
TrueType are trademarks of Apple Computer, Inc., registered in the United States and other countries. Microsoft and
Windows are either registered trademarks or trademarks of Microsoft Corporation in the United States and/or other
countries. UNIX is a registered trademark of The Open Group.
All other brand or product names are the trademarks or registered trademarks of their respective holders.
This publication and the information herein is furnished AS IS, is subject to change without notice and should not to
be construed as a commitment by Graphic Prepress Solutions. Graphic Prepress Solutions assumes no responsibility
or liability for any errors or inaccuracies, makes no warranty of any kind with respect to this publication, and
expressly disclaim any and all warranties of merchantability, fitness for particular purposes and noninfringement of
third party right.
Contents
1 Introduction
1.1 Basic ideas
1.2 Use with GFM-system
2 Installation and configuration
2.1 Before installing
2.2 Installation
2.3 Configuration
3 Basic operation
3.1 Start File Distributor
2.2 Stop File Distributor
4 Managing queues
4.1 Introduction to queues
4.3 Creating a Hot Folder queue
Creating a TCP-socket input queue
5 Managing SpoolFolder groups
5.1 Introduction to SpoolFolders
5.2 Creating a SpoolFolder group
5.3 Edit a SpoolFolder group
5.4 Delete a SpoolFolder group
5.5 Delete a SpoolFolder group item
6 Managing TCP/IP socket groups
6.1 Introduction to TCP/IP socket
5.2 Creating a TCP-socket group
5.3 Edit a TCP-socket group
5.4 Delete a TCP-socket group
5.5 Delete a TCP-socket group item
7 Managing User Datagram Protocol groups
8 Managing File Transfer Protocol groups
8.1 Introduction to FTP
5.2 Creating an FTP group
5.3 Edit an FTP group
5.4 Delete an FTP group
5.5 Delete an FTP group item
9 Managing LaserWriter groups
10 Managing Windows Printer groups
10.1 Introduction to Windows Printer
10.2 Creating Windows Printer group
10.3 Edit a Windows Printer group
10.4 Delete a Windows Printer group
10.5 Delete a Windows Printer group item
Section 1
Introduction
This guide explains how to install, configure and use the File Distributor application from
Graphic Prepress Solutions.
The application should be used to distribute files and data with different protocols and methods
to remote systems. For example could the application be used to load balance files and data to
any number of folders, LaserWriter’s or TCP sockets. The application can also be used to
distribute files with the FTP protocol or to Windows Printers.
Basic ideas
There are some basic ideas in File Distributor that you should be familiar with before
proceeding with the installation and configuration. The basic function of the application is that it
will receive data from different inputs and then distribute the data by different protocols and
methods.
Input as Queues
The application can receive files or data by ‘Hot Folders’ and TCP-sockets. You will define
your inputs as queues. Each queue is one Hot Folder or one TCP-socket. The queue will be
connected to an output group and in this way will data captured by the queue be sent to the
group.
Of course can other tools and software’s add methods how data can be inputted. For example
can NT be configured to act as an FTP-server and the Host directory for the FTP-server may be
pointed to a Hot Folder that is scanned by File Distributor and in this way will data sent by FTP
be distributed by File Distributor.
Output as Groups
File Distributor can distribute the incoming data by different methods and protocols.
•
Hot Folders
•
TCP-sockets
•
User Datagram Protocol
•
FTP server
•
LaserWriter’s
•
Windows Printers
In File Distributor will you define your outputs as groups. Each group may hold any number of
group items. A group item could be a SpoolFolder or an FTP-Server. If you defines a group to
hold SpoolFolder all group items in that group must be SpoolFolders. You cannot create a group
that contains both SpoolFolders and LaserWriter’s.
Methods
There are three methods available how the data should be distributed. By setting the correct
method can File Distributor also load balance on output. Load balancing usually means to use
the available resources as efficient as possible. There are three methods available:
•
In sequence
•
Next free
•
Send to all
These methods will be explained later in this guide when setting up queues.
Figure. The relation between queues and groups. Each queue will be attached to a group. The group then holds any
number of group items. The group item is the object that will send the incoming data.
Use with GFM-system
File Distributor can be configured to run with the GFM-system. In that case will File Distributor
connect to its own GFM-engine. In the queue setup can then different scripts be started at
different stages during the transfer.
Section 2
Installation and configuration
This section explains how to install and configure the File Distributor application.
2.1 Before installing
Before you install File Distributor, you must make sure that your computer meets the minimum
requirements prior the installation. The following list is the minimum requirements
Requirements
The following hardware and software is required for the File Distributor application:
•
Microsoft Windows NT Server version 4.0. Note that the ITG only has been tested on an
English version.
•
80486 or higher microprocessor. Recommended is a Pentium II 450 MHz or better.
•
A harddisk with a minimum of 5 MB available space.
•
VGA or higher-resolution screen supported by Microsoft Windows
•
24 MB RAM. This is minimum for the application to start. Recommended is 128 Mbytes or
more.
•
A mouse or other suitable pointing device.
•
In some installation will also the GFM-system be needed. For example if File Distributor
should generate IFRAtrack messages must the GFM-Engine and the GFM IFRATrack
Generator Module be installed.
2.2 Installation
The File Distributor application is found on the GFM Server CD in the directory
\GFM\APPS\FileDistributor. In the directory there is a setup program that should be used when
installing the application.
To install the application follow these instructions:
1. End all running applications.
2. Insert you GFM Server CD CD-ROM in your CD-ROM player.
3. Navigate to the \GFM\APPS\FileDistributor directory on the CD-ROM and double-click the
setup program.
4. After a few seconds will the following menu appear on your monitor.
To install click
this button
5. To abandon the installation click Exit Setup and the setup program will remove all files
that has been copied to your system. To continue click the OK button and the following
dialog box will be shown:
To change the
directory where
to install click
this button
6. The setup procedure is extremely easy, the only thing to tell the setup program is the path
where the application shall be installed. The default value is
C.\GFM\Applications\FileDistributor. To change this path click the Change Directory
button. To install click the button in the upper left corner. To exit setup click the button Exit
Setup.
Now will files be copied to your harddisk and the neccesary COM objects will be registered.
The next thing to do is to configure File Distributor as described on the next pages. After the
configuration you need to set up your queues and groups as described in the next sections.
Note! The first time you starts File Distributor after the installation there will be a dialog box
shown where you have to enter the installation directory as shown below:
To use the default value click OK otherwise you have to enter the path in the text box and then
click OK. The value that shall be entered is the same as the one where you installed File
Distributor
Configuration
The configuration of File Distributor is very simple and will in most cases only be done once
and that is immedialty after the installation.
To access the configuration select FileDistributor -> Configure and the following dialog box
will appear on your monitor.
The configuration dialog box has three tabs and they are explained below
General
Search Interval (seconds)
The search interval in seconds that File Distributor will search queues that are set as the type
Hot Folder. The search interval may be any value beteween 1 and 65 seconds.
Enable GFM
By enabling this option will File Distributor connect to the GFM-engine when starting up.
When this option has been selected will the scripting options in the queue setup be enabled.
Also note that you must have installed the GFM-engine before activating this option.
LogFile
The path where your logfile will be saved. The logfile could be useful for fault finding or just to
have a log about what has been distributed.
Verbosity
Sets the amount of messages written down to the logfile.
Adding functions
Under the Functions tab will you activate different functions in File Distributor. To active a
function you need the appropiate password. This password can be obtained from Graphic
Prepress Solutions.
To activate a function follow these instructions:
Click on the function you wants to activate in the list box
Click on Enable and a dialog box similar to the following will be displayed:
Enter you password and click OK. You must now restart File Distributor to have the new
function available to File Distributor. Setup your new group as described later in this guide.
To deactivate a function follow these instructions:
Click on the function you wants to deactivate in the list box
Click on Disable and a you will be prompted that you are sure that you wants to disable the
function. Click Yes to disable No to cancel.
Distributing
The Distributing tab has not been implemented in this version.
Section 3
Basic operation
This section explains how to operate the File Distributor application when is has been installed
and configured.
Under normal circumstances will File Distributor run unattended with no user interaction at all.
Start File Distributor
To start File Distributor double click the File Distributor icon and the application will start.
By default will File Distributor now be stopped. This means that no queues will be processed
even if there are files waiting. To start processing you must select File Distributor -> Start
Inputs. Now will File Distributor process all enabled queues unattended.
Stop File Distributor
To stop inputs select File Distributor -> Start Inputs and no queue will be processes. To exit
File Distributor select File Distributor -> Quit and the application will exit.
Section 4
Managing Queues
This section explains how to setup, edit and delete queues.
Introduction to queues
All input data, files or data that should be distributed by File Distributor are defined as different
queues. Each queue will be defined as its own unique component not interfering with any other
queue. Typical configuration information saved in each queue is:
•
The queue type, or how will FileDistributor receive the data. Currently there are two types
how data can be inputted: Hot Folders or TCP-socket.
•
If any GFM-script shall be executed as distribution starts, ends or fails.
•
The group that the data shall be sent to. How to setup groups is described in the following
sections. This means that you first must setup at least one group before you can setup a
queue.
•
The method how the data should be distributed. Available methods are: In sequence, Next
free, Send to all.
•
Each queue can be switched on or off.
Creating a Hot Folder queue
To create a Hot Folder queue select FileDistributor -> Configure Queues and click the New
button in the Queues dialog box. In the Set Queue Type dialog box select Hot Folder input as
the input and click OK and the following dialog box will appear on your screen:
The following part will explain each item in the above dialog box.
Name
You must give your new queue a new and unique name. If you enters a name that already exists
will you be prompted to rename your queue.
Enabled
By selecting this option will this queue be enabled. This means that File Distributor will scan
the directory entered under Path and if a file is in that directory will it be processes as defined in
this queue. If this option isn’t selected will this queue never be scanned.
Path
The path to the directory or Hot Folder to scan. By clicking the Browse button can you navigate
to the directory with standard windows techniques.
Wait for file size to stabilize
When enabled will File Distributor not wait for operating messages saying if the file is locked or
not but look if the size of the incoming file is increasing or not. The time interval is set in the
Configure dialog box as the Search Interval In Sec value. If the file size is the same after one
search interval will File Distributor assume that all data has been written to the file.
If disabled will File Distributor depend on the operating system telling if the file is locked or
not.
Note! Do only enable this option if you have problems with File Distributor picking up files
before they have completely been received by File Distributor. You should always try to use the
Do extra check before running file first. By enabling this option you will slow down the
performance of File Distributor as File Distributor has to scan all queues where this option is
enabled twice.
Do extra check before running file
This option has different meanings depending on if the Wait for file size to stabilize check box
has been enabled or not.
If the Wait for file size to stabilize check box is unchecked will File Distributor try to rename
the incoming file, and thereby receive messages from the operating system if the file is locked
or not. If the file isn’t locked will the file be renamed back to its original name again and the
group associated to the queue will be sent the file.
If the Wait for file size to stabilize check box is checked will File Distributor try to move the
incoming file to a TEMP directory, and thereby receive messages from the operating system if
the file is locked or not. If the file isn’t locked will the file be moved back to its original place
again and the GFM script associated to the process will be started.
Delete after completion
When checked will the file in the Path be deleted once it has been distributed. If unchecked will
the file be moved to the Complete directory. Note that under some circumstances will the file be
moved by the group. If you for example distributes files to SpoolFolders and the Operation is
set to Move to folder will the file be moved by the group and you cannot move the file to the
complete directory.
Complete
The directory where files will be saved if the Delete after completion isn’t enabled.
Error
The directory where files will be saved if an error occurs during distribution. What an error
means depends in the type of group connected to the queue.
GFM Scripts
The GFM Script option will only be enabled if you have installed the GFM-engine and the Use
GFM option has been selected in the configuration. In all cases will GlobalStrings be set as
below:
Index
1
2
3
4
Object
The current file.
The folder name.
The error name as a string. Will only be set if the script to run is the error script.
The details of the error, only for FTP groups currently. Will only be set if the
script to run is the error script.
Begin
The script that will be executed just before the file is sent for distribution. When the script is
started will the file still be in the Path directory.
Complete
The script that will be executed just after the file has been distributed. When the script is started
will the file still be in the Path directory.
Error
If an error occurs during distribution will this GFM-script be executed. When the script is
started will the file still be in the Path directory. Immediately after the script has been executed
will the file be moved to the error directory.
Group
The group that should be used by this queue.
Method
The method used when distributing the file. The methods are the following.
•
In sequence – If the group holds three group items will File Distributor send to item 1, item
2, item 3 and then start with item 1 again.
•
Next free – Will take the group item that is free.
•
Send to all – Sends to all items in the group.
Creating a TCP-socket input queue
Introduction to Socket
A socket is a hardware-independent method of communicating across a network. The File
Distributor plugin supports TCP/IP on Ethernet for job transfer between any combination of
machines running the UNIX or Windows NT operating systems.
The benefits of using network sockets are:
• Transfer of jobs between different types of machines occurs at network speeds — typically
much higher than those achieved with serial links.
• One server machine (the one running File Distributor) can receive input from as many sending
machines as can connect to the network.
• All sending machines are configured in the same way.
• Given an existing network, there is no requirement for extra hardware or shared file systems.
• It requires a small amount of central network management, or user access to configuration
files, on the sending and receiving machines. This management or user access is required only
when setting up the links, not for routine use.
To create a Hot Folder queue select FileDistributor -> Configure Queues and click the New
button in the Queues dialog box. In the Set Queue Type dialog box select TCP-socket input as
the input and click OK and the following dialog box will appear on your screen:
Section 5
Managing SpoolFolder groups
This section explains how to setup, edit and delete SpoolFolder groups.
Note! To be able to use SpoolFolder groups you must enable the SpoolFolder Out function
first. I.e. you must have the appropriate password to be able to activate the SpoolFolder Out
protocol.
Introduction to SpoolFolders
File Distributor will allow you to distribute data to different folders. The folder may be a local
or networked folder. The data can be moved to a folder or copied to a folder. You can also
loadbalance on SpoolFolders by setting the correct method in the queue connected to the
SpoolFolder group.
Creating a SpoolFolder group
To create a SpoolFolder group select FileDistributor -> Configure Groups and click the New
button in the Groups dialog box. In the Group Properties dialog box give your new group a
name and select SpoolFolder in the Type combo box as shown below.
Now click OK and your new group will be added to the Groups dialog box.
Select your new group and click the Edit button. Now can you add any number of folders to the
group as group items that this group will send data to.
Adding SpoolFolder group items
Once the SpoolFolder group has been created can you add group items to the group. In this case
will this mean to add folders that we wants to distribute data to. To add a SpoolFolder select the
new group in the Groups dialog box and click the New button. The dialog box below shows
how to setup a SpoolFolder group item:
The following part explains each setting in the SpoolFolder Properties dialog box.
Name
You must give your new group item a new and unique name. If the name already exists will you
be prompted to rename your new group item.
Enabled
Once selected will this group item be used in this group. If not selected will this group item not
be used.
Folder
The path to the folder where data should be distributed. By clinking the Browse button can you
navigate to the folder with standard windows techniques.
Operation
The operation sets if the data incoming file from the queue should be copied or moved.
Move to folder
Move the file to the folder. If you selects this option will you not be able to use the ability to
move the file to the complete directory in the queue as the group already has moved the file.
Copy to folder
Copy the file to the folder.
Edit a SpoolFolder group
To edit a SpoolFolder group select FileDistributor -> Configure Groups and click the group
you wishes to edit in the Groups dialog box. In the Group Properties dialog box select the
SpoolFolder group item you wishes to edit and click Edit.
Delete a SpoolFolder group
To delete a SpoolFolder group select FileDistributor -> Configure Groups and click the group
you wishes to delete in the Groups dialog box and click Delete. You will now be asked if you
are certain that you wishes to delete this group as this also will remove all group items that
belongs to this group. By clicking Yes will the group be deleted. By clicking No will the group
not be deleted.
Delete a SpoolFolder group item.
In the same way as you can delete a group can you delete a group item in the selected group. To
delete a group item selected the group in the Groups dialog box and click Edit. Now select the
group item you wishes to delete and click Delete. You will now be asked if you are certain that
you wishes to delete this group item. By clicking Yes will the group item be deleted. By
clicking No will the group item not be deleted.
Section 6
Managing TCP/IP socket groups
Introduction to TCP/IP socket
A socket is a hardware-independent method of communicating across a network. The File
Distributor plugin supports TCP/IP on Ethernet for job transfer between any combination of
machines running the UNIX or Windows NT operating systems.
The benefits of using network sockets are:
•
Transfer of jobs between different types of machines occurs at network speeds — typically
much higher than those achieved with serial links.
•
One server machine (the one running File Distributor) can receive input from as many
sending machines as can connect to the network.
•
All sending machines are configured in the same way.
•
Given an existing network, there is no requirement for extra hardware or shared file
systems.
•
It requires a small amount of central network management, or user access to configuration
files, on the sending and receiving machines. This management or user access is required
only when setting up the links, not for routine use.
The Transfer Control Protocol allows you to create and maintain a connection to a remote
computer. Using the connection, both computers can stream data between themselves.
In File Distributor, you must know the server computer's name or IP address also known as the
Host Name, as well as the port, Host Port on which it will be listening.
Once a connection has been made, either computer can send and receive data.
Creating a TCP-socket group
To create a TCP-socket group select FileDistributor -> Configure Groups and click the New
button in the Groups dialog box. In the Group Properties dialog box give your new group a
name and select TCP/IP Socket in the Type combo box as shown below.
Now click OK and your new group will be added to the Groups dialog box.
Select your new group and click the Edit button. Now can you add any number of folders to the
group as group items that this group will send data to.
Adding TCP-socket group items
Once the TCP-socket group has been created can you add group items to the group. In this case
will this mean to add sockets that we wants to distribute data to. To add a TCP-socket select the
new group in the Groups dialog box and click the New button. The dialog box below shows
how to setup a TCP-socket group item:
The following part explains each setting in the TCP-socket Properties dialog box.
Name
You must give your new group item a new and unique name. If the name already exists will you
be prompted to rename your new group item.
Enabled
Once selected will this group item be used in this group. If not selected will this group item not
be used.
Host Name
Sets the remote machine to which connect to. You can either provide a host name, for example,
"FTP://ftp.microsoft.com," or an IP address string in dotted format, such as "100.0.1.1".
Host Port
Sets the remote port number to connect to.
Timeout
The timeout in seconds that File Distributor will try to connect the remote machine.
Edit a TCP-socket group
To edit a TCP-socket group select FileDistributor -> Configure Groups and click the group
you wishes to edit in the Groups dialog box. In the Group Properties dialog box select the TCPsocket group you wishes to edit and click Edit.
Delete a TCP-socket group
To delete a TCP-socket group select FileDistributor -> Configure Groups and click the group
you wishes to delete in the Groups dialog box and click Delete. You will now be asked if you
are certain that you wishes to delete this group as this also will remove all group items that
belongs to this group. By clicking Yes will the group be deleted. By clicking No will the group
not be deleted.
Delete a SpoolFolder group item.
In the same way as you can delete a group can you delete a group item in the selected group. To
delete a group item selected the group in the Groups dialog box and click Edit. Now select the
group item you wishes to delete and click Delete. You will now be asked if you are certain that
you wishes to delete this group item. By clicking Yes will the group item be deleted. By
clicking No will the group item not be deleted.
Section 7
Managing User Datagram Protocol groups
Not yet implemented.
.
Section 8
Managing File Transfer Protocol groups
This section explains how to setup, edit and delete File Transfer Protocol (FTP) groups.
Note! To be able to use FTP groups you must enable the File Transfer Protocol Out function
first. I.e. you must have the appropriate password to be able to activate the FTP Out protocol
Introduction to FTP
The File Distributor application will allow you to automatically send files over File Transfer
Protocol, FTP, by logging on to FTP servers and send files. FTP is an Internet client-server
protocol for transferring files between computers. You can set up an unlimited number of
connections and by moving files to different predefined ’hot folders’ send them to the
predefined FTP-servers. The operation is done in the background allowing you to continue with
other tasks on your system as the transfer continues. The application can also update the
PageNet database as files has been transferred and run different scripts as a transfer starts, has
been completed or if an error occurs during the transfer.
Creating an FTP group
To create an FTP group select FileDistributor -> Configure Groups and click the New button
in the Groups dialog box.
In the Group Properties dialog box give your new group a name and select File Transfer
Protocol in the Type combo box. Now click OK and your new group will be added to the
Groups dialog box.
Select your new group and click the Edit button. Now can you add a new FTP-server to the
group as a group item that this group will distribute data to as explained below.
Note! Normally will an FTP group only hold one group item, or one FTP-server, as you cannot
loadbalance on FTP-servers. The only situation where there should be more than one FTPserver in a group is if you would like to distribute the same data to more than one FTP-server.
Adding a FTP group item
Once the FTP group has been created can you add group items to the group. In this case will this
mean to add any FTP-server that we wants to send data to. To add an FTP-server click the New
button in the Group Properties dialog box and the following dialog box will appear on your
monitor.
Name
You must give your new group item a new and unique name. If the name already exists will you
be prompted to rename your new group item.
Enabled
Once selected will this group item be used in this group. If not selected will this group item not
be used.
View progress bar
When enabled will a progress bar be shown as the transfer to the remote system occurs. When
disabled will the progress bar not be shown.
Type
In order to make any kind of connection to the Internet, you must determine how your computer
is connected to the Internet. If you are on an Intranet, you will probably be connected to the
Internet via a proxy server.
The Access Type will set the type of access (through a proxy or directly) that the connection
will use to communicate with the Internet. The options are the following:
Default. Use Defaults. The connection uses default settings found in the registry to access
the Internet.
Direct Direct to Internet. The connection has a direct connection to the Internet.
Named Proxy Named Proxy. Tells the connection to use the proxy server specified in
the Proxy setting as described below.
Proxy
In short, a proxy server is an intermediary between your computer and the Internet. All
computers on an Intranet that need to connect to the Internet must do so through a proxy server.
Thus the proxy functions as a firewall between the Intranet and the Internet, discarding invalid
end-user and external requests, thereby protecting the Intranet from hostile actions.
To find the proxy settings on your computer
1. On the Taskbar of your computer, click Start.
2. On the Settings item, click the Control Panel.
3. Double-click the Internet icon.
4. On the Internet Properties dialog box, click Connection.
5. Under Proxy Server, confirm that the Connect Through a Proxy Server check box is
selected.
6. If it is selected, click Settings. The name of proxy servers you use for various protocols will
be found in the dialog box. If no proxy is defined, contact your system administrator for
available proxy servers.
7. If it is not selected you will probably be connected to the Internet directly and you should
select Direct in the Type combo box.
RemoteHost
Sets the remote machine to which a connection sends data. You can either provide a host name,
for example, "ftp://ftp.microsoft.com," or an IP address string in dotted format, such as
"100.0.1.1".
RemotePort
Sets the remote port number to connect to. For FTP is the port almost always 21 and this is the
default value.
UserName
Sets the name that will be sent with requests to remote computers. If this property is left blank,
the connection will send "anonymous" as the user name when requests are made.
Password
Sets the password that will be sent with the request to log on to remote computers. If this
property is left blank, the connection will send a blank password or the current user's email
name.
Destination
Sets the destination directory on the remote system. The destination must always have preceding
and trailing slashes.
Timeout in seconds
Sets the timeout in seconds that File Distributor will try to establish contact with the remote
FTP-server. If timeouts occurs check your network or that the remote system is running.
Retry count
The number of retries that File Distributor will do if an error occurs during the transfer.
Disable this FTP connection on error
When checked will this FTP connection be disabled on error. In other words if an error occurs
will this FTP connection never be used until a user manually enables the connection again.
Edit an FTP group
To edit an FTP group select FileDistributor -> Configure Groups and click the group you
wishes to edit in the Groups dialog box. In the Group Properties dialog box select FTP group
item you wishes to edit and click Edit.
Delete an FTP group
To delete an FTP group select FileDistributor -> Configure Groups and click the group you
wishes to delete in the Groups dialog box and click Delete. You will now be asked if you are
certain that you wishes to delete this group as this also will remove all group items that belongs
to this group. By clicking Yes will the group be deleted. By clicking No will the group not be
deleted.
Delete an FTP group item.
In the same way as you can delete a group can you delete a group item in the selected group. To
delete a group item selected the group in the Groups dialog box and click Edit. Now select the
group item you wishes to delete and click Delete. You will now be asked if you are certain that
you wishes to delete this group item. By clicking Yes will the group item be deleted. By
clicking No will the group item not be deleted.
Section 9
Managing LaserWriter Groups
Not yet implemented.
Section 10
Managing Windows Printer groups
This section explains how to setup Windows Printer groups.
Note! To be able to use SpoolFolder groups you must enable the Windows Printer Out
function first. I.e. you must have the appropriate password to be able to activate the Windows
Printer Out protocol.
Introduction to Windows Printer
In File Distributor, a Windows Printer is any printer, local or networked, that has been installed
on the computer running File Distributor. This may be an AppleTalk device, a TCP device or
any other printer that can be accesses from the computer.
File Distributor will allow you to distribute data to any of these Windows Printers. There is
though one restriction:
•
You must enable spooling for the printer that should be used by File Distributor. In the
dialog box below are you not allowed to select Print directly to the printer but you must
select Spool print documents so program finishes printing faster.
To access the above dialog box select Start -> Settings -> Printers and double click on the
appropriate printer.
Creating a Windows Printer group
To create a SpoolFolder group select FileDistributor -> Configure Groups and click the New
button in the Groups dialog box. In the Group Properties dialog box give your new group a
name and select Windows Printer in the Type combo box as shown below.
Now click OK and your new group will be added to the Groups dialog box.
Select your new group and click the Edit button. Now can you add any number of Windows
Printers to the group as group items that this group will send data to.
Adding Windows Printer group items
Once the Windows Printer group has been created can you add group items to the group. In this
case will this mean to add printers installed on your system that we wants to distribute data to.
To add a Windows Printer select the new group in the Groups dialog box and click the New
button. The dialog box below shows how to setup a Windows Printer group item:
The following part explains each setting in the Windows Printer dialog box.
Name
You must give your new group item a new and unique name. If the name already exists will you
be prompted to rename your new group item.
Enabled
Once selected will this group item be used in this group. If not selected will this group item not
be used.
Printer name
In the combo box select the printer for this group item. All installed printers should appear in
the combo box list.
Block Size
The blocks size sets the size in number kilo bytes sent to the printer spooler in each block. The
default value is 128 kb.
Edit a Windows Printer group
To edit a SpoolFolder group select FileDistributor -> Configure Groups and click the group
you wishes to edit in the Groups dialog box. In the Group Properties dialog box select the
Windows Printer group item you wishes to edit and click Edit.
Delete a Windows Printer group
To delete a Windows Printer group select FileDistributor -> Configure Groups and click the
group you wishes to delete in the Groups dialog box and click Delete. You will now be asked if
you are certain that you wishes to delete this group as this also will remove all group items that
belongs to this group. By clicking Yes will the group be deleted. By clicking No will the group
not be deleted.
Delete a Windows Printer group item.
In the same way as you can delete a group can you delete a group item in the selected group. To
delete a group item selected the group in the Groups dialog box and click Edit. Now select the
group item you wishes to delete and click Delete. You will now be asked if you are certain that
you wishes to delete this group item. By clicking Yes will the group item be deleted. By
clicking No will the group item not be deleted.