1
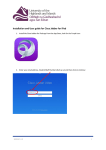
Cisco Jabber Video for TelePresence 4.7 User Guide for Windows
First Published: October 29, 2013
Americas Headquarters
Cisco Systems, Inc.
170 West Tasman Drive
San Jose, CA 95134-1706
USA
http://www.cisco.com
Tel: 408 526-4000
800 553-NETS (6387)
Fax: 408 527-0883
THE SPECIFICATIONS AND INFORMATION REGARDING THE PRODUCTS IN THIS MANUAL ARE SUBJECT TO CHANGE WITHOUT NOTICE. ALL STATEMENTS,
INFORMATION, AND RECOMMENDATIONS IN THIS MANUAL ARE BELIEVED TO BE ACCURATE BUT ARE PRESENTED WITHOUT WARRANTY OF ANY KIND,
EXPRESS OR IMPLIED. USERS MUST TAKE FULL RESPONSIBILITY FOR THEIR APPLICATION OF ANY PRODUCTS.
THE SOFTWARE LICENSE AND LIMITED WARRANTY FOR THE ACCOMPANYING PRODUCT ARE SET FORTH IN THE INFORMATION PACKET THAT SHIPPED WITH
THE PRODUCT AND ARE INCORPORATED HEREIN BY THIS REFERENCE. IF YOU ARE UNABLE TO LOCATE THE SOFTWARE LICENSE OR LIMITED WARRANTY,
CONTACT YOUR CISCO REPRESENTATIVE FOR A COPY.
The Cisco implementation of TCP header compression is an adaptation of a program developed by the University of California, Berkeley (UCB) as part of UCB's public domain version
of the UNIX operating system. All rights reserved. Copyright © 1981, Regents of the University of California.
NOTWITHSTANDING ANY OTHER WARRANTY HEREIN, ALL DOCUMENT FILES AND SOFTWARE OF THESE SUPPLIERS ARE PROVIDED “AS IS" WITH ALL FAULTS.
CISCO AND THE ABOVE-NAMED SUPPLIERS DISCLAIM ALL WARRANTIES, EXPRESSED OR IMPLIED, INCLUDING, WITHOUT LIMITATION, THOSE OF
MERCHANTABILITY, FITNESS FOR A PARTICULAR PURPOSE AND NONINFRINGEMENT OR ARISING FROM A COURSE OF DEALING, USAGE, OR TRADE PRACTICE.
IN NO EVENT SHALL CISCO OR ITS SUPPLIERS BE LIABLE FOR ANY INDIRECT, SPECIAL, CONSEQUENTIAL, OR INCIDENTAL DAMAGES, INCLUDING, WITHOUT
LIMITATION, LOST PROFITS OR LOSS OR DAMAGE TO DATA ARISING OUT OF THE USE OR INABILITY TO USE THIS MANUAL, EVEN IF CISCO OR ITS SUPPLIERS
HAVE BEEN ADVISED OF THE POSSIBILITY OF SUCH DAMAGES.
Any Internet Protocol (IP) addresses and phone numbers used in this document are not intended to be actual addresses and phone numbers. Any examples, command display output, network
topology diagrams, and other figures included in the document are shown for illustrative purposes only. Any use of actual IP addresses or phone numbers in illustrative content is unintentional
and coincidental.
Cisco and the Cisco logo are trademarks or registered trademarks of Cisco and/or its affiliates in the U.S. and other countries. To view a list of Cisco trademarks, go to this URL: http://
www.cisco.com/go/trademarks. Third-party trademarks mentioned are the property of their respective owners. The use of the word partner does not imply a partnership
relationship between Cisco and any other company. (1110R)
© 2013
Cisco Systems, Inc. All rights reserved.
CONTENTS
CHAPTER 1
Getting started 1
Signing in 1
Quick setup 2
Audio and video selection 2
Microphone 2
Speakers 2
Camera 3
Resource check 3
Showing the video window 4
Making a call 5
Receiving a call 5
CHAPTER 2
Using the pop-up toolbar 7
Controlling your camera 8
Sharing presentations 8
CHAPTER 3
Using the info bar 11
Control far-end camera 11
Using the keypad (DTMF) 12
When to use the keypad 12
How to use keypad 13
Using the keypad during conferences 13
Accessing conference information 13
CHAPTER 4
Managing your favorites 15
Adding a favorite 15
Deleting a favorite 16
Cisco Jabber Video for TelePresence 4.7 User Guide for Windows
iii
Contents
CHAPTER 5
Use call history 17
Deleting call history 17
CHAPTER 6
Presence status 19
Reading status messages 19
Setting your status 19
CHAPTER 7
Switching and joining calls 21
Switching between calls on hold 21
Joining participants to conference 21
End call on hold 22
CHAPTER 8
Pinning and closing Jabber Video 23
Keeping Jabber Video on top 23
Closing and reopening the control window 23
Signing out 23
Exiting Jabber Video 24
CHAPTER 9
Settings 25
Sign-in 25
Bandwidth 25
Audio 26
Microphone 26
Speakers 26
Video 26
Camera 26
Notifications 27
CHAPTER 10
Requirements 29
PC requirements 29
Multimedia device requirements 30
CHAPTER 11
Troubleshooting 31
Audio issues 31
Cisco Jabber Video for TelePresence 4.7 User Guide for Windows
iv
Contents
Video issues 32
Further troubleshooting 32
Cisco Jabber Video for TelePresence 4.7 User Guide for Windows
v
Contents
Cisco Jabber Video for TelePresence 4.7 User Guide for Windows
vi
CHAPTER
1
Getting started
The Jabber Video software client is usually made available to you by your organization's videoconference
or IT administrator.
See PC requirements for detail on what is required for your computer to run Cisco Jabber Video for
TelePresence (hereafter referred to as Jabber Video).
A web camera, a microphone, and loudspeakers or a headset must be connected to your computer for Jabber
Video to work correctly. See Multimedia device requirements, on page 30 for more detail.
• Signing in, page 1
• Quick setup, page 2
• Showing the video window, page 4
• Making a call, page 5
• Receiving a call, page 5
Signing in
Your sign-in process may be automated by your administrator, and you may not even notice the sign-in screen.
Otherwise, the administrator will supply you with a username and password.
Procedure
Step 1
Enter your username and password in the sign-in form.
Jabber Video will sign you in automatically from now on, unless you de-select Remember my Username,
Remember my Password, and Sign in automatically
Step 2
Click Sign in or press Enter.
Cisco Jabber Video for TelePresence 4.7 User Guide for Windows
1
Getting started
Quick setup
Quick setup
This two-step dialog window pops up the first time you start Jabber Video and guides you through setting up
your audio and video equipment. Step 2 provides an overview of expected outgoing video quality based on
the available system resources.
You can also access Quick Setup at any time by using the
menu button.
Audio and video selection
Microphone
The drop-down menu contains all microphones detected by Jabber Video. A common scenario is that both
your camera and your PC have built-in microphones.
To test audio in:
Procedure
Step 1
Step 2
Talk into your microphone to test whether the volume is within the recommended range.
Make adjustments as needed using the slider.
If no sound is detected, the device may be muted. See Troubleshooting, on page 31 for further advice on
identifying and resolving audio issues.
Speakers
The drop-down menu contains all speakers and headphones detected by Jabber Video.
To test audio out:
Procedure
Step 1
Step 2
Click Test to play a test sound that helps you determine whether the speaker volume is right for you.
Adjust using the slider.
Note that multiple controls exist for volume settings. If sound is muted, too high, or too low, you may need
to check hardware volume buttons for your devices, or the system settings.
See Troubleshooting for advice on identifying and resolving audio issues.
Cisco Jabber Video for TelePresence 4.7 User Guide for Windows
2
Getting started
Resource check
Camera
The drop-down menu contains all cameras detected by Jabber Video.
Procedure
Step 1
Step 2
Click the menu to change cameras.
Adjust the camera or your seating position so that your face is within the markers on the live preview.
If you do not see a live camera preview:
• Verify that a camera is properly connected to the computer.
• Make sure the privacy shutter is off and nothing is obstructing the camera.
• Check whether another application is already using the camera.
Resource check
Jabber Video calculates the estimated video quality you will be able to send from your computer based on
the available resources.
Expected outgoing video quality
Your outgoing video quality will be classified as one of the following:
• Excellent—your camera, computer, and network are capable of sending HD video.
• Medium—the video sent is likely to be of medium quality.
• Low—the video sent is likely to be of poor quality due to limited resources and/or camera capabilities.
Actual quality of outgoing video during calls will vary. Note that what is received by the far end also depends
on their incoming bandwith capabilities and system resources.
Detail on the factors that impact video quality and how they are tested and classified by Jabber Video is
provided below.
Camera capability
Jabber Video detects the highest available resolution from your camera and classifies it as one of the following:
• HD—Jabber Video supports high-definition video resolutions 720p (1280x720) or 1080p (1920x1080).
• Medium resolution—the actual maximum resolution supported by your camera will also be provided.
If the camera is classified as HD capable, any restrictions on sent video quality will be due to limitations of
system resources or bandwidth, see below.
Cisco Jabber Video for TelePresence 4.7 User Guide for Windows
3
Getting started
Showing the video window
System resources
Your computer's processor and memory capabilities and available resources also affect video quality.
Jabber Video will test your computer's resources and classify them as one of the following:
• Excellent—system resources are capable of sending high-quality video.
• Good—system resources are sufficient for sending good-quality video.
• Limited—system resources are likely to limit the quality of outgoing video.
Outgoing bandwidth
If permitted by your administrator, Jabber Video will test the network to determine the available bandwidth
and classify it as one of the following:
• Excellent (1200 kb/s or more)
• Good (400 kb/s or more)
• Limited (less than 400 kb/s)
During testing, this field will say "Estimating". If it says "Unknown", your administrator has not enabled the
test, or the test server could not be reached.
If actual bandwidth is unknown, the video quality estimate will be based on whichever bandwidth restrictions
exist in local or administrator settings.
About incoming video quality
Although your system resources will also impact incoming video quality, the end result depends on too many
external factors for Jabber Video to make reliable estimates.
Other factors that impact incoming quality include:
• The capabilities of the other cameras/videoconference endpoints in the call.
• The bandwidth available to the other party/parties.
Showing the video window
After you have signed in, Jabber Video displays its control window.
If you want to open your video window before a call to check your camera angle or your hair, click the Show
video button
on the upper right corner of your Jabber Video control window.
During a call, clicking the Show video button
Cisco Jabber Video for TelePresence 4.7 User Guide for Windows
4
will bring your video window to the front.
Getting started
Making a call
Making a call
Procedure
Step 1
Step 2
Step 3
In the search field, start typing the name of the person or endpoint you want to call.
Select the desired entry from the search results using the mouse or arrow keys.
Either:
•
Click
• Double-click the name
• Press Enter
The video window will now appear on screen.
There are three more ways to initiate a new call:
1 Click Favorites and select a name from your list. (See Managing your favorites, on page 15)
2 Click History and select a name from that list (See Using the call history)
3 Enter a video address (SIP URI) for a person or an endpoint directly.
Tip
To see your own video address, click on your name near the top of the Jabber Video control window.
Receiving a call
When someone calls you on Jabber Video, this dialog will appear:
Answer or reject the call by clicking the relevant button, or close the dialog using the X to ignore the call
without this being visible to the caller.
Cisco Jabber Video for TelePresence 4.7 User Guide for Windows
5
Getting started
Receiving a call
Cisco Jabber Video for TelePresence 4.7 User Guide for Windows
6
CHAPTER
2
Using the pop-up toolbar
A toolbar with these buttons will appear when you move the mouse pointer over the video window:
Icon
Controls
Description
Toggled
Selfview
See yourself on camera. (See Controlling your camera, on
page 8)
Camera
Turn your camera off/on. (See Controlling your camera, on
page 8)
Microphone Turn your microphone off/on.
Speaker
volume
Click to mute, or drag slider to adjust.
Fullscreen
Use entire screen for video. You can also toggle this setting
by double-clicking the video window.
Presentation Share an application window. (See Share presentations)
sharing
End call
Hang up.
When the video window is open with no call active, only the fullscreen and selfview controls will be enabled.
Toggling selfview off will then close the video window.
Move the mouse pointer away from the toolbar to make it disappear.
• Controlling your camera, page 8
• Sharing presentations, page 8
Cisco Jabber Video for TelePresence 4.7 User Guide for Windows
7
Using the pop-up toolbar
Controlling your camera
Controlling your camera
Self-View is the functionality that lets you see your own camera image.
on the video pop-up toolbar toggles Self-View, which during a call will appear to you as a
picture-in-picture (PiP) inside the video window. You can click and drag the PiP to move it around.
on the video pop-up toolbar toggles your camera on and off.
• Should you switch off the camera during a call, Jabber Video will continue to show the last video frame
as a still image to other call participants.
• If you switch the camera off before the recipient answers your call, there will be no image of you
available. You may still turn the camera on during the call.
The above toggles do not affect the cameras of other participants. For information on far-end camera control,
see Control far-end camera, on page 11.
Sharing presentations
How to share
During a call, you can share one of your application windows, such as a PowerPoint presentation. To share
an application window:
1
Click the Presentation button
application windows.
on the video window pop-up toolbar to bring up a list of your open
2 Select any of them to start sharing.
3 To stop, click the same button again, then click Stop sharing presentation.
If you turn on fullscreen or slideshow view in an application during a call, Jabber Video will automatically
ask whether you want to share that window. When you exit fullscreen view, Jabber Video will stop sharing.
You can also select Entire screen from the list of shareable items to share the desktop with all visible windows.
Your shared window will appear to you as a picture-in-picture (PiP) inside the video window. Double-click
a PiP to focus on it.
Tip
If bandwidth or system resources are limited, turning off your camera during a presentation will improve
presentation quality.
What to share
Participants will see everything that happens in the shared window as it occurs. This feature has many potential
uses. Here are a few examples:
• Share your word processor and let call participants see your meeting notes as you type.
Cisco Jabber Video for TelePresence 4.7 User Guide for Windows
8
Using the pop-up toolbar
Sharing presentations
• Share pictures from your computer as a slideshow.
• Draw as you go, share an image editor or other visualization tool.
• Share your web browser, email inbox, calendar ...
• Share your entire screen with all visible windows, for example to demonstrate a process on-screen.
Note
If sharing your entire screen, we recommend minimizing the Jabber Video windows, in particular the
video window, as this will otherwise be included in the shared presentation.
Cisco Jabber Video for TelePresence 4.7 User Guide for Windows
9
Using the pop-up toolbar
Sharing presentations
Cisco Jabber Video for TelePresence 4.7 User Guide for Windows
10
CHAPTER
3
Using the info bar
An info bar with information and buttons will appear when you are in a call. The information is:
• The duration of the conference.
• The address of the recipient of the call; either one person or the device hosting the conference.
•
An icon
indicating whether the conference is encrypted or not.
The buttons are:
Icon
Controls
Description
Far-end camera
control
Turn Control far-end camera, on page 11 off/on.
Numeric keypad
Use for tone-based input. (See How to use keypad, on page 13)
Conference info
Open the Accessing conference information, on page 13 box.
• Control far-end camera, page 11
• Using the keypad (DTMF), page 12
• Accessing conference information, page 13
Control far-end camera
In calls that support far-end camera control (FECC), you can adjust the far-end camera to give you a better
view. This feature will be available to you if supported by the system you are calling, and enabled for you by
your video conference administrator.
To activate far end camera control:
Cisco Jabber Video for TelePresence 4.7 User Guide for Windows
11
Using the info bar
Using the keypad (DTMF)
Procedure
Step 1
Step 2
Move the mouse inside the video window.
Step 3
Click inside the circle or use the keyboard to control the far-end camera:
Click the FECC button
in the upper right corner. It may take a few seconds for the button to become
enabled after the conference has started. The below control will now appear inside the video window when
the mouse is moved.
• The arrow buttons and the arrow keys pan and tilt the camera.
• The + and - buttons and keys make the camera zoom in and out.
The keys and controls described above can also be used to change the conference layout during multipart
conferences, depending on the multipart conference hardware deployed in your organization.
Using the keypad (DTMF)
When to use the keypad
Dual-tone multi-frequency (DTMF) signaling sends a tone sent representing each number or sign pressed on
the keypad.
The tone-based keypad in Jabber Video has several uses, notably:
• The keypad can be used to create and/or enter passwords for multi-part conferences.
• Setting up a new conference may in other ways involve equipment that requires DTMF.
• Voice systems frequently have tone-based menu navigation (such as, "To speak to an operator, please
press 1").
Cisco Jabber Video for TelePresence 4.7 User Guide for Windows
12
Using the info bar
How to use keypad
How to use keypad
on the video info bar brings up the keypad. You can then enter a number, # or * using the mouse or
keyboard.
Note
Sending DTMF may fail if the microphone is muted.
Using the keypad during conferences
The keypad may also be used for changing the layout of your video window and far-end camera control during
conferences.
Note
This feature relies on the Cisco TelePresence MCU, which may or may not be part of your Cisco setup.
If in doubt, talk to your video conference administrator.
When the keypad is active during multi-part conferences, you may use the on-screen keypad itself or your
keyboard.
• Press 2 or 8 to change the layout.
• Press 4 or 6 to change which participant appears in the largest pane.
• Press 1 or 7 to enable DTMF-based far end camera control.
◦1 and 7 will then zoom in and out if supported.
◦2, 4, 6, and 8 will work as arrows to tilt or pan the camera of the participant in the largest pane.
Accessing conference information
Move the cursor over the video window to display the information bar at the top of the window.
The Conference information button
in the top right corner opens an overview of Jabber Video's incoming
and outgoing data traffic. Your administrator may request this information from you for the purposes of
Troubleshooting, on page 31.
Cisco Jabber Video for TelePresence 4.7 User Guide for Windows
13
Using the info bar
Accessing conference information
Cisco Jabber Video for TelePresence 4.7 User Guide for Windows
14
CHAPTER
4
Managing your favorites
The Favorites list contains people and endpoints whose video addresses you have stored for quick retrieval
and reuse.
Note
Favorites, the History, and passwords are stored per user and per Jabber Video account.
• Adding a favorite, page 15
• Deleting a favorite, page 16
Adding a favorite
There are several ways to add a new favorite. The easiest way is to use the search field or the History list to
locate the person or endpoint whose address you want to store.
Once you have located the person or endpoint, select the list entry using the mouse or arrow keys, then:
1 Click the Add to favorites link.
2 Enter or modify the favorite name as needed.
3 Click Save or press Enter.
You can also add a video address as a favorite contact directly:
Procedure
Step 1
Step 2
Step 3
Step 4
Step 5
Click Favorites.
Click Add favorite.
Enter the display name you want for your contact.
Enter the video address (SIP URI).
Click Save or press Enter.
Cisco Jabber Video for TelePresence 4.7 User Guide for Windows
15
Managing your favorites
Deleting a favorite
Deleting a favorite
Procedure
Step 1
Step 2
Step 3
Step 4
Click Favorites.
Select the entry you want to delete using the mouse or the arrow keys to make the link Edit favorite appear.
Click Edit favorite.
Click Delete favorite.
Cisco Jabber Video for TelePresence 4.7 User Guide for Windows
16
CHAPTER
5
Use call history
• Deleting call history, page 17
Deleting call history
To clear the history:
Procedure
Step 1
Step 2
Click History.
Click the link Clear history in the lower right corner.
Cisco Jabber Video for TelePresence 4.7 User Guide for Windows
17
Use call history
Deleting call history
Cisco Jabber Video for TelePresence 4.7 User Guide for Windows
18
CHAPTER
6
Presence status
• Reading status messages, page 19
• Setting your status, page 19
Reading status messages
Each endpoint's presence status is reflected in your search results and favorites.
Icon
Text
Description
Online
This is an online Jabber Video user.
Registered
This is a connected endpoint.
Away
The user has set this status.
Busy in call
This status is set by Jabber Video or the endpoint when the user is in a call.
Busy
The user has set this status.
Offline
This status is set by Jabber Video or the endpoint when the user signs out or
exits, but it may also have been set by the user.
No status
No status information is available for this user, who may be online or offline.
Setting your status
When you call someone or accept an incoming call, Jabber Video will change your status automatically to
Busy in call.
You can also manually change your status by clicking on the status icon button next to your name in the Jabber
Video control window.
Cisco Jabber Video for TelePresence 4.7 User Guide for Windows
19
Presence status
Setting your status
The alternatives are:
Icon
Text
Description
Online
This is the default status when you are logged into Jabber Video and not in
a call.
Away
Set this status to let others know you are not at your computer.
Busy
Setting this status may also turn off the ring tone, depending on your settings.
(See Settings, on page 25)
Appear offline
By setting this status you will remain logged in while appearing offline to
others.
Cisco Jabber Video for TelePresence 4.7 User Guide for Windows
20
CHAPTER
7
Switching and joining calls
During a call you can have up to four calls on hold and switch between them, or join them in a conference.
If you make a new call while talking, the current call will be put on hold. A panel to the right shows the calls
on hold. The same happens if you accept an incoming call while you are already talking to someone.
• Switching between calls on hold, page 21
• Joining participants to conference, page 21
• End call on hold, page 22
Switching between calls on hold
Procedure
Step 1
Step 2
Move the mouse over the Calls on hold indicator on the left hand side of the video window. The Calls on
hold panel opens.
Click on the participant you want to talk to.
Joining participants to conference
Note
Not all organizations make this feature available to their Jabber Video users. If in doubt, talk to your
administrator.
Cisco Jabber Video for TelePresence 4.7 User Guide for Windows
21
Switching and joining calls
End call on hold
Procedure
Step 1
Step 2
Move the mouse over the Calls on hold indicator on the left hand side of the video window. The Calls on
hold panel opens.
Click Join all.
End call on hold
To end a call:
Procedure
Step 1
Step 2
Make the call active by clicking on it.
Click
.
Cisco Jabber Video for TelePresence 4.7 User Guide for Windows
22
CHAPTER
8
Pinning and closing Jabber Video
• Keeping Jabber Video on top, page 23
• Closing and reopening the control window, page 23
• Signing out, page 23
• Exiting Jabber Video, page 24
Keeping Jabber Video on top
The Pin button
in the top right corner of your Jabber Video windows will keep the window visible on
top of any other applications that may be active.
This is particularly useful when sharing a presentation, as you can keep the video window visible while
working in a different application.
Closing and reopening the control window
Procedure
Step 1
Step 2
Step 3
Click on the X in the upper right corner to close the Jabber Video window while remaining available to receive
calls.
Jabber Video is now placed in your computer's systray in the lower right corner of your screen. Your current
status will be displayed on top of the Jabber Video icon.
To reopen the Jabber Video window, double-click the systray icon, or right-click it and select Open.
Signing out
To sign out from Jabber Video, for example to allow another user to log in:
Cisco Jabber Video for TelePresence 4.7 User Guide for Windows
23
Pinning and closing Jabber Video
Exiting Jabber Video
Procedure
Step 1
Step 2
Step 3
Click the status button in the Jabber Video control window.
Select Sign out.
If your username and password are already filled in, click the Clear sign-in link to empty the fields for the
next user.
Exiting Jabber Video
To exit the Jabber Video application completely:
Procedure
Step 1
Step 2
Right-click on the Jabber Video icon in the systray.
Select Exit.
When you exit Jabber Video, you will also be signed out.
Cisco Jabber Video for TelePresence 4.7 User Guide for Windows
24
CHAPTER
9
Settings
From the Menu dropdown button
dialog box.
in the Jabber Video control window you can bring up the Settings
Click OK when you are done to store changes to settings.
• Sign-in, page 25
• Bandwidth, page 25
• Audio, page 26
• Video, page 26
• Notifications, page 27
Sign-in
The following settings are enabled by default:
• Start Jabber Video when I log on to my computer makes Jabber Video start up automatically when
you log on.
• Sign in automatically makes Jabber Video remember your username and password and sign you in
automatically when the client starts up, and when the client reconnects, for example if your computer
has been offline.
The bottom section of the sign-in settings contains the video communication server addresses and domain
that Jabber Video connects to. These settings can never be changed while logged into Jabber Video. Your
administrator may also have made these settings unavailable to users.
Bandwidth
If you experience low video quality, for example jitter, lowering the bandwidth can be helpful.
Your administrator may restrict bandwidth usage.
Cisco Jabber Video for TelePresence 4.7 User Guide for Windows
25
Settings
Audio
Audio
Microphone
The drop-down menu contains all microphones detected by Jabber Video. A common scenario is that both
your camera and your PC have built-in microphones.
To test audio in:
Procedure
Step 1
Step 2
Talk into your microphone to test whether the volume is within the recommended range.
Make adjustments as needed using the slider.
If no sound is detected, the device may be muted. See Troubleshooting, on page 31 for further advice on
identifying and resolving audio issues.
Speakers
The drop-down menu contains all speakers and headphones detected by Jabber Video.
To test audio out:
Procedure
Step 1
Step 2
Click Test to play a test sound that helps you determine whether the speaker volume is right for you.
Adjust using the slider.
Note that multiple controls exist for volume settings. If sound is muted, too high, or too low, you may need
to check hardware volume buttons for your devices, or the system settings.
See Troubleshooting for advice on identifying and resolving audio issues.
Video
Camera
The drop-down menu contains all cameras detected by Jabber Video.
Cisco Jabber Video for TelePresence 4.7 User Guide for Windows
26
Settings
Notifications
Procedure
Step 1
Step 2
Click the menu to change cameras.
Adjust the camera or your seating position so that your face is within the markers on the live preview.
If you do not see a live camera preview:
• Verify that a camera is properly connected to the computer.
• Make sure the privacy shutter is off and nothing is obstructing the camera.
• Check whether another application is already using the camera.
Notifications
You can decide how Jabber Video will notify you when calls come through.
To change the ringtone, follow these steps:
Procedure
Step 1
Step 2
Step 3
Use the drop-down menu and select one of the alternatives.
Listen to the tone by clicking Play. Note that you must stop one ring tone before you can play another.
Click OK to save changes and close the dialog when you are happy with your selection.
You may also want to tweak the following settings:
Mute when busy
You will see the pop up dialog when you have set your status to Busy, but no
ring tone will be played. This setting is enabled by default.
Mute when in a call
You will see the pop up dialog when you are already in a call, but no ring tone
will be played. This setting is disabled by default.
Hide system tray
notifications
By default, Jabber Video provides "balloon"-style notifications from the
Windows system tray, for example if you have missed calls. If you do not want
to see these notifications, enable this setting.
Cisco Jabber Video for TelePresence 4.7 User Guide for Windows
27
Settings
Notifications
Cisco Jabber Video for TelePresence 4.7 User Guide for Windows
28
CHAPTER
10
Requirements
• PC requirements, page 29
• Multimedia device requirements, page 30
PC requirements
Operating System
• Windows XP SP2 or later
• Windows Vista SP1 or later
• Windows 7
• Windows 8
Processor
Memory
2 GHz Intel Core 2 Duo or equivalent.
• Windows XP: 512 MB RAM or more.
• Windows 8, Windows 7 or Vista 32-bit: 1 GB RAM or more.
• Windows 8, Windows 7 or Vista 64-bit: 2 GB RAM or more
Graphics card
OpenGL version 1.3, or OpenGL version 1.2 with the multitexturing
extension.
Sound card
Any standard sound card (full-duplex, 16-bit or better).
Cisco Jabber Video for TelePresence 4.7 User Guide for Windows
29
Requirements
Multimedia device requirements
Note
• On computers with limited processing power and/or memory, Jabber Video will use a lot of system
resources, and reduced performance can be expected.
• On Windows 8, only the classic Desktop user interface is supported.
• Cisco Jabber Video for TelePresence 4.7 will be the last release to support Microsoft Windows XP
and Microsoft Windows Vista.
Multimedia device requirements
Microphone
All microphones work well with Jabber Video. Note that some cameras have built-in microphones.
Camera
Jabber Video works with most common web cameras. See the Cisco Knowledge Base for updated information
on Jabber Video and cameras.
Note
Cisco recommends using the Cisco PrecisionHD™ USB camera for business-quality HD video.
Cisco Jabber Video for TelePresence 4.7 User Guide for Windows
30
CHAPTER
11
Troubleshooting
• Audio issues, page 31
• Video issues, page 32
• Further troubleshooting, page 32
Audio issues
You cannot hear others
If you cannot hear the other participant(s), make sure your loudspeakers or headphones are connected. Then
check all volume controls:
• Your headphones or loudspeakers may have their own volume buttons or switches.
• The Windows volume settings will override all other volume controls. Look for the loudspeaker icon
in your system tray to open and/or unmute.
• Jabber Video has its own volume setting on the Using the pop-up toolbar, on page 7.
If this does not solve the problem, it may be that audio is not being sent from the other end. Ask the other
participant(s) to perform the microphone check described below.
Others cannot hear you
If the other call participant(s) cannot hear you, make sure your microphone is properly connected and not
muted.
Low or distorted sound
If call participants are experiencing distorted sound, very low sound, or echos:
1 Check whether any of you have enabled microphone boost, echo cancellation, gain control, noise reduction,
digital effects or similar features for your audio devices.
2 Turn all such audio device features off for Jabber Video to work optimally.
Cisco Jabber Video for TelePresence 4.7 User Guide for Windows
31
Troubleshooting
Video issues
Video issues
No video from your camera
If you cannot see any video in self view, make sure the camera is properly connected, and that no other
applications are currently using the camera.
Further troubleshooting
If all local devices are turned on and working and audio and/or video issues remain, the problem could be
with the videoconferencing infrastructure setup.
Contact your administrator for support and further troubleshooting.
Cisco Jabber Video for TelePresence 4.7 User Guide for Windows
32