1
dŽŽůŽŽŬϭϭ͘ϱhƐĞƌ'ƵŝĚĞ
Table of Contents
Getting Started .................................................................................................... 11
Introduction ...................................................................................................................................11
Introducing ToolBook ...................................................................................................................12
Before You Install .........................................................................................................................12
System Requirements.............................................................................................................12
Additional Digital Media Requirements ........................................................................................13
Installing ToolBook .......................................................................................................................13
Starting and Exiting ToolBook ......................................................................................................14
Learning ToolBook .......................................................................................................................15
ToolBook Utilities ....................................................................................................................15
ToolBook Documentation .......................................................................................................16
Using the Help System ...........................................................................................................17
Using the ToolBook Coach .....................................................................................................17
Visiting the ToolBook Web Site ..............................................................................................18
Contacting SumTotal for Technical Support ...........................................................................18
About this Book ............................................................................................................................18
Finding OpenScript Instruction ...............................................................................................18
Document Conventions...........................................................................................................19
Basic Concepts ................................................................................................... 21
Introduction ...................................................................................................................................21
About the ToolBook Product ........................................................................................................21
About ToolBook ............................................................................................................................22
Exploring the Kinds of Applications You Can Create with ToolBook ......................................23
Planning your project....................................................................................................................23
Creating an Organized Directory Structure.............................................................................24
Deciding How You Will Deliver Your Course ..........................................................................24
Prepare Your Project for Release Based on a Method of Distribution ...................................25
Building an Application .................................................................................................................25
Author Level and Reader Level ..............................................................................................26
Books and Pages ....................................................................................................................27
Objects and Properties ...........................................................................................................27
Using the Actions Editor ...............................................................................................................28
Using OpenScript .........................................................................................................................28
Extending ToolBook using Windows Technologies ................................................................29
Extending OpenScript with Dynamic-Link Libraries ................................................................30
Using Resources in Your Application ...........................................................................................30
Learning the ToolBook Interface ....................................................................... 31
Introduction ...................................................................................................................................31
Introducing the Visual Interface ....................................................................................................31
Working at Author Level ...............................................................................................................31
Working with the Menu Bar .....................................................................................................32
Working with the Toolbar ........................................................................................................32
Working with the Status Bar ...................................................................................................34
Working with Palettes .............................................................................................................35
Working with the Catalog ........................................................................................................37
Working with the ToolBook Coach ..........................................................................................38
Working with Properties and Extended Properties Dialog Boxes ...........................................39
Working with the Actions Editor ..............................................................................................40
Copyright © 2012 SumTotal Systems, Inc. All rights reserved. Duplication prohibited.
i
Table of Contents
Using the Book Explorer .........................................................................................................41
Working with the Property and Handler Browsers ..................................................................42
Working with Rulers and the Grid ...........................................................................................43
Working with Right-Click Menus .............................................................................................44
Working at Reader Level ..............................................................................................................46
Navigating in an Application .........................................................................................................47
Using the Status Bar Page Navigation Features ....................................................................47
Using the Go Menu and Arrow Keys ......................................................................................48
Navigating using the Book Explorer ........................................................................................48
Creating Books and Pages ................................................................................. 49
Introduction ...................................................................................................................................49
About Books and Pages ...............................................................................................................49
About Templates ..........................................................................................................................49
Creating and Saving Templates .............................................................................................50
Creating a New Book ...................................................................................................................50
Starting a New Book Using a Template ..................................................................................50
Starting a New Book Using a Book Wizard ............................................................................51
Starting a New, Blank Book ....................................................................................................51
Creating Backup Copies .........................................................................................................52
Creating Pages and Backgrounds ...............................................................................................53
Adding Pages and Backgrounds to a Book ............................................................................53
Importing Pages from Another Book .......................................................................................54
Organizing Pages and Backgrounds ............................................................................................55
Using the Book Explorer .........................................................................................................55
Renumbering Pages in a Book ...............................................................................................56
Removing Pages and Backgrounds .......................................................................................57
Working with Backgrounds ...........................................................................................................58
Applying Color and a Pattern to a Background ......................................................................58
Adding and Removing Backdrops ..........................................................................................58
Setting the Page Size ...................................................................................................................59
Scaling the Window Size to the Page Size .............................................................................59
Setting Properties for Books ........................................................................................................60
Protecting Books with Passwords ...........................................................................................60
Navigating Through a Book ..........................................................................................................60
Using Built-in Navigation .........................................................................................................61
Using Navigation Objects .......................................................................................................61
Skipping Pages when Navigating ...........................................................................................61
Setting Up Transition Effects between Pages ........................................................................62
Adding Navigation Behavior to an Object ...............................................................................62
Enhancing a Book's Performance ................................................................................................63
Working with the Catalog ................................................................................... 65
Introduction ...................................................................................................................................65
About the Catalog.........................................................................................................................66
Authoring with the Catalog ...........................................................................................................67
Browsing Through the Catalog ...............................................................................................67
Using Drag-and-Drop Authoring .............................................................................................67
Finding the Right Object .........................................................................................................67
Viewing Objects ......................................................................................................................68
Exploring Types of Catalog Objects .............................................................................................68
Action Triggers ........................................................................................................................68
Scoring and Tracking ..............................................................................................................68
Placeholders ...........................................................................................................................69
Media Players .........................................................................................................................69
Navigation ...............................................................................................................................69
Questions ................................................................................................................................70
Quiz Summary ........................................................................................................................70
ii
Copyright © 2012 SumTotal Systems, Inc. All rights reserved. Duplication prohibited.
Table of Contents
Other Available Objects ..........................................................................................................70
Customizing the Catalog ..............................................................................................................71
Modifying the Categories in the Catalog .................................................................................71
Adding and Removing Catalog Objects ..................................................................................71
Working with Objects .......................................................................................... 73
Introduction ...................................................................................................................................73
About Objects ...............................................................................................................................73
Using the Book Explorer ..............................................................................................................74
Adding Objects from the Catalog .................................................................................................74
Creating Objects Using the Tool Palette ......................................................................................75
Selecting Objects .........................................................................................................................77
Creating Hyperlinks ......................................................................................................................78
Choosing a Type of Link .........................................................................................................79
Cutting, Copying, Pasting and Deleting Objects ..........................................................................80
Moving Objects .............................................................................................................................81
Spreading and Centering Objects ................................................................................................81
Flipping and Rotating Objects ......................................................................................................82
Aligning Objects ...........................................................................................................................82
Using the Align Command ......................................................................................................83
Changing the Size and Shape of Objects ....................................................................................83
Constraining an Object's Shape .............................................................................................85
Modifying the Appearance of Objects ..........................................................................................85
Applying Line Styles................................................................................................................85
Applying Color to Objects .......................................................................................................86
Using Windows Colors ............................................................................................................86
Making Objects Transparent ...................................................................................................87
Filling an Object with a Pattern ...............................................................................................87
Moving Objects Between Layers ..................................................................................................88
Changing Layer Order ............................................................................................................89
Planning Layer Order for Tabbing at Reader Level ................................................................90
Grouping Objects .........................................................................................................................91
Editing Groups ........................................................................................................................91
Editing Objects within a Group ...............................................................................................92
Moving Grouped Objects ........................................................................................................92
Adding and Deleting Objects from a Group ............................................................................92
Setting Group Properties ........................................................................................................93
Ungrouping Objects ................................................................................................................94
Nesting Groups .......................................................................................................................94
Setting Object Properties ................................................................................... 95
Introduction ...................................................................................................................................95
Understanding Properties and Extended Properties ....................................................................95
Using the Properties Dialog Box ..................................................................................................96
Toolbar Buttons in the Properties Dialog Box .........................................................................97
Using the Right-Click Menu ..........................................................................................................98
Using the Extended Properties Dialog Box ..................................................................................99
Setting Extended Properties for Groups .................................................................................99
Using the Book Explorer ............................................................................................................100
Using the Property Browser .......................................................................................................100
Working with Text ............................................................................................. 103
Introduction .................................................................................................................................103
About Fields ...............................................................................................................................103
Working with Fields ....................................................................................................................104
Creating Fields ...........................................................................................................................104
Adding a Field from the Catalog ...........................................................................................104
Creating a Field Using the Tool Palette ................................................................................105
Copyright © 2012 SumTotal Systems, Inc. All rights reserved. Duplication prohibited.
iii
Table of Contents
Creating a Field Using OpenScript .......................................................................................105
Setting Field Properties ..............................................................................................................106
Modifying Border Style and Field Type .................................................................................107
Modifying the Behavior of a Field .........................................................................................108
Adding Text to Fields..................................................................................................................109
Typing Text ...........................................................................................................................109
Importing Text .......................................................................................................................109
Copying and Pasting Text from an RTF Document ..............................................................110
Selecting and Editing Text ....................................................................................................110
Navigating in Text .................................................................................................................110
Selecting Text .......................................................................................................................111
Cutting, Copying, and Pasting Text ......................................................................................111
Deleting Text .........................................................................................................................112
Formatting Text in Fields ............................................................................................................112
Applying Color to Text...........................................................................................................113
Formatting Paragraph Styles ................................................................................................114
Inserting Inline Graphics ............................................................................................................114
Inserting Special Characters ......................................................................................................115
Finding and Replacing Text .......................................................................................................116
Working with Record Fields .......................................................................................................117
Using Record Fields to Display Information .........................................................................118
Using Record Fields for Reader-Level Data Entry ...............................................................119
Importing Pages with Record Fields .....................................................................................119
Sorting Pages by Record Field .............................................................................................119
Using Graphics .................................................................................................. 123
Introduction .................................................................................................................................123
About Graphics ...........................................................................................................................123
Using Graphics on the Internet ..................................................................................................123
Adding Graphics to Your Book ...................................................................................................124
Pasting Graphics from the Clipboard ....................................................................................124
Importing Graphics ................................................................................................................124
Assigning a Graphic Resource to an Object .........................................................................125
Storing Graphic Files in ToolBook ........................................................................................125
Modifying Graphics.....................................................................................................................125
Changing the Line Style of an Imported Graphic ..................................................................125
Converting Picture or Paint Objects to Image Objects .........................................................125
Adding Interactive Features to your Application ............................................ 127
Introduction .................................................................................................................................127
About Buttons .............................................................................................................................127
Defining How Buttons Look ........................................................................................................128
Using and Modifying Buttons .....................................................................................................129
Adding a Button from the Catalog .........................................................................................129
Creating a Button Using the Tool Palette .............................................................................130
Creating a Button Using OpenScript .....................................................................................130
Setting Button Properties ......................................................................................................130
Formatting Caption Text .......................................................................................................132
Creating Hyperlinks...............................................................................................................132
Scripting a Button ..................................................................................................................133
Programming a Button with the Actions Editor .....................................................................133
Adding a Graphic to a Button .....................................................................................................133
Creating Transparent Areas in a Bitmap ..............................................................................135
Displaying the Graphic and Caption .....................................................................................136
About Hotwords ..........................................................................................................................136
Creating and Modifying Hotwords ..............................................................................................136
Editing Hotwords ........................................................................................................................138
Applying Color to Hotwords ..................................................................................................138
iv
Copyright © 2012 SumTotal Systems, Inc. All rights reserved. Duplication prohibited.
Table of Contents
Removing Hotwords ...................................................................................................................138
Working with List Boxes and Combo Boxes .................................................. 139
Introduction .................................................................................................................................139
About List Boxes and Combo Boxes ..........................................................................................139
Creating List Boxes ....................................................................................................................140
Adding a List Box from the Catalog ......................................................................................140
Creating a List Box Using the Tool Palette ...........................................................................140
Creating a List Box Using OpenScript ..................................................................................141
Setting List Box Properties .........................................................................................................141
Modifying Field Type .............................................................................................................142
Adding Text to a List Box ...........................................................................................................142
Creating Combo Boxes ..............................................................................................................143
Adding a Combo Box from the Catalog ................................................................................143
Creating a Combo Box Using the Tool Palette .....................................................................144
Creating a Combo Box Using OpenScript ............................................................................144
Setting Combo Box Properties ...................................................................................................144
Adding Text to Combo Boxes ....................................................................................................146
Determining User Selection .......................................................................................................146
Determining List Box or Combo Box Selections Using an Action Sequence .......................147
Determining List Box Selection Using OpenScript ...............................................................148
Determining Combo Box Selection Using OpenScript .........................................................149
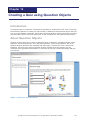
Creating a Quiz using Question Objects ......................................................... 151
Introduction .................................................................................................................................151
About Question Objects .............................................................................................................151
Working with Question Objects ..................................................................................................152
Setting the Properties of a Question Object .........................................................................152
Question Objects in Action .........................................................................................................153
Scoring Questions ......................................................................................................................156
Assigning Weight to an Answer ............................................................................................157
Specifying Feedback ..................................................................................................................157
Types of Feedback ...............................................................................................................158
Choosing Immediate or Delayed Feedback .........................................................................159
Specifying Feedback for a Question Object .........................................................................159
Quiz Summary ......................................................................................................................161
Adding a Certificate to a Book ......................................................................... 163
Introduction .................................................................................................................................163
The Certificate Feature...............................................................................................................163
Using the Certificate Page .........................................................................................................165
To use a Certificate page in your book: ................................................................................165
Hiding, Showing, and Animating Objects ....................................................... 167
Introduction .................................................................................................................................167
Creating Visual Effects ...............................................................................................................167
Hiding and Showing Objects ......................................................................................................167
Using an Action Trigger to Hide and Show Objects .............................................................167
Using the Actions Editor to Hide and Show Objects .............................................................168
Using OpenScript to Hide and Show Objects .......................................................................169
Animating ToolBook Objects ......................................................................................................169
Using the ToolBook Animation Editor ...................................................................................170
Creating a Path Animation ....................................................................................................171
Creating a Cel Animation ......................................................................................................172
Playing an Animation at Reader Level .......................................................................................173
Using an Action Trigger to Play an Animation ......................................................................173
Using the Actions Editor to Play an Animation .....................................................................174
Using OpenScript to Play an Animation................................................................................174
Copyright © 2012 SumTotal Systems, Inc. All rights reserved. Duplication prohibited.
v
Table of Contents
Modifying an Animation in the Animation Editor ........................................................................175
Selecting an Animation .........................................................................................................175
Setting Animation Options ....................................................................................................176
Adding Audio and Video Files .......................................................................... 177
Introduction .................................................................................................................................177
About Digital Media ....................................................................................................................177
Choosing a Media Player ...........................................................................................................177
Using the Universal Media Player ..............................................................................................178
Choosing a Media File ..........................................................................................................179
Using Time Markers ..............................................................................................................179
Creating Actions for Time Markers .......................................................................................180
Using Other Media Players ........................................................................................................182
Working with Media Players and Stages ..............................................................................182
Setting the Appearance of a Stage .......................................................................................183
Choosing a Frame Style .......................................................................................................183
Creating and Managing Clips .....................................................................................................184
Creating Clips .......................................................................................................................184
Managing Clips .....................................................................................................................186
Creating a Clip Library ..........................................................................................................187
Working with Media Clip Paths .............................................................................................187
Making Clip Paths Independent ............................................................................................188
How ToolBook Searches for Media ......................................................................................189
Refining Media Search Paths ...............................................................................................190
Adding a Voice Recording ................................................................................ 191
Introduction .................................................................................................................................191
About the Voice Recording Feature ...........................................................................................191
Using the Voice Recording Feature ...........................................................................................191
Creating a Voice Recording ..................................................................................................192
Changing a Voice Recording ................................................................................................193
Copying an Existing Voice Recording to a Page ..................................................................193
Using the UMP to Play Pre-recorded Voice Recordings ............................................................194
Using the Actions Editor................................................................................... 197
Introduction .................................................................................................................................197
About Action Sequences ............................................................................................................198
Choosing When to Create Action Sequences ............................................................................199
Using Action Sequences in Place of Catalog Objects ..........................................................199
Using Action Sequences in Place of OpenScript ..................................................................199
Opening the Actions Editor ........................................................................................................199
Creating Action Sequences Using the Actions Editor ................................................................200
Working with the Toolbar in the Actions Editor .....................................................................200
Working with the Actions Palette ..........................................................................................201
Choosing an Event ................................................................................................................202
Inserting Actions, Conditions, and Loops .............................................................................203
Actions ..................................................................................................................................204
Conditions .............................................................................................................................205
Loops ....................................................................................................................................206
Setting Properties for Actions ...............................................................................................206
Creating Valid Actions...........................................................................................................207
Building Expressions.............................................................................................................207
Operators and Functions ......................................................................................................208
Variables and Parameters ....................................................................................................208
Object Properties ..................................................................................................................209
Special Values ......................................................................................................................209
Using Variables .....................................................................................................................209
vi
Copyright © 2012 SumTotal Systems, Inc. All rights reserved. Duplication prohibited.
Table of Contents
Creating and Using Shared Action Sequences ..........................................................................211
Naming and Locating Shared Action Sequences .................................................................211
Using Shared Action Sequences ..........................................................................................212
Executing Shared Action Sequences ...................................................................................213
Using Parameters .................................................................................................................215
Managing Action Sequences .....................................................................................................215
Validating Actions .................................................................................................................215
Viewing Action Sequences ...................................................................................................216
Enabling and Disabling Actions ............................................................................................217
Importing and Exporting Action Sequences .........................................................................217
Creating Action Sequences: Practical Examples ........................................... 219
Introduction .................................................................................................................................219
About the Examples ...................................................................................................................219
Using the Examples ...................................................................................................................219
Example 1: Using Conditions .....................................................................................................220
Building the Action Sequence ...............................................................................................221
Testing the Action Sequence ................................................................................................223
Example 2: Using Variables .......................................................................................................224
Building the Action Sequence ...............................................................................................226
Testing the Action Sequence ................................................................................................228
Example 3: Changing Object Properties ....................................................................................229
Building the Action Sequence ...............................................................................................230
Testing the Action Sequence ................................................................................................231
Example 4: Using Shared Action Sequences ............................................................................232
Building the Shared Action Sequence ..................................................................................233
Building the Action Sequence for the List Box ......................................................................235
Testing the Action Sequence ................................................................................................238
Troubleshooting Action Sequences ...........................................................................................239
Using Resources ............................................................................................... 241
Introduction .................................................................................................................................241
About Resources ........................................................................................................................241
Creating and Modifying Resources ............................................................................................242
Adding Resources to a Book ......................................................................................................244
Assigning Resources as Object Properties ..........................................................................245
Working with Resources ............................................................................................................245
Adding a Graphic to a Button ................................................................................................245
Changing the Drag Image and No-Drop Cursor ...................................................................246
Changing a Viewer's Minimize Icon ......................................................................................247
Changing a Book's System Cursor with OpenScript ............................................................248
Getting Information about a Resource .......................................................................................248
Replacing Resources .................................................................................................................249
Exporting Resources ..................................................................................................................250
Removing Resources from a Book ............................................................................................250
Importing and Exporting Data .......................................................................... 253
Introduction .................................................................................................................................253
About Importing and Exporting ...................................................................................................253
Importing and Exporting Text .....................................................................................................254
Importing Text Files into a Text Field ....................................................................................254
Exporting Text from a Text Field ...........................................................................................254
Importing Text into Record Fields .........................................................................................255
Exporting Text from Record Fields .......................................................................................258
Importing Books and Pages .......................................................................................................261
Importing Books ....................................................................................................................262
Importing Pages ....................................................................................................................263
Copyright © 2012 SumTotal Systems, Inc. All rights reserved. Duplication prohibited.
vii
Table of Contents
Customizing the Import Process ................................................................................................264
Importing ToolBook XML ............................................................................................................265
About the SumTotal Publish to ToolBook Add-in .................................................................266
Using the SumTotal Publish to ToolBook Add-in ..................................................................267
About ToolBook XML ............................................................................................................269
Importing a ToolBook XML Book into ToolBook ...................................................................271
Building Software Simulations ......................................................................... 275
Introduction .................................................................................................................................275
About Software Simulations .......................................................................................................275
Planning a Software Simulation .................................................................................................276
Choosing a Simulation Mode .....................................................................................................277
Practice Mode .......................................................................................................................277
Creating a Simulation with the Sim AutoBuilder ........................................................................278
Developing a Simulation Manually .............................................................................................280
Preparing Screen Images .....................................................................................................282
Working in the Simulation Editor ................................................................................................283
Setting Properties for a Simulation .......................................................................................285
Developing Steps ..................................................................................................................286
Setting Trigger Events ..........................................................................................................288
Using Evaluation Objects ......................................................................................................288
Evaluating Text Entry ............................................................................................................289
Displaying Feedback.............................................................................................................289
Scoring a Simulation .............................................................................................................290
Programming Behavior for Simulation Events ......................................................................290
Locating Objects on a Simulation Page ................................................................................291
Distributing Applications on the Internet ........................................................ 293
Introduction .................................................................................................................................293
Understanding DHTML .........................................................................................................293
Tips for Optimizing a Book Designed for DHTML ......................................................................294
Publishing Your Book as Web Pages ........................................................................................295
Using ToolBook Courses with a Learning Management System ...............................................296
Adding Score Tracking to a ToolBook Course .....................................................................297
Managing ToolBook Courses with TotalLMS .......................................................................297
Preparing Native ToolBook Applications for Release .................................... 299
Introduction .................................................................................................................................299
Organizing and Checking Your Application ...............................................................................299
Creating a Central Book Directory Structure ........................................................................300
Checking Spelling .................................................................................................................300
Checking for Unused Resources ..........................................................................................301
Checking for Unused Extensions ..........................................................................................301
Compressing your Book........................................................................................................302
Resetting your Book..............................................................................................................302
Preparing your Application based on a Distribution Method ......................................................302
Preparing Files for the Internet .............................................................................................303
Preparing Files for a Local Area Network .............................................................................303
Preparing Files for CD-ROM .................................................................................................303
Using the AutoPackager ............................................................................................................304
Gathering Files ......................................................................................................................305
Packaging Files .....................................................................................................................305
Copying Files ........................................................................................................................305
Including the Run-time Version of ToolBook ........................................................................305
viii
Copyright © 2012 SumTotal Systems, Inc. All rights reserved. Duplication prohibited.
Table of Contents
Using ToolBook on a Network ....................................................................................................306
Installing and Testing your Application.......................................................................................306
Uninstalling an Application .........................................................................................................307
Glossary ............................................................................................................. 308
Copyright © 2012 SumTotal Systems, Inc. All rights reserved. Duplication prohibited.
ix
Chapter 1
Getting Started
Introduction
Welcome to ToolBook—the complete courseware authoring system that allows you to create
sophisticated online learning applications. In this book, you’ll learn about the basic concepts and
tools you need to build and manage complete, effective courseware. Before you go on to explore
ToolBook, read through this chapter. Here you will learn how to install and start ToolBook, find
out about the resources available to help you learn ToolBook, and preview this book’s contents
and conventions.
Copyright © 2012 SumTotal Systems, Inc. All rights reserved. Duplication prohibited.
11
Getting Started
Introducing ToolBook
ToolBook is a complete courseware authoring system that allows you to create and distribute
online learning applications.
With ToolBook, you can focus on what is important: presenting the material to be learned.
ToolBook helps you create and manage the content, navigation, feedback, and quizzes that are a
vital part of your interactive learning applications. You can easily add sound, animation, video,
graphics, and other special effects to your applications, making them lively and engaging.
Hyperlinks and navigation objects allow your learners to control the direction and pace of their
learning experience.
ToolBook is designed for use by a broad spectrum of course developers and instructional
designers. If you are new to developing online learning applications, you'll find that ToolBook's
easy-to-use features will get you quickly on your way to producing high-quality interactive
courses. More experienced course developers will appreciate the robust content-creation
environment of ToolBook, the Actions Editor visual programming tool, the powerful OpenScript ®
programming language, and a variety of other design options.
After you have created a course using ToolBook, you can deliver it on demand to any student with
access to the Internet, or you can deploy it on your company's intranet. ToolBook offers several
flexible deployment options. Your students can view your course in a Web browser that displays
Internet-based file formats such as HTML (Hypertext Markup Language). You can also distribute
your course as a run-time (stand-alone) application that runs from a hard drive or CD-ROM.
Before You Install
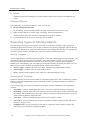
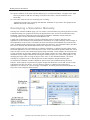
Before installing ToolBook, verify your computer meets the requirements.
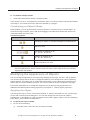
System Requirements
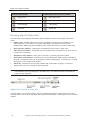
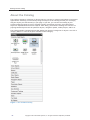
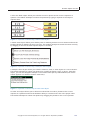
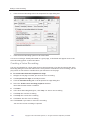
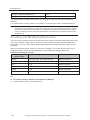
To run ToolBook, a computer must meet the requirements below.
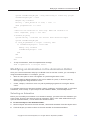
Minimum and recommended system configurations
Component
Minimum
Recommended
Computer
Intel Pentium® processor (or
compatible) 1 GHz
Same as minimum configuration
RAM
1 GB
Same as minimum configuration
Hard disk space
600 MB
600 MB
Operating system
Windows XP Professional SP 2
(or later), Windows Vista,
Windows 7 or Windows 8
Same as minimum configuration
Graphics card
Video graphics adapter
capable of displaying
800 x 600 pixel resolution
with 24-bit color for authoring
Same as minimum configuration but
with 1024x768 pixel resolution, or
higher
You must have an administrator account on in order to install and use ToolBook. See your system
administrator or refer to your Windows documentation for details.
†
12
Copyright © 2012 SumTotal Systems, Inc. All rights reserved. Duplication prohibited.
Additional Digital Media Requirements
Additional Digital Media Requirements
x
You can add media to courseware in a variety of ways. Most computers come with the
hardware and software components necessary for developing or playing media files.
Depending on how you plan to use media in your courseware, you will need some or all of the
following items:
x
Speakers or headphones to play audio
x
Files required to play digital video, such as video-playback drivers and video codecs (software
that compresses and decompresses video files)
x
Additional files required to play media or other content on the Internet (for example, browser
plug-ins like RealPlayer™)
Note You don't need to be a video technician or graphic artist to create compelling courseware
for education and training. Many companies now sell images, video clips, and sounds that
you can copy into your ToolBook application. Usually, the purchase of a company's product
that contains media files gives you the right to publish them in your application.
Sometimes, however, you must agree to specific licensing requirements. Never assume that
you have rights to publish media files; always read the product's documentation. When in
doubt, consult the product's manufacturer.
Installing ToolBook
To install ToolBook and its associated files, use the Setup program, which provides options and
instructions for each step. The Setup program decompresses the files and transfers them to your
hard disk.
To install using the setup program provided to you, double click on the installer file and follow the
prompts shown on the screen.
Copyright © 2012 SumTotal Systems, Inc. All rights reserved. Duplication prohibited.
13
Getting Started
Starting and Exiting ToolBook
You start and exit ToolBook as you would any Windows application.
► To start ToolBook:
x
From the Start menu, point to Programs, point to ToolBook 11.5, and then choose ToolBook
11.5.
When you start ToolBook, the ToolBook Startup dialog box appears. Use this dialog box to
start a new book or open an existing book.
► To exit ToolBook:
x
Do one of the following:
14
If you have opened a book, from the File menu, choose Exit.
Click the Close button on the title bar of the ToolBook Startup dialog box or the ToolBook
main window.
Copyright © 2012 SumTotal Systems, Inc. All rights reserved. Duplication prohibited.
Learning ToolBook
Learning ToolBook
ToolBook includes electronic documentation, as well as a number of other resources to help you
learn to use ToolBook. Further assistance is available from the ToolBook site, www.toolbook.com.
The ToolBook documentation includes several books in electronic format:
x
This book, the ToolBook 11.5 User Guide, discusses how to use ToolBook's features and
provides the context and procedures you'll need to use ToolBook effectively.
x
A short introductory book, Getting Started with ToolBook 11.5, covers the basic techniques
for authoring in ToolBook.
x
Programming in OpenScript provides information about how to extend the features of your
application using the OpenScript programming language.
► To open an electronic document:
x
From the Start menu, point to Programs, point to ToolBook 11.5, point to Documentation, and
then choose the electronic book you want.
ToolBook ships with an assortment of documents and utilities to assist you in using the ToolBook
software.
ToolBook Utilities
The following Utilities are available and can be found in the Windows START menu, within the
ToolBook Utilities folder.
x
Display Book Information
This utility will provide you with book information details about an entire folder full of
ToolBook files. It will allow you to quickly see important information about each file in a
folder, such as which version of ToolBook last saved each file. This is a very useful utility in
determining which ToolBook files are in need of being Version Updated.
x
FTP Utility
The FTP utility works either as a standalone application or as a ToolBook system book to
allow you to transfer files to or from FTP servers on the Internet.
x
Log Decryption Utility
For Native ToolBook developers, this utility will decrypt an encrypted log file, so that it can
be read by the log reader.
x
Log Reader
For Native ToolBook developers, this utility will read a log file and present the data in a
summary view for analysis.
x
Menu Bar Editor
For Native ToolBook developers, the Menu Bar Editor will allow you to create your own
Reader Level menu bars.
x
Repair Kit
This utility will copy all or part of an existing book into a new book. By doing this, you can
potentially remove corruption within a ToolBook file.
x
Script Remover
For Native ToolBook developers, the Script Remover utility removes the readable text of your
ToolBook application's scripts (OpenScript), but leaves the executable script-code intact. This
process prevents anyone from editing or viewing your scripts.
x
Simulation Recorder
This utility will watch as you use another application, and record your interactions with it.
Copyright © 2012 SumTotal Systems, Inc. All rights reserved. Duplication prohibited.
15
Getting Started
You can then import the recording into ToolBook, and ToolBook will construct a ToolBook
Simulation from that recorded data.
x
Version Updater
This utility will upgrade your older ToolBook files to the current version. You can update a
single ToolBook file or an entire directory full of ToolBook files.
ToolBook Documentation
A variety of documents are available to help beginners as well as more advanced users.
x
Accessibility Guide
Accessibility refers to making online information easy to obtain for all people, including those
with varying eyesight, hearing capacity, and motor skills. By creating accessible Web pages
with ToolBook your content will reach the widest audience possible.
x
Advanced Features
Any ToolBook application delivered in the native TBK file format can use the built-in
OpenScript programming language. This document describes advanced features that can be
used to enhance and customize native ToolBook applications.
x
DHTML Export Considerations
Describes differences in the appearance or behavior of certain objects in native ToolBook
when compared to these same objects in a Web browser, after Publishing to Web.
x
Getting Started with ToolBook
This guide covers the basic aspects of creating online content with ToolBook: start with a
template, add your text and graphics, and then use the Publish to Web menu command to
automatically build web pages.
x
Programming in OpenScript
This guide is a must read for anyone wanting to learn to program using the ToolBook
OpenScript language.
x
Release Notes
This documents contains last-minute information which didn't make it into the standard
product documentation before ToolBook shipped.
x
ToolBook Help
The Help system for ToolBook should be used in conjunction with the User Guide as your main
learning resources for using ToolBook. You can access Help at any time in ToolBook by
pressing F1.
x
User Guide
The document you are reading now. The User Guide is the main ToolBook reference effectively the user manual. It is the main learning resource for ToolBook, containing
information on a wide variety of topics.
16
Copyright © 2012 SumTotal Systems, Inc. All rights reserved. Duplication prohibited.
Learning ToolBook
Using the Help System
The Help system is a fast, comprehensive information resource about using ToolBook. Here, you'll
find information on specific dialog boxes, maps of screen elements, keyboard and mouse
shortcuts, information about what's new in ToolBook, and an OpenScript reference resource.
There are several ways to access Help:
From the Help menu, choose Help Contents. Then, find the information you need by choosing
from the many Help categories and topics.
x
Open a context-sensitive Help topic in a dialog box by clicking the Help button.
x
Search on keywords by choosing Search for Help On from the Help menu.
x
Display tooltips on the screen by pausing the pointer over a button on a toolbar.
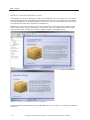
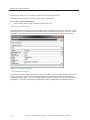
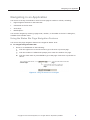
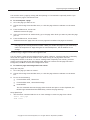
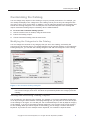
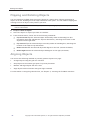
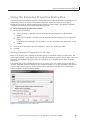
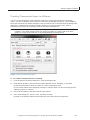
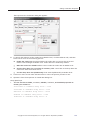
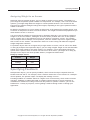
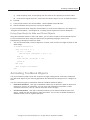
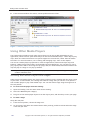
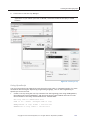
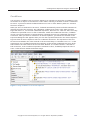
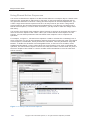
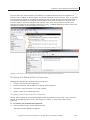
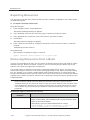
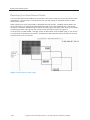
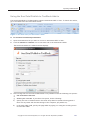
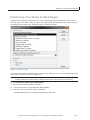
Using the ToolBook Coach
The ToolBook Coach is a quick, convenient reference tool that provides context-sensitive
information as you're authoring. The Coach displays tips and suggestions about the page you're
working on, step-by-step procedures for any object you select, and design guidance. Leave the
Coach open as you work and note how the information in the Coach window changes dynamically
according to the object and page you're working with.
► To display the Coach:
x
From the Help menu, choose Coach.
Figure 1: The ToolBook Coach
Copyright © 2012 SumTotal Systems, Inc. All rights reserved. Duplication prohibited.
17
Getting Started
Visiting the ToolBook Web Site
The ToolBook web site offers a variety of information. You'll find technical information and
support, see examples of products created with our software, and learn about the many solutions
we provide for creating and managing online learning. Here are some examples from among the
many features you'll find at www.toolbook.com:
x
Access to the Knowledge Base, a database of product information where you can perform
keyword searches for articles
x
Access to files that you can download, including sample applications, plug-ins, and updates of
current applications
Contacting SumTotal for Technical Support
If you have questions that cannot be answered by the ToolBook documentation, Help, or the
online resources available from the ToolBook web site, contact technical support representatives
at SumTotal Systems. Refer to the telephone support information on the ToolBook web site:
www.toolbook.com
About this Book
This book has the following chapters that describe different aspects of building an interactive
learning application with ToolBook:
x
Chapters 1 to 3 discuss basic ToolBook concepts and describe the user interface.
x
Chapters 4 to 9 include concepts and techniques to help you construct and customize your
online learning courses.
x
Chapters 10 to 16 describe how to use built-in ToolBook features that add interactivity to
your application and help you engage your learners.
x
Chapters 17 and 18 describe the Actions Editor visual programming tool and provide tutorialstyle examples that demonstrate how to use it to add interactive behavior to your courses.
x
Chapters 19 and 20 describe how to use the resource system to manage graphical elements.
Also included is a description of powerful features that you can use to import and export
text, graphics, and other data.
x
Chapter 21 presents tools that enable you to construct software simulations. It also describes
how to use the Sim AutoBuilder to capture activity in a software application and generate a
simulation file.
x
Chapters 22 and 23 describe how to prepare and package a course for distribution and how to
distribute your course on the Internet.
A glossary is included at the end of this book.
Finding OpenScript Instruction
OpenScript is the ToolBook programming language. Although you can use OpenScript to extend
and enhance your courses, you do not need to know OpenScript to use ToolBook. ToolBook has a
sophisticated array of tools, including the Actions Editor visual programming tool. This book
provides some OpenScript code examples that you can execute using the script editor or the
Command window (click the Script Editor button or the Command Window button on the ToolBook
toolbar). More information about OpenScript can be found in the Help system and in Programming
in OpenScript, an electronic book Installed with ToolBook.
18
Copyright © 2012 SumTotal Systems, Inc. All rights reserved. Duplication prohibited.
About this Book
Document Conventions
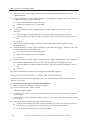
This book uses the following visual conventions to help you identify and interpret information.
Document conventions
Example Format
Meaning
comboBox
In a paragraph, italic type indicates OpenScript keywords.
Setup
In step-by-step procedures, italic type indicates literal characters to
type.
CTRL+ALT+DEL
Keys separated by a plus sign indicate keys to press in
combination.
button id 12
This font indicates an OpenScript code example.
\
A backslash at the end of a line indicates that an OpenScript
statement continues on the next line.
<isShift>
In a code example or syntax statement, angle brackets indicate a
parameter that represents a literal value or expression.
--Initialize
In a code example, two hyphens precede a comment.
before|after
In OpenScript syntax, vertical bars separate the options from which
you can choose.
end [step]
In OpenScript syntax, square brackets indicate optional words and
parameters.
…
In OpenScript syntax, an ellipsis indicates that the parameter can
be repeated. In code examples, ellipses indicate the presence of
any number of statements.
Copyright © 2012 SumTotal Systems, Inc. All rights reserved. Duplication prohibited.
19
Chapter 2
Basic Concepts
Introduction
This chapter provides an overview of ToolBook and explains important concepts you should
understand in order to use ToolBook successfully.
About the ToolBook Product
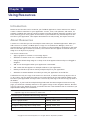
Designed for the flexible creation of content-rich learning applications, ToolBook includes the
ability to fully customize your application using the Actions Editor visual programming tool and
the OpenScript programming language. You can customize objects using these tools and then save
them in the Catalog for use.
For more information about ToolBook, visit our Web site at www.toolbook.com.
Copyright © 2012 SumTotal Systems, Inc. All rights reserved. Duplication prohibited.
21
Basic Concepts
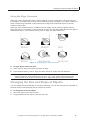
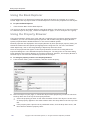
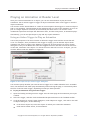
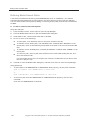
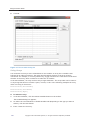
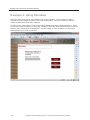
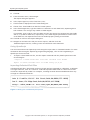
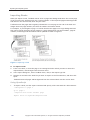
About ToolBook
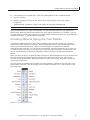
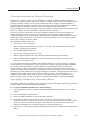
ToolBook is a courseware authoring program that allows course developers and instructional
designers to create, customize, and deliver online learning applications. With ToolBook, you can
create dynamic, interactive courses that engage the learner using sound, animation, video,
graphics, and other special effects. Although ToolBook provides sophisticated tools for
experienced programmers, you don't need to know how to program to use ToolBook: You can use
convenient prebuilt templates and preprogrammed objects from the Catalog.
Figure 1: The ToolBook Catalog
22
Copyright © 2012 SumTotal Systems, Inc. All rights reserved. Duplication prohibited.
Planning your project
With Catalog objects, it's easy to add interactive behavior to your application. You simply drag
objects with the behavior you want from the Catalog to a page. The ToolBook Catalog includes
hundreds of objects with preprogrammed capabilities that handle everything from page navigation
and quiz scoring to special effects like multimedia feedback and animation. These objects provide
prebuilt functionality for the majority of your authoring tasks.
If you are new to developing online learning applications, you'll find that the easy-to-use
templates and the Catalog will get you quickly on your way to producing high-quality interactive
courses. More experienced course designers will appreciate the robust content-creation
environment of ToolBook, the Actions Editor visual programming tool, the powerful OpenScript
programming language, and a variety of design options.
When you have finished authoring, you can distribute the application you created in several ways:
using the Internet or an intranet, a local area network, or a CD-ROM. ToolBook prepares your files
according to the distribution method you choose.
Exploring the Kinds of Applications You Can Create with ToolBook
ToolBook has specially designed features that allow you to create online courses for training and
education environments. You can create a variety of courses with ToolBook, including simulations,
interactive demonstrations, and guided tours, to name just a few. But you're not limited to
courseware development. With ToolBook's flexible and versatile authoring environment, you also
can create online presentations, kiosk applications, catalogs, and games. The blueprint for your
ToolBook application resides in your own imagination.
Interactive Online Learning Applications
An interactive online learning application provides computer-based instruction that responds to a
student's actions. You can create a ToolBook application that not only presents information, but
also quizzes students and stores their responses, displays hints, acknowledges correct answers,
and tracks progress from lesson to lesson.
Planning your project
Good project planning can help you to take advantage of the sophisticated courseware authoring
features and powerful distribution capabilities that ToolBook offers. This section describes
specific file organization and distribution issues to consider before you begin using ToolBook.
Copyright © 2012 SumTotal Systems, Inc. All rights reserved. Duplication prohibited.
23
Basic Concepts
Creating an Organized Directory Structure
Whether you plan to build just one online learning application or several, you'll find it helpful to
organize your files. In addition, when you prepare your application for release, you'll want to keep
track of any ancillary files that need to be distributed along with your application.
As we'll discuss later in this chapter, applications created in ToolBook are composed of one or
more files called books. These books should reside in one central book directory, with one or more
subdirectories for the media files (sound, graphics, video, and animation) that accompany those
books.
Let's say your application has just one book—Introduction to French. We suggest the following
directory structure:
\FRENCH
IntroFrench.tbk (the ToolBook book)
\FRENCH MEDIA
EiffelTower.avi (a video file)
Now let's say your application is more complex. You have one main book about Romance
languages, and several related books about French, Spanish, etc. You could organize the files
using several book subdirectories under a central directory, as shown in this example:
\ROMANCE
Romance.tbk
\FRENCH
IntroFrench.tbk
AdvFrench.tbk
\FRENCH MEDIA
EiffelTower.avi
\SPANISH
IntroSpan.tbk
AdvSpan.tbk
\SPANISH MEDIA
PradaMuseum.avi
etc.
Deciding How You Will Deliver Your Course
Perhaps the most important decision you'll need to make before beginning an application is how
you will deliver your course to your learners: using the Internet or an intranet, a local area
network, or a CD-ROM. Because each delivery method may require different preparation, you will
want to make this decision early in your project development.
The table on the following page provides a brief overview of application-delivery options and
requirements to consider for each method. Chapter 22, "Distributing Applications on the Internet,"
and Chapter 23, "Preparing Native ToolBook Applications for Release," cover these issues in
greater detail. You may want to review these chapters before you begin your project so that you
are prepared for some of the requirements you'll meet later on.
24
Copyright © 2012 SumTotal Systems, Inc. All rights reserved. Duplication prohibited.
Building an Application
Prepare Your Project for Release Based on a Method of Distribution
Distribution Method
Via the Internet or intranet
as a series of Web pages
that incorporate DHTML
Platforms Supported
Microsoft Internet Explorer
7.0 or later
Firefox 3.0 or later
Apple iPhone and iPod Touch
2.0 or later
Apple iPad 3.2 or later
Safari 3 or later
Google Android 1.6 or later
Windows Mobile 6.5 or later
Chrome 5 or later
Preparation Guidelines
x Do not use the OpenScript
programming language in your
application; instead, use the Actions
Editor visual programming tool.
x Ensure that any media or ancillary files
are compatible with Internet standards.
x Use Publish to Web to convert your
application to DHTML.
x If developing content for mobile
learning, be familiar with Authoring Best
Practices for Mobile Learning (detailed
in ToolBook Help).
BlackBerry 6 or later
Via a local area network as
a native ToolBook
application
Windows XP SP2 or higher
x Use all of ToolBook's powerful features
for creating rich, interactive applications,
including the OpenScript programming
language and the Actions Editor visual
programming tool.
x If users will install the application on
their own computers, use the ToolBook
AutoPackager to create a setup
program.
Via CD-ROM or other
transferable media
Windows XP SP2 or higher
x Use all of ToolBook's powerful features
for creating rich, interactive applications,
including the OpenScript programming
language and the Actions Editor visual
programming tool.
x Use the ToolBook AutoPackager to
create a setup program.
Building an Application
You build an application in ToolBook by starting a book and adding your content: text, interactive
objects, graphics, navigation, and so on. You can control the appearance and behavior of objects
by setting properties. The Actions Editor visual programming tool can also control the behavior of
objects, or you can use the OpenScript programming language in books that will not be Published
to DHTML. You create applications at Author level; users interact with them at Reader level.
Copyright © 2012 SumTotal Systems, Inc. All rights reserved. Duplication prohibited.
25
Basic Concepts
Author Level and Reader Level
ToolBook has two levels of operation: Author level and Reader level. At Author level, you create
and modify applications using authoring and development tools such as templates, the ToolBook
Catalog, dialog boxes, and various palettes. At this level, you can create and modify objects and
set properties to define their appearance and behavior.
Reader level is the level at which you test your applications as you develop them, and also the
level at which users run your applications. At this level, users can navigate to particular pages,
type text into fields, respond to interactive question objects, and trigger events.
Figure 2: Author level and Reader level in ToolBook
For more information about Author level and Reader level, see Chapter 3, "Learning the ToolBook
Interface.”
26
Copyright © 2012 SumTotal Systems, Inc. All rights reserved. Duplication prohibited.
Building an Application
Books and Pages
An online learning application created with ToolBook consists of one or more files called books.
You can order the books to create a sequenced course in which your users access one book after
the other. Alternatively, you can join books with hyperlinks so that your users can access them on
an as-needed basis; for example, one book may be a glossary for another book in your course.
In your online book, each screen is considered a separate page. Pages contain the elements that
determine the look and behavior of your application—buttons, graphics, text, media players, and
so on. You arrange the pages in any order that suits your material and then determine a way for
your users to navigate through the pages.
A background is the foundation for a page. Several pages can share one background, and a book
can contain many backgrounds. Placing objects on the background allows you to maintain a
consistent layout throughout your book.
The main ToolBook window displays one page. In addition, you can create pages to display in
windows that appear along with the main window. These windows are called viewers and can be
small, like a pop-up window, or larger, like the main window. For example, you might use
the main window to display your application and use a smaller viewer to display glossary
definitions.
Objects and Properties
All of the visual elements of your application—buttons, text, graphics, and even pages and
backgrounds—are objects.
You can create objects in ToolBook using the tool palette, or you can drag an object from the
ToolBook Catalog and drop it onto your page.
The tool palette contains tools you can use to draw objects on a page. You can draw graphical
objects, such as circles and lines, as well as functional objects, such as buttons.
The Catalog contains a rich collection of objects that you use to construct and enhance an
interactive application. Many Catalog objects have preprogrammed, built-in behavior.
Each object has a set of properties that define its appearance and behavior. A text field, for
example, has properties such as fill color, width, and height that determine its color and size, and
other properties such as text alignment and field type that define how it displays text and
whether it allows users to enter data.
Some objects have extended properties that determine more sophisticated capabilities. A media
player, for example, has properties that control the player's interactive functionality, such as
which media file will play and how ToolBook will play the file at Reader level.
For more information about objects and object properties, see Chapter 6, "Working with Objects,"
and Chapter 7, "Setting Object Properties."
You can set most properties using dialog boxes available in the ToolBook interface. However,
some behavior can be set only by using the Actions Editor or OpenScript.
Copyright © 2012 SumTotal Systems, Inc. All rights reserved. Duplication prohibited.
27
Basic Concepts
Using the Actions Editor
The Actions Editor is a visual programming tool that you can use to create sophisticated
interactive courses without using OpenScript, the ToolBook programming language. The Actions
Editor is designed to give nonprogrammers a programmer's level of control over object
behavior and to provide programmers with a tool they can use to create behavior that will Publish
to the Web.
In the Actions Editor, you use familiar interface elements to create action sequences that play
media, display pages or documents, prompt users for information, and much more. In an action
sequence, you can specify conditions for behavior or create loops to execute actions repetitively.
An action sequence for an object handles a particular event such as a button click, a page
loading, or the selection of an item from a list.
For more information about adding behavior to your application using the Actions Editor, see
Chapter 17, "Using the Actions Editor," and Chapter 18, "Creating Action Sequences: Practical
Examples."
Using OpenScript
OpenScript, the ToolBook programming language, is easy to use because its syntax is similar to
English.
A script you write in OpenScript defines an object's appearance or behavior. For example, a script
might control what happens when a learner clicks a button, enters a page, or chooses a selection
from a list box. Many of these properties can also be controlled using the Actions Editor or Catalog
objects with preprogrammed behaviors; there is often more than one way to accomplish such a
task.
Scripts created using the OpenScript programming language do not Publish to Web. If you've added
functionality to your application using OpenScript, you can deliver it as a native ToolBook
application.
For complete information about using OpenScript, refer to the Programming in OpenScript book.
You can also consult the Help system, which contains an OpenScript reference resource.
28
Copyright © 2012 SumTotal Systems, Inc. All rights reserved. Duplication prohibited.
Using OpenScript
Extending ToolBook using Windows Technologies
ToolBook provides support for such Windows technologies as ActiveX, OLE, ActiveX Data Objects
(ADO), Automation (sometimes referred to as OLE Automation), and Dynamic Data Exchange
(DDE). Using these technologies, you can extend ToolBook's capabilities and allow ToolBook and
other Windows programs to share data and interoperate in a networked environment.
ActiveX controls are software components that you can use within an online application to add
some type of functionality. These controls allow you to add custom features to a native ToolBook
application or to an application you plan to Publish to the Web. For more information about using
ActiveX in your applications, see the electronic book included with ToolBook named Advanced
Features.
OLE is a technology based on a linking and embedding model that is used to integrate
applications. OLE enables you to create an object in one application (the server application) and
then incorporate it into another application (the client application). Because OLE objects retain
information about where they were created, you can double-click an OLE object and edit it
without leaving the client application using a hybrid user interface that includes elements of the
server application. For example, you can create a worksheet in Microsoft Excel™ (the server) and
bring it into ToolBook (the client) using OLE. You can then double-click the OLE object in
ToolBook and edit the worksheet in place. Using OLE, you can create applications that integrate
the capabilities of many different Windows programs. OLE objects are different from ActiveX
controls in that an OLE object has a server application that provides its functionality. For more
information about using OLE in your applications, see the electronic book included with ToolBook
named Advanced Features.
Automation extends ToolBook's functionality, enabling you to access and manipulate the objects,
properties, and methods of other Windows applications. Automation allows a client application
(ToolBook) to connect to a server application (for example, Microsoft Word™) by creating an
instance of that application as an object. After you have created the application object, you can
work with it using OpenScript in the same way you would work with any other object: You can set
and retrieve the object's properties and apply its methods. To see an example of how Automation
can be used with ToolBook, explore the Profiler (Samples\OLE\Profiler.exe). Profiler is a sample
application that demonstrates one use of Automation—using Automation to access and manipulate
programmable features in Word. For more information about Profiler and Automation, refer to the
Profiler sample book (\Samples\OLE\Profiler.pdf).
ADO is a high-level mechanism that allows you to access the data in databases from ToolBook
using OpenScript. To see an example of how ADO can be used with ToolBook, explore the
ToolBook Quiz Builder (Samples\ADO\Quizbldr.tbk). The Quiz Builder is a sample application that
demonstrates one use of ADO technology—using ADO to send data to and retrieve data from a
Microsoft Access database. For more information about the Quiz Builder and ADO, refer to the
Quiz Builder sample (Samples\ADO\Quizbldr.pdf).
Dynamic Data Exchange (DDE) is a Windows communication protocol; two programs that support
DDE can exchange data and issue commands to each other. For example, Microsoft Excel has a
built-in utility for creating charts and graphs, but you can create a more flexible, friendly
interface in ToolBook. You can maintain data in an Excel spreadsheet and send DDE commands
from your ToolBook application to produce charts and graphs in Excel. For more information about
DDE, refer to Chapter 12, "Using Dynamic Data Exchange" in the Programming in OpenScript
electronic book.
Copyright © 2012 SumTotal Systems, Inc. All rights reserved. Duplication prohibited.
29
Basic Concepts
Extending OpenScript with Dynamic-Link Libraries
To extend the capabilities of OpenScript, you can call dynamic-link libraries (DLLs), which are
libraries of functions available to any Windows program. Windows includes a number of DLLs that
you can call to interact directly with Windows; for example, you can display windows, receive
Windows messages directly, or determine the current state of the system. In addition, third-party
vendors often provide DLLs as a way for you to use their products. For details about how to call
the DLLs supplied with another product, refer to the documentation that came with the product.
For more information about DLLs and how to use them to extend the capabilities of OpenScript,
see Chapter 13, “Using dynamic-link libraries,” in the Programming in OpenScript electronic book.
Using Resources in Your Application
You can customize the appearance of your application’s interface by importing resources such as
cursors, icons, graphics, fonts, menus, and color palettes. For example, you can import:
x
A cursor to display under certain circumstances—for instance, when the pointer is paused
over an object that cannot be clicked.
x
Icons or bitmaps to use as graphics on buttons.
You can import these resources from other Windows programs.
For more information about resources and how they can customize your application, see Chapter
19, “Using Resources.”
30
Copyright © 2012 SumTotal Systems, Inc. All rights reserved. Duplication prohibited.
Chapter 3
Learning the ToolBook Interface
Introduction
This chapter helps acquaint you with the ToolBook visual interface. Here you will learn about each
interface component, how to customize the interface, and how to use built-in tools to navigate in
ToolBook applications.
Introducing the Visual Interface
Designed for ease of use, the ToolBook tools and visual interface let you focus on the important
tasks of presenting your content and measuring student results. ToolBook has two working levels:
Author level and Reader level. At Author level, you build applications using development tools,
such as the Catalog, Book Explorer, palettes, and the toolbar. With these tools, you can build
books, create and modify objects on pages, and add interactive behavior to your application.
At Reader level, you can test your application to see how it will appear to your users. Users will
run your application at Reader level, where they can navigate to pages, respond to question
objects, and trigger events. To switch between Author level and Reader level, press F3 or choose
Author or Reader from the View menu.
Working at Author Level
When you first start ToolBook, you see the Author-level workspace. At Author level, you use tools
such as the toolbar, status bar, tool palette, and Catalog to build your application.
Figure 1: Various Author Level Tools
Copyright © 2012 SumTotal Systems, Inc. All rights reserved. Duplication prohibited.
31
Learning the ToolBook Interface
The following tools are available at Author level:
x
Book Explorer – An interactive browser that shows all pages and objects in an outline format.
It provides a convenient way to work with objects.
x
Palettes – Contain collections of tools or buttons that you use to draw new objects or change
an object's shape, color, or other properties.
x
ToolBook Catalog – Contains graphics, navigation panels, question objects, media players,
and other preprogrammed objects that you can use to design applications.
x
ToolBook Coach – Provides authoring guidance and step-by-step instructions as you work.
x
The Properties dialog box and Extended Properties dialog box – Allow you to specify
properties that determine an object's appearance and behavior.
x
The Actions Editor – Allows you to add interactive behavior to your ToolBook applications
that will be Published as Web pages.
x
Menu bar – Allows you to execute commands and access dialog boxes.
x
Toolbar – Provides a collection of buttons that you can use as shortcuts for commonly used
menu commands.
x
Status bar – Shows you the names of objects, Help text for menu commands, the current
mouse position, and the current mode of deployment. The right side of the bar provides a
quick way to select the current page and contains tools that you can use to navigate between
pages.
x
Rulers – Show you the exact size and position of objects.
x
Grid – Displays a matrix of dots that helps you size and position objects precisely.
x
Right-click menus – Appear when you right-click an object, providing quick access to common
settings and dialog boxes.
You can hide and show each of these tools and customize their appearance. The following sections
describe in detail each interface element's function and capabilities.
Working with the Menu Bar
You work with the ToolBook menu bar as you would work with any Windows menu bar. Simply
click the menu name and choose a command from the menu. You can modify how the menu bar
appears at Reader level; for more information, see the electronic book included with ToolBook,
Advanced Features.
Working with the Toolbar
The toolbar provides quick access to common menu commands and editing tools. Some of the
positions on the toolbar contain two buttons: a default button and a hidden button. To display
hidden buttons, press CTRL.
► To hide and show the toolbar:
x
From the View menu, choose Toolbar.
32
Copyright © 2012 SumTotal Systems, Inc. All rights reserved. Duplication prohibited.
Working at Author Level
Toolbar command buttons and their function
Default Toolbar button
Toolbar button when CTRL is pressed
Open another ToolBook application
Run another application or instance of
ToolBook
Save your book
Save your book under a different name
Undo last action
Duplicate selected object
Show Book Explorer
Show or hide Catalog
Open Simulation Editor
Creates a new simulation if none exists
Show or hide Command window
Show or hide tool palette
Show or hide line palette
Show or hide line ends palette
Show or hide pattern palette
Show or hide color tray
Show or hide polygon palette
View current background
Add new page to your book
Open Resource Manager dialog box
Open Clip Manager dialog box
(Grayed out in DHTML mode)
Open Viewers dialog box
(Grayed out in DHTML mode)
Open Properties dialog box
Open Extended Properties dialog box
Open Actions Editor
Open the OpenScript Editor
OpenScript Editor for shared scripts
Open Font tab of Properties dialog
box
Open Paragraph tab of Properties
dialog box
Group or ungroup objects
Copyright © 2012 SumTotal Systems, Inc. All rights reserved. Duplication prohibited.
33
Learning the ToolBook Interface
Default Toolbar button
Toolbar button when CTRL is pressed
Bring to front
Bring object closer
Send to back
Move object farther
Flip horizontally
Flip vertically
Rotate left
Rotate right
Working with the Status Bar
The status bar, which displays information about ToolBook and the current page, has several
parts:
x
Caption area – Displays Help text for menu commands, the Help text for toolbar or tool
palette buttons, or the name of an object, depending on the position of the pointer.
ToolBook also displays progress messages in the caption area when a process is under way.
x
Mouse position indicator – Displays the coordinates of the pointer in page units.
x
Page selection indicator – Shows that you are working on the foreground. You can click here
to select the entire page.
x
Navigation control buttons – Move you to the next or previous page when clicked.
x
Deployment mode indicator – Indicates the current deployment mode (native or DHTML) of
the book. In addition to the icon indicating the mode of deployment, on mouseover, a tooltip
description of the current mode appears.
x
Status box – Displays the current page number and total number of pages, or the word
"Background" if you are working on the background.
Tip
By default, ToolBook displays the status bar only at Author level. You can display the status
bar at Reader level by pressing F12. At Reader level, the status bar does not include the
page selection indicator.
Figure 2: The status bar at author level
In Native mode, if you create viewers, which are additional windows, each viewer can have its
own status bar. You can hide and show each status bar individually, including the one for the main
window.
34
Copyright © 2012 SumTotal Systems, Inc. All rights reserved. Duplication prohibited.
Working at Author Level
► To hide or show the status bar:
Using the interface
x
From the View menu, choose Status Bar. Alternatively, press F12.
Using OpenScript
You can write and execute OpenScript code using the script editor or Command window. For more
information about using the OpenScript programming language, refer to the Programming in
OpenScript electronic book.
x
To show or hide the status bar for the current window, use the show or hide command. To
specify that a window should show or hide the status bar by default, set its authorStatusBar
or readerStatusBar property:
--Displays status bar in current window
show statusBar
--Removes status bar from current window
hide statusBar
--Shows status bar at Reader level
readerStatusBar of viewer ID 0 = true
Working with Palettes
A palette is a collection of tools or buttons that you use to draw new objects or to set values that
modify existing objects. For example, you choose a tool on the tool palette to draw a new object,
and you choose a line width on the line palette to determine how thick a line should be. ToolBook
includes six palettes, described in the following table.
ToolBook Palettes
Use this palette…
If you want to…
Tool
Create new objects on a page.
Line
Set line width or border around an object.
Line ends
Add arrow heads or tails to a line.
Pattern
Set a pattern or design to fill an object.
Color
Set the color of an object or of text.
Polygon
Set the number of sides, from 3 to 99, of the next polygon to be
drawn.
Copyright © 2012 SumTotal Systems, Inc. All rights reserved. Duplication prohibited.
35
Learning the ToolBook Interface
► To hide or show a palette:
x
From the View menu, point to Palettes, and then choose a palette. Alternatively, click the
palette's button on the ToolBook toolbar.
► To move a palette:
x
Position the pointer at the top of the palette, and then drag the palette to its new position.
Figure 3: Palettes
You can show as many palettes as you like, hide them to make room onscreen, or move them
around as needed.
36
Copyright © 2012 SumTotal Systems, Inc. All rights reserved. Duplication prohibited.
Working at Author Level
Working with the Catalog
The Catalog contains the authoring objects you use to build your interactive online learning
application. There are hundreds of objects in the Catalog, including question sets, media players,
navigation panels, and other interactive objects, many with preprogrammed behavior that you
can customize. To include an object in your application, you simply drag it from the Catalog to
your page or background. Then, set its properties or extended properties to further define its
appearance and behavior. In addition, you can link an action or sequence of actions to any
Catalog object using the Actions Editor or write a script for an object using OpenScript.
Figure 4: The ToolBook Catalog
Copyright © 2012 SumTotal Systems, Inc. All rights reserved. Duplication prohibited.
37
Learning the ToolBook Interface
► To display the Catalog:
x
Do one of the following:
From the View menu, choose Catalog.
Click the Catalog button
Press F2.
on the ToolBook toolbar.
For more information about using Catalog objects to build an application, see Chapter 5, "Working
with the Catalog."
Working with the ToolBook Coach
The ToolBook Coach is a convenient reference tool that provides context-sensitive information as
you're authoring. The Coach displays tips and suggestions about the page you're working on, stepby-step procedures for any object you select, and design guidance. Leave the Coach open as you
work and note how the information in the Coach window changes dynamically according to the
object and page you're working with.
► To display the Coach:
x
From the Help menu, choose Coach.
Figure 5: The ToolBook Coach
38
Copyright © 2012 SumTotal Systems, Inc. All rights reserved. Duplication prohibited.
Working at Author Level
Working with Properties and Extended Properties Dialog Boxes
After you add an object to the page, you set its properties to customize its appearance and
behavior in your application. You set an object's properties by first selecting the object and then
opening the object's Properties or Extended Properties dialog box. These dialog boxes allow you to
set an object's color, specify a graphic displayed on a button, identify the correct answers in a
question object, control when a video plays, and much more.
Working with the Properties Dialog Box
Using the Properties dialog box, you simply enter or select the values you want to set. As a
convenience, you can leave the Properties dialog box open as you work—the Properties dialog box
shows you the properties of the currently selected object. This feature allows you to set the
properties of different objects on your page without having to close and reopen the dialog box
several times.
Figure 6: The Properties dialog box
The toolbar in the Properties dialog box includes buttons to give you quick access to commands,
other object properties, and Help. For example, if you make a mistake, you can click the Undo
button to reverse the changes you made.
You can also use the Properties dialog box to specify behavior that extends beyond individual
objects. For example, you can set properties for a page, a background, and a book. ToolBook also
provides Properties for Lesson dialog box, where you can set scoring and logging options.
► To display the Properties dialog box:
x
Do one of the following:
From the Object menu, choose one of the properties options.
Click the Properties button
Right-click an object, and then click the Properties button on the right-click menu.
on the ToolBook toolbar.
Copyright © 2012 SumTotal Systems, Inc. All rights reserved. Duplication prohibited.
39
Learning the ToolBook Interface
Press SHIFT+F6.
Working with the Extended Properties Dialog Box
Many objects from the Catalog have extended properties that define their behavior. In addition to
the Properties dialog box, these objects have an Extended Properties dialog box, where you can
specify and refine these extended capabilities.
► To display an object's Extended Properties dialog box:
x
Do one of the following:
With the object selected, from the Object menu, choose the extended properties
command. (For example, if a true/false question is selected, choose Properties for
True/False Question.)
With the object selected, click the Extended Properties button
toolbar.
In the object's Properties dialog box, click the Extended Properties button on the dialog
box toolbar.
With the object selected, press CTRL+F6.
on the ToolBook
For more information about setting object properties, see Chapter 7, "Setting Object
Properties."
Working with the Actions Editor
The Actions Editor is a visual programming tool that you can use to build or edit a series of
behaviors called an action sequence. In the Actions Editor, you use familiar interface elements,
including menus and a toolbar, to construct sophisticated behaviors based on standard
programming protocols. Using the sequences you create in the Actions Editor, you can respond to
an event (a button click, for example) by playing media, prompting users for input, changing the
appearance and behavior of objects, controlling user navigation, and much more. You can also
specify conditions for behavior, insert loops to execute actions repetitively, and set and get
variables—all without writing a script.
Action sequences are a good way to deliver custom interactive behavior on the Web. Action
sequences will be converted and functional when Published to Web.
Figure 7: The Actions Editor window
► To open the Actions Editor for an object:
40
Copyright © 2012 SumTotal Systems, Inc. All rights reserved. Duplication prohibited.
Working at Author Level
x
Do one of the following:
With the object selected, from the Object menu, choose Actions.
With the object selected, click the Actions button on the ToolBook toolbar.
Right-click the object, and then click the Actions button on the right-click menu.
With the object selected, press F5.
With the object selected, display the Properties dialog box, and then click the Actions
button on the toolbar of the Properties dialog box.
For more information about the Actions Editor, see Chapter 17, “Using the Actions Editor,” and
Chapter 18, “Creating Action Sequences: Practical Examples.”
Using the Book Explorer
The Book Explorer allows you to view all of the objects in your book in a convenient outline
format. You can edit information about an individual object, such as a page name. The Book
Explorer is also useful for reordering pages in your book—simply drag and drop the page icons into
a new order.
Figure 8: The Book Explorer
You can use the Book Explorer for many different tasks. Click an object in the Book Explorer to
select this object in the main window. Use drag and drop to move any object to a different layer
or add an object to a group. Display the properties for any object with a right-click.
Pointing to a page in the Book Explorer will display a small preview image of the page in a pop-up
window. Selecting a page in the Book Explorer causes navigation to that page in the main window.
Multiple objects can be selected in the Book Explorer if they have the same parent. Use
CTRL+click or SHIFT+click to select more than one object.
Copyright © 2012 SumTotal Systems, Inc. All rights reserved. Duplication prohibited.
41
Learning the ToolBook Interface
Working with the Property and Handler Browsers
ToolBook includes browsers that allow you to set or edit values.
► To open one of the browsers:
x
From the View menu, point to Browsers, and choose one.
The Property Browser
The Property Browser displays and allows editing of all available properties for an object. In the
Property Browser, an object's properties display using the OpenScript property name. You should
be familiar with OpenScript before using the Property Browser to edit an object's properties.
Figure 9: The Property Browser
The Handler Browser
The Handler Browser displays and allows editing of handlers in the message-passing hierarchy for
the current object. You can use the Handler Browser to edit the OpenScript for an object by
double-clicking a handler. The script containing that handler will open with the selected handler
highlighted. You should be familiar with OpenScript before editing with the Handler Browser.
42
Copyright © 2012 SumTotal Systems, Inc. All rights reserved. Duplication prohibited.
Working at Author Level
Working with Rulers and the Grid
You can use the rulers and the grid to help you precisely size and align objects. The rulers appear
along the top and left edges of the main window unless you hide them to make more room in the
window. As you move the pointer inside the window, a line appears in each ruler indicating the
position of the pointer. If you select an object, shadows in the rulers indicate the object's
dimensions.
► To hide or show the rulers:
x
From the View menu, choose Rulers. Alternatively, press CTRL+R.
By default, ToolBook displays the rulers using the units of measurement specified in Windows. You
can change the units of measurement within ToolBook in the Grid dialog box.
The grid is a matrix of dots spaced an equal distance apart in the main window. You can specify
that ToolBook align objects with the grid automatically when you move or resize them. The grid
does not have to be visible for you to "snap" objects to it.
You can show and hide the grid as needed at Author level; however, even if the grid is visible at
Author level, it never appears at Reader level. You can set the grid spacing to any width you
want.
► To change grid settings:
1.
From the View menu, choose Grid.
2.
In the Grid dialog box, do one or more of the following:
3.
To show or hide the grid, select or clear the Show grid check box.
To change the default space between grid dots, enter an increment in the Page units,
Pixels, or Inches (Centimeters) box.
To specify whether objects align with or move independently of the grid, select or clear
the Snap to grid check box.
To specify the units of measure, select Metric or English.
Click OK.
Copyright © 2012 SumTotal Systems, Inc. All rights reserved. Duplication prohibited.
43
Learning the ToolBook Interface
Working with Right-Click Menus
If you pause the pointer over an object on the page and click the right mouse button (right-click),
ToolBook displays the object's right-click menu. The right-click menu provides an easy way to set
the object's properties and provides information about the object's name and related objects. By
default, the right-click menu does not display the following advanced options: Action methods,
Debugger, and Property Browser. However, these can be displayed by selecting the Show
advanced items in right-click menus option in the ToolBook Options dialog box (accessed by
selecting Options on the View menu).
Each object's right-click menu is slightly different, but all display the type of information
illustrated below.
Figure 10: Sample right-click menu
► To display an object's right-click menu:
x
Click the right mouse button according to the table that follows.
► To show advanced items in the right-click menus:
1.
On the View menu, click Options.
2.
On the Interface tab, select the Show advanced items in right-click menus option.
Right-click menu access
Object Type
Where to click
Page
Right-click an empty spot on the page, or CTRL+right-click anywhere on
the background.
Background
CTRL+right-click on the page, or right-click an empty spot on the
background.
Viewer
CTRL+SHIFT+right-click anywhere in the viewer.
Book
SHIFT+right-click anywhere on the page.
Other Objects
Right-click the object.
44
Copyright © 2012 SumTotal Systems, Inc. All rights reserved. Duplication prohibited.
Working at Author Level
By default, you can display right-click menus only at Author level. However, you can change the
ToolBook default to display right-click menus at Reader level as well. Using right-click menus at
Reader level makes it easy for you to change an object’s properties while you are running or
testing an application.
► To enable right-click menus at Reader level:
Using the interface
1. From the View menu, choose Options.
2.
On the Interface tab, select the Show right-click menus at Reader level check box.
To disable right-click menus at Reader level, click to clear this check box.
Using OpenScript
x
Use the following statements to enable right-click menus at Reader level:
--At Reader level
sysReaderRightClick = true
send readerRightClick
--If enabled, will disable
Copyright © 2012 SumTotal Systems, Inc. All rights reserved. Duplication prohibited.
45
Learning the ToolBook Interface
Working at Reader Level
You switch to Reader level from Author level to run or test an application. When you do, ToolBook
removes the tools you use for developing an application.
Tip
Press F3 to switch between Author level and Reader level.
These changes occur when you switch from Author to Reader level:
x
The menu bar changes to a Reader-level menu bar that does not contain Author-level
commands.
x
The toolbar, Catalog, Coach, palettes, rulers, dialog boxes, and grid disappear.
x
The status bar and right-click menus disappear, unless you have chosen to make them
available.
► To switch between Author level and Reader level:
x
Choose Author or Reader from the View menu, or press F3.
Figure 11: Reader Level
46
Copyright © 2012 SumTotal Systems, Inc. All rights reserved. Duplication prohibited.
Navigating in an Application
Navigating in an Application
You can use a variety of methods to move from one page to another in a book, including:
x
Page navigation features on the status bar.
x
Commands on the Go menu.
x
Arrow keys.
x
Book Explorer.
You can also navigate by entering a page name, number, or id number in the Go To dialog box,
available from the Edit menu.
Using the Status Bar Page Navigation Features
You can use the page navigation features to navigate at Author level.
► To navigate using the status bar:
x
Do one or a combination of the following:
Click the right arrow or the left arrow to go to the next or previous page.
Click the numbers. ToolBook will prompt you to enter the number of a page.
Click the check mark or press ENTER to go to that page. Click the X or press ESC to
cancel.
Figure 12: Using the status bar to navigate
Copyright © 2012 SumTotal Systems, Inc. All rights reserved. Duplication prohibited.
47
Learning the ToolBook Interface
Using the Go Menu and Arrow Keys
The following table outlines how to use commands on the Go menu and arrow keys to move
between pages in a book.
Moving from page to page
To move to this page…
From the Go menu, choose…
Or press these keys…
Next
Next Page
ALT+RIGHT ARROW
Previous
Previous Page
ALT+LEFT ARROW
First page in book
First Page
ALT+UP ARROW
Last page in book
Last Page
ALT+DOWN ARROW
Last page visited
Back
SHIFT+F2
History*
History
CTRL+F2
* Lists the unique names of up to 100 of the last pages accessed in the current ToolBook instance.
Navigating using the Book Explorer
The Book Explorer provides an additional way to navigate in Author view. In the Pages area, you
can click the page you want to navigate to and that page will display in the authoring space. The
page you navigate to will be displayed in the Status bar.
48
Copyright © 2012 SumTotal Systems, Inc. All rights reserved. Duplication prohibited.
Chapter 4
Creating Books and Pages
Introduction
In this chapter, you will learn about creating books and pages, setting book properties to specify
how your book will run, setting up navigation between pages, and controlling how objects display
on a page. In addition, this chapter provides some tips about enhancing the performance of your
book.
About Books and Pages
The ToolBook applications that you create and run are called books. A book is composed of pages
that contain objects. Objects that you place on a page are displayed on top of a background. A
background is the foundation for a page that is shared by any number of pages in a book. One
book can contain several backgrounds, each designed for a specific purpose.
Objects that you place on a page's background appear in the same position, style, and size on
every page that shares that background. For example, you might put a panel of navigation buttons
on the background so that they appear in the same place on every page. Making changes to
several pages this way is easy: If you change the background of any page, you see the changes on
all of the pages that share the background. You will also save disk space by placing objects on the
background, because ToolBook stores only one copy of each background and the objects on that
background.
When you want an object to appear on only a single page, put it on the page itself (the
foreground).
► To switch between the page (foreground) and background:
x
Choose Foreground or Background from the View menu, or press F4 to toggle from one to the
other.
You can display pages in a book's main window and also in special viewers—like a pop-up window.
For details about creating and using viewers, see the electronic book included with ToolBook,
Advanced Features.
About Templates
A template is a prebuilt book that provides a basic structure for your application, including page
organization, graphic theme, interactive objects, and navigation controls. To this structure, you
add your own custom content. You can fully customize templates by adding or deleting pages,
changing page order, or replacing graphics. Using templates can help you save time and provide a
consistent look and feature set for each new application.
You can choose a template from the New Book dialog box (choose New from the File menu) or
from the ToolBook Startup dialog box that appears when you open ToolBook. ToolBook provides a
variety of templates that you can select in these dialog boxes, and you can create your own
custom templates that can appear here as well. When you choose to open a template, ToolBook
opens a copy of the template that you name and save.
Copyright © 2012 SumTotal Systems, Inc. All rights reserved. Duplication prohibited.
49
Creating Books and Pages
Creating and Saving Templates
In addition to using the variety of templates that ToolBook provides, you can create your own
custom templates by saving any book as a template. Books that you create from scratch, books
that you create using one of the ToolBook templates, and books that you create using one of the
Book Wizards can all be saved as templates.
When you save a book as a template, you'll want to save it in the Template directory of the
ToolBook program directory. That way, when you start ToolBook or choose New from the File
menu, the custom template you've created will appear within the list of Templates shown in the
Startup dialog box and the New Book dialog box. The Template directory is the default location
for storing templates.
► To save a book as a template:
1.
From the File menu, choose Save as Template.
2.
In the Save as Template dialog box, enter the template title, description, file name, and
directory, and then click OK.
After developing a template, you may want to provide guidance about the template to other
ToolBook authors who will use the template to create applications. To describe the purpose of a
page in a template or guidelines for its use, you can write descriptive text that will appear in the
ToolBook Coach when the page is selected. For more information about assigning your own
descriptive text, refer to "Adding Coach text to a custom Catalog object," in the Customization
Guide online book available from the Developer Corner on the www.toolbook.com site.
Creating a New Book
You can start a new book in ToolBook by using a template, creating a blank book from scratch, or
using one of the Book Wizards. When you start a new book you'll need to choose one of two
possible ways to deliver the book: as Web pages that automatically incorporate DHTML features,
or as a native ToolBook TBK file. Based on your choice, certain menu commands and options may
be unavailable if unsuited to the selected deployment method. For more information about your
delivery options, see Chapter 20, "Distributing Applications on the Internet, and Chapter 21,
"Preparing Native ToolBook Applications for Release."
Starting a New Book Using a Template
You can save time and provide a consistent look and feature set for each new application by using
a template. As described in "About templates," earlier in this chapter, a template serves as the
architecture for your content. When you use a template to start a new book, ToolBook opens a
copy of the template, which you name and save.
► To start a new book using a template:
1.
Do one of the following:
If ToolBook is not running, start ToolBook.
The ToolBook Startup dialog box appears.
If ToolBook is already running, from the File menu, choose New.
The New Book dialog box appears.
2.
Click From A Templates, select a template, and then click Create Book.
3.
In the Select a Name and Location for Your New Book dialog box, name the file, accept the
default directory or choose another file location, and then click OK.
ToolBook opens the book.
50
Copyright © 2012 SumTotal Systems, Inc. All rights reserved. Duplication prohibited.
Creating a New Book
Tip
You can bypass the New Book dialog box and automatically open a default template each
time you open a new book. In the ToolBook Options dialog box (available from the View
menu), clear the following check box: Show New Book dialog when starting new book.
Starting a New Book Using a Book Wizard
The Book Wizards automate the task of creating the layout for a ToolBook application. These
wizards gather input from you about how you want the book to appear and behave. For instance,
you can select a Smart Style specifically designed for the iPhone, or a Smart Style designed for
desktop viewing. ToolBook uses this input to build a book based on your specifications.
ToolBook offers two wizards to help you build a new book:
x
Book Wizard – Builds a book that reflects your input about page styles and outline for page
organization. You can design a sophisticated outline of pages that can serve as the basis for
any online course.
x
Lesson Design Wizard – Builds a book that reflects your input about instructional goals, page
styles, and learning topics. You can include prepared text and graphics files as well as
preprogrammed question objects.
► To start a new book using one of the Book Wizards:
1.
Do one of the following:
If ToolBook is not running, start ToolBook.
The ToolBook Startup dialog box appears.
If ToolBook is already running, from the File menu, choose New.
The New Book dialog box appears.
2.
Click Using a Book Wizard, select a wizard, and then click Start Wizard.
3.
Follow the instructions in the Book Wizard.
Starting a New, Blank Book
If you choose not to use a template, you can start with a blank book with no preprogrammed
objects or graphic theme.
► To start a new, blank book:
1.
Do one of the following:
If ToolBook is not running, start ToolBook.
The ToolBook Startup dialog box appears.
If ToolBook is already running, from the File menu, choose New.
The New Book dialog box appears.
2.
Click Blank, select one of the blank book types, and then click Create Book.
3.
The Confirm Deployment Method dialog box appears; click Yes to continue.
ToolBook opens the book.
Copyright © 2012 SumTotal Systems, Inc. All rights reserved. Duplication prohibited.
51
Creating Books and Pages
Creating Backup Copies
It is always a best practice to back up your work during development. This way, if you make
significant changes to a book that you would like to discard, you have the opportunity to go to a
previous version.
There are two main ways to create backup copies of your work:
x
Set the options in ToolBook to make copies of your work automatically.
x
Use the Save As option to create backups manually.
Using ToolBook's Backup Feature
You can set options in ToolBook to save a backup of your book whenever you save your work.
Using this feature, you can have ToolBook create up to nine backup files.
The number of backup files you select determines how many versions of the book will be available
to you. ToolBook default value for this is 1, but it is recommended that you increase this value.
The naming of the backup files created by ToolBook works in the following way. The most recent
backup of your file will end with an extension of .BAK, the second most recent backup will end
with an extension of .001, the third most recent backup will end with an extension of .002, etc.
► To use ToolBook's backup feature function:
1.
From the View menu, click Options.
2.
In the ToolBook Options box, click the Backup tab.
3.
Select the Always create backup copy checkbox.
4.
Specify the number of backups required in the Number of unique backup files (1-9) field.
► Opening a backup file:
1.
From the Windows Start menu launch ToolBook.
2.
From the Startup screen, choose Select a File from the Open Book section.
3.
From the Files Of Type selector, choose All Files (*.*).
4.
Specify the location of the backup file you want to open.
5.
Click Open.
Creating Backups Manually
It is important to back up your book manually at intervals by using the Save As option because it
will often compress and optimize the file. This results in a smaller overall file size, without any
other impact on your book.
► To create backups manually:
1.
From the File Menu, click Save As.
2.
Click OK in the reset book prompt.
3.
In the Save As box, enter a name for the book.
4.
Select a folder in which to save the book.
5.
Click Save.
52
Copyright © 2012 SumTotal Systems, Inc. All rights reserved. Duplication prohibited.
Creating Pages and Backgrounds
Creating Pages and Backgrounds
Pages and backgrounds are ToolBook objects that you can create and modify. In a ToolBook book,
you can:
x
Add and remove new pages and backgrounds.
x
Import pages and backgrounds from a different book.
Adding Pages and Backgrounds to a Book
You can add a new page by choosing:
x
Any page shown in the Pages category of the Catalog.
x
The New Page command from the Insert menu.
x
Choosing a page from the Catalog.
Any of the page types shown in the Pages category of the Catalog will automatically match the
existing style of your book when added. ToolBook supplies the graphics that match the style you
chose when starting a book from a template or Book Wizard.
The Insert menu has the New Page command and the New Background command. While both
commands allow you to add a page to your book, they each give you different options about the
type of page or background you add.
Choosing New Page from the Insert menu allows you to add an empty page using the current
background, duplicate a page from your book, or add a page from a template. After choosing one
of these options, you can specify that the page introduce a new background, so that changes
made to this new background will not affect the background you duplicated.
Choosing New Background from the Insert menu allows you to add a page that uses a new
background. You can add a new page with an empty background, duplicate a background from
your book, or add a background from a template.
► To add a new page from the Catalog:
1.
If the Catalog is not currently open, click the View menu and choose Catalog.
2.
Open the Pages category.
3.
Double-click the type of page you want to add.
The new page is inserted after the page you were viewing.
► To add a new page from the current template or book:
1.
Go to the page after which you want to add the new page.
2.
Do one of the following:
To add a new page that uses an existing background, choose New Page from the Insert
menu, or press CTRL+N.
The New Page dialog box appears. Enter a name for the page, and then select an empty
page, a page from the current book, or a page from a template.
3.
To add a new page that uses a new background, choose New Background from the Insert
menu.
Click OK.
ToolBook inserts the new page after the current page (the page displayed in the ToolBook
main window) and gives it the next sequential page number.
Copyright © 2012 SumTotal Systems, Inc. All rights reserved. Duplication prohibited.
53
Creating Books and Pages
Tip
You can modify your settings so that ToolBook adds new pages without opening the New
Page dialog box. From the View menu, choose Options; on the New tab, clear the Show New
Page dialog on New Page command check box. Now ToolBook will automatically apply the
settings from the page you are on to the new page it creates.
Using OpenScript
You can write and execute OpenScript code using the script editor or Command window. For more
information about using the OpenScript programming language, refer to the Programming in
OpenScript electronic book.
x
To add a new page that uses an existing background, display a page that uses the background
you want, and then send the newPage
message from the page:
send newPage to system
x
To add a new page that uses a new background, display the page after which you want to add
the new page, and then send the newBackground message:
send newBackground
ToolBook inserts the new page after the current page (the page displayed in the ToolBook main
window) and gives it the next sequential page number.
Importing Pages from Another Book
You can import pages from another book, called the source book, into the current book, called
the target book. Importing pages into a target book does not affect the source book. You can
import all of the pages from a source book or only specific pages. ToolBook attempts to merge
text information into the correct location and adds the resources on the imported pages to the
resources of the target book. More information about resources is available in Chapter 19, "Using
Resources."
Tip
Importing pages is especially useful when you want to include a range of pages from another
book. If you want to add a single page from another book, you can use a simple copy-andpaste operation.
► To import pages:
Using the interface
1. Open the target book, and then display the page after which you want to import the source
book's pages.
2.
From the Insert menu, choose Pages.
ToolBook displays the Import dialog box.
3.
Verify the Import type list displays ToolBook files (*.?bk).
4.
Select the source book or type in the source book's name, including its path if the book is in
another directory.
5.
To specify a range of pages, or to specify whether the background is imported, click the
Format button. Enter a range of pages and then click OK.
By default, ToolBook imports all pages with their backgrounds from the source book unless
you remove the check from the box labeled "Include Background".
6.
Click OK.
ToolBook imports the specified pages from the source book into the target book.
54
Copyright © 2012 SumTotal Systems, Inc. All rights reserved. Duplication prohibited.
Organizing Pages and Backgrounds
Using OpenScript
x
To import the entire source book into the target book, display the page after which you want
to import the book, and then use the import book command:
import book "c:\toolbook\add.tbk"
x
To import one or more pages, use the import pages command. To import pages without the
source book's background, add the without background parameter. For example:
import pages 5 to 5 of book "c:\toolbook\add.tbk"
import pages 12 to 24 of book "c:\toolbook\new.tbk"
without background
If the source book's page size is larger than that of the target book, you may need to increase the
target book's page size to see all of the objects. For details, see "Setting the page size," later in
this chapter.
Organizing Pages and Backgrounds
You can reorder your book's pages by using the Book Explorer to drag and drop a page to another
position in the sequence of pages. Other ways to change the order of pages is to renumber them,
or cut and paste pages.
Using the Book Explorer
Use the Book Explorer to display the organization of the pages of your book in an outline form.
Figure 2: The Book Explorer
Copyright © 2012 SumTotal Systems, Inc. All rights reserved. Duplication prohibited.
55
Creating Books and Pages
In the Book Explorer window, you can:
x
Reorganize the order of the pages using drag-and-drop.
x
Navigate to a specific page by clicking the page name.
► To open the Book Explorer:
x
Do one of the following:
From the View menu, choose Book Explorer.
Press Shift+F4 on your keyboard.
Click the toolbar icon for the Book Explorer.
Renumbering Pages in a Book
You can reorder pages by using the Book Explorer, or cut and paste, or the Properties for Page
dialog box. ToolBook removes the page from its old position in the page order and inserts it at the
new position. The other pages are renumbered to reflect the change. The page keeps its original
background wherever you move it in the book.
► To change the order of a page in a book:
1.
Go to the page you want to renumber.
2.
From the Object menu, choose Properties for Page to open the
Properties for Page dialog box.
3.
In the Page box, enter a new page number.
4.
Optional. Close the Properties for Page dialog box.
Using OpenScript
x
Set the pageNumber property to renumber a page and change its order in a book, where
<value> is the new page number:
pageNumber of this page = <value>
56
Copyright © 2012 SumTotal Systems, Inc. All rights reserved. Duplication prohibited.
Organizing Pages and Backgrounds
You can also move a page by cutting and then pasting it. This method is especially useful if you
want to move a page to a different book.
► To cut and paste a page:
1.
Go to the page you want to cut.
2.
Choose Select Page from the Edit menu, or click the page selection indicator on the status
bar.
3.
From the Edit menu, choose Cut.
ToolBook removes the page.
4.
In the current book or in another book, go to the page after which you want to paste the page
you cut.
5.
From the Edit menu, choose Paste.
ToolBook inserts the page after the current page and renumbers the pages in the book.
Note When you reorder the pages in your book using a cut-and-paste operation, ToolBook gives
the page you are moving a new ID number. When you reorder the pages in your book using
either the Properties for Page dialog box or the Book Explorer, the ID numbers do not
change.
Removing Pages and Backgrounds
You can remove a page and its background from a book. However, a background that is shared by
more than one page in the book remains in the book as long as one page that uses that
background remains in the book. To remove a background completely from a book, you must
remove every page that shares that background. When you remove the last page that uses a
background, ToolBook removes the background as well.
► To remove a page and background from a book:
Using the interface
1. Go to the page you want to remove.
2.
Choose Select Page from the Edit menu, or click the page selection indicator on the status
bar.
3.
Do one of the following:
From the Edit menu, choose Cut.
From the Edit menu, choose Delete Page.
Press DELETE.
The Cut command removes the page from the book and puts it on the Clipboard; the
Delete Page command and the DELETE key remove the page entirely.
Using OpenScript
x
Use the select command and the cut or clear message to remove a page from a book:
select this page
send clear
Copyright © 2012 SumTotal Systems, Inc. All rights reserved. Duplication prohibited.
57
Creating Books and Pages
Working with Backgrounds
Using backgrounds to group like pages together can save you time and reduce the size of your file.
You can specify the color, pattern, or backdrop of a background by setting the background's
properties. If you decide to make a change, simply modify the background and the change appears
on all the pages that share the background.
Applying Color and a Pattern to a Background
The background provides a common design for all pages that share that background. You can
create a consistent look and interesting visual effects by adding color and a pattern to your
background.
► To apply a color and pattern to a background:
Using the interface
1. From the Object menu, choose Properties for Background, and then click the Draw tab.
2.
To apply a color, under Colors, choose Use custom colors. Click the Fill color button to choose
a fill color from the pop-up palette or click Other to open the Color dialog box, where you
can specify a custom color.
3.
To apply a pattern, under Pattern, choose a pattern style from the pop-up palette or click
Other to open the Choose Pattern dialog box. Choose a stroke color to use in the pattern.
4.
Optional. Close the Properties for Background dialog box.
Using OpenScript
You can set properties for a background by specifying the background's name or ID number, or you
can set properties for the current background by using this background. To set colors, set the
fillColor and strokeColor or the rgbFill and rgbStroke properties. To set the pattern, set the
pattern property:
fillColor of this background = green
pattern of background "Intro" = 25
Adding and Removing Backdrops
You can use a backdrop to make your backgrounds more interesting. A backdrop is a bitmap that
appears on a background. You can specify how the bitmap will appear by choosing a style—such as
tiled, stretched, or centered—for the backdrop.
Bitmaps used as backdrops are automatically added to your book as resources. If you delete a
backdrop from a page, the resource used by the backdrop might remain in the book. See Chapter
19, "Using Resources," for more information about resources.
To change a backdrop:
x
Open the Properties for Background dialog box. You can add and remove backdrops on the
Draw tab of the Properties for Background dialog box. To add a backdrop, click Choose
Backdrop, select or import the bitmap you want to use, and specify the style. To remove a
backdrop, click Clear Backdrop. You can create transparent areas in a bitmap by selecting the
Use chromakey option and specifying a color value.
58
Copyright © 2012 SumTotal Systems, Inc. All rights reserved. Duplication prohibited.
Setting the Page Size
Setting the Page Size
You can specify the size of both the book and the background using either the Properties dialog
box or OpenScript. A background's page size takes precedence over the book's page size. The Page
tab in the Properties for Book dialog box displays the default page size setting; when you change
the book size, the change is reflected in any background's page size that hasn't been explicitly set
and in all new backgrounds that you create.
Note When you Publish your book to DHTML format, the ToolBook will size the browser window
according to the size of the largest background.
You can change a book's page size and orientation at any time, even after you add objects to the
pages. However, ToolBook does not rearrange objects to fit the new page size or orientation. To
fit the objects into a smaller page size or different orientation, move them to their new locations
before you reduce or reorient the page. If necessary, you can return to the original page size to
see the objects in their original positions.
► To set a page size:
1.
From the Object menu, do one of the following:
To set a default page size for the entire book, choose Properties for Book.
The Properties for Book dialog box appears.
To set a custom page size for a background, choose Properties for Background.
The Properties for Background dialog box appears.
2.
Click the Page tab, and then enter the size you want in pixels.
3.
Optional. Close the Properties dialog box.
Using OpenScript
The book's size property sets a default page size for the book. The background's size property can
be set for individual backgrounds. This size affects only the pages that share that background.
x
To set a default page size for the book or a background, set the size property. Page size is
specified in ToolBook page units (1/1440 of an inch):
size of this book = 10000,15000
size of this background = 10000,15000
x
To view the page size of the book or the background, use one of the following commands:
put size of this book
put size of this background
request size of this book
ToolBook displays two numbers, representing the width and height of the page in page units.
Scaling the Window Size to the Page Size
The page size does not control the size of the window. A window can be scaled larger than a page
ToolBook displays a mat beyond the page's edge) or smaller than a page ToolBook displays scroll
bars). To scale the window to match the page size, use the Size to Page command on the View
menu, or send the OpenScript sizeToPage message. ToolBook expands or contracts the window
to fit the current page or to the maximum window size, whichever is smaller.
Copyright © 2012 SumTotal Systems, Inc. All rights reserved. Duplication prohibited.
59
Creating Books and Pages
Setting Properties for Books
You can set properties for a book just as you can set properties for all objects in ToolBook. For
example, the book's title, description, and passwords are all book properties. To set a book's
properties, from the Object menu, choose Properties for Book. In the Properties for Book dialog
box, make your selections.
Protecting Books with Passwords
To protect and control access to a book, you can assign separate passwords to allow access for
opening, modifying, and saving the book. You can also assign the same password to all of these
activities in one operation.
Important – Be sure to write down your password. If you forget your password, you will not be
able to perform password-protected activities.
► To define a password:
1.
From the Object menu, choose Properties for Book.
2.
On the General tab, click Set Passwords.
The Passwords dialog box appears.
3.
Click one of the following buttons to open the Set Passwords dialog box:
Author: Specifies the password required for switching to Author level.
Open: Specifies the password required for opening the book.
Save: Specifies the password required for saving the book.
Set All: Specifies the password required for switching to Author level, opening a book,
and saving a book.
4.
In the Set Passwords dialog box, in the Password box, type the password required for the
particular user activity, based on the button you clicked in step 3.
5.
Retype the password in the Confirm password box, and then click OK.
6.
In the Passwords dialog box, click OK.
7.
Optional. Close the Properties for Book dialog box.
Note – You can remove a password by clicking Clear Password or by deleting a password in the Set
Passwords dialog box.
You can use the passwordTypes OpenScript function to return a list of the types of passwords that
are active in the specified book. The passwordTypes function takes a <bookPath> parameter. This
parameter must be a valid book path. For example:
CurrentPasswords = passwordTypes("c:\instruct\WebBook.tbk")
CurrentPasswords = passwordTypes(name of this book)
Navigating Through a Book
There are many ways to allow for navigation through a book. You can use ToolBook navigation
objects from the Catalog, you can assign navigation actions to objects using the Actions Editor, or
you can rely on the built-in navigation tools at both Reader level and Author level. You can specify
that certain pages be skipped from navigating, specify conditions for skipping to a particular page
or Uniform Resource Locator (URL), and set a transition effect for moving from one page to
another.
60
Copyright © 2012 SumTotal Systems, Inc. All rights reserved. Duplication prohibited.
Navigating Through a Book
Using Built-in Navigation
You can move from page to page using the menus, or buttons in the status bar, or the keyboard.
The table on the next page shows the ways to go to different pages.
Moving from page to page
To move to this
page...
From the Go menu,
choose...
At Author level, click on
the status bar...
Or press these
keys...
Next
Next Page
ALT+RIGHT ARROW
Previous
Previous Page
ALT+LEFT ARROW
First
First Page
ALT+UP ARROW
Last
Last Page
ALT+DOWN ARROW
Note You can also navigate by entering a page name, number, or id number in the Go To dialog
box, available from the Edit menu.
Using Navigation Objects
The Catalog contains navigation objects that you can use to help the user navigate through your
application. These navigation objects feature graphics and hyperlinks that will jump to the next,
previous, first, or last page in your application. The simplest use of these objects is to place
one on the background of a book. The navigation object will appear on each page that shares that
background. You can also create your own navigation buttons using the tool palette and set
hyperlinks to move to another page.
Skipping Pages when Navigating
If your book contains pages that you do not want the user to see, you can prevent navigation to
those pages at Reader level using the Properties for Page dialog box or OpenScript. This feature is
especially useful if you're displaying pages of a book in a popup and want to limit the user's access
through the book.
► To prevent navigation to a page at Reader level:
Using the interface
1. Go to the page to which you do not want the user to navigate.
2.
From the Object menu, choose Properties for Page.
3.
On the Behavior tab, select Skip this page when navigating.
4.
Optional. Close the Properties for Page dialog box.
Using OpenScript
x
Set the skipNavigation property for the page to true:
skipNavigation of page ID 25 = true
Copyright © 2012 SumTotal Systems, Inc. All rights reserved. Duplication prohibited.
61
Creating Books and Pages
Setting Up Transition Effects between Pages
You can set up transition effects when the user moves between pages. For example, you can
create the effect that one page is sliding off to the left while another page slides in from the
right. Transition effects are specified in the Hyperlink dialog box.
► To specify a transition effect:
1.
Select the object or word that contains the hyperlink to another page (for example, the Next
button in a navigation panel).
2.
From the Object menu, choose Hyperlink.
3.
In the Type of link list, select Go to another page.
4.
Under Style, select a transition effect from the Transition effect list. Click Test to see a
sample of the selected effect (optional).
5.
Click OK.
Adding Navigation Behavior to an Object
Using the Actions Editor, you can program any ToolBook object to send a user to another page,
book, or URL, or to exit from a lesson. One of the benefits of using an action sequence to navigate
is that you can specify a destination based on a specific condition or set of conditions. You can use
the Actions Editor to define action properties, such as destination page and transition effects, and
then add the action to an object's action sequence. For more information about programming in
the Actions Editor, see Chapter 17, "Using the Actions Editor," and Chapter 18, "Creating Action
Sequences: Practical Examples."
► To add a navigation action to an object's action sequence:
1.
Select the object.
2.
From the Object menu, choose Actions.
The Actions Editor appears.
3.
In the Event list, select the event that activates the action sequence.
4.
From the Insert menu, point to Action, point to Navigation, and then do one of the following:
To specify navigation to any page in the current book or in another ToolBook book, or to
open a page in a pop-up viewer, choose Go to Page.
To specify exit from the lesson, choose Exit Lesson.
To display a document created in another application or to specify navigation to a
particular URL, choose Display Document.
5.
In the Properties for Action dialog box, select a destination, and then set any other action
properties.
6.
Click OK.
7.
In the Actions Editor, from the File menu, choose Update Actions & Close.
62
Copyright © 2012 SumTotal Systems, Inc. All rights reserved. Duplication prohibited.
Enhancing a Book's Performance
Enhancing a Book's Performance
Careful page and background design can greatly enhance the performance of your book. When
planning your book, use these guidelines:
x
Limit the number of objects and graphics in a book.
x
Make a book's page size as small as possible.
x
Use the same background for similar pages and limit the number of different backgrounds.
x
Put objects that appear on every page, on the background.
Testing is an essential step in building a book. Test each part of your book as you complete it.
Switch to Reader level to see how the pages will look to the user and try out buttons and
hotwords to make sure they work. After the book is complete, test it as a whole. Go through it
yourself to see whether the overall design and organization work. Then get someone else to try
it—a fresh perspective can be invaluable.
Copyright © 2012 SumTotal Systems, Inc. All rights reserved. Duplication prohibited.
63
Chapter 5
Working with the Catalog
Introduction
The Catalog contains a rich collection of objects—from simple navigation buttons to sophisticated
objects such as the Universal Media Player and interactive questions. You can use the Catalog to
find objects to use in your applications. Additionally, you can create your own objects and store
them in the Catalog to use in other applications you create. This chapter describes how to use the
ToolBook Catalog.
Copyright © 2012 SumTotal Systems, Inc. All rights reserved. Duplication prohibited.
65
Working with the Catalog
About the Catalog
The Catalog contains a collection of objects that you can use to construct and enhance interactive
applications. Authoring is fast and easy using the objects in the Catalog because you can simply
drag the object you want directly to your page. If you like, you can use the Catalog as your
primary authoring resource since it includes virtually everything you need, from simple draw
objects to sophisticated interactive objects. More likely, you'll use the Catalog as a resource for
preprogrammed objects such as questions objects, navigation panels, media players, and so on.
The Catalog window contains buttons that display the names of categories of objects. You click a
category button to view the objects available in that category.
Figure 1: The ToolBook Catalog
66
Copyright © 2012 SumTotal Systems, Inc. All rights reserved. Duplication prohibited.
Authoring with the Catalog
► To display the Catalog:
x
Click the Catalog button on the ToolBook toolbar (Optionally press F2)
As with other windows, you can close, move, and resize the Catalog window.
Authoring with the Catalog
The Catalog is designed for ease of use. The intuitive browsing environment and drag-and-drop
capabilities make it easy to build the pages of your book. You can add objects to the Catalog or
remove them. The next few sections describe how to work with the Catalog.
Browsing Through the Catalog
Take a moment to browse through the objects in the Catalog. When you select a category, small
images of objects appear in the object pane below the category button you selected in the
Catalog. You can display a description of any Catalog object: point to an object, right-click, and
select Properties for Icon from the right-click menu. The Edit Object window is displayed, which
contains a description of the object.
Using Drag-and-Drop Authoring
To author using the Catalog, simply drag the object you want from the Catalog to a page or
background. This drag-and-drop operation copies the object into your application.
Some Catalog objects can be dropped on objects other than a page or background.
Drop behavior for Catalog objects
Dropping this…
On this…
Does this…
Question object
Page or background
Creates a question object at the pointer
position. The question's Extended Properties
dialog box opens (optionally).
Object with
extended properties
Page or background
Creates an object at the pointer position. The
object's Extended Properties dialog box
opens (optionally).
When an object in the Catalog has extended properties, ToolBook automatically opens its
Extended Properties dialog box after you drag the object to a page or background. You might find
this feature convenient when you are first learning to use ToolBook. To disable this feature,
choose Options from the View menu; then, on the Interface tab in the ToolBook Options dialog
box, clear the Show extended properties dialog box after adding object to book checkbox, and
then click OK.
Finding the Right Object
You can identify an object you want in the Catalog by reading a pop-up description. Point at any
object in the Catalog window and a description of the object appears in a pop-up yellow box. You
can also search on keywords to locate specific objects.
► To search for an object in the Catalog:
1.
Point at one of the category captions within the Catalog window and right-click.
2.
From the right-click menu, choose Find Object.
The Find Object dialog box appears.
3.
Type a keyword in the edit box.
Copyright © 2012 SumTotal Systems, Inc. All rights reserved. Duplication prohibited.
67
Working with the Catalog
4.
Click OK.
ToolBook searches the Catalog for an item with the keyword you entered and displays the
result.
Viewing Objects
You might want to preview an object to view it at full size.
► To view an object at full size:
1.
In the Catalog, select the small thumbnail image of the object you want to view.
2.
Right-click the object. From the right-click menu, select Preview Object.
ToolBook shows you a full-size view of the object in a pop-up window.
3.
Click anywhere on the screen to close the pop-up window.
Exploring Types of Catalog Objects
The following sections give you a general overview of the objects available in the Catalog. By
browsing through these sections, you can get an idea of the purpose of different types of objects.
For more information about using individual objects in the Catalog, add the object to a page and
read the contents of the ToolBook Coach. Open the Coach from the Help menu.
Action Triggers
Action trigger buttons can start and reset objects on the page. With trigger and reset buttons, you
can hide and show objects, play an animation, and create dynamic effects. You can trigger an
action interactively by setting the effect to occur when the user clicks the action trigger at
Reader level. Alternatively, you can trigger an action automatically by setting the effect to occur
when the user enters the page. Among the action buttons you'll find are:
x
Action Trigger – A button that can show, hide, animate, and trigger another object.
x
Reset Trigger – A button that can reset another object.
x
Delay – A button that delays the next action for a specified amount of time.
Scoring and Tracking
Evaluation buttons perform common tasks in courseware applications, such as submitting a lesson
score to a learning management system, restarting a lesson, checking the learner's response, or
resetting a page.
You use these objects for specific purposes on a page in a lesson. Examples of scoring buttons
include:
x
Score Page – A button that displays the score for all of the question objects on the page.
x
Reset Page – A button that resets the questions on the current page and clears any score that
the student has accumulated for the page. Session information is preserved and a log entry is
made indicating that the page was reset.
x
Score Quiz – A button that displays the final score for a quiz or lesson.
x
Score Field – A text field that you can use in conjunction with a question object and a score
button to display a score.
x
Feedback Field – A text field that you can use in conjunction with a question object and
(optionally) a score button to display feedback.
68
Copyright © 2012 SumTotal Systems, Inc. All rights reserved. Duplication prohibited.
Exploring Types of Catalog Objects
Placeholders
The placeholders included with ToolBook are objects that you can use to display images, embed
HTML code, and integrate other Web technologies. You apply settings to each object using that
object's Extended Properties dialog box. In books that will be Published to DHTML, the
placeholders include:
x
File Placeholder – A placeholder in which you can place any object that can be inserted into
a Web page using an HTML embed tag. If your users' machines are capable of running the file
(that is, they have the appropriate plug-in or helper application installed), the file will run.
x
Java Placeholder – A placeholder that includes a Java applet in an application that will be
Published for the Web.
x
Animated GIF Placeholder – A placeholder that allows users to view GIF (Graphics
Interchange Format) animations that you specify.
x
PowerPoint Placeholder – A placeholder that allow users to view a PowerPoint ® presentation,
in a Web browser.
Media Players
Media players are objects that you add to your application to enable users to play sound, video, or
animation files, including content created by Adobe Captivate. The Universal Media Player is the
primary object for adding media files to a ToolBook application: It supports most standard media
types, is programmable using the Actions Editor, and retains all functionality when Published to
DHTML. The Catalog also includes several other media objects with more specific functionality.
Among the objects you'll find are:
x
Correct and Incorrect Feedback Objects – Pop-up Flash Players configured to display a Flash
file for correct or incorrect feedback.
x
Flash Media Player – A player that can play Flash streaming media files with the SWF file
extension.
x
Video Player (available in Native mode only) – A simple stage or a stage with controls that
plays visual media.
Navigation
Navigation objects are buttons and fields that enable students to move through your application
and that can also display the current location. Some examples include:
x
Automatic Menu – An object that automatically creates a menu that includes hotwords that
jump to each named page in your book.
x
Navigation Panel – A grouped object consisting of buttons for general navigation.
x
Hotspot Graphic – An object that produces an image with areas that can be clicked. You can
define hyperlinks for the hotspots in the graphic, which will cause navigation to a different
page in a Web browser.
Copyright © 2012 SumTotal Systems, Inc. All rights reserved. Duplication prohibited.
69
Working with the Catalog
Questions
Question objects allow you to create questions that test your users on their understanding of your
content. You can customize question objects in many ways. These objects have built-in behavior
that provides feedback to your users, supplies you with information on how your users interacted
with the question, and interacts with a learning management system to track the behavior of
groups of learners. Among the question objects provided with ToolBook are the following:
x
Match-items object – A button set that allows the user to drag an arrow to define pairs of
matching items.
x
Multiple-choice object – A button set that allows the user to select the correct answer by
clicking one of several available choices.
x
Fill-in-the-blank object – A field that allows the user to enter text for an answer and then
evaluates whether the text is correct.
Quiz Summary
The Quiz Summary category contains one Quiz Summary object and a variety of individual text
components you can add to your summary object. Among the Quiz Summary objects provided with
ToolBook are the following:
x
Quiz Summary - The Quiz Summary object allows you to display a summary of the questions
answered. You will find various Field components within the Quiz Summary catalog category
which can be added to your Quiz Summary object in order to include additional data about
your questions.
The following objects from the Quiz Summary category can be added as a component of a
Quiz Summary object:
Question Name Field - A field object that will display the name assigned to the question
object.
Question Text Field - A field object that will display the text designated as the
Question Text for the question.
Result Field - A field object that will reveal whether the question was answered
correctly or not.
Student Answer Field - A field object that will display the user's answer to the question.
Review Field - A field object that will provide a link that the end-user can click on to
navigate directly to the page containing the question object.
Other Available Objects
The objects mentioned in the preceding sections are just a few of the multitude of objects that
are available in the Catalog. Perhaps the best way to learn what is available in the Catalog is to
explore them as you work. Soon you will become an expert at locating the objects you need when
you need them.
70
Copyright © 2012 SumTotal Systems, Inc. All rights reserved. Duplication prohibited.
Customizing the Catalog
Customizing the Catalog
You can change many aspects of the Catalog to fit your personal preferences. For example, you
can modify the display of the categories in the Catalog so that you see only the categories that
you plan to use in your current book. In addition, you can add new categories to the Catalog and
reorder the existing categories. You can add your own customized objects to the Catalog and
import customized Catalog objects created by other ToolBook authors.
► To access the Customize Catalog options:
1.
Switch to Author level if needed, using the View menu.
2.
Ensure the Catalog is Open.
3.
Choose Customize Catalog from the View menu.
Modifying the Categories in the Catalog
You can change the contents of any category that you see in the Catalog, and modify the
properties for the Catalog object icon images displayed in the Catalog window. In the Customize
Catalog dialog box, you can edit the existing categories and add new categories to the Catalog.
Figure 2: The Customize Catalog dialog box
Tip
In the Customize Catalog dialog box, you can clear the check box next to a category to hide
the selected category from view. This does not permanently delete the category from the
Catalog.
Adding and Removing Catalog Objects
You can add your own objects to the Catalog. For example, if you have customized the behavior
of an object using the Actions Editor visual programming tool, you may want to store that object
in the Catalog to use again. You can add your own customized object to the My Objects category
in the Catalog, or to any of the existing Catalog categories. You can also create a new category
for the Catalog. When you add an object to the Catalog, you can assign it a name and search
keywords. If you want to enter multiple search keywords, use commas to separate them.
Copyright © 2012 SumTotal Systems, Inc. All rights reserved. Duplication prohibited.
71
Working with the Catalog
► To add an object to the Catalog:
1.
In the main window, select the object you want to add to the Catalog.
2.
Open the Catalog if it is not already open.
3.
Right-click on a category in the Catalog window.
4.
From the right-click menu, choose Add Selected Object.
5.
The Add Selected Object dialog box opens.
6.
Type a name for the object, a description if desired, and any search keywords. Select or
create a category, and then click OK.
► To remove an object from the Catalog:
1.
Choose Customize Catalog from the view menu.
2.
Click the name of a category to select it in the Customize Catalog dialog box.
3.
Click the Edit button.
4.
In the list of objects, select the name of the object you want to remove.
5.
Click the Remove button.
6.
When prompted, choose Yes to remove the icon.
7.
Click OK to close each dialog box.
ToolBook removes the Catalog object from the Catalog.
72
Copyright © 2012 SumTotal Systems, Inc. All rights reserved. Duplication prohibited.
Chapter 6
Working with Objects
Introduction
Buttons, graphics, and questions are all examples of ToolBook objects. This chapter introduces
you to the concepts, skills, and tools you need to add and modify objects in ToolBook.
About Objects
All the visual elements of your application—buttons, fields, graphics, viewers, and even the pages
and backgrounds—are objects. You build your application by creating objects, specifying their
properties, and defining how they will work together. ToolBook offers a variety of objects with
built-in functions for quick and easy authoring. But you aren't limited to these preprogrammed
features: You can position, group, or change the properties of any object to affect its appearance
and behavior.
When an object is created or otherwise added to a book, ToolBook gives the object a unique ID
number that you can use to distinguish it from other objects. You can give a name to an object,
but you cannot change its ID number.
Note It is a good idea to assign each object in your book a unique name. In the Actions Editor,
unnamed objects will not appear in lists of available objects. A few types of Catalog objects
allow you to select from the named objects on a page.
Copyright © 2012 SumTotal Systems, Inc. All rights reserved. Duplication prohibited.
73
Working with Objects
Using the Book Explorer
The interactive Book Explorer is a browser that provides a convenient way to work with objects
and their properties. All of the pages and objects in a book are displayed in outline format in the
Book Explorer window. In this browser, you can:
x
See a small preview image of a page when you point to its name
x
Navigate to the page or background you select
x
Reorder pages using drag and drop
x
Select an object to make it selected in the main window
x
Move an object to a different layer on the page using drag and drop
x
Display the shortcut menu for an object with a right-click
x
Move an object into a group using drag and drop
Figure 1: The Book Explorer
You can select one or more objects in the Book Explorer. Use CTRL+click or SHIFT+click to select
more than one object.
► To open the Book Explorer:
x
From the View menu choose Book Explorer.
Adding Objects from the Catalog
You can quickly add objects to a page or background. At Author level, you simply drag the object
you want from the Catalog to your page. This creates a new instance (or copy) of the object on
your page.
► To create an object on a page or background:
1.
74
Navigate to the page or background to which you want to add an object.
Copyright © 2012 SumTotal Systems, Inc. All rights reserved. Duplication prohibited.
Creating Objects Using the Tool Palette
2.
If the Catalog is not already open, click the Catalog button on the ToolBook toolbar.
3.
Select a category.
4.
Drag the object you want from the object pane, and then drop it onto your page or
background.
ToolBook draws an instance (copy) of the object on the page or background.
Tip
You can double-click an object in the Catalog to add it to your page.
After you add objects to a page or background, you can customize them for your application.
Objects have built-in properties that define how they appear and behave. For example, you can
set properties such as fill color, animation, and hyperlinks. Information about setting properties is
available in Chapter 7, "Setting Object Properties."
Creating Objects Using the Tool Palette
In addition to adding objects to your book by dragging them from the Catalog, you can draw
objects using tools from the tool palette. While Catalog objects have a predefined appearance
and certain predefined behaviors, objects created using the tool palette have limited
preprogrammed properties. You can use the Actions Editor visual programming tool to easily link
an action or series of actions to any object you create using the tool palette. Alternatively, you
can use the OpenScript programming language to define an object's properties and behavior
further.
When you draw an object, its general shape and type are determined by the tool you choose from
the tool palette, and its final size and proportions are determined by how far and in which
direction you drag the pointer. When you select an object or use a tool, the pointer shows the
type of object selected.
The tool palette is available only at Author level and appears by default on the left side of the
main window. However, you can reshape the tool palette and move it to a new location to suit
your work style.
Figure 2: ToolBook tool palette
Copyright © 2012 SumTotal Systems, Inc. All rights reserved. Duplication prohibited.
75
Working with Objects
► To draw an object:
1.
Choose a tool from the tool palette by clicking the tool's button.
2.
Point where you want to start the new object.
3.
Hold down the left mouse button while you drag, and then release when the object is the size
you want.
Tip
To automatically select the object you've just drawn, press the SPACEBAR. ToolBook selects
the object and displays the select tool.
You use a slightly different method to draw polygons, angled lines, irregular polygons, and curves.
► To draw regular polygons:
1.
from the tool palette and from the View menu, point to
Choose the polygon tool
Palettes, and then choose Polygon.
2.
From the polygon palette, choose one of the polygon shapes, or type a number in the box to
specify the number of sides for the polygon.
3.
Hold down the left mouse button where you want the center of the polygon, and then drag
from the center and release when the shape is the size you want.
► To draw angled lines and irregular polygons:
1.
Choose the angled line
2.
Point where you want the shape to start, and then click.
3.
Continue to point and click to add as many angles as you want.
or irregular polygon
tool from the tool palette.
Press CTRL if you want to constrain the line to 45-degree angles.
4.
To end the shape, double-click or press ESC.
If you used the irregular polygon tool, ToolBook draws a closed shape filled with the currently
selected pattern from the pattern palette.
Note You can use the angled line tool to draw an object that looks like an enclosed object.
However, avoid having users click these objects, because they require clicking precisely on
the line. If you want an irregularly shaped enclosed object, create the shape with the
irregular polygon tool.
► To draw curves:
from the tool palette.
1.
Choose the curve tool
2.
Point where you want the curve to start, and then click.
3.
Point where you want the curve to begin curving, and then click.
4.
Continue to point and click to add as many curves as you want.
5.
To end the curve, double-click or press ESC.
After you draw a curve, you can adjust it precisely by choosing the Reshape Curve command from
the Draw menu. For details, see "Changing the size and shape of objects," later in this chapter.
76
Copyright © 2012 SumTotal Systems, Inc. All rights reserved. Duplication prohibited.
Selecting Objects
Selecting Objects
Before you can change an object or define its properties, you must first select the object. When
you select an object, ToolBook displays handles around the object. You use the handles to align
and size objects.
If you select multiple objects, your next command or mouse action affects all of the selected
objects. For example, you can drag them, change their properties, and cut or copy them as if you
had selected a single object.
Selecting objects
To...
Do this...
Select a single object
Click the object.
Select multiple objects
SHIFT+click each object you want to select, or drag the
pointer to select the objects you want.
Select all the objects
Go to a page or background and choose on the page or Select
All from the Edit menu, or press the background CTRL+A.
Cancel a selection
Click anywhere on the page away from the object.
Add or remove objects
SHIFT+click the object you want to add from a selection or
remove.
Copyright © 2012 SumTotal Systems, Inc. All rights reserved. Duplication prohibited.
77
Working with Objects
Creating Hyperlinks
Hyperlinks allow the users of your application to move from one page to another. A user can
display a page out of sequence or even display a page in a different application. All objects you
can put on a page have built-in hyperlink capabilities that let you connect ideas, information, or
topics.
Figure 3: The Hyperlink dialog box
78
Copyright © 2012 SumTotal Systems, Inc. All rights reserved. Duplication prohibited.
Creating Hyperlinks
Choosing a Type of Link
You have several options when choosing the type of link you want. You can define a hyperlink that
navigates to another page or one that pops up a page. For example, you can add a button to a
page that, when clicked, takes the user to another page or opens a pop-up window. When you
create a hyperlink to another page, you can also specify a transition effect.
A hyperlink that pops up a page is useful when presenting technical content to both novice and
expert users. For example, you can create hotwords for the technical terms in your content that,
when clicked, open a pop-up window containing the definition of a term. When you create a
hyperlink that pops up a page, you can specify the style of the pop-up window.
In addition, the destination of a hyperlink can be either a page in a book or a URL on the Internet.
When creating a hyperlink to a URL on the Internet, you can define objects that launch a Web
browser and jump to a Web site, as described in the table on the following page.
Hyperlinking to a URL
Choose this option...
If you want to define a hyperlink that...
Go to another page
Jumps to the specified URL in the current window of the Web
browser. If the Web browser is not open at the time of the
jump, ToolBook will open it before jumping to the specified
URL.
Pop up another page
Opens a new instance of the Web browser before jumping to
the specified URL.
► To create a hyperlink:
1.
Select the object that you want to hyperlink.
2.
From the Object menu, choose Hyperlink.
The Hyperlink dialog box appears.
3.
In the Type of link list, select the kind of link you want to use.
4.
Under Link to, select the type of link you want.
To link to another page, select the page option you want.
To link to a URL, enter a URL in the URL box.
5.
Optional. Specify a transition effect for the hyperlink. Transition effects are available only
when you choose Go to another page as the type of link you want to use.
6.
Optional. Under Pop up style, select a window style in the list. Pop up style is available only
when you choose Pop up another page as the type of link you want to use.
7.
Click OK.
For more information about hyperlinks, refer to Help.
Copyright © 2012 SumTotal Systems, Inc. All rights reserved. Duplication prohibited.
79
Working with Objects
Cutting, Copying, Pasting and Deleting Objects
You can share an object among pages by cutting, copying, pasting, and duplicating it. Cutting
removes an object from a page and places it on the Clipboard so that you can paste it either in
the current book or in another book. When you copy an object, ToolBook places a copy on the
Clipboard, so you can then paste it. When you duplicate an object, you create an exact copy of
the object on the same page, bypassing the Clipboard.
Most objects can be duplicated. For example, you can duplicate an entire text field or record
field. The exception is text: You cannot duplicate selected text within a text or record field. You
can cut or copy and paste objects, as described in the following table.
Objects that can be cut, copied, and pasted
This object...
Can be pasted...
Object
On a page or background
Page with background
After the current page
Page without background
After the current page
Text
In a text field or record field
Text in Rich Text Format
In a text field or record field
► To cut or copy an object:
1.
Select the object you want to cut or copy.
2.
From the Edit menu, choose Cut or Copy.
To remove the object from its current position, choose Cut.
To keep the object in its original position and place a copy elsewhere, choose Copy.
ToolBook places the cut or copied object on the Clipboard.
Tip
With an object selected, you can also use the standard Windows shortcut keys CTRL+X,
CTRL+C, and CTRL+V to cut, copy, and paste.
After you cut or copy an object, you can paste it on the same page or anywhere else in the
current book or in another book.
► To paste an object:
1.
Go to the location where you want to paste the object.
2.
From the Edit menu, choose Paste.
ToolBook pastes the object on the current page in the same position the object held on the
original page. If you choose the Paste command again, a second object is pasted on top of the
first. To reveal the first object, select the top object and drag it to a new position.
► To duplicate an object:
1.
Select the object you want to duplicate.
2.
From the Edit menu, choose Duplicate.
ToolBook creates a duplicate and places it slightly below and to the right of the original
object.
80
Copyright © 2012 SumTotal Systems, Inc. All rights reserved. Duplication prohibited.
Moving Objects
You can remove an object from any page by deleting it.
► To delete an object:
1.
Select the object you want to delete.
2.
From the Edit menu, choose Delete, or press the DELETE key.
ToolBook removes the selected object.
If you delete an object accidentally, immediately choose Undo from the Edit menu to restore it;
otherwise, the object will be lost.
Moving Objects
You can move an object to another location on a page by dragging it to a new location or by
"nudging" it pixel by pixel.
► To move an object to another location on a page:
x
Tip
Do one or a combination of the following:
Drag the object to its new location.
Nudge the object by clicking it and using the arrow keys to move the object one pixel at
a time in the desired direction. Press SHIFT as you're using the arrow keys to move the
object faster.
When dragging an object, press the CTRL key if you want to restrict the object to horizontal
or vertical movement.
Spreading and Centering Objects
You can use the Spread and Center commands on the Draw menu to automatically spread or
center a selection of objects on a page or background. The Spread command distributes a set of
selected objects along a horizontal or vertical axis on the page. The Center command centers a
set of selected objects between the left and right sides of a page, top and bottom of a page, or
both.
► To spread a selection of objects:
1.
Select the objects you want to distribute.
2.
From the Draw menu, point to Spread, and then choose an option from the submenu.
► To center a selection of objects:
1.
Select the objects you want to center.
2.
From the Draw menu, point to Center, and then choose an option from the submenu.
Copyright © 2012 SumTotal Systems, Inc. All rights reserved. Duplication prohibited.
81
Working with Objects
Flipping and Rotating Objects
You can transform ToolBook draw objects by flipping or rotating them. Flipping transposes an
object on an axis. Rotating moves an object around a center point. You can combine flipping and
rotating to move an object to the position you want.
Note You cannot flip or rotate some objects, such as imported graphics, button captions, and
text in a text field.
► To flip or rotate an object:
1.
Select the object or objects you want to transform.
2.
From the Draw menu, choose one of the following commands:
Flip Horizontal Flips the selected object horizontally within its bounding box (the
rectangular area that indicates the object's dimensions), switching the location of the
object's left and right sides.
Flip Vertical Flips the selected object vertically within its bounding box, switching the
location of the object's top and bottom.
Rotate Left Rotates the selected object 90 degrees to the left (counterclockwise).
Rotate Right Rotates the selected object 90 degrees to the right (clockwise).
Aligning Objects
You can use the following methods to precisely position objects on a page:
x
Arrange objects using the grid as a reference
x
Snap objects to the nearest grid point for precise placement
x
Measure and align objects with the rulers
x
Align objects with one another using the Align command
For information on using the grid and rulers, see Chapter 3, "Learning the ToolBook interface."
82
Copyright © 2012 SumTotal Systems, Inc. All rights reserved. Duplication prohibited.
Changing the Size and Shape of Objects
Using the Align Command
When you create diagrams and other complex objects, it may be important to align the objects.
For example, you might need to align rows of fields along their top edges, or to center columns of
fields. Use the Align command on the Draw menu to align several selected objects in precise
relation to each other.
When you select multiple objects, ToolBook uses one object as the reference against which it
aligns the others. For example, to move objects so that their left edges align with the left edge of
the leftmost object, from the Draw menu, point to Align, and then choose Left.
Figure 4: Aligning objects with each other
► To align objects with each other:
1.
SHIFT+click to select the objects you want to align.
2.
From the Draw menu, point to Align, and then choose an option from the submenu.
Note The Align command aligns objects by their bounding box, which can be seen when the
object is selected. The bounding box of a curve, arc, or pie wedge can extend past the
visual portion of the object; it may be easier to align these types of objects manually.
Changing the Size and Shape of Objects
You can change the size and shape of any object manually. You can also use the Size command on
the Draw menu to automatically size one object to another.
► To change the size of an object:
1.
Select the object you want to resize.
2.
Drag a handle until the object is the size you want.
Copyright © 2012 SumTotal Systems, Inc. All rights reserved. Duplication prohibited.
83
Working with Objects
x
To change an object's width and height at the same time, drag a corner handle.
x
To change an object's width, drag a side handle.
x
To change an object's height, drag a top or bottom handle.
x
To resize an object proportionally, press CTRL as you drag a corner handle.
If you drag the handle of one object when several objects are selected, only the object with the
handle you drag resizes; the other objects maintain their original sizes. To resize several objects
at once, you must group them. For details about grouping objects, see "Grouping objects," later in
this chapter.
To change the appearance of a polygon, curve, arc, angled line, or pie wedge, you can use the
Reshape command to display the object's reshape handles, which are handles that can be used to
alter the shape of these objects.
► To reshape an object:
1.
Select the object (angled line, curve, arc, polygon, or pie wedge) whose shape you want to
change, and then from the Draw menu, choose Reshape. Alternatively, double-click the
object.
The handles change to allow you to reshape the object.
2.
Drag the handles to change the shape of the object.
3.
For arcs and pie wedges, you can drag the handles only along the curvature of the shape. For
other objects, you can drag the handles in any direction.
4.
To remove the reshape handles and restore the sizing handles, click the object, or click
elsewhere on the page to cancel the selection.
For more precise control over the shape of some objects, you can add reshape handles that
enable you to add another vertex to a side of the object.
► To add reshape handles to an object:
1.
Select the object (angled line, curve, or regular or irregular polygon), and then choose
Reshape from the Draw menu. Alternatively, double-click the object.
2.
Press SHIFT, and then click an existing handle. A new handle appears that you can drag to add
another vertex to the object.
84
Copyright © 2012 SumTotal Systems, Inc. All rights reserved. Duplication prohibited.
Modifying the Appearance of Objects
► To delete a reshape handle:
x
Press CTRL+SHIFT while clicking a reshape handle.
If the object is a curve, the handles are removed in pairs. You cannot remove the last two handles
in an object. You cannot remove the last three handles of a polygon.
Constraining an Object's Shape
With ToolBook, you can proportionally constrain objects or constrain lines to certain angles. To
constrain an object's shape, press CTRL while dragging. The table below shows how objects are
constrained when you press CTRL.
Constraining objects
Press CTRL with this tool...
To constrain...
Rectangle to square, or rounded rectangle to rounded square
Ellipse to circle
Line angles to multiples of 45°
(0°, 45°, 90°, and so on)
Rotation to multiples of 45°
(0°, 45°, 90°, and so on)
Shape to quarter of a circle
Note You can also press CTRL before you move an object to restrict its movement to horizontal
and vertical directions, which is useful when you want to move objects that are precisely
aligned with one another.
Modifying the Appearance of Objects
You can modify the appearance of an object by changing its line style, fill color, and fill pattern.
You can also specify that an object or background take its color settings from a user's operatingsystem settings. This allows you to create applications with a color scheme that will appear as a
natural part of a user's Windows interface. You can also make an object transparent or opaque.
This section describes how to change the appearance of objects by setting properties. For
additional information about setting properties, see Chapter 7, "Setting object properties."
Applying Line Styles
You specify the style of a line—such as solid, dashed, or dotted—the width of a line, and the type
of line ends in the Properties dialog box. You can also change the line style of an object's
bounding box. A bounding box is the rectangular area around a graphic object, such as a bitmap or
paint object, that indicates its dimensions.
► To specify line style or width:
1.
Do one of the following:
To modify a line, select the line you want to modify.
Copyright © 2012 SumTotal Systems, Inc. All rights reserved. Duplication prohibited.
85
Working with Objects
To modify an object's bounding box, select a graphic object.
2.
Click the Properties button on the ToolBook toolbar.
3.
Click the Draw tab, and then choose the line style you want in the Line style list.
4.
Optional. Close the Properties dialog box.
► To specify line ends:
1.
Select the line you want to modify.
2.
Click the Properties button on the ToolBook toolbar.
3.
Click the Draw tab, select an end in the End1 list to appear as the line's starting point, and
then select an end in the End2 list to appear at the line's ending point.
4.
Select a value for the size of each line end (from 1 to 9).
5.
Optional. Close the Properties dialog box.
Applying Color to Objects
Fill color is the color of the inside of all draw objects. Stroke color is the color of the outline of
any draw object, text, or imported object. Enclosed objects, such as rectangles and ellipses, have
both a stroke (outline) and a fill (interior) color. You apply colors and patterns to an object in the
Properties dialog box.
► To apply color to an object:
1.
Select the object you want to color.
2.
Click the Properties button on the ToolBook toolbar, and then click the Draw tab.
3.
Under Colors, choose Use custom colors, and then do one of the following:
To assign a fill color to the object, click the Fill color button.
To assign a stroke color to the object, click the Stroke color button.
A pop-up window appears where you can choose from a palette of commonly used colors.
4.
Optional. To choose a color not shown in the color palette, click More Colors and select a
color.
Using Windows Colors
You can set the Use Windows Colors command on the Draw menu to specify whether an object or
the background uses Windows system colors. If you specify that an object use the Windows system
colors, the object's color will be determined by the user's system color settings.
Choosing this command does not change the fill and stroke colors that you have set for the object;
it just overrides those settings. If you clear the Use Windows Colors command, ToolBook will
revert to using the object's fill and stroke colors.
► To use the Windows system colors for an object:
1.
Select the object or display a page that shares the background that will use the Windows
colors.
2.
From the Draw menu, choose Use Windows Colors.
Tip
86
ToolBook can also draw a background using the dialog box color that is part of an operating
system's color scheme. To draw a background using a dialog box color, on the Draw tab of
the Properties for Background dialog box, choose Use standard Windows colors, and then
select Use dialog box color.
Copyright © 2012 SumTotal Systems, Inc. All rights reserved. Duplication prohibited.
Modifying the Appearance of Objects
Making Objects Transparent
You can create transparent objects or make existing objects transparent. When an object is
transparent, objects on layers below it show through.
A transparent object's stroke and fill colors are also transparent. For example, if the transparent
object is blue and an object on a lower layer is green, any overlapping areas will appear as a third
color that Windows blends. You can use transparent objects to overlay text on objects, such as
titles without a box around them.
► To make an object transparent:
1.
Select the object you want to make transparent.
2.
From the Draw menu, choose Transparent.
Tips In general, to make an object invisible, set its Fill and Stroke colors to white, and then
make it Transparent. The white portions become completely see-through.
However, if the object is a draw object (rectangle, ellipse, polygon, etc) the process is
slightly different. Using the above process will result in a semi-transparent milky white fill
color. The solution for draw objects is to set the Line Style to none, and set the Pattern to
none.
If you lose an invisible object on the screen, choose Select All from the Edit menu. ToolBook
displays handles for all objects on the page.
Filling an Object with a Pattern
When you draw enclosed shapes such as rectangles, polygons, and pie wedges, you can give them
a look of greater depth by filling them with a pattern. Use one of the 128 ToolBook patterns to fill
your objects with bricks, stripes, or other abstract shapes. ToolBook draws the pattern using the
current stroke color. You will achieve a subtle effect if the stroke color is close in hue to the fill
color. For greater contrast, choose a stroke color that is much darker or lighter than the fill color.
► To fill an object with a pattern:
1.
Select the object.
2.
Click the Properties button on the ToolBook toolbar.
3.
On the Draw tab, in the Pattern list, select a pattern.
4.
Optional. Close the Properties dialog box.
Note You cannot apply a pattern to fields, buttons, or video players.
Copyright © 2012 SumTotal Systems, Inc. All rights reserved. Duplication prohibited.
87
Working with Objects
Moving Objects Between Layers
When running an application at Reader level, a user sees a unified page in the main window.
However, each page can consist of many layers.
A layer is where ToolBook places an object in the relative order of all objects on either the page
or background. You do not see a layer; you see only the objects on a layer.
Figure 5: The layers of a page
When you create a new object, ToolBook adds a layer to the front of the current page or
background and then places the new object on that layer. The layer order affects the following
aspects of a page:
x
When objects overlap, the objects on higher layers appear to be placed on top of objects on
lower layers.
x
When tabbing between buttons and fields, the focus moves in order from the object on the
lowest layer to the object on the highest layer. For more information about the focus and
tabbing, see "Planning layer order for tabbing at Reader level," later in this chapter.
x
When ToolBook searches for text, it starts searching from the field or button with the focus
and then searches fields on higher layers before continuing to the next page. Any fields on
layers lower than the object with the focus will not be searched until after ToolBook searches
the rest of the book.
88
Copyright © 2012 SumTotal Systems, Inc. All rights reserved. Duplication prohibited.
Moving Objects Between Layers
Changing Layer Order
When you change an object's layer number, ToolBook assigns new layer numbers to all other
objects affected by the change. For example, on a five-layer page, moving the layer 3 object to
layer 4 puts the layer 4 object on layer 3. You can change an object's layer order by typing a
different layer number in the Properties dialog box for the object. The total number of layers for
the current page or background is shown beside the Layer box in an object's Properties dialog box.
You can also choose one of the four layer commands from the Draw menu to change an object's
layer number.
► To move an object to the next higher or lower layer:
1.
Select the object
2.
From the Draw menu, point to Layer, and then choose Bring Closer or Send Farther.
Bring Closer moves the object one layer up, or forward, in the layer order. Send Farther
moves the object one layer down, or back, in the layer order.
Figure 6: Changing layer order
► To move an object from its current layer to the back layer:
1.
Select the object.
2.
From the Draw menu, point to Layer, and then choose Send to Back.
► To bring an object from its current layer to the top layer:
1.
Select the Object
2.
From the Draw menu, point to Layer, and then choose Bring to Front.
► To specify an object's layer number:
1.
Select the object, and then click the Properties button on the ToolBook toolbar.
2.
Type a number in the Layer box.
3.
Optional. Close the Properties dialog box.
Copyright © 2012 SumTotal Systems, Inc. All rights reserved. Duplication prohibited.
89
Working with Objects
Planning Layer Order for Tabbing at Reader Level
A user can press the TAB key to move the focus between objects on a page. When an object has
the focus, it can receive input from the user. For example, when a button has the focus, its
caption is highlighted; when a text field has the focus, a cursor appears in the field.
The tab order—the order in which the focus moves when a user presses TAB—follows the layer
order of the objects, beginning with layers on the background and then moving to layers on the
page. If the layer order is the order in which you created those objects, the tab order could seem
random to the user. For example, the first field you create may be at the bottom of the page, the
second at the top, and the last in the middle; your user has to look all over the page for the
focus. To make your application easier to use, you can define a new tab order.
There are two ways to determine the order in which readers will tab through objects on a page:
by setting tab order in the Set Tab Order dialog box and by changing the layer number of objects
in the Properties dialog box.
► To set the tab order using the Set Tab Order dialog box:
1.
Select all the objects for which you want to define the tab order.
2.
From the Draw menu, point to Layer, and then choose Set Tab Order.
3.
In the Set Tab Order dialog box, specify the starting layer and whether the order will follow
from left to right or top to bottom.
4.
Click OK.
You can also define a tab order by specifying the layer for each object in the Properties dialog
box.
► To set the tab order by changing layer numbers in the Properties dialog box:
1.
Select the object that is to receive the focus first, and then click the Properties button on the
ToolBook toolbar.
2.
In the Layer box, type a number that is smaller than the layer number of any other fields or
buttons to which users will tab.
3.
Repeat this procedure for the remaining objects in the order you want tabbing to occur,
giving each object an incrementally higher layer number. Then, switch to Reader level and
test the tab order by pressing TAB and observing where the focus moves.
Consider the following when you define the tab order:
x
Try to follow a left-to-right and top-to-bottom reading pattern to organize fields and other
objects on a page.
x
If too many fields and buttons appear on a page, a user might have trouble finding the focus
when pressing TAB. If your pages are crowded, consider simplifying them and adding new
ones.
You may also exclude an object from the tab order:
x
To exclude a button from the tab order, clear the Include button in tab order option on the
Behavior tab of the Properties for Button dialog box.
x
To exclude a field or record field from the tab order, select the Lock the text and activate
mouse events if the field is enabled option on the Behavior tab of the Properties dialog box.
90
Copyright © 2012 SumTotal Systems, Inc. All rights reserved. Duplication prohibited.
Grouping Objects
Grouping Objects
You can create a group of objects that you work with as a single unit. This allows you to move and
format the objects together. For example, you can combine different types of objects, such as a
polygon and field, into a group, and then set properties for the group.
When you create a group, ToolBook places it on the lowest layer occupied by an object in the
group. For example, if you draw three objects on layers 1, 2, and 3, and then group them, the
group is on layer 1. The next object you add will be on layer 2.
► To create a group:
x
SHIFT+click to select each object you want in the group, and then simultaneously press
CTRL+SHIFT+G (or choose Group from the Object menu). After you group the objects, one set
of handles surrounds the group.
Editing Groups
You can work with a group as a whole, or you can work with the individual objects within the
group. For example, you can change properties for individual objects in a group without affecting
the properties of the group itself. You can move, size, add objects to, and delete objects from a
group without ungrouping it. You can also nest groups within groups.
Before you can edit a group, you must first select it.
► To select a group:
x
Click an object within the group.
Any changes you make apply to all of the objects within the group.
► To deselect a group:
x
Do one of the following:
If an entire group is selected, click outside the group's bounding box.
If an object within a group is selected, double-click outside the bounding box to deselect
the entire group.
Copyright © 2012 SumTotal Systems, Inc. All rights reserved. Duplication prohibited.
91
Working with Objects
Editing Objects within a Group
You can edit individual objects within a group. Simply double-click the object to select it and then
make your changes. You can also edit the text in a field that is part of a group. Double-click to
select the field, double-click again to display the insertion point, and then make your changes to
the text.
► To select an object within a group:
x
Double-click the object you want to select.
A bounding box appears around the group, and handles appear around the object you
selected. Any changes you make apply only to the selected object.
x
Click another object to change the selection.
Moving Grouped Objects
You can move an entire group of objects or individual objects within a group by selecting the
group or object and dragging it to a new location. After you move an object in a group, ToolBook
adjusts the group's bounding box to show the new perimeter of the group.
Adding and Deleting Objects from a Group
You can add objects to a group by pasting them from the Clipboard or by dragging them from the
Catalog to the group. When you drag an object from the Catalog to a group, ToolBook opens the
Select Target dialog box, where you can choose an option to add the object to the group.
► To add an object to a group from the Clipboard:
1.
Select the object you want to cut or copy.
2.
From the Edit menu, choose Cut or Copy to place the object on the Clipboard.
3.
To identify the group that will contain the pasted object, double-click an object in that
group.
4.
From the Edit menu, choose Paste.
The object is added to the group. The new object occupies the uppermost layer of the group
and is pasted in the same location that it occupied before being cut or copied.
► To add a Catalog object to a group:
1.
Drag an object from the Catalog, and then drop it onto the group.
The Select Target dialog box appears.
2.
Choose Add to group, and then click OK.
The group's bounding box expands to encompass the new object. That object occupies the
uppermost layer of the group.
92
Copyright © 2012 SumTotal Systems, Inc. All rights reserved. Duplication prohibited.
Grouping Objects
Note When dropping objects onto a group, be certain that the mouse pointer is paused over an
object in the group. If you attempt to drop onto a space between objects in the group,
ToolBook will place the object on the page rather than in the group.
After a group is formed, you can delete an object.
► To delete an object from a group:
1.
Double-click the object to select it.
2.
Press DELETE.
The bounding box resizes to reflect the newly defined group.
Note You cannot have fewer than two objects in a group. If you try to delete one of the last two
remaining objects, ToolBook ignores the Delete command.
Setting Group Properties
Each group has its own ID number, name, layer, script or action sequence, and drag-and-drop
properties. In addition, each member of the group also keeps its own ID number. You can change
properties for the group or for individual members of the group. Group properties are set in the
same manner as other object properties. For details, see Chapter 7, "Setting Object Properties."
Note Selecting the Visible option on the Draw tab of the Properties for Group dialog box does not
affect the Visible option of individual objects in the group.
Figure 7: Properties for Group dialog box
Copyright © 2012 SumTotal Systems, Inc. All rights reserved. Duplication prohibited.
93
Working with Objects
Ungrouping Objects
Groups can easily be ungrouped. Ungrouping does not affect individual object ID numbers or
names. However, ToolBook discards the group's ID number and name.
Tip
Ungrouping a group will result in the loss of behavior assigned to the group by you or
ToolBook. ToolBook displays a warning if you attempt to ungroup a group with extended
behavior.
► To ungroup a group:
x
Select the group you want to ungroup, and then press CTRL+SHIFT+G (or choose Ungroup from
the Object menu).
ToolBook replaces the single set of group handles with handles for each object, showing that
the objects are now ungrouped.
x
To cancel the selection of an individual object within a group, hold down the SHIFT key and
click the object. The other objects remain selected. To cancel the selection of all the
ungrouped objects, click the page away from any selected object.
ToolBook places newly ungrouped objects on the layers in front of the old group's layer. For
example, if a group contains three objects on layer 1, when you ungroup, the three objects
are placed on layers 1, 2, and 3.
Nesting Groups
You can make a subgroup of objects within an existing group. The inner (or child) group acts like a
single object within the outer (or parent) group. When you ungroup, the child group remains
intact. You might want to make child groups when you are creating a complex drawing; when part
of the drawing is finished, group it so that you will not accidentally change or move it.
94
Copyright © 2012 SumTotal Systems, Inc. All rights reserved. Duplication prohibited.
Chapter 7
Setting Object Properties
Introduction
ToolBook provides a rich variety of objects that you can use to create interactive applications
quickly and easily. You can set properties for these objects that determine appearance, behavior,
and interactive capabilities.
This chapter describes how to set object properties using the Properties dialog box, the Extended
Properties dialog box, the right-click menu, and the Property Browser.
You can also affect the behavior and interactive capabilities of objects using the Actions Editor
visual programming tool or the OpenScript programming language. For information, see Chapter
17, “Using the Actions Editor” or refer to the Programming in OpenScript electronic book.
Understanding Properties and Extended Properties
All ToolBook objects (pages, backgrounds, fields, draw objects, buttons, hotwords, and so forth)
have basic properties that define their appearance and behavior. While ToolBook sets a few
properties, such as an object's ID number, most are set by you. The properties you set for a
button, for example, might include its fill color, button graphic, and caption.
Many of the objects in the Catalog have additional properties that set more sophisticated
capabilities. These properties are called extended properties. A Universal Media player, for
example, has extended properties that control the player's interactive functionality, such as
which media file will play and how ToolBook will play the file at Reader level.
Figure 1: The Properties and Extended Properties dialog boxes for a Universal Media Player
Copyright © 2012 SumTotal Systems, Inc. All rights reserved. Duplication prohibited.
95
Setting Object Properties
Using the Properties Dialog Box
The Properties dialog box is a tabbed dialog box that allows you to view and edit an object's
properties. It features a toolbar that provides easy access to other dialog boxes, where you can
modify the object even further.
The Properties dialog box is quite versatile, because the available settings change dynamically
according to the currently selected object. You can leave the Properties dialog box open, select
various objects in your book using your mouse, and the settings in the Properties dialog box will
change to reflect the available settings for the selected object.
For example, if you select a text field, you will see the Properties for Text Field options in the
Properties dialog box. If you select a button, you will see the Properties for Button options in the
Properties dialog box. Settings made in the Properties dialog box take place immediately, without
closing the dialog box.
► To display the Properties dialog box:
x
Do one of the following:
From the Object menu, choose one of the properties options. (For example, if a button is
selected, choose Properties for Button.)
Click the Properties button
Right-click an object, and then click the Properties button
Press SHIFT+F6.
on the ToolBook toolbar.
on the right-click menu.
In the Properties dialog box, common properties are organized by tab. The following table
describes some of the property pages that are common to many objects.
Examples of property pages common to many objects
Click this tab...
To do this...
Draw
Set the properties that control the way the object is drawn, such as fill color, line
style, color palette, or border style
Bounds
Specify the position and size of the object
Font
Set character formatting information for text fields, record fields, and buttons
Paragraph
Set paragraph, alignment, tabs, and spacing information for fields
Behavior
Specify the object's behavior at run time, such as whether a user can type in a field
or whether a button is enabled at run time
Drag & Drop
Specify the appearance and behavior of the object when it is dragged or dropped
at Reader level
► To set an object's properties:
1.
Select the object, and then click the Properties button on the ToolBook toolbar.
2.
Click a tab to view the properties page containing the category of property you want to set.
3.
Choose or enter the properties or settings you want. If you type a value in a box, you must
press ENTER, press TAB, or click in another field before the changes will take effect.
4.
Optional. Click a button on the toolbar to set other available properties of the selected
object, such as Extended Properties, Hyperlink, and Path Animation.
5.
More information about the buttons on the Properties dialog box toolbar is available in the
following section.
96
Copyright © 2012 SumTotal Systems, Inc. All rights reserved. Duplication prohibited.
Using the Properties Dialog Box
6.
Tip
Optional. Close the Properties dialog box.
After you customize an object by setting its properties, you can copy it to the My Objects
category of the Catalog and use it again later. Copying an object to the My Objects category
allows you to easily share and reuse custom objects among your ToolBook applications. For
details, see Chapter 5, "Working with the Catalog."
Toolbar Buttons in the Properties Dialog Box
The Properties dialog box, like the main window, has a toolbar. Buttons on the toolbar become
available depending on the object's features and specifications on each tab.
Figure 2: The toolbar in the Properties dialog box
A.
Undo Reverses the last command.
B.
Redo Reapplies the last command.
C.
Edit Parent Changes the displayed properties to the parent of the currently selected object.
For example, if you have selected one button in a grouped navigation object, clicking Edit
Parent allows you to set properties for the group.
D.
Edit Child Changes the displayed properties to the child of the currently selected object.
E.
Set Units Allows you to choose by what units the object is measured (pixels, page units,
inches, or centimeters).
F.
Extended Properties Opens the Extended Properties dialog box for the selected object.
G.
Actions Opens the Actions Editor, where you can program a series of behaviors (called action
sequences) for the selected object.
H.
Hyperlink Opens the Hyperlink dialog box, where you can specify a hyperlink for the selected
object.
I.
Path Animation Opens the ToolBook Animation Editor, where you can create an animation.
J.
Edit Script Opens the script editor, where you can write or edit a script for the selected
object.
K.
Edit Shared Script Opens the script editor, where you can edit a shared script.
L.
Select Shared Script Allows you to choose a shared script to edit or to create a new shared
script.
M.
Help Opens the Help topic for the currently displayed tab in the Properties dialog box.
When you have finished setting properties, you can click the Close button
corner of the dialog box.
Copyright © 2012 SumTotal Systems, Inc. All rights reserved. Duplication prohibited.
in the upper-right
97
Setting Object Properties
Using the Right-Click Menu
You can set properties for an object by using the right-click menu. The right-click menu contains
commands specific to the object you right-clicked; these commands offer a quick way to set
properties that you can also set in the Properties dialog box. For example, to rename a button,
simply right-click the button and choose Rename from the right-click menu. The Rename dialog
box opens, where you can modify the name. The name you specify is set as a property of the
button and will appear in the Properties dialog box.
Figure 3: Sample right-click menu
The right-click menu for a grouped object includes child objects in the parent submenu. For
instance, the right-click menu for a Universal Media Player, which is a grouped object provides
access to the properties of both the grouped object as well as the properties of the individual
objects that make up this group.
Figure 4: Right-click menu of a grouped object
98
Copyright © 2012 SumTotal Systems, Inc. All rights reserved. Duplication prohibited.
Using the Extended Properties Dialog Box
Using the Extended Properties Dialog Box
You can set the extended properties of Catalog objects in the Extended Properties dialog box. To
tell quickly whether an object has extended properties, select the object on the page or
background and look at the Extended Properties button on the toolbar. The button is available
only when you select an object with extended properties.
► To set extended properties for an object:
1.
Do one of the following:
Select the object, and then click the Extended Properties button on the ToolBook
toolbar.
Right-click the object, and then click the Extended Properties button on the right-click
menu.
In the Properties dialog box for the object, click the Extended Properties button on the
toolbar.
2.
In the object's Extended Properties dialog box, specify the options you want.
3.
Click OK.
Setting Extended Properties for Groups
Many of the objects in the Catalog are actually groups of individual objects. In some cases, the
group itself (such as a video player with controls) has extended properties, and in other cases, the
individual objects within the group (such as the buttons in a navigation panel) have extended
properties.
The easiest way to set extended properties for an entire group is to select the group and then
click the Extended Properties button on the ToolBook toolbar. To set the extended properties for
a single object within a group, double-click to select the object and then click the Extended
Properties button on the ToolBook toolbar.
Figure 5: Extended Properties dialog box
Copyright © 2012 SumTotal Systems, Inc. All rights reserved. Duplication prohibited.
99
Setting Object Properties
Using the Book Explorer
The Book Explorer is an interactive browser that shows the objects on each page in an outline
format. Right-click any object shown in the Book Explorer to access the properties for that object.
► To open the Book Explorer:
x
From the View Menu choose Book Explorer.
You can move objects in the Book Explorer using drag and drop. This allows you to move an object
to a different layer on the page, reorder the sequence of pages, or move an object into a group.
Using the Property Browser
The Property Browser allows you to view and edit a complete list of an object's property settings.
In addition, you can view and edit system properties and variables using the Property Browser.
System properties define default behavior for the entire ToolBook system.
Because properties are displayed in the Property Browser by their OpenScript property name, you
should be familiar with the OpenScript language before using this tool. For more information
about OpenScript, refer to the Programming in OpenScript electronic book.
Some of the properties that appear in the Property Browser can also be set using either the
Properties dialog box or the Extended Properties dialog box. You may prefer to use these dialog
boxes instead of the Property Browser to set object properties. However, the Property Browser is
the best way to view all of the available properties for an object.
► To change a property's value in the Property Browser:
1.
From the View menu, point to Browsers, and then choose Property.
2.
Select an object on your page, or choose the object whose properties you want to edit from
the drop-down list at the top of the Property Browser.
100
Select the property you want to edit from the Name column. The object's current value
for that property appears in the Value column and in the drop-down list at the top of the
tab.
If the property uses a specific set of predefined values, click the drop-down arrow, and
then choose a different property value.
Copyright © 2012 SumTotal Systems, Inc. All rights reserved. Duplication prohibited.
Using the Property Browser
If the property does not use a specific set of predefined values, click the Browse button
, type a new value in the Edit Property dialog box, and then click OK. Click the check
mark button to accept the changes, or click the X button to reject the changes.
Tip
Some properties are for your reference only. You will not be able to edit these
properties.
You can also double-click the entry in the Value column to edit the property.
The User tab of the Property Browser displays some properties that are built into ToolBook. You
can add a new property for an object by specifying a user property in the Property Browser.
► To add a user property in the Property Browser:
1.
From the View menu, point to Browser, and then choose Property.
The Property Browser appears.
2.
Select an object on your page, or choose the object whose properties you want to edit from
the drop-down list at the top of the Property Browser.
3.
Click the User tab.
4.
In the Name column, double-click Add New.
5.
In the Add User Property dialog box, type a property name and property value, and then click
OK.
ToolBook adds the property to the property list.
Copyright © 2012 SumTotal Systems, Inc. All rights reserved. Duplication prohibited.
101
Chapter 8
Working with Text
Introduction
You can add text to your book using field objects, such as text and record fields. Field objects on
the pages and backgrounds of your book can be used to convey information and instructions.
You can also add inline graphics to field objects to create visual interest within text. This chapter
describes how to create, format, and use text in fields and record fields.
About Fields
Fields are objects that hold text. Before you can add text to your book, you must add a field to
contain that text. ToolBook offers two basic types of fields: text fields and record fields. A text
field can be placed on a page or on a background. If you place a text field on the background, the
field and the text it contains appear identically on every page that shares that background. A
record field must be placed on a background; unlike a text field placed on the background, a
record field can display different text on every page that shares that background.
Consider the following guidelines when adding fields to your book:
x
To display different text in the same position and in the same style on every page that shares
a particular background, use a record field placed on the background.
x
To display identical text in the same position and in the same style on every page that shares
a particular background, use a text field placed on the background.
x
To display text that appears on one particular page, use a text field placed on the page (the
foreground).
The Catalog provides a wide variety of text fields and record fields that you can use to present
information on the screen. To add text to your page, you can drag the type of field you want from
the Catalog to your page. Then you can replace its placeholder text with your own text.
Figure 1: Text fields in the Catalog
Copyright © 2012 SumTotal Systems, Inc. All rights reserved. Duplication prohibited.
103
Working with Text
Text fields and record fields, like other objects, have properties that you can set to define their
physical appearance, such as border style, font, and fill color. In addition, some fields in the
Catalog have extended properties that you can set. These properties define the extended
capabilities of a field, such as automatic sizing, which you set in the object's Extended Properties
dialog box. Together, these properties of a text object define its appearance and interactive
behavior in your application.
Working with Fields
Like other objects, text and record fields have properties that define their appearance and
behavior. After you add a field to a page, you can type or import text into it, and then edit,
format, or apply a color to the text. You can also resize and move the field.
Fields can contain graphics and hotwords. For example, you can insert a graphic, such as a
bitmap, into a field to create an inline graphic. You can also select a word or phrase and make it
a hotword. Hotwords act as buttons: They can trigger an action, such as navigating to a page or
playing an animation. For details about creating hotwords, see Chapter 10, "Adding Interactive
Features to your Application."
For the most part, you work with record fields in the same way that you work with text fields.
However, take care when cutting, pasting, or deleting record fields. If you cut a record field from
the background and paste it on the page, it becomes a regular text field. In addition, removing
the record field from the background of one page removes it (and the data it contains) from all
pages that share that background. ToolBook displays a warning if you attempt to remove a record
field.
Creating Fields
There are three ways to create a text or record field. You can drag a field from the Catalog to
your page. Alternatively, you can create a field using the ToolBook tool palette. Finally, you can
use OpenScript to draw a field.
Adding a Field from the Catalog
The Catalog provides a wide variety of fields that you can use to present text on the screen. In
addition to basic text fields, you can choose special fields that display shadowed text, formatted
lists, or a marquee.
► To add a field from the Catalog:
1.
Click the Catalog button
2.
Select the Text Field category in the Catalog.
3.
Choose the field you want from the object pane, and then drop it onto your page or
background.
Tip
104
on the ToolBook toolbar to open the Catalog.
You can also double-click an object in the Catalog to add it to the center of your page.
Copyright © 2012 SumTotal Systems, Inc. All rights reserved. Duplication prohibited.
Creating Fields
Creating a Field Using the Tool Palette
There are three tools on the tool palette that you can use to draw ToolBook field objects:
x
Field tool: Use the field tool to draw a field. You can draw a field on the page (foreground)
or background.
x
Borderless field tool: Use the borderless field tool to draw a field without a border. You can
draw a borderless field on the page or background.
x
Record field tool: Use the record field tool to draw a record field on a background. This tool
is disabled when you are working on the page and becomes available when you switch to the
background.
► To create a field using the tool palette:
1.
From the View menu, point to Palettes and choose Tool.
2.
Choose one of the field tools.
3.
On your page, hold down the mouse button as you drag to draw a field.
Creating a Field Using OpenScript
You can write and execute OpenScript code using the script editor or Command window. For more
information about using the OpenScript programming language, refer to the Programming in
OpenScript electronic book.
x
Use the draw command to draw a field or record field. Fields are measured in page units. For
example:
draw field from 1000,500 to 2000,3000
draw recordField from 1000,500 to 2000,3000
Copyright © 2012 SumTotal Systems, Inc. All rights reserved. Duplication prohibited.
105
Working with Text
Setting Field Properties
You can select a field and then set its properties in the Properties for Text Field or Properties for
Record Field dialog box. Each tab in these dialog boxes contains settings that allow you to specify
some aspect of a field's behavior and appearance.
Figure 2: Properties for Text Field dialog box
Fields are identified by the same properties that identify other objects, such as a name and ID
number. Additional properties define specific characteristics of fields. The field type property
defines the type and function of a field—for example, whether it is a wordwrap text field or a
multiple-select list box. A field also has properties that define its behavior at run time, such as
whether a field is editable (allows users to enter text) or activated (locks the text and activates
mouse events) at Reader level.
► To set the properties of a field:
1.
Select the field, and then click the Properties button
on the ToolBook toolbar.
The Properties for Text Field or Properties for Record Field dialog box appears.
2.
Click one or more tabs and select or enter the options you want to set, as described in the
table below.
ToolBook field properties
106
Click this
tab...
To do this...
Draw
Set drawing options, border style, field type, color, and visibility
state options
Bounds
Set the field's position and size
Font
Set the font, style, size, effects, and formatting options
Paragraph
Set text alignment, indentation, spacing, and tabs
Copyright © 2012 SumTotal Systems, Inc. All rights reserved. Duplication prohibited.
Setting Field Properties
3.
Behavior
Specify the field's behavior at run time
Drag & Drop
Specify the appearance and behavior of the field when it is dragged
or dropped at Reader level
Optional. Close the Properties dialog box.
You can also use the Actions Editor visual programming tool to create action sequences that set
certain field properties while the application is running. For more information about the Actions
Editor, see Chapter 17, "Using the Actions Editor," and Chapter 18, "Creating Action Sequences:
Practical Examples."
Modifying Border Style and Field Type
You can modify the basic appearance and function of a field by changing your selections in the
Border style and Field type lists (both appear on the Draw tab of the Properties for Text Field or
Properties for Record Field dialog box). For example, you can apply a number of different border
styles to a field, as shown in Figure 3.
Figure 3: Field border styles
You can change the way text wraps within a field using the options in the Field type list in the
Properties dialog box.
Field type options
Option
OpenScript Value
Result when applied
Wordwrap
wordWrap
Text wraps to the next line.
No wordwrap
noWrap
Text does not wrap to the next line; text longer than
the width of the field truncates at the field's border.
Pressing the ENTER key, however, creates a carriage
return/linefeed (CRLF)—that is, it starts a new line.
Single line
singleLineWrap
Limits text to a single line; text won't wrap, and a
CRLF isn't recognized.
Single-select
singleSelect
Limits user to selecting only one list box item at a time
from the text options in a list box.
Multi-select
multiSelect
Allows user to select multiple list box items in a list
box.
Copyright © 2012 SumTotal Systems, Inc. All rights reserved. Duplication prohibited.
107
Working with Text
Modifying the Behavior of a Field
You can set the properties of a field that define its behavior at Reader level. For example, a field
can be either editable or activated. When a field is editable (the field allows typing), a user can
enter text in the field at Reader level. When a field is activated (the field locks the text and
activates mouse events), a user cannot edit the text. Instead, the field responds to a mouse click
the same way a button would: It performs a defined action. For example, if a user clicks a
hotword (containing a defined hyperlink) in an activated field, ToolBook navigates to a specified
page. For more information about hotwords, see Chapter 10, "Adding Interactive Features to your
Application."
The following table describes the options available in the Properties dialog box that define the
behavior of a field at Reader level.
Field behavior options
Option
Result when applied
Enable the field
The field can receive the focus or mouse-event messages at
Reader level.
Allow users to enter or
modify text
The text in a field can be edited by users at Reader level. This
option is available when a field is enabled.
Lock the text and
activate mouse events
The text in a field cannot be edited by users at Reader level. Mouse
events are activated (for example, a hotword's hyperlinks can be
run). This option is available when a field is enabled.
108
Copyright © 2012 SumTotal Systems, Inc. All rights reserved. Duplication prohibited.
Adding Text to Fields
Adding Text to Fields
To add text to the pages of your application, you type or import the text into a text or record
field and format it using the options in the Properties dialog box. You can also use the Clipboard
to transfer text from another application or between books, and incorporate preformatted text in
Rich Text Format. For details, see "Cutting, copying, and pasting text," later in this chapter.
Typing Text
To select or enter text, double-click a field to switch ToolBook from object-selection mode to
text-editing mode. You can also switch to text-editing mode by selecting a field and then choosing
Edit Text from the Text menu or by selecting a field, right-clicking it, and selecting the Edit Text
option in the right-click menu.
► To type text:
Using the interface
x
Double-click the field or right-click the field and select the Edit Text option in the right-click
menu.
x
If the field contains placeholder text, select the text that you want to replace, and then type
your text.
x
To end text-editing mode, click outside the field, press the ESC key, or right-click the field
and select the Exit Edit Text option.
Using OpenScript
x
To enter text in a field, you set the text property of that field:
text of field "city" = "Yakima"
Tip
After the insertion point appears in one editable field, you can place the point in another
editable field by clicking only once.
Importing Text
You can add text to your book from other programs by importing a file or by copying and pasting a
selection of text. When you add text from another program, most character formatting is kept,
and paragraph formatting used in the first paragraph is applied to subsequent paragraphs in the
selection.
ToolBook allows you to import text in Rich Text Format (RTF) or in ASCII (American Standard Code
for Information Interchange) format. Most text-editing applications, such as Microsoft Word, allow
you to save your text in either of these formats.
► To import text:
1.
Double-click the field into which you want to import text.
2.
From the Insert menu, choose Text.
The Import Text dialog box appears.
3.
In the List files of type list, select an RTF file (with an .rtf file extension) or an ASCII text file
(with a .txt file extension), and then click OK.
4.
If your field already contains text, ToolBook notifies you that the current contents of your
field will be replaced.
5.
Click OK to continue, or click Cancel to preserve your existing content.
Copyright © 2012 SumTotal Systems, Inc. All rights reserved. Duplication prohibited.
109
Working with Text
Note When you import text, ToolBook replaces the entire contents of the field. To avoid losing
existing text, you can always import the text into an empty field and copy and paste the
text to the location you want.
Copying and Pasting Text from an RTF Document
When you copy and paste text into ToolBook from other programs that support RTF, the text will
retain most of its formatting. Paragraph formatting applied to the first paragraph is applied to
subsequent paragraphs in the selection.
Note When using RTF text, you may see paragraph formatting in the source application that does
not appear in ToolBook. Although some formatting may be lost, no text data is lost.
► To paste RTF text into ToolBook:
1.
In the source application, select the text you want, and then copy it to the Clipboard.
2.
In ToolBook, double-click the field into which you want to paste the text.
3.
From the Edit menu, choose Paste.
ToolBook pastes the text into the field or record field.
You can paste RTF text into other programs from ToolBook via the Clipboard using the Copy and
Paste commands on the Edit menu. When you copy text, ToolBook places RTF text on the
Clipboard. If the destination program supports RTF, it uses this format when you paste the text.
The text retains the formatting that the destination program can recognize; for example,
ToolBook exports color information for text, but some programs can't use color.
Selecting and Editing Text
You can select and edit the text in a field. For example, you can use the Clipboard to cut, copy,
or paste text in a field. The following sections describe the basic techniques you use when
working with text.
Navigating in Text
You can double-click a field to create an I-beam called the insertion point, which you use to
indicate where you want text to be inserted when you type. You can click with the mouse to move
the insertion point within any text in a field or to another field on the same page.
The following table describes the keyboard shortcuts you can use to navigate in a text field.
Navigating in text
To move the insertion point...
Press this key or key combination...
One character left or right
RIGHT ARROW or LEFT ARROW
One text line up or down
UP ARROW or DOWN ARROW
To the start of the text line
HOME
To the end of the text line
END
To the beginning of the text
CTRL+HOME
To the end of the text
CTRL+END
Within a large text block
PAGE UP or PAGE DOWN
110
Copyright © 2012 SumTotal Systems, Inc. All rights reserved. Duplication prohibited.
Adding Text to Fields
Selecting Text
Before you can change the appearance of text, you must select it. Selecting highlights just the
text with which you want to work.
Selecting text
To...
Do this...
Show the insertion point
Double-click the field.
Select a character
Click and drag over the character.
Select a word
Double-click the word.
Extend a selection
Hold down the SHIFT key and press a navigation key
Select all the text
Press CTRL+A.
Cutting, Copying, and Pasting Text
You can cut or copy an entire field or any selected text in a field. You can cut, copy, and paste
text from one field to another.
Tip
You can also cut, copy, and paste fields or selected text using the right-click menu or using
the standard Windows shortcut keys CTRL+X, CTRL+C, and CTRL+V.
► To cut or copy text:
Using the interface
1. Select the text you want to cut or copy.
2.
From the Edit menu, choose Cut or Copy.
ToolBook places the selected text on the Clipboard.
Using OpenScript
x
To copy the text, fonts, and styles of one field to another, set the richText property of the
field you want to receive the formats to the richText of the field containing the desired
formats:
richText of field "rats" = richText of field "mice"
x
To copy the text of one field to another without copying the formatting, set the text property
of one field to the text property of the other:
text of field "rats" = text of field "mice"
x
To copy the RTF codes separately from the text, set the text property of one field to the
richText property of another:
text of field "rats" = richText of field "mice"
► To paste text:
Using the interface
1. Copy the text you want to the Clipboard.
2.
Double-click the field into which you want to paste text.
An insertion point appears in the upper-left corner.
3.
From the Edit menu, choose Paste.
4.
To end text-editing mode, click outside the field or press the ESC key.
Copyright © 2012 SumTotal Systems, Inc. All rights reserved. Duplication prohibited.
111
Working with Text
Using OpenScript
x
You can use the send paste statement to paste the contents of the Clipboard into a new field.
Deleting Text
You can remove text from a field. If you delete text by mistake, immediately choose Undo from
the Edit menu to restore it; otherwise, your text will be lost.
► To delete text:
1.
Select the text you want to delete.
2.
Press DELETE, press BACKSPACE, or choose Delete Selected Text from the Edit menu.
Formatting Text in Fields
You can apply character formatting (such as font, style, color, and size) and paragraph formatting
(such as alignment, line spacing, indents, and tab settings) to the text in a field using the Font
and Paragraph tabs on the Properties dialog box.
► To use the Properties dialog box to change text and paragraph formatting for the entire
field:
Using the interface
1. Select the field, and then click the Properties button on the ToolBook toolbar.
The Properties for Text Field dialog box appears.
2.
3.
Do one or both of the following:
To change the font, style, size, or other text effects, click the Font tab, and then select
the options you want.
To change the alignment, line spacing, indents, or tab settings, click the Paragraph tab,
and then select the options you want.
Optional. Close the Properties for Text Field dialog box.
Using OpenScript
x
To change character style for the entire field using OpenScript, specify the field name:
fontStyle of text of field "status" = bold
x
To change the character style used in all fields on a page, select the fields and set the font:
select all field
fontFace of selection = "Arial"
fontStyle of selection = "bold"
x
To change the default text style, set the sysFontFace, sysFontStyle, and sysFontSize
properties:
sysFontFace = "Arial"
sysFontStyle = "bold"
x
You can set the textAlignment, spacing, indents, tabType, and tabSpacing field properties to
modify paragraph formats. For example, to set line spacing in a field:
spacing of field "employees" = 2
112
Copyright © 2012 SumTotal Systems, Inc. All rights reserved. Duplication prohibited.
Formatting Text in Fields
You can format specific characters by selecting them and applying character styles to them. You
can also change the character style of an entire field, or set a default character style so that all
of the text you enter has a consistent format. Your default character style remains in effect for
the current session.
► To format specific characters in a field:
Using the interface
1. Select the text you want to format.
2.
Click the Character button
on the ToolBook toolbar.
The Character dialog box appears.
3.
Choose the font, style, size, and effects you want.
4.
Click OK.
Using OpenScript
x
To change character style of specific characters in a field using OpenScript, select the text:
select textline 1 of text of field "status"
fontSize of selectedText = 12
Applying Color to Text
ToolBook uses the current stroke and fill colors when you draw a field or enter text in it. The
stroke color determines the color of the text and the border, and the fill color defines the
background color. You change the color of the text and background the same way you change the
color of any object—in the Properties dialog box. For details about coloring objects, see Chapter
6, "Working with Objects." You can also apply colors to specific characters.
► To format selected text with color:
Using the interface
1. Select the text you want to change.
2.
Click the Color Tray button
on the ToolBook toolbar.
3.
Click the Stroke Color button
.
4.
Choose the colors you want for the selected text.
Using OpenScript
x
The strokeColor property defines the default color of text in a field or record field. The
fillColor property defines the color of the area within the field. You can specify a color by its
OpenScript keyword, such as yellow or green, or you can use RGB (red, green, blue) or HLS
(hue, lightness, saturation) values. For example:
strokeColor of selectedText = blue
fillColor of field "address" = yellow
rgbStroke of selection = 0,255,0 --Sets text color to green
Copyright © 2012 SumTotal Systems, Inc. All rights reserved. Duplication prohibited.
113
Working with Text
Formatting Paragraph Styles
By changing a field's paragraph settings, you can change the appearance of the field and the text
it contains. Paragraph style always applies to an entire field (unlike character style, which can be
used to format specific characters). You can change:
x
Text alignment.
x
Spacing between lines of text.
x
Tab settings for left-aligned or decimal-aligned text.
x
Left, right, and first-line indents (starting at the edge of the field).
Note Paragraph style applies to every instance of a record field; if you center text in a record
field on one page, the text in that record field is centered on every page.
► To format paragraph style:
Using the interface
1. Select the field, and then click the Properties button on the ToolBook toolbar.
The Properties dialog box appears.
2.
Click the Paragraph tab, and then select the settings you want for alignment, line spacing,
tabs, and indents.
3.
Optional. Close the Properties dialog box.
Using OpenScript
x
You can set the textAlignment, spacing, indents, tabType, and tabSpacing field properties to
modify paragraph formats. For example, to set line spacing in a field:
spacing of field "employees" = 2
Inserting Inline Graphics
You can insert an inline graphic anywhere in a field. Inline graphics are graphics that are set
within text and can include bitmaps, icons, or cursors. When you add an inline graphic, the
graphic is automatically added to the book's resources. For more information about book resources
in ToolBook, see Chapter 19, "Using Resources."
Tip
You can use inline graphics as hotwords. To create a hotword from an inline graphic, create
the inline graphic and select it. From the Text menu, choose Create Hotword. After created
you can right-click it, choose Hyperlink, and set its hyperlink properties.
You can cut, copy, paste, or delete inline graphics just like any character. Text formatted in RTF
that contains bitmaps can be pasted into fields. The bitmaps become inline graphics.
Inline graphics wrap to the next line as you add text, and the bottom of each graphic is aligned
along the text's baseline. To add space above or below an inline graphic, use the Superscript or
Subscript command on the Text menu.
► To insert an inline graphic:
Using the interface
1. Double-click the field to display the insertion point, and then move the insertion point to
where you want to insert the graphic.
2.
114
From the Text menu, choose Insert Graphic, choose or import the graphic file you want, and
then click OK. ToolBook inserts the graphic into the field.
Copyright © 2012 SumTotal Systems, Inc. All rights reserved. Duplication prohibited.
Inserting Special Characters
Using OpenScript
x
Use the insert graphic command to insert the graphic into a field:
insert graphic bitmap "Fog" into char 1 of textline 3 of \
text of field "Horn"
insert graphic icon "speaker" into last char of text of \
hotword "sound"
insert icon ID 100 after text of field ID 1
insert graphic bitmap "Fog" before text of focus
insert graphic cursor "wait" into char 2 of selectedText
Inserting Special Characters
You can also insert ANSI (American National Standards Institute) characters to create curled single
and double quotation marks (`' or ""), em dashes (—), copyright (©) or trademark (™) symbols, and
other helpful characters. To type ANSI characters, hold down the ALT key, and then—using the
numeric keypad—type 0 and the ANSI number that corresponds to the character you want. For
example, to type a copyright symbol (©), hold down the ALT key and type 0169.
Note Some font styles do not support the ANSI character set. You may need to change fonts in
order to use some ANSI characters. The table below displays the ANSI character set.
† No conversion for this character.
‡ Values 8, 9, 10, and 13 convert to backspace, tab, linefeed, and carriage return, respectively.
§ Values 127_129, 141_144, and 157_158 vary depending on the font manufacturer.
Copyright © 2012 SumTotal Systems, Inc. All rights reserved. Duplication prohibited.
115
Working with Text
Finding and Replacing Text
You can use the Find command on the Edit menu to search for text, and the Replace command if
you also want to specify replacement text.
ToolBook searches the entire book starting on the current page and prompts you to start over
when it reaches the end of the book. If you want to limit the search, you can select one of the
options in the Find dialog box. You can search for text in:
x
All fields and list boxes shown on the current page.
x
Record fields on all pages that share the same background.
You can also customize your search using the Match whole word only option. For example, if you
specify "the" in the Find what box, ToolBook ignores "these." Or you can use the Match case option
to find only text that matches the capitalization you entered in the Find what box. For example,
if you enter "Hello World," ToolBook ignores "Hello world."
Fields that you have hidden cannot be searched using the Find or Replace commands. However,
ToolBook does search fields that are obscured by another object (including the Find dialog box) or
are outside the bounds of the window. ToolBook scrolls the text in a field to display found text,
and the Find button changes to Find Next.
To be sure you will see all found text, choose Size to Page from the View menu, or click the
Maximize button before using the Find or Replace command.
If your application uses the Find and Replace commands at Reader level, users of your application
will be able to search fields and record fields. ToolBook can find text in activated fields, but at
Reader level this text cannot be edited.
► To find or replace text:
1.
From the Edit menu, choose Find or Replace.
2.
Enter the text for which you want to search in the Find what box. If you are replacing text,
enter the new text in the Replace with box.
3.
Choose search options, if appropriate.
You can choose to match a whole word and to match uppercase and lowercase text.
4.
Click Find to start the search.
ToolBook finds and highlights the first occurrence of the text. If the text is on a different
page, ToolBook goes to the page and then highlights the text.
5.
116
To replace the text, click Replace.
Copyright © 2012 SumTotal Systems, Inc. All rights reserved. Duplication prohibited.
Working with Record Fields
6.
Click Find Next to find the next occurrence of the text.
7.
When ToolBook reaches the end of the book, you are prompted to continue searching from
the beginning of the book. Click Yes or No.
8.
When you finish searching, close the Find or Replace dialog box.
Working with Record Fields
You can add record fields to your book using the record field tool on the ToolBook tool palette.
Because you can place a record field only on the background of a page, you will notice that this
tool is disabled when you are working on the foreground.
Like any object placed on a background, a record field appears in the same style and in the same
position on any page that shares that background. However, unlike a regular text field placed on
the background, a record field allows you to enter and display different text from page to page.
ToolBook can also sort pages and print reports using record fields.
Copyright © 2012 SumTotal Systems, Inc. All rights reserved. Duplication prohibited.
117
Working with Text
Using Record Fields to Display Information
Record fields are ideal for consistently presenting information that varies from page to page, such
as address and phone lists or client contact records. After you've created the record field on the
background, you can enter text into it on any page that shares that background by switching to
the foreground (press F4), double-clicking the record field, and then typing your text. You can
type different text into the record field on each page. For example, if you have a record field on
a background, and that background is shared by five pages, you can type different text into each
of the record fields; ToolBook will then display different text on all five pages.
Tip
To prevent users from typing text into a record field in which you're displaying text or inline
graphics, in the Properties for Record Field dialog box, select the Lock the text and activate
mouse events if the field is enabled check box.
Figure 4: A record field displays text in the same location on pages that share the background
118
Copyright © 2012 SumTotal Systems, Inc. All rights reserved. Duplication prohibited.
Working with Record Fields
Using Record Fields for Reader-Level Data Entry
You can use record fields to create a form into which your users enter data at Reader level. For
example, you might set up a product catalog to index all the software products used at your
company, where each data-entry field is actually a record field.
Record fields are a good choice for creating data-entry applications, because ToolBook can print
reports or sort pages using record fields.
Importing Pages with Record Fields
You can import pages that contain record fields from another book into the current book using the
Paste command on the Edit menu or using the OpenScript import command. When you import
pages, ToolBook inserts the pages into the destination book after the current or specified page.
Note If you paste record fields into your book using the Paste command, be sure that you are on
the background when you paste; otherwise, ToolBook will create text fields from them.
When you import pages and choose not to include the source book's backgrounds, ToolBook adds
the record field text to the destination book's record field text if the source and destination books'
record field names or ID numbers match. If the source and destination books' record field names
or ID numbers do not match, the source record field text is added to the destination record field
using layer order. The source book's first record field is mapped to the destination book's first
record field. If the source book contains more record fields than the destination book, the extra
record field text is not mapped to a destination record field.
Sorting Pages by Record Field
Sorting is the process of putting pages in order according to the contents of one or more record
fields. Generally, you sort pages to put them in the order in which you expect them to be used.
For example, you might sort a library catalog alphabetically by author or title. Use the Sort Pages
command on the Tools menu to sort pages using the text of any record field according to the sort
type you specify.
Because sorting is based on record fields, only the set of pages that share the same background
can be sorted; however, within that set you can specify a range of pages to sort. If your
application is designed so that a user can add entries, you can provide sorting at Reader level
using the Sort dialog box, or you can design your own sorting option using the OpenScript sort
command. The sort command is much more flexible and can sort across books using any pagebased comparison.
For details about using the sort command, refer to its entry in the OpenScript reference in Help.
► To sort pages by record field:
Using the interface
1. From the Tools menu, choose Sort Pages, or press SHIFT+F9.
Copyright © 2012 SumTotal Systems, Inc. All rights reserved. Duplication prohibited.
119
Working with Text
The Sort dialog box appears.
2.
Select the record field by which you want to sort in the Available record fields box, and then
click Add.
3.
If you want to add more than one record field to the Sort on record field(s) list, you must
select each individually and click Add for each one. ToolBook sorts pages using the record
fields in the order that you have selected them.
4.
Under Sort order, choose Ascending or Descending.
5.
Under Sort type, choose one of the following:
6.
Text: Sorts pages in alphanumeric or reverse alphanumeric order using the text entered
in the record field.
Number: Sorts pages in numeric or reverse numeric order using the numbers entered in
the record field.
Date: Sorts pages using the date entered in the record field. For example, if you choose
Ascending, ToolBook puts a page with the date 08/18/68 before a page with the date
02/07/93. ToolBook uses the date format set by the sysDateFormat property.
Name: Sorts pages using the name entered in the record field. ToolBook uses the last
word in this field for sorting. For example, if you choose Ascending, ToolBook puts a page
with the name "Zoe Z. Benton" before a page with the name "Angela Victor." If ToolBook
encounters data that does not match the type you have specified (for example, text in a
field that you're sorting as a date), it places that page at the end.
Click OK to sort the pages.
Using OpenScript
x
To sort pages, use the sort command with any expression that can be evaluated in the
context of a page, such as page name or page ID number. Alternatively, specify a range of
pages with an expression. For example:
sort pages 1 to pageCount of this book by ascending text \ name of
this page
120
Copyright © 2012 SumTotal Systems, Inc. All rights reserved. Duplication prohibited.
Working with Record Fields
When you sort pages by a record field treated as a name, ToolBook treats the first word in the
first paragraph as a first name, the second word as a middle name, and the third word as a last
name. Additional words are ignored. ToolBook sorts by last name, then by first name, and finally
by middle name or initial. A one-word paragraph is considered a last name; two words are
considered to be first and last name, in that order. Two words concatenated with the tilde (~)
character are evaluated as one word. For example, "Hubert Van~Beek" is sorted by "Van Beek" but
"Hubert Van Beek," is sorted by "Beek." The tilde appears only onscreen and is not printed. Any
amount of additional text can follow the first paragraph.
Copyright © 2012 SumTotal Systems, Inc. All rights reserved. Duplication prohibited.
121
Chapter 9
Using Graphics
Introduction
This chapter describes how you can use graphics in ToolBook to enhance the visual appearance of
your application. With ToolBook, you can paste or import graphics into your application, and
assign resources to the objects in your book. This chapter describes how to add graphics in your
application.
About Graphics
You can paste or import graphics created in other programs into your ToolBook application. When
you paste a graphic on a page or import an image, ToolBook adds the graphic file to the book's
resource system and displays it on the page, within an Image object.
Figure 1: Right-click menu for an imported graphic
Using Graphics on the Internet
When you publish your application to the Web, ToolBook exports all graphic resources to Internetcompatible file formats of GIF, JPEG, or PNG. For graphics used in Image objects, you can specify
an image format or go with the default 'Default' option to let the Publish code decide the best
format.
Copyright © 2012 SumTotal Systems, Inc. All rights reserved. Duplication prohibited.
123
Using Graphics
Adding Graphics to Your Book
Graphics that you copied, pasted, or inserted into your book, get added as resources. Resources
can be used multiple times in your ToolBook book. Buttons and the Image object from the Catalog
can display graphics, which are stored as resources.
You can incorporate graphics into your ToolBook application in several ways. You can:
x
Use the Graphic command on the Insert menu to import a graphic.
x
Use the Clipboard to copy and paste a graphic.
x
Use the Properties dialog box to assign a graphic to a button as a resource.
Pasting Graphics from the Clipboard
You can use the Clipboard to copy a graphic from another application and paste it into ToolBook,
as well as to copy and paste a graphic from another ToolBook book into the current one. In
addition, you can paste graphics into text fields and record fields, creating inline graphics. For
details about inline graphics, see Chapter 8, "Working with text."
► To copy and paste a graphic:
1.
Run the application that contains the graphic you want to paste.
2.
Select the graphic, and then copy it to the Clipboard.
3.
In ToolBook, go to the page or background on which you want to paste the graphic.
4.
From the Edit menu, choose Paste.
ToolBook adds the graphic as an Image object in the upper-left corner of the current page or
background. If you want a border, go to the Draw tab of the Image object's Properties dialog
box and select a Border Line Style.
Note Be sure to edit a graphic file before you paste or import it, because you cannot edit the
image in ToolBook.
Importing Graphics
When you import a graphic using the Graphic command on the Insert menu, ToolBook adds the
graphic file to the book's resource system and displays it on the page, within an Image object.
► To import a graphic:
1.
From the Insert menu, choose Graphic.
ToolBook displays the Import Graphic dialog box.
2.
Navigate to and select a file from the list.
3.
Click Insert.
ToolBook imports the graphic object and displays it on the page/background within an Image
object.
124
Copyright © 2012 SumTotal Systems, Inc. All rights reserved. Duplication prohibited.
Modifying Graphics
Assigning a Graphic Resource to an Object
A resource can be used multiple times in your ToolBook application. For example, to make your
interface more graphical and consistent with other Windows applications, you can apply bitmaps
to various button states (normal, checked, and so forth) using the Properties for Button dialog
box. These bitmaps are stored as resources in a common library, making them available to all
other objects in the book that can use that type of resource.
All graphics that you use in ToolBook will be stored as resources. For more information about
managing graphics as resources, see Chapter 19, "Using Resources."
Storing Graphic Files in ToolBook
All graphic objects are stored in a ToolBook proprietary format with persistent properties (such as
size and border style).
Modifying Graphics
Like other objects, graphics have properties that you can set to modify their appearance or
behavior. You can modify an imported graphic in several ways, depending on the type of object.
For example, you can:
x
Change the border line style of the border of an imported graphic object that is displayed as
an Image object.
x
Convert legacy picture and paint objects to Image objects.
x
Create transparent areas in the graphic within an Image object.
The following sections describe the techniques you use to modify objects.
Changing the Line Style of an Imported Graphic
After you have imported a graphic, it is created in ToolBook as a resource contained within an
Image object. You can apply a border line style to its border in the Properties dialog box.
► To change the border line style of an Image object:
Using the interface
1. Select the Image object, and then click the Properties button on the ToolBook toolbar.
2.
In the Properties dialog box, click the Draw tab.
3.
In the Border Line Style list, select the desired style.
4.
Optional. Close the Properties dialog box.
Converting Picture or Paint Objects to Image Objects
In some cases, you might want to convert a picture or paint object to an Image object.
Tip
This conversion cannot be reversed. Make a backup copy of the picture or paint object
before you convert it to an Image object.
► To convert a picture or paint object to an Image object:
Using the interface
1. Select the picture or paint object, and then click the Properties button on the ToolBook
toolbar.
Copyright © 2012 SumTotal Systems, Inc. All rights reserved. Duplication prohibited.
125
Using Graphics
2.
In the Properties dialog box, click the Draw tab, and then click Convert to Image Object.
ToolBook displays a warning that the conversion you are about to perform cannot be undone.
3.
Click OK to convert the object, or click Cancel to cancel the conversion.
4.
Optional. Close the Properties dialog box.
126
Copyright © 2012 SumTotal Systems, Inc. All rights reserved. Duplication prohibited.
Chapter 10
Adding Interactive Features to your
Application
Introduction
You can add buttons and hotwords to your application when you want your users to interact with
your book. A ToolBook button, like any Windows button, is an object that the user can click to
cause something to happen. A hotword is a selection of text that the user can click like a button.
Buttons and hotwords can be used to navigate between pages, as controls for setting options, to
start and stop an animation, and for a variety of other uses. This chapter describes how to use
buttons and hotwords in your application.
About Buttons
Buttons facilitate user interaction. They are commonly used as controls—to turn options on and
off, to navigate between pages, or to choose one option from among a related set of options. For
example, a button can:
x
Take the user to another page or a Web site.
x
Start an animation or a video.
x
Allow users to check their responses to questions or score their work.
Copyright © 2012 SumTotal Systems, Inc. All rights reserved. Duplication prohibited.
127
Adding Interactive Features to your Application
Defining How Buttons Look
The Catalog contains a wide variety of buttons, from prebuilt navigation objects to question and
answer objects.
Figure 1: Buttons are used to provide choices and control actions
A button's appearance is defined by various property settings that you can specify. For example, a
button's border style is a property that determines whether the button appears as a rectangle, a
radio button, a check box, or some other type of button. For more information about border
styles and other button properties, see "Setting button properties," later in this chapter.
In addition to different border styles, a button also has a state, indicating its active status, which
you can represent with a graphic. You can assign a graphic to a button in the Properties for Button
dialog box. For details about adding a graphic to a button, see "Adding a graphic to a button,"
later in this chapter.
128
Copyright © 2012 SumTotal Systems, Inc. All rights reserved. Duplication prohibited.
Using and Modifying Buttons
Using and Modifying Buttons
There are three ways to create a button. You can drag a button with the functionality you want
from the Catalog to your page. You can also create a button using the ToolBook tool palette.
Finally, you can use OpenScript to draw a button.
After you have created a button, you can set properties that determine how the button looks—for
example, you can format its border style, color, or caption text—using the Properties for Button
dialog box.
Buttons that you draw using the tool palette or OpenScript, as well as the general-use buttons
available in the Catalog, do not have predefined behaviors. These buttons can be hyperlinked to
other locations or programmed in the Actions Editor to perform a variety of tasks. Alternatively,
you can use OpenScript to define any aspect of a button's behavior and appearance.
Adding a Button from the Catalog
The Catalog contains a wide variety of basic button objects for general use, as well as buttons
with extended properties designed for specific purposes, such as media players, navigation panels,
and question objects. To add a button to your book, drag it from the Catalog to a page or
background and then define its properties in the Properties for Button dialog box.
► To create a button and set its properties:
on the ToolBook toolbar to open the Catalog.
1.
Click the Catalog button
2.
In the Catalog, explore the categories that contain buttons.
For example, general-use buttons are available from the Buttons category. Buttons with builtin functionality are available from these and a few other categories: Action Objects, Scoring
and Tracking Objects, Navigation Objects, and Media Players.
3.
Drag the button you want from the object pane, and then drop it onto your page.
4.
Select the button, and then click the Properties button on the ToolBook toolbar.
5.
In the Properties for Button dialog box, select or enter the properties you want.
6.
Optional. Close the Properties dialog box.
Some buttons, such as the buttons in a navigation set, also have extended properties that you can
specify. To quickly determine whether a button has extended properties, you can select the
button. The Extended Properties button on the toolbar becomes available if the button has
extended properties.
Copyright © 2012 SumTotal Systems, Inc. All rights reserved. Duplication prohibited.
129
Adding Interactive Features to your Application
Creating a Button Using the Tool Palette
There are six tools on the tool palette that you can use to draw ToolBook button objects:
x
Pushbutton tool: Use a pushbutton
page to another.
x
Label Button tool: Use a label button
without the use of a mouse.
x
in a group to allow the user choose one
Radio Button 3D tool: Use a radio button 3D
option from a set of mutually exclusive options. When one option in the group is selected, the
others are not selected.
x
Check Box 3D tool: Use a check box 3D
to prompt a user action, such as navigation from one
to provide quick access to the button's functionality
to allow a user to turn options on and off.
► To create a button using the tool palette:
1.
From the tool palette, choose the button tool of your choice.
2.
Click on your page and drag the cursor until the button is the desired size.
Creating a Button Using OpenScript
You can write and execute OpenScript code using the script editor or Command window. For more
information about using the OpenScript programming language, refer to the Programming in
OpenScript electronic book.
► To create a button using OpenScript:
x
Use the draw command with the button object type, specifying the bounds of the button in
page units. For convenience, you can assign a name to the button immediately after drawing
it. For example, to draw a one-inch-square pushbutton:
draw button from 1440,1440 to 2880,2880
name of selection = "Next Page"
Setting Button Properties
You can select a button and then set its properties in the Properties for Button dialog box. Each
tab contains properties that set some aspect of a button's behavior and appearance.
► To set the properties of a button:
1.
Select the button, and then click the Properties button on the ToolBook toolbar.
The Properties for Button dialog box appears.
2.
Click one or more tabs and select or enter the options you want to set, as described in the
table below.
ToolBook button properties
Click this tab...
130
To do this...
Draw
Set the caption text and position, border style, drawing and highlight options, color
options, and current state options
Graphics
Specify a button graphic and set graphic options for each button state
Bounds
Set the button's position and size
Font
Set the font, style, size, effects, and formatting options
Copyright © 2012 SumTotal Systems, Inc. All rights reserved. Duplication prohibited.
Using and Modifying Buttons
3.
Behavior
Specify the button's behavior at run time
Drag & Drop
Specify the appearance and behavior of the button when it is dragged or dropped
at Reader level
Optional. Close the Properties for Button dialog box.
Using OpenScript
To specify properties for the button, set the:
x
caption property to specify the text that appears on the button:
caption of button "Next Page" = "Next Page"
x
captionPosition property to specify where the caption appears. If you have a graphic attached
to the button, this property sets the caption relative to the graphic; if you don't have a
graphic, this property centers the caption:
captionPosition of button "Next Page" = left
x
highlight property to see a visual indication when the button is clicked:
highlight of button "Next Page" = true
x
excludeTab property to exclude the button from the tab order:
excludeTab of button "Next Page" = true
x
enabled property to determine whether the button is dimmed or available (false dims the
button):
enabled of button "Next Page" = false
x
borderStyle property to specify the button's border style:
borderStyle of button "Off" = checkBox
You can specify a variety of button border styles using the Properties for Button dialog box or
OpenScript.
Button border styles
Example
Border Style
OpenScript Value
None
none
Pushbutton
pushbutton
Command
commandbutton
Rectangle
rectangle
Rounded
rounded
Shadowed
shadowed
Check Box 3D
checkBox3D
Radio Button 3D
radioButton3D
Label Button
label
Copyright © 2012 SumTotal Systems, Inc. All rights reserved. Duplication prohibited.
131
Adding Interactive Features to your Application
Formatting Caption Text
You can specify various character settings for a button's caption in the Properties for Button dialog
box.
► To format a button's caption:
1.
Select the button, and then click the Properties button on the ToolBook toolbar.
2.
Click the Font tab in the Properties for Button dialog box.
3.
Choose the font, style, size, effects, and other options you want.
4.
Optional. Close the Properties for Button dialog box.
Tip
Because text doesn't wrap in a button caption, you might need to resize a button to
encompass its caption. For multiple lines of text, use a field instead of a button.
You can also specify an access key for a button, which appears as an underlined character in the
button's caption. An access key allows a user to achieve a button click via the keyboard. The user
can either click the button with the mouse or press the ALT key in combination with the
underlined character in the caption. To set the access key, type an ampersand (&) before the
letter you want to use as the access key. For example, to create the caption Style, where e is the
access key, type Styl&e.
Creating Hyperlinks
Hyperlinks allow you to connect information in a variety of ways. For example, you can define a
hyperlink that navigates to or pops up a related page to display more information about a topic.
You can also define special effects for hyperlinks. For example, when the link goes to another
page, you can specify a transition effect. When the link pops up another page, you can select a
style for the pop-up window. In addition, you can create links that navigate to a URL on the
Internet or an intranet.
► To create a hyperlink for a button:
1.
Select the button on the page.
2.
From the Object menu, select the Hyperlink option.
The Hyperlink dialog box appears.
3.
In the Type of link list, select the kind of link you want to use.
4.
Optional. If you want to display the page in a window you've created using a viewer, select
the name of the viewer in the In window list.
5.
Under Link to, select or enter the page or URL option you want.
6.
Optional. Do one of the following:
7.
Specify a transition effect for the hyperlink. Transition effects are available only when
you choose Go to another page as the type of link you want to use.
Specify a style for the hyperlink's pop-up window. These settings are available only when
you choose Pop up another page as the type of link you want to use.
Click OK.
For more information about hyperlinks and linking options, see Chapter 6, "Working with Objects."
132
Copyright © 2012 SumTotal Systems, Inc. All rights reserved. Duplication prohibited.
Adding a Graphic to a Button
Scripting a Button
You can write a script specifying how a button should behave using the script editor. For example,
the following script displays a question in a pop-up dialog box and responds to a user's choice:
Note Keep in mind that you should not write scripts for objects if you plan to Publish your book
to DHTML.
to handle buttonClick
request "Do you want to continue?" with Yes or No
if it = yes
go to next page
end if
end buttonClick
Like any other object, buttons can be grouped. You can write a script that sets the behavior of
individual buttons and the behavior of the group. For example, you might create several buttons
and write a script for each that defines the behavior of a specific tool. You could then group the
buttons into a tool palette and write a script to define different aspects of the group's behavior,
such as the default location of the palette.
For details about using OpenScript to define button behavior, refer to the Programming in
OpenScript electronic book.
Programming a Button with the Actions Editor
You can use the Actions Editor to program the behavior of a button easily without using
OpenScript. In the Actions Editor, you can program a button to play media, prompt users for
input, and accomplish a variety of other tasks by linking an action or series of actions to a button
click. You can also set conditions for behavior or insert loops that execute the same actions
repeatedly. The behavior that you create using the Actions Editor will be converted into Web
format when using Publish to Web .
For details about using the Actions Editor to add interactive behavior to your applications, see
Chapter 17, "Using the Actions Editor," and Chapter 18, "Creating Action Sequences: Practical
Examples."
Adding a Graphic to a Button
Graphics can help convey the purpose and availability of a button to the user. For example, you
might use a graphic to indicate that a button is disabled. You can use graphics in combination with
a caption, or leave the caption off altogether.
You can assign a graphic to a button state using the Properties for Button dialog box.
Alternatively, you can add a graphic to a button by dragging a graphic object from the Catalog to
the button. You can also use OpenScript to define this property. You can assign as many as four
different graphics to a button (one for each of the four button states).
Graphics for each button state
Dialog box
option
OpenScript
Property
Description
Normal
normalGraphic
Displayed when button is in its normal state
Invert
invertGraphic
Displayed when button is being pressed
Disabled
disabledGraphic
Displayed when button is disabled
Copyright © 2012 SumTotal Systems, Inc. All rights reserved. Duplication prohibited.
133
Adding Interactive Features to your Application
Dialog box
option
Checked
OpenScript
Property
checkedGraphic
Description
Displayed when button is checked, (or Rollover) or
displayed as the rollover graphic when the mouse
pauses over the button if this option is selected in
the Properties for Button dialog box
► To add a graphic to a button:
Using the interface
1. Select the button to which you want to add a graphic, and then click the Properties button on
the ToolBook toolbar.
2.
In the Properties dialog box, click the Graphics tab.
3.
Under Button graphics, choose a button state (Normal, Invert, Disabled, or Checked), and
then click Choose Graphic.
The Choose Graphic dialog box appears.
4.
Select the type of resource you want (bitmap, cursor, or icon) in the Available resources list.
The resources listed in the Choose Graphic dialog box include all the resources of the
selected type that have been imported into the current book. Any new resources you import
are added to the book's resource list.
5.
Do one of the following:
To use an existing resource, select the graphic you want in the graphical list of
resources.
To import a new resource, click Import. In the Import Graphic or Import Resource dialog
box, locate the graphic file you want and click OK; then, select the resource in the
graphical list of resources.
6.
Click OK to close the Choose Graphic dialog box.
7.
Optional. Under Graphic options, do one or more of the following:
If you want the bitmap to fill the button, select Stretch the graphic to fit the button.
(You cannot stretch icons or cursors because they have a fixed size.)
If you want the button to size itself to the graphic, select Size the button to fit the
graphic.
If you want to use the Checked graphic as the rollover graphic (the graphic you see when
the pointer is paused over a button), select Use checked graphic as rollover graphic.
8.
Repeat steps 3 -7 to assign graphic resources for the other button states.
9.
Optional. Close the Properties for Button dialog box.
You might need to resize the button to see the graphic.
Using OpenScript
x
To apply a graphic to a button, set the checkedGraphic, disabledGraphic, invertGraphic, or
normalGraphic property of a button to a bitmap, cursor, or icon resource. For example:
normalGraphic of button "Baseball"=icon "Ball1"
134
Copyright © 2012 SumTotal Systems, Inc. All rights reserved. Duplication prohibited.
Adding a Graphic to a Button
Creating Transparent Areas in a Bitmap
You can create transparent areas in bitmap resources in your book with the Use chromakey
option. The Use chromakey option appears in the Resource Manager dialog box, on the Graphics
tab of the Properties for Button dialog box, and on the Draw tab of the Properties for Background
dialog box. ToolBook uses the Use chromakey setting in conjunction with a color value to
determine the portions of the bitmap resource that will be transparent.
Note The Use chromakey option is applied to all instances of a resource in your book. For
example, if the same bitmap resource is used as a graphic in a button and as an inline
graphic in a field, both instances of the bitmap display the transparency.
Figure 2: The Use chromakey option
► To create a transparent area in a bitmap:
1.
In the Properties for Button dialog box, click the Graphics tab.
2.
Under Button graphics, select the button state (Normal, Invert, Disabled, or Checked)
containing the bitmap in which you want to create a transparent area.
For more information about assigning a bitmap to a button state, see the preceding section,
"Adding a graphic to a button."
3.
Select Use chromakey, and then click the Color button.
4.
In the Color dialog box, select a color, and then click OK.
Portions of the bitmap resource that match this color value become transparent.
Copyright © 2012 SumTotal Systems, Inc. All rights reserved. Duplication prohibited.
135
Adding Interactive Features to your Application
Displaying the Graphic and Caption
You can adjust the layout of a button's caption in relation to the button graphic. By default,
ToolBook displays a caption below the graphic in pushbuttons and command buttons, and to the
right of the graphic in check boxes and radio buttons. Specify the position of the button graphic in
relation to the caption on the Draw tab of the Properties for Button dialog box. If there is no
graphic assigned to a button, the position setting has no effect for most button types.
Figure 3: Caption position is relative to the button graphic
About Hotwords
Hotwords are special areas of text that you can create within fields. You can make a hotword
from any group of characters in a field. For example, a hotword can be a few characters, a word,
a phrase, a sentence, or all the text in a field. Several hotwords can appear in the same sentence,
but no two hotwords can overlap. Inline graphics can also be hotwords.
Hotwords function much like buttons, except that they are part of the text of a field. At Reader
level, a user can click a hotword to navigate or perform some other action. The user can easily
identify a hotword because the pointer changes to a hand when it is paused over a hotword. A
hotword generates events and sends messages to other objects.
Tip
You can create hotwords that play media using a special media player object (only available
in Native mode, not DHTML) from the Catalog.
Hotwords are invaluable for building interactive books capable of complex actions. Instead of
using many buttons on a page for all of the options you want to give users, you can make text
function as an important part of a book's programmed actions. Hotwords provide another level of
individual control in the interface. For example, you can use hotwords to define difficult
terminology, saving space and allowing you to create an application appropriate for more than
one level of expertise. Experts don't have to search through a lot of definitions, while novices can
access the information they need.
Creating and Modifying Hotwords
You create and modify hotwords at Author level. Like other ToolBook objects, hotwords have
properties that you can set to define their physical appearance. After you create a hotword, you
define a hyperlink for it.
Note In order for ToolBook to run a hyperlink, a text field must be set to recognize mouse events.
On the Behavior tab of the Properties for Text Field dialog box, the option labeled Lock the
text and activate mouse events must be selected.
► To create a hotword and define a hyperlink:
1.
Select the text or inline graphic that you want to make into a hotword.
2.
Choose Create Hotword from the Text menu, or press CTRL+H.
136
Copyright © 2012 SumTotal Systems, Inc. All rights reserved. Duplication prohibited.
Creating and Modifying Hotwords
3.
With the hotword still selected, from the Object menu, choose Hyperlink, or press
CTRL+SHIFT+H.
4.
In the Hyperlink box, specify the type of link and the link destination, and then click OK.
5.
Press F3 to go to Reader level, and then click the hotword to test the hyperlink.
Using OpenScript
x
Use the createHotword message to create a hotword from selected text:
Select third word of textline 1 of text of field "Intro"
send createHotword
► To set the properties of a hotword:
Using the interface
1. Select the hotword, and then click the Properties button on the ToolBook toolbar.
2.
3.
Select one or more options to set the hotword's properties:
Style: Specifies whether the hotword appears in color, with a frame around it, with no
distinction from the surrounding text, and so on. Choose Book default to have the
hotword appear in the style indicated by a book's default hotword style.
The hotword is highlighted: Always shows the hotword in its highlighted (pressed) state.
Highlight when clicked: Highlights the hotword when the user clicks it.
Optional. Close the Properties for Hotword dialog box.
A hotword must contain at least one character. You can format hotwords just as you format other
text. For details about formatting text, see Chapter 8, "Working with Text."
Using OpenScript
x
Use the book's hotwordStyle property to set all hotwords in a book to a color, add a border,
or to have no style attributes. The default value of hotwordStyle is color:
hotwordStyle of this book = color
x
Use the hotwordStyle property of the hotword to set a different style for that hotword:
hotwordStyle of hotword "Popup" = frame
x
To remove a hotword's formatting and set it to the style of the book, set the hotword's style
to bookDefault:
hotwordStyle of hotword "Popup" = bookDefault
x
The hotwordColor property specifies the color value of the hotwords. The default for a book's
hotwordColor property is red. For example:
hotwordColor of this book = cyan
x
Use the invert property to make the hotword appear highlighted:
invert of hotword "Popup" = true
x
Use the highlight property to cause a hotword to flash momentarily when clicked:
highlight of hotword "Popup" = true
Copyright © 2012 SumTotal Systems, Inc. All rights reserved. Duplication prohibited.
137
Adding Interactive Features to your Application
Editing Hotwords
You can select and edit a hotword just as you edit other text in ToolBook. When you edit hotword
text, use these guidelines:
x
If the insertion point is within a hotword, any additional characters you type become part of
the hotword.
x
Text you paste into a hotword becomes part of the hotword.
x
If you select a hotword and include text that is not part of the hotword in the selection,
ToolBook treats the selection as text, not as a hotword.
x
You can delete a hotword by using the backspace key or the delete key. As long as one
character of the hotword text remains, the hotword's object properties (such as hyperlinks)
remain. ToolBook discards the hotword as an object when the last character of the hotword is
deleted.
To make hotword editing easier, you can choose Show Hotwords from the View menu to display all
the hotwords on a page. Alternatively, send the OpenScript showHotwords message.
Applying Color to Hotwords
Both books and hotwords have a hotword style property that determines how a hotword is
distinguished from the surrounding text—with color, for instance. A book's hotword color property
(defined on the Draw tab of the Properties for Book dialog box) defines the color value of all the
hotwords in the book. However, an individual hotword style property (defined in the Properties
for Hotword dialog box) overrides the book's hotword style property.
You can apply a color to a specific hotword that is different from the color applied to other
hotwords in a book, or even make different parts of the hotword different colors. Set the
hotword's style to None, and then apply formatting by setting the hotword's text color in the
Properties for Hotword dialog box.
After you have applied special formatting to an individual hotword, you can easily reapply the
book's formatting by changing the hotword's style to Book default.
Removing Hotwords
You can remove a hotword by changing it into regular text.
► To change a hotword into regular text:
1.
Place the insertion point in the hotword or select any part of it.
2.
From the Text menu, choose Remove Hotword.
ToolBook changes the hotword into regular text and discards its script and hyperlink
properties.
Using OpenScript
x
To remove a hotword, send the removeHotword message:
select third word of textline 1 of text of field "Intro"
send removeHotword
138
Copyright © 2012 SumTotal Systems, Inc. All rights reserved. Duplication prohibited.
Chapter 11
Working with List Boxes and Combo Boxes
Introduction
You can display multiple choices for your users with a list box, which is a type of field in
ToolBook, or with a combo box object. This chapter describes how to create and format list boxes
and combo boxes in your application.
About List Boxes and Combo Boxes
List boxes and combo boxes contain and present lists of options to your users. A list box is a type
of field. It organizes choices into a list of items from which the user can make a selection. You
determine the size of the list box; if there are more items than can fit in the area you have
defined, you can add a scroll bar.
Figure 1: List box with a scroll bar
You can use a list box when:
x
The set of choices is too large for radio buttons or check boxes.
x
Space is tight, making radio buttons impractical.
x
You want to give equal weight to all of the list choices.
x
You want the choices to be visible to avoid confusion or mistakes.
x
All the choices are fixed.
Most of the time, you'll create a list box using a text field rather than a record field. But if you
have a similar list on several pages with the same background, you can create a list box from a
record field.
A combo box has three parts: a single-line edit box, a pushbutton, and a drop-down list box. When
the user clicks the pushbutton, the drop-down list appears. Users can type in the edit box (if
allowed by the author) or select an item from the drop-down list. The edit box displays the
currently selected item.
When the user selects an item in the drop-down list, the list box is hidden and the newly selected
item appears in the edit box. By default, users cannot enter text in combo boxes at Reader level;
that is, the user can only select the items in the drop-down list. You can also create a combo box
that can be edited by the user. In this case, the user can click an insertion point in the edit box
and type any entry.
Copyright © 2012 SumTotal Systems, Inc. All rights reserved. Duplication prohibited.
139
Working with List Boxes and Combo Boxes
Figure 2: Combo box
You might choose to use a combo box when:
x
The set of choices is too large for radio buttons or check boxes.
x
Space is tight, making radio buttons and list boxes impractical.
x
There is a default choice.
x
You want users to be able to type in their own choices.
Creating List Boxes
There are three ways to create a list box. You can drag a list box from the Catalog to your page.
Alternatively, you can create a list box using the list box tool on the ToolBook tool palette.
Finally, you can use OpenScript to create a list box.
By default, list boxes that you draw using the tool palette are single-select list boxes, in which the
user can select only one item at a time. If you want the user to be able to select more than one
item at a time, you can change the list box to a multi-select list box using either OpenScript or
the Properties for Text Field dialog box. For details, see "Setting list box properties," later in this
chapter.
Adding a List Box from the Catalog
The Catalog offers several list boxes that you can drag from the object pane and drop onto your
page.
► To add a list box from the Catalog:
1.
Click the Catalog button on the ToolBook toolbar to open the Catalog.
2.
In the Catalog, select the Text Fields category.
3.
Drag a list box object onto your page.
Creating a List Box Using the Tool Palette
You draw a list box on your page using the list box tool.
► To create a list box using the tool palette:
1.
From the tool palette, choose the single-select list box tool.
2.
Click in the main window and hold down the mouse button while you drag to draw the list
box.
140
Copyright © 2012 SumTotal Systems, Inc. All rights reserved. Duplication prohibited.
Setting List Box Properties
Creating a List Box Using OpenScript
You can write and execute OpenScript code using the script editor or Command window. List
boxes you create using OpenScript will not Publish to Web. For more information about using the
OpenScript programming language, refer to the Programming in OpenScript electronic book.
► To create a list box using OpenScript:
x
To make a field into a list box, set the fieldType property to either singleSelect or
multiSelect. For example:
draw field from 2000, 1000 to 4000, 4000
name of selection = "Cities"
borderStyle of selection = scrolling
fieldType of selection = singleSelect
Setting List Box Properties
After you have created a list box, you can set properties that determine how the box appears and
behaves at Reader level—for example, its border style and color. Because a list box is a type of
ToolBook field, you set these properties in the Properties for Text Field dialog box. Each tab in
this dialog box sets some aspect of the field's appearance or behavior.
► To set the properties of a list box:
1.
Select the list box, and then click the Properties button on the ToolBook toolbar.
The Properties for Text Field dialog box appears.
2.
Click one or more tabs and select or enter the options you want to set, as described in the
following table.
3.
Optional. Close the Properties for Text Field dialog box.
Copyright © 2012 SumTotal Systems, Inc. All rights reserved. Duplication prohibited.
141
Working with List Boxes and Combo Boxes
List box properties
Click this
tab...
To do this...
Draw
Set drawing options, border style, field type, color, and
visibility state options
Bounds
Set the field's position and size
Font
Set the font, style, size, effects, and formatting options
Paragraph
Set text alignment, indentation, spacing, and tabs
Behavior
Specify the field's behavior at run time
Drag & Drop
Specify the appearance and behavior of the field when it is
dragged or dropped at Reader level
For more information about formatting text fields, see Chapter 8, "Working with Text."
Modifying Field Type
A list box organizes field text into a list, with one item per line. By default, list boxes allow only
one selection at a time. If you want the user to be able to select more than one item at a time,
you can change the single-select list box to a multi-select list box. ToolBook highlights the
selected list option or options.
Figure 3: Single-select and multi-select list boxes
► To choose a multi-select field type:
1.
Click the Draw tab of the Properties for Text Field dialog box.
2.
In the Field type list, select Multi-select list box.
3.
Optional. Close the Properties for Text Field dialog box.
Adding Text to a List Box
You add text to a list box in the same way that you add text to any field: by typing, pasting, or
importing. Each text line must be separated from the next item using the ENTER key.
Note Text does not wrap at the ends of lines in a list box. If you want to type in more text than
fits on a line, you must first resize the list box.
► To type text in a list box:
Using the interface
1. Double-click inside the list box or right-click the field and select the Edit Text option in the
right-click menu.
An insertion point appears in the upper-left corner.
2.
142
Type your text. Press ENTER after each item in the list.
Copyright © 2012 SumTotal Systems, Inc. All rights reserved. Duplication prohibited.
Creating Combo Boxes
3.
When you are finished, click outside the field.
Using OpenScript
x
You enter text in a list box by setting the text property of the field. Separate the items in the
list with a carriage return/linefeed (CRLF). For example:
text of field "Cities" = "Alphaville" & CRLF & "Bellona" \
& CRLF & "Oz" & CRLF & "Zone"
x
You can also use textline to set each item in the list separately:
textline 1 of text of field "Cities" = "Alphaville"
textline 2 of text of field "Cities" = "Bellona"
textline 3 of text of field "Cities" = "Oz"
You can also paste text from the Clipboard into a list box.
► To paste text into a list box:
1.
Copy the text you want to the Clipboard.
2.
Double-click inside the list box into which you want to paste the text.
An insertion point appears.
3.
From the Edit menu, choose Paste, and then click outside the list box.
Note If the text you paste is too long to fit the list box, ToolBook displays as much text as
possible. You cannot scroll to see missing text, but if you resize the list box, the text
becomes visible. You can also set the OpenScript property borderStyle to scrolling.
For details about working with text in fields, see Chapter 8, "Working with Text."
Creating Combo Boxes
You can drag a combo box from the Catalog to your page, use the combo box tool on the tool
palette, or use OpenScript to create a combo box. The size of the area you draw for a combo box
determines the width of the edit box. If you create a combo box using the tool palette, the
current font and font size determine the height of the combo box's edit box. If you create a
combo box using OpenScript, the height is set by the OpenScript lineCount property. When you
select the combo box, selection handles appear around the edit box portion. You can resize a
combo box after you draw it.
Adding a Combo Box from the Catalog
The Catalog contains a combo box that you can drag from the object pane and drop onto your
page.
► To add a comb box from the Catalog:
1.
Click the Catalog button on the ToolBook toolbar to open the Catalog.
2.
In the Catalog, select the Text Fields category.
3.
Drag a combo box onto your page.
Copyright © 2012 SumTotal Systems, Inc. All rights reserved. Duplication prohibited.
143
Working with List Boxes and Combo Boxes
Creating a Combo Box Using the Tool Palette
You can draw a combo box on your page using the combo box tool.
► To create a combo box using the tool palette:
1.
From the tool palette, choose the combo box tool.
2.
Click in the main window and hold down the mouse button while you drag to draw the combo
box.
The box you draw will include both the edit box and the pushbutton.
Creating a Combo Box Using OpenScript
Combo boxes you create using OpenScript will not Publish to Web. You can use a combo box from
the Catalog if you want it to Publish to Web, or draw one using the tool palette.
► To create a combo box using OpenScript:
x
Use the draw command to draw the combo box and the lineCount property to set the height
of the drop-down list. For example:
draw combobox from 100,1000 to 5000,2000
name of selection = "myList"
lineCount of combobox "myList" = 3
Setting Combo Box Properties
You set combo box properties using the Properties for Combo Box dialog box. Using this dialog
box, you can specify properties that determine how the combo box appears and behaves at
Reader level.
► To set the properties of a combo box:
Using the interface
1. Select the combo box, and then click the Properties button on the ToolBook toolbar.
144
Copyright © 2012 SumTotal Systems, Inc. All rights reserved. Duplication prohibited.
Setting Combo Box Properties
The Properties for Combo Box dialog box appears.
2.
To specify the behavior of the combo box at Reader level, click the Behavior tab, and then
select one or more of the following options:
Enable the combo box Specifies whether the combo box can receive the focus and
mouse-event messages at Reader level. Combo boxes are enabled by default.
Make the combo box editable Allows a user to edit the combo box at Reader level.
Give the drop-down list a scroll bar if necessary Adds a scroll bar to the drop-down list
if there are more items than will fit.
Sort the drop-down list alphabetically Sorts items alphabetically at Reader level.
3.
Click one or more of the other tabs and select or enter the options you want to set.
4.
Optional. Close the Properties for Combo Box dialog box.
Using OpenScript
x
You can use the scrollable, sortItems, editable, lineCount, and enabled properties to
format your combo box:
scrollable of comboBox "Long List" = true
sortItems of comboBox "Long List" = true
editable of comboBox "Long List" = false
enabled of comboBox "Long List" = true
lineCount of comboBox "Long List" = 8
Copyright © 2012 SumTotal Systems, Inc. All rights reserved. Duplication prohibited.
145
Working with List Boxes and Combo Boxes
Adding Text to Combo Boxes
You can add text to a combo box by typing in the field or by using OpenScript.
► To enter text in a combo box:
Using the interface
1. Select the combo box you have added to the page.
2.
To enter default text that will appear in the edit box, double-click inside the edit box to
display an insertion point, and then type your text.
3.
Click the pushbutton to display the drop-down list.
ToolBook places the insertion point in the drop-down list.
4.
Type as many items as you want, pressing ENTER after each item.
5.
If you want to change the character formatting of the text in the drop-down list, select the
list, choose Character from the Text menu, and then enter your changes in the Character
dialog box.
6.
When you have finished, click outside the combo box.
The drop-down list box closes.
Using OpenScript
x
Use the dropDownItems property to add items to the drop-down list. If you want default text
to appear in the edit box, use the text property:
draw comboBox from 100,1000 to 5000,2000
lineCount of comboBox "myItems" = 3
dropDownItems of comboBox "myItems" = "item 1" & CRLF & "item 2" \
& CRLF & "item 3"
text of comboBox "myItems" = "item 1"
LineCount controls the number of lines in the drop-down list, while dropDownItems controls the
text displayed in the list box. These properties don't have to match. If the number of textlines in
dropDownItems is greater than lineCount (if you specify more list options than will fit in the
visible drop-down list), ToolBook displays as much of the list as it can. Add a scroll bar so that the
user can see all the text.
Determining User Selection
You can use list boxes and combo boxes to customize the behavior or content of your application
for individual users. For example, you can show a video or direct users to a particular page based
on their list box or combo box selection.
To determine and handle a user's list box or combo box selection, you can either build an action
sequence in the Actions Editor or write a script in OpenScript. The action sequences that you
create in the Actions Editor, Publish to Web for use on the Web.
146
Copyright © 2012 SumTotal Systems, Inc. All rights reserved. Duplication prohibited.
Determining User Selection
Determining List Box or Combo Box Selections Using an Action
Sequence
In an action sequence, you determine a user's selection in a single-select list box or combo box
using the On select event. The On select event is generated when a user selects a different item
from the list. Figure 4 shows the Action Editor with an example of an action sequence that carries
out specific actions based on a user's list box selection.
The selectedItemText property of list boxes and combo boxes allows you to determine the text of
a selected item. You can set this property to select the item in a list box which matches the text
you specify. For a combo box, assigning text to the selectedItemText property causes this text to
display in the combo box.
Figure 4: Using an action sequence to determine the user selection
Copyright © 2012 SumTotal Systems, Inc. All rights reserved. Duplication prohibited.
147
Working with List Boxes and Combo Boxes
Determining List Box Selection Using OpenScript
The selectedTextlines property of the field contains the number of the selected text line, so you
can determine the text that has been highlighted in the list box. Use the following script in a
button's script (or another object other than the list box) to determine the item that the user has
selected in the single-select list box:
to handle buttonClick
choice = selectedTextlines of field "list"
if choice < > null
vHighlightedText = textline choice of text of field "list"
request vhighlightedText
end
end
If the field is a multi-select list box, selectedTextlines contains a list of numbers for the lines that
are highlighted. You can step through the list to pick out individual line numbers and then use the
line numbers one by one to extract the highlighted text. For example:
to handle buttonClick
choices = selectedTextlines of field "list"
if choices < > 0
step ctr from 1 to itemCount(choices)
nextLineNo = item ctr of choices
textFromList= textline nextLineNo of text of field "list"
request "next choice is" && textFromList
end
end
end
148
Copyright © 2012 SumTotal Systems, Inc. All rights reserved. Duplication prohibited.
Determining User Selection
Determining Combo Box Selection Using OpenScript
After the user clicks the pushbutton of a combo box and makes a selection from the drop-down
list, the message selectChange is sent to the combo box, along with a parameter indicating the
user's choice. Use a handler like the following to detect what the user has selected:
to handle selectChange itemString
request "User has selected" && itemString
end
When the user selects an item, the current value of the edit box is discarded and replaced with
the user's choice. If you want to preserve the old value, save it before the selectChange message
is sent. One option is to store the old value as a user property of the combo box when the user
presses the combo box's pushbutton and the enterDropDown message is sent. For example, put
both of these handlers in the script of a combo box:
to handle enterDropDown
saveText of self = text of self
end enterDropDown
to handle selectChange
vText = dropDownItems of self
if (saveText of self & CRLF) is not in (vText & CRLF) then
dropDownItems of self = vText & CRLF & saveText of self
end
end
You can also use the selectedItem property to determine the selected item by position number in
the combo box. Use this script in the combo box to determine what the user has selected:
to handle enterDropDown
my oldSelectedItem = my selectedItem
end
to handle leaveDropDown
conditions
when my selectedItem > my oldSelectedItem
send greaterItemChosen
when my selectedItem < my oldSelectedItem
send lesserItemChosen
else
send sameItemChosen
end
end
Note Be sure to handle the three new messages generated by this script, or an error will occur.
For more information on handling messages, refer to the Programming in OpenScript
electronic book.
Copyright © 2012 SumTotal Systems, Inc. All rights reserved. Duplication prohibited.
149
Chapter 12
Creating a Quiz using Question Objects
Introduction
An important part of interactive courseware is the ability to evaluate how well a user is learning
the material presented. To assist you with this task, ToolBook provides question objects that you
can use to test student knowledge. This chapter describes question objects and shows you how to
use and modify them to suit your application. It also introduces the new Quiz Summary feature.
About Question Objects
Question objects allow you to construct different types of questions, including multiple-choice
questions, true/false questions, fill-in-the-blank questions, match-item questions, and so on.
Question objects determine the responses that users make, calculate the score, and provide
feedback. There are many types of question objects available from the Catalog. You can
customize their appearance and behavior or use them as they are provided and simply add your
own content.
Figure 1: Examples of question objects
Copyright © 2012 SumTotal Systems, Inc. All rights reserved. Duplication prohibited.
151
Creating a Quiz using Question Objects
Working with Question Objects
You can browse through the descriptions of questions in the Catalog, and then select a specific
type of question to use.
► To add a question object to a page:
1.
If the Catalog is not already open, from the View menu choose Catalog.
2.
Select the Questions category.
3.
Drag the question object you want from the object pane, and then drop it onto your page.
Setting the Properties of a Question Object
After you add a question object to a page, you can specify its appearance and behavior in the
Properties for Question dialog box.
Figure 2: The Properties for Question dialog box
The Properties for Question dialog box differs slightly for each type of question object, but most
question objects allow you to specify:
x
each possible answer to be recognized.
x
which answer is correct.
x
how many times the student can try to answer the question.
x
the options for assigning a score to the question.
x
the options for providing feedback to the student.
x
the question text displayed in a quiz summary.
► To set the extended properties of a question object:
1.
152
Select the question object.
Copyright © 2012 SumTotal Systems, Inc. All rights reserved. Duplication prohibited.
Question Objects in Action
2.
Click the Extended Properties button on the ToolBook toolbar.
The Properties for Question dialog box appears.
This dialog box displays information specific to the selected question object. The remainder
of this procedure outlines the most common options.
3.
4.
Click the General tab and do the following:
Type a unique name in the Question name box.
Specify any other options you want.
Click the Answers tab and do the following:
5.
Click the Scoring tab and do the following:
6.
Under Possible answers, enter the answers, specify the correct answer or answers, and
then specify any other options you want.
Select Score this question, specify the weight of an answer, and then specify the scoring
options you want.
Click the Immediate Feedback tab and do the following:
Select the Enable feedback at time of response option.
Specify the feedback that occurs at the time a user responds to a question.
7.
Click the Delayed Feedback tab, and then specify the feedback that occurs at a later
(delayed) time.
8.
Click OK.
Question Objects in Action
The Catalog contains a rich variety of question objects that help you evaluate interactive learning
in your application. Several of these are introduced on the pages that follow.
Figure 3: A question created using an arrange-objects object
Copyright © 2012 SumTotal Systems, Inc. All rights reserved. Duplication prohibited.
153
Creating a Quiz using Question Objects
An arrange-objects object allows you to specify the proper positions of objects on a page and test
the student's knowledge of the positions. When the book runs, the objects are scrambled on the
page, and the student attempts to drag them back into the arrangement you defined.
A student's score is based on the number of objects that are positioned correctly.
Figure 4: A question created using a drag-objects question
A drag-objects question allows you to define objects as potential answers and test the student's
ability to identify the correct answer. The student chooses an answer by dragging objects to one
of the potential answers that you have defined. In the example above, a student drags text labels
to identify parts.
Figure 5: A question created using a drop-target object
A drop-target object allows you to define objects as potential answers and test the student's
ability to identify the correct answers. The student chooses an answer by dragging an answer
object to the drop-target object. The drop-target object itself is typically a picture of a container
or target. Use this question object when the correct answer allows the student to drag multiple
objects to a single target.
Figure 6: A question created using a fill-in-the-blank object
154
Copyright © 2012 SumTotal Systems, Inc. All rights reserved. Duplication prohibited.
Question Objects in Action
A fill-in-the-blank object allows you to define a word or phrase as the correct response to a
question. The student attempts to answer the question by typing a response in the object's
response area.
Figure 7: A question created using a match-items object
A match-items object allows you to define pairs of matching items as correct answers and test the
student's ability to identify the pairs correctly. The student attempts to match the items correctly
by dragging an arrow from each response object to its match.
Figure 8: A question created using a multiple-choice object
A multiple-choice object allows you to define a button, field, or other object as a correct answer.
The student attempts to answer the question by clicking the button, field, or object. Using this
object, you can also designate multiple correct answers and specify randomization (the correct
answer appears in a different location each time).
Figure 9: A question created using an order-text object
An order-text object allows you to define an ordered list of words or phrases as the correct
response to a question and test the student's ability to reconstruct the list in the proper order.
The student attempts to answer the question by dragging the phrases to the correct position.
Copyright © 2012 SumTotal Systems, Inc. All rights reserved. Duplication prohibited.
155
Creating a Quiz using Question Objects
Scoring Questions
In addition to indicating which answer is correct, you can specify that a question object calculate
a student's score. You can report the score to the student at the end of the book or record the
score in a log file. A log file is a text file that includes information such as the student's score,
response to each question, and time spent working on the page. You specify options for a log file
in the Properties for Lesson dialog box, which is available from the Object menu. You can also
have ToolBook report the score to a learning management system which can maintain the
student's score in a database for administrators to examine later.
At its simplest, scoring is a tally of the questions the student has answered correctly. For more
flexibility, you can assign different point values to different questions. You can also assign a
weight to each correct answer by specifying a correctness factor within any question object. You
can subtract points from the student's score for incorrect answers, and you can limit the number
of times a user attempts to answer the question.
► To enable scoring:
1.
Select the question object.
2.
Click the Extended Properties button on the ToolBook toolbar.
3.
In the Properties for Question dialog box, click the Scoring tab.
4.
Select the Score this question check box.
5.
If necessary, change the default values in the Lowest possible score and Highest possible
score boxes.
6.
Under Possible answers, select each response and verify that the weight assigned to the
answer by the Properties dialog box is correct.
7.
Click OK.
You display a student's score in your application using the Show Score, Score Page, and Score Quiz
buttons available from the Scoring and Tracking category in the Catalog. These buttons are
preprogrammed to calculate the score for an individual question object or for several question
objects. You can use a scoring button in combination with a score field to display the score to the
user. Score fields are also available in the Evaluation category of the Catalog.
156
Copyright © 2012 SumTotal Systems, Inc. All rights reserved. Duplication prohibited.
Specifying Feedback
Assigning Weight to an Answer
With most types of question objects, you can assign a weight to every answer. The weight is a
percentage of the possible points available for the question. For example, with a fill-in-the-blank
question, you might assign different weights to various possible answers. You can also let the
Properties for Question dialog box assign the weights, depending on the type of question and the
number of answers.
By default, the weight of a correct answer is 100 percent if the question has a single answer, and
a fraction of 100 percent if there are several answers. The weight is automatically updated as you
mark answers correct or incorrect.
You can modify the weights in the Properties for Question dialog box. You can assign a negative
weight to an incorrect answer, making the incorrect answer penalize the score for the question
until it is either zero or the minimum score for the question, whichever is lower. For example,
with a multiple-choice/multiple-correct question, incorrect answers may have a negative weight
that cancels correct answers. The Automatic check box on the Scoring tab makes this negative
weight assignment automatic.
For question objects that can recognize only a single answer at a time, such as a fill-in-the-blank
or rating-by-multiple-choice question object, you can assign a higher weight to the most desirable
answer and a lower weight to the other answers. For example, if your application solicited an
opinion with a question such as "Please rate the service at our hotel," you might use a rating-bymultiple-choice object with three possible answers, weighted as shown below.
Rating by multiple choice
Answer
Weight
Excellent
100%
Average
50%
Poor
0%
Specifying Feedback
With question objects, you can specify feedback, which is how the object responds when the
student interacts with it. For example, when a student chooses the correct answer for a multiplechoice question, the question object can display the message "Correct."
Providing feedback to a student allows for a higher level of interactivity, which results in better
retention. Feedback is traditionally used in computer-based training to provide responses or
remediation to students according to how well they answer a question. However, you can use
feedback for a variety of purposes, such as guiding a student through a task or through your
application.
Copyright © 2012 SumTotal Systems, Inc. All rights reserved. Duplication prohibited.
157
Creating a Quiz using Question Objects
Types of Feedback
ToolBook provides several types of feedback that you can specify for question objects. For
example, you can:
x
Play a sound or media file.
x
Display text.
x
Navigate to another page in the same book or in another book.
x
Navigate to a URL (a Web address).
You can combine these methods and use more than one type of feedback in response to the user's
choice. For example, you can both play a sound file and display text in a pop-up window when the
user selects the correct choice in a multiple-choice question. If you specify more than one
feedback option, they are executed in the order in which they appear in the bullet list above. In
the example given, the student would hear the sound and then see the text in the pop-up
window.
By default, text feedback and video feedback appear in pop-up windows. To designate a specific
location on the page for the feedback to appear, use a feedback field, a universal media player,
or in native books, a video player, or a stage from the Catalog. If a feedback field is on the page,
ToolBook will display feedback text in the feedback field by default. If a video player or stage is
on the page, ToolBook can display video feedback in the video player or stage if you select the
player or stage in the Choose Media Clip dialog box (available when you click the Select media clip
button on the Immediate Feedback or Delayed Feedback tab of the Properties for Question dialog
box).
158
Copyright © 2012 SumTotal Systems, Inc. All rights reserved. Duplication prohibited.
Specifying Feedback
Choosing Immediate or Delayed Feedback
Feedback for a question object can be immediate or delayed. Immediate feedback appears in
response to a specific question object; for example, a student clicks a button in a multiple-choice
question and hears a beep or sees a popup window that says "Try again." Delayed feedback is
triggered when the question is scored or when a message is sent to the question object to make it
play the feedback. Delayed feedback is useful for providing feedback on multiplechoice/multiple-correct questions where you want a student to select several correct answers and
then click a button to receive feedback on the selected set of answers.
If you are creating a scored quiz, do not use immediate feedback to tell the user whether an
answer attempt is correct or incorrect. ToolBook does not count an attempt that displays
immediate feedback as an actual attempt. A question with immediate feedback will be scored as
though the student selected the correct answer on the first attempt, even if it took the student
three tries to select the correct answer.
Use immediate feedback when you:
x
Do not plan to score a question.
x
Want to display feedback (such as "Correct" or "Try again") for each possible answer as the
student is answering the question.
x
Use delayed feedback when you:
x
Plan to score a question as part of a quiz.
x
Want to display feedback after the student has finished answering the question.
x
Want to display different feedback for each of the following outcomes: All correct, All
incorrect, or Partially correct.
You can sometimes combine immediate and delayed feedback in the same question. A multiplechoice/multiple-correct question can have several active answers. By using immediate feedback,
you can have the question object provide feedback for each possible answer as soon as the
student selects it, whether the question takes a single answer or multiple answers. When the
student is finished with a multiple-choice/multiple-correct question object, you can use delayed
feedback to provide feedback for the whole question. For example, you might provide one type of
feedback if the student answered the question partially correctly, and a different type of
feedback if the student answered incorrectly. You can define both types of feedback for any
question object except an order-text object, for which you can define only delayed feedback.
Specifying Feedback for a Question Object
You specify feedback for a question object using the Properties for Question dialog box, which has
separate tabs for immediate and delayed feedback.
► To specify immediate feedback for a question object:
1.
Select the question object, and then click the Extended Properties button on the ToolBook
toolbar.
2.
Click the Immediate Feedback tab.
3.
Select the Enable feedback at time of response check box.
4.
Under Possible answers, select the answer or answers for which you want to provide
feedback. You can click the Select All Correct or Select All Incorrect buttons to select all the
correct or incorrect answers at one time. (The Select All Correct and Select All Incorrect
buttons are available only for question objects of the appropriate type.)
5.
Specify one or more of the following feedback types (the object activates the feedback in this
order):
Copyright © 2012 SumTotal Systems, Inc. All rights reserved. Duplication prohibited.
159
Creating a Quiz using Question Objects
Play media – Select the type of media response you want from the options in the dropdown list. Select the media clip option if you want to play a clip. This enables a field
called Media clip in which you can specify which clip to play. Select the media player
option if you have a media player on your page in which you want to play a media file.
Selecting this option enables a field called Media player in which you can specify the
media player to associate with the question object.
Feedback text – Click the Edit Text button to specify text for ToolBook to display in a
pop-up window or in a text or record field named Feedback that appears on the current
page or background.
Hyperlink – Click the Select Hyperlink button to specify a hyperlink, indicating a target
page in the current book or in another book to which the object should jump.
Send message (applicable to Native mode only) – Click the Edit Message button to specify
an OpenScript message that ToolBook sends as feedback. The following feedback
messages are available.
OpenScript feedback messages
This message...
Does this...
ASYM_PlayFeedback
Causes question feedback to play. If delayed
feedback is assigned, it will play; otherwise,
immediate feedback will play.
ASYM_PlaySummaryFeedback
Causes delayed feedback to play.
ASYM_Reset
Resets the question to the default state (appearance,
score, and so forth).
ASYM_ShowYourScore
Shows the current score for the question.
6.
Repeat steps 4 and 5 for each answer.
7.
Click OK.
► To specify delayed feedback for a question object:
1.
Select the question object, and then click the Extended Properties button on the ToolBook
toolbar.
2.
Click the Delayed Feedback tab.
3.
Under Feedback to execute on request when the responses are, specify whether the delayed
feedback should play when responses are All correct, All incorrect, or Partially correct.
4.
Specify one or more of the feedback types for each possible outcome.
For details, see the feedback type descriptions in the preceding procedure.
5.
Click OK.
You can display delayed feedback using a preprogrammed Catalog object.
► To display delayed feedback for a question object:
1.
Navigate to the page that contains the question for which you want to display delayed
feedback.
2.
If the Catalog is not already open, click the Catalog button on the ToolBook toolbar.
3.
In the Scoring and Tracking category, select the Show Delayed Feedback object.
4.
Drag the Show Delayed Feedback object from the object pane, and then drop it onto your
page. With the object selected, click the Extended Properties button on the ToolBook
toolbar. The Properties for Play Feedback dialog box appears.
160
Copyright © 2012 SumTotal Systems, Inc. All rights reserved. Duplication prohibited.
Specifying Feedback
5.
In the Object to score list, select the name of the question object for which you want to
display delayed feedback.
6.
Click OK.
Using the Actions Editor to Specify Feedback
You can use the Actions Editor to specify immediate and delayed feedback for a question. Two
question events are available in the Actions Editor: On question answered and On question scored.
The On question answered event corresponds to immediate feedback, and the On question scored
event corresponds to delayed feedback. These events allow you to define feedback behavior that
can be more complex than the behavior available on the Feedback tabs in the Properties for
Question dialog box. For example, you could implement an action sequence that stores the
number of attempts a student makes before choosing the correct answer to a question, and then
display text to the student that shows the number of attempts made. Action sequences that you
create to respond to question events will work in conjunction with the settings in the Properties
for Question dialog box.
Quiz Summary
ToolBook now has a new Quiz Summary feature that provides a summary of questions answered in
the book. There is a new category called the Quiz Summary category that contains a Quiz
summary object and other objects that are likely to be used along with this quiz summary object.
The Quiz summary object allows you to designate which questions will be summarized, based on a
page range specified. By default, the Quiz Summary object is configured to display some general
information about your questions. Other information can be added or removed as needed, using
the various Quiz Summary components found in the Quiz Summary catalog category.
For details on the new Quiz Summary feature, refer to the topic "Using the Quiz Summary Feature"
in Help.
Copyright © 2012 SumTotal Systems, Inc. All rights reserved. Duplication prohibited.
161
Chapter 13
Adding a Certificate to a Book
Introduction
You can add a certificate to your book that can be displayed when a learner completes a course.
This chapter describes how to add a certificate to your book.
The Certificate Feature
The catalog category called Certificates contains a Certificate page that can be displayed when a
learner completes a course. The certificate page contains details such as the name of the learner
and the date of completion, and can be customized by the course author. When used in a course
that has an assessment or a quiz, the certificate page displays the score obtained by the learner
as well.
Once a learner completes a course, he or she has the option of printing the certificate.
Copyright © 2012 SumTotal Systems, Inc. All rights reserved. Duplication prohibited.
163
Adding a Certificate to a Book
The Certificate page contains the following objects:
x
Certificate of completion: The title of the certificate, which is by default "Certificate of
Completion".
x
Student Name: Displays the name of the learner. If this lesson is launched from an AICC or
SCORM LMS, the learner’s name is automatically obtained from the LMS to be used on the
certificate. If you are not using an LMS, you can use the Student Name Prompt object
(typically placing it near the beginning of your lesson) in order to prompt learners to provide
their name. This name will then later be used on the certificate. Lastly, you can choose to
obtain the learner’s name using the Actions Editor. In order to get the Certificate to utilize
this value, apply that value to the Actions Editor global variable: Certificate_StudentName. If
the learner’s name cannot be determined at the time the certificate is displayed, the
certificate will prompt the learner to enter his or her name.
x
Book Title: Displays the title of the book. This field is auto-populated from the Book Title
property on the Summary tab of the Properties for Book dialog.
x
Date: Displays the date of completion of the course. This field is auto-populated.
x
Graphic: A Reusable Graphic placeholder that can be configured to display your own logo or
other image.
x
Signature: Provides an area that can be signed by a proctor or other designated individual
after the certificate is printed.
x
Score: Displays the learner's lesson score as a percentage. This field is auto-populated.
x
Certificate Control Panel: This control panel includes a print and close button. The close
button closes the certificate page, returning the user to the previous page. The print button
enables the user to print out the certificate page, while ensuring the entire control panel is
temporarily hidden so that it does not appear on the printed certificate.
In addition to all the objects present on the certificate page, the Certificates category also
contains the following two objects:
x
Student Name Prompt: If you will not using a Learning Management System, add the Student
Name Prompt from the Certificates category to the beginning of your book. When learners
take the course, this Student Name Prompt object will enable them to enter their name. This
name is later displayed on the certificate page.
x
Display Certificate: On clicking this button, the user is taken to the certificate page. The
Display Certificate button can be added anywhere in your book. Typically it would be placed
after the quiz or assessment section in your book.
The Certificate category also contains various Frames that can be applied to the certificate page
to change the graphical look of a certificate.
164
Copyright © 2012 SumTotal Systems, Inc. All rights reserved. Duplication prohibited.
Using the Certificate Page
Using the Certificate Page
You can use the Certificate page from the Certificates category as-is or customize it to meet your
requirements.
To use a Certificate page in your book:
► To use a Certificate page in your book:
1.
If you will not be using a Learning Management System, consider adding a Student Name
Prompt object from the Certificate category to the first page of your book. This ensures that
the learner’s name is captured and displayed on the certificate page after the learner
completes the course. If you do not add this object to the beginning of your book, this prompt
appears when the learner navigates to the Certificate page.
2.
Navigate to the last page in your book and add the Certificate page to it from the Certificate
category in the catalog by double-clicking it.
3.
Access the basic properties of the Graphic object on the page and associate the required
image to it. Delete the graphic object if you do not want to display any graphic or logo.
4.
If you do not have a quiz in your book, delete the score object from the certificate page.
5.
If you want the certificate page to be displayed from any other page in your book, add the
Display Certificate object from the Certificate category of the catalog to that page. Typically,
you would add it to the summary page of the book, where the final score would be displayed.
Copyright © 2012 SumTotal Systems, Inc. All rights reserved. Duplication prohibited.
165
Chapter 14
Hiding, Showing, and Animating Objects
Introduction
You can hide and show objects and animate objects to add visual effects to your book. Hiding and
showing objects is a simple way to add interactivity, and animation can effectively demonstrate
change over time or illustrate a chain of events. This chapter describes how to hide, show, and
animate objects using the ToolBook Animation Editor, the Actions Editor, and OpenScript.
Creating Visual Effects
Visual effects—such as hiding, showing, and animating objects—can help make your ToolBook
application dynamic and engaging. To create these effects, you can use:
x
The ToolBook Animation Editor to create path-based or cel-based animations for objects.
x
The Actions Editor to create action sequences that hide, show, or animate objects in response
to specific conditions.
x
OpenScript to change the position, size, or shape of objects, or to display a changing set of
pictures that gives the illusion of motion. For a detailed description of how to use OpenScript
to create special effects in an application, refer to the Programming in OpenScript electronic
book.
Hiding and Showing Objects
Hiding and showing objects is a simple and effective way to create interactivity in your
application. An object hidden at Reader level can be made to show when the user performs a
certain action.
To create hide-and-show behavior, you can use an action trigger from the Catalog. You can also
use the Actions Editor to create an action sequence to hide and show objects. One advantage of
hiding and showing objects in an action sequence is that you can closely control how the effect
fits into your overall lesson design. For example, you can hide or show an object as part of a
longer sequence of actions, all activated by the same event. You can also create conditional
expressions and loops that determine when an object is hidden or shown.
Using an Action Trigger to Hide and Show Objects
You can use an action trigger to hide and show objects. Simply drag the action trigger from the
Catalog onto your page and specify the object to hide or show. You can add a delay when hiding
or showing an object using the action-delay trigger.
The following procedure uses an ellipse as an example. You can choose any Catalog object to hide
and show.
► To create hide-and-show sequence using action triggers:
1.
If the Catalog is not open, from the View menu choose Catalog.
2.
Click the Draw Objects category and drag an ellipse object onto your page.
3.
From the Action Objects category, drag two action triggers onto your page. Arrange the three
objects on your page so that none are overlapping.
Copyright © 2012 SumTotal Systems, Inc. All rights reserved. Duplication prohibited.
167
Hiding, Showing, and Animating Objects
4.
Select one of the action triggers, and then click the Extended Properties button on the
ToolBook toolbar.
5.
In the Properties for Action Trigger dialog box, under Objects to trigger, click Add. In the Add
an Object dialog box, do the following:
6.
In the Select object list, select the ellipse.
Under Perform what action, choose Hide.
Click OK
In the Properties for Action Trigger dialog box, under Trigger on what event, do the
following:
Select the When clicked check box, and clear the When entering page check box.
Select the Button is visible at reader check box, and clear the Loop continuously check
box.
Click OK.
7.
Select the second action trigger, and then click the Extended Properties button on the
ToolBook toolbar.
8.
In the Properties for Action Trigger dialog box, under Objects to trigger, click Add. In the Add
an Object dialog box, do the following:
9.
In the Select object list, select the ellipse.
Under Perform what action, choose Show.
Click OK.
In the Properties for Action Trigger dialog box, under Trigger on what event, do the following:
Select the When clicked check box, and clear the When entering page check box.
Select the Button is visible at reader check box, and clear the Loop continuously check
box.
Click OK.
10. Switch to Reader level (press F3) to test your hide-and-show sequence.
Using the Actions Editor to Hide and Show Objects
Using the Actions Editor visual programming tool, you can program an object to hide or show in
response to an event.
► To hide or show an object using the Actions Editor:
1.
Select an object (for example, a button or graphic).
2.
From the Object menu, choose Actions.
The Actions Editor appears.
3.
In the Event list, select an event that activates the action sequence (for example, On click or
On load page).
4.
From the Insert menu in the Actions Editor, point to Action, point to Object, and then choose
Set Property.
5.
In the Properties for Action dialog box, do the following:
168
In the Select the object for which to set the property list, select the object you want to
hide or show; or, drag the Choose object button over the object to select it.
In the Select the property to set list, select Visible.
Copyright © 2012 SumTotal Systems, Inc. All rights reserved. Duplication prohibited.
Animating ToolBook Objects
Under Property value, check Specify the new value for the property as a literal value.
In the Select logical value list, select false to hide the object or true to show the object.
6.
Click OK.
7.
From the File menu in the Actions Editor, choose Update Actions & Close.
8.
Switch to Reader level (press F3) to test your sequence.
For more information about using the Actions Editor to create action sequences, see Chapter 17,
"Using the Actions Editor," and Chapter 18, "Creating Action Sequences: Practical Examples."
Using OpenScript to Hide and Show Objects
Using the Command window or the script editor, you can write scripts to show and hide objects.
For more information about using the OpenScript programming language, refer to the
Programming in OpenScript electronic book.
x
You can show and hide a series of objects in a stack, each of which is a slight variation of the
same image:
to handle buttonClick
step ctr from 1 to 6
if ctr < 6 then
show ellipse ("ellipse" & (ctr + 1))
end if
hide ellipse ("ellipse" & ctr)
pause 20
end step
show ellipse ("ellipse1")
end
Animating ToolBook Objects
You can animate any object (with the exception of pages, backgrounds, and books). Animation
can add visual impact to your learning application and illustrate how things move or change over
time.
You can create two types of animations with the ToolBook Animation Editor:
x
Path-based animation – This type of animation allows you to define the path an object will
follow as it moves in an animation. You can use a path animation to simulate or show
movement and action, such as a banner that flies across the page.
x
Cel-based animation – This type of animation allows you to define individual views of an
object, called cels that are shown in rapid succession. You can use cel-based animation to
simulate motion, such as a globe that spins.
Copyright © 2012 SumTotal Systems, Inc. All rights reserved. Duplication prohibited.
169
Hiding, Showing, and Animating Objects
Using the ToolBook Animation Editor
You use the ToolBook Animation Editor to create, edit, and manage the animations in a book.
When you open the Animation Editor, ToolBook copies all of the objects on the page (or
background) to the Animation Editor. You use the buttons and slider along the bottom of the
window to create, edit, and run animations.
Figure 1: ToolBook Animation Editor
► To open the Animation Editor:
1.
Optional. In the main window, select the object you want to animate.
2.
From the Object menu, choose Path Animation.
To create a path animation in the Animation Editor, you use the mouse to draw the path you want
the object to follow. A path consists of segments connected by vertices. You can create a path
animation that moves an object while the object changes size. In addition, you can create
multiple animations for an object that you can trigger using an action trigger from the Catalog,
using a command you create in the Actions Editor, or using OpenScript. When you are finished
drawing the path, ToolBook compiles information about the path and stores it as a property of the
object.
170
Copyright © 2012 SumTotal Systems, Inc. All rights reserved. Duplication prohibited.
Animating ToolBook Objects
Creating a Path Animation
You create a path animation for a particular object by opening the Animation Editor and drawing
the path with the Vertex tool. Each click of the mouse adds a new segment to the path.
Figure 2: Creating a path animation
► To create a path animation:
1.
In the main window, select the object you want to animate.
2.
From the Object menu, choose Path Animation.
ToolBook opens the Animation Editor and displays the objects on the current page with the
first segment of the animation path for the selected object.
3.
Optional. To change the location of the first segment, move the cursor over the selected
object until the Move cursor
appears, and then drag the segment to a new position.
or press the SPACEBAR, and then click the
4.
To add a segment, click the Vertex button
pointer where the new segment should end.
5.
Move the Vertex cursor
6.
Click Done to save the animation and return to the main window.
and click to add segments until you have completed the path.
► To test an animation:
x
Click the Run button
in the Animation Editor. Alternatively, use the slide bar at the
bottom of the Animation Editor to step through an animation sequence.
Copyright © 2012 SumTotal Systems, Inc. All rights reserved. Duplication prohibited.
171
Hiding, Showing, and Animating Objects
Creating a Cel Animation
A cel animation displays a series of images to give the illusion of motion—much like a flipbook
animation. For example, you can use cel animation to create the appearance of a spinning globe.
The animation consists of different views of the earth, each called a cel. Showing one cel at a
time in succession gives the illusion that the globe is turning.
Figure 3: Six cels from a cel animation
After creating all of the individual cels, you arrange them on top of each other in the correct
consecutive layer order and then group them. When you play a cel animation, ToolBook shows and
hides the cells from first to last, over and over.
► To create a cel animation:
1.
In the main window, create the individual objects to serve as cels in the animation.
2.
Arrange the layer order of the objects so that the first cel is on the farthest (lowest) layer
and the last cel is on the closest (highest) layer.
3.
Select all of the objects by holding down the SHIFT key while you click each object with your
mouse.
4.
From the Object menu, choose Group to group the objects.
5.
Position the objects. For example, in a spinning globe animation, the objects are placed on
top of each other so that only the top one is visible. To select and move a single item in the
group, double-click it.
6.
Click the Properties button on the toolbar, and in the Properties for Group dialog box, assign
a name to the group. If you do not assign a unique name to the group, you will not be able to
trigger your animation from the Properties for Action Trigger dialog box or from the ToolBook
Actions Editor.
7.
Select the group, and then choose Path Animation from the Object menu.
8.
Optional. Move the grouped objects along a path by creating a path animation as described in
the preceding section, "Creating a path animation."
9.
to open the Animation Settings dialog box. Under Cel
Click the Animation Settings button
animation, select On, and then click Close.
10. Click Done in the Animation Editor to save the animation.
► To test an animation:
x
in the Animation Editor. Alternatively, use the slide bar at the
Click the Run button
bottom of the Animation Editor to step through an animation sequence.
172
Copyright © 2012 SumTotal Systems, Inc. All rights reserved. Duplication prohibited.
Playing an Animation at Reader Level
Playing an Animation at Reader Level
After you create an animation for an object, you can use action buttons to play and reset
animations. Use an action trigger to trigger an object's animation and a reset trigger to reset the
object's animation.
You can also use the Actions Editor to create an action sequence that triggers or resets an object's
path or cel animation. One advantage of this method is that you can set the animation to occur as
part of a longer sequence of actions, all activated by the same event. You can also create
conditional expressions and loops that determine when, and how many times, an animation plays.
Alternatively, you can use OpenScript to play and stop a path animation.
Using an Action Trigger to Play an Animation
You set the properties of an action button to define the trigger event and the action that will
occur. For example, after you add an action trigger to a page, you can add the object whose
animation you want to trigger to the Objects to trigger list in the Properties for Action Trigger
dialog box. Then you can define the event that triggers the action and the action that will occur—
in this case, animation of the object. To choose the action that will occur for an object, you can
click the button under the Objects to trigger list.
Figure 4: The Properties for Action Trigger dialog box
You can also specify whether you want the action trigger to be visible at Reader level. At Reader
level, the animation will either play automatically when entering the page, or interactively when
the user clicks the action trigger, depending on what you have specified.
► To play an animation using an action trigger:
1.
Open the Catalog and drag an action trigger onto the same page as the animation you've just
created.
2.
Select the trigger, and then click the Extended Properties button on the ToolBook toolbar.
3.
In the Properties for Action Trigger dialog box, under Objects to trigger, click Add. In the Add
an Object dialog box, do the following:
In the Select object list, select the object for which you created the animation.
Under Perform what action, choose Animate.
Copyright © 2012 SumTotal Systems, Inc. All rights reserved. Duplication prohibited.
173
Hiding, Showing, and Animating Objects
4.
5.
Click OK.
In the Properties for Action Trigger dialog box, under Trigger on what event, do the following:
Select the When clicked check box, and clear the When entering page check box.
Select the Button is visible at reader check box, and clear the Loop continuously check
box.
Click OK.
Switch to Reader level (press F3) to test your animation.
Using the Actions Editor to Play an Animation
If you use the Actions Editor to play an object's cel or path animation, you can include the
animation as part of a sequence of actions, use a loop to play the animation repeatedly, or specify
conditions for playing the animation.
► To create an action sequence that plays an animation:
1.
Select an object (for example, a button or graphic).
2.
From the Object menu, choose Actions.
The Actions Editor appears.
3.
In the Event list, select an event that activates the action sequence (for example, On click or
On load page).
4.
From the Insert menu in the Actions Editor, point to Action, point to Media, and then choose
Play Media.
The Properties for Action dialog box appears.
5.
In the Select the media type list, select Animate an object.
6.
In the Select an object to animate list, select the object for which an animation has been
created; or drag the Choose object button over the object to select it.
7.
Click OK.
8.
From the File menu in the Actions Editor, choose Update Actions & Close.
9.
Switch to Reader level (press F3) to test your animation.
Using OpenScript to Play an Animation
Path animations can be played and stopped with OpenScript messages. You begin an animation by
sending the message to the object whose animation you want to play. ToolBook sends the message
to move the object along the animation path and to stop the animation when it finishes.
x
To play an object's entire path animation, send the playAnimation message:
send playAnimation 1, this page, true to ellipse "Moon"
x
To move the object one step along its animation path, send the playStep message:
send playStep 1 to self
Because ToolBook sends the playStep message to the object for each step of the animation, you
can write a handler to modify the animation as it is running. Be sure to forward the playStep
message if you want the object to continue on its path:
--Starts the object's path animation when the object is clicked
to handle buttonClick
system halfway --Establishes variable used in playStep handler
174
Copyright © 2012 SumTotal Systems, Inc. All rights reserved. Duplication prohibited.
Modifying an Animation in the Animation Editor
system soundAlreadyPlayed --Flag indicating if sound clip played
soundAlreadyPlayed = false
mmOpen Clip "chimes"
halfway = (anim_Duration of self) * 1000 / 2
send playAnimation 1 to self
end
--Monitors the animation at each step. When the animation is
--half completed, plays a .wav file.
to handle playStep
system halfway --Variable set earlier when animation began
system soundAlreadyPlayed
if anim_elapsedTime of target > halfway then
if soundAlreadyPlayed = false then
mmPlay clip "chimes"
soundAlreadyPlayed = true
end
end
forward
end
x
To stop an animation, send the stopAnimation message:
send stopAnimation to ellipse "Moon"
Modifying an Animation in the Animation Editor
After you create an animation and play it at Reader level to see how it works, you can modify it
using the Animation Editor. For example, you can:
x
Move an entire path or move one segment of a path using the Move cursor.
x
Extend a path by adding segments to the end or middle of a path, or shorten a path by
deleting segments using the Vertex cursor.
x
Create, reshape, or delete a curve in a path by modifying segments of it using the Vertex
cursor.
For complete step-by-step instructions about creating, modifying, and playing path- or cel-based
animations, refer to Help. To open Help from the Animation Editor, click the Help button.
Selecting an Animation
Before you can modify an animation or its animation settings, you must select the animation you
want to edit. There are two ways to select an animation: either in the main window before you
open the Animation Editor, or from within the Animation Editor.
► To select an object in the Animation Editor:
1.
With no objects selected in the main window, choose Path Animation from the Object menu.
2.
Click the object you want to select in the main window of the Animation Editor.
Copyright © 2012 SumTotal Systems, Inc. All rights reserved. Duplication prohibited.
175
Hiding, Showing, and Animating Objects
3.
In the Select Object dialog box, do the following:
In the Object to animate list, select the name of the object or group to animate.
In the Animation list, select the number of the animation to edit.
Click OK.
You can click the Select Object button
select an object to edit.
to open the Select Object dialog box, where you can
Setting Animation Options
After you create an animation, you can set options that define the behavior and appearance of
the animation, such as duration or rate. For example, you can increase the number of steps per
second to make an animation appear to run smoother, and you can choose a variable rate to make
an animation appear to accelerate or decelerate over its path.
► To set animation options:
1.
Open the Animation Editor and select the animation whose options you want to edit.
2.
Click the Animation Settings button
.
The Animation Settings dialog box appears.
3.
Make the changes you want, and then click Close.
4.
Click Done in the Animation Editor to save your changes and recompile the animation.
176
Copyright © 2012 SumTotal Systems, Inc. All rights reserved. Duplication prohibited.
Chapter 15
Adding Audio and Video Files
Introduction
You can play media files in ToolBook —including sound, animation, digital video, and still images.
This chapter describes how to use the Universal Media Player object and other Catalog objects to
add flair to your online application.
About Digital Media
Audio, video, animation, and graphics are all types of digital media that you can incorporate in an
online learning application. Media adds interest to any page, making the learning experience
dynamic and effective.
If you plan to deliver pages via the Internet by Publishing your book to DHTML, use Internetcompatible file formats when choosing media elements.
Choosing a Media Player
The primary device for playing media files (including audio, digital video, and streaming media) is
the Universal Media Player: It supports most standard media types, is programmable using the
Actions Editor, and retains all functionality when Published to DHTML. Simply drag the Universal
Media Player object from the Catalog to your page, specify the media file to be played, and set
properties that determine how the media appears and behaves. Alternatively, you can use one of
several other media player objects available in the Catalog. These objects offer additional
buttons and design options, but more limited functionality.
Choosing a media player
Media Player
Universal Media
Player
Supports
Most currently available
digital video, audio, and
streaming media formats
Advantages
Works the same when
Published to DHTML as in
ToolBook runtime
Limitations
Will not display some still
image formats
Programmable using the
Actions Editor visual
programming tool
Has a single, consistent
authoring interface, which
makes it easy to learn and
use
Media players
Specific audio, digital
video, and still image files,
as listed in the Catalog
description*
Allow you more control over
the appearance of the object
on the page in ToolBook
runtime
To play certain types of
media files, users must
load the proper software
drivers on their
computers
Allow limited
programming with the
Actions Editor visual
programming tool
Copyright © 2012 SumTotal Systems, Inc. All rights reserved. Duplication prohibited.
177
Adding Audio and Video Files
Video players
AVI files (digital video)*
Allow you more control over
the appearance of the object
on the page in ToolBook
runtime
To play certain types of
media files, users must
load the proper software
drivers on their
computers
Allow limited
programming with the
Actions Editor visual
programming tool
Inline clip
players
Specific audio, digital
video, and still image files,
as listed in the Catalog
description*
Can be inserted in a text
field so that button scrolls
with text, similar to a
hotword
To play certain types of
media files, users must
install the proper
software drivers on their
computers
Allow limited
programming with the
Actions Editor visual
programming tool
* Will play other file formats if you install proper MCI software drivers
Using the Universal Media Player
The Universal Media Player is the easiest to use and most versatile of all of the media player
objects available in the Catalog. It supports a wide variety of digital video, audio, and streaming
media file formats, including content created by Adobe Captivate. You simply choose the file to
display, and ToolBook automatically presents the appropriate player at Reader level. For
example, if you select a Microsoft Streaming Media file, ToolBook uses the Windows Media Player
ActiveX control to play the file.
Media types supported by the Universal Media Player
If this player is available…
These file formats will play…
Flash Player/Shockwave Player
Shockwave and Flash files: *.swf
Windows Media Player
x Audio files: *.aif, *.aifc, *.aiff, *.mid, *.midi, *.rmi, *.wav, *.mp3,
*.mpa, *.m3u
x MPEG files: *.mpg, *.mpeg, *.m1v, *.mp2
x QuickTime files: *.mov, *.qt
x Video files: *.avi, *.mp4
x Windows Media files: *.asf, *.asx, *.wm, *.wma, *.wmv, *.wax
RealPlayer
x Animated GIF: *.gif
x Audio files: *.aa, *.mp3, *.dat, *.m3u, *.pls
x Flash and Shockwave files: *.swf
x Graphic files: *.gif, *.jpeg, *.jpg, *.png
x RealMedia files: *.ra, *.rm, *.rmj, *.ram, *.rmm, *.rpm
x RealText3D files: *.r3t
x SMIL files: *.smi, *.smil
QuickTime
x QuickTime files: *.qt, *.mov, *.mp4
You can find the Universal Media Player in the Media Players category of the Catalog.
178
Copyright © 2012 SumTotal Systems, Inc. All rights reserved. Duplication prohibited.
Using the Universal Media Player
► To add the Universal Media Player:
1.
Open the Catalog from the View menu.
2.
In the Media Players category, select the Universal Media Player.
3.
Drag the Universal Media Player from the object pane, and then drop it onto your page.
Choosing a Media File
After you place the Universal Media Player on a page, you can use the Extended Properties dialog
box to choose a media file.
► To choose a media file:
1.
Select the Universal Media Player, and then click the Extended Properties button on the
toolbar.
2.
On the General tab, click the Browse button.
The Select a Media File dialog box appears.
3.
Navigate to and select the file you want to use, and then click OK.
4.
Click OK.
Using Time Markers
You can use time markers to synchronize the playing of a media file with the behavior of other
objects on the page. For example, you can display pop-up text describing a scene at a certain
point in a video, and then hide it at a later point. Once you define time markers, you need to
create an action sequence in the Actions Editor to handle the media timing event generated each
time the file reaches a time marker.
Note If you do not plan to Publish to Web, you can use OpenScript to handle the
ASYM_TimeMarker media timing message.
Time markers identify positions in a media file. When a time marker is reached, ToolBook sends a
media timing event with a parameter named mediaPosition. The value of mediaPosition is equal
to the position in the media file (positions are measured in milliseconds or frames, depending on
the media type). There are two types of time markers you can set. You can set time markers that
send the media timing event at periodic intervals (for example, every 1000 milliseconds), or you
can insert time markers at specific points in the media file.
► To set periodic time markers:
1.
Select the Universal Media Player object, and then click the Extended Properties button on
the toolbar.
The Properties dialog box appears.
2.
3.
On the Time Markers tab, do the following:
a)
Select Enable time markers.
b)
Select Periodic.
c)
Type a value for the intervals between the time markers.
Click OK.
Copyright © 2012 SumTotal Systems, Inc. All rights reserved. Duplication prohibited.
179
Adding Audio and Video Files
Most media types measure their positions in milliseconds. Some media types, however, measure
their position in frames. The controls on the Time Marker tab of the Properties for Universal Media
Player dialog box are labeled according to the position format for the selected media type.
► To set time markers at specific points in the media file:
Select the Universal Media Player object, and then click the Extended Properties button on
the toolbar.
1.
The Properties for Universal Media Player dialog box appears.
On the Time Markers tab, do the following:
2.
a)
Select Enable time markers.
b)
Select Specific times.
c)
Do one of the following:
Click Play, and as the file plays, set a time marker at the current position in the media
file by clicking Add time marker.
Select the field under Marker Time, press CTRL+ENTER (or right-click and select New
Time Marker), and then replace Enter Marker with a time in milliseconds or a frame
number that corresponds with a position in the media file.
a)
Optional. Enter descriptive text in the Comment field.
b)
3.
Tip
Repeat steps a to c until you have inserted all time markers.
Click OK.
To set several time markers at once, play the media file and, while it is playing, click Add
time marker as the player reaches the positions of interest in the media file. Once you have
set the time markers, you can go back to insert comments or edit the individual time
markers.
Creating Actions for Time Markers
For each media file you play, you can set multiple time markers, each of which sends the same
media timing event. You can use the Actions Editor to create a single action sequence that runs in
response to any media timing event, or you can create an action sequence that responds with
different behavior depending on which time marker generated the media timing event.
For more information about the Actions Editor visual programming tool, see Chapter 17, "Using the
Actions Editor."
► To create an action sequence to respond to media timing events:
1.
Select the Universal Media Player object, and then click the Actions button on the toolbar.
The Actions Editor appears.
2.
In the Event list, select On media timing event.
3.
In the Actions Editor, create an action or series of actions to respond to media timing events.
4.
In the Actions Editor, from the File menu, choose Update Actions & Close.
180
Copyright © 2012 SumTotal Systems, Inc. All rights reserved. Duplication prohibited.
Using the Universal Media Player
You can also create an action sequence that responds with different behavior depending on which
time marker generated the media timing event.
To distinguish one media timing event from another, ToolBook sets a parameter named
mediaPosition to the value (the position in the file) of the time marker that generated the event.
For example, if you set a time marker at 1050ms and another at 2050ms, the first time marker
sends a media timing event with 1050 as the parameter and the second time marker sends the
same event with 2050 as a parameter.
In the Actions Editor, you can distinguish one media timing event from another by creating a
conditional expression that compares whether the parameter sent with the event is equal to a
specific value (such as 1050). In this way, you can respond to multiple media timing events in one
action sequence.
► To create an action sequence to differentiate between media timing events:
1.
Select the Universal Media Player object, and then click the Actions button on the toolbar.
The Actions Editor appears.
2.
In the Event list, select On media timing event.
3.
From the Insert menu, point to Condition, and then choose If.
If the Properties for Condition dialog box does not appear, click the Properties button on the
Actions Editor toolbar.
4.
Click the Build Expression button
.
The Build Expression dialog box appears.
5.
Do the following:
In the Select the type of item to insert list, select Variables and parameters; in the
Select a variable or parameter list, select mediaPosition.
Click the Insert into Expression button.
In the Enter your expression here field, insert the cursor at the end of the expression and
type = (the equal symbol), and then type in the value of your first time marker.
Click OK.
6.
Select the conditional expression you just created, and then create an action or series of
actions that ToolBook runs if that condition is true.
7.
Repeat steps 3 through 6 until you have created a sequence of actions to handle each time
marker event that you defined.
Copyright © 2012 SumTotal Systems, Inc. All rights reserved. Duplication prohibited.
181
Adding Audio and Video Files
8.
From the Actions Editor File menu, choose Update Actions & Close.
Figure 1: Handling multiple media timing events in an action sequence
Using Other Media Players
The Catalog also includes several other objects that you can use to add multimedia to your
application, which function quite differently from the Universal Media Player. These objects play
clips, which are named references to a specific segment of a media file, rather than the media
file itself. For more information, see "Creating and managing clips," later in this chapter.
You can set a media player's properties to refine its appearance (visual media clips only) and
behavior. Media players also feature an Extended Properties dialog box: You can select a clip to
play, specify when and for how long the clip plays, and (for visual media) determine whether the
clip will play in a stage or in a pop-up window.
Note If you do not specify a stage in which to play a visual media clip, it will appear in a pop-up
window at Reader level.
Working with Media Players and Stages
Video players and media players are objects that you drag from the Catalog and drop onto a page
in your book. In native books, the Catalog also features a stage that you can use in conjunction
with a media player to play visual media clips. You can also draw a stage using the stage tool on
the tool palette.
► To insert a media player from the Catalog:
1.
Open the Catalog: from the View menu choose Catalog.
2.
Select the Media Players category.
3.
Drag one of the media player objects from the object pane, and then drop it onto your page.
► To draw a stage:
Using the interface
1. From the tool palette, choose the stage tool.
2.
182
On your page, hold down the mouse button while you drag, and then release when the stage
is the size you want.
Copyright © 2012 SumTotal Systems, Inc. All rights reserved. Duplication prohibited.
Using Other Media Players
3.
Using the select tool, click the stage to select it.
4.
Click the Properties button on the ToolBook toolbar.
The Properties for Stage dialog box appears.
5.
In the Name box, type a name for the stage.
6.
Optional. Close the Properties for Stage dialog box.
Using OpenScript
x
Use the draw command with the stage object type, followed by the bounds, and then assign
the stage a name using the name property. For example:
draw stage from 1000,1000 to 3000,3000
name of selection = "videoStage"
Note When a video clip is playing in a stage, it is displayed in its own window, which will obscure
all objects on the page in that area, even objects that appear in front of the stage when
the media is not playing.
Setting the Appearance of a Stage
To change the appearance of a stage in a video player, you can set properties that define the:
x
frame, which is the decorative border around a stage.
x
display area, which sets the size and position of visual media clips in a stage.
x
transition effects, which determine the effect before and after a visual media clip plays.
Choosing a Frame Style
You can set a stage frame that draws attention to the stage or that subtly adds dimension to a
page.
► To set the style of a stage frame:
1.
Select the stage, and then click the Properties button on the ToolBook toolbar.
The stage may be part of a group—the video player. To select only the stage, double-click the
stage.
2.
On the Draw tab, under Frame widths, enter the width (in page units) of the outer bevel,
border, and inner bevel.
3.
Optional. Close the Properties for Stage dialog box.
Setting the Size and Position of Clips in a Stage
By default, clips have a predefined size and are centered in a stage. If you want to play clips of
different sizes in the same stage, you can scale or crop clips so that they fit in the stage. This
feature will not Publish to Web.
► To set the size and position of clips in a stage:
1.
Select the stage, and then click the Properties button on the ToolBook toolbar.
The Properties for Stage dialog box appears.
2.
Click the Draw tab.
3.
In the Sizing list, choose how clips appear in the stage.
4.
If you are playing clips of different sizes, select an anchor option from the Anchor list.
Copyright © 2012 SumTotal Systems, Inc. All rights reserved. Duplication prohibited.
183
Adding Audio and Video Files
5.
Optional. Close the Properties for Stage dialog box.
You can also use OpenScript to set the appearance of a stage. For details, refer to the
Programming in OpenScript electronic book.
Setting Transition Effects
To introduce a visual media clip and to move smoothly from one clip to another, you can add a
transition effect before and after a clip plays. For example, you can select a transition effect that
simulates a page turning or blinds opening.
► To set a stage transition effect:
1.
Select the stage, and then click the Properties button on the ToolBook toolbar.
The Properties for Stage dialog box appears.
2.
Click the PreEffect tab. Then, from the Effect list, select a transition effect to use before the
clip plays.
3.
Click the PostEffect tab. Then, from the Effect list, select a transition effect to use after the
clip plays.
4.
Optional. Close the Properties for Stage dialog box.
Creating and Managing Clips
A clip is a reference to any media file—a sound file, video file, animation file, or still-image file.
You can use the Clip Manager dialog box to create, select, edit, duplicate, remove, and play the
media clips in a book. If you've planned in advance all the audio and visual media you want to
include, you can use the Clip Manager to add them to your book all at once.
Note Animations discussed in this chapter refer to animation files—not ToolBook animations
created with the ToolBook Animation Editor. For details about ToolBook animations, see
Chapter 14, "Hiding, Showing, and Animating Objects."
Creating Clips
A clip is defined by a file name or media source and start and end points. For example, a clip's
start and end points could define the clip as the third song on a music CD or the first 20 frames of
a digital video file. A clip could also reference an entire file.
► To create a clip:
1.
2.
Do one of the following to open the Clip Manager dialog box:
From the Object menu, choose Clips.
From the Extended Properties dialog box of the video player, click Choose a Clip. In the
Choose Media Clip dialog box, click the Clips button.
Click New to open the Choose Source Type dialog box, select the type of multimedia you
want, and then click OK.
If you are creating a clip from a file, the Choose Source File dialog box appears. Navigate to
and select the file you want to use, and then click OK.
3.
In the Clip Editor, type a name for the clip you're creating in the Clip box.
4.
On the Timing and Options tabs, adjust the settings that apply to your clip, such as volume
control, start and end points, and palette options.
5.
Click OK to close the Clip Editor.
6.
Repeat steps 2 through 5 until you have finished creating clips.
184
Copyright © 2012 SumTotal Systems, Inc. All rights reserved. Duplication prohibited.
Creating and Managing Clips
7.
Click Close to close the Clip Manager.
Note Start and stop position settings for a clip are not supported in an Published DHTML
application. If you Publish your book to DHTML, the entire media file will play in a Web
browser.
Figure 2: Creating a clip
Using OpenScript
You can write and execute OpenScript code using the script editor or Command window. For more
information about using the OpenScript programming language, refer to the Programming in
OpenScript electronic book.
x
Create a new clip using the new clip command. Set the beginning point using mmBeginPoint,
the ending point using mmEndPoint, and the media search path ToolBook will use to locate
the media source file using mmSearchHD and/or mmSearchCD:
new clip from "c:\media\horn.avi"
name of It = "tuba" --Assigns name to clip
mmBeginPoint of clip "tuba" = "00:00:1:15"
mmEndPoint of clip "tuba" = "00:00:2:07"
Copyright © 2012 SumTotal Systems, Inc. All rights reserved. Duplication prohibited.
185
Adding Audio and Video Files
mmSearchHD of clip "tuba" = true
Managing Clips
In ToolBook, only a reference to a clip is stored in your application; the actual digital data
remains stored in the original media source file. When you add a clip to your application,
ToolBook keeps track of the location of that clip and includes it when you package your book for
distribution. If you add a clip to your application and then delete or move the original file, the
clip will not play. Therefore, you will want to take care when organizing any media clips you add
to your ToolBook application.
Tip
Remove a clip from your book if you are not using it. Removing unused clips will reduce the
size of your application file. Be certain, however, that a clip you remove is not referenced
in any script. If you remove a clip that is referenced in a script, you will get an error
message when the script attempts to access the clip.
► To manage clips:
1.
From the Object menu, choose Clips to open the Clip Manager.
2.
In the Available clips list, select the clip you want to work with.
3.
Do one of the following:
4.
186
To edit the clip, click Edit. The Clip Editor dialog box appears. Edit the clip, and then
click OK.
To make a copy of the selected clip, click Duplicate.
To replace the selected clip with a clip from a clip library or another book, click Replace.
The Replace Clip dialog box appears. Navigate to and select a replacement clip, and then
click OK.
To remove the selected clip from your book, click Remove.
To play the selected clip, click Play.
Click Close to close the Clip Manager.
Copyright © 2012 SumTotal Systems, Inc. All rights reserved. Duplication prohibited.
Creating and Managing Clips
Using OpenScript
Remove a clip using the remove resource command:
remove resource clip "Try this"
Figure 3: The Clip Manager dialog box
Creating a Clip Library
A clip library is a file that contains a collection of predefined clips. You can create a clip library to
organize frequently used clips. For more information about creating and using a clip library, refer
to Help.
Working with Media Clip Paths
When you add a media clip to your application, the clip isn't saved in the book; instead, ToolBook
saves the location of the clip's media source file and, each time the clip is activated, opens and
runs that file. The location where the media source file is stored is called its path. If you plan to
use Publish to Web or the ToolBook AutoPackager to prepare your file for distribution, you don't
need to set media paths as you work with clips. Publish to Web and the AutoPackager will resolve
all media path issues for you. However, if you plan to package your application using InstallShield
or another setup program, you will need to understand how to work with media clip paths.
Regardless of how you plan to package and distribute your application, you can take one simple
step during the development process to ensure that your completed ToolBook application can
easily locate and play your media files. As you build your application, create an organized
directory structure in which media files are stored in a subdirectory of the application file. For
example, if your book is stored in C:\Books, store your media files in C:\Books\Media. For more
information on creating an organized directory structure, see "Planning your project" in Chapter 2,
"Basic Concepts."
Copyright © 2012 SumTotal Systems, Inc. All rights reserved. Duplication prohibited.
187
Adding Audio and Video Files
Making Clip Paths Independent
In order to distribute a multimedia application without knowing in advance where users will install
it, ToolBook provides media search paths, which are book properties that allow you to store the
file name of a media source file separately from its path. The file name is stored with the clip,
and you can add the clip's path to a media search path. When you play the clip, ToolBook adds the
media search path to the clip reference so that it can find the media source file. For example:
x Media search path:
C:\Books
x File on the hard disk:
C:\Books\Video\Show.avi
x File name stored in clip reference:
Video\Show.avi
x Media search path plus clip reference:
C:\Books\ + Video\Show.avi
If you create a clip without setting a media search path, the clip reference includes the entire
path for the media source file, including the drive letter, subdirectories, and the file name. The
media clip will only play on a computer with the same directory structure as the authoring
computer.
File organization becomes especially important when you are setting the media search paths for
your book. Although we recommend a structure in which your media files are contained in a
subdirectory of your book files (for example, Books\Media), ToolBook is able to adapt to almost
any orderly, consistent organization.
If you intend to distribute your application on a CD-ROM, replicate the directory and file structure
of the CD-ROM on your hard disk and specify the replicated structure on your hard drive as the CDROM search path during development. ToolBook has two search paths—one for the hard disk and
one for the CD-ROM drive—so you can create separate search paths for media that you intend to
distribute on CD-ROM. For example, you would list media that will be installed on the user's hard
disk in the hard disk media path, while you would list media that will remain on the CD-ROM in
the CD-ROM media path. Each search path can store multiple directory names; when ToolBook
searches the paths, it looks through each directory in turn until it finds the clip.
When you create a new clip, Instructor checks the source file path against the existing media
search paths and removes the portion of the clip's path that is already in the search paths. (By
default, the current book's path is included in the hard disk search path.) If you store the full path
with the clip when you create it but decide later to make the clip path independent, you can
change the links to the clip's source file using the ToolBook AutoPackager. For more information
about using the AutoPackager, see Chapter 23, "Preparing Native ToolBook Applications for
Release."
When you are ready to distribute your application, you can specify that the media search paths
match the directories in which users will install your application. ToolBook stores media path
information in two book properties and three clip properties.
Media path information locations
Type
Book
Clip
188
Property
Information
HDMediaPath
List of subdirectories on hard disk that will be searched to locate a
media clip
CDMediaPath
List of subdirectories on CD-ROM that will be searched to locate a
media clip
mmSource
Name of the media source file
mmSearchHD
Whether to search using HDMediaPath (true or false)
mmSearchCD
Whether to search using CDMediaPath (true or false)
Copyright © 2012 SumTotal Systems, Inc. All rights reserved. Duplication prohibited.
Creating and Managing Clips
How ToolBook Searches for Media
When you play a clip, ToolBook first checks the clip's mmSearchHD property. If it is true, ToolBook
constructs a full path for the clip's media source file by combining values, one by one, from
HDMediaPath with the clip's mmSource property and then attempts to find the clip.
For example, if HDMediaPath contains C:\Books, C:\Books\AVI, C:\Books\WAV and the clip's
mmSource property contains Bells.wav, ToolBook searches the following paths in order:
C:\Books\Bells.wav
C:\Books\AVI\Bells.wav
C:\Books\WAV\Bells.wav
ToolBook uses the same search process if mmSearchCD is true but extracts search paths from
CDMediaPath instead of from HDMediaPath. (If both mmSearchHD and mmSearchCD are true, the
paths in HDMediaPath are searched first.)
There are two very important special values that you can use for HDMediaPath and CDMediaPath:
<BookPath> and <CDROM>.
If the media search path contains the string <BookPath>, ToolBook searches for the path of the
current book (the current TBK file). If your media files are in the same directory as the current
book or below it, ToolBook locates them regardless of where the user installs them. This is the
simplest way to handle media paths on a hard drive.
For example, consider the scenario where HDMediaPath contains <BookPath> and
<BookPath>\Media and the clip's mmSource property contains Bells.wav. If the book is installed in
c:\Books, ToolBook first searches c:\Books\Bells.wav, and then it searches
C:\Books\Media\Bells.wav. However, if the book is installed in
C:\MyFiles\MyBooks, ToolBook first searches
C:\MyFiles\MyBooks\Bells.wav, and then it searches
C:\MyFiles\MyBooks\Media\Bells.wav.
Similarly, if the media search path contains the string <CDROM>, ToolBook searches all of the CDROM drives on the user's computer. If the user has more than one CD-ROM drive, ToolBook will
search them all. This is the simplest way to handle media paths on a CD-ROM drive.
Both the <BookPath> and <CDROM> special values can be combined with additional path
information, as in the following examples:
<CDROM>Media
<BookPath>\Media
Note the difference in how subdirectories can be added to these special values. The <CDROM>
term implicitly includes the backslash directory, so adding a backslash makes the path information
invalid. The <BookPath> term does not implicitly include the backslash, so you must add it. For
example, the following media search paths are invalid:
<CDROM>\Media
<BookPath>Media
Copyright © 2012 SumTotal Systems, Inc. All rights reserved. Duplication prohibited.
189
Adding Audio and Video Files
Refining Media Search Paths
A new book's hard disk media search path (HDMediaPath) is set to <BookPath>, so ToolBook
automatically finds media source files located in the same directory as the book (the TBK file).
You can refine media search paths by adding or removing search paths for both the hard disk and
CD-ROM.
► To add or remove media search paths:
Using the interface
1. From the Object menu, choose Clips to open the Clip Manager.
2.
Click the Media Paths button to open the Media Paths dialog box.
3.
Under Path to edit, choose either Hard disk or CD-ROM.
4.
Do one or more of the following:
To add a path, click Add Path, select a new path, and then click OK.
To add the current book's path, click Add Book Path. ToolBook adds <BookPath> to the
search path, which is automatically interpreted as the path of the current book (the TBK
file).
To add the current CD-ROM path, click Add CD-ROM Path. ToolBook adds <CDROM> to the
search path.
To remove a path, select a path from the Directories on hard disk media path list, and
then click Remove Path.
If a clip's media source file is in the path you removed, ToolBook will not be able to find
the file or play the clip.
5.
Click OK to close the Media Paths dialog box, and then click Close to close the Clip Manager.
Using OpenScript
x
To add a path to the HDMediaPath or CDMediaPath book property, use the push command:
push "c:\media" onto HDMediaPath of this book
or
push "<BookPath>" onto HDMediaPath of this book
x
To remove a path from the HDMediaPath or CDMediaPath book property, use the clear
command:
clear item 2 of HDMediaPath of this book
190
Copyright © 2012 SumTotal Systems, Inc. All rights reserved. Duplication prohibited.
Chapter 16
Adding a Voice Recording
Introduction
You can create voice recordings in your book using a built-in voice recorder in ToolBook. This
chapter describes how to use the Voice Recording feature to add voice recordings to pages in your
book.
About the Voice Recording Feature
ToolBook has a Voice Recording feature that enables you to record an audio file (typically a voice
recording) for any page in your book, using a microphone on your computer. The recording plays
as the page loads. In addition to recording audio for a given page, you can choose to use a
recording from another page in your book. However, if you have an existing sound file (a
myfile.mp3 or myfile.wav, etc), we recommend using the Universal Media Player to play it.
You can control the playback of a voice recording by using the Play, Pause, and Stop buttons from
the Catalog or the Play Media, Stop Media and Pause Media commands within the Actions Editor
(in the Media category).
Using the Voice Recording Feature
There are two ways to access the built-in mini voice recorder that creates the voice recording:
Copyright © 2012 SumTotal Systems, Inc. All rights reserved. Duplication prohibited.
191
Adding a Voice Recording
x
From the Voice Recording tab on the Properties for Page dialog box.
x
From the Voice Recording option on the Insert Menu
If a voice recording is already associated to a given page, a checkmark will appear next to the
Voice Recording option on the Insert Menu.
Creating a Voice Recording
You can record audio for a given page from its page properties or by directly opening the Voice
Recording dialog box from the Insert menu. Once you have created the voice recording, you can
play it back to check how it sounds before you associate it to the page.
► To record audio from the Properties for Page:
1.
Navigate to the page on which you want the voice recording.
2.
Click Properties for Page on the Object menu.
3.
Click the Voice Recording tab in the Properties for Page dialog box.
4.
Select the Enable voice recording playback checkbox.
Note that the New button is enabled.
5.
Click New.
6.
In the Voice Recording dialog box, click Step 1 to start a new recording.
7.
Click Step 2 to end the recording.
8.
Click Step 3 to review the recording.
9.
Click OK to save the voice recording.
10. Click Cancel if you want to cancel the recording.
You can start a new recording if required.
192
Copyright © 2012 SumTotal Systems, Inc. All rights reserved. Duplication prohibited.
Using the Voice Recording Feature
Alternatively
► To record audio from the Insert menu:
1.
Navigate to the page on which you want the voice recording.
2.
Click Voice Recording on the Insert menu.
3.
In the Voice Recording dialog box, click Step 1 to start a new recording.
4.
Click Step 2 to end the recording.
5.
Click Step 3 to review the recording.
6.
Click OK to save the voice recording.
7.
Click Cancel if you want to cancel the recording.
You can start a new recording if required.
Changing a Voice Recording
Once you have a voice recording for a given page, you can change it if required by deleting it and
recording a new one. Alternatively, you can also directly record an audio file for the page,
overwriting the existing audio file.
► To delete a voice recording:
1.
Navigate to the page on which you want to delete the voice recording.
2.
Click Properties for Page on the Object menu.
3.
Click the Voice Recording tab in the Properties for Page dialog box.
4.
In the Properties for Page, click Delete to delete the existing voice recording.
You can now go ahead and record a new audio file for the page.
Copying an Existing Voice Recording to a Page
You can associate an existing voice recording from other pages in your book to any page by
copying it.
► To copy an existing voice recording from another page:
1.
Navigate to the page on which you want to copy the voice recording.
2.
Click Properties for Page on the Object menu.
3.
Click the Voice Recording tab.
If there is no recording already associated to the current page, select the Enable voice
recording playback checkbox.
Copyright © 2012 SumTotal Systems, Inc. All rights reserved. Duplication prohibited.
193
Adding a Voice Recording
Notice that all the voice recordings in the current Book are listed in the Voice recordings from
other pages area and can be selected.
4.
Select the desired Voice Recording.
5.
Click Copy.
The selected voice recording is copied to the page.
Using the UMP to Play Pre-recorded Voice
Recordings
In addition to using the voice narration feature to create audio for each page, you can also
incorporate any audio file (in .wav format), prerecorded by a voice professional into your book.
You can use the Universal Media Player to associate the required audio file onto a page and have
it play as the page loads. You can use the Hide at Reader level feature of the UMP so that the UMP
is hidden in the deployed course.
► To play pre-recorded voice recordings:
1.
Navigate to the page on which you want to associate the audio file.
2.
Open the Catalog and drag the Universal Media Player from the Media Players Category to
your page.
3.
In the Properties for Universal Media Player dialog box, in the Media source field, click the
Browse button.
4.
Browse to the folder that contains the media file. It is suggested that this be placed either in
the same folder as the book, or in a subfolder beneath the folder where the book is located.
5.
Select the file you want to add and click Open, then click OK.
If the file is not located within the same directory as your course files, the Resolve Media
Path dialog box appears.
6.
194
If the Resolve Media Path dialog box appears, keep the first option selected and click OK.
Copyright © 2012 SumTotal Systems, Inc. All rights reserved. Duplication prohibited.
Using the UMP to Play Pre-recorded Voice Recordings
The Resolve Media Path dialog box simply tells ToolBook where to look for the file. This dialog
is intended for advanced developers. The first option will ensure the media file will be
available with your course content.
7.
On the Properties for Universal Media Player General tab, select the Auto Start checkbox.
8.
Select the Hide at Reader level checkbox
9.
Click OK.
Copyright © 2012 SumTotal Systems, Inc. All rights reserved. Duplication prohibited.
195
Chapter 17
Using the Actions Editor
Introduction
The Actions Editor is a visual programming tool in ToolBook. It features familiar interface
elements—such as menus and a toolbar—that you can use to add sophisticated interactive behavior
to objects in your ToolBook applications. The action sequences that you create in the Actions
Editor will convert to DHTML format when you Publish to Web. This chapter describes how to use
the Actions Editor to add interactive behavior to your applications.
Copyright © 2012 SumTotal Systems, Inc. All rights reserved. Duplication prohibited.
197
Using the Actions Editor
About Action Sequences
Action sequences add behavior to your ToolBook application. Every action sequence consists of
one or more behaviors that ToolBook carries out in the order you specify. You can create action
sequences that prompt users for input, change an object's properties, play media, and much
more. You can also repeat actions or specify the conditions under which actions are executed by
adding a loop or condition to your action sequence.
In ToolBook , you create action sequences using the Actions Editor. The Actions Editor is a tool for
visual programming—that is, you specify behavior using an interface that features familiar
elements such as menus and a toolbar.
You can create action sequences to program the behavior of any object you add to your ToolBook
application. An action sequence for an object responds to a specific event. In Figure 1, the event
handled by the action sequence for the button is a button click.
Figure 1: Action sequence for an object
You can also create shared action sequences. A shared action sequence is not linked to a specific
event and does not belong to any individual object. Instead, you can use a shared action sequence
to assign the same behavior to multiple objects. A shared action sequence is stored under a
unique name that you assign and is available to be executed as part of any other action sequence.
For more information, see "Creating and using shared action sequences," later in this chapter.
Note You can create action sequences to program the behavior of ActiveX controls. For more
information about creating action sequences for ActiveX controls, see the online book,
Advanced Features for Native ToolBook Applications.
198
Copyright © 2012 SumTotal Systems, Inc. All rights reserved. Duplication prohibited.
Choosing When to Create Action Sequences
Choosing When to Create Action Sequences
Action sequences that you build in the Actions Editor work in both native ToolBook applications
and Published DHTML applications. In ToolBook, there are other tools you can use to create
interactive behavior as well. For example, many Catalog objects have predefined behaviors that
may meet your needs. You can also use OpenScript to create and refine behavior for objects if you
do not plan to Publish your book to DHTML.
Using Action Sequences in Place of Catalog Objects
Many Catalog objects have predefined behaviors. To add simple behavior to your application, a
Catalog object is often the best choice. However, for these more complex interactive behaviors,
you will find the Actions Editor is a more versatile tool:
x
Creating looping and conditional behavior: Using the Actions Editor, you can execute a
series of actions repetitively or in response to specific conditions.
x
Handling certain events: An action sequence can be programmed to handle many events that
are not handled by Catalog objects with predefined behaviors. For example, when a mouse is
positioned over an object, or when the property of an object changes. You can create an
action sequence that handles a generic User event that you send.
Using Action Sequences in Place of OpenScript
Although you can use OpenScript to accomplish the same behavior that you create using action
sequences, OpenScript programs do not function on the Web when you Publish your application to
DHTML format. By contrast, most action sequences that are Published to DHTML will perform in a
Web browser just as they do in the ToolBook authoring environment. For details about the
performance of specific actions in Web browsers, see the electronic document named DHTML
Export Considerations located in your ToolBook documents folder.
Opening the Actions Editor
The Actions Editor is a tool you can use to create an action sequence to handle an event for any
object in your ToolBook application. Once open, the Actions Editor changes dynamically,
displaying supported events and any actions you have created for the currently selected object.
► To open the Actions Editor:
x
Do one of the following:
Select the object, and then from the Object menu, choose Actions.
Select the object, and then click the Actions button on the ToolBook toolbar.
Right-click the object, and then click the Actions button on the right-click menu.
Copyright © 2012 SumTotal Systems, Inc. All rights reserved. Duplication prohibited.
199
Using the Actions Editor
Select the object, and then press F5.
Figure 2: The Actions Editor
Creating Action Sequences Using the Actions Editor
You create an action sequence in the Actions Editor by adding actions one at a time. After you
insert an action into the action sequence, you can move it up or down in the order of actions, as
well as cut, copy, or delete the action. You can also select multiple actions at a time to delete,
copy, or move them as a group. When running the action sequence, ToolBook carries out actions
in the order in which they are listed in the Actions Editor window.
In any action sequence, you can modify the items that appear as hotspots in colored, underlined
text. When you click one of these hotspots, the appropriate dialog box opens and you can edit the
existing settings. You can change the appearance of these hotspots on the Actions tab in the
ToolBook Options dialog box, which opens when you select Options from the View menu.
Loops and conditions are types of actions with functionality that sets them apart from the other
actions. When you insert an action after a condition or loop, ToolBook places it in a sublevel
(indented) position to indicate that it is carried out only when the loop or conditional expression
is true. It also inserts a dashed vertical line connecting the beginning and end of the loop or
conditional structure.
You can move an action into or out of a sublevel (indented) position using the Move Up
Move Down
and
buttons on the toolbar.
Working with the Toolbar in the Actions Editor
The buttons on the toolbar are shortcuts to frequently used menu commands in the Actions Editor.
Toolbar buttons in the Actions Editor and their function
Click this button...
To do this...
Cut the selected action(s) to the Clipboard.
Copy the selected action(s) to the Clipboard.
Paste the selected action(s) to the Clipboard.
200
Copyright © 2012 SumTotal Systems, Inc. All rights reserved. Duplication prohibited.
Creating Action Sequences Using the Actions Editor
Undo the last command
Redo the last command
Delete the selected action(s)
Edit the properties of the selected action(s)
Move the selected action(s) up one line
Move the selected action(s) down one line
Define variables (and parameters for shared action sequences)
Working with the Actions Palette
The Actions Editor displays a list of available actions in the actions palette. You can drag an
action from the palette and drop it in the action sequence to add a new action.
Figure 3: The actions palette
You can resize or close the actions palette. If you close the actions palette, you can reopen it
from the View menu of the Actions Editor.
Copyright © 2012 SumTotal Systems, Inc. All rights reserved. Duplication prohibited.
201
Using the Actions Editor
Choosing an Event
Action sequences for objects handle specific events. You can create an action sequence for each
event supported by an object. For example, a button might have one action sequence to handle a
click and a different action sequence to handle a right-click. You specify the event for which you
want to create an action sequence by selecting it from the Event list in the Actions Editor.
Figure 4: Opening the event list
► To display the Event list for an object:
1.
Select an object in the main ToolBook window.
2.
Click the Actions button on the ToolBook toolbar to open the Actions Editor.
3.
Click the name of the event in the first line of the action sequence.
The Event list opens.
The list of available events depends on the object and includes only events appropriate for the
object. For example, since editable fields do not respond to mouse events, the On click and On
double-click events are not available.
Common Event list options
Select this Event
list item...
To create an action sequence that handles...
On click
A user clicking the object
On User event
A generic event you initiate with the Send User Event action
On double-click
A user quickly clicking the object twice
On load page
A user entering a page
On mouse off
A user moving the pointer off the object
On mouse over
A user positioning the pointer over the object
On property change
A property change
On reset
A page or range of pages being reset
On right-click
A user clicking the right button of the mouse over the object
On trigger
A trigger message
202
Copyright © 2012 SumTotal Systems, Inc. All rights reserved. Duplication prohibited.
Creating Action Sequences Using the Actions Editor
On unload page
A user leaving the page
Some events (a button click, for example) are initiated by users as they interact with your
ToolBook application. Other events you create using commands available on the Actions Editor
menus; these include Send User Event, Trigger, Set Property, and Reset.
Most events are generated as a result of the user performing some action, or as the result of some
change in the system. You can also send a generic event called User event. With the User event,
you can send any data in a single parameter. This data may be in the form of a literal value,
variable, or expression. The User event is generated by the Send User Event action.
Note For more information about variables and expressions, see "Using variables" and "Building
expressions," later in this chapter.
► To send the User event in the Actions Editor:
1.
From the Insert menu point to Action, point to Object, and choose Send User Event.
The Properties for Action dialog box appears, if this default option is set on the Actions tab of
the ToolBook Options dialog box.
2.
Do the following:
In the Select the object to receive the User event list, select an object. Or, drag the
Choose object button over a named object to select it.
Optional. In the Specify a value to pass as a parameter with this event list, type in a
literal value or use the Build Expression dialog box to create an expression to pass as a
parameter with the event.
Click OK.
► To handle the User event:
1.
Select the object that you specified to receive the User event.
2.
Click the Actions button
on the ToolBook toolbar.
The Actions Editor appears.
3.
In the first line of the action sequence, click the name of the event to open the Event list.
4.
In the Event list, select On User event.
5.
Create an action sequence to respond to the User event.
Inserting Actions, Conditions, and Loops
Action sequences are composed of a variety of actions that are grouped in three functional
headings: actions, conditions, and loops. Actions add behavior to your application, conditions
specify the circumstances under which actions take place, and loops repeat actions. Every action
sequence you create must include at least one action that is not a condition or loop.
► To insert an action into an action sequence:
1.
Optional. If your action sequence will use variables to store values that are used in the action
sequence, click the Define Variables button
on the Actions Editor toolbar to display the
Variables dialog box, define the variables you plan to use, and then click OK.
For more information about defining variables, see "Using Variables," later in this chapter.
2.
Optional. If you are adding an action to an existing action sequence, select the action after
which you want to insert the new action.
Copyright © 2012 SumTotal Systems, Inc. All rights reserved. Duplication prohibited.
203
Using the Actions Editor
3.
From the Insert menu, point to Actions, Conditions, or Loops, and then choose the action you
want to insert. Or, you can drag one of the actions available in the actions palette to the
action sequence.
4.
Optional. Open the Properties dialog box if it is not already open and select or enter the
properties for the action.
5.
and Move Down
If necessary, use the Move Up
to reposition the action in the action sequence.
buttons on the Actions Editor toolbar
Actions
Actions add behavior to your application. Some actions are visible to users. For example, you may
choose to play media, display a document, or set an object property in response to an event;
these all affect how the application appears to the user. Other actions are not immediately visible
to the user and are actions that you can use to control how ToolBook functions. Setting a variable
and executing a shared action sequence are examples of this type of action.
Figure 5: A Properties for Action dialog box
For details about accessing action properties, see "Setting properties for actions" later in this
chapter.
204
Copyright © 2012 SumTotal Systems, Inc. All rights reserved. Duplication prohibited.
Creating Action Sequences Using the Actions Editor
Conditions
You can insert a condition into your action sequence to respond to a particular circumstance, such
as the state of an object or the selection a user makes. Inserting a condition creates a conditional
structure—a junction at which ToolBook follows one of two or more distinct paths as it executes
the action sequence.
When you insert a conditional If structure, ToolBook automatically inserts an End if statement to
indicate the end of the structure. Any subsequent conditions you insert in the same structure
begin with Else if or, for the final conditional expression, Else. Else is a "catch-all" that covers any
condition not specified in an If or Else if statement. Within this conditional structure, ToolBook
carries out only the sequence of actions directly following the first true conditional expression it
encounters. After you insert a condition in an action sequence, you define the condition in the
Properties dialog box that appears when you click the expression hotword in the action sequence.
Figure 6 shows an action sequence with two conditional structures. The expression of the first
structure tests whether the value entered in the text field "Days" is a number from 1 to 7. If this
expression is true, ToolBook executes the expression of the second conditional structure, which
tests whether the value entered in the Text field "Minutes" is a number between 1 and 200. In
both structures, if the conditional expression evaluates to false, ToolBook prompts the user to
enter a value that fits within the defined range.
Figure 6: Using conditions in an action sequence
Copyright © 2012 SumTotal Systems, Inc. All rights reserved. Duplication prohibited.
205
Using the Actions Editor
Loops
You can add a loop to your action sequence to run an action or series of actions repetitively. A
step loop runs the same action or actions a specified number of times. A conditional loop runs the
same action or actions until a condition is met. For example, if you want to keep prompting users
for input until they provide the correct answer, you can use a conditional loop.
Figure 7: The Properties for Step Loop and Properties for Conditional Loop dialog boxes
Setting Properties for Actions
For each action, there is a Properties dialog box where you can set options and refine behavior.
The options displayed in this dialog box vary depending on the behavior you have chosen to insert.
► To open the Properties dialog box for an action:
x
In the Actions Editor, do one of the following:
206
Select the action, and then click the Action Properties button
toolbar.
Click the name of the event on the first line of an action sequence.
Select the action, and then choose Properties from the Action menu.
on the Actions Editor
Copyright © 2012 SumTotal Systems, Inc. All rights reserved. Duplication prohibited.
Creating Action Sequences Using the Actions Editor
Creating Valid Actions
An action will function at Reader level only if it is valid—that is, if you have provided all the
information necessary for the action to run. ToolBook provides immediate feedback if the actions
you create are invalid. As you create an action sequence, ToolBook displays a small warning
symbol beside an invalid action and describes why the action is invalid in the status bar.
Figure 8: Invalid action with status bar message
You can also check the validity of all actions in the book at once using the Validate Actions
command: on the Tools menu point to Actions, and then choose Validate Actions. For more
information about valid actions, see "Validating actions," later in this chapter.
Building Expressions
When you create an action, you can use an expression in place of a literal value such as a number
or word. In an expression, you can combine values (variables, object properties, and literal
values) using operators and functions to produce a result.
There are three broad types of expressions:
x
Arithmetic Expressions: These are expressions that use arithmetic operators and functions to
combine numbers (or variables and object properties whose values are numbers) and produce
a numerical result. The following are examples of arithmetic expressions:
5
b^2-4*a*c
x
Logical Expressions (also called conditional expressions): These are expressions that typically
compare values and return a true or false value. The values that are compared can be
expressions (arithmetic, logical, or text). Conditions and conditional loops require logical
expressions. The following are examples of logical expressions:
enabled of button "advanced"
(Variable1 + Variable2) <10
"oscilloscope" is in studentResponse
Copyright © 2012 SumTotal Systems, Inc. All rights reserved. Duplication prohibited.
207
Using the Actions Editor
x
Text Expressions: These are expressions that work on and return text values. For example,
you can join two text values using the & (ampersand) operator or extract a single character
or string of characters from a block of text using the character and characters operators. The
following are examples of text expressions:
characters 1 to 5 of userEntry
charCount(userEntry)
When you are creating an action, you can type an expression anywhere a value is required.
Clicking the Build Expression button displays the Build Expression dialog box, which helps you
create a valid expression. The elements from which you can build an expression are grouped as
follows: Operators and functions, variables and parameters, object properties, and special values.
Figure 9: The Build Expression dialog box
Operators and Functions
An operator is a symbol or word that causes ToolBook to perform an action on operands, resulting
in another value. For example, in the expression Variable1 < Variable2, the operator is the <
symbol, and Variable1 and Variable2 are operands. A function is an operation that returns a value.
For example, the function round() returns the number (or results of an operation) supplied in
parentheses rounded to the nearest integer.
Variables and Parameters
A variable is a named container that can hold any value. You can use the Set variable action to
assign a value to a variable in an action sequence. For more information, see "Using variables,"
later in this chapter.
A parameter is a read-only value defined for a specific event or shared action sequence. Certain
events have parameters that supply additional information about the event. For example, the
parameter ctrlDown defines whether the CTRL key was pressed when an event (such as a button
click) occurred. The parameters available for a given event are listed in parentheses after the
event name in the Actions Editor. When you create a shared action sequence, you can define
parameters that the shared action sequence uses to complete any operations it performs. For
more information, see "Creating and using shared action sequences" later in this chapter.
208
Copyright © 2012 SumTotal Systems, Inc. All rights reserved. Duplication prohibited.
Creating Action Sequences Using the Actions Editor
Object Properties
You can use an object property in an expression anywhere you can use a literal value or variable.
In the Build Expression dialog box, you can select the page and background in which you are
working, all named objects on the page, self, and target. Target refers to the object that first
received the message that generated the event. Self refers to the object to which the action
sequence belongs. The options available in the Property list change depending on the object you
select.
Special Values
Special values are variables with system-defined values that are available in different contexts.
For example, the special value pi represents the mathematical constant pi (approximately
3.14159).
Using Variables
Variables are named containers that store values that can be modified while an action sequence
runs. In the Actions Editor, you can define two types of variables: local and global. You can use a
local variable only as part of the action sequence in which you defined it; so, local variables in
different action sequences are unrelated even if you give them the same name. A local variable is
reset to its initial value each time the action sequence runs.
Global variables may be used by any action sequence. If an action sequence contains a local
variable with the same name as a global variable, the local variable is used when the action
sequence runs.
► To define a variable:
1.
In the Actions Editor, click the Define Variables button
on the toolbar.
The Variables dialog box appears
2.
On either the Local Variables or Global Variables tab (depending on the type you want to
define), click New.
3.
In the Variables dialog box, type the name of the variable, and then click OK.
4.
In the Initial Value box, type a value.
Copyright © 2012 SumTotal Systems, Inc. All rights reserved. Duplication prohibited.
209
Using the Actions Editor
5.
Click OK.
Figure 10: The Variables dialog box
Using Arrays
You can define an array to store related data in one variable. An array has a variable name
followed by an index in brackets. The index specifies which element of the array is being
referenced. For example, in an array named city, city[3] references the value stored in the third
element of the array, which could store a value such as "Seattle".
In the Actions Editor, an array can have only a single dimension. The array index can be numeric
or any string that does not contain a space, comma, or tab. In the following examples the array
index is a string of characters:
PersonalInfo["FirstName"]
PersonalInfo["LastName"]
PersonalInfo["Age"]
► To define an array:
1.
In the Actions Editor, click the Define Variables button on the toolbar.
The Variables dialog box appears.
2.
On either the Local Variables of Global Variables tab (depending on the type you want to
define), click the New button.
3.
Enter a name for the array.
210
Copyright © 2012 SumTotal Systems, Inc. All rights reserved. Duplication prohibited.
Creating and Using Shared Action Sequences
4.
Select the checkbox labeled Make this variable an array, and then click OK.
You can refer to an element of an array in an expression or in any action that allows you to set a
variable. In actions that allow a variable to be set, such as Set Variable or Score Pages, you can
choose array variables from a list or you can type in an array name followed by the specific
element in brackets.
Creating and Using Shared Action Sequences
In most ways, creating a shared action sequence is identical to creating an action sequence for an
object. Refer to the sections above to learn about using variables, building expressions, and
inserting actions into your shared action sequence.
This section addresses the differences between the two types of action sequences and what you
need to know to use shared action sequences in your application.
Naming and Locating Shared Action Sequences
Shared action sequences are stored together under unique names. You work with shared action
sequences in the Shared Actions dialog box. You can access the Shared Actions dialog box from the
main Object menu or the Actions menu in the Actions Editor.
► To create a new shared action sequence:
1.
Do one of the following:
From the Object menu, choose Shared Actions.
In the Actions Editor, from the Action menu, choose Shared Actions.
The Shared Actions dialog box appears.
2.
Click New.
The Actions Editor appears, where you can create a new shared action sequence.
Copyright © 2012 SumTotal Systems, Inc. All rights reserved. Duplication prohibited.
211
Using the Actions Editor
Using Shared Action Sequences
You can use a shared action sequence to add the same behavior to multiple objects. Shared action
sequences are comparable to subroutines or functions in most programming languages and are
very powerful and useful. Instead of creating the same sequence of actions multiple times, you
create a single shared action sequence and call it as many times as you need it. Using shared
action sequences also facilitates editing and troubleshooting. If you discover a problem with a
shared action sequence, or need to alter its behavior, you only need to make one change rather
than many.
You can also use a shared action sequence (like a function) to perform an operation and return a
value to the action sequence that calls it. When you create a shared action sequence for this
purpose, you can define parameters that the shared action sequence uses to complete the
operation.
For example, in Figure 11, a shared action sequence is used to calculate the commuting hours a
driver could save in a year by telecommuting (working from home) one day per week. The shared
action sequence, TimeInHours, which performs the calculation, uses two parameters: Days and
Minutes. To divide the calculation into manageable blocks, it uses two local variables, called
AvgWeek and ShortWeek, to store values while the action sequence runs. After it completes the
operation, the shared action sequence returns the result (the number of hours saved in a year) to
the action sequence that called it. It uses a variable called returnValue to store the value that
will be returned.
Figure 11: Creating a shared action sequence
212
Copyright © 2012 SumTotal Systems, Inc. All rights reserved. Duplication prohibited.
Creating and Using Shared Action Sequences
► To define parameters for a shared action sequence:
1.
Open or create a new shared action sequence.
2.
Click the Define Variables and Parameters button
on the Actions Editor toolbar.
The Parameters and Variables dialog box appears.
3.
On the Parameters tab, click New.
4.
In the Parameters dialog box, enter a descriptive name, and then click OK.
5.
Repeat steps 3 and 4 until you have defined all the parameters your shared action sequence
needs to complete any operations it performs.
► To define a variable for a shared action sequence:
1.
Open or create a new shared action sequence.
2.
Click the Define Variables and Parameters button
on the Actions Editor toolbar.
The Parameters and Variables dialog box appears.
3.
On either the Local Variables or Global Variables tab (depending on the type of variable you
want to define), click New.
4.
In the Variables dialog box, enter a descriptive name, and then click OK.
5.
Optional. Type a starting value for the variable in the Initial value box.
6.
Repeat steps 3, 4, and 5 until you have defined all the variables used in your shared action
sequence.
► To set the return value:
1.
Create a new shared action sequence.
2.
In the Actions Editor, from the Insert menu point to Action, point to General, and then select
Set Return Value.
The Properties for Action dialog box appears.
3.
Type in the value to return to the action sequence or use the Build Expression dialog box to
build an expression, and then click OK.
Executing Shared Action Sequences
A shared action sequence executes only when an action sequence or another shared action
sequence calls it.
Note If you execute a shared action sequence that returns a value, you should define a variable
to store that value.
► To execute a shared action sequence:
1.
Open the action sequence in which you want to execute a shared action sequence.
2.
Select the action after which you want the shared action sequence to run.
3.
From the Insert menu point to Action, point to General, and then choose Execute Shared
Actions.
The Properties for Action dialog box appears.
4.
Do the following:
Copyright © 2012 SumTotal Systems, Inc. All rights reserved. Duplication prohibited.
213
Using the Actions Editor
5.
In the Select a shared action sequence list, select the shared action sequence.
Optional. If the shared action sequence uses parameters, enter a value (as a literal value
or expression) for each parameter in the Parameter Value field. For more information,
see "Using parameters," later in this section.
Optional. In the Specify a variable to store the return value list, select a variable name.
Click OK.
Figure 12: Executing a shared action sequence
214
Copyright © 2012 SumTotal Systems, Inc. All rights reserved. Duplication prohibited.
Managing Action Sequences
Using Parameters
When you create a shared action sequence, you can define parameters that the shared action
sequence uses to complete any operations it performs. When you call the shared action sequence
from another action sequence, you can supply values for those parameters. These may be literal
values, variables, object properties, or expressions. The parameter list is only enabled if the
shared action sequence accepts parameters.
Figure 13: Sending parameters to a shared action sequence
Managing Action Sequences
ToolBook provides tools you can use to validate actions, to view action sequences in a text file,
and to test your action sequences as you build your application. You can also import or export an
action sequence to reuse it in another book.
Validating Actions
Only valid actions will run at Reader level. When you finish authoring, you can check the validity
of all the actions you've created for a group of objects, a page, a background, or the entire book.
► To validate actions:
1.
From the Tools menu, point to Actions, and then choose Validate Actions. (You can also
access this command from the Tools menu in the Actions Editor.)
2.
In the Validate actions for list, select the object(s) to check.
3.
Optional. Check Validate child objects.
4.
Click Validate Now.
The Validate Actions dialog box expands to display a list of invalid actions, the objects and
events they handle, and a description of the problem that invalidates the action.
5.
To edit an action, double-click it in the list.
The Actions Editor appears, and the invalid action is highlighted.
Copyright © 2012 SumTotal Systems, Inc. All rights reserved. Duplication prohibited.
215
Using the Actions Editor
6.
Correct the action, and then click Close.
An action can be technically valid, but not produce the behavior you expect. Before you distribute
your application, test all action sequences at Reader level (and/or in a Web browser) to ensure
that the actions perform as you want them to.
Viewing Action Sequences
Large, complex applications may contain dozens of different action sequences, all of them adding
different behaviors to your application. Fortunately, you don't have to open dozens of Actions
Editor windows to find a particular action sequence. You can use the Export Book Actions
command to create a text file containing all the action sequences in your book, or you can view
all the action sequences on a page using the View Page Actions command.
► To save the action sequences in your book in a text file:
1.
From the Tools menu, point to Actions, and then choose Export Book Actions. (You can also
access this command from the Tools menu in the Actions Editor.)
2.
In the Export Book Actions dialog box, specify a name and location for the text file.
3.
Click OK.
Figure 14: Actions displayed in a text file
► To view all the action sequences on a page:
1.
From the Tools menu, point to Actions, and then choose Show Page Actions.
The Show Page Actions dialog box appears.
2.
216
Do one of the following:
Click Print to send the document to your default printer.
Click Copy to copy the contents of the window to the Clipboard. You can then paste the
actions into any text document.
Copyright © 2012 SumTotal Systems, Inc. All rights reserved. Duplication prohibited.
Managing Action Sequences
3.
Click Close.
Enabling and Disabling Actions
You can disable any action in an action sequence. You can disable actions to isolate others for
testing or, if you choose to remove some behavior from an action sequence, you can disable an
action instead of deleting it (this is equivalent to commenting out a line of code).
► To disable or enable actions in an action sequence:
1.
Select one or more actions in the action sequence. To select multiple actions, press CTRL
while you click the actions.
2.
In the Actions Editor, from the Action menu, choose Enabled.
A check mark appears beside the command when the action is enabled. Disabled actions
appear in gray in the Actions Editor.
Importing and Exporting Action Sequences
You may want to use the same action sequence in more than one ToolBook book. You can use the
same sequence of actions in more than one book by using the Import and Export commands. When
you export a sequence of actions, ToolBook saves the exported actions in a file with a .tba
extension in the location you specify.
Note If the action sequence you are importing contains explicit object references or uses
variables, be sure that the book or action sequence into which you are importing the file
contains the same object names and variable names.
In the Actions Editor, you can select and export specific actions. You can also import actions and
insert them after a selected action in the action sequence. In the Shared Actions dialog box, you
can export an entire shared action sequence or create a new shared action sequence by importing
actions.
Importing and Exporting Actions in the Actions Editor
When you export actions from the Actions Editor, ToolBook saves only those actions you
specifically select in a file with a .tba extension. When you import a .tba file into the Actions
Editor, ToolBook copies all the actions into the file after the currently selected action in the
action sequence.
► To export actions in the Actions Editor:
1.
Open the action sequence from which you want to export actions.
2.
Select the actions you want to export. To select multiple actions, press CTRL while you click
the actions.
3.
From the Actions Editor File menu, choose Export Actions.
The Export Actions dialog box appears.
4.
Navigate to the file location where you want to save the .tba file, type a name for the file,
and then click OK.
► To import actions in the Actions Editor:
1.
Open the action sequence into which you want to import actions, or open the Actions Editor
for a new action sequence.
2.
If importing into an existing action sequence, select the action after which you want to insert
the actions stored in the .tba file.
Copyright © 2012 SumTotal Systems, Inc. All rights reserved. Duplication prohibited.
217
Using the Actions Editor
3.
From the Actions Editor File menu, choose Import Actions.
The Import Actions dialog box appears.
4.
Navigate to and select the .tba file you want to import, and then click OK.
Importing and Exporting from the Shared Actions Dialog Box
You can export an entire shared action sequence at once using the Export command in the Shared
Actions dialog box. You can also import any .tba file as a new shared action sequence using the
Import command.
► To export a shared action sequence in the Shared Actions dialog box:
1.
From the Objects menu, choose Shared Actions.
The Shared Actions dialog box appears.
2.
Select the shared action sequence you want to export, and then click Export.
The Export Shared Actions dialog box appears.
3.
Navigate to the file location where you want to save the .tba file, type a name for the file,
and then click OK.
► To import in the Shared Actions dialog box:
1.
From the Objects menu, choose Shared Actions.
The Shared Actions dialog box appears.
2.
Click Import.
3.
Select the .tba file you want to import, and then click OK.
4.
In the Shared Actions dialog box, in the Name box, select NewSharedAction, and replace it
with a descriptive name.
5.
Optional. Click Edit to make any changes to the new shared action sequence you imported.
6.
Click Close.
218
Copyright © 2012 SumTotal Systems, Inc. All rights reserved. Duplication prohibited.
Chapter 18
Creating Action Sequences: Practical
Examples
Introduction
There are thousands of different ways you can combine actions in action sequences to add
behavior to your ToolBook application. This chapter takes you through the steps involved in
creating action sequences that handle some common scenarios.
About the Examples
The examples presented in this chapter provide a hands-on introduction to creating action
sequences using the Actions Editor. As you work with the Actions Editor, you will learn to combine
actions in many ways to create powerful results. Each of the examples that follow focuses on
learning a particular skill—using variables for example. All four of the examples demonstrate one
or more of the following:
x
Defining and using variables and parameters
x
Adding actions that display text, change object properties, and send users to certain pages
x
Handling multiple events
x
Testing conditions
x
Building expressions
x
Using shared action sequences
For more information about using the Actions Editor to create action sequences, see Chapter 17,
"Using the Actions Editor."
Using the Examples
You can easily recreate the examples in this chapter because most of the work of building the
pages has been done for you in the Actions Editor Walkthrough book. All you have to do is open
the book and create the action sequences that add behavior to the objects.
This chapter assumes you are familiar with basic ToolBook concepts. Before you begin, you should
feel comfortable switching between Author and Reader level, adding pages and backgrounds,
adding objects to pages using the Catalog or the tool palette, and using the Properties dialog box
to refine an object's appearance and behavior.
Since the examples that follow are self-contained, you can complete them in any order you like.
Each example takes between five and twenty minutes to complete, depending on your level of
experience with ToolBook and your knowledge of basic programming conventions. When you finish
an example, you can view the results immediately.
► To open the Actions Editor Walkthrough book:
1.
Start ToolBook.
2.
Navigate to the location where you have installed ToolBook and go to the Samples folder.
Typically, the location would be: C:\Program Files\ToolBook\ToolBook 11.5\Samples\Actions
Editor Walkthrough
Copyright © 2012 SumTotal Systems, Inc. All rights reserved. Duplication prohibited.
219
Creating Action Sequences: Practical Examples
3.
Select Walkthrough.tbk, and then click OK.
ToolBook opens the book.
Example 1: Using Conditions
There are situations in which you will want different types of users to view, or have access to,
different information. This example uses conditions in an action sequence to send new users to a
page containing introductory text while sending advanced users directly to a page with a table of
contents.
Open the second page of the Actions Editor Walkthrough book. Note that there are three
interactive objects: two radio buttons (labeled New user and Advanced user) and a pushbutton
(labeled Continue). You will create an action sequence for the Continue button that sends users to
different pages of the book depending on their radio button selection.
220
Copyright © 2012 SumTotal Systems, Inc. All rights reserved. Duplication prohibited.
Example 1: Using Conditions
Note To work with an object in the Actions Editor, you must assign the object a name.
Figure 1 shows the action sequence applied to the Continue button for Example 1. ToolBook
executes the action sequence as follows: First, ToolBook evaluates which one of two radio buttons
a user selected. Depending on the radio button selection, ToolBook sends the user to a specific
page. If the user did not select a radio button, ToolBook prompts the user to check a button and
try again.
Figure 1: Full action sequence for Example 1
Tip
As you work through the following procedures, you can refer back to Figure 1 for an
example of how the action sequence should look.
Building the Action Sequence
Building this action sequence shows you how to:
x
Select an event.
x
Define conditions for behavior.
x
Go to pages in a book.
x
Display a message in a dialog box.
Opening the Actions Editor and Selecting an Event
Every action sequence you create for an object handles a specific event and you can create a
separate sequence of actions for each possible event. In this case, you will create an action
sequence that handles a button click.
► To open the Actions Editor and select the event:
1.
If ToolBook is currently open at Reader level, press F3 to move to Author level.
2.
On the second page of the Actions Editor Walkthrough book, select the Continue button.
3.
From the Object menu, choose Actions.
The Actions Editor appears.
4.
If On click is not selected in the action sequence, click the event to open the Event list, and
then select On click.
Copyright © 2012 SumTotal Systems, Inc. All rights reserved. Duplication prohibited.
221
Creating Action Sequences: Practical Examples
Inserting Actions
Because you want to send users to two different locations depending on their radio button
selections, you need to determine which button a user has selected. You can insert a condition to
create a conditional expression that tests user selection.
► To insert a condition:
1.
From the Insert menu point to Condition, and then select If.
2.
If the Properties for Condition dialog box does not open automatically, click the Properties
button on the Actions Editor toolbar.
3.
Click the Build expression button at the end of the Condition box to open the Build Expression
dialog box.
4.
In the Build Expression dialog box, do the following:
a)
In the Select the type of item to insert list, select Object properties.
b)
In the Select an object list, select Button "New user." Or, drag the Choose object button
over the New user radio button to select it.
c)
In the Select a property list, select checked.
d)
Click Insert into Expression.
5.
Optional. Click Check Syntax to check the syntax of your expression.
6.
Click OK to close the Build Expression dialog box, and then click OK again to close the
Properties dialog box.
ToolBook inserts the expression you created and an End if statement to indicate the end of
the conditional structure.
7.
Using the skills learned above, create a second conditional expression directly below the first:
Else if checked of Button "Advanced user."
8.
From the Insert menu, point to Condition, and choose Else.
Note The Else condition covers any other possible condition. In this example, the only possible
other condition is that neither radio button is checked.
Once you have determined which radio button the user selected, you need to send the user to the
appropriate page of the book. You can use the Go to page action to send a user to a particular
page.
► To insert the Go to page action:
1.
Select the first conditional expression in the action sequence (If checked of Button "New
user").
2.
From the Insert menu, point to Action, point to Navigation, and choose Go to Page.
3.
In the Properties for Action dialog box, do the following:
a)
In the Select the type of navigation list, select Jump to page.
b)
In the Select the page to navigate to list, select Next page.
c)
Click OK.
4.
Select the second conditional expression (Else if checked of Button "Advanced user"). From
the Insert menu, point to Action, point to Navigation, and then choose Go to Page.
5.
In the Properties for Action dialog box, do the following:
a)
b)
222
In the Select the type of navigation list, select Jump to page.
In the Select the page to navigate to list, select Specific page.
Copyright © 2012 SumTotal Systems, Inc. All rights reserved. Duplication prohibited.
Example 1: Using Conditions
6.
c)
In the Select a specific page box, click the Choose page button.
d)
In the Choose Page dialog box, select Page "Contents," and then click OK.
In the Properties for Action dialog box, click OK.
If a user fails to select a radio button before clicking continue, you need to prompt the user to
select an option. There are several options you can choose from to display a message to users.
This action sequence uses the Display alert action to create a dialog box with a note to the user.
► To insert the Display alert action:
1.
Select the Else condition.
2.
From the Insert menu, point to Action, point to Prompts, and then choose Display Alert.
3.
In the Properties for Action dialog box, do the following:
a)
4.
Tip
Select Enter literal text.
b)
In the Specify the text to display box, type Please select an option and try again.
c)
Click OK to close the Properties dialog box.
In the Actions Editor, from the File menu, choose Update Actions & Close.
You can leave the Actions Editor open while you test an action sequence. From the File
menu, choose Update Actions rather than Update Actions & Close.
Testing the Action Sequence
It's a good idea to test your action sequences as you build them. You can ensure that an action
sequence works and that you are satisfied with the results before you use it again or develop
other behaviors to respond to the expected outcome.
► To test the Display alert action:
1.
Press F3 to switch to Reader level.
2.
Click Continue.
If a dialog box appears with the message, "Please select an option and try again," it indicates
that both your conditional structure and Display alert action are working. Now test the Go to
page action.
► To test the Go to page action:
1.
At Reader level, select Advanced user.
2.
Click Continue.
If the Contents page appears, your action sequence is working and you are ready to return to
Author level and continue with the next example.
If your results were different than those described above, your action sequence is not
working. Return to Author level and review the instructions in Example 1.
Copyright © 2012 SumTotal Systems, Inc. All rights reserved. Duplication prohibited.
223
Creating Action Sequences: Practical Examples
Example 2: Using Variables
There are many ways you can use variables in an action sequence. In this example, a global
variable stores the number of times a user clicks a Hint button. The action sequence uses this
number to determine which hint to display.
At Author level, open page six of the Actions Editor Walkthrough book (named Question 1). There
are several interactive objects on this page, including a fill-in-the-blank question object and three
buttons. One of the buttons is labeled Hint. You will create an action sequence for this button
that displays text as "hints" to the user.
224
Copyright © 2012 SumTotal Systems, Inc. All rights reserved. Duplication prohibited.
Example 2: Using Variables
Figure 2 shows the action sequence for Example 2 and the Variables dialog box.
ToolBook executes the action sequence as follows: First, ToolBook evaluates each conditional
expression in turn, comparing the value stored in the global variable named g_HintCounter against
a specific integer. If an expression is true (for example, if the value stored in g_HintCounter is 0),
ToolBook runs the Display Popup text action that follows. Finally, the Set variable action increases
the value of g_HintCounter by 1.
Figure 2: Full action sequence for Example 2
Tip
To make it easier to distinguish global variables from local variables, the names of global
variables are often prefixed with an identifier such as g_.
Copyright © 2012 SumTotal Systems, Inc. All rights reserved. Duplication prohibited.
225
Creating Action Sequences: Practical Examples
Building the Action Sequence
Building this action sequence shows you how to:
x
Select an event.
x
Define a variable and change its value.
x
Define conditions for behavior.
x
Display text messages.
x
Cut, paste, and edit actions in the Actions Editor.
Opening the Actions Editor and Selecting an Event
Every action sequence for an object handles a specific event. The action sequence you create in
this example occurs in response to a user clicking the Hint button.
► To open the Actions Editor and select an event:
1.
Select the Hint button.
2.
From the Object menu, choose Actions.
The Actions Editor appears.
3.
If On click is not selected, click the name of the event and select On click from the Event list.
Defining a Variable
This action sequence uses a global variable named g_HintCounter to track how many times the
user clicks the Hint button. This action sequence uses a global variable rather than a local
variable since the value of a local variable is reset each time the action sequence runs.
► To define a variable:
1.
Click the Define Variables button
on the Actions Editor toolbar.
The Variables dialog box appears.
2.
On the Global Variables tab, click New.
3.
In the Variables dialog box, type g_HintCounter, and then click OK.
4.
In the Initial Value box, type 0 (zero).
5.
Click OK.
Note When you define variables, they are not displayed as part of the action sequence. To see a
list of variables defined for an action sequence, click the Define Variables button on the
Actions Editor toolbar.
Inserting Actions
In order to display a different hint each time a user clicks the Hint button, you need to track the
number of times the user clicks this button. Since the value of the variable g_HintCounter
corresponds with the number of clicks, you need to determine the value of g_HintCounter before
displaying a hint. You can insert a condition to create a conditional expression that tests the value
of g_HintCounter.
► To insert a condition:
1.
226
From the Insert menu, point to Condition, and then choose If.
Copyright © 2012 SumTotal Systems, Inc. All rights reserved. Duplication prohibited.
Example 2: Using Variables
2.
If the Properties for Condition dialog box does not open automatically, click the Properties
button on the Actions Editor toolbar.
3.
You can type g_HintCounter = 0, or you can use the lists in the Build Expression dialog box to
create the same expression:
Click the Build expression button to open the Build Expression dialog box; in the Select
the type of item to insert list, select Variables and parameters; in the Select a variable
or parameter list, select g_HintCounter; click Insert into Expression.
Position the insertion point after g_HintCounter in the expression box, and then type = 0.
Click OK.
4.
Click OK to close the Properties for Condition dialog box.
5.
Using the skills learned above, insert two more conditions:
Else if g_HintCounter = 1
Else
To display a hint to a user, you need to show text on the page. This action sequence uses popup
text to display a hint to a user.
► To display popup text:
1.
Select the first condition in the action sequence (If g_HintCounter = 0).
2.
From the Insert menu, point to Prompts, and then choose Display Popup Text.
3.
If the Properties for Action dialog box does not open automatically, click the Properties
button on the Actions Editor toolbar.
4.
Select Enter literal text.
5.
In the Specify the text to display box, type This is your first hint.
6.
Click OK to close the Properties dialog box.
To save time and steps, you can use the editing tools in the Actions Editor to copy and paste the
Display Popup text action you just created.
► To copy and paste an action:
1.
Select the action you just created.
2.
From the Edit menu, choose Copy.
3.
Select the second condition in the action sequence (Else if g_HintCounter = 1), and then from
the Edit menu, choose Paste.
A copy of the action appears below the second condition.
4.
Select the third condition (Else) and paste again.
You will need to edit the text that is displayed by the actions you just pasted.
► To edit an action:
1.
Select the first pasted action, and then click the Action Properties button on the Actions
Editor toolbar.
2.
Select the text in the Specify the text to display box, replace it by typing This is your second
hint, and then click OK.
3.
Select the second pasted action, replace its text with Sorry, no more hints are available for
this question, and then click OK.
Copyright © 2012 SumTotal Systems, Inc. All rights reserved. Duplication prohibited.
227
Creating Action Sequences: Practical Examples
Now that you have created a conditional expression that tests the value of the g_HintCounter
variable, and a Display Popup Text action that runs if the conditional expression is true, you need
to insert an action that increments the value of g_HintCounter. You can use the Set variable
action to change the value of a variable.
► To set the value of a variable:
1.
In the Actions Editor, select the last line of the action sequence (End if).
2.
From the Insert menu, point to Action, point to General, and then choose Set Variable.
The Properties for Action dialog box appears.
3.
In the Choose a variable to set list, select g_HintCounter.
4.
In the Set the variable to this value box, type g_HintCounter + 1, and then click OK.
5.
In the Actions Editor, from the File menu, choose Update Actions & Close.
Testing the Action Sequence
You can test to see whether this action sequence executes properly at Reader level.
► To test an action sequence:
1.
Press F3 to switch to Reader level.
2.
Click Hint a few times.
The first three times you click Hint, a different hint should display If you see "This is your first
hint," followed by "This is your second hint," and finally, "Sorry, no more hints are available
for this question," your action sequence is working. You can now return to Author level to
complete the next example or exit the book.
If your results do not match the description above, your action sequence is not working.
Return to Author level and review the steps in this example.
228
Copyright © 2012 SumTotal Systems, Inc. All rights reserved. Duplication prohibited.
Example 3: Changing Object Properties
Example 3: Changing Object Properties
One advantage of online learning is that users can move through a course at their own pace and
choose which topics to visit based on their individual information needs. You can help users track
their progress by creating a table that is continually updated to show users the pages they have
visited. In this example, you will change the checked property of a table item depending on
whether its corresponding page has been visited.
At Author level, open page four (named Contents) of the Actions Editor Walkthrough book. You
will see a list of page titles. Although no check boxes are visible, each of the titles in this list is a
separate check box object.
Copyright © 2012 SumTotal Systems, Inc. All rights reserved. Duplication prohibited.
229
Creating Action Sequences: Practical Examples
Select the object labeled About variables and click the Properties button on the toolbar. On the
Graphics tab, note that there are two graphics assigned to the button: one for its normal state
and one for its checked state. You will create an action sequence for this object that determines
whether the page About variables has been visited and, if it has, changes the state of the button
to checked.
Figure 3 shows the action sequence for Example 3. ToolBook executes the action sequence as
follows: First, ToolBook checks the visited property of page About variables. If this property is
equal to true, the user has visited the page. ToolBook then changes the state of the About
variables button to checked by setting its checked property to true. If the page has not been
visited, ToolBook does not change the state of the button.
Figure 3: Full action sequence for Example 3
Building the Action Sequence
Building this action sequence shows you how to:
x
Select an event.
x
Define conditions for behavior.
x
Change the value of an object property.
Opening the Actions Editor and Selecting an Event
Because you want users to view an updated list each time they open the Contents page, you will
want the action sequence to run each time the Contents page loads. The event On load page
corresponds with the user opening a page in the book.
► To open the Actions Editor and select an event:
1.
On the Contents page, select the check box object labeled About variables.
2.
From the Object menu, choose Actions.
The Actions Editor appears.
3.
230
In the Event list, select On load page.
Copyright © 2012 SumTotal Systems, Inc. All rights reserved. Duplication prohibited.
Example 3: Changing Object Properties
Inserting Actions
The first task in this action sequence is to determine whether or not a user has visited the page
named About variables. You can insert a condition to create a conditional expression that tests
whether a page has been visited.
► To insert a condition:
1.
From the Insert menu, point to Condition, and then choose If.
The Properties for Condition dialog box appears.
2.
In the Condition box, type visited of Page "About variables" = True, and then click OK.
3.
From the Insert menu, point to Condition, and then choose Else.
To change the state of the About variables button from unchecked to checked, you can use the
Set property action.
► To set an object property:
1.
Select the first condition in the action sequence (If visited of Page "About variables").
2.
From the Insert menu, point to Action, point to Object, and then choose Set Property.
The Properties for Action dialog box appears.
3.
Do the following:
a)
In the Select the object for which to set the property list, select self.
b)
In the Select the property to set list, select checked.
c)
Check Specify the new value for the property as a literal value.
d)
In the Select logical value list, select true, and then click OK.
4.
Select the Else condition.
5.
Following the steps above, create an action that sets the checked property of self to false.
6.
Click OK.
7.
From the File menu, choose Update Actions & Close.
Tip
If you want to use the list items to send users to pages, you can follow the steps in Example
1 to create an action sequence that sends users to specific pages in response to the On click
event.
Testing the Action Sequence
You will want to test this action sequence to ensure that the state of the button changes after the
About variables page is visited.
► To test the action sequence
1.
Press F3 to switch to Reader level.
2.
Using the navigation buttons, go to the About variables page of the book and then return to
the Contents page.
If the check graphic appears next to About variables in the Contents list, your action
sequence is working, and you are ready to return to Reader level and continue with the next
example.
If the graphic doesn't change, your action sequence is not working. Return to Author level and
review the steps above.
Copyright © 2012 SumTotal Systems, Inc. All rights reserved. Duplication prohibited.
231
Creating Action Sequences: Practical Examples
Example 4: Using Shared Action Sequences
You can use a shared action sequence any time you want to reuse the same sequence of
behaviors. You can also use a shared action sequence to perform a series of actions that returns a
value. In this example, a shared action sequence is used in a program that calculates the amount
you would pay for sales tax in different cities.
At Author level, open the final page of the Actions Editor Walkthrough book titled "Tax
Calculator." You will see two interactive objects on the page: A text field for entering a price and
a list box containing three city names—Seattle, Atlanta, and New York.
232
Copyright © 2012 SumTotal Systems, Inc. All rights reserved. Duplication prohibited.
Example 4: Using Shared Action Sequences
Figure 4 shows the action sequence for Example 4. ToolBook executes the action sequence as
follows: First, ToolBook evaluates which city the user selected from the list box. Then, it executes
the shared action sequence, sending the appropriate tax rate and the text entered in the Enter a
price field as parameters. The shared action sequence uses these parameters to calculate and
return a value to the action sequence that called it. The value returned by the shared action
sequence is stored in a local variable named Tax. Finally, ToolBook displays the value of the local
variable (the results of the calculation) to the user.
Figure 4: The full action sequence and shared action sequence for Example 4
Building the Shared Action Sequence
Building this shared action sequence shows you how to:
x
Create a new shared action sequence.
x
Define parameters and variables for a shared action sequence.
x
Calculate a value and store it in a local variable.
x
Return a value to an action sequence.
Creating a New Shared Action Sequence
Shared action sequences are stored by unique names as properties of your book. You access the
Shared Actions dialog box to create, edit, duplicate, import, or export any shared action
sequence.
► To create a new shared action sequence:
1.
From the Object menu, choose Shared Actions.
The Shared Actions dialog box appears.
Copyright © 2012 SumTotal Systems, Inc. All rights reserved. Duplication prohibited.
233
Creating Action Sequences: Practical Examples
2.
Click New.
The Actions Editor appears where you can create a new shared action sequence.
Defining Parameters and Variables
When you create a shared action sequence, you can define the parameters it uses to complete any
operations it performs. In this example, the parameters required to calculate sales tax are a price
and a sales tax rate.
► To define a parameter:
1.
Click the Define Variables and Parameters button on the Actions Editor toolbar.
The Parameters and Variables dialog box appears.
2.
On the Parameters tab, click New.
3.
In the Parameter dialog box, enter Price as the name, and then click OK.
4.
Repeat the steps above to define a second parameter and name it Rate.
It is sometimes easier to divide a long equation into two parts. You can use a variable to store the
result of one calculation. Then, you can use that variable in a second calculation.
► To define a variable:
1.
On the Local Variables tab, click New.
2.
In the Name box, select NewVariable, and in its place, type Product.
3.
In the Initial value box, type 0 (zero).
4.
Click OK.
Inserting Actions
You can easily complete the calculation by dividing it into two steps. First you will multiply the
parameters Rate and Tax, round the result to the nearest integer, and store the resulting value in
the local variable named Product.
Then you will use a variable named returnValue to store the final value that results from the
operations that are carried out in the shared action sequence.
► To set the value of a variable:
1.
From the Insert menu, point to Action, point to General, and then choose Set Variable.
The Properties for Action dialog box appears.
2.
In the Choose a variable to set list, select Product.
3.
Click the Build expression button
the following:
234
to open the Build Expression dialog box, and then do
In the Select the type of item to insert list, select Operators and functions; in the Select
a category list, select All functions; in the Select an operator or function list, select
round; click Insert into Expression.
In the expression box, insert the cursor between the parentheses after round.
In the Select the type of item to insert list, select Variables and parameters; in the
Select a variable or parameter list, select Price; click Insert into Expression.
In the Select the type of item to insert list, select Operators and functions; in the Select
a category list, select Math operators and functions; in the Select an operator or function
list, select the multiplier symbol (*); click Insert into Expression.
Copyright © 2012 SumTotal Systems, Inc. All rights reserved. Duplication prohibited.
Example 4: Using Shared Action Sequences
4.
In the Select the type of item to insert list, select Variables and parameters; in the
Select the variable or parameter list, select Rate; click Insert into Expression.
Click OK to close the Build Expression dialog box, and then click OK to close the Properties
dialog box.
To return the value calculated in the shared action sequence, you use the Set Return Value
action. You can change the form of the result to display as a dollar amount limited to two
decimals, by setting the variable returnValue to the value of Product divided by 100.
► To set the return value:
1.
From the Insert menu, point to Action, point to General, and then choose Set Return Value.
The Properties for Action dialog box appears.
2.
3.
Click the Build expression button to open the Build Expression dialog box, and then do the
following:
In the Select the type of item to insert list, select Variables and Parameters; in the
Select a variable or parameter list, select Product; click Insert into Expression.
In the Select the type of item to insert list, select Operators and functions; in the Select
a category list, select Math operators and functions; in the Select an operator or function
list, select the division symbol (/); click Insert into Expression.
In the expression box, insert your cursor after the division symbol and type 100.
Click OK to close the Build Expression dialog box, and then click OK to close the Properties
dialog box.
Saving and Naming the Shared Action Sequence
Once you have built a shared action sequence, you need to save it under a unique name; then,
you can call it from any other action sequence.
► To save a shared action sequence:
1.
In the Actions Editor, from File menu, choose Update Actions & Close.
2.
In the Shared Actions dialog box, in the Name box, select NewSharedAction, and then type
CalculateTax.
3.
Click Close.
Building the Action Sequence for the List Box
The shared action sequence you just created runs only when called by another action sequence.
Now you will create an action sequence for the list box object named Cities. The action sequence
includes an action that calls CalculateTax and supplies it with the two parameters it needs to
complete its operation: Price and Rate.
Building this action sequence shows you how to:
x
Select an event.
x
Define a variable to store the value returned by the shared action sequence.
x
Define conditions for behavior.
x
Call and supply parameters to a shared action sequence.
x
Display a message in a dialog box.
Copyright © 2012 SumTotal Systems, Inc. All rights reserved. Duplication prohibited.
235
Creating Action Sequences: Practical Examples
Opening the Actions Editor and Selecting an Event
The event that activates this shared action sequence is a user selecting a city from the Cities list
box. You need to create an action sequence for the list box that runs in response to the On select
event.
► To open the Actions Editor and select an event:
1.
On the Tax Calculator page of the Actions Editor Walkthrough book, select the Cities list box.
2.
From the Object menu, choose Actions.
The Actions Editor appears.
3.
In the Event list, choose On select.
Defining Variables
The shared action sequence you created returns a value. You need to define a local variable to
store that value while the action sequence runs.
► To define a local variable:
1.
Click the Define Variables button on the Actions Editor toolbar.
2.
On the Local Variables tab, click New.
3.
In the Variables dialog box, type Tax, and then click OK.
4.
In the Initial value box, type 0 (zero).
5.
Click OK.
Inserting Conditions to Determine List Box Selection
Depending on which city a user selects in the list box, you will send a different tax rate as a
parameter to the shared action sequence. So, first you need to determine the user's selection.
You can insert a condition to create a conditional expression that tests a user's selection.
► To insert a condition:
1.
From the Insert menu, point to Condition, and then choose If.
The Properties for Condition dialog box appears.
2.
Click the Build expression button to open the Build Expression dialog box.
3.
In the Build Expression dialog box, do the following:
In the Select the type of item to insert list, select Object properties; in the Select an
object list, select self; in the Select a property list, select selectedItemText; click Insert
into Expression.
Position the insertion point at the end of the expression, and then type = "Seattle".
4.
Click OK to close the Edit Expression dialog box, and then click OK to close the Properties
dialog box.
5.
Repeat the above steps until you have created a conditional expression that tests for each
item in the list.
If selectedItemText of self = "Seattle"
Else if selectedItemText of self = "Atlanta"
Else
236
Copyright © 2012 SumTotal Systems, Inc. All rights reserved. Duplication prohibited.
Example 4: Using Shared Action Sequences
Executing a Shared Action Sequence
To perform the calculation, you need to call the shared action sequence you created above. You
use a specific action—Execute shared actions— to run the shared action sequence. When you run
the shared action sequence, you need to supply values for the two parameters it requires: Rate
and Price.
► To execute a shared action sequence:
1.
Select the first condition in the action sequence (If selectedItemText of self = "Seattle").
2.
From the Insert menu, point to Action, point to General, and then choose Execute Shared
Actions.
The Properties for Action dialog box appears.
3.
In the Select a shared action sequence list, select CalculateTax.
The two parameters you defined when you created the shared action sequence—Price and
Rate—appear under Parameter Name.
4.
Under Parameter Value, insert the cursor in the box next to Price, and then click the Build
expression button.
5.
In the Build Expression dialog box, do the following:
a)
In the Select the type of item to insert list, select Object properties.
b)
In the Select an object list, select Field "Price."
c)
In the Select a property list, select text, and then click Insert into Expression.
6.
Click OK.
7.
Under Parameter Value, insert the cursor in the box next to Rate, and then type 8.6.
8.
In the Specify a variable to store the return value list, select Tax.
9.
Click OK.
Figure 5: Properties for "Execute Shared Actions" Action
Copyright © 2012 SumTotal Systems, Inc. All rights reserved. Duplication prohibited.
237
Creating Action Sequences: Practical Examples
Copying, Pasting, and Editing an Action
There is only one difference between the action you just inserted and the actions you will insert
after the next two conditions: the value of Rate. When actions are very similar, you will save time
by copying, pasting, and editing the first action you create.
► To copy, paste, and edit an action:
1.
Select the action you inserted in the steps above.
2.
From the Edit menu, choose Copy.
3.
Select the second condition in the Action sequence (Else if selectedItemText of self =
"Atlanta").
4.
From the Edit menu, choose Paste.
5.
While the action you pasted is selected, click the Properties button on the Actions Editor
toolbar.
6.
In the Properties for Action dialog box, select the parameter value next to Rate, and type 6.
7.
Repeat the steps above to insert the same action under the third condition in the action
sequence (Else), select the value next to Rate, and then type 8.25.
Inserting the Display Alert Action
So far, the actions you have inserted into the action sequence determine which item the user
selects in the list box and call a shared action to perform a calculation from the information it
supplies. Now you need to give feedback to the user displaying the dollar amount due in tax. You
can use the Display alert action to show users a message in a dialog box.
► To display an alert:
1.
In the Actions Editor, select End if.
2.
From the Insert menu, point to Action, point to Prompts, and choose Display Alert.
The Properties for Action dialog box appears.
3.
Select Enter an expression.
4.
In the Specify the text to display box, click the Build expression button.
5.
In the Build Expression dialog box, build the following expression: "The sales tax due on the
amount you entered = $" &Tax
a)
Type "The sales tax due on the amount you entered = $"
b)
Type & (ampersand).
c)
In the Select the type of item to insert list, select Variables and parameters.
d)
In the Select a variable or parameter list, select Tax, and then click Insert into
Expression.
6.
Click OK to close the Build Expression dialog box, and then click OK to close the Properties
dialog box.
7.
In the Actions Editor, from the File menu, choose Update Actions & Close.
Testing the Action Sequence
The following steps test both action sequences you created in this example.
► To test the action sequence:
1.
238
Press F3 to switch to Reader level.
Copyright © 2012 SumTotal Systems, Inc. All rights reserved. Duplication prohibited.
Troubleshooting Action Sequences
2.
In the Price field, type 580.
3.
In the list box, click each of the cities and note the message that ToolBook displays.
When you click Seattle, a dialog box should appear that reads,
"The sales tax due on the amount you entered = $49.88."
When you click Atlanta, a dialog box should appear that reads,
"The sales tax due on the amount you entered = $34.8."
When you click New York, a dialog box should appear that reads, "The sales tax due on
the amount you entered = $47.85."
If your results do not match those listed above, return to Author level and review the
instructions. If they do match, you have successfully completed the final example.
Troubleshooting Action Sequences
If your action sequences aren't producing the expected behavior, review them for the following
common errors:
x
Typing a name in the Build Expression dialog box that doesn't exactly match the name of
the object to which it refers For example, did you type "about varailbes" instead of "about
variables"? A typo is often difficult to pinpoint as the source of a faulty action sequence. You
can avoid making typing mistakes by selecting object names and variables in the lists in the
Build Expression dialog box.
x
Selecting the wrong event in the Event list By default, when you open the Actions Editor, it
opens to the most common event in its list of supported events (usually, On click). To create
an action sequence for any other event, you must select that event in the Event list.
x
Providing insufficient information Certain dialog boxes, including those for Display
Confirmation and Display Query, have two tabs on which you need to select options. Your
action sequence will not run properly if you do not enter all necessary information.
Copyright © 2012 SumTotal Systems, Inc. All rights reserved. Duplication prohibited.
239
Chapter 19
Using Resources
Introduction
Resources are files that can be reused in your ToolBook application. Some resources are used to
create a cohesive interface for your application—cursors, icons, color palettes, and menus, for
example. ToolBook also uses the resource system to manage graphical elements you add to your
book, allowing you to use a graphic several times in your book with only minimal impact on the
file size of your application. This chapter describes how to add, modify, and export resources.
About Resources
A resource is a file that you can use multiple times within your ToolBook application. When you
add a resource to a book, ToolBook places a copy of it in the Resource Manager, which is a
common library of resources in the book. The resource is then available to all objects in the book
that can use that type of resource; however, the resource does not appear in the book until you
assign it to an object as a property.
You can use resources to:
x
Apply a graphic to a button or to an Image object.
x
Substitute a custom cursor for a ToolBook system cursor.
x
Change the default drag image or no-drop cursor that appears when an object is dragged or
dropped.
x
Add an icon that appears when your application is minimized.
x
Add a menu bar that appears in multiple windows of your application.
x
Identify a shared script that is used by multiple objects in your application.
x
Substitute a custom Windows icon when you save your application as an EXE file.
ToolBook stores only one copy of the resource in the book, no matter how many objects refer to
it. As a result, you can apply the resource to as many objects as you want without adding to the
file size of your application. An object uses a resource by referring to the stored copy by name or
ID number.
For example, if your book has multiple backgrounds with the same navigation buttons on every
page, you would use a bitmap resource for the graphic image on the navigation buttons. Because
only one copy of the bitmap is stored, your book's file size is much smaller than it would be if you
duplicated the bitmap for each button.
Note You cannot share the same copy of a resource among multiple books. You must import a
separate copy of the resource for each book.
Customizing the ToolBook interface using resources
To do this...
Assign this resource type...
Create a graphic button
Bitmap, cursor, icon
Display a graphic using the Image object
Bitmap, cursor, icon
Change the drag image and no-drop cursor
Bitmap, cursor, icon
Apply a custom menu
Menu bar*
Copyright © 2012 SumTotal Systems, Inc. All rights reserved. Duplication prohibited.
241
Using Resources
Change a viewer's† Minimize icon
Icon
Change a book's system cursor
Cursor, icon
* For details about creating custom menus, see Chapter 2 in the electronic book, Advanced
Features.
† For details about creating viewers, see Chapter 1 in the electronic book, Advanced Features.
Tip
If you plan to save your book as an EXE file, you can customize its Windows icon. Before you
save your book as an EXE file, right-click on the title bar, select Viewer Properties, choose
Choose icon, and then, in the Choose Icon dialog box, import your custom icon or create a
new icon. When you save your book as an EXE file, the title bar icon appears as the book's
Windows icon.
Creating and Modifying Resources
You can create and modify menu bar and shared-script resources using the utility applications that
come with ToolBook. Other types of resources can be created using other Windows applications.
For example, you can create graphic images using Adobe® Photoshop® and then import them to
ToolBook.
Menu bar and shared-script resources are unique to ToolBook. You create and use them only in
ToolBook products. Access the Menu Bar Editor from the Resource Manager dialog box.
Creating and modifying resources
To create this
resource type...
Identified by this file extension...
Use this...
Bitmap
.gif, .jpg, .bmp, .dib, .png, wmf, emf
Graphics program
Font
.ttf
TrueType™ fonts editor
Icon
.ico*
Graphics program
Menu bar
.mnu
ToolBook Menu Bar Editor
Palette
.pal
Graphics program
Shared script
—
ToolBook's script editor
* These files may contain more than one image. ToolBook uses the first image it encounters in the
file.
► To create or modify a resource in the Resource Manager:
1.
242
From the Object menu, choose Resources.
Copyright © 2012 SumTotal Systems, Inc. All rights reserved. Duplication prohibited.
Creating and Modifying Resources
The Resource Manager dialog box appears
2.
In the Available resources list, choose the type of resource you want to create or modify.
3.
Do one of the following:
If you're creating a new resource, click New.
If you're editing an existing resource, select the resource from the list, and then click
Edit.
If available, a utility appears so you can create or modify the resource.
Copyright © 2012 SumTotal Systems, Inc. All rights reserved. Duplication prohibited.
243
Using Resources
You can also duplicate resources that you have made available to a book. For example, if you
have an existing cursor resource that you want to use in a slightly modified form, you can
duplicate the existing resource, edit the copy, and give it a unique name.
► To duplicate a resource:
1.
From the Object menu, choose Resources
The Resource Manager dialog box appears.
2.
In the Available resources list, select the type of resource you want to duplicate.
3.
In the graphical list of resources, select the resource you want to duplicate.
4.
Click Duplicate.
ToolBook duplicates the resource.
5.
Optional. Select the new resource, and then click Edit to modify it.
6.
Click Close to close the Resource Manager dialog box.
Adding Resources to a Book
There are many ways to add a resource to your book. You can:
x
Create a new resource and add it to your book.
x
Import an existing file to be used as a resource.
x
Copy a resource from another book.
x
Add an object that includes a resource from the Catalog. ToolBook automatically imports the
resource into the current book.
x
Use OpenScript to refer to a resource in another book. ToolBook automatically imports the
resource into the current book.
x
Insert an inline graphic into a field or record field.
x
Import a ToolBook page or an entire book that contains resources.
If you've planned in advance all the artwork, system elements, and other resources that you want
to include, you can use the Resource Manager to add them to the book all at once. If you're
designing as you go, or if you discover that you need additional resources, you can add individual
resources one at a time.
► To add a resource to a book using the Resource Manager:
1.
From the Object menu, choose Resources.
The Resource Manager dialog box appears.
2.
In the Available resources list, select the type of resource you want to add.
3.
Do one of the following:
To import a file as a resource, click Import.
The Import Resource dialog box appears. Select the resource you want to import, and
then click OK.
To create a new resource, click New.
The ToolBook utility application for creating the type of resource you've selected opens.
Create the resource using the utility application. When you save the resource, you will
have the option to save it as a resource in your book. Do this, and then close the utility
application.
244
Copyright © 2012 SumTotal Systems, Inc. All rights reserved. Duplication prohibited.
Working with Resources
The resource appears in the graphical list in the Resource Manager dialog box.
4.
Type a unique name in the Name box under Resource properties.
ToolBook assigns an ID number to the resource that you can also use to refer to it.
5.
Close the Resource Manager dialog box.
Using OpenScript
You can write and execute OpenScript code using the script editor or Command window. For more
information about using the OpenScript programming language, refer to the Programming in
OpenScript electronic book.
x
To import a resource, use the import command:
import icon resource "c:\toolbook\icon\plane.ico" as "plane"
x
To copy a resource from another ToolBook book, use the copy resource command:
copy resource icon "airplane" of book "travel.tbk" to this book
x
To automatically import a resource from another book, set a resource property to a resource
that is owned by a different book:
dragImage of button "Play MIDI" = cursor "hand.cur" \
of book "tutor.tbk"
Assigning Resources as Object Properties
You can assign a resource that you have already added to your book to an individual object, or you
can create a resource for an object when you are ready to assign it. Resources are considered
properties of an object. You can assign a resource to an object using the Properties dialog box.
Working with Resources
The steps you take to assign a resource as an object property differ depending on the type of
object and the type of resource. This section describes how to assign various resources to
different objects.
Adding a Graphic to a Button
You can assign as many as four different graphics to a button: one for the button's normal state,
one for its inverted state (when the button is clicked), one for its disabled state (when the button
cannot be clicked), and one for its checked state (when an option is chosen).
Note You can also assign a rollover graphic to a button that will display when the mouse pointer
pauses over the button. On the Graphics tab in the Properties for Button dialog box, select
the option labeled Use checked graphic as rollover graphic.
► To add a graphic to a button:
1.
Select the button to which you want to add the graphic, and then click the Properties button
on the ToolBook toolbar.
2.
In the Properties for Button dialog box, click the Graphics tab.
3.
Under Button graphics, choose a button state (Normal, Invert, Disabled, or Checked), and
then click Choose Graphic.
The Choose Graphic dialog box appears.
4.
Select the type of resource you want (bitmap, cursor, or icon) in the Available resources list.
Copyright © 2012 SumTotal Systems, Inc. All rights reserved. Duplication prohibited.
245
Using Resources
The resources listed in the Choose Graphic dialog box include all the resources of the
selected type that have been imported into the current book. Any new resources you import
are added to the book's resource list.
5.
Do one of the following:
To use an existing resource, select the graphic you want in the graphical list of
resources.
To import a new resource, click Import. In the Import Graphic or Import Resource dialog
box, locate the graphic file you want and click OK; then select the resource in the
graphical list of resources.
6.
Click OK to close the Choose Graphic dialog box.
7.
Optional. Under Graphic options, do one or more of the following:
If you want the bitmap to fill the button, select Stretch the graphic to fit the button.
(You cannot stretch icons or cursors because they have a fixed size.)
If you want the button to size itself to the graphic, select Size the button to fit the
graphic.
If you want to use the Checked graphic as the rollover graphic (the graphic you see when
the pointer is paused over a button), select Use checked graphic as rollover graphic.
8.
Repeat steps 3 -7 to assign graphic resources for the other button states.
9.
Optional. Close the Properties for Button dialog box.
You might need to resize the button to see the graphic.
Using OpenScript
x
To apply a graphic to a button, set the normalGraphic, invertGraphic, disabledGraphic, or
checkedGraphic property of a button to a bitmap, cursor, or icon resource:
normalGraphic of button "Baseball" = icon "normalBaseball"
Note To remove a graphic, on the Graphics tab of the Button Properties dialog box, choose the
button state, and then click Clear Graphic.
Changing the Drag Image and No-Drop Cursor
You can change the cursor or drag image that appears when a user drags an object, as well as the
no-drop cursor that appears when a user drags the object into an area where it cannot be
dropped. Use ToolBook's default drag-and-drop cursors, or customize your book by assigning
unique resources.
► To change the drag image and no-drop cursor of an object:
Using the interface
1. Select the object, and then click the Properties button on the ToolBook toolbar.
The Properties dialog box appears.
2.
On the Drag & Drop tab, select either Can be dragged or Accepts dropped objects, and then
click Change Graphic.
The Choose Graphic dialog box appears.
3.
Select the type of resource (bitmap, cursor, or icon) that you want to assign.
4.
Do one of the following:
246
To assign an existing resource, select the resource you want in the graphical list.
Copyright © 2012 SumTotal Systems, Inc. All rights reserved. Duplication prohibited.
Working with Resources
To import a resource, click Import, navigate to and select a graphic file, and then click
OK.
5.
Optional. Close the Properties dialog box.
6.
Switch to Reader level (press F3), and drag and drop the object to test the results.
Using OpenScript
x
To change the cursor that appears when an object is dragged, set the object's dragImage
property to a bitmap, cursor, or icon resource:
dragImage of object "baseball" = bitmap "blur"
x
To change the cursor that indicates an object cannot be dropped, set the object's
noDropImage property to a bitmap, cursor, or icon resource:
noDropImage of object "bleachers" = cursor "no drop"
Changing a Viewer's Minimize Icon
You can change the icon that appears when a viewer is minimized using either the Properties
dialog box or OpenScript.
► To change a viewer's Minimize icon:
1.
From the Object menu, choose Viewers.
The Viewers dialog box appears.
2.
In the Viewers of book list, choose the viewer for which you want to change the Minimize
icon, and then click Properties.
The Properties for Viewer dialog box appears.
3.
On the Style tab, under Icon, click Choose icon.
4.
In the Choose Icon dialog box, click Import.
The Choose Icon dialog box appears.
5.
Select the resource you want to import, and then click Open.
6.
Type a unique name in the Name box under Resource properties.
ToolBook assigns an ID number to the resource that you can also use to refer to it.
7.
Close the Choose Icon dialog box.
Using OpenScript
x
To change the icon that appears when a viewer is minimized, set the icon property to an icon
resource:
icon of mainWindow = icon "fancy"
icon of viewer "Navigation" = icon "plain"
Copyright © 2012 SumTotal Systems, Inc. All rights reserved. Duplication prohibited.
247
Using Resources
Changing a Book's System Cursor with OpenScript
ToolBook comes with a number of system cursors that you can use. Alternatively, you can import a
cursor as a resource and then set the OpenScript sysCursor property to that resource. For
example:
sysCursor = cursor "hand"
You can make the cursor change whenever it passes over something that you want the user to
click. For example, use this script to make the cursor change to a pointing hand every time it
passes over a button:
--Sent when the cursor crosses the bounds of an object
to handle mouseEnter
if object of target is "button" then
system oldCursor
--Declares the system variable
oldCursor = sysCursor
--Saves the current cursor
sysCursor = cursor "hand" --Resets the cursor to a hand
end
end
to handle mouseLeave
--The mouse pointer is leaving the object
system oldCursor
--Redeclares the variable
sysCursor = oldCursor
--Resets the cursor to its old value
end
Getting Information about a Resource
You can get information about a resource (such as the size or ID number) from the Resource
Manager dialog box or by requesting the resourceInfo property in the Command window.
► To get information about a resource:
1.
From the Object menu, choose Resources.
The Resource Manager dialog box appears.
2.
In the Available resources list, select the type of resource about which you want to view
information.
3.
In the graphical list of resources, select the resource.
Information about the selected resource appears under Resource properties.
248
Copyright © 2012 SumTotal Systems, Inc. All rights reserved. Duplication prohibited.
Replacing Resources
The information ToolBook displays varies depending on the resource type, as the following table
shows. For all resource types, the first item of information that ToolBook displays is the reference
count, which is the number of times the resource is referenced within the book. The reference
count also appears in the Resource Manager dialog box.
Tip
The reference count is not updated for references to a resource in a script or in user
properties. Therefore, it is possible for a resource to have a reference count of zero but
still be used in a book.
Getting resource information with the resourceInfo property
Resource type
Information
Bitmap
Reference count; bitmap width in pixels; bitmap height in pixels; color depth
as 1, 4, 8, 16, or 24 bit; bitmap size in bytes
Cursor
Reference count; icon width in pixels; icon height in pixels; color depth as 1
bit; the hotspot x and y position in pixels, which is the area that needs to be
over an object when the mouse is clicked
Icon
Reference count, icon width in pixels, icon height in pixels, color depth as 1
or 4 bit
Menu bar
Reference count
Palette
Reference count, number of colors in the palette (up to 256)
Replacing Resources
You can replace the resources in a book with other resources. For example, if you apply a bitmap
resource to a button and then replace the resource with a new bitmap, the new bitmap appears in
place of the old resource everywhere that it is used.
► To replace a resource in a book:
1.
From the Object menu, choose Resources.
The Resource Manager dialog box appears.
2.
In the Available resources list, select the type of resource you want to replace.
3.
In the graphical list of resources, select the resource you want to replace, and then click
Replace.
The Replace Resource or Import Graphic dialog box appears, depending on the type of
resource you're replacing.
4.
Navigate to and select the resource file you want to use, and then click OK.
5.
Optional. Close the Resource Manager dialog box.
The new resource replaces the old resource throughout the book.
Using OpenScript
x
Use the replace resource command to replace an old resource with a new one. For the new
resource, specify the file name of a resource of the same type. For example:
replace resource cursor "arrow" with "c:\cursors\arrow1.cur"
Copyright © 2012 SumTotal Systems, Inc. All rights reserved. Duplication prohibited.
249
Using Resources
Exporting Resources
You can export icon and cursor resources that you have created or modified to use in other books
or Windows programs.
► To export a resource from a book:
Using the interface
1. From the Object menu, choose Resources.
The Resource Manager dialog box appears.
2.
In the Available resources list, select the type of resource you want to export.
3.
In the graphical list of resources, select the resource you want to export.
4.
Click Export.
The Export Resource dialog box appears.
5.
Enter a name for the resource, navigate to and select a file to which to export it, and then
click OK.
ToolBook exports the resource.
Using OpenScript
x
Use the export command to export a resource:
export resource cursor "point" as "c:\point.cur"
Removing Resources from a Book
If you're concerned about file size, you can remove all unused resources from your book to reduce
the book's file size. When you remove a resource, you are removing only the book's copy of the
resource; the resource's original file is unaffected.
You cannot remove a resource from a book if it has been assigned to an object. You must first
remove each object's reference to the resource using OpenScript or the object's Properties dialog
box. For example, if you create a graphic button with a bitmap resource, you must remove the
bitmap from the button before you can remove the resource from the book. The table that follows
explains how to remove an object's reference to a resource by setting the object's property to the
ToolBook default.
Note The Resource Manager dialog box maintains a reference count, which reflects the number of
times a resource is used in a book. When the reference count for a resource is zero,
ToolBook allows you to remove the resource from your book. However, this reference count
is not updated for references to a resource within a script or in user properties. Be certain
not to remove any resources that you intend to continue referencing in a script or in user
properties.
Removing an object's reference to a resource
To remove this
resource...
Bitmap
Do this...
Select the button or Image object, and then click the Properties
button on the toolbar. On the Graphics tab, choose the button state,
and then click Clear Graphic.
Alternatively, type in the Command window or a script:
normalGraphic of button "Baseball" = null or
clear normalGraphic of button "Baseball"
250
Copyright © 2012 SumTotal Systems, Inc. All rights reserved. Duplication prohibited.
Removing Resources from a Book
Icon
Type in the Command window or a script: icon of viewer
"Statistics" = null
Drag image or no-drop
cursor
Type in the Command window or a script: dragImage of button
"Play MIDI" = null noDropImage of button "Stop
MIDI" = null
Color palette
Assign a different palette to the book by typing in the Command
window or a script:
set palette of this book to palette ID 101
Menu bar resource*
Type in the Command window or a script:
menuBar of viewer "Statistics*" = null
System cursor
Type in the Command window or a script:
sysCursor = 1
or sysCursor = default
* For details, see the electronic book, Advanced Features.
After you have removed all references to a resource, you can remove the resource from a book.
► To remove a resource from a book:
1.
From the Object menu, choose Resources.
The Resource Manager dialog box appears.
2.
In the Available resources list, select the type of resource you want to remove.
3.
In the graphical list, select the resource you want to remove.
4.
Click Remove, and then close the Resource Manager dialog box.
Using OpenScript
x
Use the remove resource command to remove a resource from a book:
remove resource cursor ID 100
remove resource palette "gray tones" of book "blk_wht.tbk"
The resource no longer appears in the Resource Manager dialog box for that book.
x
Use the resourceUsedBy() function to locate all objects using a particular resource. For
example:
request resourceUsedBy (bitmap "Next", this book)
Note If you delete an object that has a resource assigned as a property (for example, a button
with a graphic resource assigned to a particular state), you cannot immediately remove the
resource from the Resource Manager dialog box. Because ToolBook saves a copy of the
deleted object in memory to allow you to undo your action, you must first perform another
action (such as clicking on another object) before you can delete the resource from the
Resource Manager dialog box.
Copyright © 2012 SumTotal Systems, Inc. All rights reserved. Duplication prohibited.
251
Chapter 20
Importing and Exporting Data
Introduction
You can import and export text and graphics in ToolBook. In addition, you can import books and
pages from other ToolBook applications into your current ToolBook application. You can also
import a ToolBook XML book into ToolBook. Importing and exporting affords flexibility and saves
time, because you can leverage your development efforts by reusing material. Further, you can
incorporate material from a number of sources, adding variety and extending functionality.
This chapter discusses how to import and export data and describes how to customize the import
process to fit the needs of your application.
About Importing and Exporting
Importing is the process of reading information from a file and copying it into your current book.
Exporting is the opposite: reading information from your current book and copying it to another
file. In a ToolBook application, you can import and export text and graphics. You can also import
pages and books from other ToolBook applications.
You can import and export text in two common text formats: a plain-text format called ASCII
(American Standard Code for Information Interchange) and RTF (Rich Text Format). You can
import graphics in a wide variety of common file formats, and you can export to GIF (Graphics
Interchange Format), PNG (Portable Network Graphics), JPEG (Joint Photographic Experts Group
format), TIFF (Tagged Image File Format) , WMF (Windows Metafile Format), EMF (Enhanced
Metafile), and BMP (Bitmap). Importing and exporting text and graphics allows you to incorporate
material from other sources into your ToolBook application and reuse material from one ToolBook
application to another.
Importing books and pages from other ToolBook applications is a way to take advantage of your
earlier work. For example, if you have created a tutorial application in another book in ToolBook,
you can import its pages into new tutorials that you create.
Importing or exporting is also useful when you need to share information with an application that
doesn't support Dynamic Data Exchange (DDE), object linking and embedding (OLE), or the calling
of functions in a dynamic-link library (DLL). For example, you might need information from a
database that doesn't run under Windows. You could export the data from the database into a
text file and then import the text file into your book. You could also export text from your book
into a text file that you can then import into a database, spreadsheet, or word-processing
program.
The ToolBook XML format provides a way to import content that was created by other
applications. SumTotal provides a Publish to ToolBook add-in for use with PowerPoint. This add-in
exports the presentation in either ToolBook XML format (.tbkx) or native ToolBook format (.tbk),
both of which can be opened in ToolBook.
This chapter discusses importing and exporting data in ToolBook but does not discuss exporting
your ToolBook application for use on the Internet. To learn about exporting your application to an
Internet-ready file format, see Chapter 22, "Distributing applications on the Internet."
Copyright © 2012 SumTotal Systems, Inc. All rights reserved. Duplication prohibited.
253
Importing and Exporting Data
Importing and Exporting Text
You can import and export text into a field or record field. A text field is a ToolBook object that
contains text; a text field can reside on the foreground or background of a page. A record field
resides on the background of a page and displays changing text consistently from page to page
(data-entry forms, for example). For more information about text and record fields, see Chapter
8, "Working with Text."
When you import to a text field, you move data from one source document into one text field.
When you import to a record field, you move data from one source file into multiple record fields.
Exporting from text fields or record fields moves data into one text file.
You can import a text file into record fields as a fixed-field file or a delimited-field file. In fixedfield files, the field size is predetermined and constant. In delimited-field files, the size can vary
and is delimited by special characters that you define. You must insert the delimiter in the source
file (the file from which you are importing the text) at each place where you want a new record
field to begin.
Importing Text Files into a Text Field
You can import data from any application that creates text files and saves them in either the
ASCII format or RTF (a word-processing program, for example). The ASCII format (also called the
text-only format) allows for only text characters to be contained in a file. RTF files include
characters and some formatting, such as font and font style.
Text pasted from the Windows Clipboard is generally formatted as RTF. For information about
copying and pasting text using the Clipboard, see Chapter 8, "Working with Text."
► To import text into a text field:
1.
Click a text field once to select it.
2.
From the Insert menu, choose Text.
The Import Text dialog box appears.
3.
In the Import Text dialog box, navigate to and select the text file you want to import, and
then click OK.
The text from the source file appears in the field and overwrites anything that was already in
the field (there is a warning given).
Exporting Text from a Text Field
You can export text from a text field using the Export command on the Tools menu.
► To export text from a text field:
1.
Select the text field from which you want to export text.
2.
From the Tools menu, point to Export, and then choose Field Text.
The Export Text dialog box appears.
3.
254
In the Export Text dialog box, do the following:
In the File name box, type a name for the text file.
In the List files of type list, choose whether the file will be saved in ASCII format (with a
.txt file extension) or in RTF (with an .rtf file extension).
Under Directories, navigate to and select the directory where you want to export the
file.
Copyright © 2012 SumTotal Systems, Inc. All rights reserved. Duplication prohibited.
Importing and Exporting Text
4.
Click OK.
ToolBook exports the text in a text file to the specified directory.
Importing Text into Record Fields
When importing into record fields, you can import text files only in ASCII format. The ASCII file
can be formatted as a fixed-field or delimited-field file.
ToolBook automatically creates a new record field for each data field and a new page for each
data record in the imported file. You cannot import data into a record field on the background of
an existing page. Rather, when you import data into a new or existing book, ToolBook creates a
new page with a blank background and inserts new record fields as needed. All tabs and control
characters are imported into ToolBook along with the data.
The first new record field is always placed at the top of the background on layer 1, and each
successive record field is placed below it. ToolBook imports data from the first data field into the
new record field on layer 1 of the first page and imports data from successive data fields into
record fields on subsequent layers. Imported text is formatted according to the current settings in
the Properties for Record Field dialog box. For more information about working with text and
record fields, see Chapter 8, "Working with Text."
Note Windows uses the ANSI (American National Standards Institute) character set for displaying
characters. If you import data from text files into ToolBook, you may need to retype some
special characters. For details about special characters, see "Inserting special characters" in
Chapter 8, "Working with text."
Importing Fixed-Field Files
In fixed-field files, the number of characters in each data field of the source file determines
where one data field ends and another begins. Whenever ToolBook finds a record separator, such
as a carriage return/linefeed (CRLF), it creates a new page and imports data from subsequent
data fields into the record fields on that page until it finds another record separator. For
example, most spreadsheet applications can save data as text in fixed-field files. Each cell, or
column, in the spreadsheet is a data field with a fixed number of characters, and each row is a
data record.
Figure 1: Table saved in fixed-field format
When you import a fixed-field file, you indicate how many data fields are in a data record by
specifying the length of each field. ToolBook uses the information about data field sizes as a
template, so you must determine the precise length of each data field before you import the file.
► To import a fixed-field file:
1.
Start a new book, or navigate to the page in an existing book after which you want to insert
the pages with imported text.
2.
From the Text menu, choose Character.
The Character dialog box appears.
3.
In the Character dialog box, select the font and point size for the imported text.
Copyright © 2012 SumTotal Systems, Inc. All rights reserved. Duplication prohibited.
255
Importing and Exporting Data
4.
Click OK.
5.
From the Insert menu, choose Pages.
The Import dialog box appears.
6.
In the Import type list, select Text files (*.txt).
7.
Click Format to display the Text Format dialog box.
8.
Choose Text—Fixed fields from the File format options.
9.
In the Field lengths box, type the number of characters in each data field, separating them
with commas. You can type any number of field lengths.
For example, type 3,5,8,12 if the first data record in the source file contains four data fields
with 3, 5, 8, and 12 characters, respectively. If the field lengths specified don't match those
in the data file, the imported text won't be divided properly among record fields.
10. Click OK to return to the Import dialog box.
11. Navigate to and select the file you want to import, and then click OK.
ToolBook imports the file, creating a new record field for each data field.
Using OpenScript
You can write and execute OpenScript code using the script editor or Command window. For more
information about using the OpenScript programming language, refer to the Programming in
OpenScript electronic book.
x
To import a fixed-field text file, use the import command with the fixed keyword and a list
of field lengths:
--Imports a fixed-field text file that contains four fields
import "c:\data\customer.txt" as fixed using 3,5,8,12
Importing Delimited-Field Files
In delimited-field files, data fields can be any length and are separated by a delimiter. A delimiter
is a single character, such as a comma or a tab that separates data fields in a data record. Data
records are separated by a CRLF. For example, a mailing list with names and addresses that vary
in length is a delimited-field file.
Figure 2: Mailing list in delimited-field format
256
Copyright © 2012 SumTotal Systems, Inc. All rights reserved. Duplication prohibited.
Importing and Exporting Text
ToolBook creates a record field for each data field in the source file's first data record (the first
line of the file). If any data record contains more data fields than the first data record, ToolBook
discards the extra data. If any data record contains fewer data fields than the first data record,
ToolBook leaves the remaining record fields blank on that page.
ToolBook inserts the data into record fields of a fixed size, regardless of the length of the data
fields. You can display data longer than the field by resizing the field on the background.
You can import a delimiter character as data by enclosing it in quotation marks (" "). For example,
you might have a comma separating city and state names in the source file. If you want to keep
that comma even though you're using a comma as the delimiter between fields, you can import it
as text by typing a quotation mark before and after the field containing the comma. The text in
the source file should read "Bellevue, WA" instead of "Bellevue", "WA".
All field delimiters and record delimiters are ignored in quoted regions of text in imported files.
To preserve quotation marks within a quoted region in the source file, enclose them within a
second set of quotation marks. For example, the field in the source file must contain "this is a
""quoted"" region" to import this is a "quoted" region into ToolBook.
► To import a delimited-field file:
Using the interface
1. Start a new book, or navigate to the page in an existing book after which you want to insert
the pages with imported text.
2.
From the Text menu, choose Character.
The Character dialog box appears.
3.
Select the font and point size for the imported text and close the window.
4.
From the Insert menu, choose Pages.
The Import dialog box appears.
5.
In the Import type list, select Text files (*.txt).
6.
Click Format to display the Text Format dialog box.
7.
Choose Text—Delimited fields from the File format options, and then type a delimiter
character in the Delimiter box.
For a tab-delimited source file, type ^t.
For a single-character delimiter, such as a comma or pound sign (#), type that character.
You cannot use a quotation mark ( " ) as the delimiter. ToolBook reserves the use of the
quotation mark to enclose text that contains a delimiter in the source file. You can
import a delimiter character as data by enclosing it in quotation marks.
8.
Click OK to return to the Import dialog box.
9.
Navigate to and select the text file you want to import, and then click OK.
ToolBook imports the file, creating a new record field for each data field. Whenever ToolBook
finds a delimiter in the source file, it removes this character and places the data from the
data field into a record field. Whenever ToolBook finds a record separator (CRLF) in the
source file, it creates a new page.
Using OpenScript
x
To import a delimited-field text file, use the import command with the delimited keyword:
--Imports a delimited text file that uses spaces to separate fields
import "c:\titles.dbs" as delimited using space
Copyright © 2012 SumTotal Systems, Inc. All rights reserved. Duplication prohibited.
257
Importing and Exporting Data
Exporting Text from Record Fields
You can export data from ToolBook record fields to text files so that you can use the data in other
applications. You can export a record field of any size and export an unlimited number of data
records from a book.
When exporting to either fixed-field or delimited-field file formats, ToolBook exports data from
all record fields on all pages that share the background of the page displayed when you choose
the Export command. ToolBook exports data from each page in the layer order of the record fields
containing the data, starting with the record field on the lowest layer (see Figure 3).
In the text file, ToolBook adds a carriage return/linefeed after each ToolBook page. If you choose
to export data in delimited-field format, ToolBook also adds quotation marks around the contents
exported from each record field.
Figure 3: Data exported from a page
258
Copyright © 2012 SumTotal Systems, Inc. All rights reserved. Duplication prohibited.
Importing and Exporting Text
Note Windows uses the ANSI character set for displaying characters. If you open an exported file
with another application, you may need to retype some special characters. For details
about special characters, see "Inserting special characters" in Chapter 8, "Working with
text."
Exporting to Fixed-Field Files
Figure 4 shows data from record fields exported to a fixed-field file. The first data record in the
file contains data from the record fields on page 1, the next data record contains data from the
record fields on page 2, and so on. In Figure 4, you'll notice that the first exported field in the
first data record is truncated. When you export to fixed-field files, you must specify the number
of characters in each field. If a field is larger than the specified size, text is truncated on the
right side.
Figure 4: Exporting data to a fixed-field file
► To export data to a fixed-field text file:
Using the interface
1. Open the book from which you want to export data.
2.
If the book uses more than one background, go to a page with the record fields containing the
data you want to export.
3.
From the Tools menu, point to Export, and then choose Record Fields.
The Export dialog box appears.
4.
In the Export dialog box, specify a path under Directories and type a file name in the File
name box. If you don't type a file extension, ToolBook adds the .txt extension.
5.
Click Format to display the Text Format dialog box.
6.
Choose Text—Fixed fields from the File format options.
7.
In the Field lengths box, type the number of characters in each data field, separated by
commas.
Copyright © 2012 SumTotal Systems, Inc. All rights reserved. Duplication prohibited.
259
Importing and Exporting Data
For example, type 3,5,8,12 if you want the data records to have four data fields with 3, 5, 8,
and 12 characters, respectively. You can type as many field lengths as needed to define the
data fields.
8.
Click OK to return to the Export dialog box, and click Save.
ToolBook exports the contents of the record fields to the file name you specified. The data in
each record field becomes a data field in the text file. As ToolBook exports the last record
field on each page, it starts a new data record in the text file.
Note ToolBook adds spaces to data fields if the field length you specify is greater than the
number of characters in the original record field. Use positive numbers to export data
aligned on the left, with fill space inserted on the right. Use negative numbers to export
data aligned on the right, with fill spaces inserted on the left. If a field is larger than the
specified size, text is truncated on the right side.
Using OpenScript
x
To export text from record fields to a fixed-field text file, use the export command with the
fixed keyword, specifying the length of the fields:
--Exports text from a book with 3 record fields
put "40,_80,10" into myFields --2nd field is right-aligned
export "mybook.dat" as fixed using myFields
Exporting to Delimited-Field Files
Figure 5 shows data from record fields exported to a delimited-field file. The first data record in
the file contains data from the record fields on page 1, the next data record contains data from
the record fields on page 2, and so on. The data fields are separated by the delimiter character
you specify in the Export dialog box.
Figure 5: Exporting data to a delimited-field file
► To export data into a delimited-field text file:
1.
Open the book from which you want to export data.
2.
If the book uses more than one background, go to a page with the record fields containing the
data you want to export.
3.
From the Tools menu, point to Export, and then choose Record Fields.
The Export dialog box appears.
260
Copyright © 2012 SumTotal Systems, Inc. All rights reserved. Duplication prohibited.
Importing Books and Pages
4.
In the Export dialog box, specify a path under Directories and type a file name in the File
name box. If you don't type a file name extension, ToolBook adds the .txt extension.
5.
Click Format to open the Text Format dialog box.
6.
Choose Text—Delimited fields from the File format options, and then type a delimiter
character in the Delimiter box.
For a tab-delimited source file, type ^t.
For a single-character delimiter, such as a comma or pound sign (#), type that character.
You cannot use a quotation mark ( " ) as the delimiter. ToolBook reserves the use of the
quotation mark as a symbol to enclose text that contains a delimiter in the source file.
You can export a delimiter character as data by enclosing it in quotation marks.
7.
Click OK to return to the Export dialog box, and click Save.
ToolBook exports the contents of the record fields to the file name you specified. The data in
each record field becomes a data field in the text file, enclosed in quotation marks.
Using OpenScript
To export text from record fields to a delimited-field text file, use the export command
with the delimited keyword and a character to use as the delimiter:
--Exports text to a text file, putting ! between each field
export "temp.dat" as delimited using "!"
For details about using the export command, refer to its entry in the OpenScript reference in
Help.
Importing Books and Pages
You can import entire ToolBook books or specific pages into a new or existing book. When you
import an entire book, ToolBook inserts all of the imported book's pages, backgrounds, viewers,
and referenced resources into the current book. This method saves time when you want to use all
of the information in a book without recreating it. Importing pages into a book is useful when you
want to use the contents of a specific page.
When you import a book or pages into another book, the book properties of the imported book do
not get applied to the new book's properties. Book scripts will not be assigned to the new book
from the imported book, nor will settings such as page size and hyperlink color. Resources that
are used on the imported pages will be added to the new book's resource system. Resources that
are not used on the imported pages will not be added to the new book.
Copyright © 2012 SumTotal Systems, Inc. All rights reserved. Duplication prohibited.
261
Importing and Exporting Data
Importing Books
When you import a book, ToolBook inserts all of its pages and backgrounds after the current page
of the current book, assigning each one a new ID number. If the imported pages and backgrounds
had names in the source book, these stay the same.
ToolBook moves the pages that originally followed the current page to the end of the book and
assigns them new page numbers, but their ID numbers and names remain.
For example, if you navigate to page 1 of a book that has two pages on a single background and
then import a book that also has two pages on a single background, the page numbers, page ID
numbers, and background ID numbers will be updated as shown in Figure 6.
Figure 6: Importing a book
► To import a book:
1.
From a new book, or from the page in an existing book after which you want to insert the
imported book, choose Pages from the Insert menu.
2.
In the Import dialog box, select ToolBook files (*.?bk) in the Import type list.
3.
Navigate to and select the book file you want to import in the File name box, and then click
Open.
ToolBook inserts all pages and backgrounds from the selected book into the current book.
Using OpenScript
x
To import a book, use the import command and specify a file name with the .tbk extension:
--Navigates to page 3
go to page 3
--Imports book after current page
import book "c:\mybooks\template.tbk"
262
Copyright © 2012 SumTotal Systems, Inc. All rights reserved. Duplication prohibited.
Importing Books and Pages
Importing Pages
You can import a page or range of pages from another book into a new or existing book. You can
import the page with its background, or you can import the page onto the current background.
If you import a page or range of pages into an existing book, ToolBook inserts the pages after the
current page of the current book. ToolBook changes the page numbers of the pages in the current
book but does not change page ID numbers or background ID numbers. For details, see the
preceding section, "Importing books."
If you import pages that contain record field text but don't import the corresponding backgrounds,
ToolBook follows these rules in sequence to determine where to place the record field text:
1. Matching record field names – ToolBook puts the imported text into a record field with a
name that matches that of the original record field. For example, if you import a page
containing text from a record field called Student Name, ToolBook attempts to find a record
field with the same name on the current background and place the text there. If no record
fields match by name, ToolBook proceeds to match by ID number.
2.
Matching record field ID number – ToolBook puts the imported text into a record field with
an ID number that matches that of the original record field. If there is no match by either
name or ID number, ToolBook proceeds to match by layer order.
3.
Matching layers – ToolBook puts the imported text in a record field that is on the same layer
as the original record field. For example, the text from the record field at layer 3 on the
original background is placed into the record field at layer 3 on the current background.
If the destination background contains more record fields than the source background, ToolBook
maps the record field's text as described above, leaving the extra record fields on the destination
background empty. If the source background contains more record fields than the destination,
ToolBook maps the text as described above and discards the text of the extra record fields.
► To import a page or range of pages into your book:
1.
From a new book, or from the page in an existing book after which you want to insert the
imported pages, choose Pages from the Insert menu.
2.
In the Import dialog box, select ToolBook files (*.?bk) in the Import type list.
3.
Click Format to display the Book Format dialog box.
4.
Choose Pages to indicate that you are importing a page range, and then enter the starting and
ending pages to import in the From and To boxes, respectively. (To import a single page,
enter its number as the starting and ending page.)
5.
If you want to import the background along with the pages, select Include background.
6.
Click OK to return to the Import dialog box.
7.
Navigate to and select the book file you want to import, and then click Open.
ToolBook inserts the pages from the selected book into the current book. If you selected
Include background, ToolBook also imports the backgrounds of the pages you indicated.
Using OpenScript
x
To import pages from a ToolBook book, use the import command, specify a file name with
the .tbk extension, and then indicate the page range to import:
--Navigates to end of book, then imports 15 pages from another book
--using the background of the current page
go to last page
import pages 2 to 16 of book "c:\mybooks\glossary" \
Copyright © 2012 SumTotal Systems, Inc. All rights reserved. Duplication prohibited.
263
Importing and Exporting Data
without background
Customizing the Import Process
If you want to import only certain fields or records, or assign the imported text to existing pages
or new pages on an existing background, you can create a script that customizes how ToolBook
imports the text data.
The OpenScript import command always creates new pages on a new background. To assign text
to an existing page or background, use the openFile and readFile commands. To control how much
text is placed in each field, use the readFile command. For example:
--Imports a file that contains fixed-length records of 80 characters
to handle buttonClick
DataFile = "c:\import.txt"
--File name
clear sysError
openFile DataFile
readFile DataFile for 80
while It is not null and sysError is null
--Sends a message to another handler to process the record
send processRecord It
readFile DataFile for 80
end
closeFile DataFile
end
--Imports a text file into the text of a field and replaces
--CRLF characters with spaces
to handle buttonClick
--set the filename in a variable to make the code more efficient
--and to make it easier to change later
dataFile = "C:\import.txt"
openFile dataFile
clear text of field "WP text"
while sysError is not "end of file"
readFile dataFile to LF
if last char of It is CR
clear last char of It
--Clears trailing CR character
end
put space & It after text of field "WP text"
end
closeFile dataFile
end
264
Copyright © 2012 SumTotal Systems, Inc. All rights reserved. Duplication prohibited.
Importing ToolBook XML
Importing ToolBook XML
ToolBook XML format (.tbkx) is a way to represent a ToolBook book as XML. This is useful when
converting from other file formats, such as PowerPoint. SumTotal provides a tool for converting a
PowerPoint presentation into .tbkx format. This tool is an add-in for PowerPoint.
Copyright © 2012 SumTotal Systems, Inc. All rights reserved. Duplication prohibited.
265
Importing and Exporting Data
About the SumTotal Publish to ToolBook Add-in
The SumTotal Publish to ToolBook add-in is a utility that converts a PowerPoint presentation into
a ToolBook book or a ToolBook XML file, depending on which file format the user selects for the
conversion.
Many organizations typically have legacy content for training in the form of PowerPoint
presentations. Converting these PowerPoint presentations manually into online learning in
ToolBook (using copy and paste) can be a very time-consuming process. The SumTotal Publish to
ToolBook add-in does this conversion in a fraction of the time. It now supports the conversion of
audio files and Speaker Notes in PowerPoint as well.
Users can take an existing PowerPoint presentation (or create one using one of the new
PowerPoint Templates included with ToolBook), click the Publish button and have the content
automatically published to a ToolBook book (ToolBook's native format with a .tbk extension ) or a
ToolBook XML file (with a .tbkx extension). The ToolBook XML file can be opened in ToolBook by
double-clicking the respective .tbkx file. The ToolBook XML file can also be imported into current
or future versions of ToolBook using a ToolBook File menu command. Since the XML files are plain
text, a version control system can be used to detect changes as compared to prior versions.
Users can enhance their published PowerPoint content in ToolBook by adding questions, scoring,
LMS integration, Publishing to the web, etc.
One of the most powerful uses for the SumTotal Publish to ToolBook add-in is creating online
learning using PowerPoint to storyboard the learning content first. You can set up the flow of the
presentation using PowerPoint, include text, graphics, and Speaker Notes containing specific
instructions for authors on enhancing the published content in ToolBook. You can then use the
SumTotal Publish to ToolBook add-in to publish the PowerPoint content to ToolBook. In ToolBook,
you can put finishing touches to your content. If you do not have speaker notes in PowerPoint, you
can add instructions for authors directly in ToolBook by using the Notes feature for a page
(accessed through the Notes tab in the Properties for Page dialog box).
About the Export of Audio to PowerPoint
You can export audio files from PowerPoint to ToolBook when publishing a PowerPoint
presentation to a ToolBook book. Note that this applies to all sounds inserted via PowerPoint's
Insert menu, excluding sounds associated with Actions. When you export a PowerPoint
presentation containing audio to ToolBook (using the SumTotal Publish to ToolBook Add -in), by
default, all embedded sound files are exported to the target directory, i.e., the location you have
specified for publishing your book. For audio files linked in your PowerPoint presentation
however, there are two options on how they are exported to ToolBook - they can be copied to the
same directory as your published ToolBook file or linked to their original locations. Refer to the
topic About PowerPoint Audio Export in the Help for details on basic concept and rules for
publishing audio files.
About the Export of Speaker Notes
The SumTotal Publish to ToolBook Add-in now has the ability to export speaker notes from
PowerPoint into ToolBook. These speaker notes exported from a PowerPoint slide can be accessed
through the page properties dialog box for the corresponding page in ToolBook. If there are no
speaker notes for a slide in PowerPoint, you can use the page properties dialog box in ToolBook to
enter notes or instructions relevant to a given page. These notes can serve as a storyboard that
capture relevant instructions for you to put the finishing touches on any given page (Example: An
instruction to the author to add a hyperlink to a website on a given page).
The text on the Notes tab retains extended characters (such as Danish and Spanish) present in the
speaker notes. However, there are no additional formatting options available on the Notes tab.
266
Copyright © 2012 SumTotal Systems, Inc. All rights reserved. Duplication prohibited.
Importing ToolBook XML
Using the SumTotal Publish to ToolBook Add-in
The SumTotal Publish to ToolBook add-in supports PowerPoint 2007 or later. To launch the add-in,
go to the Home tab of the PowerPoint ribbon.
Figure 7: The home tab of the PowerPoint ribbon
► To convert a PowerPoint presentation:
1.
Open the PowerPoint file you want to convert in PowerPoint 2007 or later.
2.
Click the Publish to ToolBook icon on the Home tab of the PowerPoint ribbon.
The SumTotal Publish to ToolBook window displays.
3.
Select a Page size for the new ToolBook book to be published from the following two options:
Use PowerPoint slide size.
Choose your own size. If you select this option, do the following:
a)
Specify the unit of measurement in the Units drop-down list (avoid selecting pixels if
there are any issues with the DPI settings of the computer you publish on).
b)
In the Page width field, specify the page width by typing it or using the scrolling arrows
to select the width.
Copyright © 2012 SumTotal Systems, Inc. All rights reserved. Duplication prohibited.
267
Importing and Exporting Data
c)
In the Page height field, specify the page height by typing it or using the scrolling arrows
to select the height.
4.
Select the Use slideshow aspect ratio checkbox if you want to preserve the original
PowerPoint slideshow aspect ratio (which determines the space the slide occupies.)
5.
Select the Add navigation panel checkbox if you want a navigation panel to appear in the
background of the published book.
6.
Select the Copy linked audio files to same folder as book checkbox if you want all linked
audio files in PowerPoint to be copied to the target directory i.e., the location you have
specified for publishing your ToolBook book.
7.
Select the Open in ToolBook when finished checkbox if you want the new file to be opened
automatically in ToolBook upon completion of the publishing process.
8.
Click the Publish button to open a “Save as ToolBook file” dialog box.
9.
Select one of the following file formats to save to in the “Save as…” dialog box:
ToolBook files (saves as a standard ToolBook book, with the extension .tbk)
ToolBook XML files (saves as a compressed ToolBook XML file, with the extension .tbkx)
10. Specify a name and location for the new file to be published.
11. Click Save to continue publishing, or Cancel to cancel the publishing.
12. Do one of the following:
If you clicked Cancel to cancel the publishing, click Cancel in the SumTotal Publish to
ToolBook dialog box and return to PowerPoint.
Once publishing is over, click OK in the Publish dialog box.
Note The SumTotal Publish to ToolBook add-in names pages based on the title placeholder field
in the PowerPoint slide that contains text. This text (if any) becomes the page title when
exported to ToolBook.
268
Copyright © 2012 SumTotal Systems, Inc. All rights reserved. Duplication prohibited.
Importing ToolBook XML
About ToolBook XML
ToolBook XML consists of a series of files and supporting resources. This folder structure can be
compressed into a .tbkx file for improved portability.
The SumTotal Publish to ToolBook add-in converts a PowerPoint into a compressed ToolBook XML
book (with the .tbkx extension). To uncompress a ToolBook XML book, rename it to a zip file and
open it using Windows Explorer or any zip program.
A sample folder structure of an uncompressed ToolBook XML file is shown in the screenshot below.
Figure 8: A sample folder structure of an uncompressed ToolBook XML book
Copyright © 2012 SumTotal Systems, Inc. All rights reserved. Duplication prohibited.
269
Importing and Exporting Data
Each page and background has its own sub-folder, each with an XML file. Pictures and other
resources are saved separately. A Book.xml file is in the root folder of the directory.
Here is a sample from the Book.xml of a ToolBook XML file:
<?xml version="1.0" encoding="UTF-8" standalone="no"?>
<Book Size="11563,8672" HDMediaPath="" HotwordColor="240,50,100"
HotwordStyle="underline"
xmlns="urn:sumtotalsystems:toolbook.tbkx"
xmlns:ae="urn:sumtotalsystems:toolbook.tbkx.actions"
xmlns:x="http://schemas.microsoft.com/winfx/2006/xaml" xmlns:sys="clrnamespace:System;assembly=mscorlib">
<Book.UserProperties>
<UserProperty Name="ASYM_DeploymentMethod" Value="HTML" />
<UserProperty Name="_ASYM_EA_Version" Value="8.0" />
<UserProperty Name="ASYM_AuthorResetPrompt" Value="TRUE" />
<UserProperty Name="info_Title" Value="sample" />
</Book.UserProperties>
<Book.Resources>
<Bitmap IdNumber="100" Source="Resources\Bitmap100.png" />
<Bitmap IdNumber="101" Source="Resources\Bitmap101.png" />
<Bitmap IdNumber="102" Source="Resources\Bitmap102.png" />
<Bitmap IdNumber="103" Source="Resources\Bitmap103.png" />
<Bitmap IdNumber="104" Source="Resources\Bitmap104.png" />
</Book.Resources>
<Book.Viewers>
<Viewer IdNumber="0" />
</Book.Viewers>
<Book.Pages>
<PageLocator IdNumber="0" Source="Page0\Page.xml" />
</Book.Pages>
<Book.Backgrounds>
<BackgroundLocator IdNumber="0" Source="Background0\Background.xml" />
</Book.Backgrounds>
</Book>
270
Copyright © 2012 SumTotal Systems, Inc. All rights reserved. Duplication prohibited.
Importing ToolBook XML
Importing a ToolBook XML Book into ToolBook
In ToolBook, the File menu command, Open XML Book, enables you to import both compressed
and uncompressed forms of a ToolBook XML book into ToolBook.
Figure 9: The Open XML menu command
Copyright © 2012 SumTotal Systems, Inc. All rights reserved. Duplication prohibited.
271
Importing and Exporting Data
The Open XML Book command opens an Open XML dialog box in which you can navigate to the
ToolBook XML book you want to open in ToolBook. To import a compressed ToolBook XML book,
you just open the .tbkx file by double-clicking it.
Figure 10: Open XML dialog box with a .tbkx file selected
When you open a compressed ToolBook XML book in ToolBook, a ToolBook book with the same
name as the compressed ToolBook XML book is saved to the location of the compressed ToolBook
XML book. For example, if you open a compressed ToolBook XML book called sample.tbkx in a
folder called “test”, a ToolBook book called “sample.tbk” is created in the same “test” folder. If
the ToolBook book already exists, ToolBook displays a prompt before overwriting it.
To import an uncompressed ToolBook XML book, you need to open the root Book.xml in the
directory where it is located. This creates a ToolBook book with the same name as the directory in
which the ToolBook XML files are located. For example, if you open Book.xml from a directory
called “test”, a ToolBook book called “test.tbk” is created in the “test” directory. If the ToolBook
file already exists, ToolBook displays a prompt before overwriting it.
► To open a ToolBook XML book in ToolBook:
1.
From a new book, choose Open XML Book from the File menu.
2.
In the save current changes dialog box, click No.
The Open XML Book dialog box is displayed.
3.
In the Files of type combo box, select the type of ToolBook XML book (“XML Book” or
“Uncompressed XML Book”) you want to import into ToolBook.
4.
Navigate to the location of the ToolBook XML book you want to import into ToolBook and
select the required ToolBook XML file.
272
Copyright © 2012 SumTotal Systems, Inc. All rights reserved. Duplication prohibited.
Importing ToolBook XML
5.
If you selected Uncompressed XML Book in step 3, select the root Book.xml in the ToolBook
XML book’s directory. (The book’s XML and supporting files should be the only things in the
directory).
6.
Click Open.
7.
After the conversion process, the following happens:
a)
a)
If you imported a compressed ToolBook XML book:
A ToolBook book (with the same name as the ToolBook XML book) is saved to the location
of the ToolBook XML book.
If you imported an uncompressed ToolBook XML book:
A ToolBook book (with the same name as the directory in which the root Book.xml of the
uncompressed ToolBook XML book is located) is saved to that directory.
Copyright © 2012 SumTotal Systems, Inc. All rights reserved. Duplication prohibited.
273
Chapter 21
Building Software Simulations
Introduction
A software simulation imitates the appearance and behavior of a software program. Using the
simulation tools available in ToolBook, you can create accurate simulations that allow learners to
experiment with software in a safe environment. Because simulations provide a realistic training
experience, learners have a high rate of retention. This chapter describes how to plan and build a
software simulation using the capture features in the Sim AutoBuilder and the built-in properties
and tools in the Simulation Editor.
About Software Simulations
A software simulation allows a learner to try out a program interface or view the steps to
accomplish a task. Because a simulation is close to the real experience of using a software
application, it is a very effective way to learn procedures and gain familiarity with a program. You
can build simulations in ToolBook that imitate other software programs by using the Sim
AutoBuilder feature or the Simulation Editor.
ToolBook provides two ways to create a simulation. You can record interaction in a software
application by using the Sim AutoBuilder. After you make a recording, the file can be opened in
ToolBook and converted automatically to a simulation that connects the images and behavior in
the recording with ToolBook objects. Another way to create a simulation in ToolBook is to build
up a simulation interface from Catalog objects and graphic images of the screen manually, using
the Simulation Editor to define the steps in the simulation. All of the properties for a simulation
can be viewed and changed in the Simulation Editor. A simulation prepared by the Sim
AutoBuilder can be modified in the Simulation Editor.
A simulation consists of a series of steps that describe changes on the screen. During a simulation,
a learner may interact with buttons and menus and other objects. These preprogrammed objects
are available from the ToolBook Catalog and can be added to any simulation. Catalog objects can
be modified to match the appearance and behavior of controls in the software being simulated.
Simulations can be delivered in three different modes: practice, demonstration, and assessment.
A practice simulation is interactive and allows people to experiment with buttons, menus, text
entry fields or other objects in a simulated user interface. A demonstration shows the learner how
to complete an online task and requires no input or interaction. An assessment is a test that gives
the learner a single chance to complete each step in a simulated task. You can develop a
simulation once and show it in any of these three simulation modes.
ToolBook provides a flexible environment for creating software simulations. An unlimited number
of steps may be included in a simulation, and a simulation can span multiple pages. You can
define where and when the instructional text and feedback will appear. In addition to the
standard functionality provided by the Simulation Editor, you can also integrate any type of
behavior that can be programmed in the Actions Editor. Simulations that you build in ToolBook
can be Published as DHTML applications for Web delivery and can be delivered as native ToolBook
applications. The results from a learner's interaction with a simulation can be tracked in a
learning management system that conforms to SCORM or AICC standards.
Copyright © 2012 SumTotal Systems, Inc. All rights reserved. Duplication prohibited.
275
Building Software Simulations
Planning a Software Simulation
Before developing a simulation you'll need to define the purpose or goal of providing a simulation
to your audience. Ask yourself the following questions:
x
What is the primary learning objective for the simulation?
x
What level of mastery will the learner be expected to attain?
x
How much time should it take for the learner to view or complete the simulation?
x
Considering the learning objective early in the planning process will help you decide how
much interaction and responsive feedback text the simulation will include. The learning
objective will determine if a simulation will be presented as a test to assess the learner's
performance.
When you are planning a simulation:
x
Define the learning objective.
x
Identify the actions in the task that will be simulated.
x
Design the page layout.
x
Choose the type of simulation: practice, demonstration, or assessment, or a combination of
these types.
Identifying the action or process that will be taught in a simulation begins with a review of the
task. Open the software program that will be simulated and practice the tasks that you want to
simulate. Think of the simulation as a series of steps. If you are planning to build an interactive
simulation, write instructions that explain how to complete each step in the task. You can use
these written instructions as text that will appear on the simulation page.
If the simulation will be built or modified with the Simulation Editor, you can design the look of
the simulation page layout. Using a consistent location for the navigation buttons and
instructional text makes it easier for learners to find what they want in the interface. Page layout
considerations also include the look of the title or heading that may appear at the top of a
simulation page.
If you are using the Sim AutoBuilder to record a simulation, the number of responsive objects will
be limited to the selections made during the capture phase. For more information about the Sim
AutoBuilder, see "Creating a simulation with the Sim AutoBuilder" later in this chapter.
Planning a simulation before building it can reduce the overall time spent on development. By
deciding on the type of simulation that suits the needs of your learners early in the development
cycle, you can focus your development efforts and avoid misdirected work.
276
Copyright © 2012 SumTotal Systems, Inc. All rights reserved. Duplication prohibited.
Choosing a Simulation Mode
Choosing a Simulation Mode
A simulation created in ToolBook can be shown in one or more of these modes:
x
Practice mode allows a learner to try out each step for a limited or unlimited number of
attempts.
x
Assessment mode allows one answer attempt for each step and calculates a score for the user
input.
x
Demonstration mode shows how to complete the task.
These three modes are discussed below.
Practice Mode
When a learner completes a step in a practice simulation correctly, the next step in the
simulation displays automatically. For an incorrect answer attempt, feedback text may display
and the learner can make another attempt to complete the step until the limit for the number of
answer attempts is reached. If the simulation includes a Continue button, this button allows the
learner to go on to the next step when the maximum number of incorrect answer attempts is
reached.
The score for a learner's interaction with a practice simulation will be calculated if the property
"Score in practice mode" is set to Yes.
Assessment Mode
In assessment mode the learner is only allowed one attempt to complete each step in the
simulation. When the learner completes the step correctly, the simulation will automatically
move on to the next step. If the learner chooses the wrong interaction for the step, feedback for
that step may display and the learner may click the Continue button to go on to the next step.
Alternatively, the simulation may include a timed delay for navigation to the next step.
In assessment mode the simulation is always scored.
Demonstration Mode
A demonstration shows the learner how to complete a software procedure or task. There is no
input from the learner during a demonstration. You can use one or both of the following methods
to provide navigation during a demonstration simulation:
x
Set a specified number of seconds for each step in the demonstration to display.
x
Use a Continue button or a key press to let the learner choose when to advance to the next
step in the demonstration.
Setting the Simulation Mode
The mode setting is a property of a simulation. In the Simulation Editor, this property can be set
on the General tab of the Properties for Simulation dialog box. It can also be set in the property
grid available in the Simulation Editor.
Copyright © 2012 SumTotal Systems, Inc. All rights reserved. Duplication prohibited.
277
Building Software Simulations
Creating a Simulation with the Sim AutoBuilder
The Sim AutoBuilder feature lets you record mouse clicks, keyboard entries, and other interaction
with a software application. Every software simulation created with the Sim AutoBuilder is a
reproduction of the original software application, with buttons and menus and other interactive
objects that act like the real objects in the original software program.
Figure 1 : The Sim AutoBuilder
278
Copyright © 2012 SumTotal Systems, Inc. All rights reserved. Duplication prohibited.
Creating a Simulation with the Sim AutoBuilder
You prepare to use the Sim AutoBuilder by opening the software application that you want to
record. Resize this application window to the size that you want to show in the simulation, and
get the screen ready for recording. It is best to close other applications before you start
recording. Open the Sim AutoBuilder to begin recording, and press the Print Screen key (or
another key you have specified) to capture the appearance of the screen for each step that will
occur during the simulation. In general, you should press the Print Screen key after you send a
command or instruction to the software application. While you are recording, press the Print
Screen key after:
x
navigating to another page
x
opening a dialog box
x
selecting a menu item
x
double-clicking an icon
x
performing an action that causes the software application to respond in some way
Each step in a simulation should include only one action that requires the recorded software
application to perform a specified task. A step can be either a single action, such as clicking a
button, or multiple actions. If multiple actions are recorded as part of a step, these actions should
be related to each other, such as typing text in a field and pressing the Enter key to signal the
completion of entering text. As an example of a single step in a simulation, the user could choose
several options in a dialog box and end the step by clicking the OK button. Simply changing the
text in a field or the selected state of a check box does not require that you end the step while
recording; data changes can be grouped into one step.
Making selections with the mouse is just one type of activity that will be recorded by the Sim
AutoBuilder. A distinction will be made between a left button click, right button click and doubleclick. Selecting items from menus, list boxes and combo boxes will also be recorded. Pressing
specific keys on the keyboard will be captured, including the Tab key, Shift key, or any function
key. Some of the function keys, such as F8, are commonly in use by Web browsers and pressing a
function key when playing a simulation through a browser will cause the browser to respond in the
default fashion.
► To make a recording and simulation with the Sim AutoBuilder:
1.
Open the software application that you want to simulate. Prepare the application by setting
it up to be ready for the start of recording.
2.
From the Start menu, point to Programs, ToolBook 11.5, Utilities, and select Simulation
Recorder.
The ToolBook Sim AutoBuilder dialog box is displayed.
3.
In the Sim AutoBuilder dialog box, enter a name and location for the file that will contain the
recording.
4.
Select the software application that you want to record.
5.
Change any of the default settings for the recording options, if desired, and then click OK.
6.
Start recording by pressing the Print Screen key (or another selected key).
7.
In the software application you are recording, take the first action that you want to show in
the simulation and then press the Print Screen key (or a key you selected) to indicate the end
of the step.
8.
Continue to record each step in the software program, pressing the Print Screen key at the
end of each step, until you are finished.
9.
Press CTRL + Print Screen to stop recording (or another selected key).
Copyright © 2012 SumTotal Systems, Inc. All rights reserved. Duplication prohibited.
279
Building Software Simulations
10. Open ToolBook. In the book that will display your recorded simulation, navigate to the page
where you want to add the recording. From the Insert menu, choose Simulation from
Recording.
11. Select the name of the file containing the recording.
ToolBook processes your recording and adds the simulation to your book. New pages will be
added to the book if necessary.
Developing a Simulation Manually
Starting from a blank ToolBook page, you can create a new simulation by placing objects from the
ToolBook Catalog over graphics that show the appearance of the screen in the software being
simulated. This section discusses how to develop a simulation manually without using the
recording feature of the automated Sim AutoBuilder tool.
A page with a simulation contains a variety of different objects. Graphics that show the
appearance of the software being simulated are stacked up on a page to display visual changes in
the appearance of the screen. Text fields can show instructions and feedback text. Buttons and
other ToolBook Catalog objects may provide interactive behavior. The Simulation Editor provides
the tools to develop the relationship between the objects in a simulation.
Graphic images form the visual basis for a software simulation. A captured screen graphic shows
the initial appearance of the screen before an event occurs and another graphic shows the screen
after an event occurs in the software program being simulated. Screen images can be placed one
on top of another on the page. Usually one screen image is shown at a time. Hiding and showing
individual screen images is handled by setting the Visible property for a particular graphic or by
changing the layer order to bring an object to the front. In the Simulation Editor, the initial
visibility for a graphic is set on the Objects tab of the simulation properties dialog box.
An interactive simulation includes responsive objects from the ToolBook Catalog such as a
buttons. These objects are placed on a graphic image that shows the screen and are set to look
and behave like the real object. You can assign a graphic to a button that matches the
appearance of a button in a screen image, for example, and then place the matching button on
top of the screen image as shown below.
Figure 2: Placing a button on top of a graphic
280
Copyright © 2012 SumTotal Systems, Inc. All rights reserved. Duplication prohibited.
Developing a Simulation Manually
In a simulation developed from scratch, a number of component objects are added to the
ToolBook page to build the simulation interface. You can add objects such as text fields to a
simulation page at any time during the development of the simulation. Often it is easier to have
the necessary objects for a step in a simulation placed on the page before setting up the
properties for the step in the Simulation Editor.
Usually a simulation includes one or more text fields. Instructions for completing the current step
in the simulation are displayed in a text field. You can use the same text field (or a different text
field) to show feedback text that may display immediately after a learner makes an incorrect
attempt to complete a step in the simulation. Another option for displaying feedback text is to
use a pop-up field. The options for displaying instructions and feedback text are available on the
Controls tab in the Properties for Simulation dialog box in the Simulation Editor.
Figure 3: Options for displaying instructions and feedback text
Copyright © 2012 SumTotal Systems, Inc. All rights reserved. Duplication prohibited.
281
Building Software Simulations
Objects in a simulation may include:
x
Text fields for instructions and feedback.
x
A navigation button for moving to the next simulation step (known as a continue button).
x
Catalog objects that provide interaction, such as buttons.
x
Objects that add to the design of the page, such as a title or graphic logo.
Catalog objects that can have a changed state, such as check boxes and text entry fields, are
known as evaluation objects in the Simulation Editor. An interaction that a learner makes with an
evaluation object can be analyzed at the end of a simulation step. For further information, see
"Using evaluation objects" later in this chapter.
After you assemble the necessary objects for the first step in a simulation on a page, you can
begin to develop the behavior for the simulation in the Simulation Editor. Developing steps in a
simulation is described later in this chapter in the section titled "Working in the Simulation
Editor."
Preparing Screen Images
Before capturing screen images for a simulation you can adjust the appearance and size of the
software application window to reduce the distractions of unnecessary toolbars, palettes, and
other items. Toolbars that are not used during a simulation can be closed. The status bar can be
turned off in some applications to save space on the page, if desired. You can adjust the size of
the application window to draw attention to the more important areas of the screen.
When you are creating a simulation manually there are several ways to capture images of the
screen:
x
Use a screen capture application such as SnagIt.®
x
Use a graphics program that includes a screen capture feature, such as PhotoImpact.®
x
Use the capture feature provided in Windows to copy an image to the Clipboard: press Print
Screen to copy an image of the active window, and then paste the image into a graphics
program to save it.
Captured screen images are often saved in a compressed file format to reduce the total file size
of a simulation. If you plan to deliver a simulation through a Web browser the screen images
should be saved in file format that is compatible with a browser, such as GIF, PNG, or JPEG files.
To display graphics, drag the the Image object from the Commonly Used Objects category of the
Catalog to a simulation page.
Cropping an image can be a useful way to modify a captured image. A simulation may show only a
portion of the captured screen graphic to reduce the overall dimensions of the screen graphic. An
image editing program allows you to select an area of a captured screen image and crop it to
remove the remainder of the image.
282
Copyright © 2012 SumTotal Systems, Inc. All rights reserved. Duplication prohibited.
Working in the Simulation Editor
Working in the Simulation Editor
You can create new simulations and edit existing simulations in the Simulation Editor. A
simulation is made up of a series of steps that define the behavior in a simulated software
process.
All of the steps in a simulation are displayed in the top panel of the Simulation Editor. When an
item in the steps panel is selected, the lower panel in the Simulation Editor shows the properties
for the selected item. The lower panel is called the property grid.
Figure 4: The Simulation Editor shows steps and properties
► To start a new simulation:
x
From the Insert menu, choose New Simulation.
The Simulation Editor opens immediately after you add a new simulation.
► To reopen the Simulation Editor:
x
From the View menu, select Simulation Editor.
Copyright © 2012 SumTotal Systems, Inc. All rights reserved. Duplication prohibited.
283
Building Software Simulations
Toolbar buttons in the Simulation Editor
Click this button...
To do this...
Add a new step to the simulation
Assign an evaluation of user input to a step
Add a new trigger event to a step
Cut the selected item(s) to the Clipboard
Copy the selected item(s) to the Clipboard
Paste the selected item(s) to the Clipboard
Undo the last command
Redo the last command
Delete the selected item(s)
Edit the properties of the selected item(s)
Move the selected item(s) up one line
Move the selected item(s) down one line
284
Copyright © 2012 SumTotal Systems, Inc. All rights reserved. Duplication prohibited.
Working in the Simulation Editor
Setting Properties for a Simulation
A simulation has a number of properties that can be set in the Simulation Editor. Depending on
the line selected in the top panel of the Simulation Editor, the properties shown in the property
grid will vary.
Figure 5: The Simulation Editor
► To view or edit the properties for an entire simulation:
1.
In the Simulation Editor, select the line that displays the name of the simulation.
2.
Do one of the following:
Click the Properties button on the toolbar of the Simulation Editor.
Select a line in the property grid.
Copyright © 2012 SumTotal Systems, Inc. All rights reserved. Duplication prohibited.
285
Building Software Simulations
The properties available for the entire simulation are not the same as the properties for a
selected step in the simulation. The items shown in the property grid correspond to the selected
line in the upper panel of the Simulation Editor. All properties shown in the property grid are also
available by clicking the Properties button on the toolbar. In the properties dialog box you will see
a more detailed description of the available properties.
Developing Steps
The steps that make up a simulation build a procedure for completing the task defined in the
simulation. A step contains some type of action or change that can be a distinct point in the
learning process. For example, a step could include instructions that direct the learner to click a
specific button on the page, a trigger event that specifies the name of the button that should be
clicked, and feedback text that displays if the learner clicks the wrong button.
► To add a new step to a simulation:
x
Do one of the following:
Click the New Step button
From the Insert menu choose New Step.
on the toolbar of the Simulation Editor.
Before you can define what will be accomplished in a new simulation step, the objects that will
be involved in the step should be placed on the page. The Simulation Editor allows you to select
the names of existing objects from drop-down lists to set some properties.
286
Copyright © 2012 SumTotal Systems, Inc. All rights reserved. Duplication prohibited.
Working in the Simulation Editor
A step in a simulation usually includes instructions that tell the user what to do. Since a single
text field can be used to display instructions for all of the steps in a simulation, the Simulation
Editor includes an option to display instructions for an individual step, and this text will be
replaced by the instructions for the following step when the learner continues to the next step.
You can enter the text for an individual step in the Properties for Step dialog box to show the
appropriate text for the selected step, as shown below under "Specify instructions."
Figure 6: Entering custom instructions for a step in a simulation
Each step has a trigger event that ends the step. You can include multiple trigger events in a step
to handle all types of user interaction. Trigger events are described in the next section.
A step may end in one of these ways:
x
Press a specific button or key (an assigned trigger event).
x
Click a button designated as the Continue button (indicated on the Controls tab of Simulation
Properties dialog box).
x
Set a timed delay to occur before automatic navigation to the next step (the number of
seconds for the delay is a property of the simulation).
You may combine the three options listed above in any way. For example, you could designate a
button which allows the learner to move immediately to the next step, and also set a timed delay
to cause the simulation to move to the next step after 10 seconds if the user hasn't yet clicked the
button.
Copyright © 2012 SumTotal Systems, Inc. All rights reserved. Duplication prohibited.
287
Building Software Simulations
Setting Trigger Events
Selecting the correct trigger event is usually the end of a step in an interactive simulation. When
a user clicks a button or activates any other defined trigger event during a simulation, the
interaction will be analyzed to determine if the correct trigger event was selected.
The following trigger events can be used in a simulation:
x
click a button, a check box, or a radio button
x
right-click a button
x
double-click a button
x
press a certain key
x
select an item from a list box or combo box
x
press a specific key when a defined object has the focus
► To add a trigger event to a step:
1.
Select a step in the Simulation Editor.
2.
From the Insert menu choose Trigger Event.
3.
Click the Properties button on the Simulation Editor toolbar to define the new trigger event.
A trigger event has a property that specifies whether it is correct or incorrect. Sometimes there is
more than one way to complete a step in a software task, such as pressing a shortcut key or
clicking a button. If there is more than one valid way to make the application respond you can
include more than one correct trigger event for a step.
Tip
If you include a trigger event that ends a step by selecting an item from a list box or combo
box, the trigger event will determine if the proper object was selected. To find out if the
correct item in the list was selected by the learner, add an evaluation object to the
simulation step to identify the correct item in the list. The evaluation object determines if
the correct or incorrect item is selected from a list box or combo box.
During a simulation, when a learner activates the correct trigger event for a step then the next
step in the simulation appears by default. If the user activates an incorrect trigger event,
feedback text may display and the user is allowed to make another attempt to choose the correct
trigger in practice mode (as long as the maximum number of tries to complete the step has not
been reached).
If no trigger event is specified for a step, the Continue button will be automatically enabled to
allow the learner to move to the next step in the simulation.
Using Evaluation Objects
An object that can have a changed state is known as an evaluation object in the Simulation Editor.
Evaluation objects include check boxes, editable text fields, combo boxes, radio button groups,
and list boxes. If an evaluation object is part of a step in a simulation, the change made to the
object will be evaluated after the user makes an attempt to complete the step. The learner has
to make the changes described in the instructive text to the evaluation object, and no other
changes, in order to complete the step correctly.
Tip
The text entered in a text field during a simulation can be evaluated to determine if the
text input is correct.
► To add an evaluation object to a step:
1.
288
Select a step in the Simulation Editor.
Copyright © 2012 SumTotal Systems, Inc. All rights reserved. Duplication prohibited.
Working in the Simulation Editor
2.
From the Insert menu choose Evaluation Object.
3.
Click the Properties button on the Simulation Editor toolbar.
4.
Choose the name of the object to be evaluated.
5.
Specify the required change (for example, the text to be entered).
Any undefined user interaction with evaluation objects will be ignored when a learner interacts
with the simulation.
Evaluating Text Entry
During a simulation, the text entered by a learner can be evaluated automatically. Many built-in
options exist for determining if the text response is correct. These text response options are
available in the Simulation Editor:
x
allow multiple correct responses
x
require text to be case sensitive (uppercase or lowercase characters)
x
ignore punctuation
x
use the asterisk (*) wildcard character to indicate any number of characters may be entered
in a specific sentence location
x
require the word order to match the defined response
x
accept words that sound like the ones in the response specified by the author
If you want text input to be evaluated during a simulation, specify the correct response text in
the Simulation Editor.
► To set the response options for text entry:
1.
On a page which includes an editable text field and a simulation, open the Simulation Editor
and select or add a step to the simulation outline.
2.
Insert an evaluation object which identifies the name of the editable text field.
3.
In the property grid of the Simulation Editor, under the Miscellaneous section, click the empty
cell in the Value row to open the Edit Text Response dialog box.
4.
Enter the text that the learner should type as a response and select options for acceptable
text input.
Displaying Feedback
Feedback is an automated response that may display after a learner interacts with a simulation.
Text such as "Try again" can appear in a pop-up window or text field if a learner makes a mistake
when interacting with a step in a simulation. You can enter the feedback text that you want to
display after an incorrect answer attempt or show the default text generated by ToolBook. Other
feedback options include playing a sound or showing an animation. Feedback can be turned on or
off for any step in a simulation.
Unique feedback text can be assigned for each incorrect attempt to complete a step. For
example, a hint could be shown in response to the first incorrect attempt, and after the second
incorrect attempt a description of the correct way to complete the step could appear.
► To define feedback text for a step in a simulation:
1.
Select a step in the Simulation Editor.
2.
Click the Properties button on the Simulation Editor toolbar.
3.
Click the Feedback tab and select the option you want.
Copyright © 2012 SumTotal Systems, Inc. All rights reserved. Duplication prohibited.
289
Building Software Simulations
Choosing the option "Automatically generate feedback text" causes the simulation to display
appropriate text if the learner makes the wrong response. You can change the default text for an
incorrect response by editing the words stored as the <Incorrect> prompt text, available from the
Generic Runtime System Prompts button on the Web tab of the Properties for Lesson dialog box.
Another way to change the automated feedback text is to edit the reference to the name of
individual objects. Without changing the name of an object, you can change the reference to an
object name by creating an alias. In the properties dialog box for a simulation, click the Objects
tab, select an object in the list, then change the default text shown under "Refer to this object in
automatic instructions and feedback as:" to create a different reference.
Another way to deliver feedback is to develop an action method that executes after the learner
completes the step or makes an attempt to complete the step. Playing a media file or navigating
to a different page are examples of behavior that can be programmed in the Actions Editor. In the
Simulation Editor, you can specify custom behavior for feedback by assigning an action method to
a simulation event. For more information about programming custom behavior, see chapter 17,
"Using the Actions Editor."
Scoring a Simulation
A score for the learner's response to each step in a simulation will be calculated when the
simulation is running in assessment mode or scored practice mode. The score for a step is evenly
split among the evaluated objects and the trigger event for the step. For example, a step with
three evaluation objects and one correct trigger event will produce a score that assigns 25% of the
total score to each of the three evaluation objects and 25% of the total score to the choice of the
correct trigger event.
Programming Behavior for Simulation Events
You can add behavior defined in the Actions Editor to any individual step in a simulation. Custom
behavior can be assigned to the beginning or end of a simulation as well. This customized behavior
may include showing a pop-up message, displaying the score for the simulation, navigating to a
different page, or anything that can be developed in the Actions Editor.
Built-in simulation events include start simulation, reset simulation, and complete simulation. You
can define an action method that will execute before the simulation starts if you have any
initialization tasks that must occur prior to the first step of the simulation. For example, three
buttons may provide a learner with a choice of the simulation mode. As soon as a learner clicks
one of the buttons, an action method starts the simulation in the mode indicated by the button
caption. Likewise, you can define behavior that will execute as soon as a simulation is finished or
reset by clicking the Actions tab in the properties dialog box for the simulation.
Individual steps in a simulation have three built-in events: start step, attempt step and complete
step. If you want to display custom feedback for a correct user response, define an action method
for the complete step event which checks to see if the score parameter equals "Correct." Another
possibility is to add behavior that would occur in the real application after a step is finished.
For information about programming in the Actions Editor, see Chapter 17, "Using the Actions
Editor" and Chapter 18, "Creating action sequences: Practical examples."
290
Copyright © 2012 SumTotal Systems, Inc. All rights reserved. Duplication prohibited.
Working in the Simulation Editor
Locating Objects on a Simulation Page
A simulation may have many graphics and interactive objects residing on different layers of a
ToolBook page, making it a challenge to locate a specific object that you wish to modify. To find
an object you can use the Book Explorer to view a list of objects on a simulation page. When you
locate an object in the Book Explorer that you want to modify, you can select it in the Book
Explorer and the object will be simultaneously selected on the page.
► To open the Book Explorer:
x
From the View menu, select Book Explorer.
For more information about changing the properties of a simulation, see "Working in the
Simulation Editor" earlier in this chapter.
Copyright © 2012 SumTotal Systems, Inc. All rights reserved. Duplication prohibited.
291
Chapter 22
Distributing Applications on the Internet
Introduction
ToolBook makes it easy to distribute your online learning applications over the Internet by
allowing you to Publish your book as a series of Web pages that utilize DHTML technology. This
chapter discusses the this distribution method for delivering your course on the Internet and
outlines the steps you can take to prepare your application for use with a learning management
system.
Understanding DHTML
HTML is a markup language that allows you to format documents for the Web. An HTML document
combines your content with HTML markup codes, called tags, that specify how your content will
be formatted. When you view an HTML document in a browser, you do not see the tags; you see
only the formatting that the tags represent.
Dynamic HTML (DHTML) extends HTML by adding the ability to create interactive features such as
buttons that respond to a click, scrolling text, animations and more. The preprogrammed objects
in the Catalog have these features built in. You can use the Publish to Web feature to convert
your application to Web pages that utilize DHTML, automatically. Publishing to DHTML from
ToolBook creates Web pages that are customized for whichever browser option you specify.
When you Publish to Web, most objects and features will appear and behave as they do in
ToolBook. The following table describes the functionality you should expect when Publishing your
application to DHTML.
Functionality to expect when Publishing your book to DHTML
Object or feature type
DHTML
Action sequences
In general, objects programmed using the Actions Editor will
behave as they do in ToolBook.
Buttons
Button captions will not appear transparent unless the caption is
centered. Access keys on button captions will not function.
Hyperlinks
Transition effects between hyperlinks will appear in Microsoft
Internet Explorer.
Menu bars and viewers
These features will not function in an Published application.
OpenScript
Objects whose functionality has been extended using OpenScript
will not function as scripted after Published. Use the Actions Editor
to program behavior that will Publish to Web.
Question objects
In general, question objects will behave as they do in ToolBook.
Text fields
Single-select list boxes, multi-select list boxes, and editable fields
will lose their character formatting and will not appear transparent.
Copyright © 2012 SumTotal Systems, Inc. All rights reserved. Duplication prohibited.
293
Distributing Applications on the Internet
Tips for Optimizing a Book Designed for DHTML
Several factors affect how quickly a Published DHTML application displays in a Web browser. The
speed of the Internet connection, the size of the media files in an application, and the complexity
of the page design all contribute to the length of time necessary to download an application. You
can minimize the amount of time it takes to run your application in a Web browser by building a
book that is designed to use objects and media files efficiently.
► To reduce the amount of time required to display your application in a Web browser:
x
Use one background in the book, or use the fewest number of backgrounds possible.
x
Limit the number of objects on the page.
x
Use graphics with a small file size. If bandwidth is an issue, reduce the overall size of your
graphics.
x
Use the Universal Media Player from the Catalog to show streaming media files. Due to the
large file size of AVI files, you should not use the AVI file format for playing videos over the
Internet.
x
For question feedback, if you choose to play an audio file in response to a user's answer, use
a short AU file or play a streaming media file in the Universal Media Player. You can make the
Universal Media Player invisible if you choose.
While developing your book you should periodically Publish the book to DHTML and evaluate the
result in a Web browser. Try to test your Published application using the same type of Internet
connection as the intended audience.
Note Your book will go through the Publish process much faster if you use the Web Graphic
Placeholder object to display GIF, PNG, or JPEG graphic files on the pages of your book.
294
Copyright © 2012 SumTotal Systems, Inc. All rights reserved. Duplication prohibited.
Publishing Your Book as Web Pages
Publishing Your Book as Web Pages
ToolBook can Publish your application as a series of Web pages using the Publish to Web feature.
This will gather information from you about your application. By selecting various options, you are
providing the information that ToolBook needs to Publish your book.
Figure 1: Publish To Web
You can use the Publish to Web process to convert your application into a series of Web pages that
you can then choose to place on a Web server.
Note This process Publishes your files to a project directory that you specify. If your application
contains hyperlinks to other books, Publish those books to the same project directory.
► To Publish your application as Web pages:
1.
Open the book that you want to Publish.
2.
From the File menu, choose Publish to Web (DHTML).
3.
Select the options you desire and click Publish.
ToolBook Publishes your files using the settings you specified.
Copyright © 2012 SumTotal Systems, Inc. All rights reserved. Duplication prohibited.
295
Distributing Applications on the Internet
After you have Published your book to the Web, you can view it in a Web browser. When you
Publish your book to DHTML, you choose a project directory. By default, ToolBook names this
directory WebExport and places it in the book's directory. Within this directory, ToolBook creates
another directory with the same name as your book file. There you will find all the files required
to run your application on the Web. To load the DHTML content in your browser, open the
INDEX.HTML file.
You can also access the folder containing the INDEX.HTML from a hyperlink displayed at the end of
the Publishing process, as shown below.
Figure 2: Link to the WebExport folder
Using ToolBook Courses with a Learning
Management System
You can deliver courses created in ToolBook over the Internet and use any learning management
system that conforms to SCORM or AICC standards to record the score from student responses to
questions. By adding evaluation buttons from the Catalog to your book, you allow results to be
sent to a database that is controlled by the learning management system.
296
Copyright © 2012 SumTotal Systems, Inc. All rights reserved. Duplication prohibited.
Using ToolBook Courses with a Learning Management System
Adding Score Tracking to a ToolBook Course
When you prepare your book for delivery by using the Publish to Web command, add SCORM or
AICC support by selecting the appropriate options when Publishing to Web. This allows scoring
information such as quiz results to be tracked and stored in a database. By including one or more
buttons from the Scoring and Tracking category of the Catalog in your course, individual test
scores can be sent to the learning management system in use. After a student opens a course
through the learning management system and answers the questions in the course, the final score
is available through a progress report generated by the learning management system.
A ToolBook course can be stopped before completion and resumed at a later time without
disrupting the overall score. You need to include a Suspend Lesson button from the Scoring and
Tracking category of the Catalog in your course to allow a student to save the current state of the
course before completion.
If a student accesses a ToolBook course through a learning management system and closes it
without selecting one of the exit buttons from the Scoring and Tracking category of the Catalog,
no work accomplished during that session will be recorded.
Managing ToolBook Courses with TotalLMS
TotalLMS from SumTotal Systems is a comprehensive learning management system which tracks
every form of training. Individual progress towards achieving all types of educational goals can be
measured and viewed online or through reports. Online courses as well as instructor-led classes
and on-the-job training can all be incorporated into a personalized curriculum. For a detailed
description of the features available, visit www.sumtotalsystems.com.
Content and courses created in ToolBook can be accessed through TotalLMS using a Web browser.
If you plan to include questions and want the score for the answers recorded in the TotalLMS
database, include one of the Exit buttons from the Scoring and Tracking category of the ToolBook
Catalog: the Done button or Mark as Complete button. The Cancel button can be included in your
course but no scoring information will be sent to TotalLMS. You can include a Suspend Lesson
button in your course to allow a student to save their score without finishing a lesson in one
session.
When designing your ToolBook course, you will want to refrain from creating a course structure
that consists of multiple books which interact with one another (one ToolBook book calls or opens
a different book). Recording the scores from this type of nested course structure is not supported
in TotalLMS.
After you finish building your course in ToolBook, prepare your course for distribution by choosing
Publish to Web from the File menu.
For more information about using TotalLMS, consult the online documentation in Learner mode
and Administrator mode when using this software.
Copyright © 2012 SumTotal Systems, Inc. All rights reserved. Duplication prohibited.
297
Chapter 23
Preparing Native ToolBook Applications for
Release
Introduction
You can make your application available in the native ToolBook file format to users via an
intranet, a local area network, or a CD-ROM. This chapter describes how to use the AutoPackager
to prepare a native application for distribution. Checking and testing your application is discussed,
as well as uninstalling an application.
Organizing and Checking Your Application
When you have finished developing your ToolBook application, a few additional tasks remain that
will improve the performance of your application when it is distributed to users. To optimize your
application's appearance and behavior, you can:
x
Organize the directory structure.
x
Check the spelling.
x
Remove unused resources.
x
Compress the books to their smallest size.
x
Reset the books so that the user can run them.
Copyright © 2012 SumTotal Systems, Inc. All rights reserved. Duplication prohibited.
299
Preparing Native ToolBook Applications for Release
Creating a Central Book Directory Structure
It's a good idea to create an organized directory structure while authoring, and it's especially
important to have this structure in place before you prepare your application for distribution.
Take some time to make sure that all the files that users will need to run your application are in
one place and that like items are grouped together.
Note If you plan to deliver your application locally (that is, if users will install your application on
their computers), make sure that the directory structure you create appears the way you
want it to appear on the users' systems.
All of the books that make up your application should reside in one central book directory, with
one or more subdirectories for the media (sound, graphics, video, and animation) files that
accompany those books.
Let's say your application has just one book—Introduction to French. We suggest the following
directory structure:
\FRENCH
IntroFrench.tbk (the ToolBook book)
\FRENCH MEDIA
EiffelTower.avi (a video file)
Now let's say your application is more complex. You have one main book about Romance languages
and several related books about French, Spanish, Italian, and so on. You could organize the files
using several book subdirectories under a central directory, as shown in this example:
\ROMANCE
Romance.tbk
\Romance and shared media
\FRENCH
IntroFrench.tbk
AdvFrench.tbk
\FRENCH MEDIA
EiffelTower.avi
\SPANISH
IntroSpan.tbk
AdvSpan.tbk
\SPANISH MEDIA
PradaMuseum.avi
etc.
Checking Spelling
You can use the ToolBook spelling checker to ensure that your application is free from spelling
errors. You can also set the spelling checker to use a custom dictionary that you create or a
foreign-language dictionary that you purchase.
To check the spelling in an application:
► To check the spelling in an application:
1.
From the Tools menu, choose Spelling.
The Spelling dialog box appears.
2.
300
Optional. Do one or both of the following:
Click the Options tab, and then select options to define the conditions of the spell check.
Click the Dictionary tab to select the dictionary to use.
Copyright © 2012 SumTotal Systems, Inc. All rights reserved. Duplication prohibited.
Organizing and Checking Your Application
3.
Click the Spell tab, and then click Start.
The Start button becomes the View button. When the spelling checker finds an unknown word
or other error (such as a duplicate word), it highlights the word and displays the text in the
Old box.
4.
Use the buttons on the Spell tab to ignore or change the unknown word, to add the word to a
user dictionary, or to skip to the next object or page. To view a list of alternative words,
click Suggest. To have the list of alternatives appear automatically, select Automatic.
5.
Continue checking words until the spell check is complete, and then click Close to exit the
Spelling dialog box.
Checking for Unused Resources
Resources added to your book during development increase the overall file size of your project. If
you have added bitmaps, fonts, menus, or other resources to your book that you did not use in any
part of your application, you can remove those resources from your book to reduce the file size.
For more information about resources, see Chapter 19, "Using Resources."
► To remove resources from a book:
1.
From the Object menu, choose Resources.
2.
In the Available resources list, select the type of resource you want to remove.
3.
In the graphical list of resources, select the resource you want to remove.
4.
Click Remove to remove the resource.
5.
Repeat steps 2, 3, and 4 until you have removed all unused resources from your book.
6.
Click Close.
Tip
You cannot remove a resource from the book if it has been assigned to an object. The
Resource Manager Dialog box maintains a reference count, which reflects the number of
times a resource is used in a book. This reference count is not updated for references to a
resource within a script. Be careful not to remove any resources that are referenced in a
script.
Checking for Unused Extensions
If you added an extension during development that you do not use in your book, it is still
registered as an extension that your book needs to run. You should remove any extensions that
are not used in your book before you package the book for distribution.
► To remove unused extensions from a book:
1.
From the File menu, choose Extensions.
The Extensions dialog box appears.
2.
In the Added Extensions list, select the unused extension.
3.
Confirm that the extension is unused by looking at the number next to References. If the
number is 0 (zero) the extension is not used in the book.
4.
Click the Remove button
5.
Repeat steps 2, 3, and 4 until you have removed all unused extensions.
6.
Click OK. (If you are prompted to add a selected extension to the Added Extensions list, click
NO to avoid adding any additional
extensions to your book.)
to remove the unused extension from the Added Extensions list.
Copyright © 2012 SumTotal Systems, Inc. All rights reserved. Duplication prohibited.
301
Preparing Native ToolBook Applications for Release
Compressing your Book
While you are developing an application, the file size grows as you make changes and add content
to your book. You can reduce the size of your file by saving it under a new file name. To ensure
that ToolBook compresses your book to its most efficient size, save it under a new file name and
then save it again under its original name.
We recommend that you save your file under a new name periodically while you are developing
your application. One easy way to do this is to save a backup copy of your book under a slightly
different file name. For example, if you are creating a book called Sample.tbk, create a directory
called Backup; periodically choose Save As from the File menu and then save your book as
BackupSample.tbk in the Backup directory. Immediately after saving BackupSample.tbk, choose
Save As from the File menu and this time save your book as Sample.tbk in the original book
directory. This simple task can greatly reduce your file size and has the added benefit of creating
a backup copy of your book.
Regardless of whether you've been saving your book under a new file name periodically, you'll
want to do this before you prepare your application for release. Be certain that after you save
your book under the new file name, you save it once again using the original file name.
Resetting your Book
When you choose Save or Save As from the File menu, you may have the option to reset your
book. Resetting prepares your application to be run by the user by putting all objects and pages in
their reset state. When you have finished developing your application, reset the book so that
features like quizzes and animations are ready to run.
If you don't see the option to reset your book when you save, the option to display this dialog box
may be turned off in the Properties for Book dialog box, or your book may not contain any objects
that require resetting.
► To turn on the prompt for reset when saving:
1.
From the Object menu, choose Properties for Book.
2.
On the General tab, select the Prompt for reset when saving check box.
3.
Optional. Close the Properties for Book dialog box.
Preparing your Application based on a Distribution
Method
You'll prepare your application for release according to how you intend to distribute it. If you plan
to have your users install your application on their computers, you'll gather the necessary files and
create a setup program using the ToolBook AutoPackager.
The remainder of this section describes how to prepare your files for the distribution method
you've chosen. A summary of distribution methods and preparation steps is provided in the table
on the following page.
Prepare your files for release based on a method of distribution
If you plan to deliver your
application this way...
Via a local area network as a native
ToolBook application
302
Do the following to prepare for release...
If users will install the application on their own computers,
use the ToolBook AutoPackager to create a setup
program. Ensure that users are running the Windows
operating system.*
Copyright © 2012 SumTotal Systems, Inc. All rights reserved. Duplication prohibited.
Preparing your Application based on a Distribution Method
Via CD-ROM
Use the ToolBook AutoPackager to create a setup
program. Ensure that users are running the Windows
operating system.*
Via the Internet or intranet
Use the Publish to Web process to prepare your
application as a series of Web pages.
* Users must have Windows XP SP2 or higher
Preparing Files for the Internet
You prepare files for distribution on the Internet using the Publish to Web process. This process
gathers information about your application and then creates the files that you'll distribute to your
learners.
More information about using Publish to Web is available in Chapter 22, "Distributing Applications
on the Internet."
Preparing Files for a Local Area Network
You prepare files for distribution on a local area network using the ToolBook AutoPackager. Before
using the AutoPackager, you'll need to decide whether users will install the course on their local
computers by running a setup program from a central server, or whether they will run the course
from the central server and view it on their local computers.
If you plan to have users install the course on their local computers, you should prepare your
application for the AutoPackager using the same optimization methods you would use if you were
distributing via CD-ROM (see the following section). However, when you use the AutoPackager,
select the local area network (LAN) distribution option.
If you plan to have your users run the course from a central server, simply organize your
application and any media or ancillary files in an orderly directory structure. If you reorganize
your directory structure during the development process, you can use the AutoPackager to update
any media paths in your application. For more information about using the AutoPackager, see
"Using the AutoPackager," later in this chapter.
Preparing Files for CD-ROM
You prepare files for distribution on CD-ROM using the ToolBook AutoPackager. Before using the
AutoPackager, you can optimize the performance of your application by saving each book in the
most efficient format for use by CD-ROM drives. When you choose to optimize for CDROM,
ToolBook saves related data—such as a page and its objects, graphics, and resources—in close
proximity on the CD-ROM to enable faster access. Keep in mind that an application can be
composed of multiple books. To optimize an application for CD-ROM, you optimize each book
separately.
Optimizing a book for CD-ROM takes more time than a normal save (up to five times longer). In
addition, if you make changes to the book after optimization, you must optimize the book again.
Therefore, make optimizing for CD-ROM one of the last steps in preparing your application for the
AutoPackager.
► To optimize a book for CD-ROM:
1.
Save the book under a new name, as described in "Compressing your book," earlier in this
chapter.
2.
From the File menu, choose Save As.
3.
Enter or navigate to the book's original file name.
4.
Select Optimize for CD-ROM, and then click OK.
Copyright © 2012 SumTotal Systems, Inc. All rights reserved. Duplication prohibited.
303
Preparing Native ToolBook Applications for Release
Using a Cache File for a CD-ROM Application
When you optimize a book for CD-ROM, you can specify whether the book uses a temporary or
permanent cache file. A cache file, which is stored on the user's hard disk, contains information
that ToolBook needs to access frequently. Using a cache file can make a CD-ROM application run
significantly faster, especially for users who have a single- or double-speed CD-ROM drive;
however, cache files do not improve the speed of newer, faster CD-ROM drives. Cache files are
used only when books are run from the CD-ROM, not when they are installed from the CD-ROM and
run from the hard drive.
Tip
If you make changes to your book after creating a cache file, you must recreate the cache
file.
► To build a cache file for a book:
1.
Save the book under a new name, as described in "Compressing your book," earlier in this
chapter.
2.
From the File menu, choose Save As.
3.
Enter or navigate to the book's original file name.
4.
Select Optimize for CD-ROM.
5.
Click Cache File Options to open the Cache File Options dialog box.
6.
Under Build cache file, choose Temporary or Permanent. (If you choose Never, no cache file
is created.) To improve startup speed in a large book significantly, use the Permanent option.
7.
Under Cache file type, choose Minimal, Preferred, or Extended.
8.
Optional. To preview the amount of disk space required for the cache file, click Show Sizes.
(Previewing can take a significant amount of time.)
9.
Click OK to close all dialog boxes.
Using the AutoPackager
The AutoPackager gathers all the files used in your application, records information about your
application, and copies these files to one location. Use the AutoPackager to create a setup
program if you plan to distribute your application on CD-ROM or on a local area network from
which users will install the application locally.
You can also use the AutoPackager to update media paths if, during the development process, you
moved your application files to a new location on your hard drive or to another computer.
The package created when you run the AutoPackager consists of all the files belonging to the
application (such as book files, media files, extension files, and run-time files) as well as files that
are required to install the application (archive files, setup program files, and related data files).
When you package an application, the AutoPackager:
x
Gathers the media and application files needed to run your application and checks the path
information for the media in your application.
x
Prepares the files necessary to install your application using the options you specified and
creates the Setup and Package directories.
x
Optionally copies the package to a chosen destination to allow for testing the setup program
and creating the CD-ROM.
► To package your book using the AutoPackager:
1.
From the File menu, choose AutoPackager.
2.
Follow the instructions in the AutoPackager. The AutoPackager will:
304
Copyright © 2012 SumTotal Systems, Inc. All rights reserved. Duplication prohibited.
Using the AutoPackager
Allow you to specify a name for your application.
Allow you to specify a default installation directory.
Check for required media files and extension files.
Update all media paths.
Give you the option to include ToolBook run-time files with your application.
Allow you to specify which of your application's files are copied to the user's computer.
Give you the option to create Windows shortcuts for your application.
Create a setup program that learners can use to install your application.
Copy your application to a specified location.
During packaging, the AutoPackager records the actions it performs and any error or warning
conditions it encounters in a log file; this file, named Packager.log, is located in the Package
directory.
Gathering Files
The AutoPackager gathers the media files associated with your application and updates the path
information referenced in the media links of your book or books. You can choose whether the
package includes the current (open) book or all of the files in the current book's directory and its
subdirectories. For example, if you package an application that consists of several books and
these books are located within the central book directory structure, each book is searched for
references to media files. When the AutoPackager encounters a media file located outside of the
central book directory structure, it can copy or move the file to the book's directory or a
subdirectory of that book's directory. For more information about organizing book files, see
"Creating a central book directory structure," earlier in this chapter.
Packaging Files
Using the AutoPackager, you can specify the default installation options that determine whether
media, ToolBook, and cache files will be copied to the user's computer or whether they will
remain on the CD-ROM.
When you package a book, the AutoPackager creates a Package directory and a Setup directory.
The Package directory contains files that the AutoPackager uses to create the Setup directory. If
you package the same book again, the AutoPackager can reuse the files in the Package directory
and will process your book quickly. After you have finished packaging your book, you no longer
need the Package directory.
The Setup directory contains all the files required to install your application on another computer.
Copying Files
When you create a package for distribution via CD-ROM, the AutoPackager copies the archive and
setup files to the directory of your choice and creates any subdirectories within that directory.
You can then test the setup program from this directory structure before you generate a CD-ROM.
Including the Run-time Version of ToolBook
When you distribute your application, you need to include a run-time version of ToolBook so that
users of your application who do not have access to a full version of ToolBook can run your
application. A run-time version of ToolBook allows users to run books at Reader level only.
Copyright © 2012 SumTotal Systems, Inc. All rights reserved. Duplication prohibited.
305
Preparing Native ToolBook Applications for Release
Using ToolBook on a Network
You can store your ToolBook application on a network to allow multiple users to access and work
in the application. ToolBook ensures that, under normal circumstances, books on network file
servers are not corrupted by multiuser access.
There are two ways to a maintain network version of an ToolBook application. You can:
x
Provide a read-only version of a book that can be opened and used by anyone. Users can open
and copy a read-only book even if it is already open on the network, but they cannot delete
the book, change its file attributes, rename it, or save changes. Other applications, including
DOS utilities and Windows applications, can open the file and access information, but they
cannot change its file attributes, rename the file, or save changes.
x
Provide a standard read/write version of a book that can be opened by only one user at a
time. Users cannot open a read/write book, copy it, delete it, or change its file attributes
until the first user has closed it. By default, users have read/write access to ToolBook files.
► To allow read-only access to a ToolBook book:
1.
Right-click the ToolBook file in Windows Explorer
2.
From the right-click menu, choose Properties.
3.
On the General tab, select Read-only.
4.
Click OK.
Installing and Testing your Application
If you are distributing your application via the Internet or an intranet, test your application for
any unforeseen configuration issues by using the versions of Web browsers your users are likely to
use. Particular points to check include:
x
Media – Make sure that the application runs in a Web browser and that your media clips play
correctly.
x
Hyperlinks – Make sure that the hyperlinks to the pages within your application and the
hyperlinks to URLs work. Be sure to test image maps and the jumps on your map or contents
pages.
x
Page navigation – Make sure that the navigation buttons in your application work. To avoid
losing your users in hyperspace, make sure that page navigation is clear and that you have
provided ways for users to return to the pages they were viewing.
If you have created distribution CDs or a network directory containing setup files, install and test
your application. Test on a system that does not have any other version of ToolBook installed to
ensure that the application installs correctly and that all media files play.
► To test your application's installation program:
1.
Insert the CD-ROM into your computer
2.
From the Start menu, choose Run.
3.
In the Run dialog box, type d:\Setup.exe. The drive letter may differ; use the appropriate
letter for your CD-ROM drive.
4.
Click OK, and then follow the instructions on the screen.
306
Copyright © 2012 SumTotal Systems, Inc. All rights reserved. Duplication prohibited.
Uninstalling an Application
Uninstalling an Application
When your users install your application, the Setup program adds entries to the Windows Registry,
which then allows files to be automatically removed using the Windows Add/Remove Programs
utility. This utility is located in the Windows Control Panel. Your application will be listed by the
application name you assigned it in the AutoPackager.
Copyright © 2012 SumTotal Systems, Inc. All rights reserved. Duplication prohibited.
307
Glossary
Glossary
&, && See concatenation operators.
Access Character An underscored character on a button, menu, or menu command that provides
direct keyboard access to the option. Press the ALT key in combination with the access character to
select the button, menu, or menu command. See also button, label button.
Action A single, complete instruction that you create in the Actions Editor to add behavior to your
application. In the Actions Editor, you can specify actions, conditions, and loops, and this behavior
will automatically Publish to Web. See also Actions Editor, action sequence, condition, DHTML, loop.
Action Method A type of action sequence you can create that is attached to a specific object. An
action method runs only when you call it from another action sequence. Typically an action method
will make the object perform a task, or return information about the object. You can define the
parameters that the action method uses to complete any operation it performs. See also action
sequence, parameter, shared action sequence.
Action Sequence One or more behaviors that you create in the Actions Editor that ToolBook carries
out in the order you specify. Unlike an OpenScript program, an action sequence will Publish to Web,
an Internet technology that runs in a Web browser. See also Actions Editor, DHTML, Publish to Web.
Actions Editor ToolBook's visual programming tool. In the Actions Editor, you use familiar interface
elements such as menus to add behavior to your ToolBook application, and this behavior will Publish
to Web. See also action, action sequence, DHTML, shared action sequence, Publish to Web.
Activated A property of a field or record field that enables the field to perform an action when a user
clicks it. When a field is activated, a user cannot enter text in it. See also field, record field.
ActiveX Control A software component that you can include in your ToolBook application to add
custom functionality. You can respond to an ActiveX event or manipulate its properties and methods
in an action sequence or an OpenScript program.
ActiveX Data Objects (ADO) A high-level mechanism that allows you to access the data in databases
from ToolBook using OpenScript. See also Automation.
AICC See Aviation Industry Computer-Based Training Committee.
Alias (1) An alternative name for a menu item that is not visible to the user. If you create an alias for
a menu item, ToolBook sends the alias in place of the menu item name. (2) When linking a dynamiclink library function, an alternative name given to the function. Use an alias to avoid conflicting with
ToolBook keywords or when you want to link the same function more than once in the same instance
of ToolBook. See also dynamic-link libraries.
American National Standards Institute(ANSI) Typically, ANSI refers to a set of 256 characters used in
computing. The first 128 of these characters are the same as the ASCII character set. The remaining
characters (128-255) include non-English letters and other symbols called extended characters. See
also American Standard Code for Information Interchange.
American Standard Code for Information Interchange(ASCII) Typically, ASCII refers to the 8-bit (256character) standard for representing characters (both printing and nonprinting) on a computer. For
example, the ASCII representation (in decimal) for a space is 32. See also American National Standards
Institute.
308
Copyright © 2012 SumTotal Systems, Inc. All rights reserved. Duplication prohibited.
Uninstalling an Application
Analog Information that flows in a continuous stream and that can vary in infinitesimal increments.
Most computers cannot manipulate analog data, so it must be converted to digital format by breaking
the continuous flow into discrete steps and assigning numeric values to each step.
Angled Line A single line with three or more points, such as a zigzag. The Catalog contains angled
lines that you can drag and drop onto a page.
Animation A file that you can incorporate as a clip in ToolBook. You can also animate objects in a
book; however, you cannot save an animation created in ToolBook as an animation file or create a clip
from it.
ANSI See American National Standards Institute.
Application In ToolBook, one or more books designed for a particular purpose, such as online learning
or information management.
Argument A constant, variable, or expression passed to a function or handler. In the following
example, 33 is an argument:
x = sin(33)
See also constant, function, handler.
Array A Variable configured to work like a list or table of individual elements. For example, the
following specifies the value of one element in an array:
x[3] = x[1] & text of field "names"
See also variable.
ASCII See American Standard Code for Information Interchange.
Audio CD Sound stored as tracks on a compact disc and played from the compact disc. Audio CD is
stored in digital format (as a series of binary values), converted to analog sound within the CD-ROM
drive, and then played back.
Audio Video Interleaved (AVI) A format for storing digital video in a file that alternates blocks of
visual and sound information. AVI files are particularly suited for storing on CD-ROM because their
interleaved format allows them to be efficiently retrieved by CD-ROM drives.
Author Level One of two working levels in ToolBook. Author level provides tools and commands for
creating and modifying objects, including pages, books, and backgrounds. Applications are built at
Author level and run at Reader level.
Automation A technology that allows you to access and manipulate the objects, properties, and
methods of other Windows applications from a ToolBook application.
AVI See Audio Video Interleaved.
Aviation Industry Computer-Based Training Committee (AICC) An industry standards group that
publishes guidelines for interaction between course management systems and computer-based
training.
Backdrop A bitmap image placed onto one or all of a book's backgrounds. Each backdrop becomes a
property of its background.
Background A design shared by pages in a book. Every book has at least one background. Objects on a
background appear on every page sharing that background. Several pages can share the same
background, and a book can contain several backgrounds.
Copyright © 2012 SumTotal Systems, Inc. All rights reserved. Duplication prohibited.
309
Glossary
Bandwidth The amount of data that can be sent via the Internet over a period of time with the
equipment being used. Bandwidth can refer to the connections on the Internet, as well as the
connection between a modem and an Internet service provider.
Baselines Lines that show the vertical spacing of text in a field or record field. See also field, record
field.
Book A collection of ToolBook pages stored together as a single file.
A book can be an entire application or one part of an application.
Book Palette In 256-color systems, a predefined list of colors assigned to a book. If a book has a
palette, all imported graphics displayed in the book use the book palette, which overrides the
palettes of the individual paint objects. Assigning a book palette eliminates palette flash, which
occurs when you navigate to a page containing an imported graphic that has a palette different from
the one currently in use.
Book Properties Attributes of a book that define its appearance and behavior.
Book Wizards The wizards that ToolBook provides to guide you through the process of creating a new
book. ToolBook includes two Book Wizards: the Lesson Design Wizard and the Book Wizard. Both are
available from the Startup dialog box.
Boolean Refers to properties and variables whose values can only be true or false. Referred to as
logical in OpenScript.
Border (1) The boundary of a field, record field, or button, or the line enclosing a graphic. (2) A line
that ToolBook adds around each page when the page is printed. See also border style.
Border Style A property of a button, graphic, field, or record field that determines the style of the
object's border.
Bounding Box The rectangle around a paint or picture object that indicates its dimensions and the
area in which it will display. The bounding box has a thin border, but you can make the border
invisible.
Breakpoint A flag set in a statement while debugging a script that indicates where ToolBook should
invoke the Debugger when executing that statement. Breakpoints are set and cleared in the Debugger.
See also Debugger, statement.
Browser A software program that accesses Web pages on the Internet. The browser reads the Web
document and translates it into the final product onscreen. The page appears as the author intended,
combining text, graphics, and jumps to other Web pages.
Built-in Message A message built into the ToolBook system that ToolBook sends in response to user
activity (for example, buttonClick). Compare user-defined message.
Button An object type that includes pushbuttons, command buttons, check boxes, radio buttons, and
label buttons. Buttons are often used to trigger events or set properties.
Call A reference in a script to another handler. See also handler, script.
Called Handler The handler that executes as the result of sending a message, invoking a user-defined
function in an expression, or using the set or get command. See also handler, user-defined function.
Calling Handler Any handler that makes a call, causing the execution of another handler. In
OpenScript, send and forward statements call other handlers. See also handler.
Caption The text that appears in the title bar of a window, on a button, or in the title bar of a book in
place of the file name.
310
Copyright © 2012 SumTotal Systems, Inc. All rights reserved. Duplication prohibited.
Uninstalling an Application
Caret Location The location of the insertion point within a text field or record field, measured by the
number of lines down from the top and number of characters in from the left. The caret location is
often used to define the ends of lines in a text field. A line is designated by a carriage
return/linefeed, not by wordwrap.
Carriage Return/Linefeed (CRLF) An OpenScript constant that represents ASCII values 13 and 10, the
characters carriage return and linefeed. CRLF moves text to the next line in a text field or record
field.
Cascading Menu A subsidiary menu that appears to the side of a submenu and presents additional
choices.
Catalog A ToolBook file that contains authoring objects, such as draw objects, action buttons,
question objects, graphics, media players, navigation objects, and user-customized objects.
Cel Animation A type of animation in which individual views of an object, called cels, are shown in
rapid sequence to make the object appear to move or change. In ToolBook, you can create cel
animations by drawing individual objects to act as cels and then grouping them.
Certificate A page containing details such as the name of the learner and the date of completion that
can be displayed when a learner completes a course. The certificate page can be customized by the
course author. When used in a course that has an assessment or a quiz, the certificate page displays
the score obtained by the learner as well.
Check Box A button style that consists of a square box and a button caption. A check mark toggles on
and off when the check box is clicked at Reader level; when checked, the option is turned on.
Check Mark The symbol that appears next to a menu item or in a check box indicating that the option
is selected. Choosing the menu item again or clicking a checked check box turns the option off and
hides the check mark. See also check box.
Child Object In ToolBook, an object that is owned by another object. For example, a button on a page
is a child object of the page.
Child Window A window that is entirely contained within and cannot be dragged beyond the
boundaries of its parent window. A child window can be minimized or tiled within its parent and
closes when its parent window closes. See also pop-up window.
Chromakey A feature that allows you to create transparent areas in bitmaps by specifying a color to
make invisible.
Client Application An application that can accept linked and embedded objects from a server
application. ToolBook is a client application. See also server application. Compare object linking and
embedding.
Client Area The area inside the frame window, including the client window. See also client window,
frame window.
Client Window The portion of the client area that displays pages and backgrounds. See also client
area.
Client-side image map An image map for which the map information is specified in the HTML file that
contains the image. Clicks are processed by the Web browser without interaction with a server.
Clip A reference to a segment of any media source or file, including sound files, audio CD, digital
video files, animation, or videotape. Only the reference is stored in ToolBook. ToolBook supports filebased clips, including sound files, digital video files, and animation files.
Copyright © 2012 SumTotal Systems, Inc. All rights reserved. Duplication prohibited.
311
Glossary
Clip Library A file (extension .cpf) that contains a collection of clips (references to media files) that
can be used in one or more applications and that can refer to different types of media. See also clip,
media file.
Clip Text A printing option to cut off text at a field's margin or at the boundary of a column or row
when printing a report.
Clipboard A temporary storage location where Windows places the item most recently cut or copied.
The Clipboard can be used to move text and graphics between ToolBook books and other Windows
applications.
Coach A quick reference tool that provides context-sensitive information about pages and objects.
You can open the Coach from the ToolBook Help menu.
Color A combination of hue, lightness, and saturation (HLS) or red, green, and blue values (RGB).
Objects created in ToolBook can have a stroke color and a fill color, which are chosen from a color
palette or the Color dialog box. See also hue, lightness, and saturation; red, green, and blue values.
Color Palette A predefined set of colors stored in a palette file (with the file extension .pal).
ToolBook uses a 256-color palette. Visual media—animations, videos, or bitmaps—have their own color
palettes.
Color Tray A ToolBook system object used to assign stroke and fill colors to objects.
Column Report A report printed in columns; each column contains the contents of one record field.
See also record field. Compare group report.
Combo Box A single object composed of an edit box, a pushbutton, and a drop-down list used to
present a list of choices in an application. A combo box shows only the selected item. To display all
items, the user clicks the pushbutton. Compare list box.
Command (1) A menu item that, when chosen, causes ToolBook to perform an action. (2) A term in
the OpenScript language. Most OpenScript commands are verbs, such as go, move, and ask. See also
Command window.
Command Window The window in which you can run script statements, get information about objects
and system variables, and set object properties. See also script, system variable.
Command Window History The Command window contains a split bar that can be dragged down to
display the last 20 commands entered in the current session. Click a command to reinsert it in the
Command window.
Comment Optional information the programmer adds to a script that does not cause ToolBook to take
any action. Comments start with two hyphens. For example:
--Sets the object's fontFace
fontFace of field "This Field" = "Times New Roman"
Compiled Path A property of an animated object containing the coordinates for the object at each
step of the animation. ToolBook plays the animation by using the next set of coordinates (four
coordinates per step) from the compiled path and setting the object's bounds to them. The number of
steps in the compiled path is based on the duration and steps per second specified when you saved the
animation in the ToolBook Animation Editor. A compiled path with 30 steps (including the start and
end points) will have 120 items in its compiled path.
Concatenation Operators The symbols in OpenScript (& and &&) that instruct the application to join
two strings of characters into a single, longer string. The double ampersand operator (&&) adds a
space between the joined strings. For example:
vMessage = "Hello," && "world"
312
Copyright © 2012 SumTotal Systems, Inc. All rights reserved. Duplication prohibited.
Uninstalling an Application
Condition A special type of action that, when inserted into an action sequence, creates a junction at
which ToolBook follows one of two or more distinct paths as it executes the action sequence. See also
action, action sequence, loop.
Constant A value that cannot change, including literal numbers and strings. For example, in the
expression x + 2, 2 is a constant. See also literal value, string. Compare variable and container.
Constrain The action of limiting the proportions, angles, or movement of an object when you create
or move it on a page or background.
Container Anything that can be set to a value using OpenScript. Variables and properties are
containers. Constants (such as the string constant "blue") and expressions (such as 1 + 2) are not
containers because their values cannot be set. See also constant, properties, variable.
Control Character A nonprinting character, such as a tab or a carriage return/linefeed, which affects
the appearance of text. See also carriage return/linefeed, tab.
Control Structure A block of statements in a script that is run under particular circumstances, such as
in a loop or as a condition. Control structures are defined by sets of OpenScript keywords such as
if/then/else/end, do/until, and condition/when/end. See also script, statement.
Controller Card A board installed in a computer that provides a hardware link between the central
processing unit and devices such as disks, monitors, or speakers.
CRLF See carriage return/line feed.
Crop To mask or hide part of a paint object. When you drag the handle of a paint object to make it
smaller, the paint object does not resize; instead the area is cropped. When you resize a picture
object or draw object, the entire object is resized and no part of it is cropped. See also draw object,
paint object, picture object.
Cursor The image assigned to the pointer (select tool, insertion point, I-beam, crosshair), depending
on where the pointer is positioned and whether a tool is selected. See also pointer.
Cursor Resource A cursor image that can be imported and shared as a resource in one or more
ToolBook applications. See also cursor, resources.
Custom Colors In 256-color systems, a list of 64 colors that are available beyond the standard 16 or 32
colors.
Data Field An individual entry in a data record in an imported or exported fixed-field file or
delimited-field file. Often a delimiter character, such as a tab or comma, separates data fields from
each other in data records. See also delimited-field file, delimiter, fixed-field file.
Data Typing Assigning a format to a variable in a script that determines what type of data the variable
will accept (integers, floating-point numbers, character strings, logical values, and so on). See also
variable.
Debugger The window that displays script errors at Author level. The Debugger can be used to step
through a script one statement at a time to isolate and correct errors. See also script, statement.
Default A setting that ToolBook supplies (for example, the character default is System, bold, 10
point). ToolBook has a default setting for any changeable setting. All defaults are system properties.
See also system properties.
Delimited-field File A text file divided into data fields of any length that are separated by a delimiter
character such as a comma or a tab. All the data fields in one line make up a data record. Compare
fixed-field file.
Copyright © 2012 SumTotal Systems, Inc. All rights reserved. Duplication prohibited.
313
Glossary
Delimiter A character such as a comma or tab that separates one data field from another in a
delimited-field file. See also delimited-field file.
Destination Object In a drag-and-drop operation, the object that accepts a drop from an object that
is dragged (the source object). See also drag and drop.
Destination Page The target page of a hyperlink. See also hyperlink.
Device Channel The hardware path by which data is passed to the output device that plays it. For
example, a sound card contains a device channel for sending audio information to speakers.
Device Driver A program that allows Windows to communicate with a specific piece of multimedia
hardware. Device drivers are installed through the Windows Control Panel. See also Media Control
Interface.
Device-independent Bitmap A bitmap that appears exactly the same way regardless of the device
used to display it. These files have a .dib file extension. See also bitmap.
DHTML See Dynamic Hypertext Markup Language.
Digital A means of describing information (pictures, sound, video, or any other type of information)
using a series of numbers. For example, a photograph can be described digitally by treating it as a
series of very small dots and recording the position, color, and lightness of each dot as a number.
Using the appropriate process, the numbers can be passed to a program that can use them to recreate
the dots and thereby recreate the photograph.
Digital Video Video converted into a digital format and stored as a file.
Display Device The combination of video card and video driver that determines a system's color
capability.
Dithered Color A color that appears on the screen as a mixture of different solid colors that attempts
to approximate the original color.
DLL See dynamic-link library.
drag and drop The process of clicking an object, dragging to another location on the page, and
releasing the mouse. Drag and drop is often used as an intuitive visual interface for such operations as
moving or deleting objects.
Drag Image The image that is displayed during a drag-and-drop operation when the pointer is over a
potential destination object. See also destination object, drag and drop.
Draw Direct Drawing an object directly on the screen rather than on an offscreen bitmap that is then
transferred to the screen. By default, new objects are drawn directly. Compare offscreen image.
Draw Object In ToolBook, draw objects are the arc, angled line, curve, ellipse, regular and irregular
polygon, line, pie, rectangle, and rounded rectangle. Compare paint object, picture object.
Draw-Type Graphic Also known as a vector graphic. An illustration created in a drawing program that
maps the shapes you draw on an invisible grid and stores them as a set of instructions.
Drop-Down Menu A menu that descends from the menu bar when clicked. For example, when a user
clicks File in the menu bar, the File drop-down menu descends.
Dynamic Data Exchange (DDE) A communication protocol to exchange data and commands between
Windows applications.
314
Copyright © 2012 SumTotal Systems, Inc. All rights reserved. Duplication prohibited.
Uninstalling an Application
Dynamic Hypertext Markup Language (DHTML) A technology that uses tags to specify the properties
and behavior of an HTML document. DHTML extends functionality available in HTML and enables
interactive behavior for such features as buttons, animations, actions, and responses. ToolBook can
Publish an application to DHTML by using Publish to Web. See also Publish to Web.
Dynamic-Link Library (DLL) A separate function library that a Windows application can call to
perform tasks. DLLs are used to add capabilities not available directly from ToolBook.
Editable A property of combo boxes, text fields, and record fields that specifies whether a user can
type text at Reader level. See also text field, record field.
Embedded Object An object that has been embedded in another application (such as ToolBook) using
object linking and embedding (OLE) technology.
Enabled A property of buttons, text fields, and record fields that determines whether an object can
receive the focus or mouse-event messages. When an object is enabled, it is included in the tab order
and can receive the focus or mouse-event messages as a result of keystrokes and mouse clicks. See
also button, text field, record field, tab order.
Enclosed Object An object that is closed on all sides and that can be filled with a color or pattern.
The following objects are enclosed: rectangle, rounded rectangle, ellipse, polygon, irregular polygon,
and pie.
End of File (EOF) An OpenScript constant that represents ASCII value 26, a character often used to
mark the end of a DOS file.
Error Box A window that appears in the Debugger and describes why a script's execution was
suspended. See also Debugger, script.
Event An action recognized by ToolBook, such as the clicking of a button or the pressing of a key.
Events can be initiated by user action, by sending the generic User event in an action sequence, or by
an OpenScript command.
Event Focus Properties ToolBook system properties that indicate what object is currently receiving
messages, such as target, focus, targetWindow, focusWindow, and selection.
Execute To carry out actions defined by OpenScript statements or actions created in the Actions
Editor. See also statements.
Execution Suspended Message A message that contains details about why and where an error
occurred in a handler. The object that was handling the message when the error occurred is also
specified. See also handler.
Explicit Reference A reference to an object that explicitly identifies its parent object. Explicit
references are used to refer to objects that are not on the current page. For example, the following
statement explicitly references the button Next:
get caption of button "Next" of background "lessons" of book "Tutorial"
See also parent object. Compare implicit reference.
Export To transfer data from one file format to another. you can export text to ASCII format. See also
import.
Expression A combination of values that yields a result, such as the name of a field, variable,
property, or an expression with operators and operands. For example, 7 + 3 is an expression yielding
the result 10. See also field, operand, operator, properties. Compare container.
Extended Character A non-English character or symbol in the ANSI character set. Extended characters
have ANSI values of 128 to 255.
Copyright © 2012 SumTotal Systems, Inc. All rights reserved. Duplication prohibited.
315
Glossary
Extended Properties Properties that specify the extended capabilities of such objects as question
objects and action triggers. Compare properties.
External Media Any media file or device referred to but not stored within an application, such as a
videodisc.
Feedback A feature of online learning used to provide responses or replies to users according to how
they answer a question.
Field An object that holds text. ToolBook uses text fields and record fields.
File Path The string of characters and delimiters that specify the location of a file, as in the following
example:
C:\My Projects\Fire Safety.tbk
File Transfer Protocol (FTP) A set of rules for transferring files from one computer to another.
ToolBook includes an FTP utility you can use to transfer files from one computer to another.
Fill The color or pattern applied to the inside of any enclosed object. You cannot apply a fill color to
paint objects or picture objects. See also paint object, picture object, stroke.
Filter A utility that allows ToolBook to import and convert files from other applications.
Fixed-Field File A text file in which each data field consists of a predefined number of characters.
Compare delimited-field file.
Focus The object awaiting the next keyboard action. Pressing the TAB key moves the focus. Only
objects that can respond to keystrokes can receive the focus. The insertion point in a field or a dotted
rectangle in a button shows a user the current focus.
Focus Window The viewer that currently has the focus. The focus window is the viewer that accepts
mouse and keyboard input (such as selecting check boxes or filling in text fields). See also focus,
viewer.
Font In Windows, a font is the complete collection of styles and sizes for a single typeface (such as
Times New Roman) as part of a set installed for a system's display adapter, graphics card, and printer.
Footer Text that appears at the bottom of every printed page.
Frame Window The portion of a window that contains the border, caption bar, system menu, scroll
bars, and Minimize and Maximize buttons. The frame window surrounds the client area. See also client
area.
FTP See File Transfer Protocol.
Function An operation that uses a predefined formula and returns a value. For example, the function
round always returns the supplied value, which may be a literal value or expression, rounded to the
nearest integer.
Function Keys The keys on a computer keyboard labeled F1, F2, F3, and so on. Function keys can be
used independently or together with the CTRL, ALT, or SHIFT key as shortcuts for choosing menu
commands and performing other tasks.
General System Properties Properties of ToolBook that affect every book opened during the current
ToolBook instance. For example, ToolBook uses the value of the property sysDateFormat to format all
dates.
Global Memory The area of memory available to all Windows applications.
Global Variable In an action sequence, a variable whose value can be accessed and used in any action
sequence. See also variable, system variable. Compare local variable.
316
Copyright © 2012 SumTotal Systems, Inc. All rights reserved. Duplication prohibited.
Uninstalling an Application
Graphic A graphic file that is added to a book's resource system and displayed on the page or
background.
See also Image Object.
Grid A set of nonprinting dots used at Author level to precisely align objects on a page.
Group A collection of objects that is defined to move and be resized as a single object. Like any other
ToolBook object, a group has an ID number and has properties that can be set.
Group Report A report printed in groups, where each group contains the contents of the record fields
from one page. For example, a group report can print mailing labels from an address book. See also
record field. Compare column report.
Gutter On a printed report, the space between adjacent columns in a column report, groups in a
group report, or ToolBook pages (if you are printing more than one page per sheet of paper). See also
column report, group report.
Handle (1) A small square that appears at each corner and edge of an object when it is selected.
Handles are visible only at Author level. You can drag the handles to resize an object. (2) A unique
reference number assigned by Windows to any open viewer, whether it is shown or hidden. A handle
can also refer to a memory location. See also viewer.
Handler A collection of OpenScript statements in a script that defines the response to a particular
event, such as clicking an object. A script can contain more than one handler, each responding to a
different event. See also script, statement.
Header Text that appears at the top of every printed page.
Highlight (1) The onscreen indication that text or another item is selected. (2) The property of a
button or hotword that controls whether it flashes when a user clicks it. See also button, hotword.
Home Page Typically refers to either the first Web page in a series or to the Web page specified to
open automatically with your browser. See also Web page.
Hotword An object made up of one or more words in a text field or record field that has an ID number
and can respond to mouse and keyboard events.
HTML See Hypertext Markup Language.
HTTP See Hypertext Transfer Protocol.
Hue, Lightness, and Saturation (HLS) Hue is the quality of a color corresponding to its position in the
spectrum: red, orange, yellow, green, cyan, blue, magenta. Lightness is the amount of white or black
in a color. Saturation is the intensity of a color. At 0 (zero) percent saturation, a color appears white;
at 100 percent saturation, a color's hue is most intense. See also red, green, and blue values (RGB).
Hyperlink A property that links objects to another page or URL. A hyperlink can be assigned to
hotwords, buttons, or any other ToolBook object. See also button, hotword.
Hypertext A word or group of words that, when clicked, cause the browser to perform an action, such
as navigation to another page. See also hyperlink, hotword.
Hypertext Markup Language (HTML) A standard document format used for pages on the World Wide
Web that uses tags to specify the properties of the document. A Web browser can interpret the HTML
tags and show the formatted document on the screen. ToolBook can Publish an application as a series
of HTML pages.
Hypertext Transfer Protocol (HTTP) A standardized procedure for transferring information via the
World Wide Web. One of several information transfer protocols used on the Internet.
Copyright © 2012 SumTotal Systems, Inc. All rights reserved. Duplication prohibited.
317
Glossary
I-beam An I-shaped cursor that appears over locations where text can be edited. See also cursor.
Icon A graphic that represents an application.
Icon Resource An icon that can be imported and shared as a resource in one or more ToolBook
applications. See also resources.
ID Number A unique identification number that ToolBook assigns each object when it is created. Each
copy of an object has an ID number that is unique for the page on which it is located. When an object
is cut and pasted it is assigned a new ID number. See also unique identifier.
Image Buffer An area of memory in which ToolBook maintains an image of the current page or
background of a viewer in order to display it quickly when required.
Implicit Reference A reference to an object that identifies it without stating its explicit location; the
object is assumed to be on the current page. For example, the following statement refers to a button
on the current page:
get caption of button "Next"
Compare explicit reference.
Import The process of bringing data such as text, graphics, and objects created in another application
into ToolBook. See also export.
Indent The space between the left and right boundaries of a field and the left and right edges of text
in a field.
Initialize To assign a starting value to a variable. See also variable.
Insertion Point A blinking cursor that shows where the next text entered will appear. See also cursor.
Instance A open copy of any Windows application, appearing as either a window or an icon. You can
run multiple instances of ToolBook in order to work with more than one book or page at the same
time.
International System Properties ToolBook properties containing format information for data that
changes according to country and language, such as sysCurrency and sysDecimal, which specify what
characters are used for these functions.
Internet A network of networks where information is shared and exchanged using agreed-upon
hardware and software communications protocols.
iPhone Any Apple PDA which includes the Safari browser – presently these are the iPhone and iPod
touch.
Irregular Polygon An enclosed draw object with unequal angles and sides of varying length. Compare
polygon.
Item One data element out of a string separated by commas. The item does not include the comma,
which is used only as a delimiter. Compare textline.
Label Button A button style composed of text with an access character. The user presses the ALT key
in combination with the underlined letter in the button's caption to achieve a button click. Often used
for labels containing read-only information and for dialog box controls. See also button, focus, access
character, tab order.
Layer The relative order of all the objects on a page or background. The most recently created object
is on the front layer. You can change an object's layer to control the way objects overlap one another
and to define the tab order. See also tab order.
318
Copyright © 2012 SumTotal Systems, Inc. All rights reserved. Duplication prohibited.
Uninstalling an Application
Lesson Design Wizard A book wizard that helps you build a new lesson specially tailored to meet your
teaching goals. This wizard guides you through the process of building a new ToolBook book. .
Line Spacing The space between individual lines of text in a field. Line spacing can be set to single,
double, or one-and-a-half lines. A field's line spacing is visible only when its baselines are displayed.
See also baselines, text field.
Line Style The visual appearance of a line (solid, dashed, dotted), determined by choosing a style in
the Properties dialog box.
List A group of one or more elements separated by commas. ToolBook uses lists for many data
structures (such as the coordinates of a cursor or a bounding box) and has special OpenScript
commands to manipulate them (pop, push, and so on).
List Box A type of field used to display a list of choices; list boxes can be defined as single-select or
multi-select. Unlike combo boxes, a list box can display more than one option at a time. Compare
combo box.
Literal Value A string of characters or a number that is assigned to a container or used to compare
information. If a literal value contains spaces, it must be enclosed in quotation marks. In the following
example, New York is the literal value:
text of field ID 1 = "New York"
See also container.
Local Variable In an action sequence or script, a variable whose value can only be accessed and
changed as the script or action sequence in which it is defined is running and which only maintains its
value while the script or action sequence is running. See also variable. Compare global variable,
system variable.
Log File A file maintained by ToolBook that stores information about a user's progress in a lesson, such
as the pages visited, the user's score, the time, the date, and the elapsed time. You can use the log
reader utility to view a log file.
Logging The process of recording user activity in a lesson. Logging starts when the user enters the
lesson and stops when the user leaves the lesson.
Logical Palette In a 256-color system, the list of colors required to display a graphic. Each graphic
maintains its own logical palette of 256 colors from the 16 million colors possible.
Loop A special type of action that, when inserted into an action sequence, directs ToolBook to repeat
a behavior (an action or sequence of actions) a specified number of times or until a condition is met.
See also action sequence, action, condition.
Margin (1) The space between a field's boundaries and the text in the field. (2) The space between
the edge of the paper and printed text or graphics. See also indent.
Mat A color border that appears if a page is smaller than the window in which it is displayed.
MCI See Media Control Interface.
Media Control Interface (MCI) A Windows-standard set of commands used to control media devices.
See also media device.
Media Device Hardware that controls a source of multimedia (for example, a CD-ROM drive that can
play an audio compact disc). See also audio CD, multimedia.
Media File A file that contains media, such as a digital video file or a bitmap.
Copyright © 2012 SumTotal Systems, Inc. All rights reserved. Duplication prohibited.
319
Glossary
Media Player A Catalog object that is preprogrammed to play media. The Universal Media Player is a
multi-purpose media player that supports most currently available media formats.
Media Source Any multimedia from which you can create clips, including media files, audio CD,
videotape, and so on.
Menu A list of choices that a user can click to open windows, execute commands, or display further
choices.
Menu Bar The area at the top of a window that lists available menus.
Menu Bar Editor The ToolBook editor used to create and edit menu bars.
Menu Bar Resource A menu that can be shared as a resource in one or more ToolBook applications.
See also resources.
Menu Item A single choice on a menu. If a menu item is not available, it appears dimmed.
Message (1) A communication ToolBook sends to an object to indicate that an event has occurred. (2)
A warning or other information displayed by Windows or ToolBook that alerts a user to a problem and
possible corrections.
Metafile Sometimes called a vector graphic. A file that defines an image as a series of instructions
instead of as a collection of pixels (as in a bitmap or paint object). A metafile is exported from a
Windows drawing program and, when imported into ToolBook, becomes a picture object. See also
picture object.
MIDI (Musical Instrument Digital Interface) A series of commands sent to a synthesizer or sound card
that controls pitch, length, volume, and so on. MIDI is not recorded sound; rather, it is sound that is
created digitally.
Modal A way of displaying a window so the user cannot perform any other action outside the window
before closing it. For example, most dialog boxes are modal; until you close the dialog box, you
cannot return to the program that displayed it. Compare nonmodal.
MP3 A file extension for the MPEG audio level 3 file format. MP3 files are small audio files that can be
transferred across the Internet easily. The Universal Media Player in the Media Players category of the
Catalog can play MP3 files.
Multimedia Information in different formats—text, graphics, sound, video, and animation—that you
can use in computer-based applications. See also animation, digital video, media file, MP3, MIDI, wave
audio.
Name One way of identifying an object. An object's name is a property of the object and is used when
referring to the object. It is a good practice to assign a unique name to each object in your book,
especially those objects with interactive functionality. Only named objects may be referenced in an
action sequence. Compare ID number.
No-Drop Image The cursor, icon, or bitmap resource displayed during a drag-and-drop operation when
the pointer is over an object that cannot be the destination object. See also destination object, drag
and drop.
Nonmodal A way of displaying a window so the user can leave it to activate another window. Compare
modal.
Nonpersistent Property A property that does not retain its value between ToolBook sessions or
instances. For viewers, nonpersistent properties exist only when a viewer is open and are not saved
when a viewer is closed. See also viewer.
320
Copyright © 2012 SumTotal Systems, Inc. All rights reserved. Duplication prohibited.
Uninstalling an Application
Notification Message A message sent after ToolBook has finished an action that affects the status of
an object. For example, notification messages are sent after an object is created, moved, or cleared,
or when ToolBook is idle.
Notify Handler A handler that is alerted automatically when a given message reaches the page. You
can create notify handlers that are called before or after the page handles the message. Notify
handlers are often used to create self-contained objects that can be copied into applications without
having to change the scripts. See also handler.
Object All of the visual elements of your pages (including buttons, fields, graphics, viewers, pages,
and backgrounds). Any object can have a script or action sequence that defines its behavior and all
objects have properties.
Object Hierarchy The order in which messages are passed from object to object. For example, a
message sent to a graphic object that the graphic object's script does not handle is passed to the
page, then to the background, then to the book, then to any system book, then to ToolBook. See also
message.
Object Linking and Embedding (OLE) A Windows technology that enables you to create an object in
one application and then incorporate it into another application. An object that is used this way is
called an OLE object. See also client application, OLE container object, server application.
Object-Oriented Programming A programming method in which programs are constructed out of selfcontained collections of data and routines, referred to as objects.
Offscreen Image An image that ToolBook first draws in memory and then displays on the screen.
Compare draw direct.
OLE Container Object An object that contains a reference to a linked object or a copy of an
embedded object. See also client application, object linking and embedding, server application.
OpenScript The ToolBook object-oriented programming language, used primarily in ToolBook.
Operand A value on which an operator performs an action. For example, in the expression a < b, the
operands are a and b, and the operator is <. See also expression, operator.
Operator In an expression, a symbol or word that causes ToolBook to perform an action on operands,
resulting in another value. For example, in the expression a < b, the operands are a and b, and the
operator is <. See also operand.
Orientation A setting that determines whether pages in a book are presented in portrait mode (taller
than they are wide) or landscape mode (wider than they are tall).
Overlay Video A means of displaying analog video on computer monitors. When overlay video is
played, ToolBook designates the area of the screen where the video is to play. The video signal is then
routed through and intercepted by the videodisc controller card, which replaces the designated area
with data from the videodisc. See also analog, controller card.
Page The object that is the basic unit of a book. Objects placed on a page are displayed on top of a
background.
Page Number The relative order of a page among all pages in a book.
Page Size The dimensions of the pages in a book.
Page Units A measurement used to specify an object's bounds and location relative to the upper-left
corner of the page. There are 1440 page units per inch, or 57 per millimeter. Page units do not vary in
size with the resolution of the display device. Compare pixel.
Copyright © 2012 SumTotal Systems, Inc. All rights reserved. Duplication prohibited.
321
Glossary
Paint Object A ToolBook object created by importing a bitmap into ToolBook or by pasting a bitmap
from the Clipboard. When you drag the handles of a paint object to make it smaller, the image is
cropped. See also bitmap, crop. Compare draw object, picture object.
Paint-Type Graphic See bitmap.
Palette (1) Predefined set of colors that can be imported and edited in ToolBook. (2) ToolBook's
collection of tools used for drawing and selecting objects and specifying color, line ends and style,
pattern, or polygon shapes.
Palette Colors The colors remaining in a color palette after ToolBook has allocated its 16 or 32
standard colors and, optionally, another 64 custom colors. For example, if solidColorsEnabled is true
on a 256-color system, ToolBook makes 160 palette colors available.
Palette Flash Also known as palette shift. A change in the colors of graphics that occurs when you
display a graphic with a color palette different from the one currently in use.
Palette Optimizer A utility you can use to adjust the colors used in imported graphics so that they
achieve a close match to the colors that are available in the ToolBook color palette. See also palette.
Palette Resource A color palette that you import for use in a book. When you import a color palette,
all imported graphics in the book use colors from that palette. See also color palette.
Parameter In OpenScript programming, the part of a statement that indicates which object or data a
command is to act on, the data a function uses in the operation it performs, or the data passed with a
message from one handler to another. Also, a value defined for a shared action sequence or ActiveX
method that supplies information used in the execution of that particular shared action sequence or
ActiveX method. See also function, handler, statement, shared action sequence.
Parent Object Any group, page, background, book, or system book that contains and is directly above
another object in the object hierarchy. See also object hierarchy.
Parent Window A window that owns another window. Compare child window, pop-up window.
Path The course that an object follows as it moves during an animation. You create a path in the
Animation Editor by clicking to create vertices that define the path. By setting the number of steps
per second, the total duration of the animation, and the animation rate, you can control how quickly
and smoothly the object moves along a path. The path is stored as a list of coordinates for each step
of the animation.
Pattern A repeating arrangement of pixels used to fill a background or draw object.
Pattern Palette A palette available at Author level from which you can assign a pattern to a
background or any enclosed object. Patterns use the stroke and fill colors specified in the color tray.
See also fill, stroke.
Picture Object Also called a vector or draw-type graphic. A graphic imported or pasted from the
Clipboard that was created in a draw program. Picture objects can be resized in ToolBook. Compare
draw object, paint object.
Pixel Short for picture element. The smallest element that display or print hardware and software can
manipulate in creating letters, numbers, or graphics. Pixel size is dependent on the resolution of the
display device. Screen units are measured in pixels. Compare page units.
Plug-In A software program that adds functionality to a Web browser (plays sounds or digital video, or
runs specific types of files over the Internet). A plug-in is stored on your computer and will open
automatically when you request your browser to perform a function enabled by the plug-in.
Point Size A typographical unit of measurement for font size. One point is equal to 1/72 inch.
322
Copyright © 2012 SumTotal Systems, Inc. All rights reserved. Duplication prohibited.
Uninstalling an Application
Pointer A symbol that shows the location of the cursor onscreen and that changes shape to indicate
special locations and processes. For example, the pointer can be a selection tool, the Windows
hourglass, or an I-beam.
Polygon An enclosed object with equal angles and a varying number of sides of equal length. Compare
irregular polygon.
Pop-Up Menu A menu that can appear anywhere onscreen within its own window.
Pop-Up Window A window that generally appears in front of its parent window and minimizes when
the parent window is minimized. A pop-up window can be dragged outside its parent's boundaries.
Floating palettes are usually pop-up windows. All windows are either child windows or pop-up
windows. See also child window, parent window.
Precedence The order in which operators are evaluated. Operators with a higher precedence are
evaluated before operators with a lower precedence. For example, the multiplication operator (*) has
a higher precedence than the addition operator (+). See also operator.
Print Preview Window The window that previews what a page will look like when it is printed.
Printer System Properties ToolBook properties that affect how reports or pages are printed, such as
the property printBorders.
Properties Attributes of an object that define its appearance and behavior, such as the object's name,
color, and whether the object can be dragged.
Properties Dialog Box A window in which you can view and edit an object's properties.
Publish to Web A process that prepares your ToolBook application for Internet distribution. This
process can automatically convert your application to DHTML format. You can access Publish to Web
from the File menu. See also application, DHTML.
Pushbutton A button style composed of a three-dimensional rectangle and a button caption that
appears to move when clicked. Often used to trigger an action, such as navigating from one page to
another.
Query Message A message sent to an object to determine its state or the value of a particular
property. For example, during a drag-and-drop operation ToolBook sends an allowDrop query message
to each object under the cursor to determine whether the object will accept a drop. See also
message.
Question Object A Catalog object with preprogrammed functionality that allows you to construct
different types of questions. Question objects can manage the user's response and score, and can also
deliver feedback.
Radio Button A button style composed of a circle and a button caption. The circle toggles a dot on
and off when a user clicks the active area of the button. Often used for a group of alternative items
from which only one can be selected.
Reader Level One of the two working levels in ToolBook. At Reader level, a user can move between
pages and books, click hotwords and buttons, make selections from combo boxes, and type text in
editable fields. Applications are used and tested at Reader level. Compare Author level.
Record A group of related data fields in a database file. For example, the name, address, and phone
number fields for one listing in an address book are a record.
Record Field A text field positioned on the background of a page that can contain different text on
each page. See also background, text field.
Copyright © 2012 SumTotal Systems, Inc. All rights reserved. Duplication prohibited.
323
Glossary
Red, Green, and Blue Values (RGB) A means of specifying a color according to the amount of red,
green, and blue in the color. Compare hue, lightness, and saturation (HLS).
Reshape Handles Handles that appear on a selected draw object when you choose Reshape from the
Draw menu that you can use to reshape an object. Curves, angled lines, arcs, pies, and regular and
irregular polygons can be reshaped.
Resources Interface elements (including graphics, cursors, fonts, icons, menu bars, palettes, and
shared scripts) that can be imported and shared in one or more ToolBook applications.
Rich Text Format (RTF) A text format that includes information about character and paragraph
formatting for use in transferring formatted text between applications. ToolBook preserves most
character formatting and some paragraph formatting of text imported from any application that
support RTF.
Right-Click Menu The menu that appears when you right-click an object.
Rollover Graphic The graphic that displays when the mouse pointer pauses over a button. In
ToolBook, you can assign a rollover graphic to a button in the Properties for Button dialog box by
selecting the option labeled Use checked graphic as rollover graphic.
RTF See Rich Text Format.
Ruler The horizontal or vertical scale used to measure and position objects on the page. A hairline on
each ruler shows the current location of the pointer. See also grid.
Run-Time A version of ToolBook that allows a user to run, but not modify, a book.
Sampling Rate A measure of how frequently an event is tested, or sampled, to convert it from analog
to digital format.
Scope The specific handlers in which a variable's value is available. For example, the scope of a local
variable is the current handler only. See also handler, variable.
Script A series of statements written in OpenScript that define ToolBook's behavior. Scripts are object
properties and are divided into parts called handlers. Handlers define responses to specific events.
When an event occurs, such as when a user clicks an object, ToolBook runs the corresponding handler
in the object's script. See also handler, statement.
Script Editor The window in which you can create and edit an object's script.
Scroll Bars A bar along the right side and/or bottom of some windows and fields used to view all the
contents of a window with more information than can be shown on screen at one time.
Segment One leg of an animation path along which an object moves. When you draw an animation
path, you click to create a new vertex. ToolBook then draws a segment from the end of the existing
path to the new vertex. By default, segments are straight lines, but they can be converted to curves.
Select To identify the target for the next action. Selected text is highlighted. Selected objects display
handles. When a page is selected, the page selection indicator is highlighted in the status bar.
Selection The text, object, or page that is selected. An object selected at Author level becomes the
target of commands you choose from the ToolBook menus. Move or resize the selection using its
handles. When text is selected, it can be edited or formatted.
Selection Rectangle A dotted box that appears when you drag the pointer across a page. When the
mouse button is released, ToolBook selects all objects completely enclosed by the selection rectangle.
Server A computer connected to a network or the Internet (or both) that contains documents
available via the network or the Internet.
324
Copyright © 2012 SumTotal Systems, Inc. All rights reserved. Duplication prohibited.
Uninstalling an Application
Server Application An application that creates objects that can be linked or embedded in a client
application. ToolBook is a client application that can receive OLE information, such as graphics or
text, from server applications. See also client application, object linking and embedding, OLE
container object.
Session One or more instances of any Windows application. See also instance.
Shared Action Sequence An action sequence that runs only when executed as part of another action
sequence. You can create a shared action sequence that performs an operation and returns a value to
the action sequence that calls it. You can define parameters the shared action sequence uses to
complete any operation it performs. See also action sequence, parameter.
Shared Script OpenScript code that can be shared among ToolBook objects. Once defined, the shared
script is stored as a resource in the book and can be applied to an object as needed.
Silent Dragging An option for drag-and-drop behavior that specifies that the source object can be
dropped anywhere, even if the destination object does not normally allow a drop. Silent dragging is
used to create drag-and-drop behavior for applications (such as tool palettes or clip art books) that
might be used in conjunction with applications not configured to receive drop objects.
Solid Color A color that appears on a color display device when all pixels are the same color. See also
pixel.
Sorting The process of placing pages in order based on the contents of specified record fields.
Sound An audio CD, MIDI, MP3 or wave audio sound that can be played in an application. See also
MIDI, MP3, wave audio.
Source Book The book from which pages are imported into another book.
Source Object In a drag-and-drop operation, the object that is clicked to begin the operation and
whose drag image is dragged. See also drag image, drag and drop.
Special Value A type of variable with a system-defined value. Special values available in the Actions
Editor include pi, true, and false.
Spooler A temporary storage location for information that is being printed. ToolBook gathers the
information to be printed in a spooler and then sends the contents of the spooler to the designated
printer. In OpenScript, you must use a spooler control structure to print.
Stack A list organized so that the last data item added to the list is the first item used.
Standard Colors The 16 or 32 colors that are always available to ToolBook applications.
Startup Screen A screen that appears for a few seconds upon startup of an application and then
disappears. A startup screen is often used as the application's introductory screen, containing
information such as the application's title, release number, and the name of the person to whom the
software is registered.
Startup System Properties ToolBook properties that specify how ToolBook is initialized when you first
start it. For example, the system property startupBook specifies the name of the book that opens
automatically when a user runs ToolBook.
Statement A single complete instruction in a script or action sequence.
Static Object An OLE object that was embedded or linked but whose link was severed. A static object
has no link to its server application. See also object linking and embedding, server application.
Status Bar The bar along the bottom of the ToolBook window that shows mouse position, name of the
object under the cursor, information about the chosen menu command, and the page selection
indicator.
Copyright © 2012 SumTotal Systems, Inc. All rights reserved. Duplication prohibited.
325
Glossary
String Any combination of contiguous characters.
Stroke The line element of an object. For fields and buttons, stroke color is applied to text and
borders. For draw objects, stroke color is applied to borders and the stroke elements of any pattern
used. For paint objects and picture objects, stroke color is applied to the border. Compare fill.
Style (1) An object's visual attributes, such as its border type, line style, or pattern. (2) The bold,
italic, underline, and strikeout text attributes that can be set using the Character dialog box.
Submenu A menu item that displays a cascading menu when clicked. Submenus are indicated by small
arrows to the right of menu items.
SumTotal Publish to ToolBook add-in A utility that converts a PowerPoint presentation into a
ToolBook book or a ToolBook XML book, depending on which file format the user selects for the
conversion.
Syntax The rules for writing script statements in OpenScript or for creating expressions in the Build
Expression dialog box of the Actions Editor.
System Book A book whose book script is shared by other books. System books are useful for defining
general scripts for repeated use by other books. For example, you can put all of your user-defined
functions and user properties into a system book so that they are available for any applications you
create. See also user property, user-defined function.
System Palette In a 256-color system, the list of colors currently used by the video display device to
display graphics. The 256 colors are drawn from the 16 million colors available to Windows.
System Properties Property that define default behavior for the entire ToolBook system.
System Variable A variable that maintains its value for the duration of an ToolBook instance or
session. Any handler that declares the system variable can access and change its value during a
session. See also handler, local variable, global variable.
Tab (1) A character in text that ToolBook uses to align text in fields. Tabs are set using the Paragraph
dialog box. To type a tab character in a field, press CTRL+TAB. See also field. (2) The TAB key.
Pressing TAB moves the focus between buttons, editable fields, and combo boxes. See also tab order.
Tab Order The order in which ToolBook moves the focus between buttons and editable fields when a
user presses the TAB key. The tab order can be modified by changing the layer order of objects. See
also focus, layer, tab.
Target A system property that specifies which object received the current message. You cannot set
this property. See also system properties.
Target Book The book into which pages are imported from another book.
Target Window The viewer in which ToolBook executes commands and searches for objects. The
commands can affect any page, background, or object displayed in the viewer, or the viewer itself.
See also viewer.
Template A prebuilt book that you customize by adding content.
Text Field A ToolBook object that holds text. A text field has properties that determine its
appearance and behavior.
Textline One data element out of a text string separated by carriage return/linefeeds (CRLF). The
textline does not include the CRLF, which is used only as a delimiter. See also carriage
return/linefeed, delimiter.
Tile A property of a window that contains a caption or the file name.
326
Copyright © 2012 SumTotal Systems, Inc. All rights reserved. Duplication prohibited.
Uninstalling an Application
Title Bar The bar at the top of a window that contains a caption or the file name.
Tool Palette The tools that appear at Author level for creating and working with objects.
Toolbar The bar containing buttons that are shortcuts for frequently used menu commands. Displayed
by default at the top of the ToolBook main window at Author level.
ToolBook XML A way to represent a ToolBook book as XML. It consists of a series of files and
supporting resources. This folder structure can be compressed into a .tbkx file for improved
portability.
Trace To go through the execution of a script in the Debugger one statement or keyword at a time to
locate an error. See also Debugger, script.
Transition A special effect, such as a fade-out, that occurs as a user navigates from one page to the
next.
Transparent A property that determines whether an object is displayed so that objects on layers
behind the object can be seen through the object. See also layer.
Ungroup To separate grouped objects into individual objects. Ungrouping discards all the group's
properties and its script but does not affect individual object's scripts and properties. See also group.
Uniform Resource Locator (URL)An address used to locate Web pages on Web servers. Much like your
area code and telephone number identify your region and then your location, the URL of a Web page
identifies a computer and then a specific document.
Unique Identifier A method of identifying an object in any book. Includes the object type name (such
as button, page, field, and so on), object ID number, and the unique name of the page or background
on which the object is located.
URL See Uniform Resource Locator.
User Property A property that a developer creates for an object beyond those which are built into the
ToolBook object, and for which the developer can get and set values as with any other property. All
objects in ToolBook can have user properties. For a list of user properties defined for an object, get
the value of the object's userProperties property.
User-Defined Function A function in OpenScript that is defined by a handler written by the
developer, in contrast to a function that is built into OpenScript. See also function, handler.
User-Defined Message Any message that is not one of the built-in messages that ToolBook sends in
response to an event. The developer must provide a corresponding handler for all user-defined
messages. ToolBook's default response to user-defined messages that are not handled is to display the
Execution Suspended message. See also Execution Suspended message, User event. Compare built-in
message.
User Event A generic event that you can send using the Send User Event action in the Actions Editor.
When you send a User event, you can send data (a literal value, variable, or expression) in a single
parameter. See also event.
Value A piece of data such as text, a number, or a logical value. For example, in the following
statements, Joe, 3456, and true are all values:
text of field "name" = "Joe" --Text value
svQuantity = 3456 --Numerical value
visible of selection = true --Logical value
See also container.
Copyright © 2012 SumTotal Systems, Inc. All rights reserved. Duplication prohibited.
327
Glossary
Variable A named container that holds data in action sequences and OpenScript programs. See also
global variable, local variable, and system variable.
Variables Window The window that displays the current values for local variables and system
variables when you work in the Debugger. See also Debugger, local variable, system variable.
Vector Graphics See draw-type graphic.
Vertex, Vertices The points defining the beginning and end of a segment in a path animation. When
you draw a path animation, you click to position a vertex, and ToolBook draws a segment between the
vertex at the end of the path and the new vertex.
Video Overlay See overlay video.
Viewer A window that you can create in ToolBook that displays pages from any book. Viewers are
composed of a frame window, a client area, and a client window. Viewers can be used to create
dialog boxes, tool palettes, status bars, pop-up windows, and application startup screens. See also
client area, client window, frame window, pop-up window.
Visual Media Clip Clips created from animation, video, photo CDs, or still images. See also clip.
Voice Recording Audio that can be recorded for any page in your book, using a microphone on your
computer. The recording plays as the page loads.
Wave Audio Sound recorded in a digital format and stored as a file with the file extension .wav.
Web Document An HTML file on a Web server. A Web document becomes a Web page when it is
viewed through a browser. See also Web page.
Web Page A document that can be viewed and interacted with over the Internet. Web pages can
contain text, graphics, and links to other Web pages. Web pages make up the content of the World
Wide Web. See also home page, Web document, World Wide Web.
Wildcard A question mark (?) used to represent a single character, or an asterisk (*) used to indicate
multiple characters in a file name or search text.
Window The fundamental interface object of Microsoft Windows. Compare instance.
Wizard An interactive utility that guides a user through a process step by step.
Wordwrap An option that automatically places text on the next line when you type past the right
margin in a field. Text does not wrap in button captions. See also field.
World Wide Web (WWW) A part of the Internet with the capacity to handle multimedia (text,
graphics, video, and sound) information. Documents, called Web pages that are stored on computers
around the world make up the content of the World Wide Web.
WWW See World Wide Web.
Zoom To magnify the view of a page using the magnify tool from the tool palette.
328
Copyright © 2012 SumTotal Systems, Inc. All rights reserved. Duplication prohibited.