1
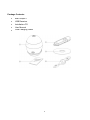
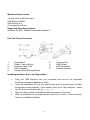
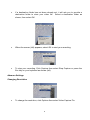
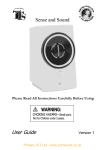
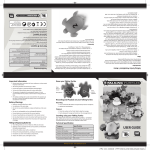
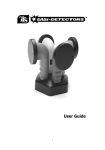
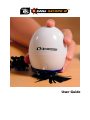
User Guide Warnings Please retain these instructions for future reference Easi-Scope 2 contains a non-replaceable, rechargeable battery Do not attempt to remove the battery In the event of an electro-static discharge, your Easi-Scope 2 may malfunction. In this case, please switch it off and then back on again Warranty is void if the case is opened for any reason The warranty does not cover any data loss nor any consequential loss of information Features Easi-Scope 2 is a USB Wireless Microscope which uses the 2.4GHz frequency band to transmit digital images of up to a 640 x 480 resolution with a range of over 10m. The USB receiver of your Easi-Scope 2 can pair with up to four (4) Easi-Scope 2s simultaneously and allow you to switch between the multiple paired devices. 2 Package Contents Easi-Scope 2 USB Receiver Installation CD User Manual USB Charging Cable 3 Minimum Requirements 1.8 GHz Intel / AMD Processor; 256 Mbytes of RAM; USB Version 2.0; A Compact Disc Drive; Supported Operating Systems Windows XP SP3, Windows Vista and Windows 7. Part and Control Locations 1. 3. 5. 7. 9. Snap Button Power / Pairing Button Objective Lens Tube Status Indicator Channel Select/Pairing Button 2. 4. 6. 8. Focusing Dial USB Socket LED Illumination Channel Indicator Installing Hardware Driver and Application Plug your USB Receiver into your computer and wait for the automatic Windows hardware installation to finish. Insert the Installation CD into your optical drive and the Easi-Scope 2 Installer should launch automatically. If this doesn’t start, go to “My Computer”, select the CD drive and double click on setup.exe When the Easi-Scope 2 InstallShield Wizard appears, Click Next. Wait for installation to be completed and then click “Finish” to close the EasiScope 2 InstallShield Wizard. 4 Using your Easi-Scope 2 Charging your Easi-Scope 2 Your Easi-Scope 2 is equipped with a built-in rechargeable battery which is charged using the mini-USB connector on the side of your Easi-Scope 2. Fully charge the battery before your first use. To Charge the battery, plug-in the supplied USB cable to your Easi-Scope 2 and to your computer. When charging your Easi-Scope 2, the Status Indicator on your EasiScope 2 lights up until the battery is fully charged. If the battery of your Easi-Scope 2 is running low, the Status Indicator flashes slowly. Note: It is recommended that you do not partially charge the battery and that you fully charge the battery every time you charge it. Start Up Start up your computer. Plug in your Easi-Scope 2 USB Receiver to your computer. Switch ON your Easi-Scope 2 by pressing the Power/Pairing button briefly. Pairing Once your Easi-Scope 2 has started up, you may need to pair your Easi-Scope 2 with your USB Receiver if: You are using your Easi-Scope 2 for the first time or, Your Easi-Scope 2 has previously been paired with another USB Receiver. The pairing procedure is as followed: Start up your computer, Plug in your USB Receiver, launch your Easi-Scope 2 application and switch ON your Easi-Scope 2. Press and Hold the Power/Pairing Button on your Easi-Scope 2 for seven (7) # seconds until the Status Indicator flashes rapidly, which indicated that your Easi-Scope 2 has entered Pairing Mode*. Press and Hold the Pairing Button on the USB Receiver for three (3) seconds until the Channel Indicator LED flashes rapidly, which indicated that your USB Receiver has entered Pairing Mode*. 5 Once both devices enter pairing mode, they will initiate the pairing process. You will shortly be able to see the image in your Easi-Scope 2 application. * Pairing mode timeout is set to be 15 seconds on your Easi Scope 2 and your USB Receiver. If pairing is not successful within this period, your devices will return to their normal state without being paired. Repeat steps 2 to 4 to pair your devices again. # The Status Indicator will not flash if you are charging the battery of your Easi-Scope 2. Pairing multiple Easi-Scope 2s Your Easi-Scope 2 USB Receivers are capable of pairing up to four (4) Easi-Scope 2s and allow you to switch between the image sources. To pair multiple Easi-Scope 2s, follow the procedure below. Pair the first Easi-Scope 2 using the pairing procedure described in the previous section. Once completed, click the Channel Select/Pairing Button once to switch to the next pairing channel. The Channel Indicator LED on the USB Receiver will move to the next channel. nd Repeat the pairing procedure to pair a 2 Easi-Scope 2. Repeat step 2-3 to pair up to four (4) Easi-Scope 2s. Using the Easi-Scope 2 with Easi-Scope 2 Application Launching the Application Launch your Easi-Scope 2 application by double clicking on the Easi-Scope 2 icon. The Easi-Scope 2 Application Window appears as shown. 6 Taking a Photo To take a photo of the image you are viewing, press the Snap Button on your Easi-Scope 2. A new window will pop up. Before saving your photo, you may rotate your photo as you wish using the “Rotate” menu. Click “File” then select “Save As” Recording a Video To record a video, click Capture then select Start Capture. 7 If a destination folder has not been already set, it will ask you to provide a destination folder to store your video file. Select a destination folder as shown, then select OK. When the screen (left) appears, select OK to start your recording. To stop your recording, Click Capture then select Stop Capture or press the Esc key on your keyboard as shown (left). Advance Settings Changing Resolution To change the resolution, click Options then select Video Capture Pin. 8 When the Properties window appears, you can select the desired resolution using “Output Size” selection box as shown (left). Support & Warranty This product has a one year warranty for problems found during normal usage. Mistreating the Easi-Scope 2 or opening the unit will invalidate this warranty. Any data loss or consequential loss is not covered by this warranty. The battery is not user replaceable. All out of warranty repairs will be subject to a replacement fee. Please visit www.tts-group.co.uk for latest product information. TTS Group Ltd Park Lane Business Park Kirkby-in-Ashfield Nottinghamshire, UK NG17 9GU Freephone: 0800 318686 Freefax: 0800 137525 N448 WARNING: Do not dispose of this product in household waste. Hand it over to a collection point for recycling electronic appliances. WARNING! Not suitable for children under 36 months due to small parts – choking hazard. Product Code: EL00132 - TTS Easi-Scope 2 9