1
F616
USER GUIDE
Copyright © Huawei Technologies Co., Ltd. 2013. All rights reserved.
No part of this manual may be reproduced or transmitted in any form or by any
means without prior written consent of Huawei Technologies Co., Ltd. and its
affiliates ("Huawei").
The product described in this manual may include copyrighted software of Huawei
and possible licensors. Customers shall not in any manner reproduce, distribute,
modify, decompile, disassemble, decrypt, extract, reverse engineer, lease, assign,
or sublicense the said software, unless such restrictions are prohibited by
applicable laws or such actions are approved by respective copyright holders.
Trademarks and Permissions
,
, and
Technologies Co., Ltd.
are trademarks or registered trademarks of Huawei
Other trademarks, product, service and company names mentioned may be the
property of their respective owners.
Notice
Some features of the product and its accessories described herein rely on the
software installed, capacities and settings of local network, and therefore may not
be activated or may be limited by local network operators or network service
providers.
Thus, the descriptions herein may not exactly match the product or its accessories
which you purchase.
Huawei reserves the right to change or modify any information or specifications
contained in this manual without prior notice and without any liability.
DISCLAIMER
ALL CONTENTS OF THIS MANUAL ARE PROVIDED "AS IS". EXCEPT AS
REQUIRED BY APPLICABLE LAWS, NO WARRANTIES OF ANY KIND, EITHER
EXPRESS OR IMPLIED, INCLUDING BUT NOT LIMITED TO, THE IMPLIED
WARRANTIES OF MERCHANTABILITY AND FITNESS FOR A PARTICULAR
PURPOSE, ARE MADE IN RELATION TO THE ACCURACY, RELIABILITY OR
CONTENTS OF THIS MANUAL.
TO THE MAXIMUM EXTENT PERMITTED BY APPLICABLE LAW, IN NO EVENT
SHALL HUAWEI BE LIABLE FOR ANY SPECIAL, INCIDENTAL, INDIRECT, OR
CONSEQUENTIAL DAMAGES, OR LOSS OF PROFITS, BUSINESS, REVENUE,
DATA, GOODWILL SAVINGS OR ANTICIPATED SAVINGS REGARDLESS OF
WHETHER SUCH LOSSES ARE FORSEEABLE OR NOT.
THE MAXIMUM LIABILITY (THIS LIMITATION SHALL NOT APPLY TO LIABILITY
FOR PERSONAL INJURY TO THE EXTENT APPLICABLE LAW PROHIBITS
SUCH A LIMITATION) OF HUAWEI ARISING FROM THE USE OF THE PRODUCT
DESCRIBED IN THIS MANUAL SHALL BE LIMITED TO THE AMOUNT PAID BY
CUSTOMERS FOR THE PURCHASE OF THIS PRODUCT.
Import and Export Regulations
Customers shall comply with all applicable export or import laws and regulations
and be responsible to obtain all necessary governmental permits and licenses in
order to export, re-export or import the product mentioned in this manual including
the software and technical data therein.
Privacy Policy
To better understand how we protect your personal information, please see the
privacy policy at http://consumer.huawei.com/privacy-policy.
Table of Contents
1 Introduction ........................................................................................................... 1
Appearance .................................................................................................... 1
Installation ....................................................................................................... 5
Text input ........................................................................................................ 9
2 Basic operations .................................................................................................. 10
Powering on the phone ................................................................................. 10
Making or answering calls ............................................................................ 10
3 Contacts ............................................................................................................... 11
Making calls from Contacts ............................................................................ 11
Searching for a contact .................................................................................. 11
Groups ........................................................................................................... 11
4 Messages ............................................................................................................ 13
Creating a text message ............................................................................... 13
Viewing a text message ................................................................................ 13
Message settings .......................................................................................... 14
Delete all ....................................................................................................... 14
5 Call log ................................................................................................................ 15
Viewing the call records ................................................................................ 15
Other operations ........................................................................................... 15
6 Tools .................................................................................................................... 16
Alarms ........................................................................................................... 16
Calendar ....................................................................................................... 16
Calculator...................................................................................................... 16
World time ..................................................................................................... 16
7 Profiles ................................................................................................................ 17
Selecting a profile ......................................................................................... 17
Editing a profile ............................................................................................. 17
8 Settings ............................................................................................................... 18
Phone settings .............................................................................................. 18
i
Display settings ............................................................................................. 18
Call settings .................................................................................................. 18
Network ......................................................................................................... 19
Security ......................................................................................................... 19
9 Wireless data service .......................................................................................... 21
Installing management program ................................................................... 21
Applying the data service .............................................................................. 22
10 Safety information ............................................................................................. 23
ii
1
Introduction
Appearance
Note:
The figures in this document are provided only for your reference. The fixed
wireless terminal (FWT) that you have purchased may differ from that
shown.
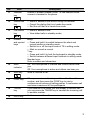
Front view
Main unit
Keypad (Number and function keys)
1
No.
2
Item
Description
1
Left
function
key
Access the main Menu in standby mode.
Select the option displayed on the lower left corner of
the screen.
2
Navigation
keys
3
Right
function
key
Access the main menu by pressing the OK key in
standby mode.
Access a shortcut menu by pressing the corresponding
navigation key in standby mode.
Adjust the volume by pressing the navigation keys
during a call.
Access the Contacts screen in standby mode.
Select the option displayed on the lower right corner of
the screen.
4
End key
5
Status
indicator
6
LND/LNR
keys
7
Shortcut
keys
8
Volume
keys
9
LINE 1/2
keys
Switch between line 1 and 2.
10
CLIP/CLIR
key
In standby mode, set whether to display or hide your
number for outgoing calls. Calling Line Identification
Presentation (CLIP) displays your number; Calling Line
Identification Restriction (CLIR) hides your number.
End a call or reject an incoming call.
Press and hold it to power on or off.
Return to the standby mode.
Blinking green: normal state
Steady red: The handset is off-hook.
Blinking red: The battery is low, or there are missed
calls, unread messages, or new voicemails.
In standby mode:
Press and hold the Last Number Dialed (LND) key to
quickly dial the last dialed number.
Press and hold the Last Number Received (LNR) key to
quickly dial the last number that called you.
Press the LND/LNR keys once to display the number.
Press again or the Call key to call that number.
Speed dial a phone number.
Select Settings > Phone settings > Shortcuts to
assign a shortcut key to a phone number.
Adjust the ringtone volume or in-call volume.
No.
Item
11
Headset
key
Enable or disable headset mode. To use headset mode,
connect a headset to the phone.
Description
12
Hands-free
key
Make or answer a call without lifting the handset.
Cancel the dialing that is in hands-free mode.
End the call that is in hands-free mode.
13
Call/Redial
key
Make or answer a call.
View dialed calls in standby mode.
14
Number
and symbol
keys
15
Mute
indicator
16
Mute key
# key:
Press and hold it to switch between the silent and
normal profiles in standby mode.
Switch on or off the input mode of T9 in editing mode.
Mark or unmark a record.
* key:
Press and hold it to lock the keyboard in standby mode.
Switch between different input methods in editing mode.
Number keys:
Enter numbers and characters.
On: Your microphone is inactive and others cannot hear
you.
Off: Your microphone is active and others can hear you.
Mute or unmute a call.
17
CONF key
18
TRANS
key
19
HOLD key
When you are in a call, set up another call with another
number, and then press the CONF key to start a
conference call among all calling parties. A conference call
can have a maximum of five participants.
If you receive a call when you are already in another call,
you can press the TRANS key to transfer the incoming call
to another number.
Hold or resume the call.
3
No.
Item
20
SOS key
21
DND key
22
Key
indicators
Description
In standby mode:
Press the SOS key once to display the preset
emergency number. You can dial another emergency
number supported by the local network instead. Then
press the SOS key again or the Call key to call that
number.
Press and hold the SOS key to directly call the preset
emergency number.
Enable call forwarding. Missed calls will be forwarded to
the voicemail you set in Message Settings.
The indicators blink when the corresponding functions are
enabled:
If you press the LINE 1 or LINE 2 key, the LINE 1 or LINE 2
indicator blinks green.
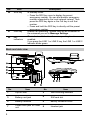
Back and side view
No.
4
Item
No.
Item
1
Flip-out feet
2
Wall-mounting brackets
3
Battery cord jack
4
SIM card slot
5
Battery container
6
Battery container cover
7
Coiled cord jack on main
unit
8
Headset jack
No.
Item
9
Data port
11
Power jack
*
No.
10
Item
* Reset
Note:
To restart the FWT if it is connected to a power supply, press the Reset key.
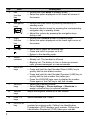
Icons
Icon
Description
Icon
Description
Network signal strength
Calling
Alarm clock is on
No service
Message received
Hands-free mode
Voice message received
Powered by power adapter
Keypad lock
Battery power level
In silent profile
Line 2 is selected
2G network
3G network
Headset mode
Earphone mode
Installation
Installing the SIM card
Caution:
The SIM card and its golden contact can be easily damaged by a scratch or
bend. Be careful when installing or removing the SIM card.
Power off the FWT and remove the power supply cable. Install the SIM card
according to the following figure. Make sure that the golden contact on the SIM card
is facing downwards.
5
Installing the battery
Power off the FWT and remove the power supply cable. Install the battery according
to the following figure. Make sure that the battery cord plug matches the battery jack.
Do not insert the battery reversely.
Installing the power adapter
1. Install the battery based on the battery installation steps.
2. Connect one end of the power adapter cable to the FWT and the other to the
power socket.
3. The battery charging icon is displayed on the screen. The battery charging icon
becomes static when the battery is fully charged.
Note:
Remove the battery if the FWT is left unused for a long period.
If the battery has not been used for a long time or the battery is
exhausted, the screen of the FWT may not function when you charge the
6
battery again. This is normal. After the battery is being charged for a
while, you can power on the FWT for use.
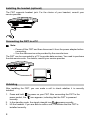
Flip-out feet (optional)
Flip out the feet for a better viewing angle and easier operation, as shown in the
following figure.
Installing and uninstalling the table stand
Your FWT can be placed upright with the use of a table stand.
Insert latch A and then latch B into the slots on the back of the FWT, as shown in
the Install procedure. The table stand allows the FWT to stand on a flat surface,
such as a table or desk.
To uninstall the FWT from the table stand, unbuckle latch A and then latch B, as
shown in the Uninstall procedure. Do not try any other methods to avoid damaging
the table stand.
Install
Uninstall
7
Installing the headset (optional)
The FWT supports headset jack. For the choice of your headset, consult your
service provider.
Connecting the FWT to a PC
Note:
Power off the FWT and then disconnect it from the power adapter before
connecting.
Use the data service suite provided by the manufacturer.
The FWT can be connected to a PC to provide data services. You need to purchase
the data service suite. For details, consult your service provider.
Validating
After installing the FWT, you can make a call to check whether it is correctly
installed.
1. Press and hold
to power on your FWT. After connecting the FWT to the
power socket, the
icon appears, indicating that the FWT is powered
normally.
2. In the standby mode, the signal strength icon
appears normally.
3. Lift the handset. If you are able to make a call, it indicates that the FWT is
installed correctly.
8
Text input
Note:
Press * key to switch between input methods.
Press # key to enable or disable T9 method.
Press 1 key to display the list of symbol.
Press
to delete the letter in front of the cursor.
T9 Input method
Press each key carrying the desired letter once, and then the predictive text scheme
will present the available words composed by the letters you have entered in the
drop-down list.
Traditional input method
When T9 input method is off, you can use the traditional input method. Repeatedly
press the key that carries the letter to be entered when it appears on the screen.
"123" numeric input method
In a text editing screen, press and hold the character/number keys to enter
corresponding numeric characters.
You can also press successively the * key to switch to the "123" numeric input
method, and enter corresponding numeric characters by pressing the
character/number keys.
Symbol input method
Your FWT provides an independent symbol input method.
For example, to enter ":" with the symbol input method, you can just press the scroll
.
keys to select ":" from the symbol list and then press
Inputting different languages
In editing mode, select Options > Input language to set the language for the text.
9
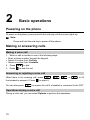
2
Basic operations
Powering on the phone
To power on the phone, press and hold the end key until the screen lights up.
Note:
Press and hold the end key to power off the phone.
Making or answering calls
Making a voice call
1. Enter or edit a number in one of the following ways:
Enter a phone number through the keypad.
Select a number from Call log.
Select a number from Contacts.
2. Press
3. Press
to dial.
to end the call.
Answering or rejecting a voice call
When there is an incoming call, press
the handset to answer it. Press
You can also press
,
,
, or
to answer the call if a headset is connected to the FWT.
Operations during a voice call
During a voice call, you can select Options to perform the operations.
10
, or lift
to reject it.
3
Contacts
Making calls from Contacts
1. In the Contacts screen, select Phone or SIM.
2. Select a contact and select Options > Voice call. Alternatively, you can select
Edit before call to edit the number before making the call.
Searching for a contact
1. In the Contacts screen, select Phone or SIM.
2. Select Options > Search, and then enter the contact name. The contact will be
displayed.
In the Phone or SIM screen, enter a string contained in the contact name. Then the
contacts whose names contain this string are displayed.
Groups
Adding/Deleting group members
1. In the Contacts screen, select Groups.
2. Select a group and press
to view the details.
3. Select Options > Add. Select a contact and press
. The member you add
will be displayed in the group member list.
To delete a group member, select a member from the group member list, and then
select Options > Delete.
Managing a group
1. In the Contacts screen, select Groups.
2. Select a group and select Options for the following options: Details, Rename,
Create message, Delete.
Note:
You cannot rename or delete any group preset in your FWT.
11
Other operations
In the Contacts screen, select one of the following options.
View the contacts in the FWT.
View the contacts in the SIM card.
View the contact groups.
Assign the speed dial numbers.
Copy all the contacts from your FWT to the SIM card or from your SIM card to the
FWT.
Delete all the contacts from your FWT or from your SIM card.
Set the contact display and save method.
View the memory status of both your FWT and SIM card.
In the Contacts screen, select Phone or SIM. Then select Options for the following
options.
View the details of a contact.
Edit the number before making a call.
Send a message to the selected contact.
Create a new contact.
Make a voice call.
Enter the contact name you are searching for.
Copy one contact from your FWT to the SIM card or from your SIM card to the
FWT.
Copy the marked contacts to the FWT or to the SIM card.
Delete the selected contact.
Mark/unmark a record or all records in your FWT and SIM card.
12
4
Messages
Creating a text message
1. Select Messages > Write SMS.
2. In the message editing screen, select Options to perform operations in the
option list.
3. After editing the message, press
key to add a recipient's number.
4. Press
key to send the message.
Note:
The maximum number of English letters in a single text message is 160. If
the characters you entered exceed this limit, the text is divided into two or
more continuous messages when it is sent.
Viewing a text message
Your FWT provides three mailboxes for message. Inbox stores received messages.
Drafts stores the messages that you save and that fail to be sent. Sent stores sent
messages.
1. Select a mailbox from Messages. And then switch three mailboxes through the
scroll key.
2. Select a message, and then select Options to perform the operations of the
option list.
A read message in the SIM card memory
An unread message in the SIM card memory
A read message in the FWT memory
An unread message in the FWT memory
A message report
13
A text message that you save to the FWT and that fail to be sent
A text message that you save to the SIM card and that fail to be sent
A text message sent and saved to the FWT
A text message sent and saved to the SIM card
Message settings
1. Select Messages > Settings.
2. Set the parameters related to messages.
Delete all
You can select Messages > Delete all to delete the messages in Inbox, Sent, or
Drafts.
14
5
Call log
Viewing the call records
Select Call log in the main menu and then press
or
to select
Missed, Received or Dialed. Then select Options for the following operations.
Edit the number before making a call.
Send a message.
Save the number of the selected record.
Make a voice call.
View the details of the selected record.
Delete the selected record.
Mark/unmark a record or all records.
Other operations
Calls status
Select Call log > Calls status to display the information about voice calls. In the
voice call, you can select Reset to clear all records.
Delete all
Select Call log > Delete all to delete the records of All calls, Missed, Received,
or Dialed.
15
6
Tools
Alarms
Select Tools > Alarms. You can select one alarm from the list, and then press
key to set an alarm clock.
When it is time for an alarm clock to ring, the tone sounds and a prompt is displayed.
Press any key to stop the tone, or select snooze or stop the prompt.
If your FWT is powered off, the alarm can still ring. When it rings, you can choose to
power on the FWT.
Select an alarm clock from the list, and press
to deactivate it.
Calendar
Select Tools > Calendar and select Options. You can perform the Go to...
operation to go to a certain date directly from the month view screen.
Calculator
Select Tools > Calculator.
Press the numeric keys to enter the figures.
Press the scroll key to enter the operators.
Press
to clear.
to exit Calculator.
Press
Press # key to enter a radix point.
Press
to enter an equal mark.
World time
Select Tools > World time. You can view the time of important cities around the
world. Press
16
/
to select the desired time zone and then press
.
7
Profiles
Selecting a profile
1. In the Profiles screen, select a profile.
2. Activate the selected profile.
Press
to activate it.
Select Options and select On to activate it.
Editing a profile
1. In the Profiles screen, select a profile.
2. Select Options and select Edit to set it.
Select a ring tone for incoming calls.
Select a message tone.
Adjust the volume of rings.
Adjust the volume of keys.
Adjust the volume of prompts.
Activate or deactivate the power-on and power-off tones.
Note:
You can select a profile, and then select Options and select Rename to
change the name of the profile.
You cannot rename any profile preset in your FWT.
17
8
Settings
Phone settings
Select Settings > Phone settings. You can change the settings of the FWT.
Select a language. You can also select Auto to set it to be the same as the
language that is used in your SIM card.
Set the language used to enter text.
Change the system time for the FWT.
Change the display format of the date.
Assign the frequently used functions to the keys as shortcut keys.
Set the keypad lock period. If there is no operation on the FWT within a preset
period of time, the keypad is locked automatically. You can press the * key, then
press
to unlock the keypad.
Note:
If the FWT is not used for a long time without adapter or battery, you may
need to reset the time after switching the FWT on.
Display settings
In the Settings screen, select Display settings.
Set the contrast level of the display.
Set the delay time of backlight.
Enter a greeting message that appears on the screen when you power on your
FWT.
Call settings
Call forwarding
When you cannot answer the phone or you want to forward a call, you can use this
function.
Call waiting
When you are in a conversation, you can answer a third call by activating this
18
function.
The function is network-dependent. For more information, consult your service
provider.
Calling ID
This function allows you to select whether to display your number on the phone of
the party who you call.
The function is network-dependent. For more information, consult your service
provider.
My number
With this function, you can save your own numbers in the SIM card. You can select
Options to edit or delete the records.
Minute alert
If the function is activated, your FWT notifies you of the call duration by giving an
alert several seconds before the end of each minute.
Auto dial
If the function is activated, the number you key in is dialed automatically at the time
you set.
Network
You can change the settings for the network. Select Settings > Network for
following options: Mode, Select network, FOTA UPDATE.
Security
You can change the settings related to the FWT security. Select Settings >
Security, and then select the following security setting items.
Reset
This option is used to reset user configurations of the FWT settings to the factory
settings.
Password lock
This option is used to enable or disable Phone lock and PIN lock.
19
Change password
1.
2.
3.
4.
5.
Select Security > Change password.
Select one item.
Enter the old password (The initial phone password is 000000.)
Enter a new password.
Enter the new password again to confirm.
Note:
To modify the PIN code, you must set PIN lock to On first.
If you enter the wrong PIN or PIN2 for three times, the SIM card is locked.
You need the PUK or PUK2 code to unlock the SIM card. If you enter the
wrong PUK or PUK2 code for 10 times in total, the SIM card is locked
permanently.
The PUK or PUK2 code is delivered with the SIM card. If you do not
receive the code or forget it, contact your service provider.
Fixed dialer number
If your SIM card supports the Fixed Dialer Number (FDN) function, you can select
Security > Fixed dialer number to set the limit for phone numbers.
20
9
Wireless data service
Installing management program
This section introduces how to install the management program and the hardware
driver. The procedures are for your reference only.
This takes the Windows XP operating system (OS) as an example to describe how
to configure your computer. For other OSs, the configurations may be different and
you need to configure them as required.
Note:
The OS configuration requirement of a PC: Windows 2000, Windows XP,
Vista (32-bit or 64 bit).
1. Use the USB cable to connect the FWT and a PC.
2. The system finds the new hardware and installs the modem driver
automatically.
3. The installation program automatically starts. Then, the installation interface
appears.
Note:
If the above interface does not appear, restart the FWT.
If the installation program does not automatically start, find the setup.exe
file and double-click it to start the installation.
4. According to the instructions, click Next to proceed.
5. Read License Agreement carefully. Then select I Agree and click Next.
6. Select an installation path.
Note:
If you do not select a path, the default path is used. You can click Browse...
to change the path.
7. In the Folder text box, enter the name. Then click Next.
8. If a prompt indicating that the software has not passed Windows Logo testing
is displayed, click Continue Anyway to proceed.
9. Click Close to complete.
10. A shortcut icon appears on the PC desktop.
21
Applying the data service
You can apply and enjoy such data services as Web browse. For details, consult
your service provider. The procedures are for your reference only.
1. Double click the newly created FWT Partner icon.
2. Click Settings to FWT Wireless Connection Setting window, and then select
New to create a new profile.
3. Enter Profile name, Username & Password and save the profile and click OK.
4. Click Connect. After the login completes, you can access the Internet.
Note:
The profile information varies with networks. For details, consult your
service provider.
The connection rate shown after the dial-up is connected may be the
connection rate of the data port. For details, consult your service provider.
22
10
Safety information
This section contains important information about the operation of your device. It
also contains information about how to use the device safely. Read this information
carefully before using your device.
Electronic device
Do not use your device if using the device is prohibited. Do not use the device if
doing so causes danger or interference with other electronic devices.
Interference with medical equipment
Follow rules and regulations set forth by hospitals and health care facilities. Do
not use your device where prohibited.
Some wireless devices may affect the performance of hearing aids or
pacemakers. Consult your service provider for more information.
Pacemaker manufacturers recommend that a minimum distance of 15 cm be
maintained between a device and a pacemaker to prevent potential interference
with the pacemaker. If using a pacemaker, hold the device on the side opposite
the pacemaker and do not carry the device in your front pocket.
Protecting your hearing when using a headset
To prevent possible hearing damage, do not listen at high volume
levels for long periods.
Using a headset at high volumes may damage your hearing. To reduce this risk,
lower the headset volume to a safe and comfortable level.
Exposure to high volumes while driving may cause distraction and increase your
risk of an accident.
Areas with flammables and explosives
Do not use the device where flammables or explosives are stored (in a gas
station, oil depot, or chemical plant, for example). Using your device in these
environments increases the risk of explosion or fire. In addition, follow the
instructions indicated in text or symbols.
Do not store or transport the device in containers with flammable liquids, gases,
or explosives.
23
Traffic security
Observe local laws and regulations while using the device. To reduce the risk of
accidents, do not use your wireless device while driving.
Concentrate on driving. Your first responsibility is to drive safely.
Do not hold the device while driving. Use hands-free accessories.
When you must make or answer a call, pull of the road safely and park the vehicle
first.
RF signals may affect the electronic systems of motor vehicles. For more
information, consult the vehicle manufacturer.
Do not place the device over the air bag or in the air bag deployment area in a
motor vehicle. Doing so may hurt you because of the strong force when the air
bag inflates.
Do not use your device while flying in an aircraft or immediately before boarding.
Using wireless devices in an aircraft may disrupt wireless networks, present a
hazard to aircraft operation, or be illegal.
Operating environment
Avoid dusty, damp, or dirty environments. Avoid magnetic fields. Using the device
in these environments may result in circuit malfunctions.
Before connecting and disconnecting cables, stop using the device and
disconnect it from the power supply. Ensure that your hands are dry during
operation.
Place the device on a stable surface.
Keep the device away from electronic appliances that generate strong magnetic
or electric fields, such as a microwave oven or refrigerator.
During thunderstorms, power off your device and remove all cables connected to
it to protect against lightning strikes.
Do not use your device during thunderstorms to protect your device against any
danger caused by lightning.
Ideal operating temperatures are –10°C to +55°C. Ideal storage temperatures are
–20°C to +70°C. Extreme heat or cold may damage your device or accessories.
Keep the device and accessories in a well-ventilated and cool area away from
direct sunlight. Do not enclose or cover your device with towels or other objects.
Do not place the device in a container with poor heat dissipation, such as a box or
bag.
Do not expose your device to direct sunlight (such as on a car dashboard) for
prolonged periods.
To protect your device or accessories from fire or electrical shock hazards, avoid
rain and moisture.
Keep the device away from sources of heat and fire, such as a heater, microwave
oven, stove, water heater, radiator, or candle.
Do not place any object, such as a candle or a water container, on the device. If
any foreign object or liquid enters the device, immediately stop using it, power it
off, and remove all cables connected to it. Then, contact an authorized service
center.
24
Do not block device openings. Reserve a minimum of 10 cm around the device to
dissipate heat.
Do not place sharp metal objects, such as pins, near the earpiece or speaker.
The earpiece may attract these objects and result in injury.
Stop using your device or applications for a while if the device is overheated. If
skin is exposed to an overheated device for an extended period, low temperature
burn symptoms, such as red spots and darker pigmentation, may occur.
Do not touch the device's antenna. Otherwise, communication quality may be
reduced.
Do not allow children or pets to bite or suck the device or accessories. Doing so
may result in damage or explosion.
Observe local laws and regulations, and respect the privacy and legal rights of
others.
The device should be installed and operated with a minimum distance of 20 cm
between the radiator and your body.
Keep the device in a place with good reception. The distance between the device
and other metal materials (such as metal brackets or metal doors and windows)
should be greater than 25 cm and the distance between the device should be
greater than 30 cm.
Child's safety
Comply with all precautions with regard to child's safety. Letting children play with
the device or its accessories may be dangerous. The device includes detachable
parts that may present a choking hazard. Keep away from children.
The device and its accessories are not intended for use by children. Children
should only use the device with adult supervision.
Accessories
Using an unapproved or incompatible power adapter, charger or battery may
cause fire, explosion or other hazards.
Choose only accessories approved for use with this model by the device
manufacturer. The use of any other types of accessories may void the warranty,
may violate local regulations and laws, and may be dangerous. Please contact
your retailer for information about the availability of approved accessories in your
area.
Charger safety
For pluggable devices, the socket-outlet shall be installed near the devices and
shall be easily accessible.
Unplug the charger from electrical outlets and the device when not in use.
Do not drop or cause an impact to the charger.
If the power cable is damaged (for example, the cord is exposed or broken), or
the plug loosens, stop using it at once. Continued use may lead to electric shocks,
short circuits, or fire.
Do not touch the power cord with wet hands or pull the power cord to disconnect
the charger.
25
Do not touch the device or the charger with wet hands. Doing so may lead to
short circuits, malfunctions, or electric shocks.
If your charger has been exposed to water, other liquids, or excessive moisture,
take it to an authorized service center for inspection.
Ensure that the charger meets the requirements of Clause 2.5 in
IEC60950-1/EN60950-1 and has been tested and approved according to national
or local standards.
Connect the device only to products with the USB-IF logo or with USB-IF
compliance program completion.
Battery safety
Do not connect battery poles with conductors, such as keys, jewelry, or other
metal materials. Doing so may short-circuit the battery and cause injuries or
burns.
Keep the battery away from excessive heat and direct sunlight. Do not place it on
or in heating devices, such as microwave ovens, stoves, or radiators. Batteries
may explode if overheated.
Do not attempt to modify or remanufacture the battery, insert foreign objects into
it, or immerse or expose it to water or other liquids. Doing so may lead to fire,
explosion, or other hazards.
If the battery leaks, ensure that the electrolyte does not make direct contact with
your skins or eyes. If the electrolyte touches your skins or splashes into your eyes,
immediately flush with clean water and consult a doctor.
In case of battery deformation, color change, or overheating while charging or
storing, immediately stop using the device and remove the battery. Continued use
may lead to battery leakage, fire, or explosion.
Do not put batteries in fire as they may explode. Damaged batteries may also
explode.
Dispose of used batteries in accordance with local regulations. Improper battery
use may lead to fire, explosion, or other hazards.
Do not allow children or pets to bite or suck the battery. Doing so may result in
damage or explosion.
Do not smash or pierce the battery, or expose it to high external pressure. Doing
so may lead to a short circuit or overheating.
Do not drop the device or battery. If the device or battery is dropped, especially
on a hard surface, and may be damaged.
If the device standby time shortens significantly, replace the battery.
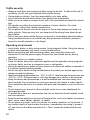
Cleaning and maintenance
During storage, transportation, and operation of the device, keep it dry and
protect it from collision.
Keep the device and accessories dry. Do not attempt to dry it with an external
heat source, such as a microwave oven or hair dryer.
Do not expose your device or accessories to extreme heat or cold. These
environments may interfere with proper function and may lead to fire or explosion.
26
Avoid collision, which may lead to device malfunctions, overheating, fire, or
explosion.
If the device is not going to be used for an extended period of time, power it off,
and remove all cables connected to it.
If anything unusual occurs (for example, if the device emits smoke or any unusual
sound or smell), immediately stop using it, power it off, remove all cables
connected to it, and contact an authorized service center.
Do not trample, pull, or excessively bend any cable. Doing so may damage the
cable, causing the device to malfunction.
Before you clean or maintain the device, stop using it, stop all applications, and
disconnect all cables connected to it.
Do not use any chemical detergent, powder, or other chemical agents (such as
alcohol and benzene) to clean the device or accessories. These substances may
cause damage to parts or present a fire hazard. Use a clean, soft, and dry cloth to
clean the device and accessories.
Do not place magnetic stripe cards, such as credit cards and phone cards, near
the device for extended periods of time. Otherwise the magnetic stripe cards may
be damaged.
Do not dismantle or remanufacture the device and its accessories. This voids the
warranty and releases the manufacturer from liability for damage. In case of
damage, contact an authorized service center for assistance or repair.
If the device screen is broken in a collision, immediately stop using the device. Do
not touch or attempt to remove the broken parts. Promptly contact an authorized
service center.
Emergency calls
The availability of emergency calls is subject to your cellular network quality, service
provider policy, and local laws and regulations. Never rely solely on your device for
critical communications like medical emergencies.
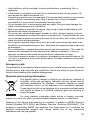
Disposal and recycling information
This symbol (with or without a solid bar) on the device, batteries (if
included), and/or the packaging, indicates that the device and its
electrical accessories (for example, a headset, adapter, or cable)
and batteries should not be disposed of as household garbage.
These items should not be disposed of as unsorted municipal waste
and should be taken to a certified collection point for recycling or
proper disposal.
For more detailed information about device or battery recycling,
contact your local city office, household waste disposal service, or retail store.
Disposal of the device and batteries (if included) is subject to WEEE Directive
Recast (Directive 2012/19/EU) and Battery Directive (Directive 2006/66/EC). The
purpose of separating WEEE and batteries from other waste is to minimize the
potential environmental impacts and human health risk of any hazardous
substances that may be present.
27
Reduction of hazardous substances
This device is compliant with the REACH Regulation [Regulation (EC) No
1907/2006] and RoHS Directive Recast (Directive 2011/65/EU). Batteries (if
included) are compliant with the Battery Directive (Directive 2006/66/EC). For
up-to-date information about REACH and RoHS compliance, please visit the web
site www.huaweidevice.com/certification.
EU regulatory conformance
Statement
Hereby, Huawei Technologies Co., Ltd. declares that this device is in compliance
with the essential requirements and other relevant provisions of Directive
1999/5/EC.
For the declaration of conformity, visit the web site
www.huaweidevice.com/certification.
The following marking is included in the product:
This device may be operated in all member states of the EU.
Observe national and local regulations where the device is used.
This device may be restricted for use, depending on the local network.
Please visit www.huaweidevice.com/worldwide/support/hotline for recently updated
hotline and email address in your country or region.
28
96722545_01