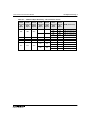
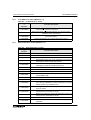
1
USER’S MANUAL
FX2N-32CAN Communication Module
FX2N-32CAN Communication Module
FX2N-32CAN Communication Module
FX2N-32CAN
Communication Module
USER’S MANUAL
Manual number : JY992D92801
Manual revision : A
Date
: DEC. 2001
i
FX2N-32CAN Communication Module
ii
FX2N-32CAN Communication Module
FAX BACK
Mitsubishi has a world wide reputation for its efforts in continually developing and pushing
back the frontiers of industrial automation. What is sometimes overlooked by the user is the
care and attention to detail that is taken with the documentation. However, to continue this
process of improvement, the comments of the Mitsubishi users are always welcomed. This
page has been designed for you, the reader, to fill in your comments and fax them back to us.
We look forward to hearing from you.
Fax numbers:
Your name....................................................
Mitsubishi Electric....
.....................................................................
America
(01) 847-478-2253
Your company ..............................................
Australia
(02) 638-7072
.....................................................................
Germany
(0 21 02) 4 86-1 12
Your location: ...............................................
South Africa
(0 27) 11 444-0223
.....................................................................
United Kingdom
(01707) 278-695
Please tick the box of your choice
What condition did the manual arrive in?
¨Good
¨Minor damage
Will you be using a folder to store the manual? ¨Yes
¨No
What do you think to the manual presentation?¨Tidy
¨Unfriendly
Are the explanations understandable?
¨Yes
¨Not too bad
¨Unusable
¨Unusable
Which explanation was most difficult to understand: ..................................................................
....................................................................................................................................................
Are there any diagrams which are not clear?
¨Yes
¨No
If so,which:..................................................................................................................................
What do you think to the manual layout?
¨Good
¨Not too bad
¨Unhelpful
If there one thing you would like to see improved, what is it?.....................................................
....................................................................................................................................................
....................................................................................................................................................
Could you find the information you required easily using the index and/or the contents, if
possible please identify your experience: ...................................................................................
....................................................................................................................................................
....................................................................................................................................................
....................................................................................................................................................
....................................................................................................................................................
Do you have any comments in general about the Mitsubishi manuals? .....................................
....................................................................................................................................................
....................................................................................................................................................
....................................................................................................................................................
....................................................................................................................................................
Thank you for taking the time to fill out this questionnaire. We hope you found both the product
and this manual easy to use.
iii
FX2N-32CAN Communication Module
iv
FX2N-32CAN Communication Module
Guidelines for the Safety of the User and Protection of the Programmable
Controller
This manual provides information for the use of the FX2N-32CAN Communication Module.
The manual has been written to be used by trained and competent personnel. The definition of
such a person or persons is as follows;
a) Any engineer who is responsible for the planning, design and construction of automatic
equipment using the product associated with this manual should be of a competent
nature, trained and qualified to the local and national standards required to fulfill that
role. These engineers should be fully aware of all aspects of safety with regards to
automated equipment.
b) Any commissioning or service engineer must be of a competent nature, trained and
qualified to the local and national standards required to fulfill that job. These engineers
should also be trained in the use and maintenance of the completed product. This
includes being completely familiar with all associated documentation for the said
product. All maintenance should be carried out in accordance with established safety
practices.
c) All operators of the completed equipment should be trained to use that product in a safe
and coordinated manner in compliance to established safety practices. The operators
should also be familiar with documentation which is connected with the actual operation
of the completed equipment.
Note : Note: the term ‘completed equipment’ refers to a third party constructed device which
contains or uses the product associated with this manual.
Notes on the Symbols Used in this Manual
At various times through out this manual certain symbols will be used to highlight points of
information which are intended to ensure the users personal safety and protect the integrity of
equipment. Whenever any of the following symbols are encountered its associated note must
be read and understood. Each of the symbols used will now be listed with a brief description of
its meaning.
Hardware Warnings
1) Indicates that the identified danger WILL cause physical and property damage.
2) Indicates that the identified danger could POSSIBLY cause physical and property
damage.
3) Indicates a point of further interest or further explanation.
Software Warnings
4) Indicates special care must be taken when using this element of software.
5) Indicates a special point which the user of the associate software element should
be aware of.
6) Indicates a point of interest or further explanation.
v
FX2N-32CAN Communication Module
• Under no circumstances will Mitsubishi Electric be liable responsible for any consequential
damage that may arise as a result of the installation or use of this equipment.
• All examples and diagrams shown in this manual are intended only as an aid to
understanding the text, not to guarantee operation. Mitsubishi Electric will accept no
responsibility for actual use of the product based on these illustrative examples.
• Owing to the very great variety in possible application of this equipment, you must satisfy
yourself as to its suitability for your specific application.
vi
FX2N-32CAN Communication Module
Table of Contents
Guideline of Safty.................................................................................v
1. Introduction............................................................................................1-1
1.1 Associated Manuals ............................................................................................ 1-1
1.2 General Names and Abbreviations...................................................................... 1-2
2. Overview ...............................................................................................2-1
2.1 Overview of the CANopen Network ..................................................................... 2-1
2.2 Overview of FX2N-32CAN Communication Module ............................................ 2-1
2.3 Characteristics ..................................................................................................... 2-2
2.3.1
2.3.2
2.3.3
2.3.4
2.3.5
Communication with other CANopen Nodes ............................................................. 2-2
The Object Dictionary ................................................................................................ 2-2
SDO Command ......................................................................................................... 2-2
The Command Interface............................................................................................ 2-2
Node Guarding .......................................................................................................... 2-2
3. Specification ..........................................................................................3-1
3.1 Environmental/Standards Specifications ............................................................. 3-1
3.2 Power Supply Specifications ............................................................................... 3-1
3.3 Performance Specification................................................................................... 3-2
4. Buffer Memory Structure/Parameter Setup ...........................................4-1
4.1 Basic Buffer Memory Structure, BFM0 ~ BFM31 ................................................ 4-1
4.2 Buffer Memory Functions .................................................................................... 4-1
4.2.1
4.2.2
4.2.3
4.2.4
4.2.5
4.2.6
4.2.7
4.2.8
Data Transfer Locations, BFMs 0~19 and 100~199 ................................................. 4-1
The Data Exchange Mode, BFM 20 .......................................................................... 4-1
Setting the Baud Rate, BFM 24................................................................................. 4-2
Reading the Communication Status, BFM 25 ........................................................... 4-2
The Watch Dog Timer Setting, BFM 26 .................................................................... 4-3
The Node Address, BFM 27 ...................................................................................... 4-3
Error Staus, BFM 29.................................................................................................. 4-4
BFM Data Memory Backup ....................................................................................... 4-4
4.3 Extended BFM Structure, BFM32 ~ BFM32767 .................................................. 4-5
5. The Object Dictionary............................................................................5-1
5.1 BFM access to the Object Dictionary - Write TO ................................................. 5-1
5.2 BFM access to the Object Dictionary - Read FROM ........................................... 5-3
5.3 CANopen Object Dictionary Structure ................................................................. 5-4
5.3.1 The General Setup .................................................................................................... 5-4
5.3.2 The Detailed Object Dictionary Contents (According to DS-301*) ............................ 5-4
vii
FX2N-32CAN Communication Module
6. The Command Interface........................................................................6-1
6.1 SDO Read Request ............................................................................................. 6-1
6.2 SDO Write Request ............................................................................................. 6-2
6.3 Layer 2 Messages ............................................................................................... 6-3
6.3.1 The PDO Remote Transmission Request ................................................................. 6-4
6.4 Error Messages ................................................................................................... 6-5
6.4.1
6.4.2
6.4.3
6.4.4
6.4.5
6.4.6
6.4.7
6.4.8
General Error Messages .......................................................................................... 6-5
Local SDO Error Codes (BFM1001 = 3).................................................................... 6-6
Remote SDO Error Codes (BFM1001 = 3)................................................................ 6-6
Unknown Command Used (BFM1001 = 100) ........................................................... 6-7
Queue was not available (BFM1001 = 8FFFF hex) .................................................. 6-7
Command or Parameter Change while CIF was busy (BFM1001 = FFFF hex)........ 6-7
The Clear/Reset “CIF was busy” Error ...................................................................... 6-7
CIF Internal Error (BFM1001 = 200 hex)................................................................... 6-8
7. The Mapping Modes..............................................................................7-1
7.1 Factory Default Mapping/Mode 0 Mapping.......................................................... 7-2
7.2 Mode A Mapping ................................................................................................. 7-2
7.3 Mode B Mapping ................................................................................................. 7-3
7.3.1
7.3.2
7.3.3
7.3.4
7.3.5
Prepare the PDO Mapping Table .............................................................................. 7-3
The Source Command .............................................................................................. 7-5
The Destination Parameter ....................................................................................... 7-5
Assign Additional COB-IDs to the Local Node ......................................................... 7-6
The End of the Parameter Table ............................................................................... 7-6
7.4 PDO Mapping Table Overviews .......................................................................... 7-7
7.4.1
7.4.2
7.4.3
7.4.4
7.4.5
7.4.6
Tx-PDO Mapping Table............................................................................................. 7-7
Rx-PDO Mapping Table ............................................................................................ 7-8
Mode B Mapping Errors ............................................................................................ 7-9
Source Parameter Errors .......................................................................................... 7-9
Destination Parameter Errors .................................................................................. 7-10
Other Errors............................................................................................................. 7-10
8. Node Guarding ......................................................................................8-1
8.1 CIF/BFM Structure for Slave Guarding Assignment ............................................ 8-1
8.2 Node Guarding Parameter Settings .................................................................... 8-1
8.2.1
8.2.2
8.2.3
8.2.4
8.2.5
8.2.6
8.2.7
8.2.8
Slave Number............................................................................................................ 8-1
Services Requested .................................................................................................. 8-2
Guard Time ............................................................................................................... 8-2
Number of Retries ..................................................................................................... 8-2
End of Parameter Table ............................................................................................ 8-2
Parameter Errors ....................................................................................................... 8-2
Read Guarding Status ............................................................................................... 8-3
Reset Guarding Status Latch .................................................................................... 8-4
9. Emergency Messages...........................................................................9-1
9.1 Read Emergency Message Buffers ..................................................................... 9-1
9.2 Send an Emergency Message ............................................................................ 9-3
viii
FX2N-32CAN Communication Module
1.
Introduction
1.1
Associated Manuals
Introduction 1
Table 1.1: Manual List
Manual name
FX2N-32CAN
¤ Communication Module
Hardware Manual
¤
FX1S/FX1N/FX2N/FX2NC
Programming Manual ΙΙ
Manual number
Description
Describes the wiring, installation, parts, and
JY992D92901
handling of the CANopen Communication
(packed with product)
Module.
JY992D88101
(sent separately)
Explains the instructions in the FX1S/FX1N/
FX2N/FX2NC Series PLC.
¡ FX1N Hardware Manual
Describes the contents related to the
JY992D89301
hardware such as specification, wiring and
(packed with product)
mounting of the FX1N Series PLC.
¡ FX2N Hardware Manual
Describes the hardware specifications such
JY992D66301
as the wiring and mounting of the FX2N
(packed with product)
Series PLC.
¡ FX2NC Hardware Manual
Describes the hardware specifications such
JY992D76401
as the wiring and mounting of the FX2NC
(packed with product)
Series PLC.
¤: Refer to these manuals
¡: Refer to the manual required depending on the equipment used
1-1
FX2N-32CAN Communication Module
1.2
Introduction 1
General Names and Abbreviations
Unless otherwise specified, this manual uses the general names and abbreviations shown in
the table below to describe the FX2N-32CAN Communication Module.
.
Table 1.2: Vocabulary List
General name/
abbreviation
Description
FX2N-32CAN
Abbreviation of the FX2N-32CAN Communication Module.
Cyclic transmission
Transmission method to periodically communicate the contents of remote
I/Os and remote registers.
Network Management
Node
Node which controls the data link system for the CANopen network.
One Network Manager station is required per system.
Rx-PDO
Receive Process Data Objects are data read from other nodes via the
CAN bus.
Tx-PDO
Transmit Process Data Objects are the data sent to other nodes via
the CAN bus.
CIF
The Command Interface is the FX2N-32CAN tool used to perform
actions such as to set parameters, execute commands, establish
communication connections, access the CANopen Object Dictionary,
and read error messages.
COB-ID
The CAN Object ID number is a unique identifying number to
distinguish between different messages on the CAN bus (e.g. PDO,
SDO, NMT, SYNC, EMCY messages)
Mapping Mode 0
Base Configuration where 4 Rx-PDOs and 4 Tx-PDOs are given BFM
assignments for each FX2N-32CAN node according to the predefined connection set of CANopen.
Mapping Mode A
Mitsubishi Electric defined configuration for the FX2N-32CAN module
that defines the relationship between up to eight FX2N-32CAN nodes,
the node BFMs, and the Rx-PDOs and Tx-PDOs. This mode is very
convenient if every node is an FX2N-32CAN module.
Mapping Mode B
Configuration mode that allows specific Rx-PDOs and Tx-PDOs to be
matched on a node by node basis.
1-2
FX2N-32CAN Communication Module
2.
Overview 2
Overview
This chapter describes the overview of the FX2N-32CAN Communication Module for the
FX1N/2N(c) Series PLC.
The Controller Area Network (CAN used hereafter in this manual) is a serial bus system
especially suited for networking "intelligent" devices as well as sensors and actuators within a
system or sub-system.
2.1
Overview of the CANopen Network
The CANopen protocol provides a system for transferring serial messages between different
nodes via the CAN bus.
1) Simple, relatively high speed communication can be accomplished with modules that
handle the ON/OFF data such as I/Os or numeric data.
2) All CAN nodes are able to transmit data and several nodes can make a request to the CAN
bus simultaneously.
3) Connections can be made to different types of devices made by partner manufacturers
giving flexibility to the system.
4) Messages can be prioritized for transfer to the CAN Bus.
2.2
Overview of FX2N-32CAN Communication Module
The FX2N-32CAN Communication Module is a special extension block which allows an FX1N/
2N(c) PLC to transfer/receive data from other nodes on the CAN bus.
1) CANopen ready I/O stations and device stations can be connected to the CAN bus and
information can be transmitted to the FX2N-32CAN module and FX Series PLC.
2) By using the FX2N-32CAN module, two or more FX1N/2N(c) Series PLCs
connected via the CAN bus to configure a simple distributed system.
Network
Configuration Manager
CANopen Network
Terminating
Resistor 120Ω
Terminating
Resistor 120Ω
Repeater
CANopen
Node
FX1N/FX2N/
FX2NC
FX2N32CAN
FX1N/FX2N/
FX2NC
FX2N32CAN
CANopen
Node
Network Manager Node:Station which controls the data link system
CANopen Node
:Node for transferring or receiving data from the CAN bus.
2-1
can be
FX2N-32CAN Communication Module
2.3
Overview 2
Characteristics
This section describes the characteristics of the CAN bus, communication with other CANopen
nodes, and some of the special features available in the CANopen protocol.
2.3.1
Communication with other CANopen Nodes
All nodes on the CAN network can write data to the all the other nodes on the network. Each
piece of data has a unique identifiying number that is read by the receiving nodes to determine
whether that data should be kept in the receiving nodes’ Buffer Memory.
The FX2N-32CAN module has separate buffer memories for writing TO and reading FROM
the CAN bus. These Buffer Memories are accessed by FROM/TO commands of the PLC.
2.3.2
The Object Dictionary
The Object Dictionary is a kind of indexed storage system that contains data, device
parameters, CANopen feature setup data, instruction triggers, and other information
necessary to configure and operate the CANopen protocol.
2.3.3
SDO Command
The Service Data Object Command can be used to read/write data to the Object Dictionary.
This command can be used to set network parameters and also to initiate CANopen
functionality.
2.3.4
The Command Interface
The Command Interface is a set of Buffer Memories that is used when using the SDO
Command. The data placed in these BFMs is used to access the parameter setup of the
Object Dictionary.
2.3.5
Node Guarding
The nodes on a CAN bus can be checked for their communication status at user defined
intervals. If a problem occurs or communication is blocked for some reason, an error message
will be generated to alert the user to the situation.
2-2
FX2N-32CAN Communication Module
Specification 3
3.
Specification
3.1
Environmental/Standards Specifications
Table 3.1: Environmental/Standards Specifications
Item
3.2
Description
Environmental specifications
excluding dielectric withstand
voltage
Same as those of the main unit.
Dielectric Withstand Voltage
500 V AC > 1 min, tested between signal line and ground
CAN Standard
ISO 11898/1993
CANopen Standard by CiA
DS-301 Version 3.0
Additional CANopen Features
NMT, Guarding, and Guarding request based on DS-302 V2.0.
Network Variables based on DS-405 V1.0
CE Standard
Emission: EN50081-2
Immunity: EN61131-2
Power Supply Specifications
Table 3.2: Power Supply Specifications
Item
Description
External Power Supply
None
Internal Current Consumption
130 mA at 5 V DC
3-1
FX2N-32CAN Communication Module
3.3
Specification 3
Performance Specification
Table 3.3: Performance Specifications
Item
Applicable function
Specification
CANopen Node
Applicable PLC
FX1N, FX2N(c)
Transmission speed
Selectable (Write to BFM 24): 10 kBd, 20 kBd, 50 kBd, 125 kBd, 250 kBd,
500 kBd, 800 kBd, 1 MBd
Node number
Selectable from 1~127, (Write to BFM 26)
Maximum total cable
5000 m maximum
length (maximum
Varies depending on the transmission speed.
transmission distance)
Maximum number of
connected modules
The node address can be set from 1 ~ 127. A total of 30 nodes can be
connected on each bus. By the use of repeaters or bridges, the total number
can be extended up to 127 nodes.
Communication
method
Cyclic or Event Driven
Transmission path
type
CAN Bus (RS-485)
Connection cable
The cable should conform to ISO11898/1993. Recommended is a shielded
2 X 2 twisted pair cable with an impedance of about 120 ohm.
Connectable PLC
FX1N, FX2N(c) Series PLC
Number of occupied
I/O points
8 I/O points of FX Series PLC (Selectable from Inputs or Outputs)
Communication with
PLC
By FROM/TO instructions via the buffer memory
RUN
Operation indication
: Lit green when module is exchanging information with the
CANopen network.
FROM/TO: Lit green when module is receiving FROM/TO commands.
Tx/Rx
: Lit green when CAN-interface system is in normal operation.
ERROR : Lit red when communication, overflow, or general error occurs.
POWER : Lit green when the 5VDC power is supplied from main unit.
3-2
FX2N-32CAN Communication Module
4.
Buffer Memory Structure/Parameter Setup 4
Buffer Memory Structure/Parameter Setup
This chapter describes Buffer Memory Structure of the FX2N-32CAN module and the how to
set the parameters associated with the CANopen protocol.
4.1
Basic Buffer Memory Structure, BFM0 ~ BFM31
Table 4.1: Buffer Memory Structure, BFM0 - BFM31
BFM#
BFM0
BFM1
:
:
BFM19
BFM20
BFM21
BFM22
BFM23
BFM24
BFM25
BFM26
BFM27
BFM28
BFM29
BFM30
BFM31
READ (FROM)
Received data (Section 4.2.1-2)
Received data (Section 4.2.1-2)
:
:
Received data (Section 4.2.1-2)
Data exchange status bit (Section 4.2.2)
Reserved
Reserved
Reserved
Read baud rate (Section 4.2.3)
WRITE (TO)
Data to Transmit (Section 4.2.1-2)
Data to Transmit (Section 4.2.1-2)
:
:
Data to Transmit (Section 4.2.1-2)
Data exchange control bit (Section 4.2.2)
Reserved
Reserved
Reserved
Set baud rate (Section 4.2.3, default 10kBd)
Reset + CANopen restart command (Section
Module communication status (Section 4.2.4)
4.2.4)
Read FROM/TO watchdog timer reload value, Set FROM/TO watchdog timer reload value,
“default = 20” equals 200ms. (Section 4.2.5)
“default = 20” equals 200ms. (Section 4.2.5)
Set node address, default = 127. (Section
Read node address (Section 4.2.6)
4.2.6)
Reserved
Reserved
Error status (Section 4.2.7)
Reset latched error status (Section 4.2.7)
Module code (K7100)
(Read only)
Reserved
Reserved
4.2
Buffer Memory Functions
4.2.1
Data Transfer Locations, BFMs 0~19 and 100~199
These Buffer memory locations in the FX2N-32CAN module are used to receive from and
transfer data to the CAN bus.
4.2.2
The Data Exchange Mode, BFM 20
On read access, BFM20 contains a status bit for data exchange. If bit0 is “1”, the module is in
data exchange mode and the received data are valid (no CAN error occurred). If bit0 is “0”, the
module is not in data exchange mode.
On write access, BFM20 acts as the data exchange control signal. To ensure that the FX2N32CAN module can handle the PDO data in a consistent way, it is absolutely necessary to
write a “1” to this BFM before reading Rx PDO data (FROM) and after writing Tx-PDO data
(TO) to the module. The data exchange control signal ensures, by internal buffer exchange,
that TO data from the PLC will be transmitted within the same corresponding Tx-PDO at the
same time.
TO data will only be sent to the CAN bus after a write access to BFM20 (data = 1).
As long as the reading of the previous data is not finished and a new exchange command to
BFM20 has not been sent, FROM data from the CAN bus will not be (partially) overwritten by
further Rx PDOs with the same ID.
4-1
FX2N-32CAN Communication Module
Buffer Memory Structure/Parameter Setup 4
If the CANopen module is in data exchange mode, the received PDO data (Rx-PDO) from
other nodes can be read by the FX2N(C)/FX1N PLC by using a FROM instruction and the
transmit PDO data (Tx-PDO) can be written to the module and sent to the network by using a
TO instruction.
4.2.3
Setting the Baud Rate, BFM 24
BFM24 contains the current baud rate setting of the FX2N-32CAN module as shown in Table
4.2 below. The baud rate can be set by writing TO BFM24 and the baud rate must be equal for
all nodes on the CANopen network.
Table 4.2: Baud Rate Settings
Baud Rate
4.2.4
BFM24 Value
10 kBd
10
20 kBd
20
50 kBd
50
125 kBd
125
250 kBd
250
500 kBd
500
800 kBd
800
1000 kBd
1000
Reading the Communication Status, BFM 25
Read the CANopen module’s communication status from BFM 25 per the table below.
Table 4.3: Communication Status
Bit
On
b0: module online/offline
Off
module online
module offline
b1 ~ b7: reserved
b9, b8: CANopen network state
00b = Prepared State
01b = Pre-operational State
10b = Operational State
11b = Not Possible
b10 ~ b15: reserved
Note: On write access, BFM25 contains the command flags to reset the FX2N-32CAN and to
restart the CANopen stack.
Table 4.4: CANopen Stack Reset
Bit
b0: restart command
On
CANopen stack will be restarted
Off
Normal operation
b1 ~ b15: reserved
The restart command can be used after the baud rate (BFM24) or the node address (BFM27)
was changed. By setting B0 to “1” (use the pulse instruction), the module can be forced to go
offline and to restart with the new settings without switching off the power of the host PLC.
4-2
FX2N-32CAN Communication Module
4.2.5
Buffer Memory Structure/Parameter Setup 4
The Watch Dog Timer Setting, BFM 26
The Watch Dog Timer setting is stored in BFM 26 in units of 10 ms. A WDT error will occur if
there is no FROM or TO instruction to any BFM for the time specified. After the WDT has
expired, it must be reset by writing the current or a new value to BFM26. When the value 0 is
written to BFM26, the FROM/TO watchdog timer is disabled.
During normal operation as soon as the module receives a FROM or TO instruction, the WDT
will reset to time zero.
Note: No Emergency Message will be transmitted if the WDT is disabled and the FROM/TO
communication stops and the FX2N-32CAN module is in operational mode.
4.2.6
The Node Address, BFM 27
The CANopen node supports setting of the node address by the FX2N(C)/FX1N PLC via the
TO instruction. The actual address is displayed in BFM27. The Node address must be set for
communication to take place via the CAN bus.
In case of an address change by TO instruction, the new address value (1...127d) must be
written to BFM27. The new address will only become effective after a power down of the host
PLC or after a restart command written to BFM25.
4-3
FX2N-32CAN Communication Module
4.2.7
Buffer Memory Structure/Parameter Setup 4
Error Staus, BFM 29
BFM29 reflects the error status of the module. Bit 7 shows the status of the FROM/TO
watchdog timer (see section 4.1.7, BFM 26). In case of a watchdog timer error (b7 is ON) an
external emergency message will be sent to the CANopen network if the module is in
operational mode.
When the value 0 is written to BFM26, the FROM/TO watchdog timer is disabled and b7 of
BFM29 will never become “1”.
Table 4.5: Error Bit Description for BFM 29
Bit
b0: general error
On
Off
This bit is ON if b2, b3 or b4 are On No general error
b1: reserved
b2: power error
Power supply error
b3: CAN bus off error
CAN bus off error
Power supply normal
b4:EEPROM/flash memory Data in EEPROM or flash memory is EEPROM and flash memory data
error
corrupted
normal
b5, b6: reserved
b 7 : F R O M/ TO w a t c hd o g No FROM/TO instruction received F R O M / TO i n s t r u c t i o n s r e c e i v e d
t im er (res et by w ri ti ng a
(for the time specified in BFM26)
regularly
value to BFM26)
b8: Data queue overflow
Data could not be written to internal No data queue overflow
queue
b 9 : C o m m a n d q u e u e o r Data could not be written to internal No command queue or event queue
event queue overflow
command queue or event queue
overflow
b 1 0: C AN o p en gu a rd i n g CANopen guarding error occurred
error
No CANopen guarding error occurred
b11: Baud rate change error
New baud rate not valid, no change Set baud rate valid
b12: Address change error
New address not valid, no change
Address is valid
b13: CANopen emergency
CANopen emergency occurred
No emergency exists
b14: CAN error passive state CAN error passive
CAN error active
b15: Reserved
NOTE:
1. The error bits b2, b8, and b9 are latched and must be reset from the PLC by writing “0” to
the appropriate bit in BFM29. By writing “0” to all of BFM29, all latched error flags will be
cleared.
2. All other error flags will be reset automatically as soon as the corresponding error has been
solved.
4.2.8
BFM Data Memory Backup
The data in BFM24, 26, and 27 are kept by EEPROM.
4-4
FX2N-32CAN Communication Module
4.3
Buffer Memory Structure/Parameter Setup 4
Extended BFM Structure, BFM32 ~ BFM32767
Table 4.6: Extended BFM Structure
BFM#
READ (FROM)
WRITE (TO)
BFM32 ~ BFM99
Reserved
BFM100 ~ BFM199
Received Output Data
Transmit Data
BFM200 ~ BFM999
Reserved
Reserved
BFM1000 ~ BFM1066
Module Command Interface
Module Command Interface
BFM1067 ~ BFM32767 Reserved
Reserved
Reserved
The Command Interface (CIF) offers the possibility to send commands directly to the
CANopen module. This command interface can be used to manipulate and control all items in
the object dictionary, to send and receive SDO messages, to send network management
messages, or to send emergency messages.
4-5
FX2N-32CAN Communication Module
Buffer Memory Structure/Parameter Setup 4
MEMO
4-6
FX2N-32CAN Communication Module
5.
The Object Dictionary 5
The Object Dictionary
The Object Dictionary is a structure for data organization within the CAN bus. The data within
the Object Dictionary can be used to set CAN bus parameters, initialize special functions,
control data flow, to store data in many formats or send emergency messages.
The Object Dictionary address consists of an Index and Sub-Index for data Read/Write.
Different indexes are used depending upon the type of data to store - unsigned 8 bit, signed 8
bit, unsigned 16 bit, signed 16 bit, unsigned 32 bit, signed 32 bit, or 32 bit floating point.
The information contained in Sections 5.1 and 5.2 detail how the FX2N-32CAN module BFMs
can tranfer information TO/FROM the Object Dictionary Mapping. For the complete structure
of the CANopen Object Dictionary, please go to the CAN-in-Automation website at http://
www.can-cia.de.
5.1
BFM access to the Object Dictionary - Write TO
Use the TO instruction to write data to the following locations.
Table 5.1: CAN bus Object Dictionary - TO Instruction Access
Index
A240h
float 32
bit
object
Index
A200h
unsigned
32 bit
object
Index
A1C0h
signed
32 bit
object
Index
A100h
unsigned
16 bit
object
Index
A0C0h
signed
16 bit
object
subindex
subindex
subindex
subindex
subindex
01h
01h
01h
01h
01h
02h
02h
03h
02h
03h
02h
03h
03h
04h
04h
05h
05h
06h
06h
02h
03h
Index
Index
A040h
A000h
unsigned signed 8
8 bit
bit
object
object
BFM (TO access)
subindex
subindex
01h
01h
BFM 0, lower 8 bit
02h
02h
BFM 0, higher 8 bit
03h
03h
BFM 1, lower 8 bit
04h
04h
BFM 1, higher 8 bit
05h
05h
BFM 2, lower 8 bit
06h
06h
BFM 2, higher 8 bit
07h
07h
BFM 3, lower 8 bit
08h
08h
BFM 3, higher 8 bit
09h
09h
BFM 4, lower 8 bit
0Ah
0Ah
BFM 4, higher 8 bit
0Bh
0Bh
BFM 5, lower 8 bit
0Ch
0Ch
BFM 5, higher 8 bit
.
.
.
.
.
.
.
.
.
.
.
.
.
.
.
.
.
.
.
.
.
.
.
.
13h
13h
14h
14h
0Ah
0Ah
0Ah
25h
25h
BFM 18 lower 8 bit
26h
26h
BFM 18 higher 8 bit
27h
27h
BFM 19, lower 8 bit
28h
28h
BFM 19, higher 8 bit
5-1
FX2N-32CAN Communication Module
The Object Dictionary 5
Table 5.1: CAN bus Object Dictionary - TO Instruction Access
Index
A240h
float 32
bit
object
0Bh
Index
A200h
unsigned
32 bit
object
0Bh
Index
A1C0h
signed
32 bit
object
Index
A100h
unsigned
16 bit
object
Index
A0C0h
signed
16 bit
object
15h
15h
16h
16h
0Bh
Index
Index
A040h
A000h
unsigned signed 8
8 bit
bit
object
object
BFM (TO access)
29h
29h
BFM 100, lower 8 bit
2Ah
2Ah
BFM 100, higher 8 bit
2Bh
2Bh
BFM 101, lower 8 bit
2Ch
2Ch
BFM 101, higher 8 bit
.
.
.
.
.
.
.
.
.
.
.
.
.
.
.
.
.
.
.
.
.
3Ch
3Ch
77h
77h
78h
78h
3Ch
.
.
.
EDh
EDh
BFM 198, lower 8 bit
EEh
EEh
BFM 198, higher 8 bit
EFh
EFh
BFM 199, lower 8 bit
F0h
F0h
BFM 199, higher 8 bit
5-2
FX2N-32CAN Communication Module
5.2
The Object Dictionary 5
BFM access to the Object Dictionary - Read FROM
Use the FROM instruction to read values from these locations in the Object Dictionary.
Table 5.2: CAN bus Object Dictionary - FROM Instruction Access
Index
A6C0h
float 32
bit
object
Index
A680h
unsigned
32 bit
object
Index
A640h
signed
32 bit
object
Index
A580h
unsigned
16 bit
object
Index
A540h
signed
16 bit
object
subindex
subindex
subindex
subindex
subindex
01h
01h
02h
02h
03h
03h
04h
04h
01h
02h
01h
02h
01h
02h
05h
03h
03h
05h
03h
06h
06h
Index
Index
A4C0h
A480h
unsigned signed 8
8 bit
bit
object
object
subindex
BFM (FROM
access)
subindex
01h
01h
BFM 0, lower 8 bit
02h
02h
BFM 0, higher 8 bit
03h
03h
BFM 1, lower 8 bit
04h
04h
BFM 1, higher 8 bit
05h
05h
BFM 2, lower 8 bit
06h
06h
BFM 2, higher 8 bit
07h
07h
BFM 3, lower 8 bit
08h
08h
BFM 3, higher 8 bit
09h
09h
BFM 4, lower 8 bit
0Ah
0Ah
BFM 4, higher 8 bit
0Bh
0Bh
BFM 5, lower 8 bit
BFM 5, higher 8 bit
0Ch
0Ch
.
.
.
.
.
.
.
.
.
.
.
.
.
.
.
.
.
.
.
.
.
.
.
25h
25h
BFM 18 lower 8 bit
26h
26h
BFM 18 higher 8 bit
27h
27h
BFM 19, lower 8 bit
28h
28h
BFM 19, higher 8 bit
29h
29h
BFM 100, lower 8 bit
13h
0Ah
0Ah
0Ah
14h
15h
0Bh
0Bh
13h
14h
15h
0Bh
16h
16h
.
2Ah
2Ah
BFM 100, higher 8 bit
2Bh
2Bh
BFM 101, lower 8 bit
2Ch
2Ch
BFM 101, higher 8 bit
.
.
.
.
.
.
.
.
.
.
.
.
.
.
.
.
.
.
.
.
.
77h
3Ch
3Ch
77h
3Ch
78h
78h
.
.
.
EDh
EDh
BFM 198, lower 8 bit
EEh
EEh
BFM 198, higher 8 bit
EFh
EFh
BFM 199, lower 8 bit
F0h
F0h
BFM 199, higher 8 bit
5-3
FX2N-32CAN Communication Module
The Object Dictionary 5
5.3
CANopen Object Dictionary Structure
5.3.1
The General Setup
The general setup for the CANopen Object Dictionary is shown in Table 6.3 below.
Table 5.3: General Object Dictionary Structure
Index (hex)
5.3.2
Object type
0000
Not Used
0001 - 001F
Static Data Types
0020 - 003F
Complex Data Types
0040 - 005F
Manufacturer Specific Data Types
0060 - 007F
Device Profile Specific Static Data Types
0080 - 009F
Device Profile Specific Complex Data Types
00A0 - 0FF0
Reserved
1000 - 1FFF
Communication Profile Area
2000 - 5FFF
Manufacturer Specific Profile Area
6000 - 9FF9
Standard Device Profile Area
A000 - FFFF
Reserved
The Detailed Object Dictionary Contents (According to DS-301*)
The detailed setup for the CANopen Object Dictionary for the CANopen node is shown below.
Table 5.4: Detailed Object Dictionary Structure
Index (hex)
Object type
1000
Device Type
1001
Error Register
1004
Number of PDOs supported
1005
COB-ID of SYNC message (producer/consumer can
be selected)
1006
Communication Cycle Period (defines SYNC message timing)
1007
Synchronous Window Length (defines SYNC time
window)
1008
Manufacturer Device Name
1009
Hardware Version
100A
Software Version
100B
Node ID
100C
Guard Time
100D
Life Time Factor
1010
Store Parameter to Flash
1011
Restore Parameter
1400 ~ 1BFF
PDO Parameter, PDO Mapping
5-4
FX2N-32CAN Communication Module
6.
The Command Interface 6
The Command Interface
The Command Interface (CIF) is located in BFMs 1000~1066 and can be used to access the
CANopen Object Dictionary to perform the following commands:
SDO Read Request - Read the value of an index/subindex of the Object Dictionary (local or
network node).
SDO Write Request - Write a value to an index/subindex of the Object Dictionary (local or
network node).
LAYER 2 message write Request - Write a layer 2 message to the CAN bus.
Local Receive PDO Refresh - Request a transmission of a local Rx-PDO to the network.
Define/Change the PDO Mapping/Binding of the Network
Setup the Guarding Parameter
Read the Guarding Status
Reset the Guarding Status Latch
Read the Emergency Message Buffer
Clear the Emergency Message Buffer
6.1
SDO Read Request
The SDO (Service Data Object) command can access all nodes on the CAN network via the
Object Dictionary by using FROM/TO commands using the appropriate BFMs.
A PLC can access the connected FX2N-32CAN module by writing the actual module address
(1~127) or by writing “0” in the FROM/TO command.
To initialize the SDO Read command, the value of the node address must be written to BFM
1001, the Object Dictionary Index to BFM 1002, and the Subindex to BFM 1003. Finally, the
command code for SDO Read Access, “4” , must be written to BFM1000.
If the access has been successful BFM1000 will display “5”, BFM 1003 will contain the node
address, index and subindex numbers for verification purposes. The length of the read data
(in bytes) will be stored in BFM1004 and BFM1005~BFM1063 will contain up to 118 data
bytes.
Byte order: 1st data byte = BFM1005 low byte, 2nd data byte = BFM1005 high byte, 3rd data
byte = BFM1006 low byte, 4th data byte = BFM1006 high byte, etc.
6-1
FX2N-32CAN Communication Module
6.2
The Command Interface 6
SDO Write Request
The SDO (Service Data Object) command can access all nodes on the CAN network via the
Object Dictionary by using FROM/TO commands.
A PLC can access the connected FX2N-32CAN module by writing the actual module address
(1~127) or by writing “0” in the FROM/TO command.
To initialize the SDO Write command, the value of the node address must be written to BFM
1001, the Object Dictionary Index to BFM 1002, and the Subindex to BFM 1003. Finally, the
command code for SDO Write Access, “2” , must be written to BFM1000.
If the access has been successful BFM1000 will display “3”, BFM 1003 will contain the node
address, index and subindex numbers for verification purposes.
Table 6.1: BFM Structure for the SDO Read/Write Commands
BFM #
READ (FROM)
WRITE (TO)
BFM1000
Result (Read 0005, Write 0003)
CIF BUSY (FFFF hex)
Command (Read 0004/ Write 0002)
BFM1001
Node Address
Node Address
BFM1002
Index
Index
BFM1003
Subindex
Subindex
BFM1004
Data Length
Data Length
BFM1005
Result Data
Command Parameter Data
BFM1006
Result Data
Command Parameter Data
BFM1007
Result Data
Command Parameter Data
BFM1008
Result Data
Command Parameter Data
BFM1009
Result Data
Command Parameter Data
BFM1010
Result Data
Command Parameter Data
:
:
:
:
:
:
:
:
:
BFM1062
Result Data
Command Parameter Data
BFM1063
Result Data
Command Parameter Data
BFM1064
Unused
Unused
BFM1065
Unused
Unused
BFM1066
Unused
Unused
6-2
FX2N-32CAN Communication Module
6.3
The Command Interface 6
Layer 2 Messages
Using this function, the PLC can send any Layer 2 messages to the CAN bus.
Incorrect use of this command can cause strange behavior in the CANopen network. Please
take care to use this function only for special purposes.
Table 6.2: Layer 2 Message Commands
BFM#
READ (FROM)
WRITE (TO)
BFM1000
Command (000C hex)
BFM1001
COB-ID (low word), *1
BFM1002
COB-ID (high word), *1
BFM1003
BFM1004
There are no Special Return
Values but the “Queue not
Available” error may occur under
high busload conditions.
BFM1005
BFM1006
RTR (Remote Transmission Request), *2
DLC (Data Length Count), *3
Data byte 2, data byte 1, *4
CIF busy (FFFF hex)
Data byte 4, data byte 3, *4
BFM1007
Data byte 6, Data byte 5, *4
BFM1008
Data byte 8, Data byte 7, *4
BFM1009
:
:
BFM1066
Unused
Unused
*1 - 11 bit Identifier (COB-ID) for transmission identification.
*2 - Set this BFM to “0” for normal transmission. If this BFM is set to “1”, a request frame is
sent. This request makes the producer of the associated CAN-ID specified in BFM 1001/1002
send the actual data.
*3 - The data length in bytes.
*4 - The data byte order is the same as the SDO Read and Write Requests.
6-3
FX2N-32CAN Communication Module
6.3.1
The Command Interface 6
The PDO Remote Transmission Request
This function can be used to refresh the local receive data buffer.
Basically, a CANopen node will not send its data unless a trigger-condition occurs (I/O change,
SYNC signal, or manufacturer specific events). The data in the local receive data buffer may
not be exactly the same as the data in the CANopen node that produces the data. This does
not mean that the local data is wrong, it means that according to the configuration of the
CANopen node producing the data, a transmission is/was not necessary. There may be no
need to monitor an Hour meter on a minute by minute basis, for example, or there might be
analog data that is triggered when it reaches a certain level.
With the PDO Remote Transmit Request, the data receiver can send a request to the data
producer that the latest data be transmitted.
To refresh the receive data buffer, write the receive PDO number to BFM1001 and set
BFM1000 to “8100” hex. Thke requeste PDO must exist in the local Object Dictionary and has
to be properly configured because all parameter data are taken from the local Object
Dictionary.
The PDO number “0” will cause the request of all local configured Rx-PDOs.
If the result in BFM1000 becomes “8101” hex, the rtr frame has been successfully sent to the
transmit queue. If the CIF was not able to access the queue, the result in BFM1000 will be
“8FFF” hex. If the PDO specified by BFM1001 was not configured (COB ID 80000000 hex),
the result in BFM 1000 will be “81FF” hex and BFM 1001 will display the PDO number.
Table 6.3: PDO Remote Transmission BFM Structure
BFM #
READ (FROM)
WRITE (TO)
BFM1000
Request successfully sent (8191 hex)
No COB-ID found (81FF hex), *2
CIF BUSY (FFFF hex)
Command (8100 hex)
BFM1001
Rx-PDO number, *2
Local Rx-PDO number, *1
BFM1002
:
BFM1066
Unused
Unused
*1 If the PDO rtr command is used with parameter “0”, the module will read the local object
dictionary to get the first PDO Identifier (COB-ID) to request, afterwards the rtr frame is
assembled and sent. Next, the second PDO Identifier is read from the local object dictionary
and the process repeats. After all PDOs have been requested to the network (or skipped if the
PDO was not configured), the result in BFM 1000 is set to “8101” hex.
The process to request all configured PDOs to the network may take some time, as long as the
command is being executed the result BFM1000 will display CIF busy (FFFF hex). To abort a
running remote transmission command, “FFFF” hex can be written to the command BFM
1000. When the result BFM 1000 does not display “CIF busy” anymore, the CIF is ready to
receive new commands.
*2 If a single PDO number is requested to be refreshed and the CIF could not find a valid
COB-ID in the object dictionary, the error message “no COB ID found for requested PDO”
(81FF hex) will be displayed in BFM1000. The Rx-PDO number which caused the failure can
be read from BFM1001.
6-4
FX2N-32CAN Communication Module
6.4
The Command Interface 6
Error Messages
If the BFM1000 receives a value of “000F” hex, an error has occured during the execution of a
command.
6.4.1
General Error Messages
Table 6.4: Error Messages when BFM1000 = 000F hex
Short
Description
SDO Error
Unknown
Command
Used
BFM1000
Error
000F hex
000F hex
000F hex
000F hex
000F hex
BFM1001
Error Class
0003
0064 hex
8FFF hex
FFFF hex
00C8 hex
BFM#
Queue was
not
Available
Command
or
Parameter
Change
While CIF
was Busy
CIF Internal
Error
BFM1002
Device ID
Content of
Error Buffer
BFM1003
Low Word of
Error Code, *3
Content of
Error Buffer
BFM1004
High Word of
Error Code, *4
Content of
Error Buffer
BFM1005
Content of
Error Buffer
BFM1006
Content of
Error Buffer
BFM1007
BFM1008
Additional
Data,
Error Class
Dependent
Content of
Error Buffer
Content of
Error Buffer
:
:
:
:
:
:
BFM1064
Content of
Error Buffer
BFM1065
Content of
Error Buffer
BFM1066
Content of
Error Buffer
*2 - Device ID which caused the error when it was accessed by SDO
*3 - Low word of error code (see DS-301, DS-405)
*4 - High word of error code (see DS-301, DS-405)
6-5
FX2N-32CAN Communication Module
6.4.2
The Command Interface 6
Local SDO Error Codes (BFM1001 = 3)
Table 6.5: Local Node Error Codes
SubIndex #
x
byte data
0 x 50000000
6.4.3
Local Error Description
Time out or Impossible to allocate identifier for SDO
transmission or Protocol mismatch
0 x 60600000
Buffer too small for received SDO data (this error will occur during
initialisation of the transmission)
0 x 08000020
Buffer too small for received SDO data (this failure will occur ONLY
during transmission)
0 x 08000022
Different transmission for requested SDO aready running
Remote SDO Error Codes (BFM1001 = 3)
Table 6.6: Remote Node Error Codes
SubIndex #
x
byte data
Local Error Description
0 x 05030000
Toggle bit not alternated
0 x 05040000
Time Out value reached
0 x 05040001
Client/Server command specifier no valid or unknown
0 x 06010000
Requested access type is not supported for this Object
(attempting to Read a Write Only device)
0 x 06010000
Requested access type is not supported for this Object
(attempting to Write to a Read Only device)
0 x 06020000
Requested Object does not exist in the Object Dictionary
0 x 06040000
The index is reserved for future use
0 x 06040041
The Object cannot be mapped to the PDO
0 x 06040042
Number and length of the Object to be mapped would
exceed PDO length
0 x 06040043
General parameter incompatibility
0 x 06040047
General internal incompatibility in the device
0 x 06060000
Buffer too small for received SDO data (this error will
occur during initialisation of the transmission) or Access
failed because of an hardware error
0 x 06070010
Data type does not match, length of service parameter
does not match
0 x 06070012
Data type of Write access and destination does not
match (service parameter too long)
0 x 06070013
Data type of Write access and destination does not
match (service parameter too short)
0 x 06090011
Requested Sub-Index does not exist
0 x 06090030
Requested Write access exceeds value range of this
parameter
6-6
FX2N-32CAN Communication Module
The Command Interface 6
Table 6.6: Remote Node Error Codes
SubIndex #
x
byte data
6.4.4
Local Error Description
0 x 06090031
Value of the parameter to Write is too high
0 x 06090032
Value of the parameter to Write is too low
0 x 06090036
Maximum value is less than minimum value
0 x 08000020
Buffer too small for received SDO data (this failure will
occur ONLY during transmission)
0 x 08000021
Data cannot be transferred or stored to the application
because of local control
0 x 08000022
The data cannot be transmitted in the actual module
status.
0 x yyyyyyyy
If the transfer is aborted by the communication partner,
the corresponding abort code is displayed here. This
can be an error code from a remote station which must
be checked in the User’s Manual of that station.
Unknown Command Used (BFM1001 = 100)
The command code sent from the PLC to BFM1000 is unknown.
6.4.5
Queue was not available (BFM1001 = 8FFFF hex)
At this time the access to the internal transmission queue was rejected (it is possible that the
bus load was too high).
6.4.6
Command or Parameter Change while CIF was busy (BFM1001 = FFFF hex)
After the CIF has received a new command in the BFM1000 it will start to execute this
command with the parameters given in BFM1001~BFM1006. After the command has been
written TO BFM1000, the result (FROM) BFM1000 will display “CIF busy” (FFFF hex). [There
are two BFM1000s, one for the TO command and one for the FROM command.] After the
command written to BFM1000 has been processed, the result (FROM) BFM1000 will be set to
the corresponding success/failure code and will not contain the value FFFF hex.
If any BFM from 1000 ~ 1066 is accessed by a TO command while the CIF is busy, the data is
not written the BFM area and the “Command or parameter change while CIF was busy” Error
is displayed in the result BFMs. This error status must be acknowledged/reset by a special
command to make the CIF available again (see section 9.4.7).
6.4.7
The Clear/Reset “CIF was busy” Error
To Reset the CIF after a “Command or Parameter Change while CIF was busy” Error, FFFF
hex must be written using the TO command to BFM1000. The CIF is available again if the
BFM1000 displays 0000 hex.
Note: If the FX2n-32CAN is in From/To watchdog error, the command execution is shifted as
long as the FROM/TO error is not reset.
6-7
FX2N-32CAN Communication Module
6.4.8
The Command Interface 6
CIF Internal Error (BFM1001 = 200 hex)
This error code was implemented to handle possible errors which are not covered by the
normal error detection. If an error occurs which does not have a corresponding error code, a
classification value will be displayed in BFM1002 and the internal error data buffer is copied to
BFM1003~1066.
If this error occurs, please contact your service representative.
6-8
FX2N-32CAN Communication Module
7.
The Mapping Modes 7
The Mapping Modes
In order to exhange data over the CANopen but the data channels between nodes must be
defined or “mapped”. The FX2N-32CAN module has been pre-configured to support three
defined mapping modes or can be configured completely to suit the user needs.
A network configuration tool is a powerful device for setting the parameter data for any
manufacturers node (including the FX2N-32CAN) and defining the data mapping connection
set. It is recommended to use a network configuration tool for large networks due to the
convenience, flexibility, and ease of use that the tools provide.
To build up a small network or for testing purposes, the module Command InterFace (CIF, see
Chapter 9) supports three PDO mapping/binding commands designed for and supported by
the FX2N-32CAN module. By using these predefined Mapping configurations, the CAN object
ID (COB-ID) number for data exchange for each node is clearly defined. For example an RxPDO (receive process data object) can be connected to a Tx-PDO (transmit process data
object) of another node. These data will always be transmitted with the same COB-ID and
every node can distinguish relevant data by checking the COB-ID.
Note: It is strongly recommended to execute the Mapping Commands only in the preoperational or stopped mode of the local and all related CANopen nodes.
Vocabulary Terms
Rx-PDO - Receive Process Data Objects are data read from other nodes via the CAN bus.
Tx-PDO - Transmit Process Data Objects are the data sent to other nodes via the CAN bus.
CIF - The Command Interface is the FX2N-32CAN tool used to perform actions such as to set
parameters, execute commands, establish communication connections, access the CANopen
Object Dictionary, and read error messages. It is located in BFM 1000~1066.
COB-ID - The CAN Object ID number is a unique identifying number to distinguish between
different messages on the CANBus (e.g. PDO, SDO,NMT,SYNC, EMCY messages)
BFM - The Buffer Memory is the data storage memory location.
Mapping Mode 0 - Base Configuration where 4 Rx-PDOs and 4 Tx-PDOs are given BFM
assignments for each FX2N-32CAN node according to the pre-defined connection set of
CANopen.
Mapping Mode A - Mitsubishi Electric defined configuration for the FX2N-32CAN module that
defines the relationship between up to eight FX2N-32CAN nodes, the node BFMs, and the RxPDOs and Tx-PDOs. This mode is very convenient if every node is an FX2N-32CAN module.
Mapping Mode B - Configuration mode that allows specific Rx-PDOs and Tx-PDOs to be
matched on a node by node basis.
For more information on the CANopen specifications please see the Can-in-Automation
website at www.can-cia.de.
7-1
FX2N-32CAN Communication Module
7.1
The Mapping Modes 7
Factory Default Mapping/Mode 0 Mapping
The Factory Default Mapping conforms to CANopen specification DS-301 and contains only
the first 2 Tx-PDOs and the first two Rx-PDOs. Please refer to the Tables in section 10.4 that
give, repectively, the relationships between Tx-PDO number/COB-IDs/BFM# and the
Rx-PDO/COB-IDs/BFM#.
By executing the Mode 0 mapping command shown below the number of automatically
assigned Tx-PDOs becomes four instead of two. Four Rx-PDOs are also mapped
automatically.
Table 7.1:
Mode 0 Mapping Command
BFM#
READ (FROM)
WRITE (TO)
BFM1000
Mapping successfully established
Command (8900 hex)
(8901)
BFM1001
Unused
:
Unused
Unused
BFM1066
Unused
Unused
Unused
The BFM 0-15 are distributed to Rx-PDOs 1-4 and Tx-PDOs 1-4 as shown in section 5.4.
This setting is useful for a network that features many different types of node or as a base for a
network mapping configured with the Mode B mapping command.
The PDOs from 5-30 (BFM16~19 and BFM100~199) are disabled in the default settings but
further mapping of BFM16~19 and BFM100~199 can be accomplished using the Mode B
mapping technique.
7.2
Mode A Mapping
Setting up a CANopen network of only FX2N-32CAN nodes can be accomplished by simply
using the Mode A Mapping configuration. Other types of CANopen modules can be added to
the Network but additional user inputs are necessary.
Table 7.2: Mode A Mapping Command
BFM#
READ (FROM)
WRITE (TO)
BFM1000
Mapping successfully established
(8201 hex).
Local node number MUST be in the Command (8200 hex)
range 1 - 8 (82FF hex)
BFM1001
Unused
Unused
:
Unused
Unused
BFM1066
Unused
Unused
To establish communication between a FX2N-32CAN node and up to 7 other FX2N-32CAN
nodes it is only necessary to write the “set Mode A Mapping” command (8200 hex) to all the
FX2N-32CAN modules via the local PLC. One of the nodes must be configured as the
network manager. The network manager can be defined in the Network Configuration tool or
by writing to the Object Dictionary using the CIF SDO write command.
When all the stations have executed the Mode A Mapping command, it is possible to exchange
16 data words with every other FX2N-32CAN module*. Due to the data size, the number of
nodes in this mapping Mode is limited to 8 stations. If the node number is outside the range
1-8, BFM1000 will display the “node number mismatch” error message (82FF hex).
7-2
FX2N-32CAN Communication Module
The Mapping Modes 7
*Note: Nodes 1 - 7 can exchange 16 words of data with every other node but station number 8
can send just 8 words of data to the other 7 stations. Node 8 can read the 16 words of data
from all the other stations.
A closer look at the mapping shows that the Tx-PDO is dependent upon the node ID but the
mapping for the Rx-PDO is fixed to the default Tx-PDO COB-ID of the stations 1-8. The
advantage is that the data location o the other nodes are the same for all FX2N-32CAN
modules [eg. station #3 is always BFM112-127 (FROM)].
To include other types of CANopen nodes in the Mode A network, it is necessary to change the
Rx-PDO and communication parameters of these stations. This can be done by the Mode B
mapping commands, the SDO write access Command, or by a standard configuration tool.
Note: For Mode A Mapping th enode number of hte local FX2N-32CAN node must be in the
range 1-8. If the node number is different, the result BFM1000 will display the “node number
mismatch” (82FF hex) error message.
7.3
Mode B Mapping
With Mode B Mapping, it is possible to build up a binding (a connection between two node
addresses) between all nodes connected to the FX2N-32CAN module. Also, the binding of
any CANopen node with any other CANopen node is supported. The Mode B mapping is
limited to the binding of the PDOs which are already configured in the remote stations (no
change of the mapping between CANopen data and the remote node’s hardware) which will
be suitable for most cases.
7.3.1
Prepare the PDO Mapping Table
The Mode B mapping command will modify or add to the current PDO mapping, therefore it is
important to have a clearly defined mapping base before executing any Mode B commands.
Executing the Mode B Mapping commands before creating a PDO mapping base may create
errors in the data transmission or module operation.
The PDO mapping base can be the “Mode 0” mapping or the “Mode A” mapping explained in
previous sections to prepare the default Rx-PDO and Tx-PDO formats as shown in section
10.4. Another method to create (or reset) a Mapping base is to initialize the Mode B Mapping
with a special instruction at the beginning of the Mode B Mapping Command.
The purpose of the Mode B Mapping Commands is to bind a Tx-PDO from one CANopen node
to a Rx-PDO of another node. This allows certain Buffer Memory information to be transfered/
read in designated nodes around the CANopen network.
The Source parameter specifies the Node number and the specific Tx-PDO. The Destination
parameter specifies the Node number and the specific Rx-PDO that can read the data. The
command consists of four hexadecimal numbers, the two higher byte numbers specify the
node number and the two lower numbers specify the appropriate PDO number.
If it is necessary to change the remote node hardware mapping, this can be done by the SDO
write access command or by a standard configuration tool.
The configuration with the Mode B mapping is controlled by a parameter set which is displayed
in the table below.
7-3
FX2N-32CAN Communication Module
The Mapping Modes 7
Table 7.3: Mode B Mapping Command
BFM#
BFM1000
READ (FROM)
Binding done without errors - 8301 H.
Binding error occurs - Hex 83FF H.
CIF BUSY (FFFFh)
WRITE (TO)
Command (8300 hex)
BFM1001
Source 1 [*1]
BFM1002
Destination 1 [*2]
BFM1003
Source 2 [*1]
BFM1004
Destination 2 [*2]
BFM1005
Source 3 [*1]
BFM1006
Destination 3 [*2]
BFM1007
Source 4 [*1]
BFM1008
Diagnosis Data: 0000 hex = no error
BFM1009
All other Values: The Corresponding Source 5 [*1]
parameter cause an error (BFM 1000 will
Destination 5 [*2]
be 83FF hex)
BFM1010
Destination 4 [*2]
BFM1063
Source 32 [*1]
BFM1064
Destination 32 [*2]
BFM1065
Source 33 [*1]
BFM1066
Destination 33 [*2]
There is a special parameter to set up the PDO mapping table. If Source1 (BFM1001) and
Destination1 (BFM1002) are set to 0000 hex, the PDO mapping will be reset to the state
shown in section 10.4. The prepare parameter must be set in the first Source/Destination
parameter set, if it is used in Source2/Destination2 ~ Source33/Destination33 it will be ignored
and will generate an error message. If it is necessary to execute the mode B mapping more
than one time to bind all PDOs, the preparation command must not be set in the second or
following parameter sets. When the preparation command is used, all previous bindings will
be reset.
Note: The parameter set must be terminated by the “end of binding Table” parameter. This is
accomplished by setting the Source parameter that follows the final binding parameter to FFFF
hex.
With one execution of the Mode B mapping command up to 33 binding connections between
CANopen stations can be made. To establish more data connections, the command can be
repeated as often as necessary.
The mode B mapping commands can be used in the same manner if Mode 0 or Mode A is
used as a base configuration.
7-4
FX2N-32CAN Communication Module
7.3.2
The Mapping Modes 7
The Source Command
The task of the mapping command is to connect a data producer and a data consumer PDO to
the same message identifier. The Source Parameter specifies the producer to the data
telegram to bind.
The high byte of this parameter is the node ID number. The node ID range is 1~127. The local
FX2N-32CAN module can be specified by the actual node number or by using a “0”.
The low byte specifies the PDO number. The FX2N-32CAN module will start a read access to
the object dictionary of the source node to read the COB-ID. This COB-ID is written in the next
step to the Destination node’s PDO mapping table.
Ex. Source = 1009 hex. The node number is the high byte or node 10. The low byte
designates Tx-PDO 09. This information will be bound to the node/Rx-PDO in the Destination
BFM that directly follows the Souce BFM.
Note: An error will be generated if the Destination BFM is not configured.
7.3.3
The Destination Parameter
This parameter defines the Destination for the corresponding Source parameter data. The
high byte of the BFM signifies the node number where the data is received and the low byte
signifies the Rx-PDO which is the final destination.
Ex. Destination = 0203 hex. The Source data will be bound to PDO #3 of Node 2.
The Destination node COB-ID is checked before the Source data is written to the mapping
table.
Note: An error message will be received if the Destination PDO was not written to the
destination PDO.
Note: The mode B mapping command cannot be used to change the mapping of the PDOs
and/or the Hardware of the Remote modules. This type of network setup can be accomplished
by the SDO write access command or by a standard configuration tool.
7-5
FX2N-32CAN Communication Module
7.3.4
The Mapping Modes 7
Assign Additional COB-IDs to the Local Node
By default every CANopen node can use four COB-IDs to transmit its data to other CANopen
stations. All COB-IDs for Data transmission are by default reserved for the nodes 1~127. If it
is necessary to transmit more than 4 PDOs (more than 16 words) from one node, this node
must occupy COB-IDs of other (unused) stations. It is recommended to use the identifier of
higher number stations for this purpose (127, 126, 125, etc). The lower the used COB-ID is,
the higher is the priority of the messages. According to this, for highly important data it should
be avoided to assign the COB-ID of the Tx-PDO4/node 127 because all other Tx-PDO COBIDs have a higher priority for transmission on the CANopen bus.
The Source parameter high byte defines the node which is by default the “owner” of hte COBID to occupy, the low byte defines the PDO number (Tx COB-ID = 0180 hex + node ID for TxPDO1/ 0280 hex + node ID for Tx-PDO2/ 0380 + node ID for Tx-PDO3/ 0480 hex + node ID for
Tx-PDO4).
To assign a COB-ID by the local station, the high byte number must be set to 80 hex.
The low byte tells the PDO number in the local station which shall use the occupied COB-ID.
Ex. Source = 7F01 hex, Destination = 8005 hex
The local FX2N-32CAN module will transfer the BFMs mapped to Tx-PDO 5 with the COB-ID
of 1FF hex (by default this would be PDO 1 of node 127 = 180 +127).
Note: The local Tx-PDO numbers 1-4 are using the COB-IDs 180 hex + local node ID to 480
hex + local node ID which are the standard COB-IDs. An attempt to assign a COB-ID to the
first four PDOs will cause an error.
7.3.5
The End of the Parameter Table
If the last parameter is not located in BFM1065/1066, the paramter set must be terminated with
Source = FFFF hex.
7-6
FX2N-32CAN Communication Module
The Mapping Modes 7
7.4
PDO Mapping Table Overviews
7.4.1
Tx-PDO Mapping Table
Table 7.4: Tx-PDO Mapping Table
Default
Factory/
Mode 0
Mapping*
Mode A
Mapping
Mode B Mapping
(after PDO
mapping is
prepared)
Assigned BFM
COB ID
Mapped BFMs (access style)
Tx-PDO 1
0180 hex + node ID
BFM#3, BFM#2, BFM#1, BFM#0
Tx-PDO 2
0280 hex + node ID
BFM#7, BFM#6, BFM#5, BFM#4
Tx-PDO 3
0380 hex + node ID
BFM#11, BFM#10, BFM#9, BFM#8
Tx-PDO 4
0480 hex + node ID
BFM#15, BFM#14, BFM#13, BFM#12
Tx-PDO 5
BFM#19, BFM#18, BFM#17, BFM#16
Tx-PDO 6
BFM#103, BFM#102, BFM#101, BFM#100 (TO)
Tx-PDO 7
Tx-PDO 8
Tx-PDO 9
Tx-PDO 10
Disabled (COB-ID set to
80000000 hex).
These PDOs can be activated by mode B mapping
commands.
Tx-PDO 11
Disabled (COB-ID
set to 80000000
hex).
Can be defined by
mode B mapping
command.parameter
BFM#107, BFM#106, BFM#105, BFM#104 (TO)
BFM#111, BFM#110, BFM#109, BFM#108 (TO)
BFM#115 ... BFM#112 (TO)
BFM#119 ... BFM#116 (TO)
BFM#123 ... BFM#120 (TO)
Tx-PDO 12
BFM#127 ... BFM#124 (TO)
Tx-PDO 13
BFM#131 ... BFM#128 (TO)
Tx-PDO 14
BFM#135 ... BFM#132 (TO)
Tx-PDO 15
BFM#139 ... BFM#136 (TO)
Tx-PDO 16
BFM#143 ... BFM#140 (TO)
Tx-PDO 17
BFM#147 ... BFM#144 (TO)
Tx-PDO 18
BFM#151 ... BFM#148 (TO)
Tx-PDO 19
BFM#155 ... BFM#152 (TO)
Tx-PDO 20
Tx-PDO 21
Tx-PDO 22
Tx-PDO 23
Tx-PDO 24
Disabled (COB-ID set to
80000000 hex)
These PDOs can be activated by mode B mapping
commands.
Disabled (COB-ID
set to 80000000
hex).
Can be defined by
mode B mapping
command
parameter.
BFM#159 ... BFM#156 (TO)
BFM#163 ... BFM#160 (TO)
BFM#167 ... BFM#164 (TO)
BFM#171 ... BFM#168 (TO)
BFM#175 ... BFM#172 (TO)
Tx-PDO 25
BFM#179 ... BFM#176 (TO)
Tx-PDO 26
BFM#183 ... BFM#180 (TO)
Tx-PDO 27
BFM#187 ... BFM#184 (TO)
Tx-PDO 28
BFM#191 ... BFM#188 (TO)
Tx-PDO 29
BFM#195 ... BFM#192 (TO)
Tx-PDO 30
BFM#199 ... BFM#196 (TO)
7-7
FX2N-32CAN Communication Module
7.4.2
The Mapping Modes 7
Rx-PDO Mapping Table
Table 7.5:
Rx-PDO#
Rx-PDO 1
Rx-PDO 2
Rx-PDO 3
Rx-PDO 4
Rx-PDO Mapping Table
Default
Factory/
Mode 0
Mapping*
Rx-PDO 7
Rx-PDO 8
Rx-PDO 9
Rx-PDO 10
Rx-PDO 11
Mode B
Mapping (after
PDO Mapping
is prepared)
Assigned BFM
COB ID
Mapped BFMs (access style)
0200 hex +
181 hex
node ID
BFM#3, BFM#2, BFM#1, BFM#0 (FROM
0300 hex +
281 hex
node ID
Node 1
Data
0400 hex +
381 hex
node ID
0500 hex +
481 hex
node ID
Rx-PDO 5
Rx-PDO 6
Mode A
Mapping
182
Disabled
(COB-ID set
to 80000000
hex).
These PDOs
can be
activated by
Mode B
mapping
commands.
282
382
Node 2
BFM#7, BFM#6, BFM#5, BFM#4 (FROM)
BFM#11, BFM#10, BFM#9, BFM#8 (FROM)
Disabled (COBID set to
80000000 hex).
Can be defined
by mode B
mapping
command
parameter.
BFM#15, BFM#14, BFM#13, BFM#12 (FROM)
BFM#19, BFM#18, BFM#17, BFM#16 (FROM)
BFM#103, BFM#102, BFM#101, BFM#100 (FROM)
BFM#107, BFM#106, BFM#105, BFM#104 (FROM))
482
BFM#111, BFM#110, BFM#109, BFM#108 (FROM)
183
BFM#115, BFM#114, BFM#113, BFM#112 (FROM)
283
383
Node 3
data
BFM#119 ... BFM#116 (FROM)
BFM#123 ... BFM#120 (FROM)
Rx-PDO 12
483
BFM#127 ... BFM#124 (FROM)
Rx-PDO 13
184
BFM#131 ... BFM#128 (FROM)
Rx-PDO 14
284
Rx-PDO 15
384
Rx-PDO 16
484
BFM#143 ... BFM#140 (FROM)
Rx-PDO 17
185
BFM#147 ... BFM#144 (FROM)
Rx-PDO 18
Rx-PDO 19
Rx-PDO 20
Rx-PDO 21
Rx-PDO 22
Rx-PDO 23
Rx-PDO 24
Disabled
(COB-ID set
to 80000000
hex).
These PDOs
can be
activated by
Mode B
mapping
commands.
285
385
485
186
286
386
486
Rx-PDO 25
187
Rx-PDO 26
287
Rx-PDO 27
387
Rx-PDO 28
487
Rx-PDO 29
188
Rx-PDO 30
288
Node 4
data
Node 5
data
Disabled (COBID set to
80000000 hex).
Can be defined
by mode B
Node 6
mapping
data
command
parameter.
BFM#135 ... BFM#132 (FROM)
BFM#139 ... BFM#136 (FROM)
BFM#151 ... BFM#148 (FROM)
BFM#155 ... BFM#152 (FROM)
BFM#159 ... BFM#156 (FROM)
BFM#163 ... BFM#160 (FROM)
BFM#167 ... BFM#164 (FROM)
BFM#171 ... BFM#168 (FROM)
BFM#175 ... BFM#172 (FROM)
BFM#179 ... BFM#176 (FROM)
Node 7
data
BFM#183 ... BFM#180 (FROM)
BFM#187 ... BFM#184 (FROM)
BFM#191 ... BFM#188 (FROM)
Node 8
data
BFM#195 ... BFM#192 (FROM)
BFM#199 ... BFM#196 (FROM)
* The Factory Default Mapping contains only the first two Rx-PDOs and the first two Tx-PDOs
as defined in DS-301. Mode 0 mapping sets the first four Rx-PDOs and Tx-PDOs as shown in
the Tables.
7-8
FX2N-32CAN Communication Module
7.4.3
The Mapping Modes 7
Mode B Mapping Errors
If the CIF was not able to execute the “mode B Mapping” command with the given parameter
set, it will return 83FF hex in BFM1000. BFM1001~1066 will show which parameter caused
the error(s).
Ex. If parameter Source5 (BFM1009 TO) caused an error, the value of BFM1009 (FROM) will
be different from 0.
7.4.4
Source Parameter Errors
There are four different states which can be displayed in BFM1001~1066 (nn = node ID, mm =
PDO no.)
Table 7.6: Source Parameter Errors
Error Number
Description
FFFF hex
Node ID higher than 127 or PDO number 0
nn00 hex
No response from node nn (time out)
00mm hex
COB-ID is 80000000 hex (PDO disabled)
nnmm hex
Node nn rejected access to PDO mm mapping parameter
(PDO number not supported)
7-9
FX2N-32CAN Communication Module
7.4.5
The Mapping Modes 7
Destination Parameter Errors
There are four different states which can be displayed in BFM1001 to BFM1066 (nn = node
number, mm = PDO number).
Table 7.7: Destination Parameter Errors
Error Number
Description
FFFF hex
Node ID higher than 127, PDO number 0, or the Parameter
may have been skipped if a Source error occured.
nn00 hex
No response from node nn (time out)
00mm hex
Previous COB-ID of destination was 80000000 hex (PDO was
disabled. Binding was accomplished but there might be an
error in the hardware mapping for the destination node. *1
nnmm hex
Node nn rejected access to PDO mm mapping parameter
(PDO number not supported)
*1 Please take care with this error message. If the desination PDO was disabled, it is not sure
if there is some hardware mapping inside the destination node for this PDO. This node might
receive the data but it is not transferred to any I/O or data register.
When the Destination node is an FX2N-32CAN the PDO data will be mapped to a BFM (if the
hardware mapping was not changed previously). In the case of the FX2N-32CAN the error
can be judged as a warning which can be completely avoided if the mapping is done by the
remote FX2N-32CAN node itself.
Another possibility is to set the remote FX2N-32CAN to Mode A mapping. In this case all RxPDO COB-IDs are different from 80000000 hex, the disadvantage is that if all Rx-PDOs are
mapped, they will also be received. This is not really a problem but the FX2N-32CAN cycle
time will be a little bit higher and it may be confusing if unused BFMs are also change their
data values.
Note: If the local FX2N-32CAN is the destination, this error is disabled.
7.4.6
Other Errors
If the prepare mode B mapping parameter (0000 hex) is used (nn = node ID, mm = PDO no.):
Table 7.8: Prepare Parameter Setting
Error Number
FFFF hex
Description
Parameter can be used only as Source1/Destination1
(BFM1001/BFM1002)
If the occupy parameter is not set properly:
Table 7.9: Occupy Parameter Error
Error Number
nnmm hex
Description
Source node nn must be in the range 1 to 127 and PDO number mm
must be 1~4 (for Source Parameter), 5~127 (Destination Parameter).
7-10
FX2N-32CAN Communication Module
8.
Node Guarding 8
Node Guarding
Nodes can be set to Guarding-Master or Guarding-Slave status by writing values to Index
1F81 using the Command Interface (CIF). The parameters for the guarding are included in the
information that can be written to the CAN bus. Please see Table 8.1 for details.
8.1
CIF/BFM Structure for Slave Guarding Assignment
Table 8.1: CIF Command for Slave Guarding Assignment
BFM#
BFM 1000
WRITE (TO)
Command - 8400 hex
BFM 1001
Slave # to be Guarded (See Section 7.2.1)
BFM 1002
Requested Services (See Section 7.2.2)
BFM 1003
Guard Time (See Section 7.2.3)
BFM 1004
Retry Factor (See Section 7.2.4)
BFM 1005
Slave # to be Guarded
BFM 1006
Requested Services
Diagnosis Data: 0000 hex = no error
BFM 1007
Guard Time
BFM 1008
Retry Factor
:
:
:
BFM 1061
8.2
READ (From)
Slaves have been Assigned - 8401 hex
Parameter Error - 84FF hex
CIF Busy - FFFF hex
All other Values: the corresponding
parameter caused an error.
:
Slave # to be Guarded
BFM 1062
Requested Services
BFM 1063
Guard Time
BFM 1064
Retry Factor
BFM 1065
Unused
BFM 1066
Unused
Node Guarding Parameter Settings
The following parameters define the Slave Node Guarding.
8.2.1
Slave Number
This parameter specifies the slave number which shall be guarded by the local FX2N-32CAN
node. This is only valid if the Network Manager function is activated for the local station.
The CANopen Object Dictionary uses Index value 1F81 hex for Node Guarding values. The
FX2N-32CAN module is set to write to this index automatically when using the TO commands
as outlined in Table 8.1.
8-1
FX2N-32CAN Communication Module
8.2.2
Node Guarding 8
Services Requested
This parameter specifies the services requested below.
Table 8.2: Service Request Table
Bit Number
Bit = 0
Bit = 1
Bit 0
Node is not a slave
Node is a slave. After Configuration, the node
will be set to operational.
Bit 2
On guard error or boot up detection
DO NOT automatically configure
and start the slave.
On guard error or boot up detection
automatically configure the slave via
Configuration Manager and afterward set the
slave to operational.
Other bits
8.2.3
Unused
Guard Time
The station which is configured to guard one or more nodes will send a Guard request every “n
x 1ms” to the network. If no response is received from the slave station, the request is
repeated after the next “n x 1ms” has elapsed until the specified number of retries has been
submitted. If no response is received, a Guarding error will occur.
8.2.4
Number of Retries
This parameter defines the number of retries for the Guard Request to poll the node before an
error is recorded.
8.2.5
End of Parameter Table
After setting the parameters one or more nodes to be guarded, a setting must be given to
signal the end of the parameter write. This is accomplished by writing FFFF hex in the “Slave
Number to be guarded” following the last node configuration setting. If the final setting is
located in BFM1061 - BFM1064, writing FFFF hex is not required.
8.2.6
Parameter Errors
If the node number to be guarded exceeds the range 1~127, the corresponding BFM will
display the value which caused the problem.
The FX2N-32CAN module may write a value of FFFF hex to the “Requested Services”
parameter of a node that has a parameter configuration error.
The FX2N-32CAN module may write a value of FFFF hex to the “Guard Time” parameter of a
node that has a parameter configuration error.
If the “Retry Factor” parameter exceeds 255, an error value will be displayed in the
corresponding BFM. The FX2N-32CAN module may write a value of FFFF hex to the “Retry
Factor” parameter of a node that has a parameter configuration error.
If the node number, requested services, retry factor and guarding time is just copied to the
corresponding result BFMs (no parameter skipped FFFF hex), the remote node does not
support Index 100C/100D hex (guarding time/retry factor). In this case, the remote node
cannot detect a missing guarding request of the network manager.
8-2
FX2N-32CAN Communication Module
8.2.7
Node Guarding 8
Read Guarding Status
To Read the Guarding Status of the CANopen nodes guarded by the local station, the CIF
supports a special read command. With a parameter in BFM1001 you can choose if the state
of all the nodes or only single node shall be read.
Table 8.3: Read Guarding Status Settings
BFM#
BFM 1000
READ (From)
WRITE (TO)
Single node status
displayed (8501 h) All nodes status displayed
Next node with error (8503 hex)
displayed (8502 h) CIF BUSY (FFFF hex)
CIF BUSY (FFFF h)
Node ID
BFM 1001
Status *2
Unused
Command 8500 hex
Display all states (0)
Display single node status (node
Node 2 status Node 1 status
no.)
*2
*2
Display next node with guarding
error (128-255) *1
BFM 1002
Node 4 status Node 3 status
*2
*2
BFM 1003
Node 6 status Node 5 status
*2
*2
BFM 1004
Node 8 status Node 7 status
*2
*2
:
:
Unused
BFM 1063
Node 126
status, *2
Node 125
status, *2
BFM 1064
unused
Node 127
status, *2
BFM 1065
BFM 1066
unused
*1 The parameter given in BFM1001 will influence the display style of the Guarding status. If
a node number (1~127) is written to the BFM1001, BFM1000 will display “Single node status
displayed” (8501 hex). BFM1001 will show the node ID for verification purposes and
BFM1002 will contain the guarding status flags.
The parameter value 128-255 written to BFM1001 will make the “read Guarding status”
command display the next node number that is in some guarding error state. Another
execution of the “read Guarding status” command with the parameter value 128-255 will
display the next node with guarding problems, so it is possible to “jump” through all nodes with
Guarding errors. BFM1000 will display a value of 8502 hex if the “Display next node with
guarding error” parameter has been used, BFM1001 will show the node ID for verification
purpose and BFM1002 will contain the guarding status flags. If currently no node is in
gurading error state, the BFMs 1001 and 1002 will display 0.
If BFM 1001 is set to “0”, the status of all 127 nodes is displayed in BFM1001 to BFM1064 as
shown in the table above and BFM1000 will display 8503 hex in this case.
8-3
FX2N-32CAN Communication Module
Node Guarding 8
The high byte of the parameter in BFM1001 is ignored!
*2 Node Guarding Status Flags
Bit 0 - Guarding is Activated
Bit 1 - Reserved
Bit 2 - One response is Missed
Bit 3 - No response and Lifetime Elapsed
Bit 4 - Toggle Error
Bit 5 - State changed (bus state of the node changed operational/pre-operational, etc.)
Bit 6 - Guarding failed for the local node (guarding request from the network manager was not
received in the expected time).
Bit 7 - Reserved
8.2.8
Reset Guarding Status Latch
To reset the local guarding error latch the CIF supports the “reset Guarding status latch’
command (8600 hex). A parameter given in BFM1001 decides if the guarding status of a
special node or the status latch of all nodes will be reset. If BFM1001 is set to a value from
1 - 127, the corresponding node status latch is reset (the guarding error flags are set to “0”). A
value of 0 or 1128-255 in BFM1001 will cause the CIF to reset the complete local guarding
error latch for all nodes.
Table 8.4: Reset Guarding Status Latch
BFM#
BFM1000
READ (FROM)
WRITE (TO)
Status latch was reset (8601 hex)
CIF BUSY (FFFF hex)
Command 8600 hex
Node number (1 - 127)
Reset complete latch (0, 128-255)
BFM1001
BFM1002
:
:
BFM1066
Unused
Unused
8-4
FX2N-32CAN Communication Module
Emergency Messages 9
9.
Emergency Messages
9.1
Read Emergency Message Buffers
The FX2N-32CAN will store the Emergency messages which are received from the bus to an
internal buffer. This buffer can store up to 22 emergency messages and is separated in an 11
message stack buffer and an 11 message ring buffer. The stack buffer will store the first 11
emergency messages received after PWO or after the Emergency message buffer was
cleared the last time. The ring buffer will store the next eleven Emergency messages, all
further received Emergency telegrams will overwrite the oldest message in the ring buffer. The
stack buffer will not be overwritten.
Table 9.1: Read EMERGENCY Message Buffer
BFM#
BFM 1000
BFM 1001
READ (FROM)
WRITE (TO)
Stack buffer displayed (8701 hex)
Ring buffer displayed (8702 hex)
Single message displayed (8703 hex)
CIF BUSY (FFFF hex)
Read stack buffer (0), *1
Read ring buffer (1), *2
Read next unread buffer entry (2), *3
Read stack buffer & clear buffer (10 hex), *4
Read ring buffer & clear buffer (11 hex), *5
Node ID, *6
BFM 1002
Message Counter, *7
BFM 1003
EMERGENCY data, *8
BFM 1004
EMERGENCY data, *8
BFM 1005
EMERGENCY data, *8
BFM 1006
EMERGENCY data, *8
BFM 1007
Node ID, *6
BFM 1008
Message Counter, *7
BFM 1009
EMERGENCY data, *8
BFM 1010
EMERGENCY data, *8
BFM 1011
EMERGENCY data, *8
BFM 1012
EMERGENCY data, *8
Command - 8700 hex
Unused
:
:
BFM 1055
Node ID, *6
BFM 1056
Message Counter, *7
BFM 1057
EMERGENCY data, *8
BFM 1058
EMERGENCY data, *8
BFM 1059
EMERGENCY data, *8
BFM 1060
EMERGENCY data, *8
BFM 1061
Node ID, *6
BFM 1062
Message Counter, *7
BFM 1063
EMERGENCY data, *8
BFM 1064
EMERGENCY data, *8
BFM 1065
EMERGENCY data, *8
BFM 1066
EMERGENCY data, *8
Unused if
single
message
is
displayed
Unused
9-1
FX2N-32CAN Communication Module
Emergency Messages 9
*1 - If the parameter 0 is set in BFM1001, the “read Emergency buffer” command will display
the complete stack buffer in the BFM1001 to BFM1066. The stack buffer always contains the
first eleven emergency messages which have been received since the PWO or since the
emergency buffer has been cleared the last time. If the stack buffer is displayed the BFM1000
will contain 8701 hex.
*2 - The parameter value 1 will cause the display of the whole content of the ring buffer. The
oldest message will be displayed in BFM1001 to BFM1066, the later messages in the higher
BFMs. BFM1000 will display 8702 hex.
*3 - If the “read Emergency buffer” command is executed with the “read next unread buffer
entry”, the CIF will display the next unread emergency message in BFM1001 to BFM1066.
BFM1000 will display 8703 hex.
With every execution of the “read next unread buffer entry” command with this parameter, the
CIF will show the next unread emergency message. After all unread messages have been
processed, the following executions will show “0” in BFM1001 to BFM1066 unless a new
emergency message is received.
*4 - Basically this parameter will cause the same behavior as the “read stack buffer” parameter
but after the read access is finished, the internal emergency buffer is cleared (both stack and
ring buffers!!). The next received emergency message will be stored in the first cell of the
stack buffer.
*5 - Basically, this parameter will cause the same behavior as the “read ring buffer” parameter
but after the read access is finished, the internal emergency buffer is cleared (both stack and
ring buffers!!). The next received emergency message will be stored in the first cell of the
stack buffer.
*6 - The ID number of the node which sent the emergency message to the network is
displayed.
*7 - The message counter shows a value from 1 to 255. This figure is a kind of running counter
which is increased with every incoming emergency message until a value of 255 is reached.
The counter will stay at this value as long as the buffer is not cleared and the module stays
powered On.
*8 - The next four BFMs contain the data of the emergency telegram. The first emergency
data byte is located in the low byte of the first BFM, the second data byte in the high byte of the
first BFM.
9-2
FX2N-32CAN Communication Module
9.2
Emergency Messages 9
Send an Emergency Message
This command can be used to send an emergency message by the PLC to the CANopen
network.
BFM#
BFM 1000
READ (FROM)
WRITE (TO)
No special return values, but the “Queue
was not available” error may occur under
high busload conditions.
Also,
CIF BUSY (FFFF hex)
Command - 000A hex
BFM 1001
Emergency Data byte 2 and 1, *1
BFM 1002
Emergency Data byte 4 and 3, *1
BFM 1003
Emergency Data byte 6 and 5, *1
BFM 1004
Emergency Data byte 8 and 7, *1
*1 - Emergency data defined in DS301 revision 3.0.
Write first emergency data byte to low byte of BFM1001, second emergency data byte to high
byte of BFM1001, third emergency data byte to low byte of BFM1002, and so on.
Unused emergency data bytes HAVE TO BE filled with 00 hex.
9-3
FX2N-32CAN Communication Module
Emergency Messages 9
MEMO
9-4
Under no circumstances will Mitsubishi Electric be liable or responsible for any
consequential damage that may arise as a result of the installation, use and/or
programming of the products associated with this manual.
All examples and diagrams shown in this manual are intended as an aid to
understanding the text, not to guarantee operation. Mitsubishi Electric will
accept no responsibility for actual use of the product based on these illustrative
examples.
Owing to the very great variety of possible applications, users must satisfy
themselves as to the suitability of each specific application.
USER’S MANUAL
FX2N-32CAN Communication Module
HEAD OFFICE: MITSUBISHI DENKI BLDG MARUNOUCHI TOKYO 100-8310
HIMEJI WORKS: 840, CHIYODA CHO, HIMEJI, JAPAN
JY992D92801A
TELEX: J24532 CABLE MELCO TOKYO
Effective DEC. 2001
Specification are subject
to change without notice.