1
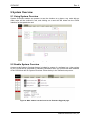
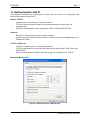
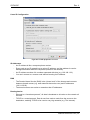
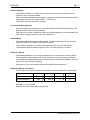
GYDA SC (Hardware v2)
System Controller for Flashlink
User manual
Rev. 4
GYDA-SC
Rev. 4
Network Electronics ASA
Thorøya
P.O. Box 1020
N-3204 Sandefjord, Norway
Phone: +47 33 48 99 99
Fax: +47 33 48 99 98
Email: [email protected]
www.network-electronics.com
Support Phone: +47 90 60 99 99
Release note
2007-09-06: This user manual is applicable for GYDA-SC with software release 2.10 and
higher, running on hardware version 2.
Revision history
Current revision of this document is the uppermost in the table below.
Rev.
Repl.
Date
Sign
4
3
2
1
3
2
1
0
2008-04-12
2008-01-03
2006-10-20
2006-07-06
JAP
JAP
RS
JAP
0
-
2006-06-06
NBS
Change description
Updated for Ver. 2.11
Updated for Ver. 2.10
Corrected backplane picture.
Covers new System Configurator and updates in
Ver. 2.02
First release, based on Rev. 5 of GYDA-SC User
Manual.
network-electronics.com | 2
GYDA-SC
Rev. 4
Contents
Revision history .......................................................................................................... 2
1 Product overview ..................................................................................................... 5
2 Specifications .......................................................................................................... 6
2.1 Ethernet port.......................................................................................................................6
2.2 Web interface .....................................................................................................................6
2.3 SNMP interface ..................................................................................................................6
2.4 TCP/IP stack ......................................................................................................................6
2.5 Serial ports .........................................................................................................................6
2.6 Number of cards monitored................................................................................................6
2.7 GPI inputs...........................................................................................................................6
2.8 GPI outputs ........................................................................................................................6
2.9 Connector module ..............................................................................................................7
3 Configuration ........................................................................................................... 8
4 Connections........................................................................................................... 10
4.1 Connecting several frames together ................................................................................10
4.2 VikinX control ...................................................................................................................11
4.3 GPI connections ...............................................................................................................11
5 IP address setup.................................................................................................... 12
6 GYDA Status Monitoring and external alarms ....................................................... 13
6.1 GPI I/O .............................................................................................................................13
6.2 Front Panel – Module Status Monitoring ..........................................................................13
7 GYDA-SC web interface ........................................................................................ 14
7.1 General.............................................................................................................................14
7.2 GYDA web interface – screen navigation.........................................................................15
7.3 Links between web controllers .........................................................................................16
7.4 VikinX control ...................................................................................................................17
7.5 Home tab..........................................................................................................................18
7.6 Password protection.........................................................................................................20
7.7 IP setup ............................................................................................................................21
7.8 Icon and labels for passive modules ................................................................................22
7.9 NTP and Time zones........................................................................................................23
7.10 Debug terminal ...............................................................................................................23
8 SNMP (Simple Network Management Protocol) interface ..................................... 24
8.1 SNMP setup .....................................................................................................................24
8.2 Audible alarms..................................................................................................................24
8.3 Authentication...................................................................................................................24
9 System Overview................................................................................................... 25
9.1 Using System Overview ...................................................................................................25
9.2 Enable System Overview .................................................................................................25
9.3 Creating the System Overview page................................................................................26
9.4 Installing System Overview ..............................................................................................26
10 GYDA software upgrade...................................................................................... 27
10.1 Introduction.....................................................................................................................27
10.2 Upgrade procedure ........................................................................................................27
11 Getting familiar with IP......................................................................................... 28
network-electronics.com | 3
GYDA-SC
Rev. 4
General environmental requirements for Network Electronics equipment ................ 32
Product Warranty...................................................................................................... 33
Appendix A Materials declaration and recycling information..................................... 34
A.1 Materials declaration........................................................................................................34
A.2 Environmentally-friendly use period.................................................................................34
A.3 Recycling information.......................................................................................................35
network-electronics.com | 4
GYDA-SC
Rev. 4
1 Product overview
The GYDA System Controller is an advanced control and monitoring card for the Flashlink
system. The card occupies a single slot in a Flashlink frame and can control and monitor up
to 8 Flashlink frames, each with up to 10 Flashlink modules, a total of 79 modules. In
addition, hardware version 2 of GYDA supports controlling of VikinX Compact and Sublime
routers, through an RS232 serial port.
The controller connects to a standard 10/100BaseT twisted pair Ethernet with TCP/IP
protocol. Any standard web browser can be used to configure and monitor the Flashlink
system. All relevant manuals are also available via the web interface in Adobe PDF-format.
For users with large heterogeneous systems, the controller supports SNMP (Simple Network
Management Protocol), a generic IP based protocol for management of a wide variety of
devices. Firmware upgrade is easily performed through the web interface or the System
Configurator software. New firmware versions can be downloaded from the Network
Electronics web site.
The controller module has four GPI inputs and a GPI open collector output. The output is a
“catch all” error output. The inputs are general purpose, intended for monitoring external
equipment like battery backup systems, climate control and power supplies. Note that all
Flashlink power supplies have GPI outputs, which can be used as inputs to the controller.
network-electronics.com | 5
GYDA-SC
Rev. 4
2 Specifications
2.1 Ethernet port
Type:
Connector:
10/100BaseT, IEEE802.3, full duplex capable.
RJ-45, 100 W, UTP cable, EIA/TIA category 3 or better.
2.2 Web interface
HTTP version 1.1, HTML ver 4.01 Compatible with all major browsers.
2.3 SNMP interface
SNMP ver 1, 2c or 3 over UDP over IP, following SMI version 2.0 according to relevant
RFC’s.
User defined community strings (V1 or V2c), or User based Security Model (V3 only).
Possible to turn off V1/V2c support.
All alarms send traps, filtering is user selectable.
2.4 TCP/IP stack
Version:
V4.
Static IP address selection: Yes, by editing a configuration file on the compact flash
card.
2.5 Serial ports
1 x RS422/RS485 internal to the Flashlink frame, available on the power supply
backplane.
1 x RS422/RS485 to external equipment. (Not in use).
1 x RS232 to external VikinX Compact and Sublime routers.
1 x RS232 to external equipment. (Not in use).
2.6 Number of cards monitored
79 Flashlink cards maximum.
1 VikinX Compact router maximum
30 VikinX Sublime routers maximum
2.7 GPI inputs
Number of inputs:
Pull-up resistors:
Trigger voltage:
4.
Internal 4.7kOhm resistor connected to +5V.
2.5V ±0.5V.
2.8 GPI outputs
Number of outputs:
Maximum voltage:
Maximum current:
1.
50V.
0.25A.
network-electronics.com | 6
GYDA-SC
Rev. 4
2.9 Connector module
If the module is not purchased pre-mounted in a Flashlink FR-2RU-10-2 frame, you will find
details of how the connector module is mounted in the user manual for the frame, FR-2RU10-2.
The user manual for the frame is also available from our web site:
http://www.network-electronics.com/
Serial port
for
connecting
router
Ethernet
connection
GPI
Figur 1: GYDA SC-MkII backplane, denoted pxa255 controller-C1
The communication protocol is found in the user manual for the Flashlink frame – FR 2RU
10-2.
network-electronics.com | 7
GYDA-SC
Rev. 4
3 Configuration
Each card has a unique identifier called card position, which is assigned automatically when
a card is inserted into a frame. The card positions are numbered from 1 to 10 from a user
point of view. Each frame should have a unique frame id, numbered 0-7.
Figure 2 shows the power connections of the frame as well as the RS-422 connections and
the DIP-switches for address setting of the frame.
Figur 2: Connector module for the power supply.
Each frame is assigned an address through the DIP-switches on the rear. Maximum 8 frame
addresses are available. This address setting only applies when the frame is used in
combination with a GYDA-SC System Controller.
If you have more than 8 frames together, you need several GYDA-SC System Controller
cards.
In order to ensure proper operation of the system, all frames controlled by a
GYDA-SC System Controller must have a unique frame address.
After changing the frame address, reset the frame by turning the power off and
on
again.
Remember to terminate the last frame with a 110ohm resistor.
network-electronics.com | 8
GYDA-SC
Rev. 4
The setting of the address of a frame is as follows:
1
0
Figur 3: Sub-rack address switch.
0 means switch to the right (OFF)
1 means switch to the left (ON)
SW 4
OFF
OFF
OFF
OFF
ON
ON
ON
ON
SW 2
OFF
OFF
ON
ON
OFF
OFF
ON
ON
SW 1
OFF
ON
OFF
ON
OFF
ON
OFF
ON
Address
0
1
2
3
4
5
6
7
Default address is 0.
The GYDA-SC System Controller automatically detects the position of the cards within each
frame.
network-electronics.com | 9
GYDA-SC
Rev. 4
4 Connections
4.1 Connecting several frames together
A maximum of 8 frames can be connected together through the RS-422 ports on the rear of
each frame. Start with the frame containing the GYDA-SC System Controller, and use 1 RS422 port to loop through to the next.
The last frame connected must be terminated with 110ohm in order to ensure proper
operation. The other port of the frame containing the GYDA-SC controller must be left open,
and cannot be connected to other frames.
Figure 5 shows an example of how to connect 8 frames together for control through a single
GYDA-SC (seen from the rear). One termination plug is provided with each frame delivered.
Figur 4: Control of 8 frames with GYDA-SC.
The 110ohm termination plug used is a standard RJ45 plug with the following internal wiring:
Figur 5: RS-422 termination.
In the figure above, Pin 1 is connected to Pin 2 with a 110ohm resistor, and Pin 3 is
connected to Pin 6 with a 110ohm resistor.
network-electronics.com | 10
GYDA-SC
Rev. 4
4.2 VikinX control
A VikinX Compact or Sublime router can be connected to the upper most serial port with a 9pin straight serial cable (1-1, 2-2, 3-3 etc). By combining this with an NCB loop, it’s possible
to connect up to 30 Sublime routers (15 audio and 15 video, data routers are controlled as
either audio or video).
If connecting a VikinX Compact, you must go to the web interface of GYDA-SC and configure
the number of inputs, outputs and format manually. When connecting VikinX Sublime
routers, GYDA-SC will automatically detect this information.
GYDA-SC will now list the routers under the Flashlink racks, and allows both web and SNMP
control of the routers.
4.3 GPI connections
The output can be used for wiring up alarms for third party control systems. The GPI outputs
are open collector outputs, sinking to ground when an alarm is triggered. The GPI connector
is shown in figure 7.
The GPI output will be active, if one or more alarms are active in the system.
This means that each GYDA-SC System Controller can monitor the status of e.g. 4 different
power supplies. To monitor more than 4 external devices, these must be hardwired together
as AND logic. Alternatively, a D422-MG with firmware revision 2.0.0 or newer can be used to
extend the number of GPI alarm inputs with up to 16 channels per card. With pairs of D422MGs and a bi-directional fiber connection this also makes it possible to do remote GPI
monitoring of up to 16 GPI alarms per D422-MG pair.
Pin #
1
2
3
4
5
6
7
8
Signal
GPI 1
GPI 2
GPI 3
GPI 4
Status
Name
External alarm 1.
External alarm 2.
External alarm 3.
External alarm 4.
General error status for the
system.
Not in use.
+5V
+5V pin
Ground 0V / GND pin.
Mode
Input
Input
Input
Input
Open
Collector
+5V
0V
Figur 6: GPI pin-out
network-electronics.com | 11
GYDA-SC
Rev. 4
5 IP address setup
See also Chapter 96H10 for basic information about IP, and how to configure devices using
IP for communication. Connection trough TCP/IP on your LAN/WAN network is also possible.
Chapter 97H2.9 shows information about the connector to use on GYDA SC.
This manual assumes that you already have a computer connected to your LAN
and have TCP/IP running on that computer. If you are unfamiliar with TCP/IP, it is
recommended to have assistance from your system administrator while doing
this.
Install the Network System Configurator on a PC with working LAN connection. Connect
GYDA-SC to the same LAN, and turn the power on.
Start the Network System Configurator. The Configurator will scan the network, GYDA-SC
will now be visible in the Project Explorer, together with other Network Electronics products.
Select IP settings->GYDA to bring up a list of all GYDAs found.
Figur 7: Network System Configurator, GYDA IP settings.
Get a unique, static IP address for the GYDA-SC. Your network administrator normally
assigns this.
Remember that the IP address of the router must be unique on your LAN. If you
use the same IP address as another device or machine on your network, you will
cause network problems.
All settings can be edited in the IP settings table, and illegal configurations will be indicated.
Press Apply to update GYDA-SC, press OK when done.
network-electronics.com | 12
GYDA-SC
Rev. 4
6 GYDA Status Monitoring and external alarms
6.1 GPI I/O
The output can be used for wiring up alarms for third party control systems. The GPI outputs
are open collector outputs, sinking to ground when an alarm is triggered. The GPI connector
is described in Chapter 4.2.
The GPI output will be active, if one or more alarms are active in the system.
This means that each GYDA-SC System Controller can monitor the status of e.g. 4 different
power supplies. To monitor more than 4 external devices, these must be hardwired together
as AND logic.
6.2 Front Panel – Module Status Monitoring
The status of the module can be easily monitored visually by the LEDs at the front of the
module. The LEDs are visible through the front panel as shown in the figure hereunder.
Figur 8: The LEDs of GYDA-SC (text not printed on the front panel)
The GYDA-SC version 2 has 4 LEDs each showing a status corresponding to the GPI
pinning. The position of the different LEDs is shown in the figure above.
Diode / Red LED
State
Yellow LED
Green LED
No light
Status
Card error
Not Applicable
Overall status of the Card has no power,
card is OK
or is not inserted
correctly.
Eth
Not Applicable
Full duplex
connection.
Half duplex
connection.
No Ethernet link
established.
(Check the cable).
Warn
Abnormal situation:
no functional error,
but a situation that
requires attention.
Boot-load / Startup.
Not Applicable
Normal situation.
Load
High load on the
μController.
It is normal for this
LED to flash red
during operation.
Medium load on the
μController.
Low, or normal load
on the μController.
Not Applicable
network-electronics.com | 13
GYDA-SC
Rev. 4
7 GYDA-SC web interface
7.1 General
GYDA-SC System Controller can control and monitor up to 79 modules, in a total of 8
frames. Each frame must be configured with a unique frame address, set by DIP switches at
the rear of the frame, as described in Chapter 3 of this manual and in the user manual for the
Flashlink frame, FR-2RU-10-2. Interconnection of several frames is also described in the
user manual for the frame itself, as well as in Chapter 4.1 of this manual.
There are six different + two optional views in the GYDA-SC System Controller web
interface. Each has its own menu-tab at the top, and will be highlighted when selected.
−
−
−
−
−
−
−
−
OVERVIEW (Optional, see Chapter 9)
HOME (Optional, see Chapter 7.5)
SYSTEM (An overview of the system connected to GYDA-SC)
ALARMS (All alarms within the system.)
LOG (Last 400 events after power up of the GYDA-SC System Controller)
CONFIG (TCP/IP and SNMP Configuration Settings)
MANUALS (All user manuals in PDF-format)
ABOUT
Figur 9: The menu-tabs of the GYDA-SC web interface.
GYDA-SC has two different pages for each module (found under the “SYSTEM” tab).
Module Information Page
Module Configuration Page
Open user manual
Figur 10: The icons for the different views in the "System" menu.
Each of the different modules in the modular Flashlink range has a dedicated icon, which will
appear in the corresponding position of the frame.
The default user name and password for access to the sub menus under the CONFIG tab is
described in Chapter 7.6.
network-electronics.com | 14
GYDA-SC
Rev. 4
7.2 GYDA web interface – screen navigation
The web interface with the information view of the GYDA-SC System Controller is shown in
figure 11. To the left we see the detection and indication of the 1-8 frames that are connected
to the system. In this case frame 0 is selected of the 3 frames that are connected to GYDASC. On the frame itself, we see the indication of the active card as a grey frame on the red
front. By clicking the different positions or icons of the frame, the different card modules can
be controlled.
Figur 11: Information view of the GYDA-SC System Controller.
Figur 12: The icon for the GYDA-SC System Controller.
As shown in figure 11, we can get a summary of the alarms in the system. Each alarm can
be in one of three different states:
−
−
Active (red colour). An alarm is present in the system, and is not acknowledged.
Acknowledged (yellow colour). A present alarm that has been acknowledged.
The alarm will disappear from the list as soon as the condition that set the alarm no
longer exists.
−
Restored (green colour). The condition that set the alarm does no longer exist. The
alarm must be acknowledged in order to disappear from the list.
The status for the GPI inputs of the GYDA-SC System Controller is shown below the alarm
list. The status can be either active (triggered by an external device) or inactive.
network-electronics.com | 15
GYDA-SC
Rev. 4
The GPI output can also be in one of two states. The GPI output is a catch all GPI output. If
one or more alarms are active in the system, the GPI output will be active, whereas if all
alarms are either acknowledged, restored or there are no alarms in the system, it will be
inactive.
The CONFIG screen of the GYDA-SC System Controller has settings for how GYDA-SC
shall work.
−
Search for new cards
Useful if the system configuration changes frequently. This setting means that all 79
possible addresses are polled each time in order to search for new modules.
−
Collect info from known cards
Default setting, this setting is useful if the system doesn't change frequently.
This setting will poll the status of known cards and one new empty slot at a time. New
cards will be detected at a rate determined by the number of cards in the system, the
more empty slots the longer it will take to detect new modules. On the other hand, all
cards are now polled once per second so changes on the known modules will be
reported much faster than before.
−
Single scan of empty slots
Will scan all empty slots for new modules. Setting is only available when the 'Collect
info from known cards' is chosen. Useful to speed up the detection of new modules.
Will not affect the scanning mode of GYDA-SC.
7.3 Links between web controllers
Figures 13 and 14 includes 3 small red rectangles with text in them. These are links to other
web devices. Examples could be another GYDA-SC, GYDA-VX, the IP-GTW series, other
web servers, etc. These are set up by editing the file “controllers.cfg” located on the
CompactFlash. This file can be uploaded with FTP or placed on the CF offline in a card
reader. The format is: One link per line, “name<space>ip-address”. Example:
prod1 10.10.10.197
prod2 10.10.10.198
ipgtw1 10.10.10.200
Alternatively, the Network Configurator can upload a list of all web controllers it has found to
GYDA-SC.
network-electronics.com | 16
GYDA-SC
Rev. 4
7.4 VikinX control
Figures 13 shows a typical view of the router information screen of a system with VikinX
Compact and/or Sublime routers connected.
Figur 13: Level info and crosspoint status.
In a router level, we get a list of the different signal types present in this level. The list
depends on what partitions are members of the level. The number of inputs and outputs
listed in the general info depends on the size of the partitions in the level. The Crosspoint
status table lists all crosspoints with output numbers, their corresponding inputs and the
locking status of the crosspoint. Locking status can be either:
−
−
−
Open, anyone can switch away from the current input,
Locked, the crosspoint must be unlocked or protected by the user indicated or
someone with a higher access level before switching,
Protected, the user indicated can do switching, everyone else need to unlock through
the same rules as for the "Locked" state.
The web interface and the SNMP interface have different user IDs.
The username used to log in to GYDA-SC when in strict "Strict password protection" mode
does not affect the user ID used for locking (see chapter 7.6).
Figure 14 shows the configuration screen for the router level in figure 13.
network-electronics.com | 17
GYDA-SC
Rev. 4
Figur 14: Crosspoint configuration.
Type in the wanted inputs to switch a crosspoint or a set of crosspoints. To disconnect ports
on CAV- or RS-422 data routers tick off "Discon." Optionally select a locking status for the
crosspoint. Any change must be followed by ticking off "Take" before executing the
command. At the bottom of the page there is a set of submit controls, marked "Ok", "Cancel"
and "Apply", respectively. "Ok" executes the command and returns to the information screen.
"Cancel" returns to the information screen without any changes, and "Apply" executes the
command without leaving the configuration screen.
7.5 Home tab
Generic webserver for static html can now be enabled from the CONFIG page, under
"General setup". This will change the graphics on the tab-menu. This homepage can also be
set as start page if this is needed.
Figur 15: Home tab configuration.
Figur 16: Tab enabled.
network-electronics.com | 18
GYDA-SC
Rev. 4
The static pages can be put on the CF (Compact flash) card in the directory called "home".
To access the “home” directory, you need to remove the flashcard from the GYDA-SC
module and put into a PCMCIA/USB adapter for CF. The file structure of the CF is shown in
figure 15.
Make sure that you don’t modify files outside the “home” directory; this may STOP
GYDA-SC from working.
Figur 17: File structure of the CF.
Make sure URLs are relative, or reference files on other WEB servers. References to
c:\\xxxxx or similar will not work.
network-electronics.com | 19
GYDA-SC
Rev. 4
7.6 Password protection
In its default state, GYDA-SC allows anonymous / open access to the card information Two
extra levels of protection (observer and operator) can be enabled for situations where
anonymous access to the system-, alarm- and log tabs are not wanted.
To enable “Strict password protection”, go to the CONFIG tab, select User and access
administration.
Figur 18: Default setup of User and access administration.
The three access levels are defined as follows:
−
Observer
Read only account, can’t acknowledge alarms and re-configure modules.
−
Operator
Has access to acknowledging alarms and re-configuring modules.
−
Administrator
Access to the CONFIG tab.
The levels are not inclusive. A normal user account needs both observer and operator
access. The default admin account does not have observer and operator access for security
reasons. There is no limit to the number of users.
In factory setting, all passwords are: password with user names as shown in
figure 18.
Remember to change the admin password to prevent abuse of GYDA-SC.
network-electronics.com | 20
GYDA-SC
Rev. 4
7.7 IP setup
Figur 19: IP settings in General Setup page.
The recommended way to change the IP setup of GYDA is to use the Network Electronics
System Configurator software, but the IP setup of GYDA can be altered through the General
Setup page if the System Configurator is not available.
Changes will not take effect before the system is restarted. If GYDA is restarted with
incorrect settings, the Network Electronics System Configurator must be used to reestablish
proper settings.
network-electronics.com | 21
GYDA-SC
Rev. 4
7.8 Icon and labels for passive modules
Passive optical modules like: WDM, CWDM, DWM and WOC don’t contain any
microcontroller which makes them able to communicate with GYDA. However, through
GYDA it’s possible to assign a graphical icon and a label for the module to make it visible in
the GYDA user interface. The procedure is as follows:
−
−
−
−
−
Click on the slot were the passive optical device is installed.
Press the “Tool” button below the frame.
Select the type of module from the “Card type” pull down menu.
If needed give the module a name in the “Card label” box.
Press Apply.
The graphical icon and the name of the module will appear when returning to the
SYSTEM tab, as shown in figure 19.
Figur 20: Graphical icon for passive optical modules.
network-electronics.com | 22
GYDA-SC
Rev. 4
7.9 NTP and Time zones
Under the CONFIG tab it is possible to set GYDA-SC to automatically keep the clock in sync
to an external time server, using NTP (Network Time Protocol). It is also possible to do
manual adjustments in case a time server is not available. In addition, it is possible to select
the time zone in which the GYDA-SC is operating. Logging is done in local time.
Figur 21: Date and time settings.
Example:
−
After the change of time zone:
Thu Mar 9 06:56:19 2006 (MDT): DAC-SDI in position 1 in rack no. 7:
user acknowledged active alarm: Card removed, see log for extra details
−
Before the change of time zone:
Thu Mar 9 09:46:01 2006 (UTC): DA-AES in position 7 in rack no. 1:
restored alarm: AES 2 signal lost
Note that for GYDA-SC to reach an NTP server outside the LAN, GYDA-SC must be
properly
configured
with
a
Netmask
and
a
Gateway.
7.10 Debug terminal
Under the CONFIG tab there is a feature called "Debug terminal". This feature is used for
service and problem solving.
network-electronics.com | 23
GYDA-SC
Rev. 4
8 SNMP (Simple Network Management Protocol) interface
GYDA can be used as an SNMP agent. This means that all the Flashlink modules can be
configured and monitored through a higher level third-party management system.
8.1 SNMP setup
Setup is done through the web interface of GYDA (described in Chapter 7). This is found
under the CONFIG tab.
The following parameters must be set:
−
sysContact
Contact person and contact details for the service person.
−
sysLocation
Where is the system located.
−
SNMP Read-Only community
Password to access the GYDA SNMP agent¹ .
−
SNMP Read-Write community
Password to access the GYDA SNMP agent¹.
−
SNMP trap destination
IP-address of the SNMP manager.
−
SNMP trap community
Password to access the SNMP manager¹.
8.2 Audible alarms
Using SNMP is the easiest way to implement audible alarms from GYDA to the operator’s
computer.
All alarms will generate SNMP traps that are fed to the operator’s computer as configured in
Chapter 8.1.
8.3 Authentication
If strict password protection is enabled, USM from SNMP v3 is used instead of the
community strings in Chapter 8.1. In this case the same three access levels as discussed in
Chapter 7.4 apply for SNMP, as well as for HTTP.
If anonymous access is enabled, the community strings are used.
network-electronics.com | 24
GYDA-SC
Rev. 4
9 System Overview
9.1 Using System Overview
System Overview enables an operator to see the situation at a glance, any cards with an
alarm state will be outlined in red, and clicking on a card will drill down into the GYDA
interface for that particular card.
Figur 22: Example system overview.
9.2 Enable System Overview
Access to the System Overview feature is locked by means of a software key. A key unique
to your GYDA will be generated by Network Electronics when you provide the MAC address
of the GYDA that will run System Overview. Enter the key in the General setup menu.
Figur 23: MAC address can be found on the Firmware Upgrade page.
network-electronics.com | 25
GYDA-SC
Rev. 4
Figur 24: Software key entry.
9.3 Creating the System Overview page
The preferred method of creating the System Overview page is by means of Microsoft Visio.
Draw your schematic on a single sheet then assign the complete card address, as seen in
the browser when watching a card, as a hyperlink to the object representing that card. Only
numeric IP addresses are supported.
When done, save the drawing as HTML in Visio.
9.4 Installing System Overview
Find the gif_1.gif and gif_1.htm files created by Visio. Rename gif_1.htm to index.html, and
place both in the sysview folder on the CF card. Create the folder if it does not already exist.
Replace the card and restart the GYDA controller. If the software key is valid, an Overview
tab will have appeared in the top menu.
For quick response, it is important that all referred GYDAs send traps to the GYDA running
System Overview. This includes the GYDA controller System Overview is running on.
network-electronics.com | 26
GYDA-SC
Rev. 4
10 GYDA software upgrade
10.1 Introduction
GYDA System Controller shall automatically detect all modules that are part of the modular
Flashlink product ranges. As the product ranges are expanded with additional modules, a
new release of the GYDA software is made in order to detect and monitor the new modules.
10.2 Upgrade procedure
Download the software from Network Electronics ASA, or use one provided for you by our
support department.
On GYDAs web page, access the CONFIG tab, subsection “Firmware upgrade”. Select the
firmware upgrade file by pressing “Choose” or “Browse” (depending on your web browser),
then press “Upgrade”. The upgrade process will then upload and install the firmware
upgrade, this will take a few minutes. GYDA must be restarted after the process is
completed.
network-electronics.com | 27
GYDA-SC
Rev. 4
11 Getting familiar with IP
This chapter is intended as a short guide to users who are new to IP configuration and
devices that communicates via IP.
What is TCP/IP?
−
−
−
Transmission Control Protocol / Internet Protocol.
TCP/IP is the data protocol used by all Internet applications (email, www, file
download, etc).
Used by VikinX Modular routers and panels, GYDA, THOR and ETH-CON.
Ethernet
−
−
Ethernet is a physical data communication interface.
Used for in-house (LAN) networks and short, medium and long haul applications (e.g.
Flashlink ETH100).
TCP/IP on Ethernet
−
−
−
TCP/IP is a data protocol, not a physical interface.
TCP/IP is designed to be used on many data carriers like Ethernet, ATM, ISDN, and
ADSL/SDSL.
Data can travel between different networks using one unified protocol: TCP/IP.
Microsoft Windows XP
Figur 25: TCP/IP properties in Windows XP.
network-electronics.com | 28
GYDA-SC
Rev. 4
Linux IP Configuration
Figur 26: TCP/IP properties in Linux.
IP Addresses
−
−
−
−
An IP address is like a computer phone number.
Every node on an IP network has a unique IP address, and the address is used to
distinguish between different computers (nodes on the network).
An IP address consists of 4 numbers separated with dots (e.g. 192.168.1.33).
You can’t connect to a remote node without knowing its IP address.
DNS
−
−
The Domain Name Service (DNS) is the “phone book” of the Internet and converts
between domain names (e.g. www.network-electronics.com) and IP addresses
(195.1.135.56).
The domain names are easier to remember than IP addresses.
Routing basics
−
−
Ethernet is a “broadcast protocol”, all data is broadcast to all nodes on the network all
the time.
TCP/IP is a routed protocol. Data is sent from node to node from the source to the
destination, enabling TCP/IP to be used on very big networks (e.g. The Internet).
network-electronics.com | 29
GYDA-SC
Rev. 4
Default Gateway
−
−
−
The Default Gateway is usually an IP router with one or more connections to the
Internet or the corporate network.
Often the default gateway is connected to “the rest of the world” through some other
media than Ethernet (e.g. ADSL, ISDN, T1, ATM, etc).
The Default Gateway has an IP address.
Use of the default gateway
−
−
All local computers (computers on your own Ethernet) can be reached directly, and
data is not sent via the default gateway.
Data sent to any other computer is sent to the default gateway, and the gateway will
take care of sending the data to the final destination.
Subnet Mask
−
−
−
The Subnet Mask (Netmask for short) filters out which data stays on your network
and which needs to be sent to the Default Gateway.
The Netmask consists of 4 numbers separated by dots (e.g. 255.255.255.0).
The Netmask splits the address space in two, one local and one non-local.
Network Address
−
−
−
−
The Network Address is the common address for all computers on a local network.
The Netmask is used together with the IP address to create the Network Address.
If the destination Network Address is different to the local Network Address, then the
data is sent to the Default Gateway.
All nodes on your local network will have the same Network Address.
Network Address calculation
−
−
−
−
The IP address is combined with the Netmask to create the Network Address (NA).
IP Address
192
168
1
33
Netmask
255
255
255
0
Network Address
192
168
1
0
Netmask = 255, copy IP to the NA.
Netmask = 0, zero the NA.
Netmask can have other values (advanced).
network-electronics.com | 30
GYDA-SC
Rev. 4
Figur 27: IP configuration example.
Example #1:
−
−
−
−
−
−
Source IP: 192.168.1.22
Destination IP: 201.2.235.56
Netmask: 255.255.255.0
Source Network Address: 192.168.1.0
Destination Network Address: 201.2.235.0
Destination is on another net; send data to the Default Gateway.
Example #2:
−
−
−
−
−
−
Source IP: 192.168.1.22
Destination IP: 192.168.1.133
Netmask: 255.255.255.0
Source Network Address: 192.168.1.0
Destination Network Address: 192.168.1.0
Source and destination is on the same net, send data directly (Not to the Default
Gateway).
network-electronics.com | 31
GYDA-SC
Rev. 4
General environmental requirements for Network Electronics
equipment
1.
2.
-
The equipment will meet the guaranteed performance specification under the following
environmental conditions:
Operating room temperature range: 0°C to 50°C
Operating relative humidity range:
<90% (non-condensing)
The equipment will operate without damage under the following environmental
conditions:
Temperature range:
-10°C to 55°C
Relative humidity range:
<95% (non-condensing)
network-electronics.com | 32
GYDA-SC
Rev. 4
Product Warranty
The warranty terms and conditions for the product(s) covered by this manual follow the
General Sales Conditions by Network Electronics ASA. These conditions are available on the
company web site of Network Electronics ASA:
www.network-electronics.com
Important notes regarding the GYDA Firmware
This product utilises software components that are licensed with open source licenses. The
source code for these components, and our modifications are available from:
51Hhttp://labs.network-electronics.com/open-source/
You may also send Network Electronics a recordable CD and a self-addressed envelope,
and we will burn the contents of 52Hhttp://labs.network-electronics.com/open-source/ to your
CD and send it back to you.
This offer is valid for 3 years after purchase of this product.
network-electronics.com | 33
GYDA-SC
Rev. 4
Appendix A Materials declaration and recycling information
A.1 Materials declaration
For product sold into China after 1st March 2007, we comply with the “Administrative
Measure on the Control of Pollution by Electronic Information Products”. In the first stage of
this legislation, content of six hazardous materials has to be declared. The table below
shows the required information.
Toxic or hazardous substances and elements
組成名稱
Part Name
GYDA-SC
鉛
汞
镉
六价铬
多溴联苯
多溴二苯醚
Lead Mercury Cadmium Hexavalent Polybrominated Polybrominated
(Pb)
(Hg)
(Cd)
Chromium
biphenyls
diphenyl ethers
(Cr(VI))
(PBB)
(PBDE)
X
O
O
O
O
O
O: Indicates that this toxic or hazardous substance contained in all of the homogeneous materials for
this part is below the limit requirement in SJ/T11363-2006.
X: Indicates that this toxic or hazardous substance contained in at least one of the homogeneous
materials used for this part is above the limit requirement in SJ/T11363-2006.
A.2 Environmentally-friendly use period
The manual must include a statement of the “environmentally friendly use period”. This is
defined as the period of normal use before any hazardous material is released to the
environment. The guidance on how the EFUP is to be calculated is not finalised at the time
of writing. See
http://www.aeanet.org/GovernmentAffairs/qfLeOpAaZXaMxqGjSFbEidSdPNtpT.pdf for an
unofficial translation of the draft guidance. For our own products, Network Electronics has
chosen to use the 50 year figure recommended in this draft regulation. Network Electronics
suggests the following statement on An “Environmentally Friendly Use Period” (EFUP)
setting out normal use:
EFUP is the time the product can be used in normal service life without leaking the hazardous
materials. We expect the normal use environment to be in an equipment room at controlled
temperature range (0ºC - 40ºC) with moderate humidity (< 90%, non-condensing) and clean air, not
subject to vibration or shock.
Further, a statement on any hazardous material content, for instance, for a product that uses
some tin/lead solders:
Where a product contains potentially hazardous materials, this is indicated on the product by the
appropriate symbol containing the EFUP. The hazardous material content is limited to lead (Pb) in
some solders. This is extremely stable in normal use and the EFUP is taken as 50 years, by
comparison with the EFUP given for Digital Exchange/Switching Platform in equipment in Appendix A
of “General Rule of Environment-Friendly Use Period of Electronic Information Products”. This is
indicated by the product marking:
50
It is assumed that while the product is in normal use, any batteries associated with real-time clocks
or battery-backed RAM will be replaced at the regular intervals.
The EFUP relates only to the environmental impact of the product in normal use, it does not imply that the
product will continue to be supported for 50 years.
network-electronics.com | 34
GYDA-SC
Rev. 4
A.3 Recycling information
Network Electronics provides assistance to customers and recyclers through our web site
http://www.network-electronics.com. Please contact Network Electronics’ Customer Support
for assistance with recycling if this site does not show the information you require.
Where it is not possible to return the product to Network Electronics or its agents for
recycling, the following general information may be of assistance:
−
−
−
−
Before attempting disassembly, ensure the product is completely disconnected from
power and signal connections.
All major parts are marked or labelled to show their material content.
Depending on the date of manufacture, this product may contain lead in solder.
Some circuit boards may contain battery-backed memory devices
network-electronics.com | 35