1
USER MANUAL
THERMAL CAMERA
KT-160
SONEL SA
ul. Wokulskiego 11
58-100 Świdnica
Version 1.03 19.07.2010
KT-160 Thermal Camera complies with current EU directives relating to electromagnetic
compatibility and safety:
Thank you for purchasing our thermal camera. KT-160 is a modern, easy and safe
measuring device. Please acquaint yourself with the present manual in order to avoid
measuring errors and prevent possible problems related to operation of the camera.
All products of Sonel S.A.are manufactured in accordance with Quality Management System which is
approved to ISO9001:2008 for the design, manufacturing, and servicing.
Due the continuous development of our products, we reserve the right to introduce changes and
improvements in the thermal imaging camera and in the software described in this manual without
prior notice.
Copyrights
© Sonel S.A., 2010. All rights reserved. This manual may not be copied, reproduced, translated or
transferred to any electronic carriers or in machine-readable form, in whole or in part, without the prior
written consent of Sonel SA
2
KT-160 USER MANUAL
TABLE OF CONTENTS
1
SAFETY ....................................................................................................................5
2
FUNCTION BUTTONS AND MENU ....................................................................7
2.1
2.2
3
LAYOUT OF BUTTONS..............................................................................................7
SCREEN .................................................................................................................7
CAMERA CONTROL AND ADJUSTMENT .......................................................9
3.1
SWITCHING THE CAMERA ON / OFF ..........................................................................9
3.2
FOCUSING .............................................................................................................9
3.3
TEMPERATURE RANGE ..........................................................................................10
3.4
IMAGE MODES ......................................................................................................12
3.5
MANUAL CALIBRATION .........................................................................................15
3.6
LASER LOCATOR ...................................................................................................15
3.7
CAPTURING AND RECORDING THE IMAGE WITH VOICE ANNOTATION .......................15
3.8
FUNCTION SETTINGS ............................................................................................17
3.8.1
Setting object emissivity ...............................................................................18
3.8.2
Ambient temperature settings ......................................................................19
3.8.3
Selecting the colour palette .........................................................................19
3.8.4
Setting the distance from an object ..............................................................21
3.8.5
Setting relative humidity ..............................................................................21
3.8.6
Activating the laser locator .........................................................................21
3.9
CAMERA SETTINGS ...............................................................................................21
3.9.1
Restoring default settings ............................................................................22
3.9.2
Selection of the user interface language ......................................................23
3.9.3
Selecting temperature units .........................................................................23
3.9.4
Setting time and date ...................................................................................23
3.9.5
Lens selection ..............................................................................................24
3.9.6
External display and selection of video signal type .....................................24
3.9.7
Setting the value for temperature alarm ......................................................25
3.10 SETTING AND VIEWING FILES, INFORMATION .........................................................25
3.10.1 Preview of stored images and deleting single images from memory ...........26
3.10.2 Deleting all saved images ............................................................................27
3.10.3
Selecting a memory ......................................................................................27
3.10.4 Help .............................................................................................................27
3.10.5 Information about hardware and software version .....................................27
3.11 POWER SUPPLY, BATTERY CHARGING ....................................................................27
3.11.1
Using the AC adapter ..................................................................................28
3.11.2 How to use batteries and rechargeable batteries ........................................28
3.11.3
Charging rechargeable batteries .................................................................28
3.11.4
General principles regarding using Ni-MH rechargeable batteries ...........29
KT-160 USER MANUAL
3
4
PRECISE TEMPERATURE MEASUREMENT................................................ 31
5
INFRA-RED FILMING ........................................................................................ 32
5.1
5.1.1
5.1.2
5.2
5.3
5.4
5.4.1
5.4.2
5.4.3
6
INSTALLING THE CAMERA DRIVER ......................................................................... 32
Hardware requirements .............................................................................. 32
Installation .................................................................................................. 32
INSTALLING "SONEL THERMOANALYZE" SOFTWARE .............................................. 35
CONFIGURATION OF "SONEL THERMOANALYZE" SOFTWARE ................................. 36
RECORDING AND PLAYBACK OF IR VIDEOS ........................................................... 37
Infrared video in real-time mode ................................................................ 37
Commands available in IR video mode, ...................................................... 39
Data record and analysis ............................................................................ 45
DATA TRANSMISSION AND ANALYSIS ........................................................ 46
6.1
6.2
6.3
READING THE EXTERNAL MEMORY (SD CARD) ...................................................... 46
USING THE INTERNAL UFLASH MEMORY ............................................................... 46
DATA ANALYSIS ................................................................................................... 47
7
TECHNICAL SPECIFICATIONS ....................................................................... 48
8
OVERVIEW OF EMISSIVITY FACTOR FOR VARIOUS MATERIALS ... 50
9
USE OF ACCESSORIES ...................................................................................... 51
9.1
9.2
9.3
TELEPHOTO LENS 30MM ...................................................................................... 51
WORKING ON A TRIPOD ........................................................................................ 53
WORKING IN CONDITIONS OF INTENSE ILLUMINATION ........................................... 53
10
CLEANING AND MAINTENANCE ................................................................... 54
11
CALIBRATION ..................................................................................................... 54
12
STORAGE .............................................................................................................. 54
13
EQUIPMENT ......................................................................................................... 55
14
DISMANTLING AND UTILISATION................................................................ 56
15
MANUFACTURER ............................................................................................... 56
4
KT-160 USER MANUAL
1 Safety
Before you proceed to operate the camera, acquaint yourself thoroughly with the present
manual and observe the safety regulations and specifications defined by the producer.
• Any application that differs from those specified in the present manual may result in a
damage to the device and constitute a source of danger for the user.
• The camera must not be used in rooms where special conditions are present e.g. fire
and explosion risk.
• It is forbidden to use damaged or malfunctioning camera.
• When the camera is not used for a long time, remove the batteries. Battery spill and
damage to the camera may occur if discharged batteries are left in the meter.
• Do not use the camera with half-closed or opened battery cover and do not use any
other adapter than the one supplied with the camera.
• Repairs may be carried out only by an authorised service point.
KT-160 Thermal Camera is designed to measure and record the images in the infrared.
The camera is constructed in a manner which gives you maximum performance and
safety at work, but the following precautions must be adhered to at all times (in addition to
any advised precautions applicable at the relevant work-site or work area):
•
Keep the camera steady during operation.
•
Do not use the camera in temperature exceeding its working and storage
temperature ranges.
•
Do not direct the camera toward very high intensity radiation sources such as
the sun, lasers or welding arcs etc.
•
Do not expose the camera to dust and moisture . When operating the device near
water, ensure that it is adequately guarded against splashes
•
When the camera is not in use or is to be transported, ensure that the unit and its
accessories are stored in the protective carry case.
•
Do not jam the holes or loudspeaker on the camera body.
•
Do not re-switch on the camera until 15 seconds later after switching it off.
•
Do not throw, knock or shake intensely the camera and its components in order to
avoid the damage.
•
Do not attempt to open the camera body, as this action will void the warranty.
•
Keep the SD memory card for the exclusive use of the camera.
•
During operation, if the camera is to be moved from hot/cold place to cold/hot place,
e.g. from inside/outside to outside/inside of a room, switch off the camera and leave
it in the new workplace for 20 minutes, then turn it on and start normal operation with
an accurate temperature measurement. Sudden and rapid changes in ambient
temperature may cause fault temperature measurement and even damage camera’s
IR detector.
•
FPA setting (FPA -. Focal Plane Array): in order to ensure accurate temperature
measurement, the FPA detector was calibrated in different temperature points:-7°,
KT-160 USER MANUAL
5
17°, 27°, 37°. For example, when the camera is turned on at 0 °, after some time the
temperature of the camera (detector) will gradually increase and when its internal
temperature exceeds 7°, an automatic FPA will take place and will last for about 30
sec. During the FPA setting the camera will not response to any operations.
This action will be repeated when the temperature exceeds 17 ° camera, etc.
NOTE!
Use only standard and additional accessories,
listed in "Equipment" section. Using other accessories does not ensure
proper operation of the camera and may cause its damage.
NOTE!
Due to the continuous development of the device, the design
of the display and its certain features may be slightly different than presented
in this manual.
NOTE!
KT-160 Thermal camera has no parts that could
be repaired by its user. Never attempt
to dismantle or modify the camera. Opening the unit
invalidates the warranty.
NOTE!
Laser locator installed in the camera may be
dangerous to eyes, in case of
direct contact!
DO NOT DIRECTED THE LASER BEAM TOWARDS OTHER PERSONS OR
ANIMALS!
Please note that the laser beam may reflect off
shiny surfaces.
6
KT-160 USER MANUAL
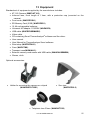
2 Function buttons and menu
2.1
Layout of buttons
Access to the camera functions is available by operating buttons (3) located below LCD
display (1) and the trigger button (10):
Function buttons (3) are arranged as follows:
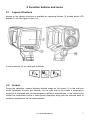
2.2
Screen
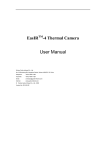
During the operation, camera displays infrared image on the screen (1) in the real-time
mode (refreshed 30 times per second). On the right side of the screen a temperature
range bar is displayed with colours assigned to different temperatures. In the centre of the
screen the temperature value is continuously displayed along with the selected point of
maximum temperature on the observed area:
KT-160 USER MANUAL
7
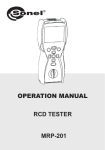
After choosing a function or completing the measurement, at the bottom of the screen a
menu appears, where each option may be performed using one out of the three buttons:
In the above example, the left key (F), is assigned to "zoom-out" command, the middle
key (M) to "zoom-in" command and the right key (P), is assigned to "Autofocus" command
".
8
KT-160 USER MANUAL
3 Camera control and adjustment
3.1
Switching the camera on / off
In order to switch the camera on press and hold button
for more than 3 sec.
The screen displays "welcome" logo, after which a self-check of the camera is carried out
(the results of consequent tests are displayed on the screen)- after completing the selfcheck the camera is ready to work and enters the infrared image display mode in realtime.
In order to switch the camera off press and hold button
3.2
until the screen goes out.
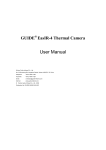
Focusing
KT-160 Camera may operate in either automatic or manual focus mode. To change
between focus modes shortly press button
(when the screen is not showing any
menu). The screen displays the following menu, where the function keys have assigned
functions according to the bar displayed at the bottom of the screen:
When the camera is pointed at a target, the focus may be changed manually by pressing
buttons
and
objects, while pressing
: pressing
results in "zooming-out"- focusing on distant
results in "zooming-in"- focusing on closer objects. Pressing
button
switches the focus mode into auto-focus. After pressing the trigger button the
camera will remember the settings and exit the function.
During operation, if the focus is not sufficient after using automatic mode, point the
KT-160 USER MANUAL
9
camera at a target object, activate the focus (short press button
pressing button
focus manually.
3.3
activate the auto-focus again or press
/
), and then by
buttons to set the
Temperature range
When the screen is not showing any menu, press and hold button
1sec.
for approximately
Pressing button
results in automatic selection of the displayed temperature range maximum and minimum temperatures will be adjusted in the course of the measurement
automatically by the device, depending on the detected temperature range in the
observed area.
Pressing button
results in switching into manually selected temperature range.
Choosing this mode causes switching into the mode for setting the upper limit
temperature Tmax:
10
KT-160 USER MANUAL
By pressing buttons
or
the user increases / decreases the upper temperature
range shown on the thermogram (changing value is additionally marked with a red line).
Pressing button
causes switching into the mode for setting the lower limit
temperature, which can be adjusted in the same way as the upper limit temperature using
buttons and
Pressing button
temperature.
:
causes switching into the mode for setting the upper limit
By pressing the trigger button (10) the user accepts the temperature range selected
manually.
KT-160 USER MANUAL
11
After choosing the automatic or manual range - information about this appears for 2
seconds in the upper left corner of the screen (message on a green background). In
addition, when manual range is chosen digits on the temperature range bar will be shown
in brown (in automatic mode in white).
3.4
Image modes
When the screen is not showing any menu, press and shortly hold button
. It results
in displaying the selection screen for selecting one of the three picture modes:
) the camera will show on the screen only the visible
1. If you select "Visible" (button
image. In order to return to infra-red image mode press the trigger button (10).
2. "Point" function enables user to change the location of the point (the centre of the
screen is its default location), for which the temperature value is always read and shown.
After selecting this function (pressing button
12
) the screen looks as follows:
KT-160 USER MANUAL
Pressing button
causes the temperature reading point to shift left, while pressing
button to right (new coordinates in relation to the centre of the screen are displayed,
and the point is marked with blue lines); pressing
Down":
switches into the mode "Up /
where buttons
/
change the location of the point vertically, and button
switches into "Left / Right." mode Regardless of the change in the position of the centre
point, the screen continuously displays the indicator of the maximum temperature.
Pressing the trigger button (10) causes the camera to exit "Point" mode and return the
temperature reading point to the centre of the screen.
KT-160 USER MANUAL
13
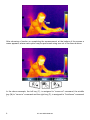
3. "Fusion" Mode
After choosing "Fusion" mode (button
) the screen shows a visual (visible) image
combined with the thermal image in such a manner that the thermal image is in the centre
of the screen:
The bottom of the screen displays a slide bar, representing the proportion of combined
images - when it is moved to the left (button
reduced, and moving it to the right (
) the intensity of the thermal image is
) - the intensity is increased:
Still the area with the highest temperature and the central measurement point of analysed
area are indicated, the values of corresponding temperatures are shown in the bottom left
corner (max - maximum temperature, "cen" - the temperature in the central point.)
14
KT-160 USER MANUAL
Pressing
button or the trigger button (10) results the camera to exit the current
setting and enter into infra-red image mode.
3.5
Manual Calibration
This camera during its operation, regularly performs the calibration (it is indicated by letter
"C" in the green rectangle appearing in the upper left corner).
The calibration may be activated manually at any time. When the screen is not showing
any menu, shortly press
button and simultaneously press the trigger button (10).
The calibration will be performed and indicated similarly to the automatic calibration.
3.6
Laser locator
Laser locator may be activated (when the screen is not showing any menu) by pressing
and holding
button (activation occurs after about 1.5 seconds), and it is turned off
after releasing or pressing the trigger button.
NOTE!
The laser beam may damage your eyes in case of contact, therefore DO NOT
DIRECT YOUR EYES TOWARD THE LASER BEAM, and do not direct the laser
beam toward people and animals! Pay particular attention, as the laser beam can
reflect off the shiny
surfaces.
For security reasons, the function is available if the laser has already been activated in the
settings menu parameters (see section 2.9 – "Settings").
3.7
Capturing and recording the image with voice annotation
The camera displays the image in a continuous manner, refreshing it 30 times per
second. In order to capture an image, press the trigger button (10) and this will capture
the image and display the menu on the screen:
KT-160 USER MANUAL
15
- Pressing 'Save' (
button) saves the captured image (without voice annotation) and
return to real-time mode.
- Pressing "Visible” (
button) switches the camera screen into the visible image
mode (captured still image is shown, which corresponds to captured infra-red image) repressing
red image.
button or the trigger button (10) switches the screen back to the still infra-
- Pressing "Voice" (
minute):
button) switches into recording mode for voice annotation (up to 1
Selecting "Record" ” (button
) starts recording a voice annotation. During the
recording, a time bar located above the command bar displays the current length of the
recording in seconds.
The user may stop recording by pressing the trigger button (10), then the camera returns
to "Save - Voice - Visible" menu "Record" without saving a voice annotation.
16
KT-160 USER MANUAL
Pressing "Stop"
- stops recording the voice annotation (Note - such action must take
place within 60 seconds from the start).
Recorded annotation may be played ("Play" - button
) through the speaker (5), or
recording process may be repeated (button
). Pressing "Save" (
) saves
captured thermal image with the voice annotation.
REMARKS:
- A voice annotation can be added only BEFORE final saving of the image.
- If the recording time exceeds 60 seconds, the recording will be stopped and the
annotation will not be saved.
- Pressing the trigger button (10) results in returning to the real-time infra-red mode
without saving the captured image.
3.8
Function Settings
When the screen is not showing any menu, press button
selection will be displayed:
and the following function
At any time the user may exit function settings menu by pressing the trigger button(10).
After selecting "Parameter" (button
) a submenu is opened to set the parameters of
KT-160 USER MANUAL
17
the camera:
Select the desired parameter by moving the arrow keys "up" or "down" keys
(buttons
/
); after choosing a parameter on the navigation bar located, the full
name of the parameter is displayed. After accepting („OK”, button
opens, allowing the user to adjust given parameter:
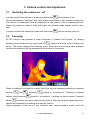
3.8.1
) a sub-menu
Setting object emissivity
Select "Emis" and accept it by pressing "OK" to go to sub-menu "Setting object
emissivity." By pressing the "+" or "-" (
18
/
) the emissivity factor may be decreased
KT-160 USER MANUAL
/ increased within the range of 0.01 .. 1.00. By pressing the "OK" (
) the user accepts
a new value.
The default value is 0.98.
Sample values of emissivity for various materials are given in Chapter 8
3.8.2
Ambient temperature settings
Select "Tamb" and accept it by pressing "OK" to go to sub-menu "Setting ambient
temperature." By pressing "Setup" (
where the "+" or "-" (buttons
/
) the camera is switched into the manual mode,
) are used to decrease / increase the value of the
ambient temperature within the range of -40.0 .. 85.0 ° C. By pressing the "OK" (
) the
user accepts a new value.
This function allows the user to set the proper relation between the ambient temperature
and the temperature of tested objects; it is useful when measurements are made from a
distance, for example from a room with a different temperature than the ambient
temperature of the measured object. Further activation of this function and exiting it,
causes the camera to switch into the automatic mode. For most measurements there is
no need for manual adjustment.
3.8.3
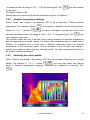
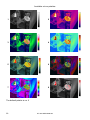
Selecting the colour palette
Select "Palette" and accept it by pressing "OK" to go to sub-menu "Selecting one of eight
pallets." By pressing "<-" or "->" (button
/
) the user may select one desired
pallet to represent temperature mapping. Changes are confirmed by pressing "OK"
(
):
KT-160 USER MANUAL
19
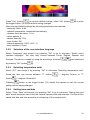
Available colour palettes:
1
2
3
4
5
6
7
8
The default palette is no. 2
20
KT-160 USER MANUAL
3.8.4
Setting the distance from an object
Select "Distance" and accept it by pressing "OK" to go to sub-menu "Setting the distance
from an object." By pressing the "+" or "-" (buttons
/
) the user may set the
distance between the camera and measured object within the range 0.1 ... 30 meters.
).
Changes are confirmed by pressing "OK" (
Setting the distance helps to correct the effects of the medium (air pollution, haze, smoke,
gases), in which the radiation propagates, on the accuracy of the measurements.
The default value is 1.8 m.
3.8.5
Setting relative humidity
Select "Relhum " and accept it by pressing "OK" to go to sub-menu "Setting ambient
/
) /) the user may set the
relative humidity." By pressing the "+" or "-" (buttons
value of relative humidity depending on environmental conditions in the range 0 .. 100%..
Changes are confirmed by pressing "OK" (
The default value is 70%.
3.8.6
).
Activating the laser locator
"Laser" option allows the user to block or make available the possibility of switching on the
laser locator. After entering sub-menu "Switching the laser locator on/off" the user may
activate or block the laser locater by using buttons
/
(current status of the
locator is displayed above the menu bar). After selection for an additional information is
displayed for two seconds in the upper left corner indicating the current status of the laser.
By default, the laser is turned off.
3.9
Camera Settings
When the screen is not showing any menu, press button
selection will be displayed: "Parameter - File - Setup".
KT-160 USER MANUAL
and the following function
21
At any time the user may exit setup menu by pressing the trigger button(10).
After selecting the "Setup" (button
) a sub-menu is opened allowing user to set own
camera parameters (language, temperature units, time / date, type of lens, type of video
output signal, temperature alarm thresholds ), or choose the default settings. The
selection is done by using the arrow keys "up" or "down" (buttons
3.9.1
/
):
Restoring default settings
Select "Default" and accept it by pressing "OK" to go to menu "Restoring default settings".
22
KT-160 USER MANUAL
) to confirm default settings, select "No" (button
Press "Yes" (button
the trigger button (10) to exit without saving changes.
After selecting default settings the following parameters are switched:
- emissivity factor: 0.98;
- ambient temperature: measured automatically;
- distance from the object: 1.8 m
- colour palette: 2;
- relative humidity: 70%
- laser locator: Off;
- alarm temperature: 100°C (212 ° F)
- lens: standard (11mm).
3.9.2
) or press
Selection of the user interface language
Select "Language" and accept it by pressing "OK" to go to sub-menu "Select user's
interface language." The user may choose between Polish, English, Spanish and
Russian. The choice is made by using the arrow keys (buttons
by pressing "OK" (button
3.9.3
/
) and confirmed
).
Selecting temperature units
Select „C/F” and accept it by pressing "OK" to sub-menu "Selecting temperature units"
where the user can choose between "C" (button
(button
) – degrees Celsius, or "F"
) – degrees Fahrenheit.
Pressing
button or the trigger button (10) results the camera to exit the current
setting without saving changes.
3.9.4
Setting time and date
Select "Time / Date" and accept it by pressing "OK" to go to sub-menu "Setting time and
date" which allows the user to set the internal camera clock and calendar. The files will be
saved with date and time according to indications of the camera clock.
KT-160 USER MANUAL
23
After selecting "Time" (button
and "" (buttons -
and
) the camera switches into time regulation mode "+"
) allow the user to set the time "Minutes" option (button
) is used to set minutes, where minutes may be set as described above or move to
seconds settings. After the clock is set (it is displayed during adjustment above the menu
bar) the user may save chosen settings by pressing OK, or exit the adjustment menu by
pressing the trigger button (10).
Similarly, after selecting date setup, the user may set ("+" and "') a year or move to
months settings, then set the month (" + "and"'), or move to day settings, and then save
the settings and exit the menu without saving them by pressing the trigger button (10).-NOTE: The date is displayed as month / day / year.
3.9.5
Lens selection
"Lens" option allows the user to choose between standard lens (11mm) or additional
telephoto lens 30mm. Additional telephoto lens may be selected only after its installation.
After installing additional lens (30mm) the camera automatically switches into the
corresponding lens mode.
The use of an additional 30mm lens is described in chapter 9.1
NOTE: Attaching/ detaching additional lens should be performed when the camera is
switched off.
3.9.6
External display and selection of video signal type
Choosing "PAL / NTSC" allows the user to switch the display from the LCD screen of the
camera to an external display and to select the type of video signal (PAL or NTSC).
External monitor should be plugged into the camera interface(12) using the supplied
cable.
When you select this option, the user may choose as follows:
After selection the user must confirm the choice by pressing "Yes" or "No" because after
choosing "PAL" or "NTSC" the image is no longer displayed on the screen of the camera
and is displayed only on a connected external display (including menu bars - and buttons'
24
KT-160 USER MANUAL
descriptions) therefore, if the user select "PAL" or "NTSC" an additional warning is
displayed:
After the selection is confirmed the camera switches its image to an external display
("PAL" or "NTSC") or to the camera screen ("LCD"). Select "No" to return to the selection
screen, pressing the trigger button (10) exits the menu without saving changes.
After the selection and approval, the camera remains in selected mode "PAL/LCD/NTSC",
and the user may exit it by pressing the trigger button. Until then, if the user selects an
external monitor, and there are problems with displaying the image, pressing button
,
the user may return to displaying the image on the camera screen.
and then
NOTE: It is recommended to switch the camera off before connecting / disconnecting an
external display.
3.9.7
Setting the value for temperature alarm
After choosing in "Setup" the option called "Alarm Temp." the user may select the
temperature above which the camera will emit a warning beep. The temperature value
may be selected within the range 0.1 ... 250 ° C (100°C by default).
3.10 Setting and viewing files, information
When the screen is not showing any menu, press button
selection will be displayed:
KT-160 USER MANUAL
and the following function
25
At any time the user may exit setup menu by pressing the trigger button(10).
After selecting "File" (button
images and information:
) a sub-menu is opened with options related to the stored
3.10.1 Preview of stored images and deleting single images from memory
Select "Files" and accept it by pressing "OK" to go to the sub-menu "View stored images",
where a preview of recorded images is available from the default memory (SD card or
internal memory, see section 3.10.3):
To select a saved file is use arrow keys "←" (
26
KT-160 USER MANUAL
) and "→" (
). When a file is
selected hover press "View" (button
) to display the picture in full screen mode, then
another 3 options are available. Select "Delete" to remove a file (press "Yes" to confirm,
press "No" to cancel and return to view the image); also the user may see the visual
image recorded with thermogram ("Visible"), or access the voice annotation ("Voice") (if
recorded). Press the trigger button (10) to return to the preview and selection mode for
stored images.
3.10.2 Deleting all saved images
After selecting "Del All" at the top of the screen a with the following message appears "Are
you sure you want to delete all images?" Select "Yes" to confirm and delete all images
stored in internal memory or SD card (depending on selected memory, see section
3.10.3). Select "No" to return to "File" menu.
3.10.3 Selecting a memory
"Memory" option allows the user to choose whether the images are stored in internal
Uflash memory or on a removable SD card.
After selecting "Memory" the current status is displayed above the menu bar (e.g.
and
), corresponding to
Memory: Uflash). The selection is made using buttons
the choice of "Uflash" or "SD Card". Selecting "SD Card" in the absence of the card in the
camera's card slot, (14) results in displaying the message "No SD card".
Pressing
button or the trigger button (10) results the camera to exit the current
setting without saving changes.
Remarks:
- Once SD card is inserted into the slot (14), the camera automatically switches its
memory to SD card.
- The camera may use a SD card with a storage capacity up to 2GB.
- Built-in Uflash memory (150MB) allows the user to store up to 120 images.
3.10.4 Help
Select "Help" to display abbreviated reference guide, containing basic information related
to the camera operation
3.10.5 Information about hardware and software version
Select "Info" to display information about camera's hardware and software version at the
top of the screen.
3.11 Power supply, battery charging
The camera is powered by six AA alkaline batteries or AA rechargeable batteries ant it
may be also powered using AC adapter.
KT-160 USER MANUAL
27
Rechargeable batteries are charged without the need to remove them from the camera.
To start charging rechargeable batteries, connect AC adapter to the camera terminal (13)
. Charging also takes place during operation of the camera.
3.11.1 Using the AC adapter
Connection of the AC adapter is indicated by the charging indicator (2). If the camera is
turned off, the indicator indicates battery charging status. After switching the camera on
(press and hold button
for 2 seconds) the indicator will flash for a while (changing
colour form green to red) at a rate of 3 times per second, and then (during the self-check)
it switches to continuous red light.
When the camera is turned off, if the AC adapter with power supply is still connected, the
indicator will indicate the battery charging.
NOTE!
Do not connect the AC adapter if the camera is powered by
non-rechargeable batteries. Connecting the AC adapter to such batteries creates
the risk of explosion
and damaging the camera.
3.11.2 How to use batteries and rechargeable batteries
After switching on the camera powered by batteries / rechargeable batteries the indicator
will flicker alternately in green / red for a few seconds after turning on the camera. During
operation, the indicator is blank.
NOTE: Low level of batteries / rechargeable batteries is indicated by message "Battery
low" in the upper right corner of the screen.
3.11.3 Charging rechargeable batteries
When the camera is turned off and contains rechargeable batteries, connecting the AC
adapter and charging is indicated by a slower flickering (approx. 1 per second) of the
charging indicator (2). After rechargeable batteries are charged the indicator is
continuously green.
Quick flickering of the indicator during the charging process indicates an irregularity (e.g.
reverse battery position or damage) in such a situation it is essential to stop charging and
check the cause of an irregularity.
In the case where only irregularity is a high battery temperature, loading should be
stopped until batteries are cool.
Ni-MH batteries do not require full charging / discharging during the operation, but it is
recommended to charge them fully during the first 3 charges.
Rechargeable batteries should be replaced all at once, do not use new batteries together
with used, do not use batteries of different types.
28
KT-160 USER MANUAL
NOTE!
Use only the AC adapter supplied with the camera.
NOTE!
Never remove rechargeable batteries from the camera while charging.
NOTE!
Pay attention to the polarity of rechargeable batteries (standard batteries )
while inserting them into the camera.
NOTE!
Charging batteries should be carried out at the temperature of 0...40°C.
3.11.4 General principles regarding using Ni-MH rechargeable batteries
When the camera is not used for a long time, remove the batteries and store them
separately.
Store the rechargeable batteries in a dry, cool and well ventilated place and protect them
from direct sunlight. The temperature of the environment in the case of prolonged storage
should not exceed 30ªC. If the rechargeable batteries are stored for a long time in a high
temperature, then the occurring chemical processes may reduce their lifetime.
Ni-MH batteries withstand normally 500-1000 charging cycles. These batteries reach their
maximum capacity after being formatted (2-3 charge/discharge cycles). The most
important factor which influences the lifetime of rechargeable batteries is the level of their
discharge. The deeper the discharge level of the batteries, the shorter their lifetime.
The memory effect is limited in case of Ni-MH batteries. These batteries may be charged
at any point with no serious consequences. However, it is recommended to discharge
them completely every few cycles.
During storage of Ni-MH batteries they are self-discharged at the rate of approximately
30% per month. Keeping rechargeable batteries at high temperatures may accelerate this
process even 100%. In order to prevent excessive discharge of rechargeable batteries,
after which it would be necessary to format them, it is recommended to charge them from
time to time (even if they are not used).
Modern fast chargers detect both too low and too high temperature of rechargeable
KT-160 USER MANUAL
29
batteries and react to the situation adequately. Too low temperature should prevent
starting the process of charging, which might irreparably damage rechargeable batteries.
An increase of the temperature of the rechargeable batteries is a signal to stop charging
and is a typical phenomenon. However charging at a high ambient temperature apart from
reducing batteries' lifetime causes an accelerated increase of their temperature and the
result is that the batteries are not charged to their full capacity.
Please note that when the batteries are charged with a fast-charger they are charged only
to approx. 80% of their capacity - better results can be achieved by continuing charging:
the charger enters trickle-charging mode and during the next few hours batteries are
charged to their full capacity.
Do not charge or use the batteries in extreme temperatures. Extreme temperatures
reduce the lifetime of batteries and rechargeable batteries . Avoid placing devices
powered by rechargeable batteries in very hot environments. The nominal working
temperature must be absolutely observed.
30
KT-160 USER MANUAL
4 Precise temperature measurement
Temperature measurement accuracy depends on many factors, among others: emissivity,
background temperature, the distance from the object, relative humidity. During the
measurements the camera makes the correction based on signals read from the sensors.
For some situations and materials it may be necessary to manually adjust the
parameters.
Emissivity. Infra-red measurements base on receiving the infra-red radiation emitted by
objects. The amount of radiation energy is based on two main factors: surface
temperature and emissivity of the object's surface. Default emissivity is 0.98 and it applies
to most surfaces.
The values of emissivity for some materials are given in the Emissivity Table (Section 8).
Poorly chosen value of the emissivity factor may cause significant reading errors for the
temperature, therefore KT-160 camera allows the user to choose the emissivity factor
within the range of 0.01 ... 1.00 (see chap. 3.8.1).
Measurement accuracy also depends on the ambient temperature. The default
temperature is the temperature measured by the camera and this value may be changed
manually to compare and establish a proper relation between measured object's
temperature and certain types of the ambient temperature (e.g., sky, snow).
Adjustment of the ambient temperature is described in Chapter 3.8.2.
The influence of the distance from the object on the measurement accuracy may be
significant, depending on the medium in which the object is located (air, fog, smoke ...)
and its impact on the attenuation of thermal radiation. It is possible to adjust the default
value (1.8 m) in the range of 0.1 ... 30m. The method of the distance adjustment is
described in chapter 3.8.4.
Relative humidity may also influence the accuracy of measurement, it is possible to
change the default value (70%) for a value from the range of 0 .. 100% (the function
described in section 3.8.5).
In addition, in order to get an accurate temperature reading, the user must hold the
camera steady and set the focus very well (Section 3.2).
KT-160 USER MANUAL
31
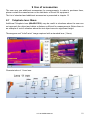
5 Infra-red filming
Infra-red video can be recorded with KT-160 camera when it is connected to a computer
via USB 2.0 connection, registration takes place in the computer memory (hard disk); this
makes the record length limited to the capacity of the computer's hard drive (1 minute of
IR video recording is about 25MB). IR video stored in a computer may be analysed both
during recording and later when read from the disk. Operation of the camera in the video
mode, recording and analysis is done using software supplied with the camera, ("Sonel
ThermoAnalyze ®")
Infra-red filming is possible after installation of the driver supplied on the software CD with
the camera.
5.1
5.1.1
Installing the camera driver
Hardware requirements
Operating System: Microsoft® Windows 2000 or higher (IE5.0 or higher)
Processor: Pentium 4 2.4GHz or more
RAM: at least 512M
5.1.2
Installation
Place the CD with the controller software in your PC's drive and run the ------------ program
in the ------------ folder. After the drivers are installed, connect the camera to the USB port
of your computer. The camera must be switched-on in the thermal image display mode
(real-time), it must not display any menu. It is recommended that the SD card is removed
from the slot for the time of installation (14). The camera should be detected and installed
automatically. If this does not happen, follow the instructions below.
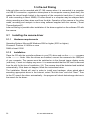
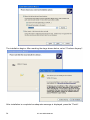
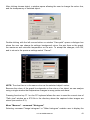
The Installation Wizard will start in order to install new hardware, when asked about
searching appropriate driver in the Internet, select "Not this time" and click "Next." Then
let the PC search the driver automatically - the program will check data storage devices in
the search for the driver:
32
KT-160 USER MANUAL
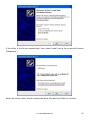
If the driver is not found automatically, then select 'Install from a list or specific location
(Advanced) ":
Select the folder (drive), which contains the driver files and click 'Next' to continue:
KT-160 USER MANUAL
33
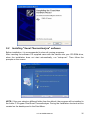
The installation begins. After reaching the stage shown below, select "Continue Anyway":
After installation is completed an adequate message is displayed, press the "Finish".
34
KT-160 USER MANUAL
5.2
Installing "Sonel ThermoAnalyze" software
Before installation, it is recommended to close all running programs.
After inserting the software CD supplied came with the camera into your CD-ROM drive,
when the installation does not start automatically, run "setup.exe". Then follow the
prompts on the screen.
NOTE: If the user selects a different folder than the default, the program will be installed in
the folder C:\Program Files\Sonel ThermoAnalyze. During the installation shortcuts will be
created on the desktop and in the Start Menu.
KT-160 USER MANUAL
35
5.3
Configuration of "Sonel ThermoAnalyze" software
NOTE.
Described below are just some features of "Sonel
ThermoAnalyze" software, containing instructions directly related to
the infra-red filming. A detailed description of all the features
"Sonel ThermoAnalyze" software may be found the software manual.
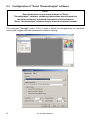
The command "Storage" (menu „File”) is used to define the storage place for recorded
movies and images and other parameters related to filming:
36
KT-160 USER MANUAL
Film Path: Sets the directory where the video files will be stored (default subdirectory \
IRVideo folder where the program is installed.
Capture saved: sets the directory for captured images.
Frame rate: determines the number of recorded frames per second (default 25)
Default Palette: sets the palette used in video mode.
Kinescope rate: determines which frame of the image is stored (e.g., 1 - each, 5 - one in
five). In some situations there is no need to record all frames - it helps to save disk space.
Update path view: data refreshing rate for each point.
5.4
5.4.1
Recording and playback of IR videos
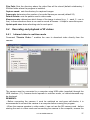
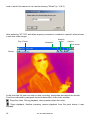
Infrared video in real-time mode
Command "Firewire Video..." enables the user to download video directly from the
camera:
The camera must be connected to a computer using USB cable (supplied) through the
USB Interface (11). Camera should operate in real-time mode, no menu/command may
be displayed.
REMARKS:
- Before connecting the camera, it must be switched on and pass self-checks, it is
recommended to connect the camera to a computer before running the program.
- When the camera operates in video mode, it can not use the SD memory card - before
starting the work in video mode and connecting the camera to the computer, remove the
KT-160 USER MANUAL
37
card or switch the camera to its internal memory "Uflash" (p. 3.10.3).
After selecting "KT-160" and when properly connected, a window is opened, which shows
a real-time video image.
Play / Pause
Calibration
Analysis
object
Capture
Full screen
Record
In the real time the user can start or stop recording, manipulate and adjust the shutter.
Functions indicated by assigned shortcuts described, in the video window:
: Plays the video. During playback, when pressed stops the video.
: Stops playback. Another pressing resume playback from the point where it was
stopped.
38
KT-160 USER MANUAL
: During playback mode, fast-forwards frame by frame.
: In playback mode, rewinds, frame by frame.
: Records video saving it in a continuous mode in the in the directory defined in
settings. The program names the file automatically. After stopping and re-pressing,
records another file.
NOTE: The
button is used both to start and stop the recording of IR video
sequences.
Additional features available from the computer function keys:
F2: Shutter operation
F3: Focus adjustment - zoom-in.
F4:Focus adjustment - zoom-out
NOTE
After moving the cursor to any displayed point, current temperature of that point is
displayed.
5.4.2
Commands available in IR video mode,
After performing the procedure described in section 5.4.1 the appearance of the menu bar
changes (upper part of Sonel ThermoAnalyze); features specific for IR video mode are
available. Described below are the commands related only to operation in the real-time;
all commands, including those related to playback and analysis of recorded data are
described in detail in the operating instructions of supplied software.
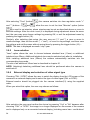
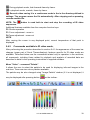
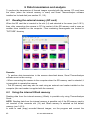
Menu "Video" - command "Palette"
It allows the user to select the palette to be used for displaying infra-red images in the
real-time. There are nine colour palettes available.
The palette may be also changed using "Image Palette" window (if it is not displayed, it
may be displayed after pressing button
on the toolbar:
KT-160 USER MANUAL
39
An exemplary images in different colours are shown in section 3.8.3, pallet 9 is a negative
of pallet 1
Menu „Video” - command "Set automatically"
It allows the user to set automatically or manually set the colour range for temperatures.
In the automatic mode, the system automatically selects the optimal settings.
In the manual mode the user can select the temperature range for the palette, setting
minimum and maximum temperature for displayed colours.
NOTE
Any adjustment of the range (see next command) changes the range and switches the
image into the manual mode. Command "Set automatically" restores the automatic mode
at any time.
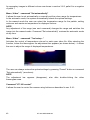
Menu „Video” - command “Tool setup...”
Activates the control of temperature colours for each open video file. After selecting the
function, below the thermogram the adjustment bar appears (as shown below) - it allows
the user to adjust the range of displayed temperatures:
The user can always restore the optimal settings by pressing "Cancel" button or command
"Set automatically" (see above).
NOTE
The adjustment bar appears (disappears), also after double-clicking the video
thermogram area.
Command "KT-160 control"
It allows the user to control the camera using buttons as described in sec. 5.4.1:
40
KT-160 USER MANUAL
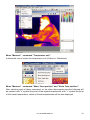
Menu "Measure" - command "Temperature unit"
It allows the user to select the temperature unit (Celsius or Fahrenheit):
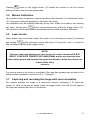
Menu "Measure" - command "Show Tmax position" and "Show Tmin position".
After selecting each of these command, on the video thermogram area the following will
be marked: with "x" symbol the point of the highest temperature, with "+" symbol the point
of the lowest temperature; values of these temperatures will be also displayed:
KT-160 USER MANUAL
41
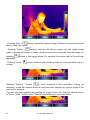
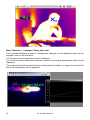
Menu "Measure" - command "Show path view"
This command displays a graph of temperature changes for the displayed object (point,
segment, area) in the real-time.
For the point current temperature will be displayed.
For the sections and areas the maximum, minimum or average temperature value will be
displayed.
The command should be selected after locating selected object on image of the object for
which the temperature will be analysed.
42
KT-160 USER MANUAL
After clicking chosen object, a window opens allowing the user to change the colour line,
and the transparency of selected object:
Double-clicking with the left mouse button on window "View path" opens a dialogue box
where the user can change its settings: background colour, the axis lines on the graph,
the maximum and minimum temperature on the axis. To accept the changes, click OK,
and to return to the previous settings select "Cancel".
NOTE: The chart line is in the same colour as the selected object's colour.
Because the colour of the graph line depends on the colour of an object, we can analyse
using a single window the temperature changes in many points and areas.
Pressing function key F11 on the PC keyboard allows the user to save the current view of
"Path view" window as a JPG file in the directory where the captured video images are
stored (see section 5.3).
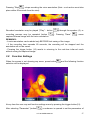
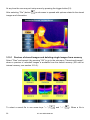
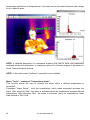
Menu "Measure" - command "Histogram"
Selecting command "Image histogram" or "Other histogram" enables user to display the
KT-160 USER MANUAL
43
percentage distribution of temperatures in the real-time for the whole thermal video image
or for a specific area:
NOTE: A detailed description of commands enabling the user to enter and manipulate
analysed areas and description of analysing options for thermal images is presented in
Sonel ThermoAnalyzee manual.
NOTE: In the video mode "isotherm" command is not available.
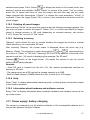
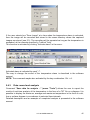
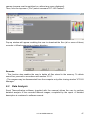
Menu "Tools" - command "Temperature alarm”
This function allows the user to activate the alarm when a defined temperature is
exceeded.
Command "Alarm Setup": sets the temperature, which when exceeded activates the
alarm. After selecting "Max", the alarm is activated when the temperature exceeds defined
temperature. After selecting "Min", the alarm is activated (also) for temperatures lower
than defined in "Min" field.
44
KT-160 USER MANUAL
If the user selects box "Save Image" at a time when the temperature alarm is activated,
then the image will be recorded and stored in the same directory where the captured
images are stored (see 5.3). The recording will be repeated as long as the temperature is
exceeded, at the intervals specified in "Interval" field.
This function is activated by clicking "Activate alarm" in the menu:
Activated alarm is indicated by mark "√".
The way to change the sound of the temperature alarm is described in the software
manual.
NOTE: The command maybe also activated by the key combination: Ctrl + A.
5.4.3
Data record and analysis
Command "Save data for analysis ..." (menu "Tools") allows the user to export the
results of real-time analysis of the temperature in the form of a TXT file or a diagram. It is
possible to display the minimum, average and maximum temperature in the form of a dot,
line or surface diagram in accordance to selected time-intervals.
Detailed description and an example of completed analysis is presented in the software
manual.
KT-160 USER MANUAL
45
6 Data transmission and analysis
To perform the transmission of thermal images recorded with the camera, PC must have
the driver (when the internal memory is used) and Sonel ThermoAnalyze software
installed on its hard disk (see section 5.1, 5.2).
6.1
Reading the external memory (SD card)
When the SD card the is inserted in the slot (14) and selected in the menu (see 3.10.3),
then, after connecting the camera to PC the content of the SD memory card is seen as
another drive installed on the computer. Files containing thermograms are located in
"PICTURE" directory
Remarks:
- To perform data transmission in the manner described above, Sonel ThermoAnalyze
software must not be running.
- When connecting the camera to the computer when the SD memory card is selected, it
is impossible to operate the camera.
- The SD memory card may also be read using an external card reader installed on the
computer (the card reader is supplied with the camera).
6.2
Using the internal Uflash memory
Reading data from the internal memory (Uflash) is possible only using ThermoAnalyze
Sonel.
NOTE: Reading data from the internal memory is possible only if the SD memory card is
not inserted in the camera's slot (14) and Uflash memory is selected as the default
memory (see 3.10.3).
In order to read (copy) recorded thermal images, run the program and connect the
46
KT-160 USER MANUAL
camera (camera must be switched on, without any menu displayed).
Then, from the top menu ("File") select command "KT-160 Camera":
Pop-up window will appear enabling the user to download the files (all or some of them)
recorder in Uflash memory to a chosen directory.
Remarks:
- This function also enables the user to delete all files stored in the memory. To delete
some files, proceed in accordance with section 3.10.1.
- The camera may be disconnected from the computer only after closing window "KT-160
Manager."
6.3
Data Analysis
Sonel ThermoAnalyze software (supplied with the camera) allows the user to perform
detailed analysis of the recorded thermal images, completed by the report. A detailed
description is contained in software manual.
KT-160 USER MANUAL
47
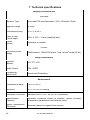
7 Technical specifications
Imaging Characteristics
THERMAL
Detector Type
Uncooled FPA microbolometer (160× 120 pixels, 25µm)
Spectral Range
8-14µm
Thermal sensitivity
≤ 0.1°C at 30°C
Field of view /
/ focal length
20.6° X 15.5° / 11mm (standard lens)
Focus
(focus)
Automatic or manual
VISUAL
Recording visual
image
CMOS sensor, 1600x1200 pixels, "true colours" mode (24-bit)
Image Presentation
External
display
3.6" TFT LCD
Video Output
PAL / NTSC
Technology
InfraFusion
Visual and IR blending
Measurement
Temperature range
-20°C to 250°C
Accuracy
± 2°C or ± 2% of reading
Emissivity Correction
Variable from 0.01 to 1.00 (in 0.01 increments)
Measurement
Features
Automatic correction based on distance, relative humidity,
atmospheric transmission and external optics
Optics Transmission
Correction
Automatic based on signals from sensors
48
KT-160 USER MANUAL
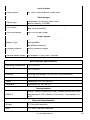
Laser Locator
Classification
A1 GalnP semiconductor, diode laser
Store images
Carrier type
Removable SD memory card (2GB)
built-in memory (150 MB)
File Format
JPG with thermograph data, real-view image
and voice annotation
Voice Annotation
up to 60 sec per image
Power System
Battery Type
AA rechargeable batteries, with the option to use nonrechargeable
AA alkaline batteries
Charging System
Built-in camera charger
Battery life
Over 3 hours of continuous operation
External power supply
AC adapter 110/230 VAC, 50/60Hz
Environmental Specifications
Operating temperature
Storage Temperature
-10°C to 50°C
-20°C to 60°C
Humidity
Working and storage: 10% to 95%, non-condensing
Housing
IP54 IEC 529 housing
Shock
Operating: 25G, IEC 68-2-29
Vibrations
Operating: 2G, IEC 68-2-6
Communication
USB 2.0
Image Transfer (thermal and real), measurements and voice
annotations to a PC transfer of live-video ( "Live transfer") to
a PC.
Physical Characteristics
Weight
0.73 kg (with batteries)
Size
111 mm x 124 mm x 240 mm
KT-160 USER MANUAL
49
8 Overview of emissivity factor
for various materials
aluminium.............................................................. 0.05
oxidized aluminium ............................................... 0.30
asphalt .................................................................. 0.90
cement and concrete ............................................ 0.90
chrome .................................................................. 0.15
tin .......................................................................... 0.09
zinc........................................................................ 0.05
red brick ................................................................ 0.93
clay ....................................................................... 0.40
graphite ................................................................. 0.85
cobalt .................................................................... 0.18
magnesium ........................................................... 0.12
brass ..................................................................... 0.10
oxidized brass ....................................................... 0.61
nickel ..................................................................... 0.15
lead ....................................................................... 0.16
oxidized lead ......................................................... 0.63
platinum ................................................................ 0.10
soot ....................................................................... 0.95
silver ..................................................................... 0.03
fabric ..................................................................... 0.85
titanium ................................................................. 0.30
coal ....................................................................... 0.90
wolfram ................................................................. 0.13
oxidized wolfram ................................................... 0.11
gold ....................................................................... 0.02
iron and steel ........................................................ 0.18
oxidized iron and steel .......................................... 0.85
50
KT-160 USER MANUAL
9 Use of accessories
The user may use additional accessories for measurements. In order to purchase them,
please contact the manufacturer or the distributor of Sonel SA equipment
The list of standard and additional accessories is presented in chapter 13
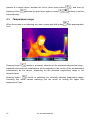
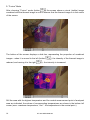
9.1
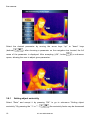
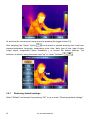
Telephoto lens 30mm
Additional Telephoto lens (WAADATO30) may be useful in situations where the user can
not approach the object and obtain a distance sufficient for measurements. Below there is
an example of such a situation where the test object was at a significant height.
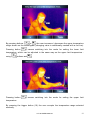
Thermogram and "InfraFusion" image captured with a standard lens (11mm):
Characteristics of 11mm lens :
KT-160 USER MANUAL
51
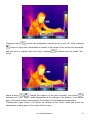
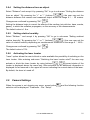
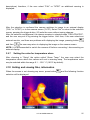
Thermogram capture with an additional lens (30mm):
Characteristics of 30mm lens :
52
KT-160 USER MANUAL
9.2
Working on a tripod
Prolonged holding the camera during the work may be tiring, in addition, vibrations cause
the blurring of images. Additional handle (WAADASTATYW1) allows the user to mount
the camera on a tripod.
9.3
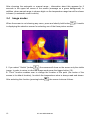
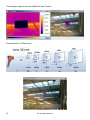
Working in conditions of intense illumination
When working in bright places (strong sunlight, strong internal lighting) the image on the
screen becomes very difficult to see. Additional lens hood (WAPOZOSL2), mounted on
the camera above the screen, allows the user to work in such adverse conditions
KT-160 USER MANUAL
53
10 Cleaning and maintenance
NOTE!
Use only the following maintenance methods.
Camera housing - all non-optical surfaces of the camera can be cleaned when required,
with a soft cloth dampened with water and a standard mild detergent. Do not use any
solvents or cleaning agents which might scratch the casing (powders, pastes, etc.).
During cleaning the camera must be switched off.
The lens of an IR camera due to their anti-reflective coating are the most sensitive and
expensive part of the camera (the lens is critical to the radiometric capabilities of the
system). Therefore, after each use of the camera, the lens cover must be attached. The
optical surfaces should be cleaned only when visibly dirty. Do not touch exposed surfaces
of the lens with fingers, because dirt left by the fingerprints may be harmful to coatings
and lens glass.
To clean the optical viewfinder and particularly camera's optics, and accessories do not
use any chemicals. Use a clean, dry and soft tissue to clean the body of the viewfinder
and only supplied tissue to clean optical part of the lens.
11 Calibration
To ensure the accuracy and reliability of thermal imaging camera it is recommended to
calibrate the device every 12 months.
Detailed information on laboratory services may be obtained by calling 74 85 83 879, or
via e-mail: [email protected]
NOTE
KT-160 Thermal camera has no parts that could be repaired by the user. Do not
attempt to disassemble or modify the camera. Opening the device will void the warranty.
12 Storage
In the case of storage of the device, the following recommendations must be observed:
• make sure that the camera and its accessories are dry,
• during prolonged storage remove the batteries
• storage temperatures must be in accordance with those defined in technical
specifications,
• in order to prevent total discharge of the rechargeable batteries during prolonged
storage, charge them from time to time.
54
KT-160 USER MANUAL
13 Equipment
Standard set of equipment supplied by the manufacturer includes:
• KT-160 Camera (WMPLKT160).
• Infra-red lens, focal length of 11mm, with a protective cap (mounted on the
camera).
• Front cover (WAPOZOSL1).
• SD Memory Card (2GB) (WAPOZSD1).
• 12 AA rechargeable batteries.
• Universal AC adapter 110/230V (WAZASZ8).
• USB cable (WAPRZUSBMNIB5).
• Video cable.
®
• CD containing Sonel ThermoAnalyze software and the driver.
• User manual.
• User Manual for ThermoAnalyze Sonel software.
• Wrist strap (WAPOZPAS1).
• Case (WAFUTM6).
• Transport case(WAWALL3).
• External memory card reader with USB cable (WAADAUSBMEM).
• Gloves, cloth.
Optional accessories:
•
Holder for mounting the camera on a tripod
(WAADASTATYW1)
• Sun visor
(WAPOZOSL2)
• Telephoto lens 30mm (WAADATO30)
KT-160 USER MANUAL
55
14 Dismantling and utilisation
Worn-out electric and electronic equipment should be gathered selectively, i.e. it must not
be placed with waste of another kind.
Worn-out electronic equipment should be sent to a collection point in accordance with the
law of worn-out electric and electronic equipment.
Before the equipment is sent to a collection point, do not dismantle any elements.
NOTE
Observe the local regulations concerning disposal of packages,
worn-out batteries and accumulators.
15 Manufacturer
The manufacturer of the device, which also provides guarantee and post-guarantee
service is the following company:
SONEL SA
Wokulskiego 11, St.
58-100 Swidnica
Poland
e-mail: [email protected]
Homepage: www.sonel.pl
NOTE
Service repairs must be realised solely by the
manufacturer.
Made in PRC.
56
KT-160 USER MANUAL