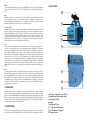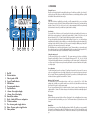
1
7. WARRANTY Products sold by AMA Laser AB (AMA) are warranted by the company in the following manner to the following extent: Subject to the succeeding provision hereof, AMA warrants products sold by AMA twenty-four (24) months after date of invoice from AMA. The manufacturer’s liability under this warranty is limited to repairing or replacing any product returned to the factory or authorised service centre and judged, upon inspection to have been defective in material or workmanship. This warranty covers the cost of labour as well as parts, but does not cover the cost of transportation to the factory or authorised service centre. The forgoing states the entire liability of AMA to the owner of a registered AMA product. AMA shall not be held responsible for any consequential damages of any kind. The forgoing is in lieu of all other warranties expressed or implied. In case of malfunction, contact your AMA dealer for shipping instructions. To help us with our records we would very much appreciate if you fill out the warranty card and return it to your appointed AMA dealer. Alternatively, you can register on our home site www.amalaser.com. AMA Laser AB Fräsarvägen 7 SE-142 50 SKOGÅS SWEDEN Tel: + 46 (0)8 981098 Fax: + 46 (0)8 981099 E-mail: [email protected] LASER RADIATION AVOID DIRECT EYE EXPOSURE CLASS 3R LASER PRODUCT DUAL GRADE LASER USER’S MANUAL CONTENTS can still operate some 20 hours. Using a lower rotation speed will prolong the lasers operation time per charge. 1. Error conditions and display messages 2. What’s what 3. Operation 4. Calibration 5. Battery power 6. Technical specification 7. Warranty The battery indicator (15) on the display gives a rough indication of the remaining battery life. The display will show a blinking battery indicator when the battery is low and close to power down. If the DLx shuts down due to low battery, the display will show ”bA Lo”. In this case, shut the laser off and charge. Charge the battery for 7 hours for full charge. The first 4 hours will charge fast. The laser can be operated when charging. In emergency situations, as little as 15 minutes of charging will give several hours of battery life. A full charge over the weekend should give you more than a week’s operation. If possible, stick to this charging scheme. If you charge more often, it will shorten the life of the battery. You need not worry about overcharging. The charger can be left connected to the instrument without risking battery damage. The external power cable can be connected to a 12V battery for long, uninterrupted operation. The DLx will not charge off the 12V cable. Longer periods of non-use without charging will drain the batteries, causing poor capacity. You will need to charge and discharge a couple of times to get the battery up to full capacity after a longer period on the shelf. This will however not cause noticeable permanent damage. For best performance, make a habit of maintenance charging once a month. 1. ERROR CONDITIONS AND DISPLAY MESSAGES E2ER2 or E2ER4................................. Possible calibration error , contact your dealer. .......... Level vial symbol, indicates OUT OF LEVEL condition. Follow . the bubble to correct. CALon............................................... Field calibration enabled. WIND[X]............................................ Flashing indication that Wind is set to lower sensitivity. CONF . ............................................. Start of user configuration menu (mode button pressed) CODE ............................................... Prompts you to enter a code for a protected function. FALSE, BAD CODE.............................. Wrong code has been entered. ooooo............................................... Manual mode selected, no automatic levelling. TOO HOT ......................................... Laser shut off because of too hot temperature. Shield from sun. trY AgAIn Soon.................................. Internal battery too low for 12V power. Wait up to 20 min. BAD EBATT......................................... External 12V battery voltage too low. TILT................................................... Tilt function has shut off laser because of disturbance. NO LASER BEAM................................ Laser not levelled. Check Sector Shutoff and display message. NO ROTATION................................... Check PRM speed setting, otherwise contact your dealer. BATTERY SYMBOL NOT SHOWING DURING CHARGING........................... Check mains power, replace charger. The manufacturer states that this equipment conforms completely with the following harmonized European standards: EN61000-6-4:97 EN55011, class A:98 EN61000-6-2:99 EN61000-4-2:95 EN61000-4-3:96 LASER RADIATION AVOID DIRECT EYE EXPOSURE CLASS 3R LASER PRODUCT 6. TECHNICAL SPECIFICATION LASER SOURCE ................................. Visible diode, 635 nm, Class 3R, 3A, IIIa WORKING RANGE............................. 500 m radius ACCURACY AT 0% GRADE.................. +/- 5 mm per 100 m GRADE RESOLUTION.......................... 0.001% GRADE RANGE, X DIRECTION ............ -5% to +20% GRADE RANGE, Y DIRECTION ............ -7% to +7% SELF LEVELLING RANGE...................... +/-11% ROTATION SPEED............................... 0 to 1200 Rpm OPERATING TEMPERATURE . ............... -20 to +50 centigrades, -4ºF to +120ºF BATTERY............................................ Built-in NiCd 5.0Ah, 12V CHARGING TIME................................ 7 Hrs OPERATING TIME PER CHARGE............ 60 Hrs typical DISPLAY............................................. 2 Custom LCD high visibility displays, backlight HOUSE.............................................. All aluminium. Fully waterproof, submersible and nitrogen purged DIMENSIONS..................................... H: 20cm (7.8"), With alignment scope 24 cm (9.45") W: 21cm (8.27") D: 24cm (9.45") WEIGHT............................................. 5.3 Kg (11.68 lbs) Keylock To avoid accidental change of the grade, you can disable all buttons except on/off and mode by activating Keylock. To turn this function off, press mode. The display lights the keylock indicator when the function is active. Wind The Wind function gives you a chance to work in windy or vibrating conditions, when the beam otherwise shuts off because of inaccuracy. It works with a time delay before a disturbance is acted upon by the automatic self levelling. Set Wind between 1-3 for increasing wind or vibration. Note that the accuracy decreases with a higher value. Wind is always set to 0 (inactive) at startup. SCT (sector shutoff) With this function you can turn off a sector of the laser beam to avoid reflections from windows or to enable the use of several lasers without interference between them. The full rotation is divided into 8 sectors, as indicated on the display by the square to the left of sct. The indicator square is shown with correct directions, i.e. the low end of the square is facing you. Solid line means laser on. Select sct with + or -, then move around the rotation with the arrow buttons. Toggle each sector using + for laser on, - for laser off. The chosen sector is blinking, and the status is shown (on/of). Leave sct by pressing mode. When working close to a windowed wall, turn off the two or three sectors pointing towards the windows. Scope If you use the telescope to align the X axis accurately, you can use the scope function to calibrate the x axis to the scope. It is the same function as if you are using adjustment screws on the telescope. This adjustment rotates the internal movement. To calibrate: Mount the DLx on a tripod, ensure that the housing is level (use the house function described below). Set X and Y to 0. Mount a detector on a rod at a distance of 20m. Aim the DLx’s X direction with the sight aid accurately at the detector window. Set the detector height to give a center reading. Set Y to +5%. Select scope in the configuration menu. You will see an indicator showing an 8 in the center position. If the beam is high on the detector, you should press the left arrow for bringing the beam down the center position on the detector. Keep pressing and the beam will come down. The display will indicate as you move away from the center position. When the indicator is full, you can still continue adjusting. With a low beam, use the right arrow. Press the mode button to confirm when the calibration is right. House If you need to make sure that the housing of the DLx is level you can use the house function. This is used for instance when you use the telescope to align the X axis. Select house with the +/- keys. The displays will now show stylized bubble vials that show you if the housing is level in each direction. Adjust the position of the housing, and wait for the instrument to level to get a new reading on the vial symbol. The accuracy of the center bubble is approx 0,5 degrees, which gives a maximum alignment error between the scope and the main axis of 1cm on 100m. Besides the center reading there are two positions of the bubble on either side. To exit the House function, press mode. 4. CALIBRATION Calibration checks should be done regularly to ensure good results. Mount the DLx on a tripod. Set X and Y grades to 0. Using the sight grove, aim the laser in positive X direction at a receiver at a distance of 50m (set the reciever to its minimum deadband). Adjust the height to get a stable centre reading from the receiver. Turn the laser around 180 degrees, aim at the receiver, and check the height difference. Do the same check in the Y direction. If you error in any of the axes is larger than 5mm, your laser is out of calibration and should be sent to your AMA Laser Systems dealer for calibration. 5. BATTERY POWER The DLx is powered by an in-built battery pack. The battery life during operation is about 60 hours under normal conditions with a fresh battery pack. With a worn battery pack and in cold temperatures, the laser 2. WHAT’S WHAT 1. 2. 3. 4. 5. 6. 7. 8. 1. Telescope or sight groves, X and Y axes 2. Rotating head, laser radiation output 3. Control panel, X-axis 4. Handle 5. Control panel, Y-axis 6. 5/8” thread for high X-grades 7. 5/8” thread for low X-grades 8. Charger connector 1. 2. 3. 4. 3. OPERATION 5. Turning the laser on Place the x on the tripod, align the housing with the sight grove. Turn the laser on with the on/off button (1) on the laser key pad. If the housing is too tilted, the laser will not turn on, and the display will show a stylized level bubble to indicate which direction to adjust. 6. 7. 15. MODE 14. 13. 12. 11. 10. 9. 8. Code lock If the code lock function is enabled (by your dealer), you will be prompted to dial in your user code when the instrument is turned on. Dial it in by selecting the digit with the arrow buttons (8,9), and setting the digit with the +/- buttons (13,14). If you lose your user code, you have ten attempts, then the laser is permanently locked and must be returned to your AMA Laser Systems dealer for unlocking. Grade setting To set a grade in the X direction, use the X control panel. Look at the grade symbols on the housing to see which direction positive grade goes. Set the desired X grade with the +/- buttons (13,14). Press once, and the grade changes 0,0015% or 1,5mm/100m. By holding down the key, the grade accelerates. You can set the grade directly to the desired value without scrolling. If you press + or - once, the lowest figure starts blinking on the display. As long as it blinks, you can select the next figure using the arrow buttons (8,9), and change its value with the +/- buttons. After a few seconds of inactivity, the blinking stops. Setting the Y grade is done in the same way, but using the Y control panel. The self-levelling action is centered around the grade you put in. This means that as you increase the grade, the mechanism comes closer to the self levelling range limit. When you need an X grade larger than 12%, you need to mount the laser using the second tilted 5/8” thread (no 6 in What´s what). Setting the rotation speed On either control panel, press the mode button (11). The current rotation speed is shown on the display. Change the speed with the +/- buttons. You can select the following speeds: 75, 150, 300, 600, 900 and 1200 rpm. Note that the DLx draws more current the higher you set the rotation speed. For long battery life, use a lower speed. For higher accuracy when working with machine receivers and machine control systems, use a higher speed. 1. 2. 3. 4. 5. 6. 7. 8. 9. 10. 11. 12. 13. 14. 15. On/Off Direction indicator Value of grade or RPM Percent/Promille indicator RPM indicator Cross axis grade indicator Keylock indicator Arrow – Move right on display Arrow – Move left on display Manual/Auto indicator Mode – Switch to RPM or user configuration Tilt function indicator Plus – Increase grade or toggle function Minus – Decrease grade or toggle function Battery indicator User configuration On either control panel, press the mode button (11) and keep it depressed for a few seconds. You can now see the user configuration screen on the display. In this mode you can control seven functions: Mirroring of the Y axis grade, Tilt function, Auto/Manual, Keylock, Wind, Scope and House. Scroll through the functions with the arrow buttons, toggle the function with the +/- buttons. Mirroring of the Y axis grade This function allows you to conveniently switch sign on the Y axis, e.g. from +3,25% to –3,25%. When grading roads, it enables you to grade the camber on one side of the road, then with the same laser setup switch sign of the Y grade to do the opposite camber. The cross axis grade indicator (6) shows in which direction the Y grade is running. Change the direction by toggling with the +/- buttons. The direction changes on the indicator, and the laser automatically adjusts to the new grade. Tilt function With the tilt function activated, the laser will turn off and warn if it has accidentally moved since startup. To start again after the laser has tilted, press on/off. The Tilt function indicator (12) shows the status of the function. Manual/Auto By selecting manual, you turn off the self levelling mechanism of the DLx. This enables you to set up manually, for instance to work steeper slopes than 20%. The display shows manual (10). Please be careful when using this function, as the Tilt function will not work. The laser can be knocked out of position without warning you.