1
Date : 20/09/2012
6T 8207-02a
tebis touch panel User Manual
User Manual
tebis touch panel
1
Date : 20/09/2012
6T 8207-02a
tebis touch panel User Manual
SUMMARY
1.
INTRODUCTION ...................................................................................................... 3
1.1
1.2
1.3
1.4
1.5
1.6
PRESENTATION .......................................................................................................................................... 3
SAFETY INSTRUCTION ................................................................................................................................. 4
STRUCTURE OF THE SCREEN ....................................................................................................................... 4
NAVIGATION PRINCIPLE ............................................................................................................................... 5
GIVING A COMMAND .................................................................................................................................... 7
OPERATION OF THE PRESENCE DETECTOR .................................................................................................... 8
2.
USE ......................................................................................................................... 9
2.1
APPLICATIONS ........................................................................................................................................... 9
2.1.1 Lighting............................................................................................................................................. 9
2.1.2 Shutters and blinds .......................................................................................................................... 9
2.1.3 Heating ........................................................................................................................................... 10
2.1.4 Indicators........................................................................................................................................ 11
2.1.5 Scenes ........................................................................................................................................... 11
2.1.6 Priority command ........................................................................................................................... 12
2.1.7 Miscellaneous commands .............................................................................................................. 12
2.1.8 Group command ............................................................................................................................ 13
2.2
QUICK ACCESS (QAC) .............................................................................................................................. 13
3.
CUSTOMISATION ................................................................................................. 15
3.1
GENERAL MENU ....................................................................................................................................... 15
3.1.1 Cleaning function ........................................................................................................................... 15
3.1.2 Screensaver function ..................................................................................................................... 15
3.1.3 Standby function ............................................................................................................................ 16
3.1.4 Turning off the tebis touch panel.................................................................................................. 16
3.1.5 Version ........................................................................................................................................... 16
3.2
PARAMETER MENU ................................................................................................................................... 17
3.2.1 Language ....................................................................................................................................... 17
3.2.2 Wallpaper ....................................................................................................................................... 17
3.2.3 Screensaver ................................................................................................................................... 18
3.2.4 Halo ................................................................................................................................................ 18
3.2.5 Date/time ........................................................................................................................................ 18
3.2.6 Shortcuts (tabs) .............................................................................................................................. 19
3.2.7 Activation Quick Access (QAC) ...................................................................................................... 19
3.3
CONFIGURATION MENU ............................................................................................................................. 20
3.3.1 Sleep timer ..................................................................................................................................... 20
3.3.2 Presence sensor ............................................................................................................................ 20
3.3.3 Back-light ....................................................................................................................................... 21
3.3.4 Password ....................................................................................................................................... 21
3.3.5 Delete my images .......................................................................................................................... 22
3.3.6 System back-up ............................................................................................................................. 22
3.3.7 Temperature ................................................................................................................................... 23
3.3.8 Time zone ...................................................................................................................................... 23
3.3.9 Touch screen calibration ................................................................................................................ 23
3.3.10
Physical address ........................................................................................................................ 24
3.3.11
Return to factory settings ........................................................................................................... 24
3.4
PROGRAMMING MODE............................................................................................................................... 25
3.4.1 Parameters: Modification of the image ........................................................................................... 25
3.4.2 Modifying the title of the device ...................................................................................................... 26
3.4.3 Advanced parameters: Screen Wake-up – Quick Access (QAC) .................................................. 26
4.
ANNEX .................................................................................................................. 28
4.1
4.2
SPECIAL CHARACTERS .............................................................................................................................. 28
IMAGES AVAILABLE ................................................................................................................................... 29
2
Date : 20/09/2012
6T 8207-02a
tebis touch panel User Manual
INTRODUCTION
1. INTRODUCTION
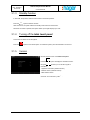
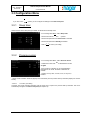
1.1 Presentation
tebis touch panel is a wall-mounted touch screen. It is used to control all of your tebis appliances from the same
interface.
8’’ Version
Temperature
Title of the view
Date and time
Access
configuration
menu
Device
Access next
page
Access
previous page
Quick access
Page shortcuts
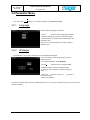
5’’
Landscape
Version
Title of the view
Reset
Date and time
Halo and detection
zone
Access configuration menu
Temperature
Page shortcuts
Device
Halo and detection
zone
Reset
Access
previous page
Access next Quick access
page
3
Date : 20/09/2012
6T 8207-02a
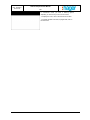
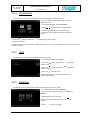
5’’ Portrait
Version
tebis touch panel User Manual
INTRODUCTION
Title of the view
Date and time
Temperature
Access configuration menu
Access
previous page
Device
Access next
page
Quick access
Halo and
detection zone
Reset Page shortcuts
The touch screen has a touch-sensitive surface. The device is controlled by touching the screen with your fingers and
allows you to make your choice by simply pressing the desired function.
1.2 Safety instruction
The device must be installed only by a qualified electrician in accordance with the installation standards in force in your
country. Do not install this module outside the building.
Do not use sharp or pointed objects (such as pencils, pens, etc.) to control the device. This may damage the touch
surface.
Do not use sharp objects, acid products or solvents for cleaning. This may damage the device.
Use only a clean, soft, dry cloth for cleaning the touch screen (see chapter 3.1.1).
Only removable storage devices are supported by the connector on the front of the unit.
1.3 Structure of the screen
The appearance and the number of devices depend on your individual system and are therefore different for each
configuration. The various components of a screen page are used to navigate between the various views, represent
your system, give commands and access the configuration menu.
4
tebis touch panel User Manual
Date : 20/09/2012
6T 8207-02a
INTRODUCTION
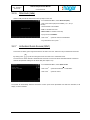
A
B
A
C
A: Top strip: contains the main information on the system (name of the view, date and time) and the access key for the
parameters menu.
B: Command zone: contains all commands and information pertaining to them and the access keys for the next and
previous pages.
C: Bottom strip: contains the shortcut keys programmed and the quick access key if programmed.
1.4 Navigation principle
The touch screen has a touch-sensitive surface. The device is controlled by touching the screen with your fingers and
allows you to make your choice by simply pressing the desired function.
In general, an application contains several views composed of various devices:
To navigate from one view to another, you have 2 options:
-
Either with the help of the
or
symbols to switch to the next or previous view.
-
Or with the help of the shortcut keys at the bottom of the screen to switch directly to the desired view.
You also have the option of calling up a detailed view of a device by clicking on its image.
General representation:
5
6
Overview with other devices with different functions
1 : ON
3
4
2 : OFF
3 : Status indication (ON/OFF)
4 : Lighting value indication
5 : Device symbol
6 : Device title
2
1
5
tebis touch panel User Manual
Date : 20/09/2012
6T 8207-02a
INTRODUCTION
Detailed representation:
7
2
1
Single view display allowing more specific
commands to be given.
5
1 : ON
2 : OFF
6
3 : Brightness setting in steps
4 : Brightness setting by cursor
5 : Status indication (ON/OFF)
6 : Lighting value indication
3
7 : Device symbol
4
Comments:
-
To switch from the general representation to the detailed representation of a device, simply click on the image.
-
The
-
The
-
When starting up the tebis touch panel, the status of certain appliances may be unknown.
symbol is used to access the parameters and configuration menu.
symbol is used for programmable quick access from a device (see chapter 3.4.3).
The undefined status will therefore be shown as follows:
-
? (question mark): indicates an unknown status.
-
--- (three dashes): indicates an unknown value.
6
Date : 20/09/2012
6T 8207-02a
tebis touch panel User Manual
INTRODUCTION
1.5 Giving a command
The devices are commanded by various symbols, each representing a particular function. The table below shows the
commands available:
Object
Description
Object
Description
Turn On
Comfort mode (heating)
Turn Off
Standby mode (heating)
Up
Night mode (heating)
Down
Frost Protection mode (heating)
Stop
Heating mode (Air conditioning)
Up (step by step)
Cooling mode (Air conditioning)
Down (step by step)
Run a scene
Increase the angle (blind)
Learn a scene
Reduce the angle (blind)
Priority start-up
Cancellation priority
7
Date : 20/09/2012
6T 8207-02a
tebis touch panel User Manual
INTRODUCTION
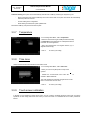
1.6 Operation of the presence detector
tebis touch panel has an automatic system that wakes up or activates the screen depending on one's physical
proximity to it.
There are two distinct detection zones:
-
Screen activation zone: if this zone is entered, the system displays the screensaver.
-
Product wake-up zone: if this zone is entered, the system displays the monitor screen.
Below, the diagrammatic representation of operation:
Screen activation
zone
(screensaver
displayed)
tebis
Product wakeup zone
(monitor
screen
displayed)
touch panel
When these zones are exited, the system will automatically return to standby.
To set the parameters for the extent of the zones, refer to chapter 3.3.2.
8
Date : 20/09/2012
6T 8207-02a
tebis touch panel User Manual
USE
2. USE
2.1 Applications
The tebis touch panel is used to manage your electrical installation and its parameters are set according to your
application. The various functions described below may appear one or more times depending on the composition of
your home. Each device has a general representation, displayed on an overview, and a detailed representation allowing
more specific commands to be given.
2.1.1
Lighting
Is used to turn on, turn off and set the brightness of a light. The device, depending on the type chosen, may be
presented in 2 forms:
SIMPLE: This command is used to turn a light on and off. A
halo indicates the lighting status.
DIMMING: This command is used to turn on, turn off and
set the brightness of the light using a dimmer. Setting is
done in 3 different ways:
- By pressing the
and
symbols.
- By sliding your finger over the cursor.
- By clicking on the setting in steps symbols
(
25%,
50%,
75%,
100%).
A halo indicates the status of the lighting and the number
indicates the brightness.
OFF: This command is used only to turn off one or more
lighting units with a single touch.
2.1.2
Shutters and blinds
Is used to control shutters and blinds. The device, depending on the type chosen, may be presented in 4 forms:
SIMPLE SHUTTER: This command is used to open and
close the shutters. An additional command is used to stop
the upward or downward movement.
9
Date : 20/09/2012
6T 8207-02a
tebis touch panel User Manual
USE
SHUTTER POSITION: This command is used to open,
close and set the position of the shutters. Setting is done in
2 different ways:
- By pressing the
and
symbols.
- By sliding your finger over the cursor.
The symbol and the number indicate the position of the
shutter.
SIMPLE BLIND: This command is used to open and close
the blinds. An additional command is used to set the angle
by pressing the
and
symbols.
The symbol indicates the position of the blind.
BLIND POSITION: This command is used to open, close
and set the position of the blinds.
By pressing the
and
position of the blinds.
symbols, you can set the
By pressing the
and
angle of the blinds.
symbols, you can set the
You can also make these settings by sliding your finger
over the cursor.
The symbol and the number indicate the position of the
blind.
2.1.3
Heating
This command is used to control the temperature throughout the home and to set it according to need at any given time.
It is also possible to control an air conditioning unit if installed. The device, depending on the type chosen, may be
presented in 2 forms:
HEATING: This command is used to set the 4 heating
modes (
(
,
,
,
,
) and the set point temperature
).
The symbol indicates the active heating mode. The first
number, at the bottom, indicates the temperature, the
second indicates the set point temperature, which may also
vary according to the mode chosen.
HEATING-AIR CONDITIONING: In addition to the
commands described above, you can control your air
conditioning unit with the help of the
and
symbols.
The symbol to the side indicates the operating status of the
air conditioning unit.
10
Date : 20/09/2012
6T 8207-02a
2.1.4
tebis touch panel User Manual
USE
Indicators
These devices are used to display information, generally from a measurement or detection system. There are 2
categories of indicator:
-
Weather indicators: the display can be done individually or grouped into a single device. Below, the various
devices:
Thermometer in °C or °F
Humidity indicator as a %
-
Anemometer in m/s, kph or m ph
Luminosity indicator in lux
Rain detector
Weather station comprising a
thermometer, an anemometer, a
luminosity indicator and a rain
detector
Binary indicators: these are used to display information like a presence or smoke detector. Below, the various
devices:
Binary indicator: several
applications are possible, such as a
smoke detector or a twilight
indicator
2.1.5
Alarm indicator: this device is
intended specifically for an alarm or
presence detector
Scenes
The scene allows you, for example, to create a mood of your choice, i.e. to set various light sources automatically to
different brightness values in one or more rooms.
In addition, it is possible to lower a roller shutter or a blind. You can thus easily create individual lighting situations for every
occasion, for mealtimes, for example, or for reading or when you leave or return home.
By clicking on the
symbol, you can run the scene
previously programmed.
You also have the option of programming a scene by
clicking on the
symbol.
The various appliances in your system have been assigned to a scene by your installer.
To learn a scene, proceed as follows:
-
Set the appliances to the status desired (e.g.: light 50%, shutter down, blind up).
11
Date : 20/09/2012
6T 8207-02a
tebis touch panel User Manual
USE
-
Click on the ‘Learn’ key in the scene device and wait a few seconds until learning is completed. If the learning
procedure has worked correctly, the devices concerned confirm learning (On/Off for a lighting unit, up/down for a
blind, etc.).
-
Check that the scene is running by clicking on ‘Read’.
2.1.6
Priority command
Priority allows you to order your appliances to override all other commands and to maintain the status of these appliances
until cancellation of this mode. The various appliances in your system have been assigned to this command by your
installer.
symbol, you will activate the priority.
By clicking on the
From this moment on, the system trips your appliances in
the status defined by your installer and remains
unchanged. No other commands will be acted upon as long
as you have not unlocked the system by clicking on the
symbol. In addition, the
symbol will appear at the top of
the screen indicating that the system is locked.
2.1.7
Miscellaneous commands
In addition to the conventional lighting and shutter commands, tebis touch panel has various commands for other
applications like opening a gate or triggering the alarm. The parameters for these devices have been set by your
installer and may take various forms depending on the application. The system has 4 different types:
ALARM: Used to activate your alarm system with indication
of the operating status.
and
: the system is activated.
only: the system is deactivated.
START/STOP: Used to start/stop any appliance other than
a lighting unit or a shutter. For example, you can control a
ventilation unit or a sprinkler system.
PULSE: Used to trigger an automatic system that requires
a pulse command like opening a gate or a garage. The
pulse time has been set by your installer according to the
needs of the appliance to be controlled.
DEAD-MAN CONTACT: Used to control a system that
requires physical contact for safety reasons like a
swimming pool cover, for example.
12
Date : 20/09/2012
6T 8207-02a
tebis touch panel User Manual
USE
tebis touch panel also has a device used to display the
date and time.
2.1.8
Group command
Is used to group a series of appliances for which the parameters have already been set into a single command. Unlike a
conventional function, it does not have the status indication already described. The system has 3 different types:
LIGHTING: This command is used to turn a group of lights
on and off.
SHUTTER: This command is used to open and close a
group of shutters. An additional command is used to stop
the upward or downward movement.
HEATING: This command is used to set the 4 heating
modes:
: Comfort
: Standby
: Frost protection
: Night
2.2 Quick access (QAC)
This function is used to give a single command from all views in one click. There are 2 ways to activate this command:
By clicking on the
symbol or touching the screen once when it is in screensaver mode.
This command can be used, for example, to control the lighting in the room where the tebis touch panel is installed.
When you enter the room, simply touch the screen to turn on the light.
See chapter 3.2.7 regarding activation or deactivation of this command.
See chapter 3.4.3 for the selection of devices associated with this command.
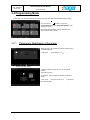
Screen wake-up activation zone:
13
Date : 20/09/2012
6T 8207-02a
tebis touch panel User Manual
USE
In screensaver mode, you have 2 wake-up options
depending on which zone you touch on the screen:
- To display the menu, click on the zone shown in black.
- To activate the QAC command, if programmed, click on
the white zone.
14
Date : 20/09/2012
6T 8207-02a
tebis touch panel User Manual
CUSTOMISATION
3. CUSTOMISATION
3.1 General Menu
You can customise operation of your tebis touch panel by accessing the parameter settings menu. If you click on the
symbol, the following view is displayed:
3.1.1
Cleaning function
Press the
symbol. A countdown is displayed in the
middle of the screen indicating the number of seconds the
screen is deactivated.
Clean only with a soft cloth. After this timed period, the
screen goes back to the menu.
3.1.2
Screensaver function
In this mode, the processor continues to run but the screen switches to minimised display.
Press the
symbol to start the function.
After 30 seconds, the system switches to screensaver, displaying the image selected from the configuration menu.
Whenever the screen is pressed, the system again displays your view.
15
tebis touch panel User Manual
Date : 20/09/2012
6T 8207-02a
3.1.3
CUSTOMISATION
Standby function
In this mode, the processor and the screen switch to minimised operation.
Press the
symbol to start the function.
After 30 seconds, the system switches to standby mode and turns off the screen.
Whenever the screen is pressed, the system wakes up and again displays your view.
3.1.4
Turning off the tebis touch panel
This function is used to turn off the system.
Press the
3.1.5
symbol to turn off the system. To restart the system, press the reset button on the front.
Version
Used to view the version of the tebis touch panel.
Press the
symbol to display the information screen.
Using the
information:
symbols, you can access 3 types of
- Application information (software version)
- Platform version (hardware version)
- KNX interface version
Comment: To exit the menu, press
16
.
tebis touch panel User Manual
Date : 20/09/2012
6T 8207-02a
CUSTOMISATION
3.2 Parameter Menu
If you click on the
3.2.1
symbol, you can configure operation of the tebis touch panel:
Language
Used to select the language in the menus:
- Use the
symbols to view the languages available.
- Select the language by clicking on the desired language.
- After the selection, the system returns automatically to the
parameters menu.
Comment: To exit the parameters menu without making a
selection, press
3.2.2
.
Wallpaper
The ‘Wallpaper’ menu is used to select the image to be displayed as wallpaper.
- Insert your USB key containing the image you wish to
display in the front.
- In the 'Parameters Menu', select: Wallpaper
- Use the
symbols to view the images available.
- Select the image by clicking on the desired image
- If necessary, click on ‘Expand’ or ‘Resize’ to adjust the
image.
- Click on the
symbol to confirm or on
the previous image.
to go back to
- Remove your USB key.
Comment: use images with a resolution of 800x480 pixels for an 8-inch screen and 480x272 pixels for a 5-inch screen to
optimise the display.
17
tebis touch panel User Manual
Date : 20/09/2012
6T 8207-02a
3.2.3
CUSTOMISATION
Screensaver
The ‘Screensaver' menu is used to select the image to be displayed in screensaver mode.
- Insert your USB key containing the image you wish to
display in the front.
- In the 'Parameters Menu', select: Screensaver
- Use the
symbols to view the images available.
- Select the image by clicking on the desired image.
- If necessary, click on ‘Expand’ or ‘Resize’ to adjust the
image.
- Click on the
symbol to confirm or on
to go back to the previous image.
- Remove your USB key.
Comment: use images with a resolution of 800x480 pixels for an 8-inch screen and 480x272 pixels for a 5-inch screen to
optimise the display.
3.2.4
Halo
The 'Halo' menu is used to select operation of the halo on the front.
- In the 'Parameters Menu', select: Halo.
- Click on the
use of the halo.
symbol to activate or
to deactivate
symbol to activate or
- Click on the
flashing of the halo.
to deactivate
- Click on the
symbol to confirm.
Comment: When the ‘Halo’ function is deactivated, the
‘Flashing’ line is deleted.
3.2.5
Date/time
The ‘Date/time' menu is used to set the date and the time shown on the touch screen.
- In the 'Parameters Menu', select: Date/time.
- Select the date format by clicking on DD/MM/YY or
MM/DD/YY
- Select the time format by clicking on
Set the date and time with the help of the
symbols.
- Click on
18
to confirm your setting.
and
Date : 20/09/2012
6T 8207-02a
3.2.6
tebis touch panel User Manual
CUSTOMISATION
Shortcuts (tabs)
Used to modify the title text and the text on the top strip for each view.
- In the 'Parameters Menu', select: Shortcuts (tabs).
- Click on the shortcut (tab) to be modified (1, 2, 3, etc.) in
the strip.
- Choose the text to be modified:
- Text: For the title of the view.
- Shortcut text: For the title on the strip.
- Input your text and Validate.
- Click on the
symbol to confirm the modification.
- To go back to the menu, press
3.2.7
.
Activation Quick Access (QAC)
This function is used to give a single command from all views in one click. There are 2 ways to activate this command:
By clicking on the
symbol or touching the screen once when it is in screensaver mode.
The next menu is used to activate or deactivate this command. The choice of device associated with this command is
made via the parameter settings for the device itself (see chapter 3.4.3).
- In the 'Parameters Menu', select: Quick access
- Click on the
symbol to activate or
- Click on the
symbol to confirm.
to deactivate.
The system will automatically select the last device on which quick access parameters have been set. Otherwise, it will
display ‘no device selected’.
19
Date : 20/09/2012
6T 8207-02a
tebis touch panel User Manual
CUSTOMISATION
3.3 Configuration Menu
If you click on the
3.3.1
symbol, you can configure the settings for the tebis touch panel:
Sleep timer
Used to set the various sleep timings available: Screensaver and standby mode.
- In the 'Configuration Menu', select: Sleep timer.
- Set the times with the
and
symbols.
- Set the time lapse before the Screensaver is activated.
- Set the time lapse before Standby is activated.
- Click on
3.3.2
to confirm your setting.
Presence sensor
- In the 'Configuration Menu', select: Presence sensor.
- Activate the function with
or deactivate the function
with
- If the function is activated, you can set the detection
thresholds for two zones. Six levels of detection are
possible:
1: Closest, 2: Very close, 3: Close, 4: Far, 5: Very far, 6:
Farthest.
- Set the screen activation threshold (displays the screensaver) and the product wake-up threshold (displays the monitor
screen).
- Click on
to confirm your setting.
Comment: The screen activation threshold must be higher than or equal to the product wake-up threshold. This rule is
automatically managed in the tebis touch panel (see chapter 1.6).
20
Date : 20/09/2012
6T 8207-02a
3.3.3
tebis touch panel User Manual
CUSTOMISATION
Back-light
Used to set the brightness of the screen, either fixed or depending on ambient brightness.
- In the 'Configuration Menu', select: Back-light.
- Activate the function with
with
or deactivate the function
.
- If automatic mode is activated, the system manages the brightness of the screen lighting itself according to the ambient
brightness thanks to the integrated detector.
- If automatic mode is deactivated, you can set the brightness threshold from 5 to 100% (5% being the lowest threshold
possible).
- Click on
3.3.4
to confirm your setting.
Password
Used to create and modify password protection.
You can also choose which functions you want to protect with a password.
Three choices are possible:
The parameters menu
The configuration menu
Turn off the device
Until you create a password, the "Password" menu will only show a single button labelled "Creation". Once the password
has been created, the menu will allow you to modify the password or secure the menus.
- Click on
to create the password.
- Input your password with the help of the on-screen
keyboard or your computer keyboard if you are using the
plug-in. The password must include at least 2 and up to 8
alphanumerical characters limited to those available on the
virtual screen (no characters with accents or symbols).
- Validate to confirm and click on
21
to exit the menu.
Date : 20/09/2012
6T 8207-02a
tebis touch panel User Manual
CUSTOMISATION
Once the password has been created, the menu will be displayed as shown below:
to modify the password and input your code
- Click on
as described above.
- Select the function that you want to protect by clicking on
to activate or
to deactivate.
Comment: In the plug-in you will not have to input the password to access the functionalities. The password menu
operates in the same way as the tébis touch panel as regards creating and modifying the password.
There is no limit on the number of attempts to input the password.
When downloading the application by USB key, if the configuration menu is protected, the system will ask for the
password to confirm.
3.3.5
Delete my images
Allows you to delete images not used in your configuration.
- In the 'Configuration Menu', select: Delete my images.
- Confirm the deletion of the images.
Comment: At this level we only delete the images not used in your configuration. The wallpaper and the screensaver remain
in place.
3.3.6
System back-up
Used to back up and restore the parameter settings specific to your home (the wallpaper, screensaver and slide show
images are not affected).
- Insert the USB key into the front.
- Click on Back-up to copy the configuration to the key or
Restore to read the configuration from the key. The file
used will be named ‘Keytouch.hg’.
22
Date : 20/09/2012
6T 8207-02a
tebis touch panel User Manual
CUSTOMISATION
Automatic loading: The system can be automatically restored from a USB key containing the ‘Keytouch.hg’ file.
-
Remove the frame and insert the USB key into the front of the tebis touch panel. The device will automatically
detect the presence of the file.
-
Confirm loading of the configuration.
-
When loading is finished, the system updates itself.
Remove the USB key and put the frame back in place.
3.3.7
Temperature
- In the 'Configuration Menu', select: Temperature.
- Select the measurement type: Local (internal thermostat)
or Temperature if the parameters for a temperature device
have been set in the application.
- Select the measurement unit: Degrees Celsius (°C) or
degrees Fahrenheit (°F).
- Click on
3.3.8
to confirm your setting.
Time zone
Used to set the time zone and activate summer/winter mode.
- In the 'Configuration Menu', select: Time zone.
- Select your time zone (GMT) with the help of the
symbols.
- Validate the summer/winter time mode with
activate or
to
to deactivate.
This mode enables the automatic changeover from winter
time to summer time and vice versa.
- Click on
3.3.9
to confirm your setting.
Touch screen calibration
In general, it is not necessary to set the touch screen. You can, however, recalibrate the touch screen when you get the
impression of often "being wide of the mark" when you touch the screen. To recalibrate the touch screen, proceed as
follows:
23
Date : 20/09/2012
6T 8207-02a
tebis touch panel User Manual
CUSTOMISATION
Carefully press and briefly hold stylus on the center of the target.
Repeat as the target move around the screen.
- In the 'Configuration Menu', select: Touch screen
calibration.
A program is started, which invites you to calibrate the
screen by clicking on the cross.
Message: Carefully press and briefly hold stylus on the
centre of the target.
Repeat as the target moves around the screen.
After calibration, touch the screen to save the new
configuration.
Otherwise, wait 30 seconds to keep the previous settings.
3.3.10 Physical address
Used to set the time zone and activate summer/winter mode.
- In the 'Configuration Menu', select: Physical address.
- Click on
to activate the physical address.
- From the ETS program, in the topology for your project,
select your tebis touch panel.
- By right-clicking on the mouse, select Download followed
by Program Individ. Address.
Programming is complete when the tebis touch panel
displays the new physical address.
- Click on
to exit the menu.
Comment: After programming the new physical address, the addressing mode is automatically deactivated.
3.3.11 Return to factory settings
Is used to reset the configuration of the tebis touch panel to restore the default parameters.
-
In the 'Configuration Menu', select: Return to factory settings
-
Click on ‘YES’ to confirm your choice or ‘NO’ to go back to the menu.
The system will reload the ex works configuration and reboot.
Comment: Your application and the password to access the parameters and configuration menus will be deleted.
24
Date : 20/09/2012
6T 8207-02a
tebis touch panel User Manual
CUSTOMISATION
3.4 Programming Mode
In this mode, you are working directly with the device and can thus define the associated image and text.
If you click on the
symbol, you go to the
‘configuration menu’, then ‘Programming Mode’. Then
confirm your choice.
From the general parameter settings view, select the
device that you want to modify.
3.4.1
Parameters: Modification of the image
Select the item to be modified by pressing the device (e.g.
‘LIGHTING SIMPLE’).
- Click on the
-
symbol and then on
.
The following view appears:
- Select the desired image from the list using the
symbols
(see table in Annex).
- If necessary, click on ‘Expand’ or ‘Resize’ to adjust the
image.
- Click on the
symbol to confirm or on
the previous image.
25
to go back to
tebis touch panel User Manual
Date : 20/09/2012
6T 8207-02a
3.4.2
CUSTOMISATION
Modifying the title of the device
- Click on the
symbol to input the text.
- Input the text with the help of the on-screen keyboard
(press SHIFT for capital letters – See chapter 4.1 for
special characters).
- Click on ‘VALIDATE’ to confirm the input.
3.4.3 Advanced parameters: Screen Wake-up – Quick Access
(QAC)
-
Screen Wake-up
This function is used to exit standby mode when an event occurs in the installation (lighting turned on, shutter opened,
etc.).
To set the parameters for this command, select the item to be modified by pressing the device. The following view
appears:
- Click on the
symbol.
- Confirm screen wake-up or otherwise with
or
to activate
to deactivate.
- To go back to the menu, press
.
When you turn on this lighting with the switch, the tebis touch panel will display the device concerned automatically.
-
Quick Access (QAC)
This function is used to give a single command from all views in one click. There are 2 ways to activate this command:
By clicking on the
symbol or touching the screen once when it is in screensaver mode.
This command can be used, for example, to control the lighting in the room where the tebis touch panel is installed.
When you enter the room, simply touch the screen to turn on the light.
If the screensaver selected is the date and time display and
quick access is activated, the following screen will be
displayed.
26
Date : 20/09/2012
6T 8207-02a
tebis touch panel User Manual
CUSTOMISATION
Screen wake-up activation zone:
In screensaver mode, you have 2 wake-up options
depending on which zone you touch on the screen:
- To display the menu, click on the zone shown in black.
- To activate quick access, if programmed, click on the
white zone.
To set the parameters for this command, select the item to be modified by pressing the device. The following view appears:
- Click on the
symbol.
- Choose quick command with
switch’ to activate.
- To go back to the menu, press
and select ‘toggle
.
The statuses available for quick access are:
-
‘Toggle switch’ for a lighting unit.
-
‘Open’ or ‘close’ for a shutter or blind.
-
‘Read’ for a scene.
For quick access with a shutter or blind, operation is not the same as for a lighting unit (ON/OFF) or a scene (Read).
Indeed, when you press the first time, the command ‘OPEN’ or ‘CLOSE’ will be performed according to the parameter
settings. When you press a second time, you will dispatch the command ‘STOP’ and not the opposite command to the
current operation.
Comment: Quick access can be simply activated or deactivated in the parameter settings menu (see chapter 3.2.7). Only
one quick access at a time per system can be configured.
27
tebis touch panel User Manual
Date : 20/09/2012
6T 8207-02a
ANNEX
4. ANNEX
4.1 Special characters
Below, the table of special characters available when inputting text:
Input is possible from the keyboard by using the ALT key + ASCII code input on the numeric keypad
on the PC (e.g.: ALT + 33 corresponds to the character ‘!’)
32
33
34
35
36
37
38
39
40
41
42
43
44
45
46
47
48
49
50
51
52
53
54
55
56
57
58
59
60
61
62
63
!
"
#
$
%
&
'
(
)
*
+
,
.
/
0
1
2
3
4
5
6
7
8
9
:
;
<
=
>
?
64
65
66
67
68
69
70
71
72
73
74
75
76
77
78
79
80
81
82
83
84
85
86
87
88
89
90
91
92
93
94
95
@
A
B
C
D
E
F
G
H
I
J
K
L
M
N
O
P
Q
R
S
T
U
V
W
X
Y
Z
[
\
]
^
_
96
97
98
99
100
101
102
103
104
105
106
107
108
109
110
111
112
113
114
115
116
117
118
119
120
121
122
123
124
125
126
127
`
a
b
c
d
e
f
g
h
i
j
k
l
m
n
o
p
q
r
s
t
u
v
w
x
y
z
{
|
}
~
128 €
129
130 ‚
138 Š
140
141
142
143
144
145
146
147
148
Œ
154
155
156
157
158
159
š
›
œ
Ž
‘
’
“
”
ž
Ÿ
28
160
161
162
163
164
165
166
167
168
169
170
171
172
¡
¢
£
¤
¥
¦
§
¨
©
ª
«
¬
174
175
176
177
178
179
180
181
182
183
184
185
186
187
188
189
190
191
®
¯
°
±
²
³
´
µ
¶
·
¸
¹
º
»
¼
½
¾
¿
192
193
194
195
196
197
198
199
200
201
202
203
204
205
206
207
208
209
210
211
212
213
214
215
216
217
218
219
220
221
222
223
À
Á
Â
Ã
Ä
Å
Æ
Ç
È
É
Ê
Ë
Ì
Í
Î
Ï
Ð
Ñ
Ò
Ó
Ô
Õ
Ö
×
Ø
Ù
Ú
Û
Ü
Ý
Þ
ß
224
225
226
227
228
229
230
231
232
233
234
235
236
237
238
239
240
241
242
243
244
245
246
247
248
249
250
251
252
253
254
255
à
á
â
ã
ä
å
æ
ç
è
é
ê
ë
ì
í
î
ï
ð
ñ
ò
ó
ô
õ
ö
÷
ø
ù
ú
û
ü
ý
þ
ÿ
tebis touch panel User Manual
Date : 20/09/2012
6T 8207-02a
ANNEX
4.2 Images available
Below, the table of images available when creating or modifying a device.
D000
D001
D002
D003
D004
D005
D006
D007
D008
D009
D010
D011
D012
D013
D014
D015
D016
D017
D018
D019
D020
D021
D022
D023
D024
D025
D026
D027
D028
D029
D030
D031
D032
D033
D034
D035
D036
D037
D038
D039
D040
D041
D042
D043
D044
D045
D046
D047
D048
D049
D050
D051
D052
D053
D054
D055
D056
D057
D058
D059
D060
D061
D062
D063
D064
D065
D066
D067
D068
D069
D070
D071
D072
D073
D074
D075
D076
D077
D078
D079
D080
D081
D082
D083
D084
D085
D086
D087
D088
D089
D090
D091
D092
D093
D094
D095
D096
D097
D098
D099
29
tebis touch panel User Manual
Date : 20/09/2012
6T 8207-02a
D100
D101
D110
D111
ANNEX
D102
D103
D104
D105
30
D106
D107
D108
D109