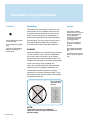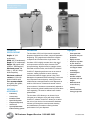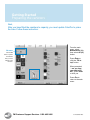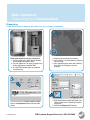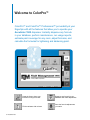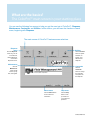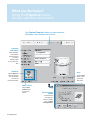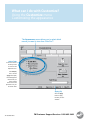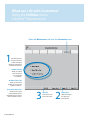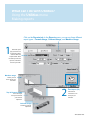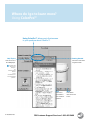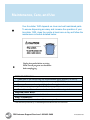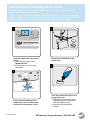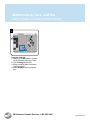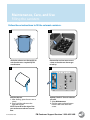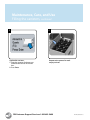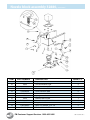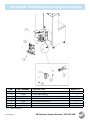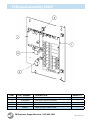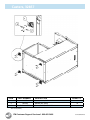
1
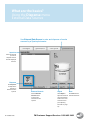
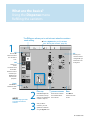
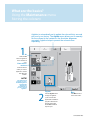
Your customers have a vision, you have a challenge and Fluid Management has the answer. Fluid Management is a global leading manufacturer of mixing and tinting equipment, plus specialized equipment for a variety of industries that include home improvement, food, chemical, and cosmetics. Located in Wheeling Illinois, Fluid Management is a United States owned and operated company with historical roots dating back to 1927. In 1996, Fluid joined the IDEX Corporation as it prepared to address the changing business environments of the 21st century. As industry leaders, Fluid Management provides trend setting creative initial design through comprehensive equipment selections. FM Direct, Fluid Management’s after-sales service is one of a kind. FM Direct technicians are Fluid Management employees, trained to understand our products like no one else. Fluid Management strives for close teamwork with our customers. The combination of leading edge technology, world class service and support, and a company prepared for the future technological trends of an ever changing business environment makes Fluid Management the ideal partner. Thank you for putting your trust in Fluid Management products. We will help you with services that will help you serve your valued customers. © 2007 Fluid Management, All rights reserved. Under the copyright laws, this material may not be copied, in whole or in part, without the written consent of Fluid Management. Your rights to the software are governed by the accompanying software license agreement. The Fluid Management logo is a trademark of Fluid Management, registered in the U.S. and other countries. Use of the Fluid Management logo for commercial purposes without the prior written consent of Fluid Management may constitute trademark infringement and unfair competition in violation of federal and state laws. Every effort has been made to ensure that the information in this manual is accurate. Fluid Management is not responsible for printing or clerical errors. Fluid Management 1023 Wheeling Rd. Wheeling, IL. 60090 800-462-2466 http://www.fluidman.com Fluid Management, the Fluid Management logo, FM Direct, ColorPro™, DVX®, Miller, and Harbil are trademarks of Fluid Management, registered in the U.S. and other countries. Published in the United States. Mention of third-party products is for informational purposes only and constitutes neither an endorsement nor a recommendation. Fluid Management assumes no responsibility with regard to the performance or use of these products. What’s next? O nce you’ve installed your Accutinter 1500 series dispenser, what’s next? In this booklet, you’ll find more information to help you get the most from your new Fluid Management Accutinter 1500 . Table of Contents: Accutinter 1500 Property of Fluid Management 5 Safety 8 Getting to Know Your Accutinter 1500 12 Getting Started 13 Installing Your Accutinter 23 How to dispense 25 Learning About ColorPro™ 44 Maintenance, Care and Use 49 Troubleshooting 55 Service 56 Replacement Parts © Copyright 2007 Fluid Management as an unpublished work all rights reserved. This material cannot be copied or disclosed to others without the prior written permission of: Fluid Management, 1023 Wheeling Rd., Wheeling, IL., 60090-5776 USA Contents Important safety information 5 Safety Precautions 7 Safety and Operational Labels 7 General safety information for servicing your Accutinter Getting to Know Your Accutinter 1500 8 Technical specifications 10 Accutinter 1500 Features 11 ColorPro™ Features 12 Tips to help you get started Getting Started 13 Installation 15 Connecting to the computer 19 Filling the canisters for the first time Basic Operation 22 Using the shelves 23 Dispensing from ColorPro™ Formula Book 24 Dispensing from ColorPro™ Manual Dispense Welcome to ColorPro™ 25 Overview of ColorPro™ and ColorPro™ Professional 27 Using the Dispense menu 35 Using the Maintenance menu 38 Using the Customize menu 42 Using the Utilities menu 3 Accutinter 1500 FM Customer Support Services 1 . 800 . 462 . 2466 Contents Maintenance, Care, and Use 44 Care of your Accutinter 1500 45 Cleaning the nozzle closer 47 Filling the colorant canisters 69 Maintenance accessories Service 55 Service technician locations 56 Ordering information and replacement parts 57 Calling for service 70 Warranty information Enhancing your Accutinter 57 Purchasing upgrades Troubleshooting 35 Purging and cleaning the lines 37 Using ColorPro™ Test 49 Mis-tints 50 Nozzle closer 53 ColorPro™ 54 Printing problems 55 Locating your product’s serial and model number FM Customer Support Services 1 . 800 . 462 . 2466 4 Accutinter 1500 Important safety information WARNINGS • This machine draws 0.5 Amp at 120 ± 10% VAC. Do not modify the provided plug. Improper use of grounding plug can result in risk of electric shock. Grounding Cautions This product must be grounded. In the event of an electrical short circuit, grounding reduces the risk of electrical shock by providing an escape for the electric current. This product is equipped with a cord that has a grounding wire and an appropriate grounding plug. The plug must be inserted into an outlet that is properly installed and grounded in accordance with all local codes and ordinances. DANGER Improper installation of the grounding plug can result in a risk of electric shock. If repair or replacement of the cord or plug is necessary, do not connect the grounding wire to either flat blade terminal. The insulation wire with green or green and yellow stripes on the outer surface is the grounding wire. Check with a qualified electrician if the grounding instructions are not completely understood, or if in doubt about whether the product is properly grounded. Do not modify the plug provided. If it will not fit into the outlet, have the proper outlet installed by a qualified electrician. Use a grounded outlet that looks like this: NOTE! This product is for use on a dedicated nominal 115 Volt (US only) circuit that has a grounding plug. 5 Accutinter 1500 Check with a qualified electrician or service person if grounding instructions are not completely understood or if in doubt as to whether product is properly grounded. Do not use an adapter or extension cord with this product. This unit must be plugged into a dedicated electrical line. To reduce the risk of electric shock or injury, use indoors only. About this manual How to use this manual This End User Guide is organized into nine sections. Each section provides detailed information on Accutinter 1500 series topics and provides a basic reference to help you with specific issues. This End User Guide provides the information for installing your Accutinter 1500, dispensing for the first time, and using ColorPro™. This publication also includes basic troubleshooting suggestions, replacement parts, Customer Support Services, frequently asked questions, daily and preventative maintenance procedures, and warranty information. Your Accutinter 1500 dispenser includes detailed illustrated labels located inside the top cover of the machine on how to clean the nozzles. You can also find these instructions in this guide on pages 45-46. Follow these directions for the best performance of your machine. The ColorPro™ application includes a basic help tool in the Help menu called Using ColorPro. You can start the Using ColorPro program by clicking the Help icon on any screen from the ColorPro™ desktop. If you have internet access, the most current information for your Accutinter 1500 is available from the worldwide web at http://www.fluidman.com For your safety Customer safety is important. Our products are designed to be safe and effective. However, dispensers are electrical equipment. The Accutinter line is safe, fast, and reliable - designed to bring you many years of operation. There are precautions you can take to avoid damage to the equipment or bodily injury before operating. By carefully following the instructions in this document and the warning and maintenance labels on the machine, you can help protect yourself from hazards and create a safer work environment. Equipment can become damaged due to misuse or neglect. Some product damage is serious enough that the product should not be used again until it has been inspected and, if necessary, repaired by a Fluid Management authorized service technician. As with any electronic device, pay close attention to the dispenser when it is turned on. On very rare occasions, you might notice an odor or see a puff of smoke or sparks come from your machine. Or you might hear sounds like popping, cracking or hissing. These conditions might mean that an internal electronic component has failed in a safe and controlled manner. Or, they might indicate a potential safety issue. Do not take risks or attempt to diagnose the situation yourself. Safety Precautions Read this manual and all warning labels before using the machine. Read and adhere to all Warning and Caution labels on the machine. Keep the manual in a safe place. Protect the cords and power adaptors from liquids. Liquids can cause a short circuit, particularly if the cord has been stressed from misuse. Prepare, level, and clear the area where the machine will be installed. To avoid risk of fire or injury, unplug the power before servicing electrical components. Do not dispense flammable materials. After installing, complete a purge and check the plumbing of the lines. Check that canisters and lines are secure and in place. Plug into an approved grounded outlet only. Make sure the outlet meets all national and local codes. To reduce the risk of electric shock or injury, use indoors only. FM Customer Support Services 1 . 800 . 462 . 2466 6 Accutinter 1500 • WARNING: UNPLUG BEFORE SERVICING • WARNING: DO NOT USE WITH OR NEAR FLAMMABLES • USE A DEDICATED 15 AMP CIRCUIT (US only) Information and Instruction Labels Air circulation You should become familiar with the information labels affixed to the machine, as well as the warnings, cautions, and notes which appear throughout this manual. Your computer and monitor for your dispenser produce heat. The computer has a fan that pulls in fresh air and forces out hot air. The monitor lets hot air escape through vents. Blocking the air vents can cause overheating, which might result in a malfunction or damage. Place the computer and monitor so that nothing blocks the air vents; usually, 51 mm (2 in.) of air space is sufficient. Read all the warning labels on the exterior and interior of the dispenser. If the labels become damaged or unreadable, you may purchase replacements from Fluid Management Customer Support Services. See the replacement parts section for ordering information. General safety information Safety Notice Information • WARNING: HAZARDOUS ELECTRICAL COMPONENTS The two main notices used in this End User Guide and on the Accutinter 1500 are Warning and Caution. A Warning notice tells you about a hazard that could cause serious injury to you or extensive damage to the equipment. This information is featured in the beginning of the manual to emphasize safety. When you see a Warning notice in this manual, read it carefully before continuing with the operation of the machine. Take all necessary precautions to avoid potential injury. Do not attempt to service a product yourself unless instructed to do so by Fluid Management Customer Support Services. Use only a Fluid Management authorized Service Technician to repair your equipment. Please note that some parts can be upgraded or replaced by the customer. Fluid Management identifies those parts as such and provides documentation with instructions when it is appropriate for customers to replace those parts. You must closely follow all instructions when performing such replacements. Always make sure that the power is turned off and that the machine is unplugged before you attempt the replacement. If you have any questions or concerns, contact Fluid Management Customer Support Services. •CAUTION: POTENTIAL SAFETY HAZARD A caution notice tells you about a danger that could cause injury to you or minor damage to the dispenser. When you see a Caution notice in this manual, read it carefully and be sure you understand it before continuing. 7 Accutinter 1500 FM Customer Support Services 1 . 800 . 462 . 2466 Getting to Know Your Accutinter 1500 Highlights: • • • • • • • • • Three point LED locator for easy can placement Highly accurate Dispenses any color in your database Accutinter 1500 Uses patented DVX® and stepper motor Introduction Technical technology Specifications The Accutinter 1500 is a fully automatic sequential Small footprint dispenser designed for accurate, easy and repeatable Height: 48“ (122 ColorPro™ dispensing. The ganged nozzle allows the machine centimeters) Handles multiple to dispense all colorants with a single stream. The Width:sizes 30” (76 container andcentimeters) Depth: 24” (61 centimeters) Accutinter 1500 is highly accurate due to the use of heights a microprocessor and five major elements: DVX® Weight: 330 pounds with Mounted swivel pump technology, digital electronics, stepper motors, colorant ( 150 Kilograms) casters for easy individual colorant nozzles, and ColorPro™ software. Maximum power: 120 moving Volts +/- 10%, ColorPro™ dispensing software runs on an external Constructed from0.5 Amps 60 Hz Frequency computer, making it possible to store customer heavy gauge steel Maximum number of formulas and machine usage reports. Using Fluid canisters: 12 (16 with Management’s patented DVX® technology, each motor optional add on unit) has a separate motor and pump, ensuring the most Cans accommodated: reliable and accurate performance, with dispenses as one-gallon, five-gallon, small as 1/384 ounce. Colorants are stored in threequart, and pints quart canisters. Colorants are automatically agitated to keep colorants in optimal condition and to prevent them Optional from separating. The exterior cabinet has a durable Accessories painted finish. • Printer tray The Accutinter 1500 allows you to choose from a • Scanner tray full spectrum of designer colors with easy to follow • Barcode scanner ColorPro™ software. ColorPro™ allows you to select • Dymo label printer the color of your choice from an extensive database. • Computer, keyboard, It directs you through the most important cleaning • and mouse and maintenance procedures ensuring the best • Spectrophotometer: performance from your dispenser. Color matching system FM Customer Support Services 1 . 800 . 462 . 2466 Highlights: Highlights: • • • • • • • • • Three point LED • Three point LED locator for easy can locator for easy can placement placement Highly accurate • Highly accurate Dispenses any color • Dispenses any color in your database in your database Uses patented DVX® ® • Uses patented DVX and stepper motor and stepper motor technology technology Small footprint • Small footprint ColorPro™ • ColorPro™ Handles multiple • Handles multiple container sizes and container sizes and heights heights Mounted swivel • Mounted swivel casters for easy casters for easy moving moving Constructed from • Constructed from heavy gauge steel heavy gauge steel 8 Accutinter 1500 Computer specifications PRODUCT: Personal computer, Recommended model: Lenovo model M55 PHYSICAL DESCRIPTION Maximum dimensions: 3 3/4” H x 14 7/16” W x 15 5/16” D (9.5 cm x 36.7 cm x 38.9 cm) Configuration: Desktop (flat horizontal) capable of operating in a horizontal or vertical postion, including the external media Serial number: Unique number supplied on each unit by vendor, unless the system manufacturer has supplied an externally visible identification. HARDWARE AND CONFIGURATION: COMPONENT MINIMUM REQUIREMENTS Operating system Windows XP Professional Service Pack 2 SOFTWARE CONFIGURATION: COMPONENT MINIMUM REQUIREMENTS Case Desktop (see physical description above) Motherboard Must include one parallel LPT port, two serial COM ports, four USB ports. Minimum two EIDE controllers capable of supporting two drives each, and one floppy drive controller. Processor Celeron, 2.6 GHz or higher Memory Minimum 512 MB Ram, 1GB if other applications used Hard drive Minimum 80 GB capacity Floppy disc drive Standard 1.44 MB CD-RW / DVD-Rom combo drive Minimum 24 X speed capable of capturing a CD/DVD for vertical operation Video SVGA compliant, minimum 640 X 480 resolution, 600 x 800, 1024 x 768, 1280 x 1024, 32 bit color Audio Network interface card (NIC) 16 bit Keyboard Standard 101 key PS/2 or USB Mouse Standard two button PS/2 or USB 9 Accutinter 1500 Must be capable of automatic switching between 10Base-T and 100Base-TX FM Customer Support Services 1 . 800 . 462 . 2466 Getting to Know Your Accutinter 1500 Top cover Keyboard tray Nozzle closer Hinged lid Daily maintenance instructions and safety information labeling (not shown) on lid interior Canisters (not shown) Quart shelf One-gallon shelf Five-gallon shelf Front panel storage area (optional cover can be purchased) Mounted casters YOUR ACCUTINTER 1500 HAS THESE BUILT IN FEATURES: • 1/384th of an ounce accuracy. • Single-stream dispense via ganged nozzle. • Built in one-gallon, five gallon, and quart shelves. • ColorPro monitors colorant levels. • Removable electronics unit for easy servicing. • Twelve colorant canisters (sixteen optional). • Three point LED locator light. • Automatic agitation helps prevent colorant separation. • Powerful DVX® pump technology reduces the frequency of calibration and scheduled maintenance sessions. FM Customer Support Services 1 . 800 . 462 . 2466 10 Accutinter 1500 Getting to Know Your Accutinter 1500 COLORPRO™ HAS THESE FEATURES: 11 Accutinter 1500 • Easy to use. • Includes a full spectrum of designer colors available from a built in formula database. • Customer friendly menus direct you through daily maintenance. • Includes over seven different menus and options for dispensing, diagnostics, and maintenance. • Optional ColorPro™ language packages allow you to operate in multiple languages. • Built in diagnostic utilities. • Mouse and keyboard operable. • All dispensing functions can be accessed from a single screen. • Tracks and reports usage statistics for formulas, colorants, and dispenses. FM Customer Support Services 1 . 800 . 462 . 2466 Getting to Know Your Accutinter 1500 Tips to Help You Get Started These tips will help you get the most out of your machine: Load ColorPro™ if you are using an existing PC. Clean the nozzles daily for consistent dispense accuracy. Purge the nozzle at least once per day, especially if you haven’t used the machine for several hours. It is recommended that the machine stay on at all times. Shake the colorant can before filling the canisters. Let the colorant sit for several minutes so the bubbles rise to the top before filling the canisters. Always keep the nozzle closer covered with the cap to prevent colorant from drying out. Keep the nozzle closer sponge moist by adding a few drops of water to the cup liner to prevent dried colorant from clogging the nozzle. Follow the preventative maintenance procedures in this manual. Do not use solvents in your dispenser. Use the Welcome to ColorPro™ section of this manual for answers to your questions about ColorPro™. Do not load any screen savers on the computer. Added software can create conflicts with ColorPro™ and could cause the dispenser to operate incorrectly. Keep your ColorPro™ software up-to-date. Use the correct sized labels for your Dymo label printer (optional accessory). FM Customer Support Services 1 . 800 . 462 . 2466 12 Accutinter 1500 Accutinter 8000 Dispenser ™ Overview Getting Started Installation Your Accutinter 1500 has been designed so that you can set it up quickly and begin using it right away. If you have never used an Accutinter dispenser or are new to paint dispensers, read this section for instructions on getting started and installing your machine. If you are an experienced user, you may already know enough to get started. Be sure to look over the information in the “Welcome to ColorPro™” section of this guide to find out more about the new features and capabilities in ColorPro™. VERIFY THESE ITEMS ARE INCLUDED WITH YOUR UNIT: Nozzle pick Water bottle Sponges AT1500 User guide Disc (contains database, machine configuration, and/or fluids configuration depending on your specifications) ColorPro™ software CD Power cable USB cable OPTIONAL ACCESSORIES (not automatically included): Computer, monitor, mouse Keyboard Computer storage mountable bracket Dymo label printer Printer tray Scanner tray Front panel storage cover 13 Accutinter 1500 FM Customer Support Services 1 . 800 . 462 . 2466 Warnings • Unpacking and Set up Follow the steps on the next eleven pages to set up your Accutinter 1500. 1 Always unplug your machine from the AC power outlet before servicing. The unit must be plugged into a dedicated 15 Amp electrical line (US only). The surface the dispenser sits on must be strong enough to support it’s weight. This machine is not explosion proof and must not be used in a flammable atmosphere or with flammable materials. Protect the cord and power adapters from liquids. Liquids can cause gradual corrosion of the power cord and / or the connector terminals on the adapter which can result in overheating. Make sure these items are available before installing: Accutinter 1500 unit Power cord Computer, monitor, mouse, and keyboard (optional accessories) Dymo label printer and labels (optional accessory) Barcode scanner (optional accessory) Surge protector (recommended, not included) 2 Tools needed for installation (not provided): Scissors or diagonal cutters 3 Unpack the machine. a. Remove the interior contents of the packaging. b. While unpacking the machine, inspect the machine for any damage that may have occurred during shipping. If any damage is found, notify the carrier immediately. Arrange for inspection in order to claim recovery. Claims for damage must be made by the consignee (YOU). The carrier assumes full responsibility upon acceptance of the shipment and will not entertain any claims by the consignor. Cautions Verify that your dispenser is firmly positioned on the surface it will sit on. Before dispensing colorant for the first time, you must complete a manual dispense. Daily cleaning and nozzle maintenance are crucial for effective machine operation. Shake colorant before filling the canisters. Do not use shelf surface to seal open cans. Do not dispense without a container in place. Do not operate the dispenser until it is in it’s permanent location. Do not dispense if canisters are empty. Always route power cords so they will not be walked on, tripped over, or pinched by objects. To reduce the risk of electric shock or injury, use indoors only. Verify the contents against the packing slip. Note if any items are missing or damaged. Call Fluid Management Customer Support Services if any items are missing. 4 Position dispenser in permanent location. Choose a location for your dispenser that is capable of supporting the weight. Make sure there is enough room for service personnel to have access to the rear of the machine. If there is not enough room, routine maintenance may be difficult to perform. FM Customer Support Services 1 . 800 . 462 . 2466 14 Accutinter 1500 5 Position the monitor, computer, and keyboard. a. Place the keyboard on the keyboard support, Figure 1. b. Place the computer on top of the left side of the Accutinter Figure 1, (unless you purchased the optional computer bracket). c. Place the monitor firmly on top of the computer. c. Plug the surge protector (not included) into a 15 Amp dedicated electrical outlet. d. Plug the dispenser power cord into the recommended customer supplied surge protector. 7 After the machine is installed, fill the canisters and update ColorPro™ (See “Getting Started: Preparing the canisters” on pages 19-21 ). 8 After the canisters are filled, complete an initial manual dispense for each colorant 6 (See ” Getting Started: Preparing the canisters” on page 21). 9 For the system to operate properly, leave the dispenser on at all times. Fig. 1 Plug in the power cord and connect all the cables. a. Connect the mouse and keyboard USB cables to their corresponding symbols on the back of the computer, Figures 2a and b. Fig. 2b Fig. 2a b. Connect the USB cable from the dispenser to the USB port on the back of the computer, Figure 3. Fig. 3 15 Accutinter 1500 FM Customer Support Services 1 . 800 . 462 . 2466 Connecting the Dymo label printer (optional accessory) The label printer software for the label printer is installed on the computer by Fluid Management. All you need to do is connect the printer cables to the computer and to a dedicated power outlet. The original packaging from the printer vendor includes the software, a quick start guide with detailed instructions, and the necessary cables. Follow steps #1-4 to connect the printer: 1 1- Unpack the printer. Save the packing materials. 2- Make sure you have these items: •CD - ROM •Quick Start Guide •Roll of labels •USB cable •Label writer printer •Power cable •Power adapter 3- Plug the power cord into the power adapter. 2 1- Plug the power adapter into the power connector on the bottom of the printer. 2- Plug the other end of the power cord into a power outlet. 3- Plug the USB cable into the bottom of the printer. 3 Plug the USB cable into the empty USB port on the back of the computer. 1- The blue light on the front of the printer should be on if the printer is ready. 2- Click the Label button on the formula tab to print labels. FM Customer Support Services 1 . 800 . 462 . 2466 16 Accutinter 1500 Connecting the Barcode Scanner (optional accessory) The barcode scanner (Part number 33322, Symbol series LS2208) must be connected to the computer and keyboard. The barcode scanner is pre-programmed by Fluid Management. After the barcode scanner is connected, it must be enabled for compatibility with ColorPro™. The original packaging from the vendor includes the barcode scanner, the cable, and a quick start guide. Follow steps #1-8 to install the barcode scanner: 1 2 1- Unpack the barcode scanner. Save the packing materials. 2- Make sure the barcode scanner and the cable are included. 3- Turn on the computer. Plug the interface cable modular cord into the port in the bottom of the scanner handle. 4 3 Go to the next page for instructions on enabling the barcode scanner in ColorPro. Connect the scanner cable to the USB port on the back of the computer. 17 Accutinter 1500 FM Customer Support Services 1 . 800 . 462 . 2466 Connecting the Barcode Scanner Enabling the Barcode Scanner in ColorPro™ After the barcode scanner is connected to the computer and keyboard, it must be enabled in ColorPro™. Note that you must have the correct barcode enabler database already installed. Follow these steps to enable the barcode scanner: 6 5 1- Select Customize. 2- Type in “service” when prompted for the password. 3- Click OK. Start ColorPro™. 7 8 1- Check the Enable Barcoding box in the Options tab. 2- Click Apply, then click OK. After enabling the barcode scanner, you can test the scanner by dispensing. 1- Open the Dispense menu. 2- Select a formula. 3- Click the Dispense button. 4- If you receive a prompt that says, “Please Scan Base Can”, you have successfully enabled the bar code scanner. FM Customer Support Services 1 . 800 . 462 . 2466 18 Accutinter 1500 What’s next? Getting Started Preparing the canisters when empty After your machine is installed in the proper location, you need to fill the canisters with colorant so you can dispense for the first time. Your machine is pre-calibrated and does not come shipped with colorant. You will need to fill the canisters to capacity. The colorant compartment holds twelve three-quart canisters (sixteen optional). After the canisters are filled, ColorPro™ must be updated with the new canister information (see “Getting Started: Preparing the canisters” on page 20). 1 2 Raise the top cover of the Accutinter 1500 so you can see the top of the canisters. 3 Shake the colorant before pouring into the canisters. Fill the canister no more than one inch below the top of the canister. • Do not rest the can on top of the agitator. 4 19 Accutinter 1500 Remove the lids from each canister one at a time and prepare to fill them with colorant. Update ColorPro™ with the canister level information after you have filled all of the canisters (see “Preparing the canisters” on page 21). FM Customer Support Services 1 . 800 . 462 . 2466 Getting Started Preparing the canisters Next, After you have filled the canisters to capacity, you must update ColorPro to prime the lines. Follow these instruction: From the main menu, select Maintenance (F3), then select All (F2) button. Fill menu Click the All button to update the software after you have filled all of the canisters. Press Enter or click the “Fill to top” button. When prompted, “...are you sure you want to fill all?”, press Enter or click yes. Press Esc to return to the main menu. FM Customer Support Services 1 . 800 . 462 . 2466 20 Accutinter 1500 Getting Started Preparing pre-filled canisters Your canisters may have come from our factory filled with a small amount of colorant. After you have filled the canisters and updated the software, you must do an initial dispense to make sure the Accutinter 1500 is working. From the main menu of ColorPro™ select Maintenance. Then, select the Purge tab. Purge will dispense a small amount of colorant for your initial dispense. You must repeat this process until you see the colorant fill the lines. 1 2 Select All. Press Enter. When Purge button is highlighted, press Enter a second time or press F3. 3 21 Accutinter 1500 Place a container underneath the nozzle when prompted. Press Enter. Repeat entire sequence again until you dispense. FM Customer Support Services 1 . 800 . 462 . 2466 Basic Operation Using the shelves 1 The one-gallon shelf pulls out to accommodate one-gallon containers for easier dispensing with less splashing. When the shelf is completely pushed back, it holds a five-gallon can on the lower shelf. When the quart shelf is fully extended, it holds a one-quart can. Pull the one-gallon shelf out by pulling the handle. Place the can under the three point LED light indicator. 2 3 Pull the quart shelf out by pulling the handle. Place the can under the three point LED light indicator. Place the five gallon can on the fivegallon shelf under the three point LED light indicator. FM Customer Support Services 1 . 800 . 462 . 2466 22 Accutinter 1500 Basic Operation Dispensing from Formula Book Dispensing Follow these steps to dispense a formula from your company’s database: 1 2 Choose the container size you want to use: 1- For five-gallon cans, place the can directly on the bottom five-gallon shelf. 2- For one-gallon cans or quarts, place the can on the appropriate extended shelf. 3- Use the LED indicator lights to guide the can placement. 4 3 Click on the Dispense button from the main screen. 23 Accutinter 1500 1- Make sure the machine is turned on. 2- Start ColorPro™ or the dispensing software you are using. 3- Your monitor display shows the ColorPro™ logo. Click on the logo to start the program. 1- Enter information into the text boxes. See “What are the basics? Selecting Formulas” on page 27. 2- Click on the Dispense (F2) button. FM Customer Support Services 1 . 800 . 462 . 2466 What Basic Operation if I have a problem? Troubleshooting Dispensing individual colorants Dispensing Follow these steps to dispense individual colorants from Manual Dispense: 1 Choose the container size you want to use: 1- For five-gallon cans, place the can directly on the bottom five-gallon shelf. 2- For one-gallon cans or quarts, place the can on the appropriate extended shelf. 3- Use the LED indicator lights to guide the can placement. 3 Click on the Dispense button from the main screen. 22 1- Make sure the machine is turned on. 2- Start ColorPro™ or the dispensing software you are using. 3- Your monitor display shows the ColorPro™ logo. Click on the logo to start the program. 4 1- Select the Manual Dispense tab. 2- Enter the amounts you want to dispense into the text boxes. See “What are the basics? Manually Dispensing Colorant” on page 28. 3- Click on the Dispense button (F2) . FM Customer Support Services 1 . 800 . 462 . 2466 24 Accutinter 1500 Welcome to ColorPro™ ColorPro™ and ColorPro™ Professional™ put usability at your fingertips with all the features that allow you to operate your Accutinter 1500 dispenser. Instantly dispense any formula in your database, perform maintenance, run usage reports, estimate paint coverage for any room, adjust formulas, and calculate the formulas for lightening and darkening paint. 25 Accutinter 1500 Clean the lines to keep your machine running at it’s best. Dispense any formula in your database and make adjustments. Fill the canisters with colorant. Save the formula adjustments you make. What’s What arenext? the basics? The ColorPro™ main screen is your starting place You can use the following four menus to help you get the most out of ColorPro™: Dispense, Maintenance, Customize, and Utilities. In this section, you will learn the functions of each menu, beginning with Dispense. The main screen of ColorPro™ features seven selections. Dispense menu Utilities Click the Dispense button to go to the Formula book, Manual Dispense, and Custom Dispense menus. Click the Utilities button to update software, run reports, save data and test dispenser. Maintenance Customize Click the Maintenance button to add colorant, purge lines, and agitate. Click the Customize button to change the properties and options for the dispenser. About menu Help menu Click the About button to see ColorPro™ information. Click the Help button to look up answers to your ColorPro™ questions. 26 Accutinter 1500 What are the basics? What’s next? Using the Dispense menu Selecting Formulas The Formula Book menu allows you to select, dispense, and adjust the formula. You can also estimate paint quantities, and enter new formulas. Select Formula Enter information in the text boxes about the colorants you want to dispense. Formula quantities The colorant quantities needed to dispense your formula will show here. Sky Blue FM Paint Colorize Interior Flat Dispense Click the Dispense button to dispense the colorant after you enter the formula information. Adjust Click Adjust to adjust individual formulas. Coverage Use the paint wizard to estimate how much paint is needed for your job. Label Click the Label button to print labels for your paint containers. 27 Accutinter 1500 Help Click the Help button to get answers to your ColorPro™ questions. Main Click the Main button to return to the main screen. What are the basics? What’s Using next? the Dispense menu Manually dispensing colorant Manual Dispense allows you to enter the amount of colorant you want to dispense. Enter the amount in the text box first and then click Dispense. Ingredient The letters shown are the colorants your dispenser uses. Enter amount 3 Enter the amount or use the scroll arrows for the colorant you want to dispense. Dispense Click Dispense to dispense the colorant after you enter the formula information. You will receive a prompt when the dispense is complete. Click Done. New Formula Click here to make new formulas that are not in your database. Save • Click Save to save formula information. • In the Save As Custom text boxes, type in the job information. • Click Save to save information. 28 Accutinter 1500 What are the basics? Using Dispense menu What’sthe next? Saving customer information Use Custom Formula to enter and save customer information, plus dispense the formula. Customer Information FM Paint Living Room Enter information in each textbox about the formula you want to dispense. Make sure you fill in each field. Peach surprise 1414 Dispense Save Click the Dispense button to dispense the colorant after you enter the formula information. Click the Save button to save customized information. New Formula Click the New Formula button to start a new formula. Paint Coverage Wizard To estimate how much paint you need for a specific room, use Paint Coverage Wizard. 29 Accutinter 1500 What the basics? What’sare next? Using Coverage Estimator To use Paint Coverage Wizard, click the Coverage button (F9), from any menu, and follow the prompts. Click the Next button through each step. Next Select one of the two buttons to indicate if you know the dimensions of the room you will be painting. Click the Next button to begin uisng Paint Coverage estimator. Next Click the Next button after you have selected the room type. Enter the room size and wall height in the text boxes. 30 Accutinter 8000 What are the basics? What’s Using thenext? Dispense menu External Data Sources Use External Data Source to enter and dispense a formula scanned by a Spectrophotometer. Input List Select the formula you want to dispense from the formulas displayed in the list. Dispense Click Dispense to dispense the formula you selected from the input list. 31 Accutinter 1500 Remove Formula Adjust Click the Remove Formula button to remove the formulas from the input list. Click Adjust to Click Save to save adjust the colorants formula information. using the formulas shown in the Color Correction menu (see “Adjusting Formulas” on page 32). Save FM Customer Support Services 1 . 800 . 462 . 2466 What are the basics? What’s next? Using the Dispense menu Adjusting Formulas Use Color Correction to adjust the original formula, label and dispense the adjusted formula. Total Allows you to view the colorant changes after you enter them in the Change box. Current Formula Enter the formula adjustment you want to make in the textboxes for the corresponding colorant by typing in the amount or using the up down arrows. Dispense Change Label Dispense Total Click here to dispense the formula. Click here to print labels if you have an optional label printer. Click here to dispense the total amount of the original formula. FM Customer Support Services 1 . 800 . 462 . 2466 32 Accutinter 1500 What are the basics? What’s Usingnext? the Dispense menu Color Calculator Adjust formulas for the container size you want to dispense into using Color Calculator. Lighten or darken any formula with Percent Change. Information area Click here to view the change from the original formula and the formulas that have changed. Scaling Method Select the container size you want to use or enter an amount in Percent Change to lighten or darken the formula. +100 is the lightest and -75 is the darkest. Transfer Change Select the container size you want to dispense or the percentage change. Start Over Click the Start Over button to start your calculation again. -75% Lightest 33 Accutinter 1500 Transfer Total Click here to return to the Manual Dispense screen. The percentage changes you entered will adjust automatically. Back Click the Back button to return to the previous screen. +100 Darkest What are the basics? Using the Dispense menu Refilling the canisters The Fill menu allows you to add colorant when the canisters need refilling. 1 ►Select Agitate after you fill canisters (see “Stirring the colorant”, page 36). All All Click the All button to fill all of the colorants at once. Allows you to view the colorant changes after you enter them in the Change box. OR Select your choice of colorants to fill the canister. Enter the amount of colorant you added into the text box when prompted. Undo Click Undo to restore the old fill values. NOTE! Use Undo only if you want to recall a mis-entered colorant. 2 3 Fill to top Colorant volumes Main Click Fill to Top to fill the canister to the top after you’ve selected the colorant in step one. These are the volumes the canisters hold for each colorant. Click Main to return to the main screen. After you fill the canisters, you must agitate the containers using the Agitate menu. 34 Accutinter 1500 What are the basics? Using the Maintenance menu Purging the lines 1 The Purge menu allows you to maintain and clean the nozzle lines by preventing air and dried colorant from reaching the nozzle openings. Purging helps prevent dripping and mis-tints. All Click All to purge all of the cartridges at once. OR Select your choice of colorants to purge. ColorPro™ will give you a text message indicating the last time the colorant was purged. Reset Timer Click here to reset the timer for the last time you purged. 35 Accutinter 1500 2 Purge Help Main Click here to purge after you’ve selected the colorant in Step one. Click Help to get answers to your ColorPro™ questions. Click Main to return to the main screen. What are the basics? Using the Maintenance menu Stirring the colorant Agitation is automatically set to agitate the colorant thirty seconds per hour by our factory. The Agitate menu allows you to manually stir the colorant in the canister so the Accutinter dispenses accurately. Agitation helps to prevent the colorants from separating. 1 All Select the All button to agitate all of the colorants at once. Enter time in text box Enter the amount of time you want to agitate the colorant after filling the canister. NOTE! The default is 30 seconds per hour. Fluid Management recommends agitating for four minutes if you do a manual agitation. 2 Agitate Click the Agitate button to begin the agitation cycle. A window will appear that indicates the progress. Wait until the blue bar reads 100%. Press Abort or Esc to stop the cycle. Main Click Main to return to the main screen. 36 Accutinter 1500 What are the basics? Using the Maintenance menu Testing your Accutinter 1500 The Test menu allows you to run diagnostics on the Accutinter. There are three tests available. If you receive a Pulse Failure message in ColorPro™, you can use the Pulse Test to repair the problem. 1 Available Tests 2 3 Select Pulse Test. Test (F2) Click here to begin the pulse test. Note which colorants you receive Pulse failure messages about because they will need updating. Repeat up to three times until you get a prompt that says “Pulse test passed.” Click OK If you do not receive a passed message, call Customer Support Services for assistance. 37 Accutinter 1500 Main (Esc) Click here to return to the main screen. What can I do with Customize? Using the Customize menu ColorPro™ options The Customize menu allows you to customize many of the regularly used features in ColorPro™ such as: label printing, machine shut down, and the screen appearance. Options Choose the Options tab to choose customized options by checking any of the boxes. Enable Bar Coding is available in ColorPro™ Professional only. You must have the correct database loaded to support barcode scanning. Check the Enable Barcoding box to enable the barcode scanner to work. NOTE! Call Fluid Management Customer Support Services at 1.800.462.2466 to receive your authorization code. 38 Accutinter 1500 What can I do with Customize? Using the Customize menu Customizing the appearance The Appearance menu allows you to select which menus you want to view from ColorPro™. Active Tabs Check each box for the tab you want to view from the Dispense menu. Click OK (F2). Then, click the Apply button (F3). Fluid Management recommends you check all three boxes for the best performance of your Accutinter 1500. Apply (F3) Click the Apply button to apply the tabs you have selected. 39 Accutinter 1500 FM Customer Support Services 1 . 800 . 462 . 2466 What can I do with Customize? Using the Customize menu Printing Select the Print tab from the Customize menu. Check the boxes under Label Print Options for the information you want printed on your optional label printer.* * The printer is an optional accessory. FM Customer Support Services 1 . 800 . 462 . 2466 40 Accutinter 1500 What can I do with Customize? Using the Utilities menu ColorPro™ Maintenance Select the Maintenance tab from the Customize menu. 1 Check the boxes for the actions you want to allow when filling canisters and performing maintenance functions. ►Allow Fill All Allows you to fill all of the canisters at once and update in ColorPro™. ►Allow Fill to Top Allows you to fill each canister one at a time and update in ColorPro™. ►Confirm Fill to Top Check the box to get a prompt that asks you for confirmation that you want to fill the canisters to the top. 41 Accutinter 1500 3 OK (F2) Click here to move to the next screen. 2 Apply (F3) Click here to apply the options you have selected. What can I do with Utilities? Using the Utilities menu Making reports Click on the Reports tab. In the Reports menu, you can run three different report types - Formula Usage, Colorant Usage, and Machine Usage. 1 Select the report type you want to run from the drop down window. Select the output method. Enter the dates you want the report for, and select how many formulas. Machine usage Shows you how much colorant you have used. Top 10 Formula Usage Use to show you the top ten formulas your machine dispenses. 2 Run Report (F5) Click here for ColorPro™ to run the report you selected. Colorant Usage Shows the amounts dispensed. 42 Accutinter 1500 Where do I go to learn more? Using ColorPro™ Using ColorPro™ allows you to find answers to your questions about ColorPro™. Getting Started Help Topics Click here to see a list of Help topics. Click here to learn basic navigational tools. If you didn’t find what you were looking for, call Customer Support Services or go to www.fluidman.com for frequently asked questions. Help Click here to get answers to your ColorPro™ questions. 43 Accutinter 1500 Main Click Main to return to the main screen. FM Customer Support Services 1 . 800 . 462 . 2466 Maintenance,and Care, and Use Maintenance Service • Your Accutinter 1500 depends on clean and well maintained parts. To ensure dispensing accuracy and increase the operation of your Accutinter 1500, clean the nozzle at least once a day and follow the maintenance schedule detailed below: • Unplug from outlet before servicing. Make sure all programs are shut down before unplugging. PERFORM EVERY DAY: • Clean each of the nozzles with the recommended nozzle cleaner (PN 29763). • Clean the nozzle cover liner. Replace if necessary (PN 33221). • Remove all excess colorant and debris from the nozzle and nozzle area. • Complete a purge by using ColorPro™ (see page 35). • Clean all accessible surfaces and cabinet with a mild cleaning solution. PERFORM EVERY WEEK: • Clean the excess colorant and debris from around canisters. EVERY SIX MONTHS: • Check the calibration and re-calibrate as required.* * This should be performed by a Fluid Management authorized service technician. FM Customer Support Services 1 . 800 . 462 . 2466 44 Accutinter 1500 Daily Nozzle Cleaning Instructions Your Accutinter 1500 will perform best if the nozzle and colorant lines are purged and cleaned every day. If you use your machine frequently, Fluid Management recommends cleaning and purging the nozzle more than once a day. The instructions for cleaning the nozzles and filling the colorant canisters are on the next three pages. 1 2 Open the nozzle cover and clean the nozzle. 1- From the main screen, select Maintenance (F3). 2- Move the arm so you can access the nozzles. Remove the cup holder from the nozzle closer. 4 3 Clean each nozzle opening with a nozzle cleaner. Use a circular motion to make sure each opening is clean. 45 Accutinter 1500 Clean the inside of the cup liner and sponge with water. 1- After cleaning, insert the sponge and fill the cup liner with water to keep the colorants moist. 2- Return the cup holder to the bracket. FM Customer Support Services 1 . 800 . 462 . 2466 Maintenance, What if I haveCare, a problem? and Use Troubleshooting Daily Nozzle Cleaning Instructions 5 Purge the colorants. 1- Make sure the All button is selected on the left hand side of the screen. 2- Click the Purge button (F3). 3- When prompted, place a container under the nozzle. 4- Select Dispense, when prompted (F2). FM Customer Support Services 1 . 800 . 462 . 2466 46 Accutinter 1500 Maintenance, Care, and Use Filling the canisters Follow these instructions to fill the colorant canisters. 2 1 Shake the colorant can thoroughly to mix the colorant as required by the manufacturer. 3 4 Add the colorant. 1- After shaking, open the cans one at a time. 2- Slowly add the colorant to the open the canister. NOTE! Do not fill to the edge of the canister because colorant can overflow. 47 Accutinter 1500 Remove the canister covers one at a time so the colorants do not get mixed up. Update ColorPro™ for each colorant you add: 1- Select Maintenance. 2- Click the correct colorant button from the left hand side of the screen. FM Customer Support Services 1 . 800 . 462 . 2466 What’s next? Care, and Use Maintenance, Filling the canisters, continued 3 4 Update the canisters. 1- Enter the amount of colorant you added to the canister in the text box. 2- Press Enter. Repeat entire process for each empty canister. FM Customer Support Services 1 . 800 . 462 . 2466 48 Accutinter 1500 What if I have a problem? Frequently Asked Questions Troubleshooting chart Most of the problems listed in this section can be prevented by daily cleaning and by purging the nozzle. See the Maintenance, Care and Use section in this manual for instructions. Use the chart below to locate the problem and perform the recommended actions in the last column. Contact Fluid Management Customer Support Services if you are unable to find a resolution. PROBLEM FIRST CHECK: ACTION The machine is dispensing mis-tints. …Do the fill settings in ColorPro™ match what is inside the canister? Compare the canister contents with the fill settings. Adjust if necessary: 1- Look inside the canister and compare the contents with what the fill settings in ColorPro™ show. 2- If they do not match, fill the canister and adjust the colorant level in ColorPro™ (see page 34). …Have the nozzle openings been cleaned recently? The colorant shoots to the side during a dispense. 49 Accutinter 1500 Clean the nozzles: 1- Clean each nozzle opening with a nozzle cleaning tool. 2- Remove all excess colorant from around the nozzles (see pages 45-46). 3 - Purge the lines with ColorPro™ (see page 35). 4- Repeat cleaning and purging if necessary. …Is the Accutinter dispensing accurately? Dispense one ounce of each colorant into a marked measuring container (see page 35). If you notice any colorants are not dispensing, call Customer Support Services for assistance. …Have the nozzles been cleaned recently? 1- Clean the nozzle. Remove all excess colorant and dried debris. 2- Purge the colorant line. 3- Repeat if necessary. FM Customer Support Services 1 . 800 . 462 . 2466 What if I have a problem? Frequently Asked Questions Troubleshooting chart PROBLEM FIRST CHECK: ACTION The nozzle closer is not opening or closing. …Is the nozzle closer covered with dried colorant and debris? Clean all dried colorant and debris from the nozzle closer area. Make sure the nozzle arm is clean so it moves freely. If the nozzle closer still does not close, call Customer Support Services. Colorant drips or runs after dispensing. …Is ColorPro™ prompting you to fill the canister? 1- If yes, fill the canister with colorant (see page 47). 2- Agitate for up to three minutes (see page 36). 3- Purge the line (see page 35). ...Do the nozzle openings need to be cleaned? If the canister is full, clean the nozzle and complete a purge using ColorPro™ (see page 35). Repeat if necessary. …Does the colorant have air in it? Complete a purge using ColorPro™. Repeat if necessary. A colorant canister needs to be filled. Follow the “Filling the colorant canisters” instructions on page 47. The canister cover and lids need to be cleaned. Soak the canister covers in hot water and mild detergent. Wipe off the excess debris and dried colorant when the colorant has loosened. Scrape the excess colorant off with a putty knife. The colorant coming out of the nozzle is drippy or clumpy. ...Do the nozzle openings need to be cleaned? FM Customer Support Services 1 . 800 . 462 . 2466 Clean the nozzle openings and purge the lines (see pages 47-48). The colorant should come out of the nozzle in a steady stream. 50 Accutinter 1500 What if I have a problem? Frequently Asked Questions Troubleshooting chart PROBLEM FIRST CHECK: ACTION The machine is not dispensing. …Is the machine turned on and plugged in? Make sure the power cord is plugged in. Restart the machine: 1- Exit ColorPro™. 2- Shut down the computer. 3- Wait 30 seconds. 4- Turn the computer back on. Perform a pulse test with ColorPro diagnostics (see page 37). If the problem still persists, call Customer Support Services. There is no power. …Is the machine turned on and plugged in? …Is there power at the receptacle? …Is the surge protector turned on? The printer is not printing. …Is the power cord firmly connected to the computer and functioning properly? …Is the USB cable connected at both ends? The motor is running erratically or not at all. …Is the dispenser on a dedicated line? 51 Accutinter 1500 Make sure the power cord is plugged in. Replace the power cord if it is damaged. Check the circuit breaker. Turn on the surge protector; replace if necessary. Make sure the printing device is properly connected. Unplug the power to the printer for 30 seconds and then replug. Try to print again. Restart the computer. After restarting, print again. If you still have problems, after following these suggestions, contact the Dymo printer manufacturer at 1.800.426.7827 If no, plug the dispenser into a dedicated 115 Volt line. FM Customer Support Services 1 . 800 . 462 . 2466 What if I have a problem? Frequently Asked Questions Troubleshooting chart PROBLEM FIRST CHECK: ACTION One or two colorants are not dispensing. …Are the nozzles clogged? Follow the daily nozzle cleaning instructions (see page 45). How do I clean the nozzle openings? Follow the daily nozzle cleaning instructions (see page 45). AND Follow the “Daily Nozzle Cleaning Instructions” on the inside of the top cover of your machine each day. The computer doesn’t start when you press the power button. …Is the power cord plugged in? Make sure the power cord is plugged into the rear of the computer and to a working electrical outlet. The monitor screen is blank. …Is the power turned on and are the cables attached? Make sure the cable is plugged into the back of the monitor and to the back of the computer. Make sure the power cord is plugged to the back of the computer and to a working electrical outlet. Make sure the recommended surge protector is turned on. The keyboard isn’t responding. …Are all the cables securely attached between the cmputer and the keyboard? …Are all the cables securely attached between the computer and the keyboard? …Does the keyboard need replacing? If not, firmly attach all cables. FM Customer Support Services 1 . 800 . 462 . 2466 If not, firmly attach all cables. Replace the keyboard. 52 Accutinter 1500 What if I have a problem? ColorPro™ Troubleshooting Troubleshooting chart PROBLEM FIRST CHECK: General ColorPro™ related …Make sure ColorPro™ is installed. …Can you find the answer in the Help section of ColorPro™? …Make sure your computer is properly connected. ACTION Turn on the computer. Does the ColorPro™ main screen open up? If yes, then ColorPro™ is installed. Look in ColorPro Help for instructions and troubleshooting information. Make sure the communication cable connects the computer to the dispenser. If screen savers have been installed recently, they may conflict with ColorPro™. Uninstall the screen savers. Restart the computer: 1- Exit ColorPro™. 2- Shut down the computer. 3- Wait 30 seconds. 4- Turn the computer back on. If none of these suggestions work, call Customer Support Services. A message in ColorPro™ says, “Communication to dispenser has been severed. Recheck connections and try again.” …Make sure the communication cable is connected between the computer and the machine. Exit ColorPro™. Shut down the computer. Restart the computer: 1- Exit ColorPro™. 2- Shut down the computer. 3- Wait 30 seconds. 4- Turn the computer back on. If you still receive the message, call Customer Support Services. 53 Accutinter 1500 FM Customer Support Services 1 . 800 . 462 . 2466 What if I have a problem? ColorPro™ Troubleshooting Troubleshooting chart PROBLEM FIRST CHECK: A message in ColorPro™ says, “Encoder pulse failure. Motor failed on canister containing...” 1- Click the Maintenance button (F3). 2- Click the Test tab. 3- Select the Pulse Test button. Then, click on the Test button (F2). 4- If the test fails, call Customer Support Services. ColorPro™ gives you a message that says the colorant canister needs to be filled... Follow the instructions for adding colorant in the Maintenance section of the manual (see page 47). The optional barcode scanner won’t work... 1- You must have ColorPro™ Professional for barcoding capability, 2- Select the Customize menu. 3- Make sure the Enable Barcoding box is checked in the Options menu (see page 38). 4- Click the Apply button, and then click the OK button (F2). If you suspect a problem with the label printer... Contact the printer manufacturer at 1.800.426.7827 If you suspect a problem with the colorants... Contact your department manager or store manager. FM Customer Support Services 1 . 800 . 462 . 2466 54 Accutinter 1500 Service Service: • FM Direct ® Factory Direct Service Technicians located throughout the United States, Puerto Rico, Hawaii, Canada and the Bahamas. • On site setup and training for store personnel. Always observe the following precautions in order to reduce the risk of accident: Do not attempt to service a product yourself unless instructed to do so by Fluid Management Customer Support Services. Use only a service provider who is approved to repair your particular product. Note: Some parts can be upgraded or replaced by the customer. These parts are referred to as Replacement parts. Fluid Management expressly identifies parts as such, and provides documentation with instructions when it is appropriate for customers to replace those parts. You must closely follow all instructions when performing such replacements. Always make sure that the power is turned off and that the product is unplugged from any power source before you attempt the replacement. 2007 FM Direct ® Service Technician Locations: Fluid Management Customer Support Services: 1.800.462.2466 www.fluidman.com Save time and money. If something should go wrong, we suggest consulting the maintenance and service section of this book. It is designed to solve basic problems before consulting a service technician. It also provides replacement part information for you. Phoenix, AZ. Atlanta, GA. Sacramento, CA. Chicago, IL. San Jose, CA. Louisville, KY. Los Angeles, CA. Winston-Salem, N.C. San Diego, CA. Baltimore, MD. Denver, CO. Yonkers, N.Y. Hartford, CT. Syracuse, N.Y. St. Louis, MO. Boston, MA. Dallas, TX. Detroit, MI. San Antonio, TX. Twin Cities, MN. On the right side of the machine is a black and silver sticker. It includes the serial number and model number of your machine. Please make a note of these numbers below: Houston, TX. Columbus, OH. Memphis, TN. Philadelphia, PA. Date of purchase: Miami, FL. Richmond, VA. Orlando, FL. Seattle, WA. Serial Number: Pensacola, FL. Toronto, CANADA Your Service Technician’s Name: Tampa, FL 55 Accutinter 1500 However, should you need assistance, please have your model and serial number ready. Be located near your machine when you call and have a Purchase Order number if ordering parts. Model Number: Replacement Parts This section is designed to assist you in: • IDENTIFYING SERVICE FUNCTIONS and • IDENTIFYING REPLACEMENT PARTS Occasionally, you may experience a complication with one of our products. If this should happen, please call our toll-free number and we can help you solve the problem or send you replacement parts. TERMS: Unless prior arrangements have been made, parts will be shipped UPS - C.O.D. All prices are FOB, Wheeling, Illinois and are subject to change without notice. In all correspondence or phone orders, please state the model number and the serial number of the machine. Orders less than $30.00 will be assessed an $8.00 handling charge. There is a restocking fee of 25% on all returned goods. RETURNS: No parts are to be returned without prior authorization. A Returned Goods Authorization (RGA) or Returned Materials Authorization (RMA) number is required. All warranty repairs must be performed by FM Direct ® or FM authorized service personnel. Any service work performed by non-authorized service personnel will void the FM Original Equipment Manufacturer warranty. FM Customer Support Services 1 . 800 . 462 . 2466 56 Accutinter 1500 Calling for service If you have tried to correct the problem yourself and still need help during the warranty period and after, you can get support and information by telephone through the Fluid Management Customer Support Services Center. The following services are available: PROBLEM DETERMINATION - Trained personnel are available to assist you with determining what kind of action is necessary to fix the problem and help you order parts. ENGINEERING CHANGE - Occasionally, there might be changes or parts that are required for your machine, after a product has been sold. Fluid Management will make selected parts available to your equipment. HAVE THE FOLLOWING INFORMATION AVAILABLE WHEN CALLING FLUID MANAGEMENT Customer Support Services: • A description of the problem (for example, the dispenser is producing mis-tints, or the computer is frozen). • What you have tried to do already. • The type of machine, computer and software. • The serial number of the machine. • The version of software, third party software, or external devices, (especially if the issue involves software you have added to the computer). PLEASE BE IN FRONT OF THE MACHINE WHEN YOU CALL. ColorPro™ upgrades Purchasing upgrades, additional licenses, and technical support software upgrades and technical support are available for a fee through Fluid Management. For information about purchasing additional licenses for ColorPro™, call Customer Support Services. Purchasing additional accessories During and after the warranty period, you can purchase additional services such as support and installation for Fluid Management equipment and accessories like barcode scanners, label printers, computers, and monitors. 57 Accutinter 1500 FM Customer Support Services 1 . 800 . 462 . 2466 Accutinter 1500 Main components ITEM PART NUMBER DESCRIPTION QUANTITY 1 32790 Keyboard cover 1 2 32789 Keyboard housing 1 3 32880 Nozzle closer assembly (see page 61) 1 4 NSS* Hex nut, M4 5 5 33097 Nozzle block with tubing 1 6 01328 Rubber grommet 2 7 33043 Elevated raceway bracket 1 8 01320 Wire raceway 1 9 01325 Raceway cover 4 10 32776 Panel, canister access 1 11 15134 Pocket pull 1 12 NSS* Phillips head machine screw, M5 As needed *Not sold separately. FM Customer Support Services 1 . 800 . 462 . 2466 58 Accutinter 1500 Canister, Three-quart, 32483 ITEM PART NUMBER DESCRIPTION QUANTITY 1 32483 Canister, three-quart As needed 2 32437 Lid, three-quart canister As needed 3 32499 Cover, pump housing As needed *Not sold separately. 59 Accutinter 1500 FM Customer Support Services 1 . 800 . 462 . 2466 Accutinter 1500 optional accessories ITEM PART NUMBER DESCRIPTION QUANTITY 1 32085 Label printer tray 1 2 32799 Rear mounted computer support bracket 1 3 33045 Front cover storage panel 1 FM Customer Support Services 1 . 800 . 462 . 2466 60 Accutinter 1500 Nozzle block assembly 32880 ITEM PART NUMBER 1 32885 2 F0130080304N 3 DESCRIPTION QUANTITY Bracket, weldment, nozzle closer 1 Standoff, R, 1/2 x 3/16 4 29687 PCB, LED locator board 1 4 29782 Twelve position nozzle block assembly 1 5 NSS* Screw, 8 - 32 x 3/4, PH, PAT 4 6 32882 Bracket, plate, link, arm 1 7 29766 Gasket, seal, PU 1 8 33221 Cup liner 1 *Not sold separately. 61 Accutinter 1500 FM Customer Support Services 1 . 800 . 462 . 2466 Nozzle block assembly 32880, continued ITEM PART NUMBER DESCRIPTION QUANTITY 9 32881 Drip catcher bracket 1 10 32887 Arm link weldment, right 2 11 32886 Arm link weldment, left 2 12 F015306005 Screw, shoulder, 6MM 2 13 F015306010 Screw, shoulder, 6MM 6 14 F015306008 Screw, shoulder, 6MM 2 15 33092 Spring, extension 2 16 33091 Bracket holder magnet 1 17 F0071A005P16 Screw, PHCS, M5 x 16 MM 2 Magnet, ultra thin 1 Rivet, 1/8” diameter, 1/16 - 1/8 2 Riv-nut, 5/32 x 1/8 STL 4 18 29926 19 F003742ASC 20 F003752SS FM Customer Support Services 1 . 800 . 462 . 2466 62 Accutinter 1500 Accutinter 1500 Electronics and power supply ITEM PART NUMBER DESCRIPTION QUANTITY 1 32805 PCB panel assembly 1 2 33299 Power supply assembly 1 3 NSS* Hex nut, M3 x 0.5 KEPS 6 4 81791333RH Receptacle outlet 1 5 NSS* FHCS Screw, M3 x 0.5 x 8 2 6 23444 Power cord (not shown) 1 7 29957 USB cable, 6 feet (not shown) 1 *Not sold separately. 63 Accutinter 1500 FM Customer Support Services 1 . 800 . 462 . 2466 Sample PCB panel Dispenser assembly Assembly 32805 ITEM PART NUMBER DESCRIPTION QUANTITY 1 87141512RH PCB Board, twelve channel 1 2 87129350RH PCB Board, dispense coordinator 1 3 83032797RH 24 Volt DC Relay, OHMS 1 4 30964 Ferrite bead connector, large 1 5 4000101 Cable hold down clamp, medium 7 FM Customer Support Services 1 . 800 . 462 . 2466 64 Accutinter 1500 Sample Power supply Dispenser assembly Assembly 33299 ITEM PART NUMBER DESCRIPTION QUANTITY 1 83812024RH 24 Volt DC Power supply 1 2 81512115RH Circuit breaker rocker switch 1 3 81590125RH Line filter 1 4 87337524RH Transformer 1 5 82118000RH Capacitor 1 6 81102508RH Bridge diode 1 7 82501001RH Resistor 1 65 Accutinter 1500 FM Customer Support Services 1 . 800 . 462 . 2466 Shelf components, 33319, 33321 ITEM PART NUMBER DESCRIPTION QUANTITY 1 33318 Drawer slide mounting bracket 1 2 33319 One-gallon shelf kit 1 3 33321 Quart shelf kit 1 4 32779 Front shelf panel 1 5 32856 Bracket 1 6 F0071A005P16 Screw, PHCS, M5 x 16MM As needed *Not sold separately. FM Customer Support Services 1 . 800 . 462 . 2466 66 Accutinter 1500 Cover, 32807 and Lid stay arm, 27265 ITEM PART NUMBER DESCRIPTION QUANTITY 1 27265 Lid stay arm 1 2 03484 Spacer bracket 1 3 00165 Washer, #10 1 4 NSS* Hex nut, M4, nylock 1 5 32809 Hinge 2 6 32807 Cover, twelve canister 5 *Not sold separately. 67 Accutinter 1500 FM Customer Support Services 1 . 800 . 462 . 2466 Casters, 32857 ITEM PART NUMBER 1 32857 2 1850164 3 F0071A005P16 DESCRIPTION QUANTITY Caster, swivel, 2” diameter 4 Washer, M5, spring 16 Screw, PHCS, M5 x 16 MM As needed *Not sold separately. FM Customer Support Services 1 . 800 . 462 . 2466 68 Accutinter 1500 Accutinter 1500 Maintenance items These items can be used to help keep your Accutinter 1500 clean and operating well. Daily maintenance and cleaning are crucial to your machine’s performance. The main areas that need attention are the nozzles and the nozzle closer. For specific instructions, see the Maintenance, Care, and Use section on pages 45 in this manual and the daily maintenance label on your machine. 70 Accutinter 1500 FM Customer Support Services 1 . 800 . 462 . 2466 Appendix A What’s next? Fluid Management Statement of What’s next? Limited Warranty 7/2007 FLUID MANAGEMENT LIMITED WARRANTY WARRANTY COVERAGE If within two years from the date of shipment any equipment covered by this warranty shall prove to be defective in material or workmanship upon examination by Fluid Management, Inc. (“ SELLER”), SELLER will supply identical or substantially similar replacement equipment or parts, or at SELLERS option will repair or allow credit for such equipment. This warranty does not cover labor costs incurred by PURCHASER for repair of equipment except that the cost of labor authorized by the SELLER shall be included for repairs to the following major components for claims made during the first year following shipment or proven installation date: pumps, motors, speed reducers, power supplies, transformers, and circuit boards, relays, relay panels, and bearings. Labor is not covered for minor items such as fuses, indicator lights, or can adapters. For items not listed SELLER will determine if it is a major or minor component. All labor must be approved in advance by SELLER and performed by Fluid Management employees or Authorized Service Center. OBTAINING WARRANTY SERVICE While your equipment is under warranty, do not attempt on-site repairs or parts replacement without first contacting Fluid Management at 1-800-462-2466. After the warranty expires, on site servicing and parts replacement are available from an authorized service technician from Fluid Management. Contact Fluid Management’s After Sales Support for arrangements. To expedite this process, prior to calling have your model number and serial number available. EXCLUSIONS AND LIMITATIONS Any maintenance, repairs, and replacements attributable to “Abuse” will be billed separately on a time and materials basis, which are not covered under the agreement. “Abuse” includes but is not limited to: physical damage to the equipment, excluding normal wear and tear; an Act of God; colorant in the wrong canister; colorant related issues (beads in colorant, etc.); mis-tints or fills; over-filling of canisters; operator error; lack of daily maintenance and /or abuse. Due to computer technology advancements, Fluid Management cannot offer an extended warranty for computer and/or computer related equipment, such as monitors, printers, or other peripheral equipment. The computer warranty is that of the standard manufacturer’s warranty coverage and not extends above or beyond Fluid Management’s Limited Warranty agreement. PURCHASER MUST NOTIFY SELLER OF A WARRANTY CLAIM WITHIN THIS PERIOD. NO RETURNS ARE AUTHORIZED WITHOUT A COMPLETED AUTHORIZATION FORM AND NUMBER. Any repair or replacement provided hereunder shall be warranted against defects in material or workmanship for the unexpired portion of the limited warranty. This warranty does not cover software, which is covered by a separate warranty. DISCLAIMER THIS WARRANTY SHALL BE APPLICABLE ONLY IF THE EQUIPMENT SHALL BE THE PROPERTY OF THE ORIGINAL PURCHASER OR USER, AND SHALL HAVE BEEN PROPERLY USED, OPERATED AND MAINTAINED IN ACCORDANCE WITH THE MANUAL OR INSTRUCTIONS PROVIDED WITH THE EQUIPMENT AND FOR THE PURPOSE FOR WHICH SOLD. NORMAL WEAR AND TEAR IS NOT COVERED BY THIS WARRANTY. THIS WARRANTY SHALL NOT BE APPLICABLE IF THE EQUIPMENT OR ANY PART THEREOF HAS BEEN REPAIRED OR REPLACED BY THE BUYER WITHOUT THE SELLER’S PRIOR PERMISSION OR HAS BEEN SUBJECTED TO ANY ACCIDENT, CASUALTY, MISAPPLICATION, ALTERATION, ABUSE OR MISUSE. FM Customer Support Services 1 . 800 . 462 . 2466 69 Accutinter 1500 Appendix A Fluid Management Statement of What’s next? Limited Warranty 7/2007 NO OTHER WARRANTY, EITHER EXPRESS OR IMPLIED, INCLUDING A WARRANTY OR MERCHANTABILITY AND FITNESS FOR A PARTICULAR PURPOSE, HAS BEEN OR WILL BE MADE BY OR ON BEHALF OF SELLER OR BY OPERATION OF LAW WITH RESPECT TO THE EQUIPMENT AND ACCESSORIES OR THEIR INSTALLATION, USE, OPERATION, REPLACEMENT, OR REPAIR. SELLER SHALL NOT BE LIABLE BY VIRTUE OF THIS WARRANTY, OR OTHERWISE, FOR ANY INCIDENTAL, SPECIAL OR CONSEQUENTIAL DAMAGES RESULTING FROM THE USE OR OPERATION OF THE EQUIPMENT, WHETHER OR NOT SELLER WAS APPRISED OF THE POSSIBILITY OF SUCH DAMAGES. IRRESPECTIVE OF ANY STATUTE, THE BUYER RECOGNIZES THAT THE EXPRESS WARRANTY SET FORTH ABOVE IS THE EXCLUSIVE REMEDY TO WHICH IT IS ENTITLED AND WAIVES ALL OTHER REMEDIES, STATUTORY OR OTHERWISE. REPAIR OR REPLACEMENT SHALL BE BUYER’S SOLE REMEDY UNDER THIS WARRANTY. 71 Accutinter 1500 FM Customer Support Services 1 . 800 . 462 . 2466