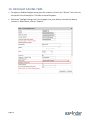
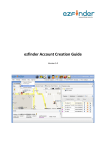
1
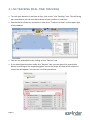
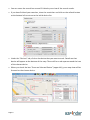
ezFinder User Guide Version 1.01 Copyright © 2011 TraqLogic Technology Inc. All rights reserved. This document contains information and material protected by copyright. No part of this document may be reproduced, copied, photocopied, translated, transmitted, disseminated, converted into an electronic form or converted into a machine-readable form without prior written consent from TraqLogic Technology Inc. The TraqLogic and ezfinder marks, names, images, logos and symbols, as well as their variations, are the exclusive properties of TraqLogic Technology Inc. ALL TRAQLOGIC TECHNOLOGY INC. (“TRAQLOGIC”) PRODUCTS AND SERVICES ARE CONSTANTLY BEING MODIFIED AND IMPROVED. THEREFORE, THIS DOCUMENT MAY NOT BE UP-TO-DATE AT THE TIME YOU READ IT. THIS DOCUMENT IS PROVIDED "AS IS" AND TRAQLOGIC ASSUMES NO RESPONSIBILITY FOR ANY ERRORS, OMISSIONS OR INACCURACIES IN THIS DOCUMENT. TRAQLOGIC RESERVES THE RIGHT TO REVISE OR WITHDRAW THIS DOCUMENT AT ANY TIME WITHOUT PRIOR NOTICE. TRAQLOGIC MAKES NO COMMITMENT TO UPDATE, MODIFIY OR WITHDRAW THIS DOCUMENT IN A TIMELY MANNER OR AT ALL. TRAQLOGIC MAKES NO REPRESENTATIONS, WARRANTIES, CONDITIONS OR COVENANTS, EITHER EXPRESS OR IMPLIED (INCLUDING WITHOUT LIMITATION, ANY EXPRESS OR IMPLIED WARRANTIES OR CONDITIONS OF FITNESS FOR A PARTICULAR PURPOSE, NON-INFRINGEMENT, MERCHANTABILITY, DURABILITY, TITLE OR RELATED TO THE PERFORMANCE OR NON-PERFORMANCE OF ANY SOFTWARE REFERENCED HEREIN OR PERFORMANCE OF ANY SERVICES REFERENCED HEREIN). IN NO EVENT SHALL TRAQLOGIC, ITS DIRECTORS, OFFICERS, EMPLOYEES, SUPPLIERS, LICENSORS AND AFFILIATES BE LIABLE TO YOU FOR ANY DAMAGES OF ANY NATURE WHATSOEVER EVEN IF TRAQLOGIC, ITS DIRECTORS, OFFICERS, EMPLOYEES, SUPPLIERS, LICENSORS OR AFFILIATES HAVE BEEN ADVISED OF THE POSSIBILITY OF SUCH DAMAGES. WITHOUT LIMITING THE GENERALITY OF THE FOREGOING OR OF ANY OTHER EXCLUSION OF LIABILITY THAT MAY BE CONTAINED IN THIS DOCUMENT, IN NO EVENT SHALL TRAQLOGIC, ITS DIRECTORS, OFFICERS, EMPLOYEES, SUPPLIERS, LICENSORS AND AFFILIATES BE LIABLE FOR: (i) ANY DIRECT, ECONOMIC, COMMERCIAL, SPECIAL, CONSEQUENTIAL, INCIDENTAL, PUNITIVE, EXEMPLARY OR INDIRECT DAMAGES; (ii) ANY LOSS OF CLIENTS, LOSS OF GOODWILL, LOSS OF REVENUE OR EARNINGS, LOST DATA, DAMAGES CAUSED BY DELAYS, LOST PROFITS OR A FAILURE TO REALIZE EXPECTED SAVINGS. This document might contain references to third-party sources of information, hardware or software, products or services and/or third-party web sites (collectively the "Third-Party Information"). TRAQLOGIC does not control, and is not responsible for any Third-Party Information, including, without limitation, the content, accuracy, copyright compliance, compatibility, performance, trustworthiness, legality, decency, links or any other aspect of Third-Party Information. The inclusion of Third-Party Information in this document does not imply endorsement by TRAQLOGIC of the Third-Party Information or the third party in any way. Installation and/or use of Third-Party Information with TRAQLOGIC's products or services may require express authorization or licenses in order to avoid infringement of the rights of others. Any dealings with Third-Party Information, including, without limitation, compliance with applicable licenses, terms and conditions, are solely between you and the third party. You are solely responsible for determining whether third-party authorizations or licenses are required and are solely responsible for acquiring any such authorizations or licenses relating to Third-Party Information. Any Third-Party Information that is provided with TRAQLOGIC's products and/or services is provided "as is". TRAQLOGIC makes no representation, warranty or guarantee whatsoever in relation to the Third-Party Information and TRAQLOGIC assumes no liability whatsoever in relation to the Third-Party Information even if TRAQLOGIC has been advised of the possibility of such damages or can anticipate such damages. Page 2 INDEX 1. LOGIN WEB SERVICE 4 2. LIVE TRACKING (REAL-TIME TRACKING) 5 3. HISTORY 9 4.SEND COMMAND TO TRACKER BY GPRS 4-1. COMMAND LIST 11 13 5. GEOFENCES 13 6. ALERT SETTINGS (PREMIUM SERVICE ONLY) 14 7. ALERTS (PREMIUM SERVICE ONLY) 16 8. LANDMARKS 17 9. REPORTS (PREMIUM SERVICE ONLY) 18 10. DISTANCE TRAVELED 20 10-1. DISTANCE TRAVELED - VEHICLE TRACKERS (AVL) 20 10-2. DISTANCE TRAVELED – ASSET / PERSONAL TRACKERS 20 11. DEVICES TO VIEW 22 12. LOCATE NEAREST 25 13. LANGUAGES & MAPS 26 14. DAYLIGHT SAVING TIME 27 15. DEFINITIONS 28 16. LEGEND 28 Page 3 1. LOGIN WEB SERVICE Page 4 2. LIVE TRACKING (REAL-TIME TRACKING) • To track your devices in real time or live, click on the “Live Tracking” icon. This will bring up a map where you can see the locations of your trackers in real time. • Choose the list of devices you want to view from “Trackers to View” on the upper right of the window. • You can see a detailed list by clicking on the “Devices” tab. • If you have several devices under the “Devices” tab, you can search for a particular device by clicking on the magnifying glass icon on the lower left side of the section. A search bar will appear. You can use it to find your device. Page 5 • You can move the search bar around if it blocks your view of the search results. • If you have finished your searches, close the search bar and click on the refresh button at the bottom left to return to the initial device list. • Under the “Devices” tab, click on the device that you want to track. Details on that device will appear at the bottom of the map. There will be a red square around the icon of the chosen device. • When you check the box “Focus on Selected Device” (upper left), your map view will be focused on the chosen device. Page 6 • By default, the positions of trackers will be automatically updated every 60 seconds. To change the default setting, go the “Automatically Update Positions” field and choose the desired time interval for updates. You can also stop the updates by selecting “OFF”. • You can also click on the “Update Position Now” button to update the position immediately, regardless of the automatic update interval. • Check the “Show Non-Fixed Positions” box to view the positions that were not fixed. • Fixed positions (i.e. positions that were calculated based on data from at least 3 satellites) are shown by default. • When it is time for your device to report its position to the server, but it is unable to obtain data from at least 3 satellites, it may send the last available fixed position instead. This position is referred to as a “non-fixed position”. • To show non-fixed positions on the map, simply check the box called “Show Non-Fixed Positions”. Cell-ID positions, represented by cell tower icons, will also be shown if your device is Cell-ID enabled. • Uncheck the “Show” box if you do not want the tracker to appear on the map. • Click on the “Track” button of a device to open a separate window that is focused on tracking that device. Page 7 You can also view the Geofences and Landmarks that you have created in the account by clicking on the corresponding tabs. Page 8 3. HISTORY • To view the route history of your device, click on the “History” icon. • Then Click on the “Route / History” button of the device you wish to view. • The “Tracking History” window will open up. By default, the last fixed positions of your device (for a time period of 1 hour) will be shown. • Note: If you wish to view more route history for your device, you can consider subscribing your device to the Premium service. • You can search for other routes by date and time. • To replay the route traveled, simply click on the play button next to “Replay History”. You can choose the speed of the replay and make it loop by checking the Loop” box. Page 9 • To obtain details on a particular tracking point, simply click on the corresponding line under the “Tracking Data” section (lower right side of the window). Detailed information will appear beneath the map under the “Detail” section. • That particular point will be represented by a green (fixed position) or red (non-fixed position) on the map. The arrow inside the icon represents the direction of the device at that time. • Click on the “Address” button to display the street address. • To view non-fixed positions, check the “Show Non-Fixed Positions” box. Non-fixed positions are represented by red icons on the map. • If your tracker is Cell ID enabled, non-fixed positions (positions determined by cell towers instead of GPS) will be represented by cell tower icons. • If applicable to your tracker: [M = Main Battery] [3 = Input 3] Input 1] Page 10 [Green = ON] [Grey = OFF] [2 = Input 2] [1 = 4. SEND COMMAND TO TRACKER BY GPRS 4.1 How to change report interval Click on “Trackers” from the top dock menu Click on “Configuration” icon of the tracker you want to edit Click on “Report mode” selection list to select your report mode and then click on “Send” and “Confirm”. Note: If your SMS credits are all used up, the system will send the command by GPRS. The command is only sent when your tracker reports back to our server. Therefore, it could take a while depending on how frequent your tracker reports back to our server. 4.2 To send a command to you tracker • To send a command to you tracker, click on the “Live Tracking” icon. Page 11 • Under the Devices tab, click on the “Commands” icon for the device you want to configure. The “Send Commands” window below will appear. • The “Send Commands” window will list the commands (both default & customized, if any) available for your tracker model. • If the option is available to you, you may select the type of command (SMS or GPRS) you want to send in the “Type” field. • Then click on the name of the command to be send. Click on “Send”, then on “Confirm” to finalize the process. • For GPRS, the server first needs to know the IP address of the device. Therefore, the command will be sent the next time your tracker reports its position (and IP address) to the server. No confirmation will be issued. • For SMS, the command is sent immediately. Page 12 5. GEOFENCES • A “Geofence” is a “virtual fence” set by the user. When your device enters or leaves the Geofence, you will receive an alert. • To create, edit or delete a Geofence, click on the “Geofences” icon. • This will open the “Geofences” window. The existing Geofences will be listed. • To create a new Geofence, click on “Add”. • The “Add” window will appear. Follow the instructions indicated therein to create your Geofence. • You can select the shape of your Geofence from the “Type” field (polygon or circle). Page 13 • IMPORTANT: Before you can receive alerts whenever your device enters/exits a Geofence, you must first assign that Geofence to an alert and to selected devices. See the “Alerts Settings” section for more details. • To edit a Geofence, click on the pencil icon. • To delete a Geofence, first check the box next to its Geofence ID, then click on “Delete”. 6. ALERT SETTINGS (PREMIUM SERVICE ONLY) • ezFinder allows you to set various types of alerts depending on the model of your tracker. To create, edit, delete or assign an alert, click on the “Manage” tab and then go to “Alerts”. • This will open the “Alert Settings” window. In this window, you can create, edit or delete existing alerts. You can also assign an alert to specific devices. • To create a new alert, click “Add New Alert”. • For Geofence alerts, remember to select the “Geofence ID” to indicate which geofence is to be activated by this alert. Page 14 • Complete the fields and make the desired selections when applicable. • Indicate your email address to receive an alert by email. If you want to enter more than one email address, separate the email addresses using a semicolon (;) or a coma (,). Do not add any space between the email address and the semicolon/coma. Maximum: 5 email addresses. • If the SMS alert option is available to you, enter the number of the phone that should receive the SMS alert. Make sure that the phone is able to receive SMS. You must enter the phone number with the country code and area code. Maximum: 1 phone number. • The text of the message can be modified, but you must NOT modify the words containing the “$” sign. Please also note that if your message is too long, your phone may not be able to receive the SMS message or may only receive it partially. • Click on “Save changes” when done. Page 15 • edit an alert setting, click on the pencil icon. • To delete an alert, first check the box next to the Alert’s name, then click on “Delete”. • To assign an alert to specific devices, click on the tracker icon. Assigning an alert to a device means applying that alert to the device. For example, when you create a Geofence alert, you must also indicate (or “assign”) which device this alert will apply to, i.e. which devices will trigger the alert when they enter or exit the Geofence. 7. ALERTS (PREMIUM SERVICE ONLY) • The Alert icon allows you to view which alerts have been activated or received. • When you click on it, the Alerts window will appear. • The exclamation point ( ) means that the tab contains alert items. • Click on the tab of an alert type to view the alerts that were activated. For each device, only the latest alert is shown. • You can clear the contents of the tab by clicking on the “Clear” button. Page 16 8. LANDMARKS • Landmarks feature is used to place a landmark on the map for reference purposes. • Click on the “Landmarks” icon. This will open the Landmarks window where you can create, edit or delete landmarks. • To edit an existing landmark, click on the pencil icon. • To delete an existing landmark, check the box next to the Landmark ID, then click on “Delete”. • To create a new landmark, click on “Add”. A new window will appear. Follow the instructions therein to create your landmark. Page 17 9. REPORTS (PREMIUM SERVICE ONLY) • To view a report of a device’s activities, click on the “Reports” icon. The Reports window will appear. • Select the model, type of report, the time frame and the particular device (you can choose more than one) you want to view. • You can also include non-fixed positions by checking the relevant box. • Click on “Get Report” when selections are made. • If relevant data is available, they data will appear. • The report function can also be used to verify whether or not a device is reporting back to the server. Page 18 • Click on one of the “Export to…” buttons to generate a report in the corresponding file format. IMPORTANT: For Personal trackers or Asset trackers, if you would like to generate trip, daily, weekly and monthly summaries, you must enter a value in the field “End trip after idle time of (min)” of the Add / Edit Device window. By entering the idle time duration, you are defining when a trip starts and when it ends. This will allow EzFinder to calculate and compile the distance of the trips for the reports. For this feature to work, your device must set to motion mode. The idle time duration must be greater than the motion report interval (i.e. the report interval when the device is moving). Otherwise, your report may show more trips than there really were. We suggest that the idle time duration be at least double the motion report interval. In this context, “idle time” means the time when the tracker is not moving. IMPORTANT: If you do not activate this feature, you will not have any trip, daily, weekly or monthly summary reports for your personal/asset tracker. Page 19 10. DISTANCE TRAVELED DISTANCE TRAVELED Estimations of the distance traveled may be available for certain vehicle tracker models (AVL). • Estimations of the distance traveled are available in the reports (click the “Reports” icon). See Trip / Daily / Weekly / Monthly summaries. • Estimation of the accumulated mileage is shown in “Mileage (Km)” field of the device “Edit” window (click on “Device” icon, then on the pencil icon of a tracker for that window to appear). Remember to first enter the vehicle’s existing mileage (in Km) into the “Mileage (km)” field so that future mileage estimations can be added unto it. 10-2. DISTANCE TRAVELED – ASSET / PERSONAL TRACKERS Estimations of the distance traveled may be available for some asset / personal tracker models. • Your tracker must first be set under the Motion Mode for this distance estimation feature to work; it will not work if your tracker is set under any other mode. So please remember to change the reporting mode of your tracker if need be. • To activate the distance estimation feature, click on the “Device” icon and then on the pencil icon of the tracker. The “Edit” window will appear. • In the “End trip after idle time of (min)”, enter the idle time duration for EzFinder to deemed the trip has ended. • IMPORTANT: The idle time duration must be greater than the motion report interval (i.e. the report interval when the device is moving). Otherwise, your report may show more trips than there really were. We suggest that the idle time duration be at least double the motion report interval. • For personal trackers, “Idle time” means the time when the tracker is not moving. By entering the idle time duration, you are defining when a trip starts and when it ends. This will allow EzFinder to calculate and compile the distance of the trips for the reports. Page 20 • Once all of the above is done, the distance estimation feature will be activated. Since this feature is not retroactive, data of distance traveled prior to the activation will not be available. • Estimations of the distance traveled are available in the reports (click the “Reports” icon). See Trip / Daily / Weekly / Monthly summaries. Page 21 11. TRACKERS TO VIEW • You can gather up the devices that you want to view as a group. • Click on the “Manage” tab, then click on “Trackers to view”. • The “devices to view” window will appear. Click on “Add”. • The “Add” window will appear. Complete the fields and click on “Submit” when done. The “Add” window will close and you will return to the previous window. Page 22 • Click on the device icon for that new list you just created. The “Assign Devices” window will appear. • You must now assign devices to that list so that you may view these devices as a group on the same map. • Check the box of the devices that you want to assign to this list. Then click on the corresponding green arrow (or you may click on the “Assign Devices” button) to transfer them into the side of Assigned Devices. Page 23 • You can now return to the Live Tracking page and you will see your new list under “Trackers to view” (if you don’t, close the Live Tracking window and re-open again). • Click on that list and you will only see the assigned devices on the map and under the Trackers tab. Page 24 12. LOCATE NEAREST • To locate the nearest devices or landmarks to a particular device, landmark or address, click on the “Live Tracking” icon. • Then click on the magnifying glass icon. • The “Locate” window will appear. Use the drop down menus from this window to find the desired distances. • To locate the nearest device/landmark to a particular device/landmark, remember to select the name of the particular device/landmark using the drop down list next to the “Search” button. • To locate the nearest device/landmark to an address, remember to type in the address in the box that will appear next to the “Search” button. • Please note the “Page” button at the bottom of the “Locate” window that you can use to display the additional results of your search. Page 25 13. LANGUAGES & MAPS • You can change the language of the interface using the “Preferred Language” drop down list near the upper right of the screen. You can also change the default language of your account through the “Edit” window of the “Users” page. See the “EDIT USER PROFILE / CHANGE PASSWORD” section above. • If this option is available to you, you can change the map used for tracking with the “Map” drop down list near the upper right of the screen. Whenever you change maps, please close and re-open your window for the change to take effect. Page 26 14. DAYLIGHT SAVING TIME • To apply or disable Daylight saving time for a device, click on the “Device” icon, then on the pencil icon of the device. The Edit screen will appear. • Check the “Daylight saving time” box to apply it to your device; uncheck the box to remove it. When done, click on “Submit”. Page 27 15. DEFINITIONS • “Cell-ID Position”: Cell-ID position is a position that was calculated based on data received from nearby cell towers. Cell-ID positioning will only be shown for devices for which this function has been enabled. Cell-ID positions are usually less accurate than GPS positions. To view Cell-ID positions, check the “Show Non-Fixed Positions” box. • “Fixed Position”: A fixed position is a position that was calculated based on data from at least 3 GPS satellites. • “Geofence”: It is a “virtual fence” set by the user. When your device enters or leaves the geofence, you will receive an alert. • “Idle”: For AVL, this means that the ignition of the vehicle is ON, but the vehicle is not moving. • “Non-Fixed Position”: When it is time for your device to report its position to the server, but it is unable to obtain data from at least 3 GPS satellites, it may send the last available fixed position instead. This position is referred to as a “non-fixed position”. “Non-fixed position” can also be used to refer to a position that was determined by means other than GPS, for example, a position determined by Cell ID. Non-fixed positions are not as reliable as fixed positions. 16. LEGEND • The blue circle means that the last time the device reported its last position was less than 1 hour ago. • The yellow circle means that the last time the device reported its position was less than 1 day ago. • The pink circle means that the last time the device reported its position was less than 1 week ago. • The brown circle means that the last time the device reported its position was over 1 week ago. • • This icon means that the alert button of the device has been activated. • Page 28 This icon means that the device’s battery is low (less than 30%). • “m” means that the device is moving. As an additional feature, this icon also moves from side to side. • “I” means that the vehicle is idle (ignition ON, but vehicle not moving). For AVL only. • “P” means that the ignition of the vehicle is OFF. For AVL only. • This icon is used to represent fixed positions of personal trackers on the Live Tracking map. • This icon is used to represent non-fixed positions of personal trackers on the Live Tracking map. • This is the default icon for vehicle trackers. Unlike personal tracker icons, the colors of vehicle tracker icons do not have a particular meaning. When the vehicle’s ignition is ON, this vehicle icon will vibrate (if the ignition input is connected). When the vehicle’s ignition is OFF or if the input is not connected, this icon will not vibrate. • This icon is used to represent Cell-ID positions located using 4 ~ 5 cell towers. • This icon is used to represent Cell-ID positions located using 3 cell towers. • This icon is used to represent Cell-ID positions located using 1 ~ 2 cell towers. • This icon represents a fixed position and shows the direction of the tracker. This icon is used when viewing/replaying routes. • This icon represents a non-fixed position and shows the direction of the tracker. This icon is used when viewing/replaying routes. Page 29 • [M = Main Battery] = ON] [Grey = OFF] Page 30 [3 = Input 3] -- VEHICLE TRACKERS (AVL) [2 = Input 2] [1 = Input 1] [Green