1
DocuScan C4250/C3200 A
User Guide
Preface
Thank you for choosing the DocuScan C4250/C3200 A. This manual provides complete
information about the scanner, such as how to get ready to scan, operating instructions, and
usage restrictions and requirements. To get the most out of this product, read this manual
thoroughly before use.
After reading this manual, keep it handy for future reference.
This manual assumes that you are familiar with personal computers and network
environments.
Fuji Xerox Printing Systems Co., Ltd.
Adobe and Reader are registered trademarks or trademarks of Adobe Systems
Incorporated.
Microsoft, Windows, and Windows NT are registered trademarks or trademarks of Microsoft
Corporation in the US and other countries.
Permission have been obtained from Microsoft Corporation for use of software screen
shots.
All products/brand names are registered trademarks or trademarks of the respective
holders.
In this manual, safety instructions are preceded by the symbol
before performing the required procedures.
. Always read and follow the instructions
As the scanner contains a feature designed to prevent forging of certain documents, there may be a rare
instances where copies do not achieve the desired results.
This product is certified by the following Agency using the Safety standards listed.
Agency
Standard
NEMKO
IEC60950-1 Edition 1 (2001)
This product was manufactured under a registered ISO9001 system.
Important
1. This manual is copyrighted with all rights reserved. Under the copyright laws, this manual may not be copied
or modified in whole or part, without the written consent of the publisher.
2. Parts of this manual are subject to change without prior notice.
3. We welcome any comments on ambiguities, errors, omissions, or missing pages.
4. Never attempt any procedure on the machine that is not specifically described in this manual. Unauthorized
operation can cause faults or accidents. Fuji Xerox is not liable for any problems resulting from unauthorized
operation of the equipment.
XEROX, The Document Company, the digital X, Ethernet, and CentreWare are registered trademarks of
Xerox Corporation or Fuji Xerox Co., Ltd.
DocuWorks is a trademark.
2
Preface
Related Information Sources
Manuals Included with the Scanner
Want to install the
scanner.
Setup and Quick
Reference Guide
(hard cover/
PDF)
Provides the scanner installation instructions,
document loading instructions, basic scanning/
copying procedures, and problem solving
information.
Refer to“Contents of Setup and Quick Reference
Guide (Reference)” (P. 10).
> This manual is included in the "Software Pack"
CD-ROM.
Software Operation Guide
("DocuWorks SelfExtracting Documents"
format file)
Contains information about the "Software Pack"
CD-ROM and instructions on installing
DocuScan Manager.
> This manual is included in the "Software Pack"
CD-ROM.
User Guide (PDF)
(This manual)
Provides the scanning/copying procedures,
maintenance information, problem solving
information, and notes/restrictions on use.
This manual contains all of the information
included in the "Setup and Quick Reference
Guide" except for the scanner installation
instructions.
> This manual is included in the "Software Pack"
CD-ROM.
DocuScan Manager
Online Help
Contains information about features and
operating procedures of DocuScan Manager.
> This manual can be viewed by selecting the
[Help] menu on DocuScan Manager.
CentreWare Internet
Services Online Help
Contains information about the features and
operating procedures of CentreWare Internet
Services.
> This manual can be viewed by selecting the
[Help] button on CentreWare Internet
Services.
Want to use the
scanner.
Manuals
you should
read before
using the
scanner
Want to know about
the included CDROM.
Want to install
DocuScan Manager.
Want to know all about
the scanner's
features.
Want to know how to
troubleshoot error
messages.
Manuals
you should
read when
using the
scanner
Want to know how to
clean the scanner.
Want to register
addresses in Address
Book.
Want to edit scanned
images.
Want to monitor the
scanner on a Web
browser.
Manual Included with the Optional Accessory
Scanner Stand Installation Guide
Provides the scanner stand installation
instructions.
Note
• To view PDF files, you must have Adobe® Reader® installed in your computer. If not installed, install it
from the "Software Pack" CD-ROM.
Related Information Sources
3
Using This Manual
Organization
This manual is organized by the following chapters. The summary of each chapter is as
follows:
1 Basic Operation
Provides the names and functions of the scanner components and
the control panel buttons, as well as basic operating procedures
such as loading documents.
2 Scan
Contains information about basic scanning procedure and how to
configure each scan feature.
3 Copy
Contains information about basic copying procedure and how to
configure each copy feature.
4 Address Book and Subject/
Comment List
Describes how to use Address Book and Subject/Comment List.
5 Job Status
Describes how to check the status of scan/copy jobs.
6 System Settings
Provides descriptions for customizing various defaults.
7 DocuScan Manager
Describes basic operating procedure of DocuScan Manager.
8 Problem Solving
Contains problem solving procedures to help quickly resolve
problems.
9 Maintenance
Provides maintenance information such as cleaning and relocating
the scanner.
A Appendix
Contains information about the scanner specifications, optional
accessory, product information, and notes/restrictions on use.
Conventions
1.
The illustrations and scanner interface screens are based on a DocuScan C4250
connected with a color printer. The procedural steps and computer screen shots are
based on Microsoft Windows XP.
2.
This manual uses the following conventions:
3.
4
[
]
: Items that appear on your computer screen or the touch panel display
on the scanner's control panel.
<
>
: The names of keys that appear on your computer keyboard or
hardware buttons and lamps on the scanner.
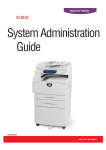
In this manual, paper feed orientations are referred to as follows:
,
Long Edge Feed (LEF) :Paper is fed into the scanner long-edge first.
,
Short Edge Feed (SEF) :Paper is fed into the scanner short-edge first.
Using This Manual
LEF Orientation
SEF Orientation
Paper feed direction
Paper feed direction
Contents
Preface.............................................................................................................. 2
Related Information Sources ............................................................................ 3
Manuals Included with the Scanner .........................................................................3
Manual Included with the Optional Accessory .........................................................3
Using This Manual ............................................................................................ 4
Contents............................................................................................................ 5
Contents of Setup and Quick Reference Guide
(Reference) ................................................................................................. 10
Illegal Copies and Printouts ............................................................................ 12
1
Basic Operation........................................................................................ 13
1.1
1.2
1.3
1.4
1.5
2
Main Components ................................................................................................. 13
Front View .............................................................................................................13
Right/Rear View .....................................................................................................14
Duplex Automatic Document Feeder .....................................................................15
Control Panel .........................................................................................................16
Entering Characters............................................................................................... 18
Using the Numeric Keypad ....................................................................................18
Confirming an Entry ...............................................................................................19
Moving the Cursor .................................................................................................19
Deleting a Character ..............................................................................................19
Modifying a Character ...........................................................................................19
Character Entry Procedure ....................................................................................19
Switching On/Off the Power .................................................................................. 21
Switching On the Power ........................................................................................21
Switching Off the Power ........................................................................................21
Setting/Exiting the Power Saver Mode .................................................................. 22
Loading Documents............................................................................................... 23
Supported Documents ...........................................................................................23
Detectable Document Sizes ..................................................................................23
Document Loading Precautions ............................................................................24
Tips on Loading Documents ..................................................................................25
Loading Documents ...............................................................................................27
Scan ......................................................................................................... 30
2.1
2.2
2.3
2.4
2.5
Scanning Procedure .............................................................................................. 30
Step 1 Get ready to scan ......................................................................................30
Step 2 Load a document and insert media ...........................................................30
Step 3 Select the scan type ..................................................................................31
Step 4 Set the scan features ................................................................................32
Step 5 Start the scan job ......................................................................................33
Step 6 Check the job status ..................................................................................35
Step 7 Use the scanned data ...............................................................................36
Stopping a Scan Job ............................................................................................. 37
Scan Feature Setting Items ................................................................................... 38
Using Scan to E-mail ............................................................................................. 40
Operating Tips .......................................................................................................40
Configuring Settings for Scan to E-mail .................................................................41
Using Scan to PC .................................................................................................. 49
Operating Tips .......................................................................................................50
Contents
5
2.6
2.7
2.8
3
Copy ......................................................................................................... 79
3.1
3.2
3.3
3.4
3.5
3.6
6
Contents
Configuring Settings for Scan to PC ......................................................................51
Using Scan to Media ............................................................................................. 58
Configuring Settings for Scan to Media .................................................................58
Setting the Basic Scan Features ........................................................................... 61
Output Color (Selecting the Output Color) .............................................................62
File Format (Selecting the File Format of the Scanned Data) ...............................63
2 Sided Originals (Scanning a 2-Sided Original) ...................................................64
Original Type (Selecting the Original Type) ...........................................................66
Lighten/Darken (Adjusting the Scan Density) ........................................................68
Setting Other Scan Features ................................................................................. 69
Scan Size (Specifying the Scan Size) ...................................................................70
Reduce/Enlarge (Specifying the Scan Ratio) ........................................................71
Scan Resolution (Specifying the Scan Resolution) ...............................................73
Image Compression (Specifying the Compression Rate of the Output) ................73
Mixed Sized Originals (Scanning Mixed-size Originals Simultaneously)
(DocuScan C4250 Only) .......................................................................................74
Original Orientation (Specifying the Orientation of the Original) ............................75
Sharpness (Adjusting the Sharpness of the Output) .............................................76
Auto Exposure (Removing the Background of the Original) ..................................77
Contrast (Adjusting the Contrast of the Output) ....................................................78
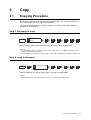
Copying Procedure................................................................................................ 79
Step 1 Get ready to copy ......................................................................................79
Step 2 Load a document ......................................................................................79
Step 3 Select [Copy] .............................................................................................80
Step 4 Set the copy features ................................................................................80
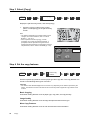
Step 5 Enter the quantity ......................................................................................81
Step 6 Start the copy job ......................................................................................81
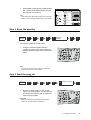
Step 7 Check the job status ..................................................................................83
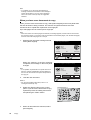
Stopping a Copy Job ............................................................................................. 83
Copy Feature Setting Items................................................................................... 84
Setting the Basic Copy Features ........................................................................... 85
Paper Supply (Selecting a Paper Tray) .................................................................86
Reduce/Enlarge (Making a Reduced/Enlarged Copy) ...........................................89
Output Color (Selecting the Output Color) .............................................................91
2 Sided Copying (Making a 1-Sided/2-Sided Copy) ..............................................92
Lighten/Darken (Adjusting the Copy Density) ........................................................95
Setting the Image Quality Features ....................................................................... 96
Image Quality Presets (Specifying the Image Quality) ..........................................96
Original Type (Selecting the Original Type) ...........................................................98
Auto Exposure (Removing the Background of the Original) ..................................99
Color Balance (Adjusting the Color Balance of the Output) ................................100
Sharpness (Adjusting the Sharpness of the Output) ...........................................102
Color Saturation (Adjusting the Color Saturation of the Output) ..........................103
Settings Other Copy Features ............................................................................. 104
Copy Output (Collating or Uncollating the Output) ..............................................105
2 Up (Copying Two Originals on One Page) .......................................................106
Original Orientation (Specifying the Orientation of the Original) ..........................107
Mixed Sized Originals (Scanning Mixed-size Originals Simultaneously)
(DocuScan C4250 Only) ......................................................................................109
Edge Erase (Erasing Unwanted Marks from the Center/Edges of the Original) ..110
Original Size (Specifying the Scan Size) .............................................................111
4
Address Book and Subject/Comment List.............................................. 113
4.1
4.2
5
Job Status .............................................................................................. 127
5.1
5.2
6
Using the Control Panel....................................................................................... 127
Using CentreWare Internet Services ................................................................... 128
System Settings ..................................................................................... 129
6.1
6.2
6.3
6.4
6.5
6.6
6.7
6.8
7
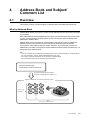
Overview.............................................................................................................. 113
What is Address Book ......................................................................................... 113
What is Subject/Comment List ............................................................................ 114
Registering Addresses/Subjects/Comments .......................................................114
Using Address Book and Subject/Comment List .................................................120
Using Address Book on the Scanner................................................................... 121
Displaying Address Book .....................................................................................121
Selecting an Address ...........................................................................................124
Searching for an Address ....................................................................................125
Viewing the Details of an Address .......................................................................126
System Setting Procedure................................................................................... 129
Step 1 Display the [System Settings] screen ......................................................129
Step 2 Enter the system administrator password ...............................................129
Step 3 Select a setting item ................................................................................130
Step 4 Exit the [System Settings] screen ...........................................................130
System Settings Setting Items............................................................................. 131
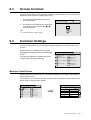
Screen Contrast................................................................................................... 133
Common Settings ................................................................................................ 133
Machine Clock/Timers ......................................................................................... 133
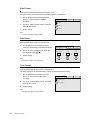
Audio Tones ........................................................................................................137
Screen Defaults ...................................................................................................140
Original Size Button .............................................................................................141
Service Availability ...............................................................................................143
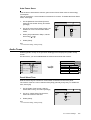
Service Login .......................................................................................................145
Other Settings ...................................................................................................... 147
Maintenance/Diagnostics ....................................................................................149
Network Settings ................................................................................................. 154
Port Settings ........................................................................................................154
Protocol Settings .................................................................................................155
Copy Settings ...................................................................................................... 158
Basic Copying ...................................................................................................... 158
Copy Defaults ...................................................................................................... 160
Auto Exposure Level ...........................................................................................166
Print Auditron Settings ......................................................................................... 169
Scan Settings ...................................................................................................... 170
Scan Defaults ...................................................................................................... 170
File Name Conflict ...............................................................................................176
Scan to PC Protocol ............................................................................................176
System Administrator Settings ............................................................................ 177
Setup Password ..................................................................................................177
DocuScan Manager................................................................................ 178
7.1
7.2
What is DocuScan Manager................................................................................ 178
What You Can Do ................................................................................................ 178
Image Editing Procedure .....................................................................................179
Registering an Address ....................................................................................... 180
Selecting a Scanner ............................................................................................180
Contents
7
7.3
7.4
7.5
7.6
7.7
8
Problem Solving ..................................................................................... 194
8.1
8.2
8.3
8.4
8.5
8.6
8.7
9
9.2
9.3
A.2
A.3
A.4
A.5
Contents
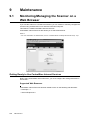
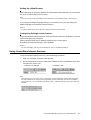
Monitoring/Managing the Scanner on a Web Browser ........................................ 216
Getting Ready to Use CentreWare Internet Services ..........................................216
Using CentreWare Internet Services ...................................................................217
CentreWare Internet Services Setting Items .......................................................219
Using the Online Help ..........................................................................................220
Cleaning the Scanner .......................................................................................... 220
Cleaning the Exterior ...........................................................................................220
Cleaning the Interior ............................................................................................220
Moving the Scanner............................................................................................. 226
Appendix ................................................................................................ 229
A.1
8
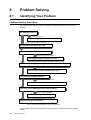
Identifying Your Problem ..................................................................................... 194
Problem Solving Procedure .................................................................................194
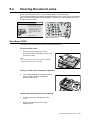
Clearing Document Jams .................................................................................... 195
DocuScan C4250 ................................................................................................ 195
DocuScan C3200 A .............................................................................................197
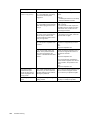
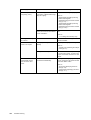
Hardware Problems............................................................................................. 199
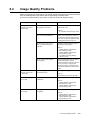
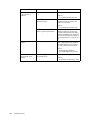
Image Quality Problems ...................................................................................... 203
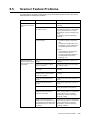
Scanner Feature Problems.................................................................................. 205
Network-related Problems ................................................................................... 206
CentreWare Internet Services Problems .............................................................206
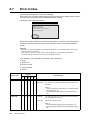
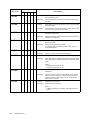
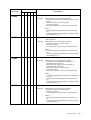
Error Codes ......................................................................................................... 208
Other Errors .........................................................................................................215
Maintenance........................................................................................... 216
9.1
A
Registering an Address Folder ............................................................................ 181
Registering an Address for Scan to PC ............................................................... 182
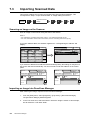
Importing Scanned Data...................................................................................... 186
Scanning an Image on the Scanner ....................................................................186
Importing an Image into DocuScan Manager ......................................................186
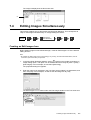
Editing Images Simultaneously ........................................................................... 187
Creating an Edit Images Icon ..............................................................................187
Executing an Editing Operation ...........................................................................188
Editing Images One by One ................................................................................ 190
Displaying an Image ............................................................................................190
Editing an Image ..................................................................................................191
Printing an Image ................................................................................................ 193
Saving an Image.................................................................................................. 193
Main Specifications.............................................................................................. 229
Scanner Specifications ........................................................................................229
Document Feeder Specifications .........................................................................230
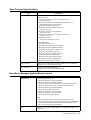
Scan Feature Specifications ................................................................................231
DocuScan Manager System Requirements ........................................................231
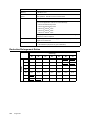
Reduction/Enlargement Ratios ............................................................................ 232
Optional Accessory.............................................................................................. 233
Optional Accessory ..............................................................................................233
About Repair Performance Parts......................................................................... 233
Obtaining the Product Information....................................................................... 233
Updating the Scanner's Firmware .......................................................................233
Notes and Restrictions ........................................................................................ 234
Scan Features .....................................................................................................234
Copy Features .....................................................................................................234
A.6
Glossary .............................................................................................................. 236
Index ............................................................................................................. 240
Contents
9
Contents of Setup and Quick Reference Guide
(Reference)
Preface
Using This Manual
Contents
What You Can Do
Related Information Sources
Contents of the User Guide (Reference)
Safety Notes
1 Installing the Scanner............................................................................................ 14
2
Checking the Package Contents and Unpacking the Scanner
Main Components
Unlocking the Carriage Lock
Connecting and Switching On the Scanner
Changing the Display Language
Setting the Time Zone
Connecting the Scanner to a Network
Connecting the Scanner to a Printer
Network Settings .................................................................................................... 22
Network Setting Procedure
Setting an IP Address
Starting CentreWare Internet Services
Configuring the Settings for Scan to E-mail
Configuring the Settings for Scan to PC
Registering an Address in Address Book
Basic Operation ...................................................................................................... 31
Switching On/Off the Power
Setting/Exiting the Power Saver Mode
Loading Documents
Control Panel
Using the Screens
4 Scan ........................................................................................................................... 42
Using Scan to E-mail
Using Scan to PC
Using Scan to Media
Displaying a Preview
Stopping a Scan Job
3
5
Copy ........................................................................................................................... 56
Copy
Stopping a Copy Job
6
Problem Solving ...................................................................................................... 60
Identifying Your Problem
Clearing Document Jams
Hardware Problem
Image Quality Problems
Scanner Feature Problems
Network-related Problems
Error Codes
A Appendix ................................................................................................................... 79
Screen Functions and Character Entry Limits
Entering Characters
Optional Accessory
About Repair Performance Parts
Obtaining the Product Information
Main Specifications
Notes and Restrictions
10
Contents of Setup and Quick Reference Guide (Reference)
Index
Trademark
: Information included only in the Setup and Quick Reference Guide.
Contents of Setup and Quick Reference Guide (Reference)
11
Illegal Copies and Printouts
Copying or printing certain documents may be illegal in your country. Penalties of fines or
imprisonment may be imposed on those found guilty. The following are examples of items
that may be illegal to copy or print in your country.
• Currency
• Banknotes and checks
• Bank and government bonds and securities
• Passports and identification cards
• Copyright material or trademarks without the consent of the owner
• Postage stamps and other negotiable instruments
This list is not inclusive and no liability is assumed for either its completeness or accuracy.
In case of doubt, contact your legal counsel.
12
Illegal Copies and Printouts
1
Basic Operation
1.1
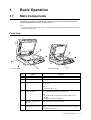
Main Components
The following provides a brief description of the components of the DocuScan C4250/
C3200 A (hereinafter referred to as "the scanner").
Note
• The components that are specific to only one of the models (DocuScan C4250/DocuScan C3200 A) are
noted with a model name.
Front View
DocuScan C4250
DocuScan C3200 A
No.
Name
Function
1
Document feeder cover
Holds documents in place.
2
Document glass
Place documents here.
3
Control panel
The feature buttons, indicator lamps, and touch panel display are
placed here.
Refer to
• "Control Panel (P. 16)"
4
USB Connector
Connects a USB flash memory to the scanner.
Note
• The USB interface of the scanner supports USB 2.0 (HiSpeed).
• USB hubs cannot be connected.
5
Document feeder cover
sensor
Detects the size of documents loaded.
6
Carriage lock
(DocuScan C4250 only)
Locks or unlocks the carriage (read head). When in a locked
position, it locks the carriage in place to prevent it from shaking
when moving the scanner.
1.1 Main Components
13
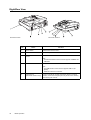
Right/Rear View
DocuScan C4250
DocuScan C3200 A
No.
Name
Function
1
Power switch
Switches the scanner on/off.
2
Power cord connector
Connects a power cord to the scanner.
3
Ethernet interface connector
Connects a network cable to the scanner.
Note
• The Ethernet interface of the scanner supports 100BASE-TX/
10BASE-T.
4, 5
USB connector
Connects a USB cable to the scanner.
Note
• The USB interface of the scanner supports USB 2.0 (HiSpeed).
• USB hubs cannot be connected.
6
14
1 Basic Operation
Carriage lock
(DocuScan C3200 A only)
Locks or unlocks the carriage (read head). When in a locked
position, it locks the carriage in place to prevent it from shaking
when moving the scanner.
Duplex Automatic Document Feeder
DocuScan C4250
DocuScan C3200 A
No.
Name
Function
1
Wheel
Turned when clearing document jams.
2
Left cover
Opened when clearing document jams.
3
Inner cover
Opened when clearing document jams.
4
Document guides
Adjusted to keep documents aligned.
5
Document feeder tray
Load documents here.
6
Document output tray
Holds scanned documents.
7
Documents indicator lamp
(DocuScan C4250 only)
Lights when documents are loaded correctly.
8
Extension guide
(DocuScan C3200 A only)
Extended when scanning long documents.
1.1 Main Components
15
Control Panel
Note
• The control panel is common to both the DocuScan C4250 and DocuScan C3200 A.
1
2
3
4
5
6
7
8
9
10
14
Name
1
Touch panel display
2
Custom buttons
Note
• The features
assigned to the
custom buttons can
be changed.
For details, refer to
"Screen Defaults (P.
140)" in “6.4
Common Settings”.
13
12
11
Function
Displays the messages and feature buttons required to
operate the scanner. Touch the display surface to
access and control the features.
<Copy> button
Pressed to display the copy feature setting screen.
Basic Copying Image Quality
Paper Supply
<Scan to PC> button
More Copy
Features
Reduce
/ Enlarge
Output Color
Auto Paper
100%
Tray 1
A4
Auto %
2 Sided
Tray 2
A3
70%
A3´A4
Lighten/Darken
More...
More...
Pressed to display the Scan to PC setting screen.
Scan
Basic Scanning More
Features
Save In
Address Book...
Change File Name...
SMB
Preview
FTP
Server
Shared Name
1/2
Save In
<Scan to E-mail> button
Pressed to display the Scan to E-mail setting screen.
More Scan
E-mail Address Basic Scanning Features
Address Book...
Details...
Clear
Preview
From
To
1/9
<All Services> button
Pressed to display the [All Services] screen.
All Services
Job Status
3
Numeric keypad
16
1 Basic Operation
Copy
Scan to E-mail
Scan to PC
Scan to Media
Pressed to enter numbers and characters.
Name
4
<Address Book> button
Function
Pressed to display the [Address Book] screen. Pressing
this button takes you first to the following screen. Select
the type of [Address Book] screen from [Scan to E-mail]
and [Scan to PC].
Select Service
Scan to E-mail
5
<Tools> button
Close
Scan to PC
Pressed to display the [Tools] screen that allows you to
set the defaults.
Tools
Close
System Settings
6
<Power Saver> button
Screen Contrast
Pressed to exit the Power Saver mode.
The scanner switches into the Power Saver mode to
reduce the power consumption during periods of inactivity. This button lights when the scanner is in the
Power Saver mode.
Refer to
• "1.4 Setting/Exiting the Power Saver Mode (P. 22)"
7
<Clear All> button
Pressed to reset the features to the defaults.
8
<Stop> button
Pressed to stop scanning or copying.
9
<Start> button
Pressed to start scanning.
10
<Error> lamp
Lights when an error occurs.
11
<OK> button
Used when entering characters. Pressing this button
confirms your entry.
12
<J> button
Used when entering characters. Pressing this button
moves the cursor or confirms your entry.
13
<C> button
Cancels the copy quantity entered (Resets the quantity
to 1).
Used also when entering characters. Pressing this button deletes characters or cancels confirmed entries.
14
<I> button
Used when entering characters. Pressing this button
moves the cursor or reverses the order of characters.
1.1 Main Components
17
1.2
Entering Characters
To enter characters, use the numeric keypad on the control panel.
You can enter alphanumeric characters and symbols.
Using the Numeric Keypad
The following characters can be entered by pressing the corresponding buttons on the
numeric keypad.
Locate the button labelled with the character you want to enter, and press the button
repeatedly until the character appears on the touch panel.
Each button displays the characters in the order indicated in the chart: a number, the lowercase characters, and then the upper-case characters.
When a button is pressed continuously after the last character is displayed, it goes back to
display the first character and then the rest of the characters in the same order.
Example: When the [2] button is pressed repeatedly, the touch panel displays:
2 > a > b > c > A > B > C > 2 > a...
If you press the [I] button repeatedly when a character is displayed (before confirming its
entry), the rest of the characters will display in the reversed order.
Number Button
18
1 Basic Operation
Assigned Numbers/Characters
[1] button
1@:./
[2] button
2abcABC
[3] button
3defDEF
[4] button
4ghiGHI
[5] button
5jklJKL
[6] button
6mnoMNO
[7] button
7pqrsPQRS
[8] button
8tuvTUV
[9] button
9wxyz WXYZ
[0] button
0 Space
[*] button
-_ ~
[#] button
!“#$%&‘~^\|`;:?@_,.+-*
/=()[]{}<>
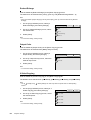
Confirming an Entry
If you press a number button to enter a character, and press another button to enter next
character, the entry of the first character will be confirmed and the second character will
display on the touch panel.
Character entries can also be confirmed by pressing the <OK> button. When an entry is
confirmed by pressing the <OK> button, the cursor in the shape of an "I" displays right of
the character entered.
Moving the Cursor
To modify or delete a character, move the cursor to the right of the character to be modified
or deleted.
To move the cursor, press the <I> or <J> button.
Deleting a Character
To delete a character, move the cursor to the right of the character, and press the <C>
button.
Before confirming your entry, the character you entered is highlighted. While it is
highlighted, it can be deleted by pressing the <C> button.
Note
• Depending on the entry field, an entire character string can be deleted at once by pressing the <C>
button, or by selecting the [Clear] button on the touch panel.
Modifying a Character
To modify a character, move the cursor to the right of the character and press the <C>
button. Then, enter the correct character using the numeric keypad.
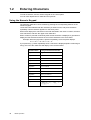
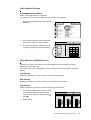
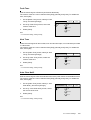
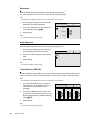
Character Entry Procedure
Use the following procedure to enter characters using the numeric keypad.
In this example, we will enter the word “catalog” in the [Subject] entry box.
Enter/Change Subject
1.
2.
On the touch panel, select the [Subject]
entry box.
Using the <J> button, move the cursor to
right of the default entry.
Cancel
Save
Select from List
Subject
Scan Data from [Host Name]
Restore Auto
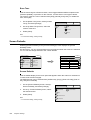
3.
Press the <C> button repeatedly until the
default entry is deleted.
1.2 Entering Characters
19
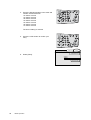
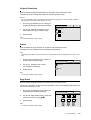
4.
Press the following buttons in the order and
number of times as below:
<2> button: 4 times
<2> button: 2 times
<8> button: 2 times
<2> button: 2 times
<5> button: 4 times
<6> button: 4 times
<4> button: 2 times
The word "catalog" is entered.
5.
Press the <OK> button to confirm your
entry.
Enter/Change Subject
Cancel
Save
Select from List
6.
Select [Save].
Subject
Catalog
Restore Auto
20
1 Basic Operation
1.3
Switching On/Off the Power
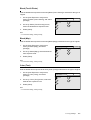
Switching On the Power
1.
Press the power switch to the <|> position.
2.
When the scanner is switched on, the
default screen appears on the touch panel.
Important
• If an error message appears, follow the instructions
in the message to resolve the error. If an error code
is displayed, refer to "8.7 Error Codes (P. 208)" for
suggested solutions.
Note
• The scanner does not use electricity when the power is switched off even if the power cord is plugged in.
Switching Off the Power
Important
• Do not switch the power off while running a scan job. Otherwise, the scan data remained in the scanner
and the information stored in the scanner's memory will be lost.
1.
Make sure that the scanner is not in operation by checking the display on the touch
panel.
2.
Press the power switch to the <O> position
to switch off the scanner.
1.3 Switching On/Off the Power
21
1.4
Setting/Exiting the Power Saver Mode
The scanner has the Power Saver feature which reduces the power consumption during the
periods of inactivity.
As delivered, the scanner automatically switches to the Power Saver mode 10 minutes after
the last operation.
During the Power Saver mode, all indicator lamps on the control panel except for the
<Power Saver> button go out. The touch panel also goes blank and displays nothing.
The factory default setting of 10 minutes is changeable within the range of 1 to 60 minutes.
The scanner consumes less than 9 W during the Power Saver mode, and returns to the
ready-to-scan state in about 12 seconds when re-activated.
Note
• The Power Saver mode can be disabled.
Refer to
• For more information about the Power Saver mode, refer to "Auto Power Saver (P. 137)".
Exiting the Power Saver Mode
To exit the Power Saver mode, press the <Power Saver> button on the control panel.
22
1 Basic Operation
1.5
Loading Documents
Two choices of document input areas are available: the document glass and duplex
automatic document feeder (hereinafter referred to as the "document feeder").
Use the document feeder when scanning or copying multiple-sheet documents
simultaneously.
Note
• If loading additional documents while the first document is being scanned, load them in the same
document input area as the first document.
• You cannot change the document input area during a job. Only one document input area can be used for
a single job.
Supported Documents
Documents that meet the following criteria can be scanned from the document glass or
document feeder:
Document Glass
Document size
Scannable area
Document weight
(Gram per square
meter*¹)
Loading capacity
Document Feeder
C4250
[Max.] 334.5 x 452.0 mm
[Min.] 100.0 x 148.0 mm
[Max.] 297.0 x 432.0 mm
C3200 A
[Max.] 220.0 x 300.0 mm
[Min.] 140.0 x 140.0 mm
[Max.] 215.9 x 355.6 mm
C4250
[Min.] 15.0 x 15.0 mm
[Max.] 297.0 x 432.0 mm
[Min.] 100.0 x 148.0 mm
[Max.] 297.0 x 432.0 mm
C3200 A
[Min.] 15.0 x 15.0 mm
[Max.] 215.9 x 297.0 mm
[Min.] 140.0 x 140.0 mm
[Max.] 215.9 x 355.6 mm
C4250
35 - 120 g/m² (1-sided documents)
50 - 120 g/m² (2-sided documents*²)
C3200 A
60 - 105 g/m² (1-sided documents)
60 - 105 g/m² (2-sided documents*²)
1 sheet
50 sheets
(plain paper: 60 - 100 g/m²)
*1 Gram per square meter (g/m²) refers to a weight in grams of one square meter of paper.
*2 The values apply when scanning or copying documents 2-sided.
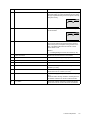
Detectable Document Sizes
The scanner automatically senses the sizes of documents loaded. Documents of the
following standard sizes can be scanned or copied without specifying their sizes.
Note
• The chart shows the standard paper sizes for A/B Series (8K/16K). For the standard paper sizes for A/B
Series and Inch Series, and for information on how to set the scanner to detect other paper size series,
refer to "Paper Size Settings (P. 148)".
• When loading a document of non-standard paper size, specify the size under [More Scan Features] >
[Scan Size] if scanning, or under [More Copy Features] > [Original Size] if copying. For more
information, refer to "Scan Size (Specifying the Scan Size) (P. 70)" or "Original Size (Specifying the
Scan Size) (P. 111)".
1.5 Loading Documents
23
Document Glass
C4250
B5
, B5
, A5
, A5
Document Feeder
, A4
,
A4
8.5 x 11”
A3
C3200 A
, B5
, A5
A4
, B4
, A3
B5
, A5
, A5
, A5
, A4
,
, B4
, 11 x 17”
16K
B5
, 16K
, A6
, B6
,
, 8K
B5
, A5
B6
, 8.5 x 11”
, A5
, A4
, A6
,
, A4
, 16K
Document Loading Precautions
Observe the following precautions when placing documents on the document glass or into
the document feeder.
Documents Not Supported
Document Glass
The following types of documents can cause the auto size sensor to malfunction, resulting
in an error message or image loss.
Remedy the problem as follows:
Document Type
Non-standard size documents
Glossy documents
Remedy
Specify the document size in [Scan Size] on the [More
Scan Features] screen if scanning, or in [Original Size] on
the [More Copy Features] screen if copying.
Thick documents (such as books)
Highly translucent documents (such as
transparencies)
Torn, wrinkled, hole-punched, or tightly
curled documents
Place a blank paper of the same size on top of the document, or specify the document size in [Scan Size] on the
[More Scan Features] screen if scanning, or in [Original
Size] on the [More Copy Features] screen if copying.
Important
• Do not load documents that contain a lot of moisture. The moisture may get inside the scanner and
cause it to malfunction.
• Do not load documents that weigh more than 5 kg. Doing so may break the document glass or the
scanner itself.
Note
• Documents that use photo holders may not be properly scanned or copied depending on how lumpy the
films are.
Refer to
• For information about [Scan Size], refer to "2.8 Setting Other Scan Features (P. 69)".
• For information about [Original Size], refer to "3.6 Settings Other Copy Features (P. 104)".
24
1 Basic Operation
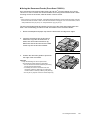
Document Feeder
The following types of documents may get jammed or damaged if loaded into the document
feeder. Make sure to scan them from the document glass.
Folded,
creased or
torn originals
Cut and
paste
originals
Lightweight
originals
Carbon
paper
Curled
originals
Pre-punched
paper
The following types of documents must also be scanned from the documents glass:
• glossy documents (such as photos)
• documents that are glued or held together with clips or staples
• thick documents
• highly translucent documents (such as transparencies)
• documents using thermosensitive paper
The DocuScan C3200 A does not support scanning of mixed-size documents (documents
of different sizes) from the document feeder.
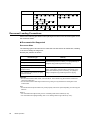
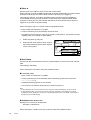
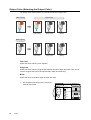
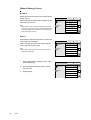
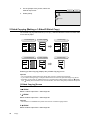
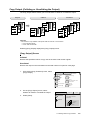
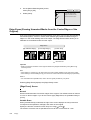
Tips on Loading Documents
Document Orientation
When scanning/copying documents, specify their orientations to identify which side is their
top.
Select [Head to Top] or [Head to Left] under [Original Orientation] either on the [More Scan
Features] or [More Copy Features] screen.
When the output file format is TIFF, Multi-page TIFF, or JPEG, load documents in "Head to
Left" orientation.
When scanning 2-sided documents, make sure that they are loaded in the orientation
specified in [2 Sided Orig.] if scanning, or in [Original Orientation] if copying.
Head to Top
Top
Top
Left
TIFF, Multi-page TIFF, JPEG
Right
Bottom
PDF, DocuWorks
Original placed on document glass
Scan result
1.5 Loading Documents
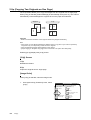
25
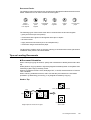
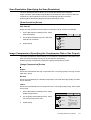
Top
TIFF, Multi-page TIFF, JPEG
PDF, DocuWorks
Original loaded into document feeder
Scan result
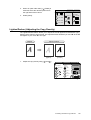
Head to Left
Top
Right Top
Left
Bottom
Original placed on document glass
Scan result
Top
Original loaded into document feeder
Scan result
Refer to
• For information about [Original Orientation] (scan), refer to "2 Sided Originals (Scanning a 2-Sided
Original) (P. 64)" or "Original Orientation (Specifying the Orientation of the Original) (P. 75)".
• For information about [Original Orientation] (copy), refer to "2 Sided Copying (Making a 1-Sided/2-Sided
Copy) (P. 92)" or "Original Orientation (Specifying the Orientation of the Original) (P. 107)".
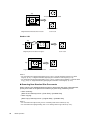
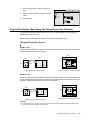
Scanning Non-Standard Size Documents
When scanning non-standard size documents or documents with sticky notes attached,
specify their sizes on the [More Scan Features] or [More Copy Features] screen.
• When scanning:
[More Scan Features] screen > [Scan Size] > [Variable Size]
• When copying:
[More Copy Features] screen > [Original Size] > [Variable Size]
Refer to
• For information about [Scan Size], refer to "2.8 Setting Other Scan Features (P. 69)".
• For information about [Original Size], refer to "3.6 Settings Other Copy Features (P. 104)".
26
1 Basic Operation
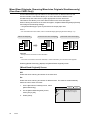
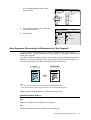
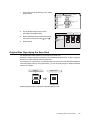
Scanning Mixed-size Documents (DocuScan C4250 only)
When scanning documents of different sizes, set [Mixed Sized Originals] to [On].
Refer to
• For information about [Mixed Sized Originals], refer to "Setting Other Scan Features (P. 69)" or "3.6
Settings Other Copy Features (P. 104)".
When loading mixed-size documents, follow the guidelines below:
• Load A5 documents in LEF orientation.
• Align the top left corner of documents to prevent them from jamming.
Align the corner
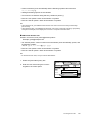
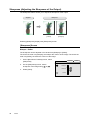
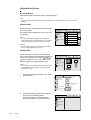
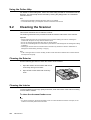
Loading Documents
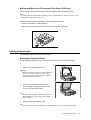
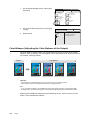
The following explains how to load documents.
Using the Document Glass
Use the following procedure when scanning a document from the document glass:
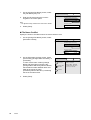
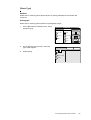
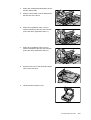
1.
Open the document feeder cover.
Important
• Raise the document feeder cover until the document
feeder cover sensor is detached. The auto size
sensor will not work unless the sensor is detached
from the document feeder cover.
2.
Place the document face down on the
document glass, aligned with the top left
corner of the document glass.
Note
• When scanning a highly translucent document, such
as a transparency or tracing paper, place a blank
paper on top of it.
3.
Close the document feeder cover.
Note
• Besure to close the document feeder cover gently. Otherwise, the document glass may break.
1.5 Loading Documents
27
Important
• When scanning a thick document, do not press it hard against the document glass. The document
glass may break and injure you.
• When scanning with the document feeder cover open, do not stare at the scan light. The light may
cause eye irritation or fatigue.
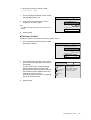
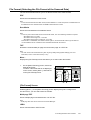
Using the Document Feeder (DocuScan C4250)
Up to 50 sheets of documents (plain paper: 60-100 g/m2) of sizes ranging from 100.0 x
148.0 mm to 297.0 x 432.0 mm can be loaded at once using the document feeder. When
scanning more than 50 sheets, load 50 sheets or less at a time.
Note
• When scanning more than 50 sheets, select [Next Original] while the first 50 sheets are being scanned,
and load the next 50 sheets or less to scan all documents as a single job. For more information, refer to
" Step 5 Start the scan job (P. 33)" or " Step 6 Start the copy job (P. 81)".
The document feeder feeds documents from the top of the stack and outputs them face
down. Use the following procedure when loading documents into the document feeder.
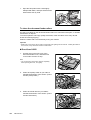
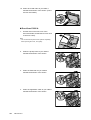
1.
Remove all staples and paper clips from the documents and align their edges.
2.
Insert the documents into the document
feeder face up, and align them with the left
and rear edges of the document feeder tray.
When the documents are loaded correctly,
the document indicator lamp lights up.
3.
Position the document guide to just touch
the edge of the documents.
Important
• Keep the followings in mind to prevent the
documents from being jammed or damaged:
• Do not hold the documents while they are being
fed into the document feeder.
• Constantly remove the documents from the
document output tray after they are output (Do
not leave them on the tray until they are piled up).
• Do not put any objects on the document output tray.
28
1 Basic Operation
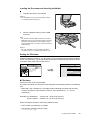
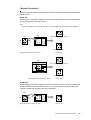
Using the Document Feeder (DocuScan C3200 A)
Up to 50 sheets of documents (plain paper: 60-100 g/m2) of sizes ranging from 140.0 x
140.0 mm to 215.9 x 355.6 mm can be loaded at once using the document feeder. When
scanning more than 50 sheets, load 50 sheets or less at a time.
Note
• When scanning more than 50 sheets, select [Next Original] while the first 50 sheets are being scanned,
and load the next 50 sheets or less to scan all documents as a single job. For more information, refer to
" Step 5 Start the scan job (P. 33)" or " Step 6 Start the copy job (P. 81)".
The document feeder feeds documents from the top of the stack and outputs them face
down. Use the following procedure to load documents into the document feeder.
1.
Remove all staples and paper clips from the documents and align their edges.
2.
Insert the documents into the document
feeder face up (If the documents are 2sided, their front sides should face up).
Make sure that the documents are loaded
all the way into the document feeder.
3.
Position the document guides to just touch
the edge of the documents.
Important
• Keep the followings in mind to prevent the
documents from being jammed or damaged:
• Do not hold the documents while they are being
fed into the document feeder.
• Constantly remove the documents from the
document output tray after they are output (Do
not leave them on the tray until they are piled up).
• Do not put any objects on the document output tray.
1.5 Loading Documents
29
2
Scan
2.1
Scanning Procedure
This section outlines the procedure of scanning a document and creating its electronic data.
For details, refer to the description provided for each operation.
Step 1 Get ready to scan
STEP
1
Get ready to
scan
2
3
4
5
6
7
Before using the scan features, ensure that the following items are available or have been
performed:
Scan Type
Scan to E-mail
Scan to PC
Scan to Media
Items to Get Ready
Resource to Use
•Set an IP address
•Enable ports
Control panel
(or CentreWare Internet Services)
•Set the e-mail parameters
CentreWare Internet Services
•Register an address
DocuScan Manager
(or CentreWare Internet Services)
•Set an IP address
•Enable ports
Control panel
(or CentreWare Internet Services)
•Create a folder in which to
save scanned data
Computer on which to save scanned data
•Register a login user
Computer on which to save scanned data
•Register an address
DocuScan Manager
(or CentreWare Internet Services)
•USB flash memory
Refer to
• For information on how to get your scanner ready to scan, refer to "2 Network Settings" in the Setup and
Quick Reference Guide.
Step 2 Load a document and insert media
STEP
1
2
Load a document
and insert media
3
4
5
6
7
Place a document onto the document glass or into the document feeder.
When using Scan to Media, plug a USB flash memory into the scanner's USB connector.
30
2 Scan
Refer to
• For instructions on how to load documents, refer to "1.5 Loading Documents (P. 23)".
• For instructions on connecting a USB flash memory to the scanner, refer to "2.6 Using Scan to Media (P.
58)".
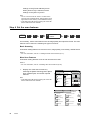
Step 3 Select the scan type
STEP
1
2
3
Select the scan
type
4
5
6
7
Select the type of the scan job from the [All Services] screen depending on where you want
to save the scanned data. The following types of scan jobs are available:
Scan to E-mail
Sends the scanned data by e-mail.
Refer to
• For more information, refer to "2.4 Using Scan to E-mail (P. 40)".
Scan to PC
Transfers the scanned data to a network-connected computer using an FTP or SMB
protocol.
Refer to
• For more information, refer to "2.5 Using Scan to PC (P. 49)".
Scan to Media
Saves the scanned data on the USB flash memory.
Refer to
• For more information, refer to "2.6 Using Scan to Media (P. 58)".
1.
Push the <Scan to E-mail>/<Scan to PC>
button on the control panel. Or, select
[Scan to E-mail]/[Scan to PC]/[Scan to
Media] on the [All Services] screen.
Note
• The features assigned to the custom buttons can be
changed. For more information, refer to "Custom
Buttons 1 - 3 (P. 141)".
• When a password is set for the feature selected, a
screen prompting you to enter the password appears.
When prompted, enter the password using the
numeric keypad and select [Confirm]. For information
on how to set passwords, refer to "Service Login (P.
145)".
• If the feature selected is disabled, a message
informing you of this appears. To enable or disable
each feature, refer to "Service Availability (P. 143)".
2.
Set the required settings such as the “Save
In” location.
When [Scan to E-mail] is selected, set the
All Services
Job Status
Copy
Scan to E-mail
Scan to PC
Scan to Media
2.1 Scanning Procedure
31
settings on the [E-mail Address] screen.
When [Scan to PC] is selected, set the
settings on the [Save In] screen.
Note
• You do not need to set the “Save In” location when
using the Scan to Media feature. Data is always saved
right under the root directory of the USB flash memory.
• If old settings are still present, pressing the <Clear All>
button resets them to the defaults.
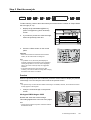
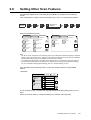
Step 4 Set the scan features
STEP
1
2
3
4
Set the scan
features
5
6
7
As necessary, set the scan features such as image quality and output file format. The scan
features can be set on the following two types of screens:
Basic Scanning
Used when setting features such as scan color, image quality, scan density, and file format.
Refer to
• For more information, refer to "2.7 Setting the Basic Scan Features (P. 61)".
More Scan Features
Used when setting features such as scan size and scan ratio.
Refer to
• For more information, refer to "2.8 Setting Other Scan Features (P. 69)".
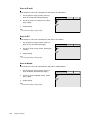
1.
Display one of the above screens by
selecting the [Basic Scanning] tab or [More
Scan Features] tab, and set the required
features.
Note
• If old settings are still present, pressing the <Clear All>
button resets them to the defaults.
Scan
E-mail Address Basic Scanning More
Features
Output Color
File Format
Full Color
PDF
Grayscale
DocuWorks
Black
TIFF
2 Sided Orig.
Original Type
Lighten/Darken
More...
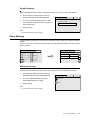
Scan
E-mail Address Basic Scanning More
Features
Scan Size
Auto Size
Detect
32
2 Scan
Image Compression
Normal
Reduce / Enlarge
100%
Mixed Sized Orig.
Off
Scan Resolution
200 dpi
Original Orientation
Head to Left
1/2
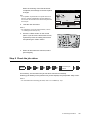
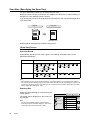
Step 5 Start the scan job
STEP
1
2
3
4
5
Start the scan job
6
7
To start scanning, return to the screen where you set the “Save In” location in " Step 3 Select
the scan type (P. 31)".
1.
Display the [E-mail Address]/[Save In]
(Scan to PC)/[Save In] (Scan to Media)
screen.
Scan
E-mail Address Basic Scanning More
Features
Address Book...
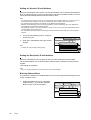
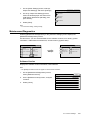
2.
3.
If you want to preview the scanned image,
select the [Preview] check box.
Details...
Clear
Preview
From
To
Jane Smith
CC
System Design Group
BCC
ABC Corp.
1/9
Press the <Start> button on the control
panel.
Important
• When the document is loaded into the document
feeder, do not hold it while it is being fed.
Note
• If a problem occurs, the touch panel displays a
message. Follow the instructions in the message to
remedy the problem. If an error code is displayed,
refer to "8.7 Error Codes (P. 208)" for suggested
solutions.
• It may take some time for the scanner to start
scanning. The scanner starts scanning after verifying
the status of the ”Save In” location.
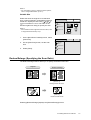
Preview
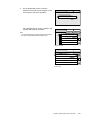
When the [Preview] check box is selected, press the <Start> button to display the preview
of the image. You can verify the scan result on the preview screen.
Note
• The preview may not show the fine details of the image. The details, however, are scanned and saved
as they appear on the original.
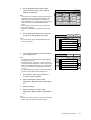
1.
Verify the scanned image on the preview
screen.
90-degree CW
90-degree CCW
90-degree CW/90-degree CCW
Preview
Next Page
Rotates and saves the scanned image.
This setting applies also to the rest of the pages.
Note
• Images can be rotated only when scanned in PDF or
DocuWorks format.
1 pages scanned
Stop
Last Original
Next Original
2.1 Scanning Procedure
33
Preview Next Page
Shows the preview of the next page.
Stop
Stops the scan job.
Last Original/Next Original
Sets whether you have more documents to scan.
Refer to
• For information about canceling a scan job from a
preview screen, refer to "4 Scan" in the Setup and
Quick Reference Guide.
2.
Press the <Start> button on the control
panel. The scanning starts.
Note
• It may take some time for the scanner to start
scanning. The scanner starts scanning after verifying
the status of the ”Save In” location.
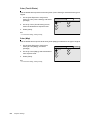
When you have more documents to scan
When you have more documents to scan, select [Next Original] on the touch panel while
the first document is being scanned. The scanner recognizes that there are more
documents to be scanned and scans them as a single job.
Up to 500 pages can be scanned per a single job.
Note
• When the number of scanned pages reaches 500, a message appears and the scanner will not scan the
rest of pages. When scanning documents that exceed 500 pages, scan the first 500 pages and then
scan the rest of the pages as a new job.
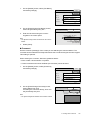
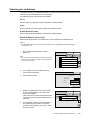
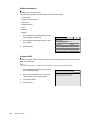
1.
Select [Next Original] while the first
document is being scanned.
Scanning Documents...
E-mail Address: [email protected]
A4
Full Color
200dpi
Pages
Scanned
70%
Pages
Transferred
10
Last Original
34
2 Scan
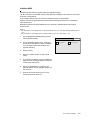
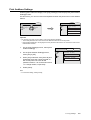
7
Next Original
When the scanning of the first document
completes, the message on the touch panel
changes.
Press Start to scan.
Press Last Original to complete scanning.
E-mail Address: [email protected]
Note
• If no operation is performed for a specific amount of
time, the scanner automatically assumes that there
are not more documents to be scanned and presumes
the scan job.
2.
A4
Full Color
200dpi
Pages
Scanned
Pages
Transferred
70%
10
7
Load the next document.
Last Original
Next Original
Refer to
• For instructions on how to load documents, refer to
"1.5 Loading Documents (P. 23)".
3.
Press the <Start> button on the control
panel. If you have more documents to scan,
repeat the process of loading a document
and pressing the <Start> button.
4.
When all documents are scanned, select
[Last Original].
Step 6 Check the job status
STEP
1
2
3
4
5
6
Check the job
status
7
As necessary, check whether the job has been scanned successfully.
Selecting [Job Status] on the [All Services] screen displays the [Completed Jobs] screen.
Refer to
• For information about checking job status, refer to "5 Job Status (P. 127)".
2.1 Scanning Procedure
35
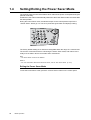
Step 7 Use the scanned data
STEP
1
2
3
4
5
6
7
Use the scanned
data
Scan to E-mail
Sends the scanned data to a specified e-mail address. The recipient will receive the data
as an e-mail attachment.
Scan to PC
Saves the scanned data on a specified computer.
Note
• If editing the scanned data using DocuScan Manager, it is convenient if you set the “Save In” location on
DocuScan Manager.
Refer to
• For installation instructions of DocuScan Manager, refer to the Software Operation Guide.
• For basic operating instructions of DocuScan Manager, refer to "7 DocuScan Manager (P. 178)".
• For detailed operating instructions of DocuScan Manager, refer to the DocuScan Manager Online Help.
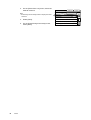
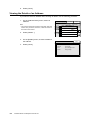
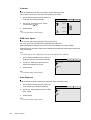
Scan to Media
Saves the scanned data on the USB flash memory.
You can unplug the media when the following screen is displayed.
Save In
Scan
Basic Scanning More
Features
Change File Name...
Preview
The USB Flash Memory
is inserted.
Do not remove it
while saving the data.
(You can remove it
when it is not saving)
36
2 Scan
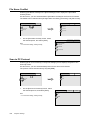
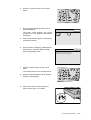
2.2
Stopping a Scan Job
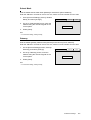
1.
Press the <Stop> button on the control
panel.
A message appears confirming the
cancellation of the job.
2.
Select [Yes].
A message appears informing you that the
cancellation is complete.
Cancel Job
Yes
No
Do you want to cancel the job?
3.
Select [Close].
Job Cancelled
Close
The job has been cancelled.
2.2 Stopping a Scan Job
37
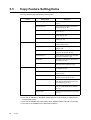
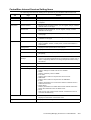
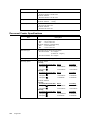
2.3
Scan Feature Setting Items
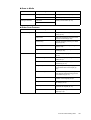
The scan features offer the following setting items:
Scan to E-mail
Screen
E-mail Address
Details
Setting Item
Reference
Address Book
"Setting the Recipient's E-mail Address
(P. 42)"
Details
"Setting a Subject/Comment (P. 44)"
Clear
"Setting the Sender's E-mail Address (P.
42)"
"Setting the Recipient's E-mail Address
(P. 42)"
Preview
"Preview (P. 33)"
From
"Setting the Sender's E-mail Address (P.
42)"
To
"Setting the Recipient's E-mail Address
(P. 42)"
Subject
"Setting a Subject/Comment (P. 44)"
Reply to
File Name
Comment
Scan to PC
Screen
Save In
Change File Name
Setting Item
Address Book
"Setting the “Save In” Location Using
Address Book (P. 51)"
Change File Name
"Setting the File Name (P. 56)"
Preview
"Preview (P. 33)"
SMB/FTP
"Transfer Protocol (P. 52)"
Server
"Server (P. 52)"
Shared Name
"Shared Name (SMB) (P. 53)"
Save In
"Save In (P. 54)"
User Name
"User Name (P. 54)"
Password
"Password (P. 56)"
File Name
"Setting the File Name (P. 56)"
File Name Conflict
38
2 Scan
Reference
Scan to Media
Screen
Save In
Change File Name
Setting Item
Reference
Change File Name
"Setting the File Name (P. 56)"
Preview
"Preview (P. 33)"
File Name
"Setting the File Name (P. 59)"
File Name Conflict
Other Scan Features
Screen
Basic Scanning
More Scan Features
Setting Item
Reference
Output Color
"Output Color (Selecting the Output
Color) (P. 62)"
File Format
"File Format (Selecting the File Format
of the Scanned Data) (P. 63)"
2 Sided Orig.
"2 Sided Originals (Scanning a 2-Sided
Original) (P. 64)"
Original Type
"Original Type (Selecting the Original
Type) (P. 66)"
Lighten/Darken
"Lighten/Darken (Adjusting the Scan
Density) (P. 68)"
Scan Size
"Scan Size (Specifying the Scan Size)
(P. 70)"
Reduce/Enlarge
"Reduce/Enlarge (Specifying the Scan
Ratio) (P. 71)"
Scan Resolution
"Scan Resolution (Specifying the Scan
Resolution) (P. 73)"
Image Compression
"Image Compression (Specifying the
Compression Rate of the Output) (P.
73)"
Mixed Size Orig.*
"Mixed Sized Originals (Scanning Mixedsize Originals Simultaneously) (DocuScan C4250 Only) (P. 74)"
Original Orientation
"Original Orientation (Specifying the Orientation of the Original) (P. 75)"
Sharpness
"Sharpness (Adjusting the Sharpness of
the Output) (P. 76)"
Auto Exposure
"Auto Exposure (Removing the Background of the Original) (P. 77)"
Contrast
"Contrast (Adjusting the Contrast of the
Output) (P. 78)"
*This item is not available on the DocuScan C3200 A.
2.3 Scan Feature Setting Items
39
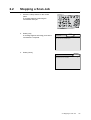
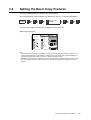
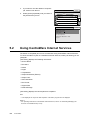
2.4
Using Scan to E-mail
This section explains how to convert scanned data into PDF, DocuWorks, TIFF, or JPEG
format and send it via e-mail using the Scan to E-mail feature.
This corresponds to " Step 3 Select the scan type (P. 31)" in “2.1 Scanning Procedure”.
STEP
1
2
3
Select the scan
type
4
5
6
7
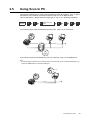
Scan to E-mail allows you to send scanned data as an e-mail attachment. Fax might get
mixed up with other faxes and may not reach the intended recipient. Using this feature,
however, data is sent directly to the recipient without any worry of getting lost.
Scanned data
PC
Scanned data
E-mail server
PC
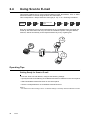
Operating Tips
Getting Ready for Scan to E-mail
To use the Scan to E-mail feature, configure the following settings:
• Specify the method of obtaining an IP address and set an IP address on the control panel.
• Start CentreWare Internet Services on the control panel.
• Set the e-mail parameters on CentreWare Internet Services.
Refer to
• For details on the above settings, refer to “2. Network Settings” in the Setup and Quick Reference Guide.
40
2 Scan
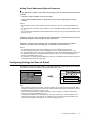
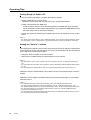
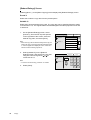
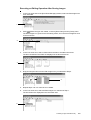
Setting E-mail Addresses/Subjects/Comments
E-mail addresses, subjects, and comments (messages) can be entered by the following two
methods:
• Using the numeric keypad on the control panel.
• Storing them in Address Book or Subject/Comment List and selecting them on the
scanner.
Refer to
• For information on how to enter characters on the control panel, refer to "1.2 Entering Characters (P.
18)".
• For information about character entry restrictions, refer to "Registering Addresses/Subjects/Comments
(P. 114)".
• For information about Address Book and Subject/Comment List, refer to "4.2 Using Address Book on the
Scanner (P. 121)".
Addresses, subjects, and comments stored in Address Book or Subject/Comment List can
be altered using the numeric keypad on the control panel.
Addresses, subjects, and comments can be registered in Address Book or Subject/
Comment List using DocuScan Manager or CentreWare Internet Services.
Refer to
• For installation instructions of DocuScan Manager, refer to the Software Operation Guide.
• For basic operating instructions of DocuScan Manager, refer to "7 DocuScan Manager (P. 178)".
• For detailed operating instructions of DocuScan Manager, refer to the DocuScan Manager Online Help.
• For operating instructions of CentreWare Internet Services, refer to "9.1 Monitoring/Managing the
Scanner on a Web Browser (P. 216)".
• For instructions on setting addresses/subjects/comments on CentreWare Internet Services, refer to the
CentreWare Internet Services Online Help.
Configuring Settings for Scan to E-mail
Pressing the <Scan to E-mail> button on the control panel or selecting [Scan to E-mail] on
the [All Services] screen displays the [E-mail Address] screen.
All Services
Scan
E-mail Address Basic Scanning More
Features
Job Status
Copy
Scan to E-mail
Address Book...
Details...
Clear
Preview
From
To
1/9
Scan to PC
Scan to Media
Note
• When a password is set for the feature, a screen prompting you to enter the password appears. When
prompted, enter the password using the numeric keypad and select [Confirm]. For information on how to
set passwords, refer to "Service Login (P. 145)".
• When the feature is disabled, a message informing you of this appears. To enable or disable each
feature, refer to"Service Availability (P. 143)".
• If old settings are still present on the [Scan to E-mail] screen, pressing the <Clear All> button on the
control panel resets them to the defaults. The defaults can be changed under [System Settings]. For
information about [System Settings], refer to "6 System Settings (P. 129)".
2.4 Using Scan to E-mail
41
Setting the Sender's E-mail Address
Set the e-mail address of the sender. The sender’s address can be selected from Address
Book or entered using the numeric keypad. When selected from Address Book, the name
set for [Recipient Name] will be set as the sender's name.
Note
• The scanner cannot receive e-mail. It is recommended to set an address that can receive e-mail, such
as the administrator's address, in case the e-mail server returns e-mail in the event of errors.
• The default sender's address is the address set for [Machine E-mail Address].
• [Machine E-mail Address] can be set under [Properties] > [Protocol Settings] > [E-mail] > [Machine Email Address] on CentreWare Internet Services.
• This setting is optional. If you leave this blank, however, an error may occur when attempted to send email depending on the SMTP server.
• The characters that can be used for entering the sender's address are the same as for the recipient's
address.
1.
2.
On the [E-mail Address] screen, select the
[From] entry box.
Enter the e-mail address using the numeric
keypad.
E-mail Address Basic Scanning
Address Book...
Details...
More Scan
Features
Clear
Preview
From
Note
• To delete an incorrect entry, select [Clear].
1/9
Setting the Recipient's E-mail Address
Set the e-mail address of the recipient to whom you are sending the scanned data.
The recipient address can be selected from Address Book or entered using the numeric
keypad.
This settings is mandatory.
Note
• Up to 27 recipient addresses can be entered for one e-mail message.
Using Address Book
If you select the address from Address Book, the name set for [Recipient Name] will be set
as the recipient's name.
1.
Select the address entry box, and select
[Address Book...] or press the <Address
Book> button on the control panel.
More Scan
E-mail Address Basic Scanning Features
Address Book...
From
Details...
Clear
Preview
[email protected]
To
1/9
42
2 Scan
2.
On the [Address Book Folder] screen,
select the folder in which the recipient's
address is registered.
Note
• This screen does not appear if [List View] is selected
for [Address Screen] under [System Settings]. The
[Address Book...] button takes you directly to the
[Address Book] screen, which appears after a specific
folder is selected on the [Address Book Folder]
screen.
• When a password is set for the folder, a password
entry screen appears.
• Password-locked folders are indicated with a "lock"
icon.
3.
On the [Address Book] screen, select the
check box of the recipient to be used.
Address Book Folder
Close
01
Common
04
Smith
02
Jones
05
Jones
03
Accounting
06
Brown
07
Potter
08
09
Administration Misc.
To Folder
Search...
Note
• The check boxes can be selected/deselected each
time you touch them.
13-24
25-36
10
11
12
(Not in Use) (Not in Use) (Not in Use)
Address Book [01]
01-12
37-48
Confirm
Details...
001 Jane Smith
002 System Design Group
003 xxx.xxx...
20
004 ABC Corp.
005 Daniel Brown
4.
The [To] button appears on the left side of
the recipient name.
Note
• The [To] button can toggle between [To]/[CC]/[BCC]
each time you touch it.
• Select the [Search...] button if you want to search for
an address. Select the [Details...] button to display the
details of the address selected. For more information,
refer to "4 Address Book and Subject/Comment List
(P. 113)".
• The [To Folder] button cancels the selection and takes
you back to the [Address Book Folder] screen.
5.
As necessary, touch the [To] button to
change it to [CC] or [BCC].
6.
When sending the e-mail to other
addresses in the same folder, repeat Step 3
to 5.
7.
Select [Confirm].
8.
When sending the e-mail to other
addresses in different folders, repeat Step 1
to 7.
Address Book [01]
To Folder
Search...
To
001 Jane Smith
CC
002 System Design Group
Confirm
Details...
003 xxx.xxx...
BCC
20
004 ABC Corp.
005 Daniel Brown
Note
• To delete an address entered on the [E-mail Address]
screen, select the address and select [Clear].
2.4 Using Scan to E-mail
43
Using the Control Panel
When entering the recipient's address on the control panel, follow the guidelines below:
• Enter it within 64 characters or symbols.
• Spaces, control characters (such as linefeeds), and the following symbols cannot be
used:
()<>[]:;\, "
• This can be a character string without an "@" symbol.
• More than one "@" symbols cannot be included.
• If an "@" symbol is included, one or more characters must come before and after the
symbol.
Use the following procedure also when altering an address that is already set.
Note
• Altering addresses on the control panel does not alter the contents of Address Book.
1.
Select an address entry box.
2.
Enter the recipient's e-mail address.
Scan
E-mail Address Basic Scanning More
Features
Address Book...
From
Details...
Clear
Preview
[email protected]
To
1/9
Setting a Subject/Comment
Selecting [Details...] on the [E-mail Address] screen displays the [Details] screen. On this
screen, you can set the e-mail subject and comment, return e-mail address, and the file
name of the scanned data.
Details
Scan
E-mail Address Basic Scanning More
Features
Address Book...
Details...
Clear
44
2 Scan
Jane Smith
CC
System Design Group
BCC
ABC Corp.
Change
Preview
From
To
Close
1/9
Subject
Scan Data from [Host Name]
Reply to
(Not Set)
File Name
(Auto Set)
Comment
(Auto Set)
Subject
Set the subject of the e-mail you are attaching the scanned data to. The subject can be
selected from Subject/Comment List or entered using the numeric keypad.
This setting is optional. When this is left blank, the default subject will be used. The default
is "Scan Data from [xxx]" where "xxx" is a host name.
When entering the subject, follow the guidelines below:
• Enter it within 64 characters or symbols.
• Control characters (such as linefeeds) cannot be used.
Note
• The default subject can be changed under [Setup Menu] > [Subject] > [Default Subject Number] on
CentreWare Internet Services.
On CentreWare Internet Services, you can register contents of subjects such as [Default Subject
Number], [Number], and [Content]. When [Default Subject Settings] is set to [0], or when no information
is registered for the default subject, "Scan Data from [xxx]" (where “xxx” is a host name) will display as
the default.
• The "xxx" of "Scan Data from [xxx]" is the host name set under [Properties] > [Protocol Settings] > [TCP/
IP] > [Host Name] on CentreWare Internet Services.
1.
On the [Details] screen, select [Subject],
and select [Change].
Details
Close
Change
2.
On the [Enter/Change Subject] screen,
select [Select from List].
If entering the subject directly, enter it in the
[Subject] entry box.
Subject
Scan Data from [Host Name]
Reply to
(Not Set)
File Name
(Auto Set)
Comment
(Auto Set)
Enter/Change Subject
4.
On the [Select from List] screen, select the
desired subject.
Select [Save].
Save
Select from List
Subject
Note
• The [Restore Auto] button resets the subject to the
default.
3.
Cancel
Scan Data from [Host Name]
Restore Auto
Select from List
Cancel
Save
Monthly Report
Video Conference Minutes
5.
On the [Enter/Change Subject] screen,
select [Save].
Weekly Meeting Agenda
1/2
Catalog Data
Bussiness Trip Schedule
Design Group Scan Data
2.4 Using Scan to E-mail
45
Reply to
Set the return address of the e-mail you are attaching the scanned data to. The return
address can be selected from Address Book or entered using the numeric keypad. When
selected from Address Book, the name set for [Recipient Name] will be set as the name of
the return address.
Note
• The scanner cannot receive e-mail. It is recommended to set an address that can receive e-mail, such
as the administrator's address, in case the e-mail server returns e-mail in the event of errors.
• The characters that can be used for entering the return address are the same as for the recipient's
address.
1.
On the [Details] screen, select [Reply to],
and select [Change].
Details
Close
Change
2.
On the [Enter/Change Reply To] screen,
select [Address Book...], and select the
return e-mail address.
When entering it on the control panel, enter
it in the [Reply to] entry box.
Subject
Scan Data from [Host Name]
Reply to
(Not Set)
File Name
(Auto Set)
Comment
(Auto Set)
Enter/Change Reply To
Cancel
Save
Address Book...
Reply to
Refer to
• For information on how to enter addresses, refer to
"Setting the Recipient's E-mail Address (P. 42)".
3.
Select [Save].
File Name
Set the file name of the scanned data.
When this is left blank, the file name will be assigned automatically based on the following
rule:
• Starts with "img-" followed by a nine-digit number indicating the saved date and time.
October, November, and December, however, are indicated as "X", "Y", and "Z",
respectively.
Example: img-102030400
January 2nd, 03:04:00 (hr:min:sec)
img-X11123045
October 11th, 12:30:45 (hr:min:sec)
When entering the file name, follow the guidelines below:
• Enter it within 20 characters or symbols.
• The following symbols cannot be used:
*"/\<>:|?=,.;[]+
46
2 Scan
1.
On the [Details] screen, select [File Name],
and select [Change].
Details
Close
Change
2.
3.
On the [Enter/Change File Name] screen,
select the [File Name] entry box.
Subject
Scan Data from [Host Name]
Reply to
(Not Set)
File Name
(Auto Set)
Comment
(Auto Set)
Enter/Change File Name
Enter the file name using the numeric
keypad on the control panel.
Save
File Name (Max. 20 chars.)
(Auto Set)
Note
• The [Restore Auto] button resets the file name to the
default.
4.
Cancel
Restore Auto
Example: img-102030400
(Jan.2 03:04:00)
Select [Save].
Comment
Set the comment (message) of the e-mail you are attaching the scanned data to. The
comment can be selected from Subject/Comment List or entered using the numeric keypad.
This setting is optional.
When entering the comment, follow the guidelines below:
• Enter it within 192 characters or symbols.
• Control characters other than linefeeds (such as tabs) cannot be used.
1.
On the [Details] screen, select [Comment],
and select [Change].
Details
Close
Change
2.
On the [Enter/Change Comment] screen,
select [Select from List].
If entering the comment directly, enter it in
the [Comment] entry box.
Note
• The [Clear Field] button deletes all characters entered.
Subject
Scan Data from [Host Name]
Reply to
(Not Set)
File Name
(Auto Set)
Comment
(Auto Set)
Enter/Change Comment
Cancel
Clear Field
Save
Select from List
Comment
2.4 Using Scan to E-mail
47
3.
On the [Select from List] screen, select the
desired comment.
Select from List
Cancel
Save
Full Comment
Note
• Select the [Full Comment] button to display the entire
comment.
FYI, attached is this month’s progress report
4.
Please verify the attached data and contact u
Select [Save].
Please find attached the schedule for your bu
Please circulate the attached file among your
5.
48
2 Scan
On the [Enter/Change Comment] screen,
select [Save].
I’m sending you the minutes from the confere
1/2
2.5
Using Scan to PC
This section explains how to convert scanned data into PDF, DocuWorks, TIFF, or JPEG
and transfer it to a network-connected computer using an FTP or SMP protocol.
This corresponds to " Step 3 Select the scan type (P. 31)" in “2.1 Scanning Procedure”.
STEP
1
2
3
Select the scan
type
4
5
6
7
If you want to share scanned data among many users, save it on an FTP server.
FTP server
Scanned
data
If you want to import scanned data into your own computer, save it on an SMB server.
Note
• A shared folder that will be used on SMB to save the scanned data can be created automatically if you
register the SMB address on DocuScan Manager.
Scanned data
PC
2.5 Using Scan to PC
49
Operating Tips
Getting Ready for Scan to PC
To use the Scan to PC feature, configure the following settings:
• Set the parameters for an FTP server
Obtain the server name and user name from your system administrator.
• Create a shared folder (for SMB only)
Create a folder in which to save the scanned data and enable sharing of the folder.
The shared folder can be created automatically if you register the SMB address using
the Easy Setup mode on DocuScan Manager.
• Specify the method of obtaining an IP address and set up an IP address on the control
panel.
Refer to
• For details on the above settings, refer to "Network Settings" in the Setup and Quick Reference Guide.
• For information on how to create folders or to enable their sharing, refer to the Windows online help.
Setting the “Save In” Location
The following two methods can be used to enter the server name (IP address), shared name
of the location where the scanned data is to be saved, as well as the user ID and password
to be used when accessing the location:
• Using the numeric keypad on the control panel.
• Storing them in Address Book and selecting them on the scanner.
Refer to
• For information on how to enter characters on the control panel, refer to "1.2 Entering Characters (P.
18)".
• For information about character entry restrictions, refer to "Registering Addresses/Subjects/Comments
(P. 114)".
• For information about Address Book, refer to "4.2 Using Address Book on the Scanner (P. 121)".
Addresses stored in Address Book can be altered on the control panel using the numeric
keypad.
Addresses can be registered in Address Book using DocuScan Manager or CentreWare
Internet Services.
Refer to
• For installation instructions of DocuScan Manager, refer to the Software Operation Guide.
• For basic operating instructions of DocuScan Manager, refer to "7 DocuScan Manager (P. 178)".
• For detailed operating instructions of DocuScan Manager, refer to the DocuScan Manager Online Help.
• For operating instructions of CentreWare Internet Service, refer to "9.1 Monitoring/Managing the
Scanner on a Web Browser (P. 216)".
• For information about setting addresses/subjects/comments on CentreWare Internet Services, refer to
the CentreWare Internet Services Online Help.
50
2 Scan
Configuring Settings for Scan to PC
The [Save In] screen can be displayed by pressing the <Scan to PC> button on the control
panel or by selecting [Scan to PC] on the [All Services] screen.
All Services
Job Status
Copy
More Scan
Basic Scanning Features
Save In
Address Book...
Scan to E-mail
Change File Name...
SMB
Preview
FTP
Server
Save In
Scan to PC
Scan to Media
1/2
User Name
Note
• If a password is set for the feature, a screen prompting you to enter the password appears. If prompted,
enter the password using the numeric keypad and press [Confirm]. For information on how to set
passwords, refer to "Service Login (P. 145)".
• If the feature is disabled, a message informing you of this appears. To enable or disable each feature,
refer to "Service Availability (P. 143)".
• If old settings are still present on the [Save In] screen, pressing the <Clear All> button resets them to the
defaults. The defaults can be changed under [System Settings]. For information about [System
Settings], refer to "6 System Settings (P. 129)".
Setting the “Save In” Location Using Address Book
1.
On the [Save In] screen, select [Address
Book...].
Save In
Address Book...
SMB
Scan
Basic Scanning More
Features
Change File Name...
Preview
FTP
Server
Save In
1/2
User Name
2.
On the [Address Book Folder] screen,
select a folder where the address to be
used is registered.
Note
• This screen does not appear if [List View] is selected
for [Address Screen] under [System Settings]. The
[Address Book...] button takes you directly to the
[Address Book] screen, which appears after a specific
folder is selected on the [Address Book Folder]
screen.
• If a password is set to the folder, a password entry
screen appears.
• Password-lock folders are indicated with a "lock" icon.
Address Book Folder
Close
01
Common
04
Smith
02
Jones
05
Jones
03
Accounting
06
Brown
07
Potter
08
09
Administration Misc.
10
11
12
(Not in Use) (Not in Use) (Not in Use)
2.5 Using Scan to PC
01-12
13-24
25-36
37-48
51
3.
On the [Address Book] screen, select the
desired “Save In” location.
Note
• Select [Search...] button to search for an address.
Select the [Details...] button to display the details of
the address selected. For more information, refer to "4
Address Book and Subject/Comment List (P. 113)".
• The [To Folder] button cancels the selection and takes
you back to the [Address Book Folder] screen.
4.
Select [Close].
5.
The [Save In] screen appears.
Address Book [01]
To Folder
Search...
Close
Details...
001 SMB Exterior Designs
002 FTP Design Concept
003 SMB Minutes
1
004 FTP Software Specifications
005 FTP Hardware Specifications
Note
• The address selected from Address Book can be
altered using the control panel.
Setting the “Save In” Location Using the Control Panel
Use the following procedure also when altering a “Save In” location that is already set.
Note
• Altering addresses on the control panel does not alter the contents of Address Book.
Transfer Protocol
Select a method to be used when transferring the scanned data from the scanner.
If saving the scanned data in a Windows shared folder, select [SMB].
If saving it on an FTP server, select [FTP].
1.
Select [SMB] or [FTP].
Save In
Address Book...
SMB
Scan
Basic Scanning More
Features
Change File Name...
Preview
FTP
Server
Save In
User Name
Server
Set the computer on which the scanned data is to be saved.
This setting is mandatory.
When entering the server, follow the guidelines below:
• Enter it in one of the following formats:
FQDN format
Example: pcname.example.com
Computer Name (NetBIOS name)
Example: pcname
DNS Host Name
Example: pcname
IP Address
52
2 Scan
1/2
Example: 192.168.1.100
• Enter it within 64 characters or symbols.
• Control characters (such as linefeeds) cannot be used.
Note
• For information about FTP server, ask your system administrator.
• Your computer name can be found in [My Computer] > [Properties] on Windows. If using Windows XP,
your computer name is under [Change] > [Computer Name] on the [Computer Name] tab. If using
Windows 2000, your computer name is under [Properties] > [Computer Name] on the [Network ID] tab.
• The IP address of your computer can be displayed by entering "ipconfig" in [Command Prompt] and
pressing the <Enter> key.
• If entering this in FQDN format, [Properties] > [Protocol Settings] > [TCP/IP] > [DNS] > [DNS Server
Address] must be set on CentreWare Internet Services.
• Computer name (NetBIOS name) can be entered only when [Transfer Protocol] is set to [SMB].
• When [Transfer Protocol] is [SMB] and if entering the computer name of a computer located on other
subnet, [Properties] > [Protocol Settings] > [TCP/IP] > [WINS] > [WINS Server Address] must be set on
CentreWare Internet Services.
• If entering a DNS host name, the location where the scanned data is to be saved must be in the domain
specified in [Properties] > [Protocol Settings] > [TCP/IP] > [DNS] > [DNS Server Address]/ [DNS Domain
Name] on CentreWare Internet Services.
• If setting this by entering a DNS host name when [Transfer Protocol] is [SMB], and if a computer that
uses the same name for its computer name (NetBIOS name) exists on the same subnet as the scanner,
the scanned data will be saved on that computer.
1.
2.
Select the [Server] entry box.
Enter the name or IP address of the server
using the numeric keypad on the control
panel.
Save In
Address Book...
SMB
Scan
Basic Scanning More
Features
Change File Name...
Preview
FTP
DCSERVER
Server
Save In
1/2
User Name
Shared Name (SMB)
This item appears when [SMB] is selected for the transfer protocol. Set the shared name of
the shared folder in which to save the scanned data. This setting is mandatory.
When entering the shared name, follow the guidelines below:
• Enter it within 32 characters or symbols.
• Control characters (such as linefeeds) cannot be used.
Note
• The shared name can be found in [Properties] of the shared folder you created. It is under [Share name]
on the [Sharing] tab.
1.
Select the [Shared Name] entry box.
2.
Enter the shared name using the numeric
keypad on the control panel.
Save In
Address Book...
SMB
Server
Scan
Basic Scanning More
Features
Change File Name...
Preview
FTP
DCSERVER
Shared Name scandata
1/2
Save In
2.5 Using Scan to PC
53
Save In
Set the name of the folder in which to save the scanned data.
When [Transfer Protocol] is [SMB], set the folder under the shared folder you created. When
[Transfer Protocol] is [FTP], set the folder under the directory to be logged in.
This setting is optional. If you leave this blank when [Transfer Protocol] is [SMB], the
scanned data will be saved right under the shared folder set in [Shared Name]. When
[Transfer Protocol] is [FTP], the scanned data will be saved in the directory that will be
logged in by the user set in [User Name].
When entering the “Save In” location, follow the guidelines below:
• Enter it within 96 characters or symbols.
• Control characters (such as linefeeds) cannot be used.
• If [Transfer Protocol] is [FTP], enter it in a format of "path1/path2". If [Transfer Protocol]
is [SMB], enter it in a format of "path1\path2".
1.
Select the [Save In] entry box.
2.
Enter the path of the folder in which to save
the scanned data using the numeric keypad
on the control panel.
Save In
Address Book...
Scan
Basic Scanning More
Features
Change File Name...
SMB
Preview
FTP
Server
DCSERVER
Save In
planning/data
1/2
User Name
User Name
Set the user who is authorized to enter the computer/folder in which to save the scanned
data.
This setting is mandatory.
When entering the user name, follow the guidelines below:
Local user name
• Enter it within 97 characters or symbols.
• Control characters (such as linefeeds) and the following symbols cannot be used:
“*+,/:;<=>?[\]|
• Leading and trailing spaces are not allowed.
• This cannot be a character string that only contains a period (.).
Note
• If using Windows XP, your local user name can be found under [Control Panel] > [User Account].
• If using Windows 2000, your local user name is under [My Computer] > [Properties] on the [User
Profiles] tab, and is displayed in a format of "computer name\user name". For details, check [Control
Panel] > [Users and Passwords].
NetBIOS-format domain user
Specify this in a format of "domain\user".
Example: pcname\smith
When entering the "domain” and "user” portions, follow the guidelines below:
54
2 Scan
• Control characters (such as linefeeds) and the following symbols cannot be used:
“*+,/:;<=>?[\]|
• Leading and trailing spaces are not allowed.
• This cannot be a character string that only contains a period (.).
• Enter the "user portion" within 32 characters or symbols.
• Enter the "domain portion" within 64 characters or symbols.
Note
• If using Windows XP, your NetBIOS-format domain user name can be found under [Control Panel] >
[User Account].
• If using Windows 2000, your NetBIOS-format domain user name is under [My Computer] > [Properties]
on the [User Profiles] tab, and is displayed in a format of "computer name\user name".
UPN-format domain user
Set this in a format of "user portion@domain portion".
Example: [email protected]
• The "domain portion" cannot contain control characters (such as linefeeds), spaces, and
the following symbols:
!“#$&‘()*+,/:;<=>?@[\]^`{|}~
• Enter the "user portion" within 32 characters or symbols.
• Enter the "domain portion" within 64 characters or symbols.
Note
• For UPN-format user name, ask your network administrator.
1.
2.
Select the [User Name] entry box.
Enter the user name using the numeric
keypad on the control panel.
Save In
Address Book...
Scan
Basic Scanning More
Features
Change File Name...
SMB
Preview
FTP
Server
DCSERVER
Save In
planning/data
User Name
smith
2.5 Using Scan to PC
1/2
55
Password
Set the password for the user set in [User Name]. This setting is mandatory.
Enter the password within 32 characters or symbols.
1.
Select [T] on the right side of the [Save In]
screen to display the [Password] entry box.
Scan
Basic Scanning More
Features
Save In
Address Book...
Change File Name...
SMB
2.
Preview
FTP
Server
DCSERVER
Save In
planning/data
User Name
smith
1/2
Select the [Password] entry box.
3.
Enter the password using the numeric
keypad on the control panel.
Scan
Basic Scanning More
Features
Save In
Address Book...
Change File Name...
SMB
Password
Preview
FTP
*****
2/2
Setting the File Name
Selecting [Change File Name...] on the [Save In] screen displays the [Change File Name]
screen. On this screen, you can set the file name of the scanned data and specify the action
to be taken when a file name conflict occurs.
Save In
Address Book...
Change File Name
Scan
Basic Scanning More
Features
Change File Name...
Preview
Cancel
Save
File Name (Max. 20 chars.)
(Auto Set)
SMB
FTP
Restore Auto
Server
File Name Conflict
Save In
1/2
Change Name and Save
User Name
File Name
Set the file name of the scanned data.
When this is left blank, the file name will be assigned automatically based on the following
rule:
• Starts with "img-" followed by a nine-digit number indicating the saved date and time.
October, November, and December, however, are indicated as "X", "Y", and "Z",
respectively.
Example: img-102030400
January 2nd, 03:04:00 (hr:min:sec)
img-X11123045
October 11th, 12:30:45 (hr:min:sec)
When entering the file name, follow the guidelines below:
• Enter it within 20 characters or symbols.
56
2 Scan
• The following symbols cannot be used:
*"/\<>:|?=,.;[]+
1.
2.
On the [Change File Name] screen, select
the [File Name] entry box.
Change File Name
Enter the file name using the numeric
keypad on the control panel.
Save
File Name (Max. 20 chars.)
(Auto Set)
Restore Auto
Note
• The [Restore Auto] button rests the file name to the
default.
3.
Cancel
File Name Conflict
Change Name and Save
Select [Save].
File Name Conflict
Specify the action to be taken if a file name conflict occurs.
1.
On the [Change File Name] screen, select
[File Name Conflict].
Change File Name
Cancel
Save
File Name (Max. 20 chars.)
(Auto Set)
Restore Auto
File Name Conflict
Change Name and Save
2.
3.
On the [File Name Conflict] screen, select
[Cancel Job], [Change Name and Save], or
[Overwrite].
In case of a file name conflict, [Change
Name and Save] will not save the file.
[Change Name and Save] will save the file,
but will add a number between 0001 and
9999 to the end of its name.
[Overwrite] will save the file by overwriting
the file of the same name.
File Name Conflict
Cancel Job
Change Name
and Save
Cancel
Save
In the case of file name
conflict, a number
between 0001 - 9999 will
be added to the file name
to save as a new file.
Overwrite
Select [Save].
2.5 Using Scan to PC
57
2.6
Using Scan to Media
This section explains how to convert scanned data into PDF, DocuWorks, TIFF, or JPEG
and save it on a USB flash memory (available commercially) plugged into the USB
connector.
This corresponds to " Step 2 Load a document and insert media (P. 30)" and " Step 3 Select
the scan type (P. 31)" in “2.1 Scanning Procedure”.
STEP
1
2
Load a document
and insert media
3
4
Select the scan
type
5
6
7
The Scan to Media feature allows you to import scanned data into your computer even when
the scanner is not connected to a network.
Scanned data
USB memory
PC
When Scan to Media is used, data will be saved directly under the root directory of the USB
flash memory.
Important
• Scan to Media cannot be used when the security or write-protect feature of the USB flash memory is
enabled.
Configuring Settings for Scan to Media
Selecting [Scan to Media] on the [All Services] screen or pressing the <Scan to Media>
button displays the [Save In] screen.
All Services
Save In
Job Status
Copy
Scan
Basic Scanning More
Features
Change File Name...
Preview
Scan to E-mail
Insert a USB Flash
Memory as shown
on the left.
Scan to PC
Scan to Media
Note
• When a password is set for the feature, a screen prompting you to enter the password appears. When
prompted, enter the password using the numeric keypad and select [Confirm]. For information on how to
set passwords, refer to "Service Login (P. 145)".
• When the feature is disabled, a message informing you of this appears. To enable or disable the use of
each feature, refer to"Service Availability (P. 143)".
• If old settings are still present on the [Save In] screen, pressing the <Clear All> button on the control
panel resets them to the defaults. The defaults can be changed under [System Settings]. For information
about [System Settings], refer to "6 System Settings (P. 129)".
58
2 Scan
Loading the Document and Inserting the Media
1.
Load the document to be scanned.
Refer to
• For instructions on how to load documents, refer to
"1.5 Loading Documents (P. 23)".
2.
Insert a USB flash memory into the USB
connector.
Note
• The scanner has three USB connectors. To insert a
USB flash memory, the connector located on the front
side is the most convenient. Other USB connectors
can be used also if the connector on the front side has
malfunctioned.
Refer to
• For more information on the location of the USB
connectors, refer to "1.1 Main Components (P. 13)".
Setting the File Name
Selecting [Change File Name...] on the [Save In] screen displays the [Change File Name]
screen. On this screen, you can set the file name of the scanned data and specify the action
to be taken when a file name conflict occurs.
Save In
Change File Name
Scan
Basic Scanning More
Features
Change File Name...
Preview
Cancel
Save
File Name (Max. 20 chars.)
(Auto Set)
Insert a USB Flash
Memory as shown
on the left.
Restore Auto
File Name Conflict
Change Name and Save
File Name
Set the file name of the scanned data.
If you leave this blank, the file name will be assigned automatically based on the following
rule:
• Starts with "img-" followed by a nine-digit number indicating the saved date and time.
October, November, and December, however, are indicated as "X", "Y", and "Z",
respectively.
Example: img-102030400
January 2nd, 03:04:00 (hr:min:sec)
img-X11123045
October 11th, 12:30:45 (hr:min:sec)
When entering the file name, follow the guidelines below:
• Enter it within 20 characters or symbols.
• The following symbols cannot be used:
*"/\<>:|?=,.;[]+
2.6 Using Scan to Media
59
1.
2.
On the [Change File Name] screen, select
the [File Name] entry box.
Change File Name
Enter the file name using the numeric
keypad on the control panel.
Save
File Name (Max. 20 chars.)
(Auto Set)
Restore Auto
Note
• The [Restore Auto] resets the file name to the default.
3.
Cancel
File Name Conflict
Change Name and Save
Select [Save].
File Name Conflict
Specify the action to be taken when a file name conflict occurs.
1.
On the [Change File Name] screen, select
[File Name Conflict].
Change File Name
Cancel
Save
File Name (Max. 20 chars.)
(Auto Set)
Restore Auto
File Name Conflict
Change Name and Save
2.
3.
60
2 Scan
On the [File Name Conflict] screen, select
[Cancel Job], [Change Name and Save], or
[Overwrite].
In case of a file name conflict, [Change
Name and Save] will not save the file.
[Change Name and Save] will save the file,
but will add a number between 0001 and
9999 to the end of its name.
[Overwrite] will save the file by overwriting
the file of the same name.
Select [Save].
File Name Conflict
Cancel Job
Change Name
and Save
Overwrite
Cancel
Save
In the case of file name
conflict, a number
between 0001 - 9999 will
be added to the file name
to save as a new file.
2.7
Setting the Basic Scan Features
This section explains how to set the basic scan features.
This corresponds to " Step 4 Set the scan features (P. 32)" in “2.1 Scanning Procedure”.
STEP
1
2
4
3
Set the scan
features
5
6
7
The basic scan features can be set on the [Basic Scanning] screen.
[Basic Scanning] screen
Scan
E-mail Address Basic Scanning More
Features
Output Color
File Format
2 Sided Orig.
Full Color
PDF
Grayscale
DocuWorks
Black
TIFF
Original Type
Lighten/Darken
More...
Note
• The above screen is the [Basic Scanning] screen when [Scan to E-mail] is selected. The content of the
screen, however, is the same even when [Scan to PC] or [Scan to Media] is selected.
• If old settings are still present on the [Basic Scanning] screen, pressing the <Clear All> button on the
control panel resets them to the defaults. The defaults can be changed under [System Settings]. For
information about [System Settings], refer to "6 System Settings (P. 129)".
From the [Basic Scanning] screen, access the setting screen for each available feature.
<Example>
File Format
Cancel
PDF
Multi-page
TIFF
DocuWorks
JPEG
Save
TIFF
On each setting screen, configure the required settings and select [Save] when you are
done.
When you want to delete or cancel the settings you entered, select [Cancel].
2.7 Setting the Basic Scan Features
61
Output Color (Selecting the Output Color)
The Output Color feature allows you to select the desired output color.
Output Color
Color Original
[Full Color]
[Grayscale]
[Black]
[Full Color]
[Grayscale]
[Black]
B&W Original
Full Color
Select this when scanning color originals.
Grayscale
Select this when scanning originals with different shades of black and white. This can be
used for originals that cannot be represented in black and white only.
Black
Select this when the desired output is black and white.
1.
On the [Basic Scanning] screen, select the
desired output color.
Scan
E-mail Address Basic Scanning More
Features
Output Color
File Format
Full Color
PDF
Grayscale
DocuWorks
Black
TIFF
More...
62
2 Scan
2 Sided Orig.
Original Type
Lighten/Darken
File Format (Selecting the File Format of the Scanned Data)
The File Format feature allows you to set the file format of the scanned data.
PDF
Saves the scanned data in PDF format.
Note
• To view scanned data saved in PDF format, Acrobat Reader 4.0 or later is required. Acrobat Reader can
be installed from the "Software Pack" CD-ROM included with the scanner.
DocuWorks
Saves the scanned data in DocuWorks format.
Note
• To view or print scanned data saved in DocuWorks format, one of the following software is required:
• DocuWorks Ver. 4.0 or later
• DocuWorks Viewer Light Ver. 4.0 or later
• DocuWorks Viewer Light for Web Ver. 4.0 or later
DocuWorks 6.0 Trial Edition, DocuWorks Viewer Light 6.0, and DocuWorks Viewer Light for Web 6.0
can be installed from the "Software Pack" CD-ROM included with the scanner.
TIFF
Divides the scanned data per page and saves each page as a TIFF file.
Note
• The TIFF format can be selected from [TIFF V6] and [TTN2] under [System Settings]. For more
information, refer to "TIFF File Format (P. 172)".
More...
Displays the [File Format] screen that allows you to select other file formats.
1.
On the [Basic Scanning] screen, select the
desired file format.
To select a file format that is not displayed
on the screen, select [More...] and select it
on the [File Format] screen.
Scan
E-mail Address Basic Scanning More
Features
Output Color
File Format
Full Color
PDF
Grayscale
DocuWorks
Black
TIFF
2 Sided Orig.
Original Type
Lighten/Darken
More...
[File Format] Screen
Selecting [More...] on the [Basic Scanning] screen displays the [File Format] screen.
On this screen, you can select other file formats.
Multi-page TIFF
Saves multiple-page scanned data into one TIFF file.
Note
• Multi-page TIFF files can be viewed on DocuScan Manager.
JPEG
Saves scanned data in JPEG format.
2.7 Setting the Basic Scan Features
63
Note
• [JPEG] cannot be selected when [Output Color] is set to [Black].
1.
2.
When [More...] is selected, select the
desired file format on the [File Format]
screen.
File Format
Cancel
PDF
Multi-page
TIFF
DocuWorks
JPEG
Select [Save].
Save
TIFF
2 Sided Originals (Scanning a 2-Sided Original)
The 2 Sided Originals feature allows you to set whether to scan both sides or only one side
of the original.
When scanning both sides of the original, specify its printing orientation (head-to-head or
head-to-toe) and the orientation it is loaded.
Selecting [2 Sided Orig.] displays the [2 Sided Originals] screen.
Important
• If you enlarge and scan a large head-to-toe document, part of its image may get lost.
[2 Sided Originals] Screen
1 Sided
Scans one side of the original.
2 Sided
Scans both sides of the original.
Selecting [2 Sided] displays the options for [Originals] and [Original Orientation] on the right
side of the screen.
[Originals]
H to H
Select this when the original is head-to-head (The top of the page remains at the top when
the page is flipped over).
H to T
Select this when the original is head-to-toe (The top of the page comes at the bottom when
the page is flipped over).
64
2 Scan
[Original Orientation]
When scanning the original from the document feeder, specify its orientation to define which
side is the top.
Head-Top
Select this when placing the original on the document glass or into the document feeder with
its top towards the back of the scanner.
Note
• The output orientation for TIFF, Multi-page TIFF, and JPEG differs from that of PDF and DocuWorks.
Top
Top
Left
TIFF, Multi-page TIFF, JPEG
Right
Bottom
PDF, DocuWorks
Original placed on document glass
Scan result
Top
TIFF, Multi-page TIFF, JPEG
PDF, DocuWorks
Original loaded into document feeder
Scan result
Head-Left
Select this when placing the original on the document glass or into the document feeder with
its top towards the left of the scanner. Make sure to select [Head-Left] when placing the
original in head-left orientation (texts are in sideways).
Top
Right Top
Left
Bottom
Original placed on document glass
Scan result
2.7 Setting the Basic Scan Features
65
Top
Original loaded into document feeder
Scan result
Note
• The scanner will not correctly recognize the top of the original if the [Original Orientation] setting does
not match the actual orientation of the original.
1.
On the [Basic Scanning] screen, select [2
Sided Orig.].
T
Scan
h E-mail Address Basic Scanning More
Features
eOutput Color
File Format
2 Sided Orig.
s
c
a
n
n
e
.
2.
On the [2 Sided Originals] screen, select [1
Sided] or [2 Sided]. When [2 Sided] is
selected, select the options for [Originals]
and [Original Orientation].
Full Color
PDF
Grayscale
DocuWorks
Black
TIFF
Select [Save].
Lighten/Darken
More...
2 Sided Originals
Cancel
Originals
1 Sided
3.
Original Type
Save
Original
Orientation
H to H
Head-Top
H to T
Head-Left
2 Sided
Original Type (Selecting the Original Type)
The Original Type feature allows you to define the type of the original.
Selecting [Original Type] displays the [Original Type] screen.
[Original Type] Screen
Text
Select this to produce sharp text images.
Text & Photo
Select this for scanning originals that contain both texts and photos. It automatically
identifies text and photo area and copies both areas in the optimal print quality.
Selecting [Text & Photo] displays [Photo Type] on the right side of the screen.
Photo
Select this for scanning photos.
Selecting [Photo] displays [Photo Type] on the right side of the screen.
66
2 Scan
[Photo Type]
Halftone
Select this for scanning printer-printed photos or printing materials such as books and
brochures.
Photograph
Select this for scanning photos printed on photographic paper.
1.
On the [More Scan Features] screen, select
[Original Type].
Scan
E-mail Address Basic Scanning More
Features
Output Color
File Format
2 Sided Orig.
Full Color
PDF
Grayscale
DocuWorks
Black
TIFF
Original Type
Lighten/Darken
More...
2.
3.
On the [Original Type] screen, select the
type of the original.
Original Type
Cancel
Save
Select [Save].
Text
Text & Photo
Photo
2.7 Setting the Basic Scan Features
67
Lighten/Darken (Adjusting the Scan Density)
The Lighten/Darken feature allows you to adjust the overall lightness and darkness (scan
density) of the output in seven levels.
Original
Lighten / Darken
[Lighten]
1.
[Darken]
Adjust the scan density using [ ] or [ ].
Scan
E-mail Address Basic Scanning More
Features
Output Color
File Format
Full Color
PDF
Grayscale
DocuWorks
Black
TIFF
More...
68
2 Scan
2 Sided Orig.
Original Type
Lighten/Darken
2.8
Setting Other Scan Features
The following explains how to set the features available on the [More Scan Features]
screen.
This corresponds to " Step 4 Set the scan features (P. 32)" in “2.1 Scanning Procedure”.
1
STEP
2
4
3
Set the scan
features
5
6
7
[More Scan Features] screen
Scan
E-mail Address Basic Scanning More
Features
Scan Size
Auto Size
Detect
Scan
E-mail Address Basic Scanning More
Features
Image Compression
Normal
Reduce / Enlarge
100%
Mixed Sized Orig.
Off
Scan Resolution
200 dpi
Original Orientation
Head to Left
Sharpness
Normal
Contrast
Normal
Auto Exposure
1/2
On
2/2
Note
• The above screen is the [More Scan Features] screen on the DocuScan C4250 when [Scan to E-mail] is
selected. The content of the screen, however, is the same even when [Scan to PC] or [Scan to Media] is
selected. [Mixed Sized Orig.] is not available on the DocuScan C3200 A.
• If old settings are still present on the [More Scan Features] screen, pressing the <Clear All> button on
the control panel resets them to the defaults. The defaults can be changed under [Systems Settings].
For more information about [System Settings], refer to "6 System Settings (P. 129)".
From the [More Scan Features] screen, access the setting screen for each available
feature.
<Example>
Scan Size
Cancel
Auto Size
Detect
A4
Standard Size
A3
Variable Size
Save
A4
1/2
B4
B5
B5
On each setting screen, configure the required settings and select [Save] when you are
done.
When you want to delete or cancel the settings you entered, select [Cancel].
2.8 Setting Other Scan Features
69
Scan Size (Specifying the Scan Size)
The Scan Size feature allows you to specify the scan size.
Specify the scan size when scanning a non-standard size document, or when scanning a
document in a size different from the original.
If you specify the scan size, the original will be scanned in the size you specified regardless
of its actual size.
Original
Scan Size
X
Question
Question
Y
Answer
[Variable Size]
Selecting [Scan Size] displays the [Scan Size] screen.
[Scan Size] Screen
Auto Size Detect
Automatically detects the size of the original. The following documents sizes can be
detected automatically:
Document Glass
C4250
B5
, B5
A4
, 8.5 x 11”
, B4
,
A3
, 11 x 17”
, A6
, B6
16K
C3200 A
, 16K
, A5
, A5
Document Feeder
, A4
,
B5
, B5
, A5
, A5
A4
, B4
, A3
B5
, A5
, A5
, A4
,
,
, 8K
B5
, A5
B6
, 8.5 x 11”
, A5
, A4
, A6
,
, A4
, 16K
Note
• When the size of a document cannot be detected, a screen that allows you to enter the size appears.
• The chart shows the standard paper sizes for A/B series (8K/16K). For the standard paper sizes for A/B
Series and Inch Series, and for information on how to set the scanner to detect other paper size series,
refer to "Paper Size Settings (P. 148)".
Standard Size
Select this when selecting the scan size from the
preset options.
The preset options displayed on the screen can
be changed.
Note
• The DocuScan C4250 displays 12 preset options
while the DocuScan C3200 A displays 6. The screen
on the right is that of the DocuScan C4250.
Scan Size
Cancel
Auto Size
Detect
A4
Standard Size
A3
Variable Size
A4
B4
B5
B5
70
2 Scan
Save
1/2
Refer to
• For information on how to change the preset options,
refer to "Original Size Button (P. 141)".
Variable Size
Select this when the original is non-standard
size, or when scanning in a size different from its
actual size. Specify the size using [ ]/[ ]/[ ]/
[ ] in increments of 1 mm. The scale on the
document glass can help you specify the size.
Scan Size
Cancel
Auto Size
Detect
(15 - 297)
Y
1.
2.
100
mm
X
Standard Size
Refer to
• For information about supported document sizes, refer
to "Supported Documents (P. 23)".
Save
(15 - 432)
Variable Size
On the [More Scan Features] screen, select
[Scan Size].
Scan Size
On the [Scan Size] screen, set the scan
size.
100
mm
Cancel
Save
Auto Size
Detect
Standard Size
3.
Select [Save].
Variable Size
Reduce/Enlarge (Specifying the Scan Ratio)
The Reduce/Enlarge feature allows you to specify the desired scan ratio.
Original
A
B
Reduce / Enlarge
A
B
[Preset %]
Enlarged from A4 to A3
[Auto %]
Reduced to fit on B5
Selecting [Reduce/Enlarge] displays the [Reduce/Enlarge] screen.
2.8 Setting Other Scan Features
71
[Reduce/Enlarge] Screen
Preset %
Select this when selecting the scan ratio from the
preset options.
When selected, the preset options appear on the
right side of the screen.
Note
• When the scan ratio is selected from [Preset %], the
output size may not exactly match the selected preset
%. Use the paper sizes on the screen as a reference
when selecting a preset %.
Reduce/Enlarge
Preset %
Auto %
Cancel
Save
100%
50%
A3´A5
70%
A3´A4/B4´B5
81%
B4´A4/B5´A5
86%
A3´B4/A4´B5
115%
B4´A3/B5´A4
1/2
Auto %
Automatically reduces/enlarges the original to fit
on the paper size selected.
When selected, the paper size options appear
on the right side of the screen.
Note
• When [Auto %] is selected, the scanner recognizes
margins as white data.
Reduce/Enlarge
Preset %
Cancel
Save
A4
A3
Auto %
B4
1/3
B5
A5
B6
1.
2.
3.
72
2 Scan
On the [More Scan Features] screen, select
[Reduce/Enlarge].
On the [Reduce/Enlarge] screen, specify
the scan ratio.
Select [Save].
Reduce/Enlarge
Preset %
Auto %
Cancel
Save
100%
50%
A3´A5
70%
A3´A4/B4´B5
81%
B4´A4/B5´A5
86%
A3´B4/A4´B5
115%
B4´A3/B5´A4
1/2
Scan Resolution (Specifying the Scan Resolution)
The Scan Resolution feature allows you to specify the desired scan resolution.
Higher resolution yields better image quality but increases the size of data. As data size
increases, the time required for scanning or transferring data also increases.
Selecting [Scan Resolution] displays the [Scan Resolution] screen.
[Scan Resolution] Screen
200 - 600 dpi
Select the scan resolution from the options of 200 dpi, 300 dpi, 400 dpi, and 600 dpi.
1.
2.
3.
On the [More Scan Features] screen, select
[Scan Resolution].
On the [Scan Resolution] screen, select the
desired scan resolution.
Select [Save].
Scan Resolution
Cancel
Save
200 dpi
300 dpi
400 dpi
600 dpi
Image Compression (Specifying the Compression Rate of the Output)
The Image Compression feature allows you to specify the desired data compression rate
when scanning with [Output Color] set to [Full Color] or [Grayscale].
Selecting [Image Compression] displays the [Image Compression] screen.
[Image Compression] Screen
Higher
Saves the scanned data at a high compression rate. The image quality is not high, but the
data size is small.
Normal
Saves the scanned data at a standard compression rate. Both the image quality and data
size is standard.
Lower
Saves the scanned data at a low compression rate. The image quality is high, but the data
size is large.
1.
2.
3.
On the [More Scan Features] screen, select
[Image Compression].
On the [Image Compression] screen, select
the desired compression rate.
Select [Save].
Image Compression
Cancel
Save
Higher
Higher
File Size: Small
Normal
Lower
Resolution: High
Lower
This feature does not
work when Black is
selected as Output
Color.
2.8 Setting Other Scan Features
73
Mixed Sized Originals (Scanning Mixed-size Originals Simultaneously)
(DocuScan C4250 Only)
Use the Mixed Sized Originals feature to feed documents of different sizes into the
document feeder. This feature allows you to scan documents of different sizes
simultaneously and scans them on paper appropriate for each document.
This feature also allows you to scan all documents on the same size paper.
When scanning documents on the same size paper, set [Mixed Sized Originals] to [Enable]
and configure the following settings:
• Set [Reduce/Enlarge] to [Auto %] and select the output paper size.
Refer to
• For information about scan ratios, refer to "Reduce/Enlarge (Specifying the Scan Ratio) (P. 71)".
Mixed-size Originals
Scanned in Same Sizes as Originals
A
Scanned on Same Size Paper
A
A
ReportB
1
Report
ReportB
2
3
1
B
2
2
1
3
3
Important
• Always load A5 documents in LEF orientation.
Note
• If the sizes of documents cannot be detected, a screen that allows you to enter the sizes appears.
Selecting [Mixed Sized Orig.] displays the [Mixed Sized Originals] screen.
[Mixed Sized Originals] Screen
Off
Select this when scanning documents of the same size.
On
Select this when scanning documents of different sizes. The scanner will automatically
detect the size of each document.
1.
2.
On the [More Scan Features] screen, select
[Mixed Sized Orig.].
On the [Mixed Sized Originals] screen,
select [On] or [Off].
Mixed Sized Originals
Off
On
3.
74
2 Scan
Select [Save].
Cancel
Save
Select On when there are
different sizes of originals.
Original Orientation (Specifying the Orientation of the Original)
The Original Orientation feature allows you to specify the orientation of the original to
identify which side is the top.
Selecting [Original Orientation] displays the [Original Orientation] screen.
[Original Orientation] Screen
Head to Top
Select this when placing the original on the document glass or into the document feeder with
its top towards the back of the scanner.
Top
Top
Top
Left
Right
Bottom
Original placed on document glass
Original loaded into document feeder
Head to Left
Select this when placing the original on the document glass or into the document feeder with
its top towards the left of the scanner. Make sure to select [Head to Left] when loading the
original in head-left orientation (texts are in sideways).
Top
Top
Right Top
Left
Bottom
Original placed on document glass
Original loaded into document feeder
Note
• The scanner will not correctly recognize the top of the original if the [Original Orientation] setting does
not match the actual orientation of the original.
• This feature does not work when [File Format] is set to [TIFF] or [JPEG].
1.
On the [More Scan Features] screen, select
[Original Orientation].
2.
On the [Original Orientation] screen, select
the orientation of the original.
3.
Select [Save].
Original Orientation
Cancel
Head to Top
Select the orientation
your originals are
loaded.
Head to Left
The selected Original
Orientation becomes
invalid if TIFF or JPEG
is selected as File Format.
Save
2.8 Setting Other Scan Features
75
Sharpness (Adjusting the Sharpness of the Output)
The Sharpness feature allows you to adjust the sharpness of the output.
Original
Sharpness
[Softer]
[Sharper]
Selecting [Sharpness] displays the [Sharpness] screen.
[Sharpness] Screen
Sharper - Softer
The sharpness can be adjusted in five levels from [Sharper] to [Softer].
The closer the level is to [Sharper], the sharper the contour of the image. The closer the
level is to [Softer], the softer the contour of the image.
1.
On the [More Scan Features] screen, select
[Sharpness].
2.
On the [Sharpness] screen, set the
sharpness of the image using [ ] or [ ].
3.
Select [Save].
Sharpness
Cancel
Sharper
Normal
Softer
76
2 Scan
Save
Auto Exposure (Removing the Background of the Original)
The Auto Exposure feature allows you to remove unwanted marks on the original's
background when scanning with [Output Color] set to [Black]. A newspaper is one example
of this type of original.
Also when scanned with [Output Color] set to [Full Color], a white background sometimes
appears in a faint color depending on the type of paper used and how old the paper is. In
such case, this feature can make the background of the output white.
Original
Auto Exposure
Report
Report
Note
• The Auto Exposure feature does not work when [Photo] is selected for [Original Type].
• When [Output Color] is [Full Color], this feature removes less of the background.
Selecting [Auto Exposure] displays the [Auto Exposure] screen.
[Auto Exposure] Screen
Off
Scans the background as it appears on the original.
On
Removes the background on the output.
1.
2.
On the [More Scan Features] screen, select
[Auto Exposure].
On the [Auto Exposure] screen, select [On]
or [Off].
Auto Exposure
Off
On
3.
Cancel
Save
This feature does not work
when Photo is selected
as the Original Type.
Select [Save].
2.8 Setting Other Scan Features
77
Contrast (Adjusting the Contrast of the Output)
The Contrast feature allows you to adjust the contrast of the output.
Original
Contrast
[Lower]
[Higher]
Selecting [Contrast] displays the [Contrast] screen.
[Contrast] Screen
Higher - Lower
The contrast can be adjusted in five levels from [Higher] to [Lower].
The closer the level is to [Higher], the higher the degree of contrast (The bright area is made
more brighter while the dark area is made more darker.) The closer the level is to [Lower],
the lower the degree of contrast.
1.
On the [More Scan Features] screen, select
[Contrast].
2.
On the [Contrast] screen, set the contrast of
the image using [ ] or [ ].
3.
Select [Save].
Contrast
Cancel
Higher
Normal
Lower
78
2 Scan
Save
3
Copy
3.1
Copying Procedure
By connecting the scanner to a printer using the USB cable, you can scan documents on
the scanner and output their copies from the printer.
This section outlines the basic copying procedure. For details, refer to the description
provided for each operation.
Step 1 Get ready to copy
STEP
1
Get ready to
copy
2
3
4
5
6
7
Before making copies, connect the scanner with a printer using the USB cable.
Refer to
• For information on how to connect the scanner with a printer, refer to "1 Installing the Scanner" in the
Setup and Quick Reference Guide.
• For information on how to get your printer ready to copy, refer to the user guide provided for the printer.
Step 2 Load a document
STEP
1
2
Load a document
3
4
5
6
7
Place a document onto the document glass or into the document feeder.
Refer to
• For instructions on how to load documents, refer to "1.5 Loading Documents (P. 23)".
3.1 Copying Procedure
79
Step 3 Select [Copy]
STEP
1
2
3
Select [Copy]
4
5
6
7
Display the [All Services] screen, and select [Copy].
1.
Press the <Copy> button on the control
panel, or select [Copy] on the [All Services]
screen.
Note
• The features assigned to the custom buttons can be
changed. For more information, refer to "Custom
Buttons 1 - 3 (P. 141)".
• When a password is set for [Copy], a screen
prompting you to enter the password appears. If
prompted, enter the password using the numeric
keypad and press [Confirm]. For information on how to
set passwords, refer to "Service Availability (P. 143)".
All Services
Job Status
Copy
Scan to E-mail
Scan to PC
Scan to Media
Step 4 Set the copy features
STEP
1
2
3
4
Set the copy
features
5
6
7
Set the required copy features such as paper type and copy ratio. The copy features can
be set on the following three types of screens.
Important
• The features and defaults displayed on the screens vary depending on the features provided by the
printer. The interface screens in this manual are of when the printer supports all copy features of the
scanner.
Basic Copying
Used when setting features such as paper type, copy ratio, and copy density.
Image Quality
Used when setting features such as image sharpness and document type.
More Copy Features
Used when setting features such as scan size and document orientation.
80
3 Copy
1.
Select [Basic Copying] tab, [Image Quality]
tab, or [More Copy Features] tab, and set
the required copy features.
Basic Copying Image Quality
Paper Supply
Note
• If old settings are still present, pressing the <Clear All>
button on the control panel resets them to the defaults.
More Copy
Features
Reduce
/ Enlarge
Output Color
Auto Paper
100%
Tray 1
A4
Auto %
2 Sided
Tray 2
A3
70%
A3´A4
Lighten/Darken
More...
More...
Step 5 Enter the quantity
STEP
1
2
3
4
5
Enter the
quantity
6
7
Start the copy job
7
The scanner makes up to 999 copies.
1.
Using the numeric keypad, enter the
number of copies. The number entered is
displayed in the top right corner of the touch
panel.
Note
• To cancel an incorrect entry, press the <Clear All>
button and enter the correct quantity.
Step 6 Start the copy job
STEP
1.
1
2
3
4
5
6
Press the <Start> button on the control
panel. The copying starts. The document is
scanned on the scanner and its copies are
output from the printer.
Important
• When the document is loaded into the document
feeder, do not hold it while it is being fed.
3.1 Copying Procedure
81
Note
• If a problem occurs, the touch panel displays a
message. Follow the instructions in the message to
remedy the problem. If an error code is displayed,
refer to "8.7 Error Codes (P. 208)" for suggested
solutions.
When you have more documents to copy
When you have more documents to copy, select [Next Original] on the touch panel while
the first document is being scanned. The scanner recognizes that there are more
documents to be copied and copies them as a single job.
Up to 500 pages can be scanned per a single job.
Note
• When the number of scanned pages reaches 500, a message appears, and the scanner will not scan
the rest of the pages. If you want to scan documents that exceeds 500 pages, scan the first 500 pages,
and then scan rest of the pages as a new job.
1.
While the first document is being scanned,
select [Next Original].
Scanning Documents...
Black
100%
Uncollated
Pages
Scanned
70%
Pages
Transferred
10
7
Last Original
When the scanning of the first document
completes, the message on the touch panel
changes.
Note
• If no operation is performed for a specific amount of
time, the scanner automatically assumes that there
are no more documents to be copied and presumes
the copy job.
2.
Press Start to scan.
Press Last Original to complete scanning.
Black
100%
Uncollated
Pages
Scanned
10
Last Original
3 Copy
70%
Pages
Transferred
7
Load the next document.
Refer to
• For document loading instructions, refer to"1.5
Loading Documents (P. 23)"
82
Next Original
3.
Select the <Start> button on the control
panel. If you have more documents to copy,
repeat the process of loading a document
and pressing the <Start> button.
4.
When all documents are scanned, select
[Last Original].
Next Original
Step 7 Check the job status
STEP
1
2
3
4
5
7
6
Check the job
status
As necessary, check whether the job has been processed successfully.
Selecting [Job Status] on the [All Services] screen displays the [Completed Jobs] screen.
Refer to
• For information about checking job status, refer to"5 Job Status (P. 127)"
3.2
Stopping a Copy Job
1.
Press the <Stop> button on the control
panel.
A message appears confirming the
cancellation of the job.
2.
Select [Yes].
A message appears informing you that the
cancellation is complete.
Cancel Job
Yes
No
Do you want to cancel the job?
3.
Select [Close].
Job Cancelled
Note
• Only pages that have not been transferred to the
printer can be cancelled.
Close
The job has been cancelled.
Important
• Depending on the printer, you may need to cancel jobs
on the printer instead of on the scanner. In such event,
a message informing you of this appears on the touch
screen. When using the printer on a network, make
sure not to cancel other jobs by mistake.
• When starting a new copy job after cancelling a job,
make sure that the printer is in the ready-to-copy state.
3.2 Stopping a Copy Job
83
3.3
Copy Feature Setting Items
The copy features offer the following setting items:
Screen
Basic Copying
Image Quality
More Copy Features
Setting Items
Reference
Paper Supply
"Paper Supply (Selecting a Paper Tray)
(P. 86)"
Reduce/Enlarge
"Reduce/Enlarge (Making a Reduced/
Enlarged Copy) (P. 89)"
Output Color*1
"Output Color (Selecting the Output
Color) (P. 91)"
2 Sided
"2 Sided Copying (Making a 1-Sided/2Sided Copy) (P. 92)"
Lighten/Darken
"Lighten/Darken (Adjusting the Copy
Density) (P. 95)"
Presets*1
"Image Quality Presets (Specifying the
Image Quality) (P. 96)"
Original Type*2
"Original Type (Selecting the Original
Type) (P. 98)"
Auto Exposure
"Auto Exposure (Removing the Background of the Original) (P. 99)"
Color Balance*1
"Color Balance (Adjusting the Color Balance of the Output) (P. 100)"
Sharpness
"Sharpness (Adjusting the Sharpness of
the Output) (P. 102)"
Color Saturation*1
"Color Saturation (Adjusting the Color
Saturation of the Output) (P. 103)"
Copy Output*3
"Copy Output (Collating or Uncollating
the Output) (P. 105)"
2 Up
"2 Up (Copying Two Originals on One
Page) (P. 106)"
Original Orientation
"Original Orientation (Specifying the Orientation of the Original) (P. 107)"
Mixed Sized Orig.*4
"Mixed Sized Originals (Scanning Mixedsize Originals Simultaneously) (DocuScan C4250 Only) (P. 109)"
Edge Erase
"Edge Erase (Erasing Unwanted Marks
from the Center/Edges of the Original)
(P. 110)"
Original Size
"Original Size (Specifying the Scan Size)
(P. 111)"
*1 This item is not available if the scanner is connected to a monochrome printer.
*2 This item is available on the [Basic Copying] screen if the scanner is connected to a
monochrome printer.
*3 This item is available only if the printer has a collating feature and add-on hard disk.
*4 This item is not available on the DocuScan C3200 A.
84
3 Copy
3.4
Setting the Basic Copy Features
This section describes how to set the basic copy features.
This corresponds to " Step 4 Set the copy features (P. 80)" in “3.1 Copying Procedure”.
STEP
1
3
2
4
Set the copy
features
5
6
7
The basic copy features can be set on the [Basic Copying] screen.
[Basic Copying] screen
Basic Copying Image Quality
Paper Supply
Reduce
/ Enlarge
More Copy
Features
Output Color
Auto Paper
100%
Tray 1
A4
Auto %
2 Sided
Tray 2
A3
70%
A3´A4
Lighten/Darken
More...
More...
Note
• If old settings are still present on the [Basic Copying] screen, pressing the <Clear All> button on the
control panel resets them to the defaults. The defaults can be changed under [System Settings]. For
information about [System Settings], refer to "6 System Settings (P. 129)".
• Depending on the features provided by the printer, the features and defaults displayed on the scanner
vary. The interface screens in this manual are of when the printer supports all copy features of the
scanner.
3.4 Setting the Basic Copy Features
85
Paper Supply (Selecting a Paper Tray)
The Paper Size feature allows you to select the paper tray that contains the paper you want
to copy onto.
Auto Paper
Automatically selects an appropriate paper tray based on the size of the original and the
specified copy ratio.
Note
• When [Auto Paper] is selected, select an option other than [Auto %] for [Reduce/Enlarge].
Tray 1, Tray 2
Displays the paper trays available on the printer.
Note
• The paper trays displayed on the screen are those set under [System Settings] > [Basic Copying] >
[Paper Supply-2]/[Paper Supply-3]. The following screen uses the default settings of [Tray 1] and
[Tray2]. For information on how to change the paper supply options on the [Basic Copying] screen, refer
to "Basic Copying (P. 158)".
More...
Displays the [Paper Supply] screen. On this screen, you can select paper trays that are not
displayed on the [Basic Copying] screen.
Selecting [Bypass] on the [Paper Supply] screen displays the [Bypass] screen. This screen
allows you to select the type and size of paper to be loaded on the bypass tray.
1.
On the [Basic Copying] screen, select the
desired paper tray under [Paper Supply].
If the paper tray you want to use is not
displayed, select [More...]. On the [Paper
Supply] screen, select the desired paper
tray.
Basic Copying Image Quality
Paper Supply
Reduce
/ Enlarge
More Copy
Features
Output Color
Auto Paper
100%
Tray 1
A4
Auto %
2 Sided
Tray 2
A3
70%
A3´A4
Lighten/Darken
More...
More...
[Paper Supply] screen
Selecting [More...] on the [Basic Copying] screen displays the [Paper Supply] screen.
This screen displays all paper trays that are available on the printer and allows you to select
paper trays that are not displayed on the [Basic Copying] screen.
Selecting the bypass tray displays the [Bypass] screen.
Important
• When the printer accommodates non-standard size paper or standard size paper that is not supported
by the scanner, the paper trays that contain such paper cannot be selected.
• The paper types available on the printer but not supported by the scanner cannot be used on the
scanner.
86
3 Copy
1.
When [More...] is selected, select the
desired paper tray on the [Paper Supply]
screen, and select [Save].
Paper Supply
Cancel
Save
Auto Paper
Tray 1
A4
Plain
Tray 2
B4
Recycled
Tray 3
A3
Plain
Tray 4
A5
Recycled
Bypass
A5
Recycled
1/2
[Bypass] Screen
Selecting [Bypass] on the [Paper Supply] screen displays the [Bypass] screen.
On this screen, you can select the type and size of paper to be loaded on the bypass tray.
Important
• Depending on the printer, additional settings may be required on the printer when making copies on nonstandard size paper from the bypass tray. For more information, refer to the user guide provided for the
printer.
Note
• The paper types and sizes displayed on the screen are not those of paper loaded on the printer.
Standard Size
Displays the [Standard Size] screen. On this screen, you can select the size of paper to be
loaded on the bypass tray.
Non-standard Size
Displays the [Non-standard Size] screen.
On this screen, you can specify the width (X direction) and height (Y direction) of paper in
increments of 1 mm.
Note
• The range of paper size that can be specified depends on the printer. Refer to the user guide provided
for the printer.
Paper Type
Allows you to select the desired paper type from the list.
1.
When [Bypass] is selected on the [Paper
Supply] screen, select [Standard Size] or
[Non-standard Size].
Bypass
Cancel
Paper Size
Paper Type
Standard Size
Plain
Save
A4
Bond
Non-standard Size
Recycled
1/2
Transparency
Heavyweight 1
3.4 Setting the Basic Copy Features
87
2.
When [Standard Size] is selected, select
the desired paper size on the [Standard
Size] screen.
Standard Size
Cancel
Save
Paper Size
A4
A4
1/1
A3
B4
B5
When [Non-standard Size] is selected,
specify the paper size using [ ]/[ ]/[ ]/
[ ].
Non-standard Size
Cancel
X is the edge
perpendicular
to the feeder.
Save
(90 - 215)
X
Y:
200
mm
Y
(140 - 355)
X:
3.
Select [Save].
4.
Select the desired paper type from [Paper
Type].
5.
Select [Save] repeatedly until you return to
the [Basic Copying] screen.
Bypass
200
mm
Cancel
Paper Size
Paper Type
Standard Size
Plain
Save
A4
Bond
Non-standard Size
Recycled
Transparency
Heavyweight 1
88
3 Copy
1/2
Reduce/Enlarge (Making a Reduced/Enlarged Copy)
The Reduce/Enlarge feature allows you to make a reduced/enlarged copy by selecting the
desired copy ratio.
Original
Reduce / Enlarge
A
A
B
B
A
B
[100%]
[Preset %]
Enlarged from A4 to A3
[Auto %]
Reduced to fit on B5
[Variable %]
Enlarged by 120%
100%
Copies in the same size as the original (size-for-size copying).
Auto %
Automatically reduces/enlarges the original to fit on the paper size selected. The original will
be reduced/enlarged in the same proportions for X and Y directions.
Note
• When [Auto %] is selected, select an option other than [Auto] for [Paper Supply].
N%
Used when reducing/enlarging the original by this preset ratio.
More...
Displays the [Reduce/Enlarge] screen which allows you to select other copy ratios.
1.
From [Reduce/Enlarge] on the [Basic
Copying] screen, select the desired copy
ratio.
When specifying a copy ratio not displayed
on the [Basic Copying] screen, select
[More...], and set the ratio on the [Reduce/
Enlarge] screen.
Basic Copying Image Quality
Paper Supply
Reduce
/ Enlarge
More Copy
Features
Output Color
Auto Paper
100%
Tray 1
A4
Auto %
2 Sided
Tray 2
A3
70%
A3´A4
Lighten/Darken
More...
More...
3.4 Setting the Basic Copy Features
89
[Reduce/Enlarge] Screen
Selecting [More...] on the [Basic Copying] screen displays the [Reduce/Enlarge] screen.
Preset %
Select this to select a copy ratio from the preset options.
Variable %
Select this to enter the desired copy ratio. The copy ratio can be specified from 50 to 200%
in increments of 1%. The original will be reduced/enlarged in the same proportions for X and
Y directions.
1.
On the [Reduce/Enlarge] screen, select
[Preset %]. From the list of preset options
on the right side of the screen, select the
desired copy ratio, and select [Save].
Reduce / Enlarge
Cancel
Save
100%
Preset %
Auto %
Note
• When the copy ratio is selected from [Present %], the
output size may not exactly match the selected preset
%. Use the paper sizes displayed on the screen as a
reference when selecting a preset %.
2.
Select [Variable %] on the [Reduce/
Enlarge] screen, and specify the copy ratio
using the numeric keypad or [ ]/[ ] in
increments of 1%.
Variable %
50%
A3´A5
70%
A3´A4/B4´B5
81%
B4´A4/B5´A5
86%
A3´B4/A4´B5
Reduce / Enlarge
Preset %
Cancel
(50 - 200)
100
Note
• To clear an incorrect entry, press the <C> button.
3.
90
3 Copy
Select [Save].
Variable %
1/2
%
Save
1
2
3
4
5
6
7
8
9
0
C
Output Color (Selecting the Output Color)
The Output Color feature allows you to select the desired output color.
Output Color
Color Original
[Full Color]
[Black]
[Full Color]
[Black]
B&W Original
Selecting [Output Color] displays the [Output Color] screen.
Important
• This feature is not available if the scanner is connected to a monochrome printer.
[Output Color] Screen
Black
Select this when the desired output is a black and white copy.
Full Color
Select this when making copies of color documents.
1.
On the [Basic Copying] screen, select
[Output Color].
Basic Copying Image Quality
Paper Supply
Reduce
/ Enlarge
More Copy
Features
Output Color
Auto Paper
100%
Tray 1
A4
Auto %
2 Sided
Tray 2
A3
70%
A3´A4
Lighten/Darken
More...
More...
3.4 Setting the Basic Copy Features
91
2.
3.
On the [Output Color] screen, select the
desired output color.
Output Color
Cancel
Save
Select [Save].
Black
Full Color
2 Sided Copying (Making a 1-Sided/2-Sided Copy)
The 2 Sided Copying feature allows you to copy 1 sided/2 sided documents onto both sides
or one side of paper.
1-Sided Original
Report
A
2-Sided Original
Report
1-Sided Copy
Report
B
Page 1
Report
B
Page 2
1-Sided Original
A
A
Page 1
Page 2
2-Sided Original
2-Sided Copy
Report
Report
B
Page 1
Page 2
Selecting [2 Sided Copying] displays the [2 Sided Copying] screen.
Important
• You cannot make 2-sided copies if the printer does not have a 2-sided copying feature.
• If you make an enlarged copy of a large 2-sided head-to-toe document, part of its image may get lost.
• Depending on the printer, an additional memory is required when making 2-sided copies ([1J2 Sided]
or [2J2 Sided]) of A3 documents. For more information, refer to the user guide provided for the printer.
[2 Sided Copying] Screen
1J1 Sided
Makes 1-sided copies from 1-sided originals.
1J2 Sided
Makes 2-sided copies form 1-sided originals.
Important
• This feature is not available if the printer does not have a 2-sided copying feature.
2J2 Sided
Makes 2-sided copies from 2-sided originals.
92
3 Copy
Important
• This feature is not available if the printer does not have a 2-sided copying feature.
2J1 Sided
Makes 1-sided copies from 2-sided originals.
Copies
Note
• This feature is displayed when [1J2 Sided] is selected.
• H to H
Select this when making head-to-head copies (The top of the page remains at the top when
the page is flipped over).
• H to T
Select this when making head-to-toe copies (The top of the page comes at the bottom when
the page is flipped over).
Original/Copies
Note
• This feature is displayed when [2J2 Sided] is selected.
• H to H
Select this when making head-to-head copies from the head-to-head original.
• H to T
Select this when making head-to-toe copies from the head-to-toe original.
Originals
Note
• This feature is displayed when [2J1 Sided] is selected.
• H to H
Select this when the original is head-to-head.
• H to T
Select this when the original is head-to-toe.
Original Orientation
Note
• This feature is not displayed when [1J1 Sided] is selected.
Specify the orientation of the original to identify which side is the top.
3.4 Setting the Basic Copy Features
93
• Head-Top
Select this when placing the original on the document glass or into the document feeder with
its top towards the back of the scanner.
Top
Top
Top
Left
Right
Bottom
Original placed on document glass
Original loaded into document feeder
• Head-Left
Select this when placing the original on the document glass or into the document feeder with
its top towards the left of the scanner. Make sure to select [Head-Left] when placing the
original in head-left orientation (texts are in sideways).
Top
Top
Right Top
Left
Bottom
Original placed on document glass
Original loaded into document feeder
Important
• The scanner will not correctly recognize the top of the original if the [Original Orientation] setting does
not match the actual orientation of the original.
1.
On the [Basic Copying] tab, select [2
Sided].
Basic Copying Image Quality
Paper Supply
2.
On the [2 Sided Copying] screen, select the
desired option.
100%
Tray 1
A4
Auto %
2 Sided
Tray 2
A3
70%
A3´A4
Lighten/Darken
More...
More...
2 Sided Copying
1´2 Sided
2´2 Sided
2´1 Sided
3 Copy
Output Color
Auto Paper
1´1 Sided
94
Reduce
/ Enlarge
More Copy
Features
Cancel
Save
3.
4.
When an option other than [1J1 Sided] is
selected, select the desired options from
the right side of the scanner.
Select [Save].
2 Sided Copying
Cancel
Originals
1´1 Sided
Save
Original
Orientation
H to H
Head-Top
H to T
Head-Left
1´2 Sided
2´2 Sided
2´1 Sided
Lighten/Darken (Adjusting the Copy Density)
The Lighten/Darken feature allows you to adjust the overall lightness and darkness (copy
density) of the output in seven levels. The output becomes darker as you move T to the left
and lighter as you move T to the right.
Original
Lighten / Darken
[Lighten]
1.
[Darken]
Adjust the copy density using [ ] and [ ].
Basic Copying Image Quality
Paper Supply
Reduce
/ Enlarge
More Copy
Features
Output Color
Auto Paper
100%
Tray 1
A4
Auto %
2 Sided
Tray 2
A3
70%
A3´A4
Lighten/Darken
More...
More...
3.4 Setting the Basic Copy Features
95
3.5
Setting the Image Quality Features
The following explains how to set the image quality features.
This corresponds to " Step 4 Set the copy features (P. 80)" in “3.1 Copying Procedure”.
STEP
1
2
3
Set the copy
features
4
5
6
7
The image quality features can be set on the [Image Quality] screen.
[Image Quality] screen
Basic Copying Image Quality
More Copy
Features
Presets
Normal
Color Balance
Y 0 0 0/M 0 0 0
C 0 0 0/K 0 0 0
Original Type
Text & Photo
(Halftone)
Sharpness
Sharper
Auto Exposure
On
Color Saturation
Normal
Note
• If old settings are still present on the [Image Quality] screen, pressing the <Clear All> button resets them
to the defaults. The defaults can be changed under [System Settings]. For information about [System
Settings], refer to "6 System Settings (P. 129)".
Image Quality Presets (Specifying the Image Quality)
The Image Quality Presets feature automatically adjusts the [Color Balance] settings to
produce image tones appropriate for the image.
Important
• This feature is available only when the scanner is connected to a color printer.
• This feature is available only when [Output Color] is set to [Full Color].
Note
• If you change the settings on [Color Balance] screen after configuring them on the [Image Quality
Presets] screen, the settings configured on the [Image Quality Presets] screen will become invalid.
Selecting [Presets] displays the [Image Quality Presets] screen.
[Image Quality Presets] Screen
Normal
Copies the originals with the default Color Balance settings.
Color Adjustment...
Displays the [Color Adjustment] screen which allows you to adjust the tone of red/blue/
green.
96
3 Copy
1.
2.
On the [Image Quality] screen, select
[Presets].
Basic Copying Image Quality
On the [Image Quality Presets] screen,
select [Normal] or [Color Adjustment...].
More Copy
Features
Presets
Normal
Color Balance
Y 0 0 0/M 0 0 0
C 0 0 0/K 0 0 0
Original Type
Text & Photo
(Halftone)
Sharpness
Sharper
Auto Exposure
On
Color Saturation
Normal
Image Quality Presets
Normal
Color
Adjustment...
Cancel
Save
Image Quality Presets
automatically adjusts
Color Balance.
The feature will be
cancelled if Color
Balance is changed.
[Color Adjustment] Screen
Selecting [Color Adjustment...] on the [Image Quality Presets] screen displays the [Color
Adjustment] screen.
On this screen, you can adjust the tone of colors.
Original
Red +
Original
Green +
Original
Blue +
Red +/Red Emphasizes or de-emphasizes the tone of red.
Blue +/Blue Emphasizes or de-emphasizes the tone of blue.
Green +/Green Emphasizes or de-emphasizes the tone of green.
3.5 Setting the Image Quality Features
97
1.
2.
On the [Color Adjustment] screen, select
the desired color tone, and select [Save].
On the [Image Quality Presets] screen,
select [Save].
Color Adjustment
Cancel
Red +
Red -
Blue +
Blue -
Green +
Green -
Save
Original Type (Selecting the Original Type)
The Original Type feature allows you to define the type of document you want to copy.
Selecting [Original Type] displays the [Original Type] screen.
Note
• This feature is available on the [Basic Copying] screen if the scanner is connected to a monochrome
printer.
[Original Type] Screen
Text
Select this to produce sharp text images.
Text & Photo
Select this for copying documents that contain both texts and photos. It automatically
identifies text and photo areas and copies both areas in the optimal image quality.
Selecting [Text & Photo] displays [Photo Type] on the right side of the screen.
Photo
Select this for copying photos.
Selecting [Photo] displays [Photo Type] on the right side of the screen.
Map
Select this for copying maps.
[Photo Type]
Halftone
Select this for copying printer-printed photos or printing materials such as books and
brochures.
Photograph
Select this for copying photos printed on photographic paper.
98
3 Copy
1.
2.
3.
On the [Image Quality] screen, select
[Original Type].
Basic Copying Image Quality
On the [Original Type] screen, select the
type of the document.
More Copy
Features
Presets
Normal
Color Balance
Y 0 0 0/M 0 0 0
C 0 0 0/K 0 0 0
Original Type
Text & Photo
(Halftone)
Sharpness
Sharper
Auto Exposure
On
Color Saturation
Normal
Original Type
Select [Save].
Cancel
Save
Photo Type
Text
Halftone
Text & Photo
Photo
Photograph
Map
Auto Exposure (Removing the Background of the Original)
The Auto Exposure feature allows you to remove unwanted marks on the original's
background when copying with [Output Color] set to [Black]. A newspaper is one example
of this type of original.
Also when copied with [Output Color] set to [Full Color], a white background sometimes
appears in a faint color depending of the type of paper used and how old the paper is. In
such case, this feature can make the background of the output white.
Original
Auto Exposure
Report
Report
Note
• The Auto Exposure feature does not work when [Original Type] in [Photo].
• When [Output] Color is [Full Color], this feature removes less of the background.
Selecting [Auto Exposure] displays the [Auto Exposure] screen.
[Auto Exposure] Screen
Off
Copies the background as it appears on the original.
On
Removes the background of the original on the output copy.
3.5 Setting the Image Quality Features
99
1.
2.
3.
On the [Image Quality] screen, select [Auto
Exposure].
On the [Auto Exposure] screen, select [On]
or [Off].
Select [Save].
Basic Copying Image Quality
More Copy
Features
Presets
Normal
Color Balance
Y 0 0 0/M 0 0 0
C 0 0 0/K 0 0 0
Original Type
Text & Photo
(Halftone)
Sharpness
Sharper
Auto Exposure
On
Color Saturation
Normal
Auto Exposure
Off
On
Cancel
Save
This feature does not work
when Photo is selected
as the Original Type.
Color Balance (Adjusting the Color Balance of the Output)
The Color Balance feature allows you to adjust the level of four process colors (yellow,
magenta, cyan, and black). The color balance can be adjusted in seven levels for areas of
low, medium, and high density.
Color Balance
Original
Enhanced cyan
Enhanced magenta
Enhanced yellow
Enhanced black
Important
• This feature is not available if the scanner is connected to a monochrome printer.
• When [Output Color] is set to [Black], this setting only applies to black.
Note
• If you change the settings on [Color Balance] screen after configuring them on the [Image Quality
Presets] screen, the settings configured on the [Image Quality Presets] screen will become invalid.
Selecting [Color Balance] displays the [Color Balance] screen. On this screen, you can
select a color and adjust its intensity.
100
3 Copy
[Color Balance] Screen
Yellow/Magenta/Cyan/Black
Select a color that needs to be adjusted.
If you select a color, the [Color Balance] screen of that color appears.
1.
2.
3.
On the [Image Quality] screen, select [Color
Balance].
On the [Color Balance] screen, select the
button of the color you want to adjust.
On the [Color Balance (Y/M/C/K)] screen,
configure the settings, and select [Save].
More Copy
Features
Basic Copying Image Quality
Presets
Normal
Color Balance
Y 0 0 0/M 0 0 0
C 0 0 0/K 0 0 0
Original Type
Text & Photo
(Halftone)
Sharpness
Sharper
Auto Exposure
On
Color Saturation
Normal
Color Balance
Cancel
Yellow
Save
Low Mid. High
Magenta
Cyan
Black
Y
0
0
-2
M
+1
-2
+3
C
0
+1
+2
K
+3
0
0
[Color Balance (Y/M/C/K)] Screen
Selecting one of the color buttons on the [Color Balance] screen displays the [Color
Balance] screen of that color.
The colors balance can be adjusted in seven levels for areas of low, medium, and high
density.
Low Density
Adjusts the intensity of a color in seven levels for low density area.
Mid. Density
Adjusts the intensity of a color in seven levels for medium density area.
High Density
Adjust the intensity of a color in seven levels for high density area.
1.
2.
On the [Color Balance] screen of the color
you selected, adjust the intensity of the
color for each degree of density using [ ]
and [ ].
Select [Save].
Color Balance (Y)
Low Density
Cancel
Mid. Density
Save
High Density
+3
+3
+3
0
0
0
-3
-3
-3
3.5 Setting the Image Quality Features
101
Sharpness (Adjusting the Sharpness of the Output)
The Sharpness feature allows you to adjust the sharpness of the output.
Original
Sharpness
[Softer]
[Sharper]
Selecting [Sharpness] displays the [Sharpness] screen.
[Sharpness] Screen
Sharper - Softer
The sharpness can be adjusted in five levels from [Sharper] to [Softer].
The closer the level is to [Sharper], the sharper the contour of the image. The closer the
level is to [Softer], softer the contour of the image.
1.
2.
3.
On the [Image Quality] screen, select
[Sharpness].
On the [Sharpness] screen, set the
sharpness level using [ ] and [ ].
Select [Save].
Basic Copying Image Quality
Presets
Normal
Color Balance
Y 0 0 0/M 0 0 0
C 0 0 0/K 0 0 0
Original Type
Text & Photo
(Halftone)
Sharpness
Sharper
Auto Exposure
On
Color Saturation
Normal
Sharpness
Cancel
Sharper
Normal
Softer
102
3 Copy
More Copy
Features
Save
Color Saturation (Adjusting the Color Saturation of the Output)
The Color Saturation feature allows you to adjust the saturation of the output.
Color Saturation
Original
[Higher]
[Lower]
Important
• This feature is not available if the scanner is connected to a monochrome printer.
• This feature is available only if [Output Color] is set to [Full Color].
Selecting [Color Saturation] displays the [Color Saturation] screen.
[Color Saturation] Screen
Higher - Lower
The color saturation can be adjusted in five levels from [Higher] to [Lower].
The closer the level is to [Higher], more lively the colors of the image. The closer the level
is to [Lower], less lively the colors of the image.
1.
2.
3.
On the [Image Quality] screen, select [Color
Saturation].
On the [Color Saturation] screen, set the
saturation level using [ ] and [ ].
Select [Save].
Basic Copying Image Quality
More Copy
Features
Presets
Normal
Color Balance
Y 0 0 0/M 0 0 0
C 0 0 0/K 0 0 0
Original Type
Text & Photo
(Halftone)
Sharpness
Sharper
Auto Exposure
On
Color Saturation
Normal
Color Saturation
Cancel
Save
Higher
Normal
Lower
3.5 Setting the Image Quality Features
103
3.6
Settings Other Copy Features
The following explains how to set the features available on the [More Copy Features]
screen.
This corresponds to " Step 4 Set the copy features (P. 80)" in " Step 4 Set the copy features
(P. 80)".
STEP
1
3
2
Set the features
4
5
6
7
[More Copy Features] screen
Basic Copying Image Quality
Copy Output
Collated
2 Up
Off
Original Orientation
Head to Top
More Copy
Features
Mixed Sized Orig.
Off
Edge Erase
T&B: 4mm/ R&L: 4mm
Center: 0mm
Original Size
Auto Size
Detect
Note
• The above is the [More Copy Features] screen of the DocuScan C4250. The [Mixed Sized Originals]
feature is not available on the DocuScan C3200 A.
• If old settings are present on the [More Copy Features] screen, pressing the <Clear All> button on the
control panel resets them to the defaults. The defaults can be changed under [System Settings]. For
information about [System Settings], refer to "6 System Settings (P. 129)".
104
3 Copy
Copy Output (Collating or Uncollating the Output)
The Copy Output feature allows you to set whether to collate or uncollate the output.
Original
Collated
Uncollated
A
A
Report
B
ReportB
A
3
1
Report
2
2
3
1
2
B
B
Report
Report
B
1
A
A
2
3
1
3
3
2
1
Important
• This feature is only available if the printer that the scanner is connected to:
• has a collating feature.
• has an add-on hard disk.
Selecting [Copy Output] displays the [Copy Output] screen.
[Copy Output] Screen
Collated
Delivers the specified number of copy sets in the same order as the original.
Uncollated
Delivers the output in the order based on the total number of copies for each page.
1.
On the [More Copy Features] screen, select
[Copy Output].
Copy Output
Collated
2 Up
Off
Original Orientation
Head to Top
2.
3.
On the [Copy Output] screen, select
whether to collate or uncollate the output.
Select [Save].
More Copy
Features
Basic Copying Image Quality
Copy Output
Uncollated
Mixed Sized Orig.
Off
Edge Erase
T&B: 4mm/ R&L: 4mm
Center: 0mm
Original Size
Auto Size
Detect
Cancel
Save
Copies will be output
by set when Collated
is selected.
Collated
1.2.3...
1.2.3...
1.2.3...
3.6 Settings Other Copy Features
105
2 Up (Copying Two Originals on One Page)
The 2-Up feature allows you to copy the images from two originals onto a single page.
When [2 Up] is selected, [Reduce/Enlarge] is automatically set to [Auto %]. The scanner
automatically reduces/enlarges the originals to fit on the paper size selected.
2 Up
Original
2
1
1
2
2
1
Important
• Make sure that the orientation of the original is identical to [Original Orientation].
Note
• When [Auto %] under [Reduce/Enlarge] is disabled (when a copy ratio of your choice is specified),
image loss may occur depending on the size of the originals.
• When enabled, Edge Erase will be applied to each original.
• [Paper Supply] on the [Basic Copying] screen must be set to an option other than [Auto].
Selecting [2 Up] displays the [2 Up] screen.
[2 Up] Screen
1 Up
Disables the feature.
2 Up
Copies two originals onto a single page.
[Image Order]
When [2 Up] is selected, select the image order.
1.
On the [More Copy Features] screen, select
[2 Up].
Basic Copying Image Quality
Copy Output
Collated
2 Up
Off
Original Orientation
Head to Top
106
3 Copy
More Copy
Features
Mixed Sized Orig.
Off
Edge Erase
T&B: 4mm/ R&L: 4mm
Center: 0mm
Original Size
Auto Size
Detect
2.
On the [2 Up] screen, select [1 Up] or [2
Up].
3.
When [2 UP] is selected, select the image
order.
4.
Select [Save].
Cancel
2 Up
Save
Image Order
1 Up
2 Up
Original Orientation (Specifying the Orientation of the Original)
The Original Orientation feature allows you to specify the orientation of the original to
identify which side is the top.
Select [Original Orientation] to display the [Original Orientation] screen.
[Original Orientation] Screen
Head to Top
Select this when placing the original on the document glass or into the document feeder with
its top towards the back of the scanner.
Top
Top
Top
Left
Right
Bottom
Original placed on document glass
Original loaded into document feeder
Head to Left
Select this when placing the original on the document glass or into the document feeder with
its top towards the left of the scanner. Make sure to select [Head to Left] when placing the
original in head-to-left orientation (texts are in sideways).
Top
Top
Right Top
Left
Bottom
Original placed on document glass
Original loaded into document feeder
Important
• The scanner will not correctly recognize the top of the original if the [Original Orientation] setting does
not match the actual orientation of the original.
3.6 Settings Other Copy Features
107
1.
On the [More Copy Features] screen, select
[Original Orientation].
Basic Copying Image Quality
Copy Output
Collated
2 Up
Off
Original Orientation
Head to Top
2.
3.
On the [Original Orientation] screen, select
the orientation of the original.
Select [Save].
Original Orientation
Head to Top
Head to Left
108
3 Copy
More Copy
Features
Mixed Sized Orig.
Off
Edge Erase
T&B: 4mm/ R&L: 4mm
Center: 0mm
Original Size
Auto Size
Detect
Cancel
Select the orientation
your originals are
loaded.
Save
Mixed Sized Originals (Scanning Mixed-size Originals Simultaneously)
(DocuScan C4250 Only)
Use the Mixed Sized Originals feature to feed documents of different sizes into the
document feeder. This feature allows you to scan documents of different sizes
simultaneously and copy them on paper appropriate for each document.
This feature also allows you to copy all documents on the same size paper.
When copying documents on the same size paper, set [Mixed Sized Originals] to [On] and
configure the following settings:
• Set [Reduce/Enlarge] to [Auto %], and select the output paper size.
Mixed-size Originals
Copied in Same Sizes as Originals
A
Copied on Same Size Paper
A
A
ReportB
1
Report
ReportB
2
3
1
B
2
3
3
2
1
Important
• Always load A5 documents in LEF orientation.
Note
• If the sizes of documents cannot be detected, a screen that allows you to enter the sizes appears.
Selecting [Mixed Sized Orig.] displays the [Mixed Sized Originals] screen.
[Mixed Sized Originals] Screen
Off
Select this when copying documents of the same size.
On
Select this when copying documents of different sizes. The scanner will automatically detect
the size of each document.
1.
On the [More Copy Features], select [Mixed
Sized Orig.].
Basic Copying Image Quality
Copy Output
Collated
2 Up
Off
Original Orientation
Head to Top
More Copy
Features
Mixed Sized Orig.
Off
Edge Erase
T&B: 4mm/ R&L: 4mm
Center: 0mm
Original Size
Auto Size
Detect
3.6 Settings Other Copy Features
109
2.
3.
On the [Mixed Sized Originals] screen,
select [On] or [Off].
Select [Save].
Mixed Sized Originals
Off
On
Cancel
Save
Select On when loading
originals of different sizes
in the Document Feeder.
Edge Erase (Erasing Unwanted Marks from the Center/Edges of the
Original)
If you copy documents with the document feeder cover open, or if you copy documents that
are bound together, such as in a book, dark shadows get printed sometimes along the
edges or in the center binding area of the output. The Edge Erase feature allows you to
eliminate such unwanted marks from the output.
Edge Erase
[Top & Bottom Edges]
[Left & Right Edges]
[Center Area]
: Area erased
Important
• Make sure that the orientation of the original is identical to [Original Orientation] on the [More Copy
Features] screen.
Note
• When making a 2-sided copy, the same amount of erasure will be applied to both sizes of the output.
• When making a reduced/enlarged copy, the amount of erasure will be reduced/enlarged proportionally.
Refer to
• For information about printable area, refer to the user guide provided for your printer.
Selecting [Edge Erase] displays the [Edge Erase] screen.
[Edge Erase] Screen
Normal
Erases unwanted marks from all four edges of the original. The default amount of erasure
is 4 mm on all four edges. If you do not want to apply Edge Erase, set [Variable Erase] to
[0 mm].
Variable Erase
When [Variable Erase] is selected, the right of the screen displays the entry boxes that
correspond to the top/bottom, left/right, and center of the original.
Specify the amount of erasure in each entry box using [ ] and [ ].
The amount of erasure can be specified from 0 to 50 mm in increments of 1 mm.
110
3 Copy
1.
On the [More Copy Features] screen, select
[Edge Erase].
Basic Copying Image Quality
Copy Output
Mixed Sized Orig.
Collated
2 Up
Off
Original Orientation
Off
Edge Erase
T&B: 4mm/ R&L: 4mm
Center: 0mm
Original Size
Auto Size
Detect
Head to Top
2.
3.
4.
On the [Edge Erase] screen, select
[Normal] or [Variable Erase].
Edge Erase
When [Variable Erase] is selected, specify
the amount of erasure using [ ] and [ ].
More Copy
Features
Cancel
Save
Normal
Variable Erase
(mm)
Select [Save].
4
4
0
Original Size (Specifying the Scan Size)
The Original Size feature allows you to specify the scan size.
Specify the original size when scanning a non-standard size document, or when copying a
document in a size different from its actual size.
If you specify the original size, the original will be scanned in the size specified regardless
of its actual paper size. By using this feature, you can also add margins or delete unwanted
areas on the output.
Original
Original Size
X
Question
Question
Y
Answer
[Variable Size]
Selecting [Original Size] displays the [Original Size] screen.
3.6 Settings Other Copy Features
111
[Original Size] Screen
Auto Size Detect
Automatically detects the size of the original document.
Note
• When the original size cannot be detected automatically, a screen that allows you to enter the size
appears.
Standard Size
Select this when selecting the original size from
the preset options.
The preset options displayed on the screen can
be changed.
Note
• The DocuScan C4250 displays 12 preset options
while the DocuScan C3200 A displays 6. The screen
shown on the right is that of the DocuScan C4250.
Original Size
Cancel
A4
Auto Size
Detect
A4
Standard Size
A3
Variable Size
Save
1/2
B4
B5
B5
Refer to
• For information on how to change the preset options,
refer to "Original Size Button (P. 141)".
Variable Size
Select this when the original is non-standard
size, or when copying it in a size different from its
actual size. Specify the size using [ ]/[ ]/[ ]/
[ ] in increments of 1 mm. The scale on the
document glass can help specify the size.
Original Size
Cancel
Auto Size
Detect
Y
Standard Size
Refer to
• For information about supported document sizes, refer
to "Detectable Document Sizes" under "Supported
Documents (P. 23)".
1.
On the [More Copy Features] screen, select
[Original Size].
2 Up
Off
Original Orientation
Head to Top
Original Size
Auto Size
Detect
Standard Size
Variable Size
112
3 Copy
200
mm
X
200
mm
Basic Copying Image Quality
Collated
Select the desired option on the [Original
Size] screen, and select [Save].
When specifying a non-standard size,
specify the values for X and Y directions.
(15 - 297)
(15 - 432)
Variable Size
Copy Output
2.
Save
More Copy
Features
Mixed Sized Orig.
Off
Edge Erase
T&B: 4mm/ R&L: 4mm
Center: 0mm
Original Size
Auto Size
Detect
Cancel
Save
4
Address Book and Subject/
Comment List
4.1
Overview
This section provides a brief description of Address Book and Subject/Comment List.
What is Address Book
Address Book allows you to store e-mail or server addresses for the Scan to E-mail /Scan
to PC feature.
With Address Book, entering addresses is as easy as just a few touches on the touch panel.
To save yourself the time of entering them on the control panel, store frequently-used
addresses in Address Book.
Address Book can be organized by creating folders and grouping common addresses
together. Folders can have their access controlled by assigning them passwords.
If you want to make address searches simple, however, we recommend you store all
addresses in one folder. The scanner performs address searches within one folder only, not
across the entire Address Book.
Note
• If you have registered new addresses into Address Book, it is recommended that you create its backup.
For more information, refer to "Address Book Maintenance (P. 150)".
• Up to 350 e-mail/server addresses can be registered in Address Book.
• Up to 48 address folders can be registered in Address Book.
· DocuScan Manager
· CentreWare Internet Services
Register/change/delete folders
Register/change/delete addresses
Address Book for Scan to E-mail/Scan to PC
fold
fold
fold
fold
fold
fold
fold
fold
fold
er
er
Stores up to
48 folders
er
er
er
er
er
er
er
Stores up to 350 addresses
4.1 Overview
113
What is Subject/Comment List
E-mail subjects and comments (messages) for Scan to E-mail can be registered in Subject/
Comment List. With Subject/Comment List, you can enter e-mail subjects and comments
simply by selecting them from a list.
Subjects and comments stored in Subject/Comment List can be used as a whole or partially
by editing them on the control panel.
Registering Addresses/Subjects/Comments
To register addresses in Address Book or subjects and comments in Subject/Comment List,
use DocuScan Manager or CentreWare Internet Services.
Note
• DocuScan Manager can be installed from the "Software Pack" CD-ROM included with the scanner.
Refer to
• For installation instructions of DocuScan Manager, refer to the Software Operation Guide.
• For basic operating instruction of DocuScan Manager, refer to "7 DocuScan Manager (P. 178)".
• For detailed operating instructions of DocuScan Manager, refer to the DocuScan Manager Online Help.
• For operating instructions of CentreWare Internet Services, refer to "9.1 Monitoring/Managing the
Scanner on a Web Browser (P. 216)".
• For information on how to register addresses on CentreWare Internet Services, refer to the CentreWare
Internet Services Online Help.
Address Book Setting Items
The following setting items are available for Address Book:
Note
• Items that are not mentioned optional are mandatory and must be set.
Settings Items Common for Scan to E-mail/Scan to PC
DocuScan Manager/
CentreWare Internet Services
Setting Items
Item
Folder
Folder
Name
(Optional)
Password
(Optional)
114
Description
A container for addresses.
Folder
Number
How Used on the Scanner's Control Panel
• If you open Address Book, the folders stored in it will
be listed. Select a folder in which the address you
The registration number of a folder.
want to use is registered.
Set this by selecting the desired
• If you want to skip the [Address Book Folder] screen,
folder from the folders list.
change the default setting under [System Settings] >
The name of a folder.
[Scan Settings] > [Scan Defaults].
• Enter this within 16 characters or
• An address search can be performed only within one
symbols (ASCII characters).
folder. It cannot be performed across multiple folders
• This setting is optional. If you leave
simultaneously.
this blank, the folder will be named
"No name".
The password of a folder.
• Enter this within 4 to 8 numeric
digits.
• This setting is optional.
4 Address Book and Subject/Comment List
DocuScan Manager/
CentreWare Internet Services
Setting Items
Item
How Used on the Scanner's Control Panel
Description
Address Number
The registration number of an
• Enter this in [Go To] as a search keyword when
address.
searching for the address.
• This should be an integer between • If you open an address folder, the address numbers
1 and 350.
and recipient names of the addresses contained in
• You cannot have multiple
the folder will be listed.
addresses of the same address
number in the same address folder.
Address numbers can be the same
as long as they are in different
folders.
E-mail/Server
The type of an address.
Select [E-mail] and [Server] if the
address is for [Scan to E-mail] and
[Scan to PC], respectively.
Address Book only lists [E-mail] addresses when [Scan
To E-mail] is selected on the [Select Service] screen.
Similarly, it only lists [Server] addresses when [Scan to
PC] is selected on the [Select Service] screen.
Recipient Name/Save In
Location
(Mandatory)
The recipient name of an address.
• Enter this within 32 characters or
symbols (ASCII characters).
• Control characters (such as
linefeeds) cannot be used.
• If you open an address folder, the address numbers
and recipient names of the addresses contained in
the folder will be listed.
• If you select the address from Address Book, the
recipient name entered here will be entered in the email address entry box or in the [Server] entry box.
Index
(Mandatory)
A character string to be used as a
keyword when searching for an
address.
• Enter this within 32 characters or
symbols (ASCII characters).
• Control characters (such as
linefeeds) cannot be used.
Enter this in [Index] as a search keyword when
searching for the address.
Settings Items for Scan to E-mail
DocuScan Manager/
CentreWare Internet Services
Setting Items
Item
How Used on the Scanner's Control Panel
Description
Recipient
(E-mail
Address)
(Mandatory)
An e-mail address to which to send scanned data. • Set this for the following items:
• Enter this within 64 characters or symbols (ASCII
- [To]/[CC]/[BCC] on the [E-mail Address] screen.
characters).
- [From] on the [E-mail Address] screen.
• Spaces, control characters (such as linefeeds),
- E-mail address for [Details] > [Reply To] > [Change]
and the following symbols cannot be used:
> [Enter/Change Reply To] on the [E-mail Address]
()<>[]:;\, "
screen.
• This can be a character string without an "@"
• Enter this in [E-mail Address] as a search keyword
symbol.
when searching for the address.
• This cannot contain more than one "@" symbol. • To verify this, select the address from Address Book
• When an "@" symbol is included, one or more
and select [Details...].
characters must come before and after the
symbol.
Remarks
(Optional)
Additional information for an e-mail address, such To verify this, select the address on Address Book and
as company name or department name. This
select [Details...].
setting is optional.
• Enter this within 32 characters or symbols (ASCII
characters).
• Control characters (such as linefeeds) cannot be
used.
4.1 Overview
115
Setting Items for Scan to PC
DocuScan Manager/
CentreWare Internet Services
Setting Items
Item
How Used on the Scanner's Control Panel
Description
Transfer
Protocol
The method to be used when transferring scanned • Set this on the [Save In] screen.
data from the scanner.
• If you open an address folder, the address numbers,
Select [SMB] when saving scanned data in a
server names, and transfer protocols of the addresses
Windows shared folder. Select [FTP] when saving it
contained in the folder will be listed.
on an FTP server.
Save In
(Server
Name/IP
Address)
(Mandatory)
A computer on which to send scanned data.
• This corresponds to [Server] on the [Save In] screen.
• Enter this within 64 characters or symbols (ASCII • Enter this in [Server/IP Address] as a search keyword
characters).
when searching the address.
• Control characters (such as linefeeds) cannot be • To verify this, select the address from Address Book
used.
and select [Details...].
• Enter this in one of the following formats:
FQDN format
Example: pcname.example.com
Computer name (NetBIOS name)
Example: pcname
DNS host name
Example: pcname
IP address
Example: 192.168.1.100
Note
• If entering this in FQDN format, [Properties] >
[Protocol Settings] > [TCP/IP] > [DNS] >
[DNS Server Address] must be set on
CentreWare Internet Services.
• Computer name (NetBIOS name) can be
entered only when [Transfer Protocol] is set
to [SMB].
• When [Transfer Protocol] is SMB and if
entering the computer name of a computer
located on other subnet, [Properties] >
[Protocol Settings] > [TCP/IP] > [WINS] >
[WINS Server Address] must be set on
CentreWare Internet Services.
• If entering a DNS host name, the location
where the scanned data will be saved must
be in the domain specified in [Properties] >
[Protocol Settings] > [TCP/IP] > [DNS] >
[DNS Server Address]/ [DNS Domain Name]
on CentreWare Internet Services.
• If entering a DNS host name when [Transfer
Protocol] is [SMB], and if a computer that
uses the same name for its computer name
(NetBIOS name) exists on the same subnet
as the scanner, scanned data will be saved
on that computer.
Port Number
(Mandatory)
A port number to be used to communicate with a
server.
• When [Transfer Protocol] is [FTP], enter 21 or
any integer between 5,000 and 65,535.
• When [Transfer Protocol] is [SMB], enter 139 or
any integer between 5,000 and 65,535.
SMB
Shared
Name
(Mandatory)
The shared name of a shared folder in which to
This corresponds to [Shared Name] on the [Save In]
save scanned data.
screen. [Shared Name] is displayed when [Transfer
• Enter this within 32 characters or symbols (ASCII Protocol] is set to [SMB].
characters).
• Control characters (such as linefeeds) cannot be
used.
• When [Transfer Protocol] is [SMB], this setting is
mandatory.
116
4 Address Book and Subject/Comment List
To verify this, select the address from Address Book and
select [Details].
DocuScan Manager/
CentreWare Internet Services
Setting Items
Item
Save In
(Optional)
How Used on the Scanner's Control Panel
Description
The name of a folder in which to save scanned
This corresponds to [Save In] on the [Save In] screen.
data.
• Enter this within 96 characters or symbols (ASCII
characters).
• Control characters (such as linefeeds) cannot be
used.
• When [Transfer Protocol] is [FTP], enter this in a
format of "path1/path2". When [Transfer
Protocol] is [SMB], enter this in a format of
"path1\path2".
• This setting is optional. If you leave this blank
when [Transfer Protocol] is [SMB], scanned data
will be saved right under the shared folder set in
[Shared Name]. When [Transfer Protocol is
[FTP], scanned data will be saved right under the
directory to be logged in.
4.1 Overview
117
DocuScan Manager/
CentreWare Internet Services
Setting Items
Item
Description
User Name The name of the user who is authorized to change
(Mandasettings on computer/folder where scanned data is
tory)
to be saved.
• This setting is mandatory.
Enter this in one of the following formats:
Local User Name
• Enter this within 97 characters or symbols (ASCII
characters).
• Control characters (such as linefeeds) and the
following symbols cannot be used:
“*+,/:;<=>?[\]|
• Leading and trailing spaces are not allowed.
• This cannot be a character string that only
contains a period (.).
Note
• If using Windows XP, your local user name can
be found under [Control Panel] > [User Account].
• If using Windows 2000, your local user name is
under [My Computer] > [Properties] > [User
Profiles], and is displayed in a format of
"computer name\user name".
• For details, check [Control Panel] > [Users and
Passwords].
NetBIOS-format Domain User
Enter this in a format of "domain\user".
Example: pcname\smith
Enter the "domain” and "user” portions as follows:
• Control characters (such as linefeeds) and the
following symbols cannot be used:
“*+,/:;<=>?[\]|
• Leading and trailing spaces are not allowed.
• This cannot be a character string that only
contains a period (.).
• Enter the "user” portion within 32 characters or
symbols (ASCII characters).
• Enter the "domain” portion within 64 characters
or symbols (ASCII characters).
Note
• If using Windows XP, your NetBIOS-domain user
name can be found under [Control Panel] > [User
Account].
• If using Windows 2000, your NetBIOS-format
domain user name is under [My Computers] >
[Properties] > [User Profiles], and is displayed in
a format of "computer name\user name".
118
How Used on the Scanner's Control Panel
4 Address Book and Subject/Comment List
This corresponds to [User Name] on the [Save In]
screen.
DocuScan Manager/
CentreWare Internet Services
Setting Items
Item
How Used on the Scanner's Control Panel
Description
User Name UPN-format Domain User
(Optional)
Enter this in a format of "user@domain".
Example: [email protected]
(Cont.)
• The "domain” portion cannot include control
characters (such as linefeeds), spaces, and the
following symbols:
! “#$ ‘()*+,/:;<=>?@[\]^`{|}~
• Enter the "user” portion within 32 characters or
symbols (ASCII characters).
• Enter the "domain” portion within 64 characters
or symbols (ASCII characters).
Note
• To obtain your UPN-format user name, ask your
network administrator.
Password
(Mandatory)
A password for the user set under [User Name].
This corresponds to [Password] on the [Save In] screen.
• Enter this within 32 characters or symbols (ASCII
characters).
• Control characters (such as linefeeds) cannot be
used.
Subject /Comment List Setting Items
Subject/Comment List offers the following setting items:
Note
• Items that are not mentioned optional are mandatory and must be set.
DocuScan Manager/
CentreWare Internet Services
Setting Items
Item
How Used on the Scanner's Control Panel
Description
Subject
The subject of the e-mail you are attaching
Set this under the [E-mail Address] screen > [Details] >
scanned data to.
[Subject] > [Change] > [Enter/Change Subject] >
• Enter this within 64 characters or symbols (ASCII [Subject] > [Select From List].
characters).
• Control characters (such as linefeeds) cannot be
used.
Comment
The comment of the e-mail you are attaching
scanned data to.
• Enter this within 192 characters or symbols
(ASCII characters).
• Control characters other than linefeeds (such as
tabs) cannot be used.
Set this under the [E-mail Address] screen > [Details] >
Comment] > [Change] > [Enter/Change Comment] >
[Comment] > [Select From List].
4.1 Overview
119
Using Address Book and Subject/Comment List
Address Book and Subject/Comment List can be operated on the following three types of
tools:
• Control panel
• Address Book Tool on DocuScan Manager
• CentreWare Internet Services
What you can do on the control panel
On the control panel, you can:
• specify or search for e-mail/server addresses on the Scan to E-mail/Scan to PC setting
screen.
• select subjects/comments on Scan to E-mail setting screen.
• save or restore Address Book.
Refer to
• For information about setting e-mail/server addresses, refer to "2.4 Using Scan to E-mail (P. 40)" or "2.5
Using Scan to PC (P. 49)".
• For information about searching for e-mail/server addresses, refer to "Searching for an Address (P.
125)".
• For information about saving/restoring Address Book, refer to "Address Book Maintenance (P. 150)".
What you can do on Address Book Tool
On Address Book Tool, you can:
• register, change, or delete address folders.
• register, change, or delete addresses.
• search for addresses.
• import addresses from your e-mail application.
• register, change, or delete subjects in Subject/Comment List.
• register, change, or delete comments in Subject/Comment List.
Refer to
• For operating instructions, refer to the DocuScan Manager Online Help.
What you can do on CentreWare Internet Services
On CentreWare Internet Services, you can:
• register, change, or delete address folders.
• register, change, or delete addresses.
• register, change, or delete subjects in Subject/Comment List.
• register, change, or delete comments in Subject/Comment List.
Refer to
• For operating instructions, refer to the CentreWare Internet Services Online Help.
120
4 Address Book and Subject/Comment List
4.2
Using Address Book on the Scanner
This section describes how to display Address Book on the scanner and to select or search
for an address in Address Book.
Displaying Address Book
Use the following procedure to display Address Book:
Using the <Address Book> button on the control panel
1.
Press the <Address Book> button on the
control panel.
2.
On the [Select Service] screen, select the
type of Address Book from [Scan to E-mail]
and [Scan to PC].
3.
On the [Address Book Folder] screen,
select the desired folder. If a password is
set to the folder, a password entry screen
appears.
Note
• Selecting [01-12], [13-24], [25-36], or [37-48] on the
right side of the screen displays the corresponding
address folders.
• Password-locked folders are indicated with a "lock"
icon.
• You can skip the [Address Book Folder] screen and
display the screen for a specific folder by changing the
default under [System Settings]. For more information,
refer to "Address Screen (P. 175)".
• If a password is not set to the folder, the [Address
Book] screen displays.
4.
On the password entry screen, enter the
password using the numeric keypad, and
select [Confirm].
Select Service
Close
Scan to E-mail
Scan to PC
Address Book Folder
Close
01
Common
04
Smith
02
Jones
05
Jones
03
Accounting
06
Brown
07
Potter
08
09
Administration Misc.
Cancel
13-24
25-36
10
11
12
(Not in Use) (Not in Use) (Not in Use)
Password
01-12
37-48
Confirm
Folder Name: 01 Common
*****
4.2 Using Address Book on the Scanner
121
The [Address Book] screen appears and
lists the addresses in the folder.
Address Book [01]
To Folder
Search...
Note
• The [To Folder] button cancels the selection and takes
you back to the [Address Book Folder] screen.
Confirm
Details...
001 Jane Smith
002 System Design Group
003 xxx.xxx...
20
004 ABC Corp.
005 Daniel Brown
Scan to E-mail
Address Book [01]
To Folder
Search...
Close
Details...
001 SMB Exterior Designs
002 FTP Design Concept
003 SMB Minutes
1
004 FTP Software Specifications
005 FTP Hardware Specifications
Scan to PC
Using the [Address Book...] button on the touch panel
1.
On the [E-mail Address] or [Save In] (Scan
to PC) screen, select [Address Book...].
Note
• The screens used here are those of the Scan to E-mail
feature. The procedure, however, is the same also for
the Scan to PC feature.
Scan
E-mail Address Basic Scanning More
Features
Address Book...
Details...
Clear
Preview
From
To
1/9
2.
On the [Address Book Folder] screen,
select the desired folder.
If a password is set to the folder, a
password entry screen appears.
Note
• Selecting [01-12], [13-24], [25-36], or [37-48] on the
right side of the screen displays the corresponding
address folders.
• Password-locked folders are indicated with a "lock"
icon.
• You can skip the [Address Book Folder] screen and
display the screen for a specific folder by changing the
default under [System Settings]. For more information,
refer to "Address Screen (P. 175)".
• If a password is not set to the folder, the [Address
Book] screen displays.
122
4 Address Book and Subject/Comment List
Address Book Folder
Close
01
Common
04
Smith
02
Jones
05
Jones
03
Accounting
06
Brown
07
Potter
08
09
Administration Misc.
10
11
12
(Not in Use) (Not in Use) (Not in Use)
01-12
13-24
25-36
37-48
3.
On the [Password] screen, enter the
password using the numeric keypad on the
control panel, and select [Confirm].
Cancel
Password
Confirm
Folder Name: 01 Common
*****
The [Address Book] screen appears and
lists the addresses in the folder.
Address Book [01]
To Folder
Search...
Note
• The [To Folder] button cancels the selection and takes
you back to the [Address Book Folder] screen.
Confirm
Details...
001 Jane Smith
002 System Design Group
003 xxx.xxx...
20
004 ABC Corp.
005 Daniel Brown
Scan to E-mail
Address Book [01]
To Folder
Search...
Close
Details...
001 SMB Exterior Designs
002 FTP Design Concept
003 SMB Minutes
1
004 FTP Software Specifications
005 FTP Hardware Specifications
Scan to PC
4.2 Using Address Book on the Scanner
123
Selecting an Address
The [Address Book] screen displays a list of addresses in the selected address folder.
To select an address on the [Address Book] screen, use the following procedure:
Scan to E-mail
1.
Select the desired address. A check mark
appears in the check box next to the
address.
Check marks can be added or removed by
touching the check boxes. When a check
box is selected, the [To] button appears on
its left.
Address Book [01]
Search...
To
001 Jane Smith
CC
002 System Design Group
As necessary, select the type of recipient
by touching the [To] button. The button can
be changed to [CC], [BCC], [To], [CC]...
each time you touch it.
3.
When selecting multiple addresses from
the same folder, repeat Steps 1 and 2.
4.
Select [Confirm].
Confirm
Details...
003 xxx.xxx...
BCC
2.
To Folder
20
004 ABC Corp.
005 Daniel Brown
Scan to PC
1.
Select the desired address.
2.
Select [Close].
Address Book [01]
To Folder
Search...
Close
Details...
001 SMB Exterior Designs
002 FTP Design Concept
003 SMB Minutes
004 FTP Software Specifications
005 FTP Hardware Specifications
124
4 Address Book and Subject/Comment List
1
Searching for an Address
An address search can be performed within one folder by specifying a search keyword. The
keyword can be entered either in full or partially.
The following types of keywords are available:
Go To
Used to specify an address number registered in Address Book.
Index
Used to specify a character string registered in Address Book.
E-mail (Scan to E-mail)
Used to specify an e-mail address registered in Address Book.
Server/IP Address (Scan to PC)
Used to specify the name or IP address of a server registered in Address Book.
Refer to
• For information about the contents of Address Book, refer to "Registering Addresses/Subjects/
Comments (P. 114)".
1.
On the [Address Book] screen, select
[Search...].
Address Book [01]
To Folder
Confirm
Search...
Note
• The screens used here are those of the Scan to E-mail
feature. This procedure, however is also the same for
the Scan to PC feature.
Details...
001 Jane Smith
002 System Design Group
003 xxx.xxx...
20
004 ABC Corp.
005 Daniel Brown
2.
3.
On the [Search E-mail Address] screen,
enter a search keyword.
Search E-mail Address
Close
Keyword
Select [Search Now].
Go To
(001 - 350)
Index
E-mail
Search Now
4.
Select an address from the search result.
A check mark appears in the check box
next to the address.
This screen for the Scan to PC feature does
not show check marks when addresses are
selected.
Address Book [01]
To Folder
Search...
To
Close
Details...
005 Daniel Brown
015 Interior Design Group
20
5.
As necessary, select the type of recipient
by touching the [To] button. The button
changes to [CC], [BCC], [To], [CC]... each
time you touch it.
4.2 Using Address Book on the Scanner
125
6.
Select [Close].
Viewing the Details of an Address
If you want to select an address after checking its details, use the following procedure:
1.
On the [Address Book] screen, select an
address.
Address Book [01]
To Folder
Search...
Note
• The screens used here are those of the Scan to E-mail
feature. The procedure, however, is also the same for
the Scan to PC feature.
To
001 Jane Smith
CC
002 System Design Group
2.
BCC
Close
Details...
003 xxx.xxx...
Select [Details...].
20
004 ABC Corp.
005 Daniel Brown
3.
4.
126
On the [Details] screen, check the details of
the address.
Select [Close].
4 Address Book and Subject/Comment List
Details
Close
Number
001
Recipient
Jane Smith
E-mail
[email protected]
Remarks
Design Group
5
Job Status
This section describes how to check the status of completed jobs.
The status of jobs can be checked by the following methods:
• Using the control panel
• Using CentreWare Internet Services
5.1
Using the Control Panel
The status of completed jobs can be checked using the control panel.
Selecting [Job Status] on the [All Services] screen lists the last 20 jobs that completed.
You can also view their details by selecting them from the list.
1.
Press the <All Services> button on the
control panel.
2.
On the [All Services] screen, select [Job
Status].
All Services
The [Completed Jobs] screen appears.
Job Status
3.
Copy
Scan to E-mail
Scan to PC
Scan to Media
Check the status of the jobs.
Completed Jobs
Note
• Select [S] to display the previous screen or [T] to
display the next screen.
Job Status
Close
Remote Terminal/Contents
Completed -Completed pc001
Completed [email protected]
1/2
Cancelled -Completed 192.168.1.100/temp
5.1 Using the Control Panel
127
4.
5.
If you want to view the details of a specific
job, select it from the list.
Select [Close] repeatedly until you return to
the [All Services] screen.
Completed Jobs
Job Status
Close
Remote Terminal/Contents
Completed -Completed pc001
1/2
Completed [email protected]
Cancelled -Completed 192.168.1.100/temp
Copy
Close
Output Color: Black
Original Size: A4
R / E: 100%
Result: Completed
Job Ended: 2005/07/29 15:00
Pages: 1
5.2
Using CentreWare Internet Services
The status of completed jobs can be checked also using CentreWare Internet Services.
To check the status of jobs on CentreWare Internet Services, select [Job History] on the
[Jobs] tab.
[Job History] displays the following information:
• Service Name
• File Name
• Result
• Pages
• Completed at
• Output Destination (Entries)
• Output Color
• Scan Resolution
• File Format
• Original Size
• Reduce/Enlarge
[Job History] displays the last 20 jobs that completed.
Note
• Jobs displayed are only those that completed. Jobs still in progress are not displayed.
Refer to
• For operating instructions of CentreWare Internet Services, refer to "9.1 Monitoring/Managing the
Scanner on a Web Browser (P. 216)".
128
5 Job Status
6
System Settings
6.1
System Setting Procedure
This section describes how to change the scanner's default settings, such as the system
clock, audio tones, and network-related settings.
Refer to
• For information about the setting items for System Settings, refer to "6.2 System Settings Setting Items
(P. 131)".
Step 1 Display the [System Settings] screen
1.
Press the <Tools> button on the control
panel.
2.
On the [Tools] screen, select [System
Settings] or [Screen Contrast].
Tools
Close
Note
• When [Screen Contrast] is selected, proceed to " Step
3 Select a setting item (P. 130)".
System Settings
Screen Contrast
Step 2 Enter the system administrator password
To change the system settings, you will need a system administrator password.
If you select [System Settings] on the [System Settings] screen, the [Login] screen that
prompts you to enter [System Administrator Password] appears. The default password is
"11111".
The system administrator password can be changed. We recommend you to change it right
after installing the scanner.
Refer to
• To change the system administrator password, refer to "Setup Password" (P. 147).
6.1 System Setting Procedure
129
1.
Enter the password using the numeric
keypad on the control panel, and select
[Confirm].
Cancel
Login
Confirm
System Administrator Password
*****
Step 3 Select a setting item
1.
When [System Settings] is selected in Step
1, select an item you want to set on the
[System Settings] screen.
Note
• When [Screen Contrast] is selected, adjust the screen
contrast on the [Screen Contrast] screen and select
[Save]. For more information, refer to "6.3 Screen
Contrast (P. 133)".
2.
System Settings
Close
Common Settings
Network Settings
Copy Settings
Scan Settings
System Admin.
Settings
Change the setting on the screen of the
selected item.
Refer to
• For information about each setting screen, refer to the
descriptions from "6.4 Common Settings (P. 133)"
onward.
Step 4 Exit the [System Settings] screen
1.
130
When you are finished with the settings,
select [Close] repeatedly until you return to
the [System Settings] screen.
2.
On the [System Settings] screen, select
[Close].
3.
The [Switch Off/On] screen may appear
depending on the settings you made.
Follow the message and switch off the
power. When the touch panel has gone off,
switch the power back on again.
6 System Settings
Switch Off / On
Reboot machine at the end of the
system settings for the changes
to take effect.
Switch off the machine.
Ensure that the screen disappears
before switching it on.
6.2
System Settings Setting Items
System Settings offer the following setting items:
Screen Contrast
Used to change the screen contrast of the touch panel.
System Settings
Used to set or change the default of the features.
Common Settings
"Machine Clock/Timers" (P.
133)
"Date Format" (P. 134)
"Date Setup" (P. 134)
"Time Format" (P. 134)
"Time Setup" (P. 135)
"Time Zone" (P. 135)
"Auto Clear" (P. 136)
"Auto Job Release" (P. 136)
"Auto Power Saver" (P. 137)
"Audio Tones" (P. 137)
"Panel Select Tone" (P. 137)
"Panel Alert Tone" (P. 138)
"Machine Ready Tone" (P. 138)
"Job Complete Tone" (P. 138)
"Fault Tone" (P. 139)
"Alert Tone" (P. 139)
"Auto Clear Notif." (P. 139)
"Base Tone" (P. 140)
"Screen Defaults" (P. 140)
"Screen Defaults" (P. 140)
"Custom Buttons 1 - 3" (P. 141)
"Default Language" (P. 141)
"Original Size Button" (P. 141)
"Original Size Button" (P. 142)
"Service Availability" (P. 143)
"Scan to E-mail" (P. 143)
"Scan to PC" (P. 144)
"Scan to Media" (P. 144)
"Service Login" (P. 145)
"Copy" (P. 145)
"Scan to E-mail" (P. 146)
"Scan to PC" (P. 146)
"Scan to Media" (P. 146)
"Setup Password" (P. 147)
"Other Settings" (P. 147)
"Millimeters/Inches" (P. 147)
"Paper Size Settings" (P. 148)
"Maintenance/Diagnostics" (P.
149)
"Software Version" (P. 149)
"Error History" (P. 150)
"Address Book Maintenance" (P. 150)
"Printer Information" (P. 152)
"Carriage Shift" (P. 152)
"Initialize NVM" (P. 153)
6.2 System Settings Setting Items
131
Network Settings
"Port Settings" (P. 154)
"SNMP" (P. 154)
"CW Internet Services" (P. 155)
"Protocol Settings" (P. 155)
"Ethernet Setting" (P. 155)
"Get IP Address" (P. 156)
"IP Address" (P. 156)
"Subnet Mask" (P. 157)
"Gateway" (P. 157)
Copy Settings
"Basic Copying" (P. 158)
"Paper Supply - 2" (P. 159)
"Paper Supply - 3" (P. 159)
"Reduce/Enlarge - 3" (P. 160)
"Copy Defaults" (P. 160)
"Paper Supply" (P. 161)
"Paper Type - Bypass" (P. 161)
"Paper Size - Bypass" (P. 161)
"Reduce/Enlarge" (P. 162)
"Output Color" (P. 162)
"2 Sided Copying" (P. 162)
"Original Type" (P. 163)
"Lighten/Darken" (P. 163)
"Sharpness" (P. 163)
"Saturation" (P. 164)
"Auto Exposure" (P. 164)
"Color Balance (Y/M/C/K)" (P. 164)
"Original Orientation" (P. 165)
"Output" (P. 165)
"Edge Erase" (P. 165)
"Mixed Sized Orig." (P. 166)
"Auto Exposure Level" (P. 166)
"Black (Text)" (P. 166)
"Black (Text & Photo)" (P. 167)
"Black (Map)" (P. 167)
"Color (Text)" (P. 167)
"Color (Text & Photo)" (P. 168)
"Color (Map)" (P. 168)
"Print Auditron Settings" (P. 169)
Scan Settings
"Scan Defaults" (P. 170)
"File Name Conflict" (P. 176)
"Scan to PC Protocol" (P. 176)
System Admin. Settings
"Setup Password" (P. 177)
132
6 System Settings
"Output Color" (P. 170)
"Scan Resolution" (P. 171)
"Original Type" (P. 171)
"Lighten/Darken" (P. 171)
"File Format" (P. 172)
"TIFF File Format" (P. 172)
"Image Compression" (P. 173)
"Original Orientation" (P. 173)
"Sharpness" (P. 173)
"Contrast" (P. 174)
"RGB Color Space" (P. 174)
"Auto Exposure" (P. 174)
"Preview" (P. 175)
"Address Screen" (P. 175)
"Mixed Sized Orig." (P. 175)
6.3
Screen Contrast
Screen Contrast allows you to adjust the contrast of the touch panel. The contrast can be
adjusted in seven levels from [Higher] to [Lower].
1.
2.
On the [System Settings] screen, select
[Screen Contrast].
Cancel
Screen Contrast
On the [Screen Contrast] screen, adjust the
contrast of the touch panel using [ ]/[ ],
and select [Save].
Save
(1 - 7)
4
Higher
Note
• To cancel the setting, select [Cancel].
6.4
Lower
Common Settings
Common Settings allows you to change the settings relating to the specifications of the
scanner.
Selecting [Common Settings] on the [System
Settings] screen displays the [Common Settings]
screen.
The following explains the settings that can be
changed under [Common Settings].
Common Settings
Close
Machine Clock
/ Timers
Audio Tones
Screen Defaults
Original Size
Button
Service Availability
Service Login
Other Settings
Maintenance
/ Diagnostics
Machine Clock/Timers
Selecting [Machine Clock/Timers] on the [System Settings] screen displays the [Machine
Clock/Timers] screen.
On this screen, you can set the scanner's system clock and the time to wait until the Power
Saver mode or reset functions engage.
Common Settings
Machine Clock
/ Timers
Close
Machine Clock / Timers
Audio Tones
Items
Screen Defaults
Original Size
Button
1. Date Format
Y/M/D
2. Date Setup
2005/7/21
Service Availability
Service Login
3. Time Format
12 Hour Clock
4. Time Setup
06:59PM
5. Time Zone
+09:00
Other Settings
Maintenance
/ Diagnostics
Current Settings
Close
Change
6.3 Screen Contrast
1/2
133
Date Format
Sets the date format of the scanner's system clock.
The date format can be selected from [Y/M/D], [M/D/Y], and [D/M/Y].
1.
On the [Machine Clock/Timers] screen,
select [1. Date Format], and select
[Change].
Cancel
1. Date Format
Save
Y/M/D
2.
On the [1. Date Format] screen, select the
desired date format.
3.
Select [Save].
M/D/Y
D/M/Y
Note
• To cancel the setting, select [Cancel].
Date Setup
Sets the date of the scanner's system clock.
1.
2.
3.
On the [Machine Clock/Timers] screen,
select [2. Date Setup], and select [Change].
On the [2. Date Setup] screen, enter the
current date using [ ]/[ ].
2. Date Setup
Cancel
Save
Year
Month
Day
(2000 - 2099)
(1 - 12)
(1 - 31)
2005
07
21
Select [Save].
Note
• To change the setting, select [Cancel].
Time Format
Sets the time format of the scanner's system clock.
The time format can be selected from [12 Hour Clock] and [24 Hour Clock].
1.
On the [Machine Clock/Timers] screen,
select [3. Time Format], and select
[Change].
3. Time Format
12 Hour Clock
2.
On the [3. Time Format] screen, select the
desired time format.
3.
Select [Save].
Note
• To change the settings, select [Cancel].
134
6 System Settings
24 Hour Clock
Cancel
Save
Time Setup
Sets the time of the scanner's time clock.
1.
2.
On the [Machine Clock/Timers] screen,
select [4. Time Setup], and select [Change].
When [12 Hour Clock] is selected on the [4.
Time Setup] screen, select [AM] or [PM] on
the [Time Setup] screen.
3.
Enter the current time using [ ]/[ ].
4.
Select [Save].
Cancel
4. Time Setup
AM
PM
Hours
Minutes
(1 - 12)
(0 - 59)
10
59
Cancel
4. Time Setup
Note
• To cancel the setting, select [Cancel].
Save
Save
Hours
Minutes
(0 - 23)
(0 - 59)
22
59
Time Zone
Sets the time zone that the scanner is in. The time zone is specified by the time difference
from the Greenwich Mean Time (GMT).
1.
2.
3.
On the [Machine Clock/Timers] screen,
select [5. Time Zone], and select [Change].
On the [5. Time Zone] screen, set the time
zone using [ ]/[ ].
Cancel
5. Time Zone
Save
(-12:00 - +13:00)
GMT
+10:00
Select [Save].
Note
• To cancel the setting, select [Cancel].
6.4 Common Settings
135
Auto Clear
Sets the time to wait before the touch panel returns to the default screen. It also sets the
time to wait until the scanner presumes scanning/copying while waiting for the next
document to be loaded, or when left idle on the [Preview] screen.
This can be set from 1 to 4 minutes in increments of 1 minute.
1.
2.
3.
On the [Machine Clock/Timers] screen,
select [6. Auto Clear], and select [Change].
6. Auto Clear
On the [6. Auto Clear] screen, set the time
using [ ]/[ ].
Cancel
Save
(1 - 4)
1
Minutes
Select [Save].
Note
• To cancel the setting, select [Cancel].
Refer to
• For information about the default screen, refer
to"Screen Defaults" (P. 140).
Auto Job Release
Sets the time to wait before the scanner cancels the current job and starts the next job when
an error occurs with the current job. The next job can be executed only in parts of the
scanner that are functioning normally.
This can be set from 4 to 20 minutes in increments of 1 minute.
1.
On the [Machine Clock/Timers] screen,
select [7. Auto Job Release], and select
[Change].
2.
On the [7. Auto Job Release] screen, set
the time using [ ]/[ ].
3.
Select [Save].
Note
• To cancel the setting, select [Cancel].
136
6 System Settings
7. Auto Job Release
Cancel
(4 - 20)
4
Minutes
Save
Auto Power Saver
Sets the time to wait until the scanner goes into the Power Saver mode to save energy
consumption.
This can be set from 1 to 60 minutes in increments of 1 minute. To disable the Power Saver
mode, select [Off].
1.
On the [Machine Clock/Timers] screen,
select [8. Auto Power Saver], and select
[Change].
On the [8. Auto Power Saver] screen, set
whether or not to use the Power Saver
mode.
3.
When [On] is selected in Step 2, set the
time using [ ]/[ ].
4.
Select [Save].
Save
From last selection
to Sleep Mode
(1 - 60)
Off
2.
Cancel
8. Auto Power Saver
On
10
Minutes
Note
• To cancel the setting, select [Cancel].
Audio Tones
Selecting [Audio Tones] on the [Common Settings] screen displays the [Audio Tones]
screen.
On this screen, you can enable/disable the audio tones and set their volume.
Common Settings
Machine Clock
/ Timers
Screen Defaults
Service Availability
Other Settings
Close
Close
Audio Tones
Audio Tones
Items
Original Size
Button
1. Panel Select Tone
Normal
2. Panel Alert Tone
Normal
Service Login
Current Settings
Change
3. Machine Ready Tone Normal
Maintenance
/ Diagnostics
4. Job Complete Tone
Normal
5. Fault Tone
Normal
1/2
Panel Select Tone
Sets the tone that goes off when a correct button is selected on the touch panel.
The volume of the tone can be selected from [Soft], [Normal], and [Loud]. To disable the
tone, select [off].
1.
2.
On the [Audio Tone] screen, select [1.
Panel Select Tone], and select [Change].
On the [1. Panel Select Tone] screen,
select the volume of the tone.
1. Panel Select Tone
Off
Cancel
Save
Soft
Normal
3.
Select [Save].
Loud
Note
• To cancel the setting, select [Cancel].
6.4 Common Settings
137
Panel Alert Tone
Sets the tone that goes off when an incorrect button was selected, or an operation was
attempted during an error.
The volume of the tone can be selected from [Soft], [Normal], and [Loud]. To disable the
tone, select [Off].
1.
2.
On the [Audio Tone] screen, select [2.
Panel Alert Tone], and select [Change].
On the [2. Panel Alert Tone] screen, select
the volume of the tone.
2. Panel Alert Tone
Off
Cancel
Save
Soft
Normal
3.
Select [Save].
Loud
Note
• To cancel the setting, select [Cancel].
Machine Ready Tone
Sets the tone that informs you that the scanner is ready for scanning/copying.
The volume of the tone can be selected from [Soft], [Normal], and [Loud]. To disable the
tone, select [Off].
1.
On the [Audio Tone] screen, select [3.
Machine Ready Tone], and select
[Change].
3. Machine Ready Tone
Off
2.
3.
On the [3. Machine Ready Tone] screen,
select the volume of the tone.
Cancel
Save
Soft
Normal
Loud
Select [Save].
Note
• To cancel the setting, select [Cancel].
Job Complete Tone
Sets the tone that goes off when a job has been completed successfully.
The volume of the tone can be selected from [Soft], [Normal], and [Loud]. To disable the
tone, select [Off].
1.
2.
On the [Audio Tone] screen, select [4. Job
Complete Tone], and select [Change].
On the [4. Job Complete Tone] screen,
select the volume of the tone.
4. Job Complete Tone
Off
Cancel
Soft
Normal
3.
Select [Save].
Note
• To cancel the setting, select [Cancel].
138
6 System Settings
Loud
Save
Fault Tone
Sets the tone that goes off when a job finishes abnormally.
The volume of the tone can be selected from [Soft], [Normal], and [Loud]. To disable the
tone, select [Off].
1.
2.
On the [Audio Tone] screen, select [5. Fault
Tone], and select [Change].
On the [5. Fault Tone] screen, select the
volume of the tone.
Cancel
5. Fault Tone
Off
Save
Soft
Normal
3.
Select [Save].
Loud
Note
• To cancel the setting, select [Cancel].
Alert Tone
Sets the tone that goes off when a fault, such as a document jam, occurs and the job is held
in a fault state.
The volume of the tone can be selected from [Soft], [Normal], and [Loud]. To disable the
tone, select [Off].
1.
2.
On the [Audio Tone] screen, select [6. Alert
Tone], and select [Change].
On the [6. Alert Tone] screen, select the
volume of the tone.
Cancel
6. Alert Tone
Off
Save
Soft
Normal
3.
Select [Save].
Loud
Note
• To cancel the setting, select [Cancel].
Auto Clear Notif.
Sets the tone that goes off 5 seconds before the touch panel returns to the default screen.
The volume of the tone can be selected from [Soft], [Normal], and [Loud]. To disable the
tone, select [Off].
1.
On the [Audio Tone] screen, select [7. Auto
Clear Notif.], and select [Change].
2.
On the [7. Auto Clear Notif.] screen, select
the volume of the tone.
3.
Select [Save].
7. Auto Clear Notif.
Off
Cancel
Save
Soft
Normal
Loud
Note
• To cancel the setting, select [Cancel].
6.4 Common Settings
139
Base Tone
Sets the tone that goes off when a button, which toggles between different options when
pressed repeatedly, is pressed. On this scanner, <Power Saver> is this type of button.
The volume of the tone can be selected from [Soft], [Normal], and [Loud]. To disable the
tone, select [Off].
1.
2.
On the [Audio Tone] screen, select [8. Base
Tone], and select [Change].
On the [8. Base Tone] screen, select the
volume of the tone.
Cancel
8. Base Tone
Off
Save
Soft
Normal
3.
Select [Save].
Loud
Note
• To cancel the setting, select [Cancel].
Screen Defaults
Selecting [Screen Defaults] on the [Common Settings] screen displays the [Screen
Defaults] screen.
On this screen, you can set the default screen that appears when the scanner is switched
on. You can also assign features to the custom buttons.
Common Settings
Machine Clock
/ Timers
Close
Close
Screen Defaults
Audio Tones
Items
Screen Defaults
Original Size
Button
1. Screen Defaults
All Services
2. Custom Button 1
Copy
Service Availability
Service Login
3. Custom Button 2
Scan to PC
Other Settings
Maintenance
/ Diagnostics
4. Custom Button 3
Scan to E-mail
5. Default Language
English
Current Settings
Change
1/1
Screen Defaults
Sets the default display for the touch panel that appears when the scanner is switched on
or when reset functions engage.
The default screen can be selected from [All Services], [Copy], [Scan to E-mail], [Scan to
PC], and [Scan to Media].
1.
2.
On the [Screen Defaults] screen, select [1.
Screen Defaults], and select [Change].
On the [1. Screen Defaults] screen, select
the desired screen.
1. Screen Defaults
All Services
Copy
3.
Select [Save].
Note
• To cancel the setting, select [Cancel].
140
6 System Settings
Scan to E-mail
Scan to PC
Cancel
Scan to Media
Save
Custom Buttons 1 - 3
Changes the features assigned to the custom buttons 1 to 3 (<Copy>, <Scan to E-mail>,
and <Scan to PC>) on the control panel.
The features can be selected from [Copy], [Scan to E-mail], [Scan to PC], and [Scan to
Media].
If you do not want to assign any features to the buttons, select [Off].
Note
• The same feature can be assigned to two or more custom buttons.
1.
On the [Screen Defaults] screen, select [2.
Custom Button]/[3. Custom Button]/[4.
Custom Button], and select [Change].
2. Custom Button 1
Cancel
Scan to Media
Off
2.
3.
On the screen of the button you selected,
select the desired feature.
Save
Copy
Scan to E-mail
Select [Save].
Note
• To cancel the setting, select [Cancel].
Scan to PC
Default Language
Changes the default language for the touch panel. You can choose between three different
languages: [English], [Chinese] and [Korean].
1.
On the [Screen Defaults] screen, select [5.
Default Language], and select [Change].
2.
On the [5. Default Language] screen, select
the desired language.
3.
Select [Save].
5. Default Language
Cancel
Save
English
Korean
Note
• To cancel the setting, select [Cancel].
Original Size Button
Selecting [Original Size Button] on the [Common Settings] screen displays the [Original
Size Button] screen.
On this screen, you can set the paper sizes displayed on the [Scan Size] or [Original Size]
screen. You can also assign a paper size to each Original Size button.
Common Settings
Machine Clock
/ Timers
Screen Defaults
Service Availability
Other Settings
Close
Audio Tones
Original Size
Button
Service Login
Maintenance
/ Diagnostics
Original Size Button
Items
Close
Current Settings
1. Original Size 1
A6
2. Original Size 2
A5
3. Original Size 3
A4
4. Original Size 4
A4
5. Original Size 5
A3
Change
1/2
If you assign non-standard paper sizes that you use frequently on these buttons, you can
save the time of entering them each time you make copies.
The following types of paper size can be assigned to the buttons:
6.4 Common Settings
141
• A/B Series
• Inch Series
• Others
• Variable Size
[Variable Size] allows you to specify sizes in increments of 1 mm.
Refer to
• For information about [Scan Size], refer to "2.8 Setting Other Scan Features (P. 69)".
• For information about [Original Size], refer to "3.6 Settings Other Copy Features (P. 104)".
Original Size Button
Assigns paper sizes to the Original Size buttons.
Note
• The DocuScan C4250 displays 12 original size buttons while the DocuScan C3200 A displays 6. The
screen used here is that of the DocuScan C4250.
1.
On the [Original Size Button] screen, select
an original size button from [1. Original Size
1] to [12. Original Size 12], and select
[Change].
Cancel
1. Original Size 1
A/B Series
Save
A4
A4
2.
3.
On the screen of the button you selected,
select the type of paper size series.
Inch Series
When [A/B Series], [Inch Series], [Others]
are selected, select the desired size from
the list on the right side of the screen.
Variable Size
Note
• Select [ ] to display the previous screen or [
display the next screen.
4.
5.
1/2
Others
B4
B5
B5
] to
When [Variable Size] is selected, enter the
size using [ ]/[ ]/[ ]/[ ].
Select [Save].
A3
1. Original Size Button 1
Cancel
(15 - 297)
A/B Series
Y
Note
• To cancel the setting, select [Cancel].
Inch Series
Others
Variable Size
142
6 System Settings
Save
X
(15 - 432)
100
mm
100
mm
Service Availability
Selecting [Service Availability] on the [Common Settings] screen displays the [Service
Availability] screen.
On this screen, you can enable or disable the use of each feature. The features cannot be
used when they are disabled.
Common Settings
Service Availability
Close
Close
Machine Clock
/ Timers
Audio Tones
Items
Screen Defaults
Original Size
Button
1. Scan to E-mail
Enable
2. Scan to PC
Enable
3. Scan to Media
Disable
Service Availability
Service Login
Other Settings
Maintenance
/ Diagnostics
Change
Current Settings
1/1
If you attempt to use a feature that is disabled, the following screen appears.
Unavailable Service
Close
Scan to E-mail is currently unavailable.
Please contact System Administrator to
enable the service.
Press Close to return to All Services
screen.
Screen for Scan to E-mail
Note
• The access to each feature can be controlled by setting a password and authenticating users. For
details, refer to "Service Login" (P. 145).
Scan to E-mail
Enables or disables the Scan to E-mail feature.
1.
On the [Service Availability] screen, select
[1. Scan to E-mail], and select [Change].
2.
On the [1. Scan to E-mail] screen, select
[Enable] or [Disable].
3.
Select [Save].
1. Scan to E-mail
Cancel
Save
Enable
Disable
Note
• To cancel the setting, select [Cancel].
6.4 Common Settings
143
Scan to PC
Enables or disables the Scan to PC feature.
1.
On the [Service Availability] screen, select
[2. Scan to PC], and select [Change].
2.
On the [2. Scan to PC] screen, select
[Enable] or [Disable].
3.
Select [Save].
2. Scan to PC
Cancel
Save
Cancel
Save
Enable
Disable
Note
• To cancel the setting, select [Cancel].
Scan to Media
Enables or disables the Scan to Media feature.
1.
2.
On the [Service Availability] screen, select
[3. Scan to Media], and select [Change].
On the [Scan to Media] screen, select
[Enable] or [Disable].
3. Scan to Media
Enable
Disable
3.
Select [Save].
Note
• To cancel the setting, select [Cancel].
144
6 System Settings
Service Login
Selecting [Service Login] on the [Common Settings] screen displays the [Service Login]
screen.
On this screen, you can set whether to set a password for each feature and authenticate
users.
If you are setting passwords, set them on this screen also. You can set one password for
each feature that is set to authenticate users.
Common Settings
Machine Clock
/ Timers
Service Login
Close
Close
Audio Tones
Items
Screen Defaults
Original Size
Button
1. Copy
Off
2. Scan to E-mail
Off
Service Availability
Service Login
3. Scan to PC
Off
Other Settings
Maintenance
/ Diagnostics
4. Scan to Media
Off
5. Password Settings
(Not Set)
Change
Current Settings
1/1
If you select the button of a feature that is set to authenticate users, the following password
entry screen appears. Enter the password to enter the setting screen for that feature.
Note
• If you set a password to the copy features, pressing the <Copy> button displays the following password
entry screen.
Copy Login
Cancel
Confirm
Password
*****
Copy
Sets whether or not to set a password for the copy feature.
1.
On the [Service Login] screen, select [1.
Copy], and select [Change].
2.
On the [1. Copy] screen, select [On] or
[Off].
3.
Select [Save].
1. Copy
Cancel
Save
Off
On
Note
• To cancel the setting, select [Cancel].
6.4 Common Settings
145
Scan to E-mail
Sets whether or not to set a password for the Scan to E-mail feature.
1.
On the [Service Login] screen, select [2.
Scan to E-mail], and select [Change].
2.
On the [2. Scan to E-mail] screen, select
[On] or [Off].
3.
Select [Save].
2. Scan to E-mail
Cancel
Save
Cancel
Save
Cancel
Save
Off
On
Note
• To cancel the setting, select [Cancel].
Scan to PC
Sets whether or not to set a password for the Scan to PC feature.
1.
2.
On the [Service Login] screen, select [3.
Scan to PC], and select [Change].
On the [3. Scan to PC] screen, select [On]
or [Off].
3. Scan to PC
Off
On
3.
Select [Save].
Note
• To cancel the setting, select [Cancel].
Scan to Media
Sets whether or not to set a password for the Scan to Media feature.
1.
On the [Service Login] screen, select [4.
Scan to Media], and select [Change].
2.
On the [4. Scan to Media] screen, select
[On] or [Off].
3.
Select [Save].
4. Scan to Media
Off
On
Note
• To cancel the setting, select [Cancel].
146
6 System Settings
Setup Password
Sets a password for each feature. The password must be a four to eight digit number.
1.
2.
3.
On the [Service Login] screen, select [5.
Setup Password], and select [Change].
On the [5. Setup Password] screen, enter
the password using the numeric keypad on
the control panel.
5. Password Settings
Cancel
Save
Password (4-8 digits)
*****
Select [Save].
Note
• To cancel the setting, select [Cancel].
Other Settings
Selecting [Other Settings] on the [Common Settings] screen displays the [Other Settings]
screen.
On this screen, you can set the measurement unit and paper size series to be used on the
setting screens.
Common Settings
Machine Clock
/ Timers
Close
Other Settings
Close
Audio Tones
Items
Screen Defaults
Original Size
Button
1. Millimeters / Inches Millimeters
Service Availability
Service Login
Other Settings
Maintenance
/ Diagnostics
Change
Current Settings
2. Paper Size Settings A/B Series (8K/16K)
1/2
Millimeters/Inches
Sets the measurement unit to be used on the setting screens to millimeters or inches.
1.
On the [Other Settings] screen, select [1.
Millimeters/Inches], and select [Change].
2.
On the [1. Millimeters/Inches] screen,
select [Millimeters] or [Inches].
3.
Select [Save].
1. Millimeters / Inches
Cancel
Save
Millimeters
Inches
Note
• To cancel the setting, select [Cancel].
6.4 Common Settings
147
Paper Size Settings
Sets the paper size series to be detected automatically by the scanner.
Paper size series can be selected from A/B series, A/B series (8K/16K), and inch series.
The combination of paper sizes that can be detected automatically are as follows:
DocuScan C4250
Paper Size Series
A/B Series
Inch Series
A/B Series
A/B Series
(8K/16K)
Inch Series
document glass
document feeder
document glass
document feeder
document glass
document feeder
document glass
document feeder
document glass
document feeder
document glass
document feeder
A6
O
X
O
X
X
X
O
X
O
X
X
X
A6
X
X
X
X
X
X
X
X
X
X
X
X
A5
O
O
O
O
X
X
O
O
O
O
X
X
A5
O
O
O
O
X
X
O
O
O
O
X
X
A4
O
O
O
O
X
X
O
O
O
O
X
X
A4
O
O
O
O
O
X
-
-
-
-
-
-
A3
O
O
O
O
O
X
-
-
-
-
-
-
B6
O
X
O
X
X
X
O
X
O
X
X
X
B6
X
X
X
X
X
X
X
X
X
X
X
X
B5
O
O
O
O
X
X
O
O
O
O
X
X
B5
O
O
O
O
X
X
X
X
X
X
X
X
B4
O
O
O
O
O
O
-
-
-
-
-
-
5.5 x 8.5”
X
X
X
X
O
O
X
X
X
X
O
O
5.5 x 8.5”
X
X
X
X
X
O
X
X
X
X
O
X
7.25 x 10.5”
X
X
X
X
O
X
-
-
-
-
-
-
8 x 10”
X
X
X
X
X
X
X
X
X
X
X
X
8 x 10”
X
X
X
X
X
X
-
-
-
-
-
-
8.5 x 11”
X
X
X
X
O
O
X
X
O
X
O
O
8.5 x 11”
O
X
O
X
O
O
-
-
-
-
-
-
8.5 x 13”
X
X
X
X
X
X
-
X
-
X
-
X
8.5 x 14”
X
X
X
X
O
X
-
X
-
X
-
X
11 x 15”
X
X
X
X
X
X
X
X
X
X
X
X
11 x 17”
O
X
O
X
O
O
X
X
X
X
X
X
16 K
X
X
O
X
X
X
X
X
O
X
X
X
16 K
X
X
O
X
X
X
-
-
-
-
-
-
8K
X
X
O
X
X
X
-
-
-
-
-
-
Postcard
X
X
X
X
X
X
X
X
X
X
X
X
Return postcard
X
X
X
X
X
X
X
X
X
X
X
X
No.3 standard envelope
X
X
X
X
X
X
X
X
X
X
X
X
4 x 6”
X
X
X
X
O
X
X
X
X
X
O
X
Document
input area
Size/
Orientation
O: Can use
148
A/B Series
(8K/16K)
DocuScan C3200 A
6 System Settings
X: Cannot use
-: Not supported
1.
2.
On the [Other Settings] screen, select [2.
Paper Size Settings], and select [Change].
2. Paper Size Settings
On the [2. Paper Size Settings] screen,
select the desired paper size series from
[A/B Series], [A/B Series (8K/16K)], and
[Inch Series].
Cancel
Save
A/B Series
A/B Series
(8K/16K)
Inch Series
3.
Select [Save].
Note
• To cancel the setting, select [Cancel].
Maintenance/Diagnostics
Selecting [Maintenance/Diagnostics] on the [Common Settings] screen displays the
[Maintenance/Diagnostics] screen.
On this screen, you can set the defaults for the software versions, error history, printer
information, Address Book maintenance, and NV memory (system data).
Common Settings
Maintenance / Diagnostics
Close
Close
Machine Clock
/ Timers
Audio Tones
Software Version
Error History
Screen Defaults
Original Size
Button
Address Book
Maintenance
Printer Information
Service Availability
Service Login
Carriage Shift
Initialize NVM
Other Settings
Maintenance
/ Diagnostics
Software Version
Displays the software version information, MAC Address.
Note
• The [DADF] information does not appear on the DocuScan C3200 A.
1.
2.
3.
On the [Maintenance/Diagnostics] screen,
select [Software Version].
Software Version
Close
000000000
00:A0:B7:31:CB:D5
Ver.000.000.000
On the [Software Version] screen, verify the
contents.
Serial No.
Select [Close].
ICM
Ver.000.000.000
IIT
Ver.000.000.000
DADF
Ver.000.000.000
MAC Address
Panel
6.4 Common Settings
149
Error History
Displays the error history.
1.
On the [Maintenance/Diagnostics] screen,
select [Error History].
2.
On the [Error History] screen, select [Error
Log History].
3.
On the error log screen, verify the contents.
4.
Select [Close].
Error History
Close
Error Log History
Address Book Maintenance
Saves the scanner's Address Book on a USB
memory connected to the scanner. It also
restores (imports) Address Book back to the
scanner from a USB memory.
Address Book Maintenance
Store Address Book
Close
Recover Address
Book
If you have registered new addresses to Address
Book, we recommend you to create its backup
using [Store Address Book].
Important
• Address Book cannot be saved when the security or
write-protect feature of the USB flush memory is
enabled.
Store Address Book
1.
Insert a USB flush memory into the
scanner's USB connector.
2.
On the [Maintenance/Diagnostics] screen,
select [Address Book Maintenance].
3.
On the [Address Book Maintenance]
screen, select [Store Address Book].
4.
The confirmation message appears. Press
the <Start> button on the control panel.
5.
When Address Book is saved, a message
appears.
Note
• If Address Book was not saved successfully, a
message informing you of this appears. If the
message appears, try saving Address Book again.
6.
150
Select [Close].
6 System Settings
Store Address Book
The file will be stored as:
Address.ADB.
Close
Recover Address Book
Address Book can be restored by the following two methods:
• [Overwrite]:
The addresses on the scanner that exist also on the USB flash memory will be
overwritten with the addresses on the USB memory. The addresses that exist on the
USB memory but not on the scanner will be added to the scanner. The addresses that
exist on the scanner but not on the USB flush memory will stay on the scanner without
being deleted.
• [Replace]:
The entire addresses on the scanner will be deleted and will be replaced with the
addresses on the USB flush memory.
1.
Insert the USB memory on which Address
Book is saved.
2.
On the [Maintenance/Diagnostics] screen,
select [Address Book Maintenance].
3.
On the [Address Book Maintenance]
screen, select [Recover Address Book].
4.
On the [Recover Address Book] screen,
select the desired recovery method, and
press the <Start> button on the control
panel.
5.
When Address Book is restored, a
message appears.
Recover Address Book
Close
Overwrite
Replace
Note
• If the scanner fails to restore Address Book, a
message informing you of this appears. If the
message appears, try restoring Address Book again.
6.
Select [Close].
6.4 Common Settings
151
Printer Information
Displays the printer information.
The following information can be found in the printer information:
• Printer Name
• USB Connection Speed
• Color Print
• 2 Sided Printing
• Trays
• Collated
• Bypass
1.
On the [Maintenance/Diagnostics] screen,
select [Printer Information].
2.
On the [Printer Information] screen, verify
the contents.
3.
Select [Close].
Printer Information
Cancel
Close
Printer Name
Fuji Xerox DocuPrint C2424
USB Connection Speed High-speed
Color Print
Enable
2 Sided Printing
Enable
Trays
5
Collated Enable
Bypass
Available
Carriage Shift
Shifts the carriage. When moving the scanner, lock the carriage on this screen to prevent it
from being damaged.
Refer to
• For information on how to relocate the scanner, refer to "9.3 Moving the Scanner (P. 226)".
1.
152
On the [Maintenance/Diagnostics] screen,
select [Carriage Shift].
2.
On the [Carriage Shift] screen, press the
<Start> button on the control panel.
3.
The carriage shifts.
4.
Select [Close].
6 System Settings
Carriage Shift
When you move the device, select
Disallow to prevent any damages.
Close
Initialize NVM
Initializes the NV memory (system data and registered data).
The NV memory is nonvolatile memory that retains the settings of the scanner even when
its power is switched off.
If you initialize the NV memory, various settings will return to the defaults.
System data are the parameters set under System Settings as well as on CentreWare
Internet Services.
Registered data are the data registered in the scanner's Address Book and Subject/
Comment list.
Refer to
• For information on the setting items for System Settings, refer to "6.2 System Settings Setting Items (P.
131)".
• For information on the setting items for Address Book, refer to "4.1 Overview (P. 113)".
1.
On the [Maintenance/Diagnostics] screen,
select [Initialize NVM].
2.
On the [Initialize NVM] screen, select the
check box of the data you want to initialize.
You can select both [User Section] and
[System Section].
3.
Select [Close].
4.
Press the <Start> button on the control
panel.
5.
A message confirming you the initialization
appears. If the message appears, verify the
content and select [Yes].
6.
When the initialization is complete, the
[Switch Off/On] screen appears. Switch off
the scanner.
7.
Wait for the touch panel to go out, and
switch the scanner back on.
Initialize NVM
Close
User Section
System Section
6.4 Common Settings
153
6.5
Network Settings
[Network Setting] offers [Port Settings], which enables/disable each port, and [Protocol
Settings], which configures settings required for the device-to-device communication over
a network.
Note
• CentreWare Internet Services enables more detailed network settings.
Refer to
• For operating instructions of CentreWare Internet Services, refer to "9.1 Monitoring/Managing the
Scanner on a Web Browser (P. 216)".
Selecting [Network Settings] on the [System
Settings] screen displays the [Network Settings]
screen.
The following explains the settings that can be
changed on the [Network Settings].
Network Settings
Close
Port Settings
Protocol Settings
Port Settings
Selecting [Port Settings] on the [Network Settings] screen displays the [Port Settings]
screen.
On this screen, you can set whether to enable or disable each port.
Network Settings
Port Settings
Port Settings
Close
Items
Protocol Settings
Close
Current Settings
1. SNMP
Enable
2. CW Internet Services
Enable
Change
1/1
SNMP
Sets whether to enable or disable an SNMP agent (SNMP port).
1.
2.
3.
On the [Port Settings] screen, select [1.
SNMP], and select [Change].
On the [1. SNMP] screen, select [Enable] or
[Disable].
Select [Save].
Note
• To cancel the setting, select [Cancel].
154
6 System Settings
1. SNMP
Disable
Enable
Cancel
Save
CW Internet Services
Sets whether to enable or disable CentreWare Internet Services (HTTP port).
1.
2.
3.
On the [Port Settings] screen, select [2. CW
Internet Services], and select [Change].
On the [2. CW Internet Services] screen,
select [Enable] or [Disable].
Cancel
2. CW Internet Services
Save
Disable
Enable
Select [Save].
Note
• To cancel the setting, select [Cancel].
Protocol Settings
Selecting [Protocol Settings] on the [Network Settings] screen displays the [Protocol
Settings] screen.
On this screen, you can configure the items required for network communication, such as
Ethernet port and TCP/IP (IP address, method for obtaining IP address, subnet mask, and
gateway).
Network Settings
Port Settings
Protocol Settings
Close
Items
Protocol Settings
Close
Change
Current Settings
1. Ethernet Setting
Auto
2. IGet IP Address
DHCP/Autonet
3. IP Address
0.0.0.0
4. Subnet Mask
0.0.0.0
5. Gateway
0.0.0.0
1/1
Ethernet Setting
Sets the communication speed of the Ethernet interface.
The communication speed can be selected from [Auto], [100BASE-TX (Full Duplex)],
[100BASE-TX (Half Duplex)], [10BASE-T (Full Duplex)], and [10BASE-T (Half Duplex)]
When [Auto] is selected, the scanner automatically switches the communication speed to
100BASE-TX (Full Duplex), 100BASE-TX (Half Duplex), 10BASE-T (Full Duplex), or
10BASE-T (Half Duplex).
1.
2.
3.
On the [Protocol Settings] screen, select [1.
Ethernet Setting], and select [Change].
Cancel
1. Ethernet Setting
On the [1. Ethernet Settings] screen, select
the desired communication speed.
Auto
10 BASE-T
(Full Duplex)
100 BASE-TX
(Full Duplex)
10 BASE-T
(Half Duplex)
Select [Save].
100 BASE-TX
(Half Duplex)
Save
Note
• To cancel the setting, select [Cancel].
6.5 Network Settings
155
Get IP Address
Set the method for obtaining information required to use TCP/IP (IP address, subnet mask,
gateway address) from the following options:
• DHCP (Dynamic Host Configuration Protocol)
• DHCP/Autonet
• BOOTP
• RARP
• Manual
Note
• For information about the addresses to be set manually, ask your network administrator.
• When [DHCP/Autonet] is selected, the scanner searches for a DHCP server that can be connected to. If
DHCP server does not exist, the scanner automatically assigns an IP address.
• When [DHCP] is selected, the scanner searches for a DHCP server that can be connected to. If DHCP
server does not exist, the scanner does not allow TCP/IP communication.
• When [BOOTP] is selected, the scanner searches for a BOOTP server that can be connected to. If
BOOTP server does not exist, the scanner does not allow TCP/IP communication.
• When [RARP] is selected, the scanner searches for a RARP server that can be connected to. If RARP
server does not exist, the scanner does not allow TCP/IP communication.
1.
2.
3.
On the [Protocol Settings] screen, select [2.
Get IP Address], and select [Change].
On the [Get IP Address] screen, select the
desired method.
Select [Save].
2. Get IP Address
Cancel
DHCP
DHCP/Autonet
BOOTP
Manual
Save
RARP
Note
• To cancel the setting, select [Cancel].
IP Address
Sets the default IP address when [Manual] is selected for [Get IP Address].
Enter the address in a format of xxx.xxx.xxx.xxx, where xxx is the number from 0 to 255.
1.
2.
3.
On the [Protocol Settings], select [3. IP
Address], and select [Change].
On the [3. IP Address] screen, enter the IP
address using the numeric keypad on the
control panel.
Select [Save].
Note
• To cancel the setting, select [Cancel].
156
6 System Settings
3. IP Address
Cancel
192 . 168 . 1 . 100
Save
Subnet Mask
Sets the default subnet mask when [Manual] is selected for [Get IP Address].
Enter the address in a format of xxx.xxx.xxx.xxx, where xxx is the number from 0 to 255.
1.
2.
3.
On the [Protocol Settings], select [4. Subnet
Mask], and select [Change].
4. Subnet Mask
On the [4. Subnet Mask] screen, enter the
address using the numeric keypad on the
control panel.
Cancel
Save
255 . 255 . 255 . 0
Select [Save].
Note
• To cancel the setting, select [Cancel].
Gateway
Sets the default gateway address when [Manual] is selected for [Get IP Address].
Enter the address in a format of xxx.xxx.xxx.xxx, where xxx is the number from 0 to 255.
1.
2.
3.
On the [Protocol Settings] screen, select [5.
Gateway], and select [Change].
On the [5. Gateway] screen, enter the
address using the numeric keypad on the
control panel.
5. Gateway
Cancel
Save
192 . 168 . 1 . 254
Select [Save].
Note
• To cancel the setting, select [Cancel].
6.5 Network Settings
157
6.6
Copy Settings
[Copy Settings] allows you to change defaults for different copy settings.
The items displayed vary depending on the printer. Before changing the settings on this
screen, switch on the power of the printer.
Important
• The settings on this screen can be changed even when the scanner is not connected to the printer or
when the printer is not switched on. However, the changes you made may not be reflected accurately.
Note
• Unless otherwise noted, the screens used in this section are of when the printer supports all copy
features of the scanner.
Selecting [Copy Settings] on the [System
Settings] displays the [Copy Settings] screen.
The following explains the settings that can be
changed on the [Copy Settings] screen.
Copy Settings
Close
Basic Copying
Copy Defaults
Auto Exposure
Level
Print Auditron
Settings
Basic Copying
Selecting [Basic Copying] on the [Copy Settings] screen displays the [Basic Copying]
screen.
On this screen, you can change the paper trays and copy ratios displayed on the [Basic
Copying] screen. Set frequently-used paper trays or copy ratios to save the time of entering
them on the control panel.
Copy Settings
Basic Copying
Auto Exposure
Level
Close
Copy Defaults
Print Auditron
Settings
Basic Copying
Items
Close
Current Settings
1. Paper Supply - 2
Tray 1
2. Paper Supply - 3
Bypass
3. Reduce/Enlarge - 3 70% A3´A4
158
6 System Settings
Change
1/1
Paper Supply - 2
Sets the default paper tray for the second button of the four displayed under [Paper Supply]
on the [Basic Copying] screen.
The default can be selected from Trays 1 to 8.
Note
• You cannot set the same tray set for [Paper Supply - 3].
• The buttons are displayed for the number of paper trays available on the printer.
1.
2.
3.
On the [Basic Copying] screen, select [1.
Paper Supply - 2], and select [Change].
1. Paper Supply - 2
Cancel
On the [1. Paper Supply - 2] screen, select
the desired paper tray.
Tray 1
Save
Tray 5
(Bypass)
Tray 2
Select [Save].
Tray 3
Note
• To cancel the setting, select [Cancel].
Tray 4
The above screen appears when the scanner
is connected to the DocuPrint C2424.
Paper Supply - 3
Sets the default paper tray of the third button of the four displayed under [Paper Supply] on
the [Basic Copying] screen.
The default can be selected from Trays 1 to 8. If you do not want to set this setting, select
[No Tray].
Note
• You cannot set the same tray set for [Paper Supply - 2].
• The buttons are displayed for the number of paper trays available of the printer.
1.
2.
3.
On the [Basic Copying] screen, select [2.
Paper Supply - 3], and select [Change].
On the [2. Paper Supply - 3] screen, select
the desired paper tray.
Select [Save].
Note
• To cancel the setting, select [Cancel].
2. Paper Supply - 3
No Tray
Cancel
Tray 1
Save
Tray 5
(Bypass)
Tray 2
Tray 3
Tray 4
The above screen appears when the scanner
is connected to the DocuPrint C2424.
6.6 Copy Settings
159
Reduce/Enlarge - 3
Sets the default copy ratio of the third button of the four displayed under [Reduce/Enlarge]
on the [Basic Copying] screen.
1.
2.
3.
On the [Basic Copying] screen, select [3.
Reduce/Enlarge - 3], and select [Change].
On the [3. Reduce/Enlarge - 3], select the
desired copy ratio.
Select [Save].
Note
• To cancel the setting, select [Cancel].
3. Paper Supply - 3
50%
A3´A5
70%
A3´A4/B4´B5
81%
B4´A4/B5´A5
86%
A3´B4/A4´B5
115%
B4´A3/B5´A4
122%
A4´B4/A5´B5
Cancel
Save
1/2
Copy Defaults
Selecting [Copy Defaults] on the [Copy Settings] screen displays the [Copy Defaults]
screen.
On this screen, you can set the default of each copy feature.
The copy features will reset to the defaults when the scanner is switched on, when it is reactivated from the Power Saver mode, or when the <Clear All> button is pressed.
Set frequently-used settings to save the time of entering them on the control panel.
Note
• The setting items and values vary depending on the printer. The screens used in this section are of when
the printer supports all copy features of the scanner.
Refer to
• For more information about the copy features, refer to "3 Copy (P. 79)".
Copy Settings
Basic Copying
Auto Exposure
Level
160
6 System Settings
Close
Copy Defaults
Print Auditron
Settings
Copy Defaults
Items
Close
Current Settings
1. Paper Supply
Auto Paper
2. Paper Type - Bypass
Plain
3. Paper Size - Bypass
A3
4. Reduce / Enlarge
100%
5. Output Color
Black
Change
1/1
Paper Supply
Sets the default of [Paper Supply] on the [Basic Copying] screen.
The default can be selected from [Auto Paper], [Paper Supply Button - 2], and [Paper
Supply Button - 3].
Note
• When [Reduce/Enlarge] is set to [Auto %], [Auto Paper] cannot be selected for [Paper Supply].
1.
2.
3.
On the [Copy Defaults] screen, select [1.
Paper Supply], and select [Change].
On the [1. Paper Supply] screen, select
[Auto Paper], [Paper Supply Button - 2], or
[Paper Supply Button - 3].
Select [Save].
1. Paper Supply
Cancel
Save
Auto Paper
Paper Supply Button - 2
Paper Supply Button - 3
Note
• To cancel the setting, select [Cancel].
Paper Type - Bypass
Sets the default paper type displayed on the [Bypass] screen.
1.
2.
3.
On the [Copy Defaults] screen, select [2.
Paper Type - Bypass], and select [Change].
On the [2. Paper Type - Bypass], select the
desired paper type.
Select [Save].
Note
• To cancel the setting, select [Cancel].
Cancel
2. Paper Type - Bypass
Plain
Heavyweight 2
Bond
Heavyweight 3
Recycled
Envelope
Heavyweight 1
Transparency
Save
Postcard
Paper Size - Bypass
Sets the default paper size displayed on the [Bypass] screen.
1.
2.
On the [Copy Defaults] screen, select [3.
Paper Size - Bypass], and select [Change].
On the [3. Paper Size - Bypass], select the
desired paper size series from [A/B Series],
[Inch Series], and [Others].
Cancel
3. Paper Size - Bypass
A/B Series
Save
A4
A4
Inch Series
A3
1/3
B4
3.
Select the desired paper size.
4.
Select [Save].
Others
B5
B5
Note
• To cancel the setting, select [Cancel].
6.6 Copy Settings
161
Reduce/Enlarge
Sets the default of [Reduce/Enlarge] on the [Basic Copying] screen.
The default can be selected from [100%], [Auto %], and [Reduce/Enlarge Button - 3].
Note
• When the default of [Paper Supply] is set to [Auto Paper], [Auto %] cannot be selected for [Reduce/
Enlarge].
1.
2.
3.
On the [Copy Defaults] screen, select [4.
Reduce/Enlarge], and select [Change].
4. Reduce / Enlarge
On the [4. Reduce/Enlarge] screen, select
the desired ratio.
100%
Select [Save].
Reduce/Enlarge
Button - 3
Cancel
Save
Cancel
Save
Auto %
Note
• To cancel the setting, select [Cancel].
Output Color
Sets the default of [Output Color] on the [Basic Copying] screen.
The default can be selected from [Black] and [Full Color].
1.
2.
3.
On the [Copy Defaults] screen, select [5.
Output Color], and select [Change].
On the [5. Output Color] screen, select the
desired output color.
5. Output Color
Black
Full Color
Select [Save].
Note
• To cancel the setting, select [Cancel].
2 Sided Copying
Sets the default of [2 Sided Copying] on the [Basic Copying] tab.
The default can be selected from [1J1 Sided], [1J2 Sided], [2J2 Sided], and [2J1 Sided].
Note
• The [2J2 Sided] and [1J2 Sided] settings are valid only when the printer has a 2-sided printing
feature.
1.
2.
3.
On the [Copy Defaults] screen, select [6. 2
Sided Copying], and select [Change].
On the [6. 2 Sided Copying] screen, select
the desired option.
Select [Save].
Note
• To cancel the setting, select [Cancel].
162
6 System Settings
6. 2 Sided Copying
1´1 Sided
1´2 Sided
2´2 Sided
2´1 Sided
Cancel
Save
Original Type
Sets the default of [Original Type] on the [Basic Copying] or [Image Quality] screen.
The default can be selected from [Text], [Text & Photo (Halftone)], [Text & Photo
(Photograph), [Photo (Halftone), and [Map].
1.
2.
3.
On the [Copy Defaults] screen, select [7.
Original Type], and select [Change].
7. Original Type
Cancel
Save
On the [7. Original Type] screen, select the
desired original type.
Text
Photo
(Halftone)
Text & Photo
(Halftone)
Photo
(Photograph)
Select [Save].
Text & Photo
(Photograph)
Map
Note
• To cancel the setting, select [Cancel].
Lighten/Darken
Sets the default of [Lighten/Darken] on the [Basic Copying] screen.
The lightness/darkness (copy density) can be set in seven levels from [Lighten] to [Darken].
1.
On the [Copy Defaults] screen, select [8.
Lighten/Darken], and select [Change].
2.
On the [8. Lighten/Darken] screen, set the
copy density using [ ]/[ ].
3.
Select [Save].
8. Lighten/Darken
Cancel
Darken
Save
Lighten
Note
• To cancel the setting, select [Cancel].
Sharpness
Sets the default of [Sharpness] on the [Image Quality] screen.
The sharpness can be set in five levels from [Softer] to [Sharper].
1.
On the [Copy Defaults] screen, select [9.
Sharpness], and select [Change].
2.
On the [9. Sharpness] screen, set the level
of sharpness using [ ]/[ ].
3.
Select [Save].
Note
• To cancel the setting, select [Cancel].
Cancel
9. Sharpness
Save
Sharper
Normal
Softer
6.6 Copy Settings
163
Saturation
Sets the default of [Color Saturation] on the [Image Quality] screen.
The color saturation can be set in five levels from [Lower] to [Higher].
Note
• This setting is available only if the scanner is connected to a color printer.
1.
On the [Copy Defaults] screen, select [10.
Saturation], and select [Change].
2.
On the [10. Saturation] screen, select the
color saturation using [ ]/[ ].
3.
Select [Save].
10. Color Saturation
Cancel
Save
Cancel
Save
Higher
Normal
Note
• To cancel the setting, select [Cancel].
Lower
Auto Exposure
Sets the default of [Auto Exposure] on the [Image Quality] screen.
1.
2.
On the [Copy Defaults] screen, select [11.
Auto Exposure], and select [Change].
On the [11. Auto Exposure], select [On] or
[Off].
11. Auto Exposure
Off
On
3.
Select [Save].
Note
• To cancel the setting, select [Cancel].
Color Balance (Y/M/C/K)
Sets the defaults for [Color Balance (Y)] - [Color Balance (K)] on the [Image Quality] screen.
The color balance can be set in seven levels for areas of low, medium, and high density.
Note
• This setting is only available if the scanner is connected to a color printer.
1.
2.
3.
On the [Copy Defaults] screen, select an
option from [12. Color Balance (Y)] to [15.
Color Balance (K)], and then select
[Change].
On the Color Balance screen of the color
you selected, set the color balance for [Low
Density], [Mid. Density], and [High Density]
using [ ]/[ ].
Select [Save].
Note
• To cancel the setting, select [Cancel].
164
6 System Settings
12. Color Balance (Y)
Low Density
Cancel
Mid. Density
Save
High Density
+3
+3
+3
0
0
0
-3
-3
-3
Original Orientation
Sets the default of [Original Orientation] on the [More Copy Features] screen.
The default can be selected from [Head to Top] and [Head to Left].
Refer to
• For more information about the [Head to Top] and [Head to Left] options, refer to "Original Orientation
(Specifying the Orientation of the Original)" (P. 107).
1.
On the [Copy Defaults] screen, select [16.
Original Orientation], and select [Change].
2.
On the [16. Original Orientation] screen,
select [Head to Top] or [Head to Left].
3.
Select [Save].
Cancel
16. Original Orientation
Save
Head to Top
Head to Left
Note
• To cancel the setting, select [Cancel].
Output
Sets the default of [Copy Output] on the [More Copy Features] screen.
The default can be selected from [Uncollated] and [Collated].
Note
• This settings is available only if the printer has a collating feature and is equipped with an add-on hard
disk.
1.
On the [Copy Defaults] screen, select [17.
Output], and select [Change].
2.
On the [17. Output] screen, select
[Uncollated] or [Collated].
3.
Select [Save].
Cancel
17. Output
Save
Uncollated
Collated
Note
• To cancel the setting, select [Cancel].
Edge Erase
Sets the default of [Edge Erase] on the [More Copy Features] screen.
The amount of erasure can be set for the top/bottom, center, and left/right edges within 0 to
50 mm in increments of 1 mm.
1.
2.
3.
On the [Copy Defaults] screen, select [18.
Edge Erase], and select [Change].
On the [18. Edge Erase] screen, enter the
amount of erasure using [ ]/[ ].
Select [Save].
Cancel
18. Edge Erase
Save
(0 - 50)
(0 - 50)
(0 - 50)
4
4
0
mm
Note
• To cancel the setting, select [Cancel].
6.6 Copy Settings
165
Mixed Sized Orig.
Sets the default of [Mixed Sized Originals] on the [More Copy Features] screen.
Note
• This setting is only available on the DocuScan C4250.
1.
On the [Copy Defaults] screen, select [19.
Mixed Sized Orig.], and select [Change].
2.
On the [19. Mixed Sized Orig.] screen,
select [On] or [Off].
3.
Select [Save].
19. Mixed Sized Orig.
Cancel
Save
Off
On
Note
• To cancel the setting, select [Cancel].
Auto Exposure Level
Selecting [Auto Exposure Level] on the [Copy Settings] screen displays the [Auto Exposure
Level] screen.
On this screen, you can set the default of [Auto Exposure] on the [Image Quality] screen.
The auto exposure level can be set in five levels: Normal, +1, +2, +3, and +4.
Copy Settings
Basic Copying
Auto Exposure
Level
Auto Exposure Level
Close
Items
Copy Defaults
Print Auditron
Settings
Close
Current Settings
1. Black (Text)
Normal
2. Black (Text&Photo)
Normal
3. Black (Map)
+1
4. Color (Text)
+1
5. Color (Text&Photo)
+1
Change
1/2
Black (Text)
Sets the default auto exposure level when [Black (Text)] is selected for the type of original.
1.
On the [Auto Exposure Level] screen,
select [1. Black (Text)], and select
[Change].
2.
On the [1. Black (Text)] screen, select the
desired auto exposure level.
3.
Select [Save].
Note
• To cancel the setting, select [Cancel].
166
6 System Settings
1. Black (Text)
Cancel
Normal
+3
+1
+4
+2
Save
Black (Text & Photo)
Sets the default auto exposure level when [Black (Text & Photo)] is selected for the type of
original.
1.
On the [Auto Exposure Level] screen,
select [2. Black (Text & Photo)], and select
[Change].
2.
On the [2. Black (Text & Photo)] screen,
select the desired auto exposure level.
3.
Select [Save].
2. Black (Text & Photo)
Cancel
Normal
+3
+1
+4
Save
+2
Note
• To cancel the setting, select [Cancel].
Black (Map)
Sets the default auto exposure level when [Black (Map)] is selected for the type of original.
1.
On the [Auto Exposure Level] screen,
select [3. Black (Map)], and select
[Change].
2.
On the [3. Black (Map)], select the desired
auto exposure level.
3.
Select [Save].
3. Black (Map)
Cancel
Normal
+3
+1
+4
Save
+2
Note
• To cancel the setting, select [Cancel].
Color (Text)
Sets the default auto exposure level when [Color (Text)] is selected for the type of original.
1.
On the [Auto Exposure Level] screen,
select [4. Color (Text)], and select
[Change].
2.
On the [4. Color (Text)] screen, select the
desired auto exposure level.
3.
Select [Save].
4. Color (Text)
Cancel
Normal
+3
+1
+4
Save
+2
Note
• To cancel the setting, select [Cancel].
6.6 Copy Settings
167
Color (Text & Photo)
Sets the default auto exposure level when [Color (Text & Photo)] is selected for the type of
original.
1.
On the [Auto Exposure Level] screen,
select [5. Color (Text & Photo)], and select
[Change].
2.
On the [5. Color (Text & Photo)] screen,
select the desired auto exposure level.
3.
Select [Save].
5. Color (Text & Photo)
Cancel
Normal
+3
+1
+4
Save
+2
Note
• To cancel the setting, select [Cancel].
Color (Map)
Sets the default auto exposure level when [Color (Map)] is selected for the type of original.
1.
On the [Auto Exposure Level] screen,
select [6. Color (Map)], and select
[Change].
2.
On the [6. Color (Map)], select the desired
auto exposure level.
3.
Select [Save].
Note
• To cancel the setting, select [Cancel].
168
6 System Settings
6. Color (Map)
Cancel
Normal
+3
+1
+4
+2
Save
Print Auditron Settings
Selecting [Print Auditron Settings] on the [Copy Settings] screen displays the [Print Auditron
Settings] screen.
On this screen, you can set a user ID and password when the printer uses a user auditron
feature.
Copy Settings
Close
Basic Copying
Copy Defaults
Auto Exposure
Level
Print Auditron
Settings
Print Auditron Settings
Off
Cancel
Save
User ID (1 - 32 chars.)
UserA
On
Password (1 - 12 digits)
Important
• The scanner goes into an error state in case of the following situations:
• The ID and password set on the scanner are different from those set on the printer.
• [Print Auditron Settings] is set to [Off] even if the printer that the scanner is connected to uses a user
authentication feature.
1.
2.
On the [Copy Settings] screen, select [Print
Auditron Settings].
On the [Print Auditron Settings] screen,
select [On] or [Off].
3.
When [On] is selected, enter [User ID] and
[Password] using the numeric keypad on
the control panel. The user ID and
password must be 1 to 32 characters and a
1 to 12-digit number, respectively.
4.
Select [Save].
Cancel
Print Auditron Settings
Off
Save
User ID (1 - 32 chars.)
UserA
On
Password (1 - 12 digits)
Note
• To cancel the setting, select [Cancel].
6.6 Copy Settings
169
6.7
Scan Settings
[Scan Settings] allows you to set the defaults that relate to the scanner's specifications.
Select [Scan Settings] on the [System Settings]
screen displays the [Scan Settings] screen.
The following explains the settings that can be
changed on the [Scan Settings] screen.
Scan Settings
Scan Defaults
Close
File Name Conflict
Scan to PC
Protocol
Scan Defaults
Selecting [Scan Defaults] on the [Scan Settings] screen displays the [Scan Defaults]
screen.
On this screen, you can set the default of each scan feature.
The scan features will reset to the defaults when the scanner is switched on, when it is reactivated from the Power Saver mode, or when the <Clear All> button is pressed.
Set frequently-used settings to save the time of entering them on the control panel.
Refer to
• For more information about the scan features, refer to"2 Scan (P. 30)".
Scan Settings
Scan Defaults
Close
Scan Defaults
Items
File Name Conflict
Scan to PC
Protocol
Close
Current Settings
Change
1. Output Color
Black
2. Scan Resolution
200dpi
3. Original Type
Text & Photo (Photo.) 1/3
4. Lighten / Darken
Normal
5. File Format
PDF
Output Color
Sets the default of [Output Color] on the [Basic Scanning] screen.
The default can be selected from [Full Color], [Grayscale], and [Black].
1.
2.
3.
On the [Scan Defaults] screen, select [1.
Output Color], and select [Change].
On the [1. Output Color] screen, select the
desired output color.
Select [Save].
Note
• To cancel the setting, select [Cancel].
170
6 System Settings
1. Output Color
Full Color
Grayscale
Black
Cancel
Save
Scan Resolution
Sets the default of [Scan Resolution] on the [More Scan Features] screen.
The default can be selected from [200 dpi], [300 dpi], [400 dpi], and [600 dpi].
1.
2.
3.
On the [Scan Defaults] screen, select [2.
Scan Resolution], and select [Change].
On the [2. Scan Resolution] screen, select
the desired scan resolution.
Select [Save].
Note
• To cancel the setting, select [Cancel].
2. Scan Resolution
Cancel
Save
200dpi
300dpi
400dpi
600dpi
Original Type
Sets the default of [Original Type] on the [Basic Scanning] screen.
The default can be selected from [Text], [Text & Photo (Halftone)], [Text & Photo
(Photograph), [Photo (Halftone)], and [Photo (Photograph)].
1.
2.
3.
On the [Scan Defaults] screen, select [3.
Original Type], and select [Change].
3. Original Type
Cancel
Save
On the [3. Original Type] screen, select the
desired original type.
Text
Photo
(Halftone)
Text & Photo
(Halftone)
Photo
(Photograph)
Select [Save].
Text & Photo
(Photograph)
Note
• To cancel the setting, select [Cancel].
Lighten/Darken
Sets the default of [Lighten/Darken] on the [Basic Scanning] screen.
The level of lightness/darkness (scan density) can be set in seven levels from [Lighten] to
[Darken].
1.
On the [Scan Defaults] screen, select [4.
Lighten/Darken], and select [Change].
2.
On the [4. Lighten/Darken] screen, set the
density level using [ ]/[ ].
3.
Select [Save].
4. Lighten / Darken
Darken
Cancel
Save
Lighten
Note
• To cancel the setting, select [Cancel].
6.7 Scan Settings
171
File Format
Sets the default of [File Format] on the [Basic Scanning] screen.
The default can be selected from the followings:
• PDF
• DocuWorks
• TIFF
• Multi-page TIFF
• JPEG
Note
• [JPEG] cannot be selected when [Output Color] is set to [Black].
1.
On the [Scan Defaults] screen, select [5.
File Format], and select [Change].
2.
On the [5. File Format] screen, select the
desired file format.
3.
Select [Save].
Note
• To cancel the setting, select [Cancel].
5. File Format
Cancel
PDF
Multi-page
TIFF
DocuWorks
JPEG
Save
TIFF
TIFF File Format
Sets the default TIFF format that can be selected under [File Format] on the [Basic
Scanning] screen.
Select the type of TIFF format that will be used when reading scanned data on your
application software. The format can be selected from [TIFF V6] and [TTN2].
1.
On the [Scan Defaults] screen, select [6.
TIFF File Format], and select [Change].
2.
On the [6. TIFF File Format] screen, select
the desired file format.
3.
Select [Save].
6. TIFF File Format
TIFF V6
TTN2
Note
• To cancel the setting, select [Cancel].
172
6 System Settings
Cancel
Save
Image Compression
Sets the default of [Image Compression] on the [More Scan Features] screen.
The default can be selected from [Higher], [Normal], and [Lower].
1.
On the [Scan Defaults] screen, select [7.
Image Compression], and select [Change].
2.
On the [7. Image Compression] screen,
select the desired compression rate.
3.
Select [Save].
7. Image Compression
Cancel
Save
Higher
Normal
Lower
Note
• To cancel the setting, select [Cancel].
Original Orientation
Sets the default of [Original Orientation] on the [More Scan Features] screen. The default
can be selected from [Head to Top] and [Head to Left].
Refer to
• For more information about [Head to Top] and [Head to Left] options, refer to "Original Orientation
(Specifying the Orientation of the Original)" (P. 107).
1.
On the [Scan Defaults] screen, select [8.
Original Orientation], and select [Change].
2.
On the [8. Original orientation] screen,
select [Head to Top] or [Head to Left].
3.
Select [Save].
8. Original Orientation
Cancel
Save
Cancel
Save
Head to Top
Head to Left
Note
• To cancel the setting, select [Cancel].
Sharpness
Sets the default of [Sharpness] on the [Other Scan Features] screen.
The sharpness can be set in five levels from [Softer] to [Sharper].
1.
On the [Scan Defaults] screen, select [9.
Sharpness], and select [Change].
2.
On the [9. Sharpness] screen, set the
sharpness using [ ]/[ ].
3.
Select [Save].
Note
• To cancel the setting, select [Cancel].
9. Sharpness
Sharper
Normal
Softer
6.7 Scan Settings
173
Contrast
Sets the default of [Contrast] on the [Other Scan Features] screen.
The contrast can be set in five levels from [Higher] to [Lower].
1.
On the [Scan Defaults] screen, select [10.
Contrast], and select [Change].
2.
On the [10. Contrast] screen, set the
contrast using [ ]/[ ].
3.
Select [Save].
Cancel
10. Contrast
Save
Higher
Normal
Note
• To cancel the setting, select [Cancel].
Lower
RGB Color Space
Sets the color space when [Output Color] is [Full Color].
The color space can be selected from [Standard] and [Device].
When [Standard] is selected, the scanner uses the standard color space, sRGB.
When [Device] is selected, images can be edited using profile data. Select this for advanced
color processing.
Note
• The profile data for color management is included in the "Software Pack" CD-ROM.
1.
On the [Scan Defaults] screen, select [11.
RGB Color Space], and select [Change].
2.
On the [11. RGB Color Space] screen,
select the desired color space.
3.
Select [Save].
11. RGB Color Space
Cancel
Save
Standard
Device
Note
• To cancel the setting, select [Cancel].
Auto Exposure
Sets the default of [Auto Exposure] on the [More Scan Features] screen.
1.
On the [Scan Defaults] screen, select [12.
Auto Exposure], and select [Change].
2.
On the [12. Auto Exposure] screen, select
[On] or [Off].
3.
Select [Save].
12. Auto Exposure
Off
On
Note
• To cancel the setting, select [Cancel].
174
6 System Settings
Cancel
Save
Preview
Sets the default for [Preview] on the [E-mail Address]/[Save In] (Scan to PC)/[Save In]
(Scan to Media) screen.
1.
On the [Scan Defaults] screen, select [13.
Preview], and select [Change].
2.
On the [13. Preview] screen, select [On] or
[Off].
3.
Select [Save].
Cancel
13. Preview
Save
Off
On
Note
• To cancel the setting, select [Cancel].
Address Screen
Sets the default of the [Address Book] screen, which can be displayed by selecting the
[Address Book...] button on the touch panel or pressing the <Address Book> button on the
control panel.
You can set the touch panel to display the [Address Book Folder] screen or the [Address
Book] of the specified folder when either button is selected.
1.
On the [Scan Defaults], select [14. Address
Screen], and select [Change].
2.
On the [14. Address Screen], select [Folder
View] or [List View].
3.
When [List View] is selected, specify the
folder number under [Folder Number:]
using [ ]/[ ].
4.
Cancel
14. Address Screen
Address
Folder View
Save
Specify the Address
Folder by folder number.
Address
List View
Folder Number:
(01 - 48)
1
Select [Save].
Note
• To cancel the setting, select [Cancel].
Mixed Sized Orig.
Sets the default of [Mixed Sized Orig.] on the [More Scan Features] screen.
Note
• This setting is only available on the DocuScan C4250.
1.
On the [Scan Defaults] screen, select [15.
Mixed Sized Orig.], and select [Change].
2.
On the [15. Mixed Sized Orig.] screen,
select [On] or [Off].
3.
Select [Save].
15. Mixed Sized Orig.
Cancel
Save
Off
On
Note
• To cancel the setting, select [Cancel].
6.7 Scan Settings
175
File Name Conflict
Selecting [File Name Conflict] on the [Scan Settings] screen displays the [File Name
Conflict] screen.
On this screen, you can set the default of [File Name Conflict] for the Scan to PC feature.
The default can be selected from [Change Name and Save], [Overwrite], and [Cancel Job].
Scan Settings
Scan Defaults
File Name Conflict
Close
File Name Conflict
Cancel
Save
Change Name
and Save
Scan to PC
Protocol
Overwrite
Cancel Job
1.
On the [File Name Conflict] screen, select
the desired option, and select [Save].
File Name Conflict
Cancel
Save
Change Name
and Save
Note
• To cancel the setting, select [Cancel].
Overwrite
Cancel Job
Scan to PC Protocol
Selecting [Scan to PC Protocol] on the [Scan Settings] screen displays the [Scan to PC
Protocol] screen.
On this screen, you can set the default protocol for the Scan to PC feature.
The protocol can be selected from [FTP] and [SMB].
Scan Settings
Scan Defaults
Scan to PC Protocol
Close
File Name Conflict
On the [Scan to PC Protocol] screen, select
the desired protocol, and select [Save].
Note
• To cancel the setting, select [Cancel].
SMB
Scan to PC Protocol
FTP
SMB
176
6 System Settings
Save
FTP
Scan to PC
Protocol
1.
Cancel
Cancel
Save
6.8
System Administrator Settings
[System Administrator Settings] allows you to set the system administrator password that is
required to change the settings on the [System Settings] screen.
For security measures, it is recommended to set the system administrator password.
Selecting [System Admin. Settings] on the
[System Settings] screen displays the [System
Administrator Settings] screen.
The following explains the setting that can be
changed on the [System Administrator Settings]
screen.
System Administrator Settings
Close
Setup Password
Setup Password
Sets the password of the system administrator. The password must be a 4 to 12-digit
number.
Note
• The default system administrator password is "11111".
1.
2.
On the [System Administrator Settings]
screen, select [Setup Password].
On the [System Admin. Password] screen,
select [On] or [Off].
3.
When [On] is selected, enter the password
in [New password] using the numeric
keypad on the control panel.
Then, enter the same password again in
[Re-enter].
4.
Select [Save].
System Admin. Password
On
Cancel
Save
New password (4-12 digits)
*****
Off
Re-enter (4-12 digits)
Note
• To cancel the setting, select [Cancel].
6.8 System Administrator Settings
177
7
DocuScan Manager
This chapter provides a brief description of the features and operation of DocuScan
Manager.
Refer to
• For installation instructions of DocuScan Manager, refer to the Software Operation Guide.
• For details on DocuScan Manager, refer to the DocuScan Manager Online Help.
7.1
What is DocuScan Manager
DocuScan Manager is software that allows you to edit scanned images using features such
as tilt correction and denoising. It also allows you to register e-mail or server addresses for
the Scan to E-mail/Scan to PC feature in Address Book.
What You Can Do
DocuScan Manager offers the following three types of tools. Use them according to your
needs.
DocuScan Manager
Use DocuScan Manager to edit two or more images simultaneously. In the [DocuScan
Manager] window, you can work with files and folders in the same way as in Windows
Explorer.
• Enables editing operations such as tilt correction, denoising and rotation.
• Edits the following types of files. Denoising can be performed only on monochrome
images.
- JPEG(JFIF): file extension ".jpg", ".jpeg", ".jpe", ".jfif"
- TIFF: file extension ".tif", ".tiff"
• Displays the files contained in folders in list view. It can also display the first pages of the
following files in thumbnail view (reduced-size image).
- JPEG(JFIF): file extension ".jpg", ".jpeg", ".jpe", ".jfif"
- TIFF: file extension ".tif", ".tiff
- PDF: file extension ".pdf"
- DocuWorks: file extension ".xdw"
Note
• To display DocuWorks files in thumbnail view, DocuWorks Viewer Light for Web 6.0.2 or later is required.
DocuWorks Viewer Light for Web 6.0.2 can be installed from the "Software Pack" CD-ROM.
• Since DocuWorks is not supported by Windows NT, DocuWorks files cannot be displayed in thumbnail
view on Windows NT.
DocuScan Viewer
Use DocuScan Viewer to edit images one by one, print images, or delete an area selected
on an image.
• Enables editing operations such as tilt correction, denoising, and rotation. It also allows
you reduce/enlarge an image or delete/save a selected area on an image.
• Edits the following types of files. Denoising can be performed only on monochrome
images.
- JPEG(JFIF): file extension ".jpg", ".jpeg", ".jpe", ".jfif"
- TIFF: file extension ".tif", ".tiff
178
7 DocuScan Manager
DocuScan Address Book Tool
Use DocuScan Address Book Tool to register, change, or delete addresses for the Scan to
E-mail/Scan to PC feature in Address Book.
With Address Book, entering addresses is much faster when compared to entering them on
the scanner's control panel.
Address Book also allows you to register e-mail subjects and comments (messages) for
Scan to E-mail feature.
Image Editing Procedure
The sections from “7.2 Registering an Address” onward outline the image editing procedure
using DocuScan Manager:
STEP 1
Register an
address
DocuScan Address Book Tool
• Select a scanner.
• Register an address folder.
• Register an address.
2
Import scanned
data
Scanner
• Scan images on the scanner.
DocuScan Manager
• Import images into DocuScan Manager.
3
Edit images
simultaneously
DocuScan Manager
• Create an Edit Images icon.
• Execute an editing operation.
4
Edit images one
by one
DocuScan Viewer
• Display images.
• Edit images.
5
Print images
DocuScan Viewer
• Print images.
6
Save images
DocuScan Viewer
• Save images by overwriting the original files.
• Save images with different file names
7.1 What is DocuScan Manager
179
7.2
Registering an Address
This section explains how to register an address in Address Book. This corresponds to
"Step 1 Register an address" in “Image Editing Procedure”.
STEP
1
Register an
addresss
2
3
4
5
6
Selecting a Scanner
First, select the scanner on which the address is to be registered using Address Book Tool.
Use the following procedure only when starting Address Book Tool for the first time.
Note
• This procedure should be used also when configuring Address Book on a different scanner, or when a
connection to the scanner used previously could not be established.
1.
From the [Start] menu, select [Programs] > [Fuji Xerox] > [DocuScan Manager] >
[DocuScan Address Book Tool].
If this is the first time Address Book Tool has been started, the [Select Scanner] dialog
box appears.
Note
• Address Book Tool can be started also by clicking [
(Start Address Book Tool)] on the toolbar of the
[DocuScan Manager] window, or by selecting [Start Address Book Tool] on the [Tools] menu.
2.
Select a scanner from [Scanner List].
If the scanner you are searching for cannot be found in [Scanner List], click [Search
Conditions] and change the search criteria, such as subnet or time-out value.
Or, enter the scanner's IP address in [Enter IP Address].
2
3
3.
Click [OK].
The connection to the scanner is established, and the [DocuScan Address Book Tool]
window appears.
Important
When a connection to the scanner cannot be established, check or change the followings, and click
[Search again] in the [Select Scanner] dialog box.
• If the power of the scanner is switched on.
• If the network cable is connected.
• If [SNMP] is set to [Enable].
To check the [SNMP] setting:
The scanner's control panel > [System Settings] > [Network Settings] > [Port Settings]
CentreWare Internet Services > [Properties] > [Protocol Settings] > [SNMP]
• [CW Internet Services] is set to [Enable].
180
7 DocuScan Manager
•
•
•
•
•
To check the [CW Internet Services] settings:
The scanner's control panel > [System Settings] > [Network Settings] > [Port Settings].
If TCP/IP is set correctly.
To check the TCP/IP setting:
The scanner's control panel > [System Settings] > [Network Settings] > [Protocol Settings]
CentreWare Internet Services > [Properties] > [Protocol Settings] > [TCP/IP]
If the SNMP port is set to "161".
If [Community Name] is correct. The default is "public".
To change [Community Name]:
CentreWare Internet Services > [Properties] > [Protocol Settings] > [SNMP]
Extend the time-out value in the [Search Conditions] dialog box.
Change the subnet in the [Search Conditions] dialog box.
Registering an Address Folder
Before registering an address, you must create a folder in which the address is to be saved.
1.
In the Tree View area on the [DocuScan Address Book Tool] window, select an
address folder that is not used from [Address Book].
2.
Click [
1
(Properties)] on the toolbar, or select [Properties] from the [File] menu.
The properties dialog box of the folder appears.
3.
Enter the name of the folder in [Folder Name] within 16 characters or symbols (ASCII
characters). In this example, we will name the folder "common".
This setting is optional. If you leave this blank, the folder will be named "No name".
Note
• To set a password to the folder, select the [Set password] check box, and enter the password. The
password should be a 4 to 8-digit number. If you set the password, you will be asked to enter it when
openning the folder.
3
4
4.
Click [OK].
The color of the folder icon in the Tree View area changes, and the name of the folder
is displayed.
7.2 Registering an Address
181
Registering an Address for Scan to PC
The following explains how to register an address for the Scan to PC feature. In this
example, we will register the following type of address:
• A shared folder on the computer on which DocuScan Address Book Tool is being
operated. (The transfer protocol is SMB).
Using the Easy Setup Mode
In this example, we will register the address using the Easy Setup mode. The Easy Setup
mode automatically enables sharing of a folder created on a local computer.
Important
Keep the followings in mind when using the Easy Setup mode:
• When using Windows NT 4.0 or Windows 2000/XP, you must be logged in as an administrator or a user
of the Power Users group.
• When using Windows XP Home Edition, the Easy Setup mode cannot be used.
• To use the Easy Setup mode in a network environment where Windows XP Professional is connected to
a workgroup, the following settings are required:
1. From the [Tools] menu on Windows Explorer, select [Folder Options].
2. On the [Display] tab, clear the [Use simple file sharing] under [Detailed Settings], and click [OK].
1.
In the Tree View area of the [DocuScan Address Book Tool] window, select a folder in
which the address is to be saved.
2.
Click [
(Create New Address)] on the toolbar, or select [Create New Address] from
the [File] menu.
1
The Address Setting wizard starts.
3.
Select [Server] under [E-mail/Server], and click [Next].
Note
• When specifying [Address Number], clear the [Auto Numbering] check box and enter the address
number. The address number should be an integer between 1 and 350. Its second or third digit can be
"0" such as "001".
2
The [Server Settings] dialog box appears.
182
7 DocuScan Manager
4.
Enter the name of the address in [Recipient Name/Save in Location] within 32
characters or symbols (ASCII characters). In this example, we will name the address
"scan data".
This setting is mandatory.
4
5
6
7
5.
The same character string entered in [Recipient Name/Save In Location] is
automatically entered into [Index]. Edit the entry in [Index] as necessary. The [Index]
field accepts up to 32 characters or symbols (ASCII characters).
In this example, we will use “scan data” without editing.
This setting is mandatory.
6.
In this example, we will use the defaults for the following items:
•[Transfer Protocol]
Verify that this is set to [SMB].
•[Use Easy Setup]
Verify that the check box is selected.
7.
Click [Next].
The [SMB Folder Settings] dialog box appears.
8.
Click [Browse] under [Save In Folder], and select a folder in which scanned data is to
be saved. This setting is mandatory.
8
9
10
9.
In this example, we will use the defaults for the following items:
•[Use a network shared folder as the Save In Folder]
Verify that the check box is selected. The folder specified in [Save In Folder]
becomes a shared folder.
7.2 Registering an Address
183
•[Shared Folder]
Verify that the path set in [Save In Folder] is automatically entered in this field.
•[Auto Share]
Verify that the check box is selected. This automatically enable the sharing of the
folder.
•[Shared Name]
Verify that this is entered automatically.
10. Click [Next].
The [SMB Folder User Settings] dialog box appears.
11. Verify that [User Name] is entered automatically. In this example, we will use the user
name that is entered. The user is registered automatically.
11
12
13
12. A randomly created password is entered automatically in [Password]. To change it,
enter it within 32 characters or symbols (ASCII characters).
13. Verify that the [Use Scan Service User] check box is selected, and click [Next].
The [Finish] dialog box appears.
14. Verify the settings, and click [Finish].
184
7 DocuScan Manager
The address registered is displayed in the [DocuScan Address Book Tool] window.
The folder set in Step 8 is also added to the [DocuScan Manager] window. If you select
this folder when using the Scan to PC feature, scanned data will be saved in this folder.
Checking the Details of the Address on Windows
If you select the [Use Easy Setup] check box when registering an address, a shared folder
and user will be created automatically.
On Windows XP, the shared folder and user can be verified as follows:
<Shared Folder>
Can be verified by displaying the properties of the shared folder.
<User>
Can be verified under [Control Panel] > [Administrative Tools] > [Computer Management].
7.2 Registering an Address
185
7.3
Importing Scanned Data
This section explains how to import a scanned image into DocuScan Manager. This
corresponds to “Step 2 Import scanned data” in “Image Editing Procedure”.
Import a scanned
image
2
1
STEP
3
4
5
6
Scanning an Image on the Scanner
Scan an image on the scanner using the Scan to PC feature.
Refer to
• For instructions on loading documents, refer to "1.5 Loading Documents (P. 23)".
• For more information on the Scan to PC feature, refer to "2.5 Using Scan to PC (P. 49)".
If you open Address Book, the address registered in “7.2 Registering an Address” will
display.
Address Book Folder
Close
01
(No name)
02
common
03
04
05
06
(Not in Use)
(Not in Use)
(Not in Use)
07
08
09
(Not in Use)
(Not in Use)
(Not in Use)
10
11
12
(Not in Use)
(Not in Use)
(Not in Use)
(Not in Use)
Address Book [01]
To Folder
Search...
Close
Details...
01-12
001 SMB scan data
13-24
25-36
37-48
If you select an address from Address Book and select [Close], the settings on the [Scan to
PC] screen will enter automatically. You do not need to enter the address on the control
panel.
Save In
More Scan
Basic Scanning Features
Save In
More Scan
Basic Scanning Features
Address Book...
Change File Name...
Address Book...
Change File Name...
SMB
Server
Preview
SMB
FTP
scan data
Shared Name SCAN_S869CG63$
1/2
Preview
FTP
User Name
DocuScan_182jzN4K
Password
*****
2/2
Save In
Importing an Image into DocuScan Manager
After scanning the image, import it into the DocuScan Manager.
1.
From the [Start] menu, select [Programs] > [Fuji Xerox] > [DocuScan Manager].
The [DocuScan Manger] window appears.
2.
186
In the Tree View area, select the folder in which the image is saved. In this example,
we will select the "scan data" folder.
7 DocuScan Manager
The image is displayed in the Document area.
2
7.4
Editing Images Simultaneously
This section explains how to edit images with DocuScan Manager. This corresponds to
“Step 3 Edit Images simultaneously” in “Image Editing Procedure”.
STEP
1
2
3
Edit images
simultaneously
4
5
6
Creating an Edit Images Icon
Before editing images on DocuScan Manager, create an Edit Images icon of the desired
editing function.
Note
• By default, the Edit Images icons for Denoising (Low), 90 deg. Counterclockwise Rotation, and Tilt
Correction (Auto Correction) are provided.
1.
In the [DocuScan Manager] window, select [
(New)] on the toolbar, and select an
image editing option. The option can be selected also from the [File] menu > [New] >
[Edit Images]. In this example, we will select [Denoising].
The properties dialog box appears.
2.
Enter the name to be displayed in the Tree View area in [Name], set parameters, and
then click [OK]. In this example, we will set the denoising level to [Low].
The Edit Images icon is created under the Edit Images toolbox in the Tree View area.
7.4 Editing Images Simultaneously
187
Executing an Editing Operation
In the [DocuScan Manager] window, you can edit images in the following two methods:
Executing an editing operation each time you select images
You can perform an editing operation each time you select images from the Document
Area.
Executing an editing operation after storing images
You can store images that require the same editing operation and execute them all at once.
This method is useful when images that require the same operation are in different folders.
You can also specify the order in which stored files are executed.
Execute an Editing Operation Each Time You Select Images
1.
In the Tree View area of the [DocuScan Manager] window, select a folder where the
files to be edited are saved.
The files contained in the folder are displayed in the Document area.
1
2.
Drag and drop the files onto the Edit Images icon in the Tree View area. You can
select more than one file at once.
2
The [Browse for Folder] dialog box appears.
3.
Select the location where you want to save the files, and click [OK].
The files are edited and saved with the original file names.
The folder where the files are saved is added to the Tree View area, and the edited files
are listed in the Document area.
188
7 DocuScan Manager
Executing an Editing Operation After Storing Images
1.
In the Tree View area of the [DocuScan Manager] window, select an Edit Images icon
to be executed.
2.
Click [
1
(Store Files)] on the toolbar, or select [Store Files] from the [Tools] menu.
The Edit Images icon goes into the file storing mode, and a check mark appears next
to the menu item.
2
3.
In the Tree View area, select a folder where the files to be edited are saved.
The files contained in the folder are displayed in the Document area.
3
4.
Drag and drop the files onto the Edit Images icon you selected in Step 2.
4
5.
6.
Repeat Steps 3 to 4 for each file to be edited.
In the Tree View area, select the Edit Images icon selected in Step 1.
The stored files are displayed in the Document area.
6
7.4 Editing Images Simultaneously
189
7.
Click [
(Execute Stored Files)] on the toolbar, or select [Execute Stored Files] from
the [Tools] menu.
The [Browse fro Folder] dialog box appears.
8.
Specify the location to save the edited files, and click [OK].
The files are edited and saved with the original file names.
The folder where the files are saved is added in the Tree View area, and the edited files
are saved in the Document area.
7.5
Editing Images One by One
This section explains how to edit images on DocuScan Viewer. This corresponds to “Step
4 Edit images one by one” in “Image Editing Procedure”.
STEP
1
2
3
4
Edit images one
by one
5
6
Displaying an Image
1.
In the Document area of the [DocuScan Manager] window, double click an image
scanned in TIFF or JPEG format.
1
DocuScan Viewer starts, and the image is displayed in the window.
190
7 DocuScan Manager
Editing an Image
Saving or Deleting a Selected Area on the Image
1.
Click [
Mode].
(Area Mode)] on the toolbar, or select the [View] menu > [Mode] > [Area
The shape of your mouse pointer changes to "+".
2.
By dragging your mouse, select the area to be saved or deleted.
2
The area selected is outlined with a border.
3.
To save a selected area:
1) Click [
(Save Selected Area)] on the toolbar, or select [Save Selected Area] from
the [Edit] menu.
2)Specify the file name and location to save the file, and click [Save].
The area selected is saved on a file.
To delete a selected area:
Click the [
(Delete Selected Area)] on the toolbar, or select [Delete Selected Area]
from the [
(Edit)] menu.
The area selected is deleted.
Correcting the Tilt of the Image
To automatically correct the tilt
1.
Click [
(Tilt Correction)] on the toolbar, or select the [Edit] menu > [Tilt Correction] >
[Auto Correction].
The tilt of the image is corrected automatically.
To correct the tilt by tilting the image with a specified angle
1.
Click [
(Tilt Correction)] on the toolbar, or select the [Edit] menu > [Tilt Correction] >
[Specify Angle].
The [Tilt Correction] dialog box appears.
7.5 Editing Images One by One
191
2.
Specify the angle and direction to tilt the image, and click [OK].
The image is tilted by the specified angle and direction, and its tilt is corrected.
Denoising the Image
To denoise the entire image
1.
Click [
(Denoising)] on the toolbar, or select a denoising method from [Denoising]
under the [Edit] menu.
If you select [Low], [Medium], or [High], the image will be denoised in the level you
selected.
If you select [Dots], the [Denoising] dialog box will appear.
2.
Specify the size of the noise to be removed, and click [OK].
The entire image is denoised in the method you specified.
To denoise the specified area on the image
1.
Click [
Mode].
(Area Mode)] on the toolbar, or select the [View] menu > [Mode] > [Area
The shape of your mouse pointer changes to "+".
2.
By dragging the mouse, select the area to be denoised.
2
The area selected is outlined with a border.
3.
Click [
(Denoising)] on the toolbar, or select [Denoising] from the [Edit] menu, and
then select a denoising method.
If you select [Low], [Medium], or [High], the image will be denoised in the level you
selected.
If you select [Dots], the [Denoising] dialog box will appear.
192
7 DocuScan Manager
4.
Specify the size of the noise to be removed, and click [OK].
The image of the selected area is denoised.
7.6
Printing an Image
This section explains how to print an image on DocuScan Viewer. This corresponds to "Step
5 Print images” in “Image Editing Procedure”..
STEP
1.
1
Click [
2
3
4
5
Print an image
6
(Print)] on the toolbar, or select [Print] from the [File] menu.
The [Print] dialog box appears.
2.
Set the required print options and click [OK].
The image is printed.
7.7
Saving an Image
This section explains how to save an image on DocuScan Viewer. This corresponds to
“Step 6 Save images” in “Image Editing Procedure”.
STEP
1
2
3
4
5
6
Save an image
To save the image by overwriting the original file
1.
Click [
(Save)] on the toolbar, or select [Save] from the [File] menu.
The image is saved on its original file.
To save the image with a different file name
1.
Select [Save as] from the [File] menu.
The [Save as] dialog box appears.
2.
Specify the file name and location to save the file, and then click [Save].
The image is save on a new file.
7.6 Printing an Image
193
8
Problem Solving
8.1
Identifying Your Problem
Problem Solving Procedure
If a problem occurs with the scanner, follow the following procedure and remedy the
problem:
A problem occurred.
It is a document jam.
"8.2 Clearing Document Jams (P. 195)"
It is a problem other than a document jam.
"8.3 Hardware Problems (P. 199)"
Is it an image quality problem?
It is an image quality problem.
"8.4 Image Quality Problems (P. 203)"
Did it occur while using one of the scanner’s features?
It occurred while using one of the scanner’s features.
"8.5 Scanner Feature Problems (P. 205)"
Is it a network-related problem?
It is a network-related problem.
"8.6 Network-related Problems (P. 206)"
Is an error code displayed on the control panel?
An error code is displayed.
"8.7 Error Codes (P. 208)"
Check the usage restrictions.
Refer to "A.5 Notes and Restrictions (P. 234)" in Appendix.
If the problem could not be resolved with this procedure, contact our Customer Support
Center.
194
8 Problem Solving
8.2
Clearing Document Jams
When a document jam occurs in the document feeder, the scanner stops.
The touch panel displays the following message and the <Error> lamp on the control panel
lights. Follow the instructions in the message to clear the jam, and re-load the document
into the document feeder.
Original Jam
Close
1. Open the Document Feeder
Cover as shown, and turn
the Green Wheel to remove
the jammed original. If
needed, lift up the Green
Lever and open the Inner
Cover.
2. Close the Cover.
DocuScan C4250
To remove a jammed document, use the following procedure:
To open the left cover:
1.
Pull the lever on the left cover of the
document feeder, and lift the left cover until
it comes to a stop.
Note
• The cover fixes into place when opened completely.
When opening the cover, do it gently.
If only one side of the document is jammed:
2.
Turn the green wheel as illustrated, and pull
the document out slowly towards the
direction of the arrow.
If both sides of the document are jammed:
3.
Pull the green lever and open the inner
cover.
4.
Remove the document in one of the
following ways:
8.2 Clearing Document Jams
195
• Turn the green wheel as illustrated to
send the document towards the output
direction, and pull the document out
slowly.
• Turn the green wheel as illustrated.
Slowly pull the document out of the
output roller towards the upward
direction.
Important
• Do not attempt to pull out the document without
turning the wheel. You may damage the document.
5.
Close the inner cover opened in Step 3.
If the document is jammed at the output area:
6.
Lift the document feeder tray, turn the
green wheel as illustrated, and then pull the
document out slowly.
7.
Put the document feeder gently back into
its original position.
To close the left cover:
196
8.
Close the left clover until it clicks into place.
9.
Verify that the document is not ripped,
wrinkled, or creased, and re-load it into the
document feeder.
8 Problem Solving
DocuScan C3200 A
To open the left cover:
1.
Hold the left cover of the document feeder
by the center, and lift it until it comes to a
stop.
Note
• The cover fixes into place when opened completely.
When opening the cover, do it gently.
If only one side of the document is jammed:
2.
Turn the green wheel as illustrated, and pull
the document out slowly towards the
upward direction.
If both sides of the document are jammed:
3.
Lift up the green lever and leave the inner
cover open.
4.
Remove the document in one of the
following ways:
• Turn the green wheel as illustrated to
send the document to the output
direction, and pull the document out
slowly.
• Turn the green wheel as illustrated.
Slowly remove the document out of the
output roller towards the upward
direction.
Important
• Do not attempt to pull out the document without
turning the wheel. You may damage the document.
5.
Close the inner cover opened in Step 3.
8.2 Clearing Document Jams
197
If the document is jammed at the output area:
6.
While lifting up the document feeder tray,
pull the document out slowly.
7.
Close the document feeder tray gently.
To close the left cover:
198
8.
Close the left cover until it clicks into place.
9.
Verify that the document is not ripped,
wrinkled, or creased, and re-load it into the
document feeder.
8 Problem Solving
8.3
Hardware Problems
Before concluding that your scanner has malfunctioned, check the following table to see if
you can resolve your problem.
Symptom
The scanner will not
switch on.
Cause
Is the power switched on?
Remedy
Switch on the power.
Refer to
• " Switching On the Power (P. 21)"
Is the power cord plugged into the
power outlet?
Is the power cord plugged into the
power cord connector?
If the power of correct voltage
being supplied?
Switch the power off, firmly plug in the
power cord, and then switch the
power back on.
Refer to
• "Installing the Scanner" in the Setup
and Quick Reference Guide
Connect the scanner to a power outlet
that supplies the correct voltage.
Refer to
• "Safety Note" in the Setup and
Quick Reference Guide
The touch panel is too
dark.
Is the <Power Saver> button lit?
The scanner is in the Power Saver
mode. Press the <Power Saver> button on the control panel to exit the
Power Saver mode.
Refer to
• "1.4 Setting/Exiting the Power
Saver Mode (P. 22)"
The scanner will not
scan or copy.
Is a message displayed on the
touch panel?
Follow the message to remedy the
problem.
Is the power cord plugged into the
power cord connector?
Switch the power off, firmly plug in the
power cord, and then switch the
power back on.
Refer to
• "Installing the Scanner" in the Setup
and Quick Reference Guide
If the scanner will not scan while
using the Scan to E-mail or Scan
to PC feature, is the network
cable plugged in?
Plug the network cable firmly into the
connector.
Refer to
• "Installing the Scanner" in the Setup
and Quick Reference Guide
8.3 Hardware Problems
199
Symptom
The scanner will not
scan or copy. (Cont.)
Cause
Remedy
If the scanner will not make copies, is the USB cable connecting
the scanner with the printer
plugged in?
Plug the USB cable firmly into the connector.
If the scanner will not make copies, is the USB connector that the
USB cable is plugged into is functioning?
Try plugging the USB cable into other
USB connector.
If you were able to make copies, the
first USB connector might be broken.
If this is the case, Contact our Customer Support Center
If the scanner will not make copies, it may not be recognizing the
printer. Did you switch on the
scanner while the printer is in the
ready-to-copy state?
Switch off the scanner. If the printer is
in the ready-to-copy state, switch the
scanner back on again.
If the scanner will not make copies, is the printer compatible to the
scanner?
Check the following website to see if
the printer is supported by the scanner.
URL:
http://www.fxprinters.com
If you cannot make copies, the
version of the printer's firmware
may not be supported by the
scanner. Is the firmware the latest
version?
Check the following website to see if
the scanner supports the version of
the printer's firmware.
URL:
http://www.fxprinters.com
Refer to
• "Installing the Scanner" in the Setup
and Quick Reference Guide
If it is not supported, download the
version that is supported from the following website, and update the firmware.
URL:
http://www.fxprinters.com
200
Forgot the system
administrator password and thus cannot
enter the [System Settings] screen.
If the system administrator password is set, you cannot enter the
[System Settings] screen without
entering the password.
If you cannot recall the password, contact our Customer Support Center.
Try not to lose your password again.
The image quality is
poor.
You might be having an image
quality problem.
Refer to "8.4 Image Quality Problems
(P. 203)" to remedy the problem.
8 Problem Solving
Symptom
The scanner will not
scan/copy in the
desired size.
Cause
Is the document glass or document feeder cover clean?
Remedy
Clean the document glass or document feeder cover.
Refer to
• "9.2 Cleaning the Scanner (P. 220)"
Are you trying to scan or copy a
highly translucent document such
as a transparency?
Scan/copy the document from the
document glass with a blank paper
placed on top of it.
Is the document skewed or
slanted?
Load the document correctly.
Is the document loaded correctly?
Are the document guides
adjusted properly?
Refer to
• "1.5 Loading Documents (P. 23)"
Adjust the document guides properly.
Refer to
• "1.5 Loading Documents (P. 23)"
Is the document creased?
Straighten the document and re-load it
into the document feeder.
Refer to
• "1.5 Loading Documents (P. 23)"
Is the document non-standard
size?
Specify the document size.
Refer to
• "2.8 Setting Other Scan Features
(P. 69)"
• "3.6 Settings Other Copy Features
(P. 104)"
The document will not
feed through the document feeder.
Is the document large enough to
be fed into the document feeder?
Check if the size of the document is
appropriate for loading into the document feeder.
Refer to
• "1.5 Loading Documents (P. 23)"
Document jams occur
frequently.
Is a proper type of paper being
used?
Load only appropriate types of document in the document feeder.
Did you load an irregular size document, business card, transparency, or lightweight paper?
Refer to
• "1.5 Loading Documents (P. 23)"
Did you remove all paper clips,
sticky notes, and cellophane
tapes from the document?
Removing all paper clips, sticky notes
and cellophane tapes from the document and scan or copy it again.
Are the document guides
adjusted properly?
Adjust the document guides properly.
Refer to
• "1.5 Loading Documents (P. 23)"
Is a torn piece of paper from a
previous document jam remained
in the scanner?
Open the document feeder cover, and
check if there is no piece of paper left
inside.
Refer to
• "8.2 Clearing Document Jams (P.
195)"
8.3 Hardware Problems
201
Symptom
Document jams occur
frequently. (Cont.)
Cause
Remedy
When scanning documents of different sizes, is [Mixed Sized Originals] set to [On]?
Set [Mixed Sized Originals] to [On].
If using the Mixed Sized Originals
feature, are A5 documents loaded
in LEF orientation?
Load A5 documents in LEF orientation.
Refer to
• "Mixed Sized Originals (Scanning
Mixed-size Originals
Simultaneously) (DocuScan C4250
Only) (P. 74)"
• "Mixed Sized Originals (Scanning
Mixed-size Originals
Simultaneously) (DocuScan C4250
Only) (P. 109)"
Refer to
• "1.5 Loading Documents (P. 23)"
The edge of the output
is creased.
Is the document curled?
Fix the curl before loading into the
document feeder.
The scanner will not
make color copies.
Is the [Output Color] set to
[Black]?
Set [Output Color] to [Full Color].
Refer to
• "Output Color (Selecting the Output
Color) (P. 91)"
The scanner will not
automatically detect
the size of the document.
Is the printer a color printer?
You cannot make color copies if using
a monochrome printer. To make color
copies, connect the scanner to a color
printer.
The size of the document cannot
be detected automatically.
On the [Scan Size] or [Original Size]
screen, specify the document size and
press the <Start> button.
Refer to
• "Scan Size (Specifying the Scan
Size) (P. 70)"
• "Original Size (Specifying the Scan
Size) (P. 111)"
202
8 Problem Solving
8.4
Image Quality Problems
When you experience a poor scan or copy result, choose the symptom you think the closest
from the following table, and perform the corresponding corrective action.
If you see no improvement in your result, contact our Customer Support Center.
Symptom
Smudges and spots
appear on the scan/
copy output.
Cause
Is the document glass or document feeder cover clean?
Remedy
Clean the document glass or document feeder cover.
Refer to
• "9.2 Cleaning the Scanner (P. 220)"
Is the document highly translucent, such as a transparency?
Any dirt or smudges on the document
feeder cover may appear on the output when the original is highly translucent. Scan or copy the document with
a blank paper paced on top of it.
Did you scan or copy a color
paper, groundwood paper, or
blueprint?
Adjust the [Lighten/Darken] setting or
the [Original Type] setting.
Refer to
• "Lighten/Darken (Adjusting the
Scan Density) (P. 68)"
• "Lighten/Darken (Adjusting the
Copy Density) (P. 95)"
• "3.5 Setting the Image Quality
Features (P. 96)"
Did you scan or copy a glossy
printing paper?
Glossy printing paper tend to stick to
the document glass, causing
unwanted marks to appear on the output. Try scanning or copying the
glossy paper with a transparent film,
such as a transparency, placed underneath.
Streaks and lines
appear on the scan/
copy output.
Is the scanning glass of the document feeder clean?
Clean the scanning glass.
The scan/copy output
is too dark.
Is the [Lighten/Darken] setting set
to [Darker]?
Refer to
"9.2 Cleaning the Scanner (P. 220)"
Adjust the [Lighten/Darken] setting.
Refer to
• "Lighten/Darken (Adjusting the
Scan Density) (P. 68)"
• "Lighten/Darken (Adjusting the
Copy Density) (P. 95)"
The scan/copy output
is too light.
In the [Lighten/Darken] setting set
to [Lighter]?
Adjust the [Lighten/Darken] setting.
Refer to
• "Lighten/Darken (Adjusting the
Scan Density) (P. 68)"
• "Lighten/Darken (Adjusting the
Copy Density) (P. 95)"
8.4 Image Quality Problems
203
Symptom
Cause
The image on the output is skewed or
slanted.
Is the document loaded correctly?
Remedy
Load the document correctly.
Refer to
• "1.5 Loading Documents (P. 23)"
Are the document guides
adjusted properly?
Load the document correctly and
adjust the document guides to the
width of the document.
Refer to
• "1.5 Loading Documents (P. 23)"
Stripes appear on the
output.
Are you trying to copy/scan a
folded or a paste-up document?
The portions of the document that are
pasted or folded may be curled up,
preventing the document from being
attached completely to the document
glass. Place a blank sheet of paper on
top of the document so it will not curl
up.
Isn't the copy ratio too large?
Depending on the reduce/enlarge
ratio, a stripe pattern may appear on
the output. Reduce the copy ratio to
see if the problem can be resolved.
Refer to
• "Reduce/Enlarge (Making a
Reduced/Enlarged Copy) (P. 89)"
Black lines or color
lines appear on the
output.
204
8 Problem Solving
Is the scanning glass of the document feeder clean?
Clean the scanner glass.
Refer to
• "9.2 Cleaning the Scanner (P. 220)"
8.5
Scanner Feature Problems
If you experience a problem while using one of the features of the scanner, refer to the
following table to remedy the problem:
Symptom
Cannot send e-mail via
the Scan to E-mail feature.
Cause
Remedy
Is the e-mail address correct?
Check if the e-mail address is entered
correctly.
Is the e-mail address or the TCP/
IP setting correct?
Check with your system administrator
if the following settings on CentreWare
Internet Services are set correctly.
[Properties] > [Protocol Settings] > [Email]
[Properties] > [Protocol Settings] >
[TCP/IP]
Is the size of the e-mail within the
size permitted?
• Reduce the scan size.
• Increase the image compression
rate.
• Enlarge the [E-mail] setting under
[Properties] > [Protocol Settings] on
CentreWare Internet Services.
Refer to
• "Scan Resolution (Specifying the
Scan Resolution) (P. 73)"
• " Image Compression (Specifying
the Compression Rate of the
Output) (P. 73)"
Cannot transfer the
scanned data via a network using the Scan to
PC feature.
Is the transfer protocol set correctly?
Check of the transfer protocol is set
correctly.
Is the server name/IP address
entered correctly?
Check if the server name/IP address
is entered correctly.
Is the “Save In” location entered
correctly?
Check if the save in location is entered
correctly.
When SMB is selected for the
transfer protocol, is the shared
name set correctly?
Check if the shared name is entered
correctly.
Is the user name entered correctly?
Check if the user name is entered correctly.
Is the password entered correctly?
Check if the password is entered correctly.
Is the port number set correctly?
Check with your system administrator
if the port number is set correctly.
When the server name is set in
FQDN or DNS host format, is
TCP/IP set correctly?
Check with your system administrator
if the following setting on CentreWare
Internet Services is set correctly.
[Properties] > [Protocol Settings] >
[TCP/IP] > [DNS]
When the transfer protocol is
SMB, and if you specified a computer located on other subnet with
its NetBIOS name, is TCP/IP set
correctly?
Check with your system administrator
if the following setting on CentreWare
Internet Services is set correctly.
[Properties] > [Protocol Settings] >
[TCP/IP] > [WINS]
8.5 Scanner Feature Problems
205
8.6
Network-related Problems
The following table lists the some of the problems you may encounter with CentreWare
Internet Services. Remedy your problem using the corrective actions provided in the table.
CentreWare Internet Services Problems
Symptom
Cannot access to CentreWare
Internet Services.
Cause/Remedy
Is the scanner running normally?
Check if the scanner is switched on.
Is the CentreWare Internet Services activated?
Refer to
• "2 Network Settings" in the Setup and Quick Reference Guide
Is the URL entered correctly?
Check the URL. If you still cannot access the service, enter the IP
address instead of the URL.
Are you using a proxy server?
The connection cannot be established depending on the proxy
server.
Try connecting to the service without using a proxy server.
Refer to
• "2 Network Settings" in the Setup and Quick Reference Guide
The "Please wait..." message is
displayed on the web browser
and does not disappear.
Wait for a while as instructed.
If nothing happens, refresh the browser window. If this does not
help, check if the scanner is running normally.
[Refresh] does not work.
Does the service support the web browser you are using?
Refer to "9.1 Monitoring/Managing the Scanner on a Web Browser
(P. 216)" to see if the browser is supported by the service.
The content in the right frame
does not change even when a
different topic is selected in the
left frame.
The contents projected on the
screen is distorted.
Change the window size setting on the web browser.
The screen does not display
the latest information.
Click [Refresh Status] or [Refresh] button.
Clicking [Apply New Settings]
does not reflect the new
settings.
Is the value entered correctly? If the entry is not valid, it will be
changed to a value that is permitted.
Forgot the system
administrator ID or password,
and thus cannot change the
settings.
If you cannot recall the system administrator ID or password of
CentreWare Internet Services, select [Tools] on the control panel,
and initialize [System Section] under [System Settings] > [Initialize
NVM]. This setting, however, initializes the entire system data to the
default settings. If you have also forgotten the system administrator
password for the control panel, contact our Customer Support
Center. Make sure not to lose the system administrator ID and
passwords again.
Refer to
• "Initialize NVM (P. 153)"
The service will not accept the
system administrator ID and
password.
206
8 Problem Solving
If you fail to enter the correct password 5 times in a row, you will be
locked out of the service.
In such case, switch the scanner off and on again. And then, try
entering the ID and password again.
Symptom
The display language is not
what is desired.
Cause/Remedy
Change the display language setting on the web browser.
Refer to
• Online help provided for the web browser.
A connection to CentreWare
Internet Services was rejected,
or a message saying "The page
does not contain data" is
displayed.
This may happen if you refresh your web browser too often. Try not
to refresh the browser too often.
Also, do not display the [Status], [Jobs], or [Maintenance] screen on
multiple browsers.
Pressing the <Enter> key on
the keyboard instead of
selecting a button on the
screen causes the screen to
return to the previous display.
Click a button on the screen instead of pressing the <Enter> key on
your keyboard.
8.6 Network-related Problems
207
8.7
Error Codes
This section describes error codes and messages.
Error codes (xxx-yyy) and messages appear when the scanner has malfunctioned, or when
an error occurs, preventing jobs from being performed normally.
<Example of Error Message Screen>
Fault / Error
A fault has occurred.
Switch off the machine.
Ensure that the screen disappears
before switching it on.
XXX-XXX
When error codes not listed in the following table appear, or when the corrective actions
provided in the table could not resolve your problems, contact our Customer Support
Center.
Important
• When an error code is displayed, scanned data and information accumulated on the scanner or the
scanner's memory can be lost.
• If you switch the scanner off while an error code is displayed, scanned data and information
accumulated on the scanner or the scanner's memory will be erased.
The "Category" row in the table is classified into the followings:
C: Copy
P: Scan to PC
M: Scan to E-mail
U: Scan to Media
O: Others
Category
Error Code
Cause/Remedy
C
003-711
P
M
U
O
O
O
O
[Cause]
[Remedy]
The scanned data was not compressed successfully.
Try scanning at a higher compression rate and lower scan
resolution.
Refer to
• "Image Compression (Specifying the Compression Rate
of the Output) (P. 73)"
• "Scan Resolution (Specifying the Scan Resolution) (P.
73)"
003-770
O
O
O
O
[Cause]
[Remedy]
The scan/copy ratio for the 2-sided document exceeds the
ratio permitted by the scanner.
Reduce the copy/scan ratio.
Refer to
• "Reduce/Enlarge (Specifying the Scan Ratio) (P. 71)"
• "Reduce/Enlarge (Making a Reduced/Enlarged Copy) (P.
89)"
208
8 Problem Solving
Category
Error Code
003-795
Cause/Remedy
C
P
M
U
O
O
O
O
O
[Cause]
[Remedy]
The scan/copy ratio exceeds the maximum ratio permitted
by the scanner when the document is enlarged/reduced to fit
to the specified paper size.
Remedy this by one of the following methods:
•Specify the reduction/enlargement ratio
•Change the output paper size
Refer to
• "Reduce/Enlarge (Specifying the Scan Ratio) (P. 71)"
• "Reduce/Enlarge (Making a Reduced/Enlarged Copy) (P.
89)"
• "Paper Supply (Selecting a Paper Tray) (P. 86)"
031-503
O
[Cause]
While attempting to send the e-mail, the SMTP server name
could not be resolved.
[Remedy]
Check if the SMTP server have been set correctly on
CentreWare Internet Services. Also, check whether the DNS
server setting is correct.
Refer to
• "9.1 Monitoring/Managing the Scanner on a Web Browser
(P. 216)"
031-504
O
[Cause]
While attempting to send the e-mail, the POP3 server name
could not be resolved.
[Remedy]
Check if the POP3 server have been set correctly on
CentreWare Internet Services. Also, check whether the DNS
server setting is correct.
Refer to
• "9.1 Monitoring/Managing the Scanner on a Web Browser
(P. 216)"
031-505
O
[Cause]
[Remedy]
While attempting to send the e-mail, the login to the POP3
server failed.
Check if the user name and password entered to access the
POP3 server have been set correctly on CentreWare
Internet Services.
Refer to
• "9.1 Monitoring/Managing the Scanner on a Web Browser
(P. 216)"
031-506
O
[Cause]
[Remedy]
The SMTP server or POP3 server is not set.
Check if the SMTP server/POP3 server has been set on
CentreWare Internet Services.
Refer to
• "9.1 Monitoring/Managing the Scanner on a Web Browser
(P. 216)"
031-507
O
[Cause]
While attempting to send the e-mail, the login to the SMTP
server failed.
[Remedy]
Check if the user name and password entered to access the
SMTP server have been set correctly on CentreWare
Internet Services.
Refer to
• "9.1 Monitoring/Managing the Scanner on a Web Browser
(P. 216)"
8.7 Error Codes
209
Category
Error Code
Cause/Remedy
C
P
M
031-511
U
O
O
[Cause]
[Remedy]
The media cannot be recognized.
• Check the format of the USB flash memory.
• Make sure that there is no problem with the format of the
USB flash memory.
• Check whether the USB flash memory is plugged in.
• Make sure that the USB flash memory is not broken.
Refer to
• For information about the supported formats of USB flash
memory, refer to"Scan Feature Specifications (P. 231)"
031-512
O
[Cause]
[Remedy]
031-515
031-700
O
O
The files in the media have reached the maximum number.
[Remedy]
Delete some of the files in the root directory of the USB flash
memory, and try scanning the document again.
[Cause]
O
[Cause]
[Remedy]
031-702
O
[Cause]
[Remedy]
031-710
O
O
O
O
[Cause]
[Remedy]
031-720
O
[Cause]
[Remedy]
031-721
O
[Cause]
[Remedy]
031-722
O
[Cause]
[Remedy]
210
8 Problem Solving
• If the USB flash memory is write-protected, cancel the
write-protection.
• Make sure that the USB flash memory is not broken.
• Delete the files in the root directory of the USB flash
memory.
[Cause]
[Remedy]
031-701
While saving the data on the media, an error occurred during
the write process.
A trouble occurred on the printer.
Check the printer's control panel. For corrective actions,
refer to the user guide provided for the printer.
The communication to the printer has been shut off.
Check the printer's power cord installation, and see if the
power switch is on.
The job was canceled on the printer.
Check the printer.
The scan area was not identified successfully.
Re-load the document and try scanning again.
If the same message appears, copy down the message.
Switch the machine off, wait for the touch panel to go out,
and then call our Customer Support Center.
Address Book was not restored successfully.
Check if Address Book is saved in the USB flash memory.
Make sure that the USB flash memory is not broken.
Address Book was not saved successfully.
Check if there is enough space in the USB flash memory to
save Address Book.
Make sure that the USB flash memory is not broken.
Address Book was not saved/restored successfully.
Address Book is being accessed from CentreWare Internet
Services or DocuScan Manager.
Stop the access from CentreWare Internet Services or
DocuScan Manager, and try saving/restoring Address Book
again.
Category
Error Code
Cause/Remedy
C
P
M
031-723
U
O
O
[Cause]
[Remedy]
031-724
O
[Cause]
[Remedy]
Address Book was not restored successfully.
The contents of Address Book may not be appropriate.
Check if Address Book is the one saved from the scanner.
Address Book was not restored completely since the
number of addresses registered on the scanner has reached
the maximum (350).
Delete unnecessary addresses from CentreWare Internet
Services or DocuScan Manager, and try restoring Address
Book again.
Refer to
• "9.1 Monitoring/Managing the Scanner on a Web Browser
(P. 216)"
• DocuScan Manager Online Help
031-764
O
[Cause]
[Remedy]
031-765
O
[Cause]
[Remedy]
031-766
O
031-767
O
[Cause]
An error occurred while establishing a connection with the
SMTP server.
Check with the SMTP server administrator.
The SMTP server does not have enough memory.
Check with the SMTP server administrator.
An error occurred on the SMTP server.
[Remedy]
Check with the SMTP server administrator.
[Cause 1]
The e-mail address of the recipient is incorrect.
[Remedy1]
Check if the e-mail address is correct and try scanning the
document again.
[Cause 2]
A POP-before-SMTP authentication error occurred on the
SMTP server.
[Remedy 2]
Check if the authentication method for e-mail transmissions
is set to POP before SMTP on CentreWare Internet
Services. To use POP before SMTP authentication, the
settings for POP3 server must be made.
Refer to
• "9.1 Monitoring/Managing the Scanner on a Web Browser
(P. 216)"
031-768
031-781
031-782
O
O
O
[Cause]
The e-mail address of the sender is incorrect.
[Remedy]
Check if the e-mail address is correct and try scanning the
document again.
[Cause]
While attempting to transfer the file, a connection with the
server could not be established.
[Remedy]
Check the server address again. If the address is correct,
ask your network administrator to check the network and
server status.
[Cause]
While attempting to transfer the file, the login to the server
failed.
[Remedy]
Check the server name, login user name, and password.
8.7 Error Codes
211
Category
Error Code
Cause/Remedy
C
031-783
P
M
U
O
O
[Cause]
[Remedy]
031-784
031-785
031-786
O
O
O
O
While attempting to transfer the file, an error occurred during
the write process.
[Remedy]
Check if there is enough space in the server's directory and
if you have an access right to the folder.
[Cause]
The file could not be transferred due to the insufficient hard
disk space of the server.
[Remedy]
Delete unnecessary data from the hard disk to increase the
available hard disk space.
[Cause]
A time-out error occurred during the transmission/receipt of
the scanned data.
[Cause]
[Remedy]
031-788
O
O
Check the path name of the server and the access right to
the folder.
[Cause]
[Remedy]
031-787
While attempting to transfer the file, the specified server
path could not be found.
[Cause]
[Remedy]
Check the network cable installation.
If no problem was found with the cable, check with your
server administrator.
The directory was not created successfully.
Check if you have a right to create a directory.
A file of the same name already exists.
Set the [File Name Conflict] setting to [Overwrite] or [Change
Name and Save]. Or, delete the file of the same name in the
folder.
Refer to
• "Setting the File Name (P. 56)"
• "Setting the File Name (P. 59)"
031-789
O
[Cause]
[Remedy]
031-790
O
[Cause]
[Remedy]
The file was not processed successfully after it was
transferred.
Check if you have a right to rename/delete the file. Also, if
Windows Server 2003 of the computer where the file was
transferred does not have Service Pack1, install Service
Pack1 on that computer.
A network error occurred.
Check the network settings.
Refer to
• "2 Network Settings" in the Setup and Quick Reference
Guide
212
8 Problem Solving
Category
Error Code
Cause/Remedy
C
P
M
031-950
U
O
O
[Cause]
The USB flash memory does not have a sufficient space.
[Remedy]
Remedy this by one of the following methods:
• Secure enough space in the USB flash memory to save
the file.
• Reduce the number of document pages.
• Lower the resolution.
• If scanning in full color, increase the compression rate.
Refer to
• "Scan Resolution (Specifying the Scan Resolution) (P.
73)"
• "Image Compression (Specifying the Compression Rate
of the Output) (P. 73)"
031-951
O
[Cause]
[Remedy]
The file attempted to save in the media exceeds the
maximum file size.
Remedy this by one of the following methods:
• Reduce the number of document pages.
• Lower the resolution.
• If scanning in full color, increase the compression rate.
Refer to
• "Scan Resolution (Specifying the Scan Resolution) (P.
73)"
• "Image Compression (Specifying the Compression Rate
of the Output) (P. 73)"
031-985
O
[Cause]
[Remedy]
The e-mail exceeds the maximum file size.
Remedy this by one of the following methods:
• Increase the value of [Maximum E-mail Size] on
CentreWare Internet Services.
• Reduce the value of [Data Size to Split Send] on
CentreWare Internet Services.
• Reduce the number of document pages.
• Lower the resolution.
• If scanning in full color, increase the compression rate.
Refer to
• "9.1 Monitoring/Managing the Scanner on a Web Browser
(P. 216)"
• "Scan Resolution (Specifying the Scan Resolution) (P.
73)"
• "Image Compression (Specifying the Compression Rate
of the Output) (P. 73)"
031-986
O
O
O
[Cause]
[Remedy]
The file attempted to save exceeds the maximum file format.
Remedy this by one of the following methods:
• Reduce the number of document pages.
• Lower the resolution.
• If scanning in full color, increase the compression rate.
Refer to
• "Scan Resolution (Specifying the Scan Resolution) (P.
73)"
• "Image Compression (Specifying the Compression Rate
of the Output) (P. 73)"
8.7 Error Codes
213
Category
Error Code
Cause/Remedy
C
P
031-987
M
U
O
O
[Cause]
[Remedy]
The scanner's memory is full and cannot save the scanned
data.
Remedy this by one of the following methods:
• Increase the value of [Maximum E-mail Size] on
CentreWare Internet Services.
• Reduce the value of [Data Size to Split Send] on
CentreWare Internet Services.
• Lower the resolution.
• Reduce the image size (such as from A3 to A4)
Refer to
• "9.1 Monitoring/Managing the Scanner on a Web Browser
(P. 216)"
• "Scan Resolution (Specifying the Scan Resolution) (P.
73)"
• "Image Compression (Specifying the Compression Rate
of the Output) (P. 73)"
062-360
O
[Cause]
[Remedy]
The carriage may be locked.
If the carriage is locked, unlock it, and switch the scanner off
and then on again.
Refer to
• “Unlocking the Carriage Lock” in the Setup and Quick
Reference Guide
062-790
O
131-701
O
O
O
O
O
[Cause]
[Remedy]
Refer to "Illegal Copies and Printouts (P. 12)" for the types of
paper that are not copy-prohibited.
[Cause]
The file was saved with a different file name via Scan to PC
or Scan to Media.
[Remedy]
131-702
O
O
[Cause]
[Remedy]
131-703
O
O
O
O
[Cause]
[Remedy]
214
8 Problem Solving
The scanned document is copy-prohibited.
Select [Close].
The file was saved by overwriting the file of the same name
via Scan to PC or Scan to Media.
Select [Close].
The number of pages scanned has reached the maximum
(500 pages).
Re-load the rest of the pages and scan again.
Other Errors
If the following message appears, resolve the problem by performing the corrective action.
Category
Error Code
A fault has
occurred.
Switch off the
machine.
Ensure that
the screen
disappears
before
switching it
on.
Cause/Remedy
C
P
M
U
O
O
O
O
O
O
[Cause]
[Remedy]
An error occurred.
Turn the power switch off, wait for the touch panel to go out,
and then turn the power switch back on.
If the same message appears, copy down "(xxx-yyy)". Switch
the scanner off, wait for the touch panel to go out, and then call
our Customer Support Center.
(xxx-yyy)
8.7 Error Codes
215
9
Maintenance
9.1
Monitoring/Managing the Scanner on a
Web Browser
If you use the scanner in a TCP/IP environment, you can monitor or remotely configure the
scanner using a web browser on a network-connected computer.
This feature is called CentreWare Internet Services.
CentreWare Internet Services also allows you to edit Address Book.
Refer to
• For more information on Address Book, refer to "4 Address Book and Subject/Comment List (P. 113)".
Getting Ready to Use CentreWare Internet Services
Before using CentreWare Internet Services, you must configure the settings described in
this section.
Supported Web Browsers
CentreWare Internet Services has been tested to work on the following web browsers:
• Netscape 7.1
• Internet Explorer 6.0
216
9 Maintenance
Setting Up a Web Browser
When specifying the scanner's address on CentreWare Internet Services, we recommend
you to do so without using a proxy server.
Note
• If you use a proxy server, CentreWare Internet Services may not display properly or become slow.
If you change the display language setting on your web browser, you can change the
display language of CentreWare Internet Services.
Refer to
• To setup a web browser, refer to the online help provided for the web browser.
Configuring Settings on the Scanner
To use CentreWare Internet Services, make sure that the scanner's IP address is set and
[CW Internet Services] is enabled.
When [CW Internet Service] is disabled, enable it on the control panel.
By default, [CW Internet Service] is set to [Enable].
Refer to
• For more information, refer to "Protocol Settings (P. 155)" in “6.5 Network Settings”.
Using CentreWare Internet Services
To use CentreWare Internet Services, use the following procedure:
1.
Start your computer, and start a web browser.
2.
On the web browser, enter the scanner's IP address or URL in the address entry field,
and press the <Enter> key.
• Example - URL
• Example - IP address
Note
• When specifying a port number, enter ":" followed by "80" (the default port number) after the address.
The port number can be changed under [Properties] > [Protocol Settings] > [HTTP] on CentreWare
Internet Services. If you changed the port number, enter ":" followed by the new port number after the
address.
9.1 Monitoring/Managing the Scanner on a Web Browser
217
The main window of CentreWare Internet Services appears.
Changing the Network Settings
The settings required to use the scanner as a network scanner can be configured on the
[Properties] tab.
218
9 Maintenance
CentreWare Internet Services Setting Items
The followings are the main setting items provided by CentreWare Internet Services:
Tab
Page
Feature
Status
General
• Displays the information and status of the scanner.
Jobs
Job History
• Displays the detailed information of the last 20 scan/copy jobs that
completed.
Setup Menu
Address Folders
• Displays the list of address folders. You can register, change, or delete
address folders on this page.
Address List
• Displays the list of addresses. You can register, change, or delete
addresses on this page.
Subject List
• Displays the list of subjects. You can register, change, or delete subjects
on this page.
Comment List
• Displays the list of comments. You can register, change, or delete
comments on this page.
Machine Details
• Displays the product name of the scanner. You can set the scanner
name, installation location, contact person, and the administrator's email address.
Configuration
• Displays the main specifications of the scanner.
Counters
• Displays the number of scanned/copied pages to date.
Initialization
• Initializes the NV memory of NIC (Network Interface Card) set under
[Properties].
Internet Services
Settings
• Sets the administrator ID and password for CentreWare Internet
Services. The default administrator ID and password is "admin" and "Xadmin", respectively. Make sure to change the password before using
the scanner.
Port Status
• Sets whether or not to enable an SNMP/SNTP client.
Port Settings
• Sets the parameters for Ethernet.
Protocol Settings
• TCP/IP
Sets the settings for TCP/IP such as an IP address.
• SNMP
Sets the community name for SNMP.
• FTP Client
Sets the time to wait for a response from an FTP server.
• SMB Client
Sets the time to wait for a response from an SMB client.
• E-mail
Sets the parameters for an e-mail server and the maximum size of email that can be sent.
• SNTP Clients
Sets the parameters for an SNTP client and the interval at which the
SNTP client obtains time from an SNTP server.
• HTTP
Sets an HTTP port number and the number of sessions that can be
connected simultaneously.
Properties
Maintenance
• Error History
Displays the information of the last 20 errors.
Support
• Displays the customer support information as well as a link to our website.
9.1 Monitoring/Managing the Scanner on a Web Browser
219
Using the Online Help
For details on each setting item, refer to the online help provided for CentreWare Internet
Services. The online help can be browsed by clicking the [Help] button on CentreWare
Internet Services.
Note
• Clicking the [Help] button displays the online help on our website.
• To view the online help, your computer must be connected to the Internet.
9.2
Cleaning the Scanner
This section describes how to clean the scanner.
The cleaning instructions are provided for both the exterior and interior of the scanner.
Important
• Always switch the power off and unplug the power cord when cleaning the scanner. Cleaning the
scanner with the power on may cause an electric shock.
• Do not use cleaning agents other than water or neutral cleaner.
• Do not use chemical agents such as benzene or paint thinner. Chemical agents can damage the coating
on plastics.
• Cleaning the scanner with an excessive amount of water may cause the scanner to malfunction or
damage documents during scanning or copying.
Note
• If dirt or smudges does not come off easily, moisten a soft cloth with a small amount of neutral cleaner
and wipe them off gently.
Cleaning the Exterior
Use the following procedure to clean the exterior of the scanner:
1.
Wipe the exterior of the scanner with a soft
cloth firmly wrung out of water.
2.
Wipe off the excess water with a soft dry
cloth.
Cleaning the Interior
To ensure optimum scan/copy quality at all times, clean the interior of the scanner monthly,
or more often if needed.
To clean the document feeder cover
Note
• Any dirt or smudges on the document feeder cover can cause streaks and smears on outputs, or the
scanner to incorrectly detect document sizes.
220
9 Maintenance
1.
Wipe the document feeder cover with a
cloth lightly damped with water, and wipe
off the excess water with a soft dry cloth.
To clean the document glass
Note
• Any dirt or smudges on the document feeder cover can cause streaks and smears on outputs.
1.
Wipe the document glass with a cloth lightly
damped with water, and wipe off the excess
water with a soft dry cloth.
To clean the scanning glass
Note
• Any dirt or smudges on the scanning glass can cause document jams, or streaks and smears on
outputs.
1.
Wipe the scanning glass with a cloth lightly
damped with water, and wipe off the excess
water with a soft dry cloth.
To clean the film portion
Important
• Do not press the film with an excessive force as it can easily damage or deform.
• The DocuScan C4250 has two films: white film and transparent film. Do not touch the transparent film.
Note
• Any dirt or smudges on the film portion can cause streaks and smears on outputs.
9.2 Cleaning the Scanner
221
1.
Wipe the film portion with a cloth lightly
damped with water, and wipe off the excess
water with a soft dry cloth.
To clean the document feeder rollers
Any dirt or smudges on the document feeder rollers can cause document jams, or streaks
and smears on outputs.
To ensure optimum scan/copy quality at all times, clean the rollers once every 30,000
sheets of scanning/copying.
Clean the rollers with a soft cloth firmly wrung out of water.
Important
• Make sure to use a firmly wrung cloth to avoid water from getting into the scanner. If water gets inside of
the scanner, it may cause the scanner to malfunction.
DocuScan C4250
1.
Pull the lever on the left cover of the
document feeder cover, and lift the left
cover until it comes to a stop.
Note
• The cover fixes in place when opened completely.
When opening the cover, do it gently.
222
2.
Clean each pickup roller as you rotate it
towards the direction of the arrows. (There
are two pickup rollers.)
3.
Clean each feed roller as you rotate it
towards the direction of the arrows. (There
are two feed rollers.)
9 Maintenance
4.
Clean each retard pad as illustrated. (There
are two retard pads.)
5.
Clean the front rubber of each retard pad in
the direction of the arrow.
6.
Clean each registration roller 1 as you
rotate it towards the direction of the arrows.
(There are three registration rollers 1.)
7.
Clean each registration roller 2 as you
rotate it towards the direction of the arrows.
(There are three registration rollers 2.)
8.
Close the left cover of the document feeder
until it clicks into place.
9.
Lift the document feeder cover.
9.2 Cleaning the Scanner
223
10. Clean each read roller as you rotate it
towards the direction of the arrows. (There
are five read rollers.)
DocuScan C3200 A
1.
Pull the lever on the left cover of the
document feeder, and lift the left cover until
it comes to a stop.
Note
• The cover fixes into place when opened completely.
When opening the cover, do it gently.
224
2.
Clean the pickup roller as you rotate it
towards the direction of the arrows.
3.
Clean the feed roller as you rotate it
towards the direction of the arrows.
4.
Clean the registration roller as you rotate it
towards the direction of the arrows.
9 Maintenance
5.
Clean the retard pad as illustrated.
6.
Clean the front rubber of the retard pad in
the direction of the arrow.
Important
• If the retard pad comes off, push it back on the
scanner until it fixes into place.
7.
Lift the document feeder cover.
Note
• The read rollers can be rotated easier when the left
cover of the document feeder is open. They can also
be cleaned with the left cover closed.
8.
Clean each read roller as you rotate it
towards the direction of the arrows. (There
are two read rollers.)
9.
Close the left cover of the document feeder
cover until it clicks into place.
9.2 Cleaning the Scanner
225
9.3
Moving the Scanner
When moving the scanner, follow the guidelines below:
CAUTION
• The DocuScan C4250 weighs approximately 24.0 kg. When moving the equipment,
make sure that there are two more persons carrying it.
• When lifting the DocuScan C4250, each person should stand either at the front or the
back of the scanner and grip it firmly by the recessed areas located on both sides of the
scanner.
When lifting the DocuScan C3200 A, one person should stand facing the back of the
scanner and grip it firmly by the recessed areas located on both sides of the scanner.
Do not hold it by the control panel or any other portions. You might drop the scanner and
get injured.
[DocuScan C4250]
1.
Remove all documents from the document
glass, document feeder, or document
output tray.
2.
Check that the carriage is unlocked.
If locked, unlock it as follows:
To unlock the carriage on the DocuScan
C4250, slide the lock to the unlock position
(to the rear direction).
On the DocuScan C3200 A, the carriage
lock is located on the underside of the
scanner below the lock mark. To unlock the
carriage, slide the lock to the unlock position
(to the rear direction).
226
9 Maintenance
3.
Press the <Tools> button on the control
panel.
4.
On the [System Settings] screen, select
[System Settings].
The [Login] screen appears. You will be
prompted to enter [System Administrator
Password].
5.
Enter the password using the control panel,
and select [Confirm].
6.
Select [Common Settings] > [Maintenance/
Diagnostics] > [Carriage Shift] to display
the [Carriage Shift] screen.
Tools
Close
System Settings
Screen Contrast
Carriage Shift
Close
When you move the device, select
Disallow to prevent any damages.
7.
Press the <Start> button on the control
panel.
The carriage moves to the locked position.
8.
Select [Close] repeatedly until the [Switch
Off/On] screen displays.
9.
Switch the scanner off by pressing the
power switch to the <O> position.
9.3 Moving the Scanner
227
10. Lock the carriage in place.
When using the DocuScan C4250, slide the
carriage lock towards the front of the
scanner.
When using the DocuScan C3200 A, slide
your hand underneath the scanner right
below the “lock” mark, and slide the lock
towards the front of the scanner.
11. Unplug the power code, USB cable, and
network cable.
12. Place the cushioning materials on the
scanner. Re-use the cushioning materials
that came in the packaging box.
13. Hold the scanner, and move it gently. When
moving it over a long distance, pack it in a
box.
DocuScan C4250
DocuScan C3200 A
228
9 Maintenance
A
Appendix
A.1
Main Specifications
Scanner Specifications
Item
Description
Type
Color scanner (flat bed/sheet feed)
Reduced optical CCD scanner
Scan size
DocuScan C4250
Max. : 297.0 x 432.0 mm
Min.
: 15.0 x 15.0 mm
DocuScan C3200 A
Max. : 215.9 x 297.0 mm
Min.
: 15.0 x 15.0 mm
Optical resolution
Main scan : 600 dpi (23.6 dots/mm)
Sub-scan : 600 dpi (23.6 dots/mm)
Output resolution
600, 400, 300, 200 dpi (23.6, 15.7, 11.8, 7.9 dots/mm)
Scanning gradation
Full Color
Grayscale
Scanning speed
(at 600 dpi)
DocuScan C4250
Scan ratio
50%
50% < m ≤ 100%
100% < m ≤ 200%
DocuScan C3200 A
Scan ratio
50%
50% < m ≤ 100%
100% < m ≤ 200%
Input 30 bits, Output 24 bits
Input 10 bits, Output 8 bits
Color
97.32 mm/sec
48.66 mm/sec
24.33 mm/sec
Black
209.16 mm/sec
104.58 mm/sec
52.29 mm/sec
Color
120.9 mm/sec
60.5 mm/sec
30.2 mm/sec
Black
241.8 mm/sec
120.9 mm/sec
60.5 mm/sec
Interface
100BASE-TX/10BASE-T, USB 2.0 (Hi-Speed, HOST USB)
Output format
Format
Black
: TIFF (single-page/multi-page), XDW, PDF
Grayscale
: TIFF, JFIF(JPEG), XDW, PDF
Full color
: TIFF, JFIF(JPEG), XDW, PDF
Note: Uncompressed formats are not supported.
Data compression format
Black
: MH (photo), MMR (text, text/photo)
Grayscale
: JPEG
Full color
: JPEG
Supported protocol
TCP/IP (FTP, SMB, SMTP)
Power
AC100 - 240V ± 10%, 50 Hz/60 Hz common
Power consumption
DocuScan C4250
Stand-by
Power Saver mode
Operation
120 W or less
40 W or less
9 W or less
DocuScan C3200 A
Operation
Stand-by
Power Saver mode
100 W or less
35 W or less
9 W or less
The scanner does not use electricity when the power is switched off even
if the power cord is plugged in.
A.1 Main Specifications
229
Item
Description
Dimensions
DocuScan C4250
W 582.0 x D 658.0 x H 209.0 mm
DocuScan C3200 A
W 448.0 x D 502.0 x H 194.0 mm
Weight
DocuScan C4250
DocuScan C3200 A
Space requirements
DocuScan C4250
W 732.0 x D 1394.0 mm
DocuScan C3200 A
W 648.0 x D 1119.0 mm
: 24.0 kg
: 15.0 kg
Document Feeder Specifications
Item
Description
Document size
DocuScan C4250 (1-sided/2-sided)
Max. : 297.0 x 432.0 mm
Min.
: 100.0 x 148.0 mm
DocuScan C3200 A (1-sided/2-sided)
Max. : 215.9 x 355.6 mm
Min.
: 140.0 x 140.0 mm
Document type
Non-translucent or translucent documents
DocuScan C4250 : 35 - 120g/m2
(2-sided: 50 - 120g/m2)
DocuScan C3200 A: 60 - 105g/m2
Capacity
50 sheets
Scanning speed
DocuScan C4250
[1-Sided]
Resolution/Document Size
Note: plain paper 60 - 100g/m2
Black
Color/Gray
40 sheets/min
23 sheets/min
25 sheets/min
12 sheets/min
Black
Color/Gray
300 dpi/A4
10 sheets/min
7 sheets/min
600 dpi/A4
7 sheets/min
4 sheets/min
Black
Color/Gray
31 sheets/min
20 sheets/min
20 sheets/min
10 sheets/min
Black
Color/Gray
300 dpi/A4
7.5 sheets/min
5 sheets/min
600 dpi/A4
5 sheets/min
3 sheets/min
300 dpi/A4
600 dpi/A4
[2-Sided]
Resolution/Document Size
DocuScan C3200 A
[1-Sided]
Resolution/Document Size
300 dpi/A4
600 dpi/A4
[2-Sided]
Resolution/Document Size
230
A Appendix
Scan Feature Specifications
Item
Scan to PC
Description
Supported protocol: TCP/IP (FTP, SMB)
OS for FTP server:
• Microsoft® Windows NT® Server 4.0 (Service Pack 1)
- IIS4.0 FTP service
• Microsoft® Windows NT® Workstation 4.0 (Service Pack 1)
- Personal Web Server 4.0 FTP service
• Microsoft® Windows® 2000 Server/
Microsoft® Windows® 2000 Professional
- IIS5.0 FTP service
• Microsoft® Windows® XP Professional
- IIS5.1 FTP service
• Microsoft® Windows ServerTM 2003 (Service Pack 1)
- IIS6.0 FTP service
• NetWare® 5.11J/5.12J
- FTP service standard for your OS
OS for SMB server:
• Microsoft® Windows® 98
• Microsoft® Windows® 98 Second Edition
• Microsoft® Windows® Millennium Edition
• Microsoft® Windows NT® Workstation 4.0
• Microsoft® Windows NT® Server 4.0
• Microsoft® Windows® 2000 Professional
• Microsoft® Windows® 2000 Server
• Microsoft® Windows® XP Home Edition
• Microsoft® Windows® XP Professional
• Microsoft® Windows ServerTM 2003
Scan to E-mail
SMTP client: RFC2821/2822-compatible, MIME Version 1.0 (Base64)
Supported server: Sendmail 8.9.3 or later
Scan to Media
Supported media: USB flash memory
Supported format:FAT or FAT32 less than 2GB
DocuScan Manager System Requirements
Supported OS
• Microsoft® Windows® 98
• Microsoft® Windows® 98 Second Edition
• Microsoft® Windows® Millennium Edition
• Microsoft® Windows NT® Workstation 4.0 (Service Pack4 or later)
• Microsoft® Windows NT® Server 4.0 (Service Pack4 or later)
• Microsoft® Windows® 2000 Professional
• Microsoft® Windows® 2000 Server
• Microsoft® Windows® XP Home Edition
• Microsoft® Windows® XP Professional
• Microsoft® Windows ServerTM 2003
Note
• Since DocuWorks does not support Microsoft® Windows NT®,
DocuWorks files cannot be displayed in thumbnail view on Windows NT.
• On Microsoft® Windows® XP Home Edition, the Easy Setup mode
cannot be used for registering addresses.
CPU
Pentium® III 400 MHz or higher (Pentium® III 850 MHz or higher is recommended)
A.1 Main Specifications
231
Hardware
PC/AT compatible machine
Memory
128 MB or more
Available hard disk
space
For installation: 20 MB or more
For operation: 200 MB or more is recommended
Software
Microsoft Internet Explorer 5.0 or later
To import addresses stored in your e-mail application to Address Book,
your e-mail application must be one of the followings:
• Microsoft® Outlook® Express 5
• Microsoft® Outlook® Express 6
• Microsoft® Outlook® 2000
• Microsoft® Outlook® 2002
• Microsoft® Outlook® 2003
To display DocuWorks files in thumbnail view, DocuWorks Viewer Light for
Web 6.0.2 or later is required.
Monitor
VGA or higher resolution monitor (graphics card of SVGA (800 x 600) or
higher is recommended.
Others
• Network interface card
• CD-ROM drive (Required only upon installation)
Reduction/Enlargement Ratios
Document
Scan/Copy
A6
B6
A5
B5
A4
A6
100%
122%
141%
173%
200%
B6
82%
100%
116%
142%
164%
A5
71%
86%
100%
123%
B5
58%
70%
81%
A4
50%
61%
50%
B4
A3
232
A Appendix
B4
A3
141%
174%
200%
100%
115%
141%
163%
70%
87%
100%
122%
141%
58%
71%
81%
100%
115%
50%
61%
71%
86%
100%
A.2
Optional Accessory
Optional Accessory
The following optional accessory is available. To purchase it, contact our Customer Support
Center.
Product Name
Scanner Stand
Product
Code
ES100011
Description
A stand designed to provide an optimal
installation space for the scanner and a
printer.
*The above product name and code are as of July, 2006.
A.3
About Repair Performance Parts
We retain the scanner's repair performance parts (the parts that are essential to maintain
the performance of the product) until seven years after the discontinuation of its production.
A.4
Obtaining the Product Information
Updating the Scanner's Firmware
We provide software embedded within the scanner called "firmware". The latest firmware
can be obtained from our website.
Follow the instructions on the website to download firmware appropriate for your scanner
and update your current firmware to the latest version.
http://www.fxprinters.com
Note
• The communication fee shall be borne by users.
A.2 Optional Accessory
233
A.5
Notes and Restrictions
This section lists the notes and restrictions that apply to the scanner.
Scan Features
Output size error when scanned in black
When scanned with [Output Color] set to [Black], a pixel error of ±16 may occur when
compared to scanning in [Full Color] or [Grayscale].
Error when scanning 2-sided documents (003-770)
When scanning a 2-sided document from the document feeder, its scan size may
exceed the scannable area depending on the combination of the original size, scan
resolution, and scan ratio. If this happens, the scanner goes into an error state and
displays the error code 003-770. If this error occurs, try scanning at a reduced scan
ratio.
The above error occurs, for example, when a 2-sided A3 document is scanned at 600
dpi and 166% scan ratio.
Creating a backup of Address Book
If you have stored new addresses into Address Book, it is recommended that you
create its backup. The backup can be created under [System Settings] > [Common
Settings] > [Maintenance/Diagnostics] > [Address Book Maintenance].
Refer to
• For more information, refer to "Address Book Maintenance (P. 150)".
Copy Features
Copying from the bypass tray
When copying on non-standard size paper by selecting [Bypass] for [Paper Supply],
additional settings on the printer may be required. For more information, refer to the
user guide provided for the printer.
Making a 2-sided copy of A3 document (DocuScan C4250)
When making a 2-sided copy of an A3 document ([2 Sided] is set to [1J2 Sided] or
[2J2 Sided]), the printer may require an additional memory. For more information, refer
to the user guide provided for the printer.
Changing paper supply option during copying
If you change the paper supply option while running a copy job, the change may not be
reflected on the output.
Paper loaded in the printer in landscape orientation
When the printer accommodates paper of the same size in both portrait and landscape
orientations, only paper loaded in portrait orientation will be used.
Example: When the printer accommodates both A4
234
A Appendix
and A4
:
• When both trays are loaded:
A4
• When A4
A4
will not be used, and the scanner
considers that A4 paper has run out.
is not loaded:
will be used.
Error when scanning 2-sided documents (003-770)
When scanning a 2 sided document from the document feeder, its scan size may
exceed the scannable area depending on the combination of the original size and scan
ratio. When this happens, the scanner goes into an error state and displays the error
code 003-770. If this error occurs, try scanning at a reduced scan ratio.
The above error occurs, for example, when a 2-sided A3 document is enlarged by
166% or above.
About the printer status
If the printer breaks down, the scanner may not accurately obtain the status of the
printer. In such case, check the display on the printer's control panel.
To accurately obtain the status of the printer, use the copy features after repairing the
printer.
Refer to
• For information about the breakdown and repair of the printer, refer to the user guide provided for the
printer.
A.5 Notes and Restrictions
235
A.6
Glossary
10BASE-T:
A 10MBps Ethernet network that uses a baseband signal and twisted-pair cable. It is one of
the IEEE802.3 standards.
100BASE-TX:
An extended version of 10BASE-T, and is also known as FastEthernet. Its communication
speed is 100Mbps, which is much faster than 10Mbps of 10BASE-T.
A3:
420 x 297 mm paper
A4:
297 x 210 mm paper
A5:
210 x 148 mm paper
Address:
Information (identifier) that is assigned to identify each node (computer or terminal) on a
network. A number that specifies a location in a computer's memory is also called
"address".
Application software:
Computer software designed to perform a specific task. Software for various types of needs,
such as word processing, spreadsheets, graphics, and databases, are available
commercially.
B4:
364 x 257 mm paper
B5:
257 x 182 mm paper
Carriage:
A read head of the scanner.
CD-ROM:
A compact disc containing a large amount of data, including computer software and images.
Click:
A single action of pressing and releasing a mouse button. In this manual, "to click" refers to
pressing and releasing the left mouse button, whereas "to right-click" refers to pressing and
releasing the right mouse button.
"To double-click" refers to a quick double action of pressing and releasing a mouse button.
CMYK:
A color model that represents all colors as combinations of four process colors, which are
cyan (C), magenta (M), yellow (Y), and black (B).
236
A Appendix
Collate
An output programming whereas each copy set is delivered in the same order as the
originals. If making two copies of three-page original, the order of the output will be pages
1-2-3, 1-2-3.
Color space:
The range of color that a device can produce. Color spaces vary from device to device, and
thus a variety of color spaces exists. The sRGB color space is adopted as an international
standard to achieve consistent colors among different devices. The sYCC color space,
which offers more wider color space than sRGB, is used commonly for devices such as
digital cameras.
Default settings:
The settings on the scanner that were configured at the factory, or the settings used by the
scanner when the NV memory is initialized.
DHCP:
An acronym for Dynamic Host Configuration Protocol. It is a protocol that uses a server to
automatically assign IP addresses to client computers.
DNS:
An acronym for Domain Name System. It is a name resolution service which converts host
names to IP addresses and vice-versa.
dpi:
An acronym for dots per inch. It refers to the number of dots that can be printed in an inch
(approx. 25.4 mm) and is a unit of measurement to indicate resolution.
Gram per Square Meter (g/m2):
A weight in grams of one square meter of paper.
HTTP:
A protocol used to communicate with a web server over the Internet.
Install:
"To install" means to load software or hardware onto a computer or peripheral device to
make it ready for use.
In this manual, "to install" mainly refers to loading software onto a computer.
Interface:
The surface or point where two things (systems) meet or touch each other. It is commonly
used to describe the boundary between a computer and a scanner, or that between a user
and a device.
The (electronic) specifications of an interface is sometimes just called "interface".
Interface cable:
A cable that is used to connect multiple devices together.
Interface cables include USB cable, which connects the scanner with a printer, and Ethernet
cable, which connects the scanner with a network.
IP address:
An address used by TCP/IP protocols to identify computers on a network. It is expressed in
dotted quad format which is a series of four decimal numbers separated by decimal points.
A.6 Glossary
237
Job:
A unit of work processed by computers or other electronic devices. On the scanner, one
scan or copy action is counted as one job.
JPEG file:
JPEG is a compression format used for images, and JPEG files are files created in JPEG
format. JPEG provides a high degree of compression and used commonly for photographic
images taken on digital cameras.
Log in/on:
To gain access to a resource on a computer system (such as hard disk or scanner on a
network). To end a session on a computer system refers to "to log out/off".
NetWare:
A network operating system developed by Novell.
Network scanner:
In this manual, "network scanner" refers to the scanner connected to a network via an
Ethernet cable.
Online help:
A manual that can be viewed on your computer screen.
Operating system (OS):
Software that runs on a computer to control or manage the basic operation of its hardware
and software. It provides an interface to the hardware for the application software.
PDF file:
In this manual, we call an online document created with Acrobat (software developed by
Adobe Systems) "a PDF file". To display PDF files on your computer screen, you need to
install software called Adobe Reader on your computer.
Port:
A connection point that allows exchange of information between a computer and its
peripherals.
Protocol:
A set of rules for transmission and receipt of information between devices or computers.
Resolution:
The quality of detail of an image represented by dots per square inch (dpi). The higher the
dpi, the higher the resolution.
RGB:
A color model commonly used to display color on scanners and computer monitors. It
represents all colors as combinations of red (R), green (G), and blue (B).
Server:
A computer in a network that stores data files accessed by other computers.
Contrary, "client" is a computer that demands service from a server.
238
A Appendix
SMB:
A network protocol used to enable file sharing over Windows Network (Microsoft Network)
and that can be used on Windows 98/Windows Me/Windows NT 4.0/Windows 2000/
Windows XP/Windows Server 2003. When software called Samba is used, SMB can also
be used on the UNIX operating systems. This scanner, however, does not support the type
of server on which Samba runs.
SNMP:
A protocol that manages network-connected devices via a network.
A device that manages the activities of network devices runs on software called "SNMP
manager", whereas a device that is being monitored runs on "SMNP agent".
Software:
Programs that run computers. Operating systems and application software are also the
types of software.
TCP/IP:
A network protocol developed by DARPANET (Defense Advanced Research Project
Agency NetWork). It is the standard protocol of the Internet and is widely used on various
types of computers, from personal computers to large mainframes.
TIFF:
An image file format developed by Aldus (now Adobe Systems).
Tone:
A smoothness of colors represented by the number of gradation steps. The higher the
number of gradation steps, the smoother the gradation of colors.
USB:
An acronym for Universal Serial Bus. It is a data communication method used between a
computer and its peripherals. It allows hot-plug, which is the capability of connecting or
disconnecting peripherals with a computer without having to switch off the computer.
Web browser:
Software that is designed to view information from the Internet on your computer. Netscape
and Internet Explorer are the two most popular web browsers.
WWW:
An acronym for World Wide Web. It is a system that provides websites on the Internet.
A.6 Glossary
239
Index
Symbols, Numerics
I button .......................................................... 17
J button .......................................................... 17
2 Sided Copying (Copy) .................................. 92
2 Sided Copying (System Settings)............... 162
2 Sided Originals (Scan).................................. 64
2 Up (Copy) ................................................... 106
A
A/B Series (System Settings) ........................ 142
address
details......................................................... 126
register an address .................................... 180
searching for an address ........................... 125
selecting an address .................................. 124
Address Book ................................................ 113
Address Book button ....................................... 17
Address Book Maintenance
(System Settings).................................... 150
Address Book Tool ................................ 120, 179
address folder................................................ 181
Address Screen (System Settings)................ 175
Alert Tone (System Settings)......................... 139
All Services button........................................... 16
Area Mode (DocuScan Manager).................. 191
Audio Tones (System Settings) ..................... 137
Auto Clear (System Settings) ........................ 136
Auto Clear Notif. (System Settings)............... 139
Auto Exposure (Copy) ..................................... 99
Auto Exposure (Scan) ..................................... 77
Auto Exposure (System Settings).......... 164, 174
Auto Exposure Level (System Settings) ........ 166
Auto Job Release (System Settings)............. 136
Auto Power Saver (System Settings) ............ 137
B
Base Tone (System Settings)........................ 140
Basic Copying (System Settings) .................. 158
Basic Copying screen...................................... 85
Basic Scanning screen .................................... 61
Black (Map) (System Settings) ...................... 167
Black (Text & Photo) (System Settings) ........ 167
Black (Text) (System Settings) ...................... 166
BOOTP .......................................................... 156
C
C button ........................................................... 17
carriage.............................................. 13, 14, 152
carriage lock ...................................... 13, 14, 228
CentreWare Internet Services ............... 128, 217
administrator ID.......................................... 219
getting ready to use ................................... 216
online help.......................................... 219, 220
setting items............................................... 219
240
Index
character
entering characters ...................................... 18
cleaning ......................................................... 220
cleaning the document feeder cover .......... 220
cleaning the document feeder rollers ......... 222
cleaning the document glass...................... 221
cleaning the exterior of the scanner ........... 220
cleaning the film portion ............................. 221
cleaning the interior of the scanner ............ 220
cleaning the scanning glass ....................... 221
Clear All button ................................................ 17
collated (see Copy Output (Copy))
Color (Map) (System Settings) ...................... 168
Color (Text & Photo) (System Settings)......... 168
Color (Text) (System Settings) ...................... 167
Color Balance (Copy) .................................... 100
Color Balance (System Settings)................... 164
Color Saturation (Copy) ................................. 103
color space .................................................... 174
Comment (Scan).............................................. 47
Common Settings (System Settings)............. 133
components ..................................................... 13
Contrast (Scan)................................................ 78
Contrast (System Settings)............................ 174
control panel .............................................. 13, 16
copy ................................................................. 79
copying two originals on one page............. 106
removing the background of the original ...... 99
selecting output color ................................... 91
starting a copy job ........................................ 81
stopping a copy job ...................................... 83
when you have more documents to copy..... 82
Copy button ..................................................... 16
Copy Defaults (System Settings)................... 160
copy density..................................................... 95
Copy Output (Copy)....................................... 105
copy quantity.................................................... 81
Copy Settings (System Settings) ................... 158
custom buttons ................................................ 16
Custom Buttons 1-3 (System Settings).......... 141
CW Internet Services (System Settings) ....... 155
D
Date Setup (System Settings) ....................... 134
Default Language (System Settings) ............. 141
Denoising (DocuScan Manager).................... 192
DHCP............................................................. 156
DHCP/Autonet ............................................... 156
document
clearing document jams ............................. 195
document orientation.................................... 25
documents with sticky notes attached.......... 26
loading documents ....................................... 23
mixed sized documents
(see Mixed Sized Originals (Copy))
document feeder cover.................................... 13
document feeder cover sensor .................. 13, 27
document feeder tray....................... 15, 196, 198
document glass ............................................... 13
document guides ............................................. 15
document indicator lamp ................................. 15
document output tray....................................... 15
documents
documents not supported ............................ 24
documents supported .................................. 23
mixed-size documents ................................. 27
non-standard size documents...................... 26
DocuScan Address Book Tool....................... 179
DocuScan Manager............................... 114, 178
DocuScan Viewer .......................................... 178
DocuWorks (Scan) .......................................... 63
duplex automatic document feeder ................. 15
E
Easy Setup mode (DocuScan Manager) ....... 182
Edge Erase (Copy) ........................................ 110
Edge Erase (System Settings) ...................... 165
Edit Images icon (DocuScan Manager)......... 187
enlarged copy (see Reduce/Enlarge (Copy))
enlarged scan (see Reduce/Enlarge (Scan))
Error History (System Settings) ..................... 150
Error lamp........................................................ 17
Ethernet interface connector ........................... 14
Ethernet Settings (System Settings).............. 155
extension guide ............................................... 15
F
Fault Tone (System Settings) ........................ 139
file
storing files................................................. 189
File Format (Scan)........................................... 63
File Format (System Settings) ....................... 172
File Name (Scan)................................. 46, 56, 59
File Name Conflict (Scan).......................... 57, 60
File Name Conflict (System Settings)............ 176
firmware......................................................... 233
folder
address folder ............................................ 113
FTP................................................................ 176
G
Gateway (System Settings) ........................... 157
Get IP Address (System Settings)................. 156
glossary ......................................................... 236
H
Head to Left ..................................................... 26
Head to Top..................................................... 25
HTTP port ...................................................... 155
I
image
display........................................................ 190
edit ..................................................... 188, 191
print ............................................................ 193
save............................................................ 193
Image Compression (Scan) ............................. 73
Image Compression (System Settings) ......... 173
Image Quality Presets (Copy).......................... 96
Image Quality screen....................................... 96
Inch Series (System Settings) ....................... 142
Initialize NVM (System Settings) ................... 153
inner cover ....................................... 15, 195, 197
IP Address (System Settings)........................ 156
J
Job Complete Tone (System Settings) .......... 138
job status ........................................... 35, 83, 127
JPEG (Scan).................................................... 63
L
left cover .......................................... 15, 195, 197
lever ....................................................... 195, 197
Lighten/Darken (Copy)..................................... 95
Lighten/Darken (Scan)..................................... 68
Lighten/Darken (System Settings) ......... 163, 171
M
Machine Clock/Timers (System Settings)...... 133
Machine Ready Tone (System Settings) ....... 138
Maintenance/Diagnostics (System Settings) . 149
Map (Copy) ...................................................... 98
Millimeters/Inches (System Settings)............. 147
Mixed Sized Orig. (System Settings) ..... 166, 175
Mixed Sized Originals (Copy) .................. 27, 109
Mixed Sized Originals (Scan) .................... 27, 74
moving the scanner ....................................... 226
Multi-page TIFF (Scan).................................... 63
N
Network Settings (System Settings) .............. 154
non-standard size document ........................... 26
numeric keypad ............................................... 16
O
OK button......................................................... 17
online help (CentreWare Internet Services)... 220
optional accesory........................................... 233
Original Orientation (Copy) ...................... 25, 107
Original Orientation (Scan) ........................ 25, 75
Original Orientation (System Settings) .. 165, 173
Original Size (Copy)....................................... 111
Original Size Button (System Settings).. 141, 142
Original Type (Copy)........................................ 98
Original Type (Scan)........................................ 66
Original Type (System Settings) .................... 163
Other Settings (System Settings) .................. 147
Others (System Settings)............................... 142
Output (System Settings)............................... 165
Output Color (Copy)......................................... 91
Output Color (Scan)......................................... 62
Output Color (System Settings) ............. 162, 170
Index
241
P
Panel Alert Tone (System Settings) .............. 138
Panel Select Tone (System Settings)............ 137
Paper Size - Bypass (System Settings)......... 161
Paper Size Settings (System Settings).......... 148
Paper Supply - 2 (System Settings) .............. 159
Paper Supply - 3 (System Settings) .............. 159
Paper Supply (Copy) ....................................... 86
Paper Supply (System Settings).................... 161
Paper Type - Bypass (System Settings)........ 161
Password (Scan) ............................................. 56
PDF (Scan)...................................................... 63
Photo (Copy) ................................................... 98
Photo (Scan).............................................. 66, 67
Port Settings (System Settings)..................... 154
power
power switch ................................................ 14
switching off the power ................................ 21
switching on the power ................................ 21
power cord connector ...................................... 14
Power Saver button ......................................... 17
Power Saver mode .......................................... 22
Preveiw (System Settings) ............................ 175
Preview (Scan) ................................................ 33
print (DocuScan Viewer)................................ 193
Print Auditron Settings (System Settings) ..... 169
Printer Information (System Settings)............ 152
problem solving ............................................. 194
CentreWare Internet Services problems .... 206
hardware problems .................................... 199
image quality problems .............................. 203
network-related problems .......................... 206
scanner feature problems .......................... 205
product information........................................ 233
Protocol Settings (System Settings) .............. 155
R
RARP............................................................. 156
recipient ........................................................... 42
Reduce/Enlarge - 3 (System Settings) .......... 160
Reduce/Enlarge (Copy) ................................... 89
Reduce/Enlarge (Scan) ................................... 71
Reduce/Enlarge (System Settings) ............... 162
reduced copy (see Reduce/Enlarge (Copy))
reduced scan (see Reduce Enlarge (Scan))
Reply to (Scan)................................................ 46
resolution ......................................................... 73
RGB Color Space (System Settings)............. 174
S
Saturation (System Settings)......................... 164
Save In (Scan)................................................. 54
scan ................................................................. 30
removing the background of the original...... 77
selecting the output color ............................. 62
starting a scan job........................................ 33
stopping a scan job ...................................... 37
when you have more documents to scan .... 34
Scan Defaults (System Settings)................... 170
242
Index
scan density..................................................... 68
Scan Resolution (Scan) ................................... 73
Scan Resolution (System Settings) ............... 171
Scan Settings (System Settings) ................... 170
Scan Size (Scan) ............................................. 70
Scan to E-mail (Scan)...................................... 40
Scan to E-mail (System Settings) .......... 143, 146
Scan to E-mail button ...................................... 16
Scan to Media (Scan) ...................................... 58
Scan to Media (System Settings) .......... 144, 146
Scan to PC (Scan) ........................................... 49
Scan to PC (System Settings) ............... 144, 146
Scan to PC button............................................ 16
Scan to PC Protocol (System Settings) ......... 176
scanner
selecting a scanner .................................... 180
scanner stand ................................................ 233
Screen Contrast (System Settings) ............... 133
Screen Defaults (System Settings)................ 140
search
address ...................................................... 125
sender.............................................................. 42
Server (Scan)................................................... 52
Service Availability (System Settings) ........... 143
Service Login (System Settings).................... 145
Setup Password (System Settings) ....... 147, 177
Shared Name (Scan) ....................................... 53
Sharpness (Copy).......................................... 102
Sharpness (Scan) ............................................ 76
Sharpness (System Settings) ................ 163, 173
SMB ............................................................... 176
SNMP (System Settings) ............................... 154
Software Version (System Settings) .............. 149
sort (see Copy Output (Copy))
specifications ................................................. 229
Start button ...................................................... 17
Stop button ...................................................... 17
Subject (Scan) ................................................. 45
Subnet Mask (System Settings) .................... 157
system administrator password ..... 129, 177, 219
System Adminsitrator Settings
(System Settings) ..................................... 177
System Settings............................................. 129
T
TIFF (Scan)...................................................... 63
TIFF File Format (System Settings)............... 172
Tilt Correction (DocuScan Manager) ............. 191
Time Format (System Settings) ..................... 134
Time Setup (System Settings) ....................... 135
Time Zone (System Settings) ........................ 135
Tools button ..................................................... 17
touch panel display .......................................... 16
Transfer Protocol (Scan).................................. 52
U
USB connector........................................... 13, 14
USB flash memory........................................... 30
User Name (Scan) ..................................... 54, 55
V
Variable Size (System Settings) .................... 142
W
wheel ............................................... 15, 195, 197
Index
243
DocuScan C4250/C3200 A User Guide
Human Interface Design Development
Fuji Xerox Co., Ltd.
ME3655E2-1 (Edition 1)
Copyright © 2006 by Fuji Xerox Co., Ltd.