1
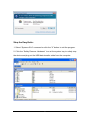
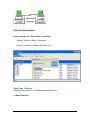
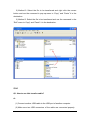
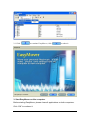
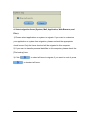
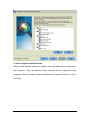
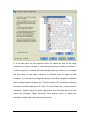
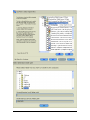
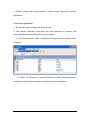
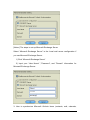
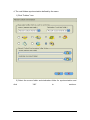
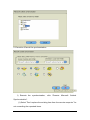
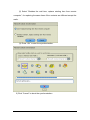
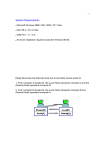
EasySuite User Guide V1.0 11 Launch EasySuite ..........................................................................................3 Stop the EasySuite: ................................................................................4 System Requirements ............................................................................5 EasyCopy .......................................................................................................6 Function Description..............................................................................7 File Transfer ............................................................................................9 EasyMover ....................................................................................................12 Function Descriptions of EasyMover..................................................12 System requirements ...........................................................................12 Support Applications............................................................................13 Limitation...............................................................................................14 FAQ ........................................................................................................23 EasySync......................................................................................................25 Mail Synchronization............................................................................25 System requirements ...........................................................................25 Limitation...............................................................................................25 Folder Synchronization ........................................................................32 GO! Bridge for Mac ......................................................................................35 System Requirements ..........................................................................35 Dock Introduction .................................................................................38 File Transfer ..........................................................................................40 22 Launch EasySuite Before you use EasySuite, you have to connect both PCs via the USB cable and launch EasySuite application. If the EasySuite does not launch automatically after you insert the device, please refer following guideline according to the operation system of your computer to launch EasySuite. Windows 2000/ Windows XP: When the device is inserted, it will launch EasySuite automatically. If not, users have to open “My Computer” and double click the EasySuite icon on “My Computer” to launch the program. Windows Vista/ Windows 7: When the device is inserted, the “AutoPlay” windows will pop-up. If you want to run it automatically next time, please check “Always do this for software and games” , users have to click “Run EasySuite.exe” on auto-play window to launch EasySuite. If User Account Control window pops up, click on "Allow" to continue it. If auto-run is not launched, users have to open “My Computer” and double click the EasySuite icon on “My Computer” to launch the program. 33 Stop the EasySuite: 1. Select “System->Exit” command or click the “X” button to exit the program. 2. Click the “Safely Remove Hardware” icon at the system tray to safely stop the device and plug out the USB data transfer cable from the computer. 44 System Requirements 1. Microsoft Windows 2000 SP3 / Win XP 32-bit / Vista / Windows 7 32-bit or 64-bit. 2. USB Port (1.1 / 2.0) Note:Under Microsoft® Windows® 2000/XP, the program is executable only when log-in as “Administrator”. 55 EasyCopy When the EasySuite program is executed on both computers, the connection will be made automatically. The following figure shows the file manager windows for the two connected computers after the connection is successfully made. [Note] What does the “Remote Host” and “Local Host” window stand for? 1. From computer A standpoint, the Local Host represents computer A and the Remote Host represents computer B. 2. From computer B standpoint, the Local Host represents computer B and Remote Host represents computer A. 6 Function Description How to release the “Read Only” protection? 1) Select “System->Setup” command. 2) Clear the check of “Shared as Read Only”. EasyCopy Function: EasyCopy provides PC to PC bidirectional file transfer. 1. Menu Function: 7 2. Create new folder: Click the right mouse button in the right side list window and select “Make Directory” command from pop-up edit menu to create new folder. 3. “Cut”, “Copy”, “Paste”, “Delete”, and “Select All” functions. You can use these functions by selecting the file and right click the mouse button to pop-up the menu or select the “Edit “ menu from top of window. 8 4. View and Window. Change the file/folder display and file manager windows layout. File Transfer 1. How to proceed the file transfer? 1) Method 1: Select the file to be transferred and drag and drop it into the destination directly. 9 2) Method 2: Select the file to be transferred and right click the mouse button and use the command in pop-up menu to “Copy” and “Paste” it in the destination. 3) Method 3: Select the file to be transferred and use the command in the “Edit” menu to Copy” and “Paste” it in the destination. Q&A Q1. How to use this transfer cable? A: (1) Connect another USB cable to the USB port of another computer. (2) Make sure two USB connectors of the cable are connected properly 10 and the program is executed automatically on these two computers. (3) The LED indicator will be lighted if two USB ports are connected to computers properly. Note:Under Microsoft® Windows® 2000/XP, the program is executable only when log-in as “Administrator”. Q2. How to use the EasyCopy function? A: (1) Connect one USB connector of the cable to the USB port of the Windows-based computer. (2) Connect another USB connector of the cable to the USB port of another Windows-based computer. (3) The application will be executed automatically and these two computers are ready to transfer and receive data. Q3. What do LED indicators on the cable mean? A: (1) When one USB connector of the cable is connected to one computer, one s will be lighted, when two USB connectors of the cable are connected to two computers, two indicators will be lighted. (2) When data is transferred thought the cable, indicators on the transfer cable will blink rapidly. 11 EasyMover Function Descriptions of EasyMover EasyMover allows users quickly and easily to move personal data, like e-mail, music, photos, files, folders, computer settings from their old computer to new computer. EasyMover can let you select the file types and settings that you want to move, so that you do not end up cluttering your new computer with unwanted files. EasyMover makes your new computer look like your old computer and better! System requirements 1. Microsoft Windows 2000 SP3 / Win XP 32-bit / Vista / Windows 7 32-bit or 64-bit 2. Intel® Pentium® II Processor or later 3. 512MB RAM or higher 4. Hard disk space requirement of at least 100 MB 5. Built-in USB port 1.1 or 2.0 12 Support Applications 1. System Setting: Windows System Setting 2. Mail Setting/Data: Microsoft Outlook (version 2000, XP, 2003, 2007) Microsoft Outlook Express (version 5.0~6.0) Microsoft Windows Mail (Vista) (version 7.0) Microsoft Windows Live Mail (Win 7) 3. Application Setting: Microsoft Word (version 2000, XP, 2003, 2007) , Microsoft PowerPoint (version2000, XP, 2003, 2007) Microsoft Excel (version 2000, XP, 2003, 2007), Microsoft Media Player (Version 8.0~ 12.0) Play List & Media Files 4. Web Explorer: Internet Explorer Messenger: MSN 8.0 or higher are supported. 5. File: File Backup 13 Limitation 1. Support the same language of operation system moving; a different language of operation system moving isn’t supported. 2. Support the same version or old version to new version of OS moving. Does not support new version of OS to old version of OS (e.g. Vista to WinXP does not work) 3. Support the same version or old version to new version of application moving. Does not support new version of application to old version of application (e.g. Office 2007 to Office 2003) 4. Before executing EasyMover, please close all applications. 5. Both computers must install the OS and the applications you wish to migrate and then execute EasySuite before transferring settings and data. 6. The mail data of Microsoft Outlook on this computer will be overwritten if you choose to migrate Microsoft Outlook. 7. The mails don’t support Exchange Server. 8. If the new PC use Win 7 and want to move the Outlook Express data of old PC to this new PC, before executing the migration, please install Window Live Mail first. Note: Please do not check the "appearance setting" option, when moving old version OS to Vista and Win 7. 14 Step by step to execute EasyMover 1. Launch EasySuite on both computers. Before using EasyMover, you have to launch EasySuite application. First of all, you have to connect to both PCs via the USB device and transfer cable. Follow the ways to launch EasySuite under the operation system of your computer. WINXP: When the device is inserted, it will launch EasySuite automatically. If not, users have to double click the EasySuite icon of the removable device on “My Computer” to launch the program. Vista& Win 7: When the device is inserted, users have to click “Launch EasySuite” on auto-play window to launch EasySuite. If User Account Control window pops up, click on "Allow" to continue it. If auto-run is not launched, users have to double click the EasySuite icon of the removable device on “My Computer” to launch the program. 2. Click EasyMover on EasySuite main panel to execute the settings and data moving. Before clicking EasyMover button, please make sure the end you execute is the new computer or the side you wish to receive data migration; otherwise please execute it on the other computer. 15 2.1 Click to continue EasyMover; click to abort it. 3. Start EasyMover on this computer. Before starting EasyMover, please close all applications on both computers. Click “OK” to continue it. 16 4. Select migration items (System, Mail, Application, Web Browser, and Files). 1) Please select applications or system to migrate. If you want to customize your application or system item migration, please uncheck the appropriate check boxes. Only the items checked will be migrated to this computer. 2) If you want to transfer personal data/files to this computer, please check the [File backup] item. 3) Click to select all items to migrate; if you want to undo it, press to deselect all items. 17 5. Select migration detailed items. Please select detailed settings of system items and applications to migrate to this computer. Only the detailed items checked will be migrated to this computer. After you select migration detailed items, press<Continue> to go to next step. 18 A pop-up window will remind you to close other applications if you want to execute move profile. 6. Select migration file types. Check the migration file types from the list and retarget the destination folder path if necessary. (EasyMover will list all available files types existed in the common folder or disk drive on the other computer) 1) Click the checkbox to the left of common folder or drive to transfer all contained file types or clicking individual file types under them to transfer selected file types to this computer. 19 2) If the disk drive on this computer does not match the one on the other computer (e.g. there is a drive F: on the other computer, but there is no drive F: on this computer), a window will automatically pop-up to allow you to retarget the disk drive on the other computer to different drive or folder on this computer. 3) If you want to retarget the drive on the other computer to different drive or folder on this computer (ex. The drive name is “E” on the old computer , and want to transfer data from “E” to the “C” on the other one.), click on the left checkbox of drive and click mouse right button over the disk drive icon and select the [Change Target Directory] from pop-up menu to select the destination folder path; referred to figure below. 20 21 7. Migrate profile. After the migration is completed, users shall restart the computer to update the system and the related settings. 1) You can see the progress of migration in this screen, the item will be selected if the migration action is working and the item will be checked as the item is completed. 2) After the migration is completed, click to exit EasyMover, the system will ask user to restart the computer. If you want to restart computer, click [Yes(Y)] to restart the computer now, or click [No (N)] to abort it. 22 FAQ Q1. Will Outlook mails on this computer be overwritten? A: Yes. The whole PST file (Outlook database) is moved and pasted. Q2. Do other applications on this and the other computer need to be closed for executing EasyMover? A: Yes. Please close all application or some associated files can not be moved. Q3. Can I execute EasyMover again? A: Yes, you can since it’s harmless to execute EasyMover repeatedly. Q4. Can EasyMover move the application software? A: No, you have to install the application software on this/new computer first(such as Microsoft Office etc…) before you start to do the moving, otherwise the data item won’t listed in the selection list. 23 Q4.Why I can’t see the Microsoft Word migration item in the list ? A: You have to install the Microsoft Word on this/new computer before you start the EasyMover. Q5.Why I can’t see some of file type item in the file types migration list even I have those document on the other/old computer? A: The files type list is base on the installed application software on the other/old computer, that’s if you have Microsoft Word document on the other computer but didn’t install the Microsoft Word document on the other computer, the Microsoft Word file type won’t listed in the migration list. You can use GO! Bridge to individually select those file and transfer to this computer after you finishes the EasyMover migration. 24 EasySync Mail Synchronization The mail synchronization function for EasySync provides user an USB data transfer cable for Outlook item synchronization between both computers. The Outlook synchronization item contains “contacts”. “mail”. “calendar”. “task”. “notes”. “journal” and the users could select any sub-folders for data synchronization. System requirements 1. Operating system: Microsoft Windows 2000 SP3 / Win XP 32-bit / Vista / Windows 7 32-bit or 64-bit. 2. Memory: 128MB. 3. CPU: P2-450MHz or higher processor. 4. Support Outlook Version: Microsoft Outlook 2000 / 2002 / 2003 /2007 Limitation 1. Language: Support the same language of Microsoft Outlook synchronization only. 2. Outlook version: Support the synchronization among Microsoft Outlook 2000/2002/2003/2007. Some information can not be synchronized completely since some data formats are different. 25 3. Before starting the synchronization, please close “Microsoft Outlook” application. Functional operation 1. The system supports Microsoft Outlook only. 2. The remote computer must allow the host computer to execute mail synchronization before starting the synchronization. 1) Click Synchronize -> Mail -> Setup from EasySuite menu at the remote computer. 2) Check the [Enable to execute Microsoft Outlook Synchronization] checkbox to permit host computer to execute mail synchronization. 26 [Notes:] The steps to set up Microsoft Exchange Server Select “Microsoft Exchange Server” in the Local mail server configuration if you use Microsoft Exchange Server. 1) Click “Microsoft Exchange Server” 2) Input your “User Name” ,”Password”, and ”Domain” information for Microsoft Exchange Server 3. How to synchronize Microsoft Outlook items (contacts, mail, calendar, 27 journal, notes, task) 1) Click Synchronize -> Mail -> Start from EasySuite menu. 2) Select the source profiles and destination profiles which you want to synchronize: (Note: the default profile will be the preset profile for the current user) 3) Supports: contacts, mail, calendar, journal, notes, task…etc. 28 4. The mail folders synchronization defined by the users. 1) Click “Folders” icon. 2) Select the source folder and destination folder for synchronization and click “OK” to 29 continue. 5. Execution /Cancel the synchronization 1) Execute the synchronization, click “Execute Microsoft Outlook Synchronization”. (1) Select ”Don’t replace the existing item from the remote computer” for not overwriting the repeated items. 30 (2) Select ”Besides the mail item, replace existing item from remote computer”, for replacing the same items if the contents are different except the mails. (3) Press “OK” to start the synchronization. 2) Click “Cancel” to abort the synchronization. 31 Folder Synchronization The folder synchronization function for EasySync provides users to synchronize source folder in the remote computer to target folder in the host computer through an USB data transfer cable. 1. The remote computer must allow the host computer to to execute folder synchronization before starting data transmission. 1) Click Synchronization -> Folder Synchronization->Setup. 2) Click “Allow Remote Synchronization” and press “OK” button. 2. The steps for folder synchronization: 1) Click Synchronization -> Folder Synchronization->Start. 32 2) Select the source (Remote) folder. 3) Select the target (Local) folder. 4) Click “Sync!!” to start the synchronization. 5) After the synchronization is finished, the related information will be 33 showed on the window. 34 GO! Bridge for Mac System Requirements Mac OS X 10.4 or later PowerPC G4 processor or later RAM: 512 Mbytes or higher Hard disk space: at least 100 MB Built-in USB port 1.1 or 2.0 GO! Bridge for Mac Introduction: GO! Bridge for Mac is a user-friendly and simple data transmission (Windows to Mac or Mac to Mac) application via a USB transfer cable to connect two computers. It combines high speed transmission and non-technical requirement which help easily transfer and share data between two computers. Before using GO! Bridge: On Mac operation system: Open EasySuite CDROM on desktop and then double click GO! Bridge icon to execute the application. 35 Below is the introduction of each function of GO! Bridge. 36 Settings Forward Back Open Add a new Folder Dock File List Window Mode of GO! Bridge Mac Window Mode: It allows users to simply check and transfer files of the other computer. Icon Mode of the other computer: Click the wallpaper icon of window mode to switch to icon mode of the other computer. Click icon mode once to switch to window mode. Icon mode not only saves the space of the window but also allows users to transfer files to the root directory of the other computer by simply drag and drop steps. View files on the other computer: 37 Simply click the disk you wish on DEVICES or select PLACES on window mode to browse the folders and the selected folder’s file list on the other computer will be shown. User can simply transfer files via drag-and-drop. Dock Introduction You can collect files on Dock and then drag all the files to the destination for once. Therefore, it's not necessary to copy a single file every time and then wait for the file transfer. It's very convenient for two computers to work together. Dock Area: 1. On Window mode, click to open Dock area .Right click the files on the file list and select “Add to Dock”, the files will be added on the Dock area. 2. Right click the file on Dock area to copy,remove from Dock and select all items on Dock which helps users easily manage file transfer between two computers. 3. Drag and drop files to Dock area and paste batch files once between two computers. 4. Press” Clear” button to remove all items on Dock. Add a new folder: Click to quickly add a new folder on the file list. File List: 38 Right click on the file of the file list to open, add to Dock, Rename, copy, paste, and move to trash the files selected on the file list. Settings: Settings of GO! Bridge can be also be edited and selected under the function menu on the top of the window; from left to right are GO! Bridge, File, Edit, View, Window and Help. Below is the quick introduction of each menu. ¾ Click GO! Bridge, the pull-down menu shows “About GO! Bridge”(the version of GO! Bridge), Preferences (you can select “Keep icon mode on top of the other window” or “Show warning before deleting items), Services”, “Hide GO! Bridge”, “Hide Others”, “Show All” and “Quit GO! Bridge”. ¾ Select File, you can create a new folder or execute “Open”, “Close” or “Move to Trash” of the selected file on the pull-down menu. ¾ Click Edit, the pull-down menu show “Cut”, “Copy”, “Paste”, “Select All” and “Special Characters” to edit the selected files. ¾ Choose View option, you can select “Refresh the window”, “Show/Hide Path Bar”, ”Hide Status Bar”, ”Hide Toolbar” , “Customize Toolbar” and “Show View Options” on the pull-down menu. ¾ Select Window option, the pull-down menu shows Minimize, Zoom, GO! Bridge Main Window and Show Dock. ¾ Select Help option to search for the help from Mac. Wallpaper of the other computer: 39 The wallpaper of the other computer displays on the top left corner of window mode for users to recognize the computer they are use now. File Transfer There are three ways to transfer files on GO! Bridge. 1. GO! Bridge allows user to transfer files via the dock area for once . 2. You can transfer files directly via copying the file from the source to the destination you wish to paste on the file list on Window Mode of the other PC. 3. User can simply drag the file and drop it on Icon Mode of the other PC; however, it only allows you to transfer the file to the desktop of the other PC. A progress Information window will pop up to notice you that the file transfer is in progress; press "Cancel" if you wish to abort the file transfer. 40


![ユーザーズマニュアル [PDF形式]](http://vs1.manualzilla.com/store/data/006549932_2-914a815380cb32ace7055ab3fc992e8a-150x150.png)