1
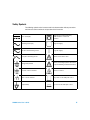
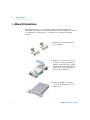
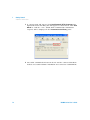
Agilent U2600A Series
USB Isolated Digital
Input/Output Modules
User’s Guide
Agilent Technologies
Notices
© Agilent Technologies, Inc., 2007 - 2011
Warranty
No part of this manual may be reproduced in
any form or by any means (including electronic storage and retrieval or translation
into a foreign language) without prior agreement and written consent from Agilent
Technologies, Inc. as governed by United
States and international copyright laws.
The material contained in this document is provided “as is,” and is subject to changed, without notice, in
future editions. Further, to the maximum extent permitted by the applicable law, Agilent disclaims all
warranties, either express or implied,
with regard to this manual and any
information contained herein, including but not limited to the implied warranties of merchantability and fitness
for a particular purpose. Agilent shall
not be liable for errors or for incidental or consequential damages in connection with the furnishing, use, or
performance of this document or of
any information contained herein.
Should Agilent and the user have a
separate written agreement with
warranty terms covering the material
in this document that conflict with
these terms, the warranty terms in the
separate agreement shall control.
Manual Part Number
U2651-90011
Edition
Fourth Edition, November 1, 2011
Agilent Technologies, Inc.
3501 Stevens Creek Blvd.
Santa Clara, CA 95052 USA
Trademark Acknowledgements
Pentium is a U.S. registered trademark of
Intel Corporation.
Microsoft, Visual Studio, Windows, and MS
Windows are trademarks of Microsoft Corporation in the United States and or other
countries.
Technology Licenses
The hardware and or software described in
this document are furnished under a license
and may be used or copied only in accordance with the terms of such license.
Restricted Rights Legend
U.S. Government Restricted Rights. Software and technical data rights granted to
the federal government include only those
rights customarily provided to end user customers. Agilent provides this customary
commercial license in Software and technical data pursuant to FAR 12.211 (Technical
Data) and 12.212 (Computer Software) and,
for the Department of Defense, DFARS
252.227-7015 (Technical Data - Commercial
Items) and DFARS 227.7202-3 (Rights in
Commercial Computer Software or Computer Software Documentation).
II
Safety Notices
CAUTION
A CAUTION notice denotes a hazard. It calls attention to an operating procedure, practice, or the likes
of that, if not correctly performed
or adhered to, could result in damage to the product or loss of important data. Do not proceed beyond a
CAUTION notice until the indicated
conditions are fully understood and
met.
WA R N I N G
A WARNING notice denotes a
hazard. It calls attention to an
operating procedure, practice, or
the likes of that, if not correctly
performed or adhered to, could
result in personal injury or death.
Do not proceed beyond a WARNING notice until the indicated
conditions are fully understood
and met.
U2600A Series User’s Guide
Safety Symbols
The following symbols on the instrument and in the documentation indicate precautions
which must be taken to maintain safe operation of the instrument.
Direct current (DC)
Equipment protected throughout by
double insulation or reinforced
insulation
Alternating current (AC)
Off (power supply)
Both direct and alternating current
On (power supply)
Three-phase alternating current
Caution, risk of electric shock
Earth (ground) terminal
Caution, risk of danger (refer to this manual
for specific Warning or Caution information)
Protective conductor terminal
Caution, hot surface
Frame or chassis terminal
Out position of a bi-stable push control
Equipotentiality
In position of a bi-stable push control
U2600A Series User’s Guide
III
General Safety Information
WA R N I N G
• Do not use the device if it is damaged. Before you use the device,
inspect the case. Look for cracks or missing plastic. Do not
operate the device around explosive gas, vapor or dust.
• Do not apply more than the rated voltage (as marked on the
device) between terminals, or between terminal and external
ground.
• Always use the device with the cables provided.
• Observe all markings on the device before connecting to the
device.
• Turn off the device and application system power before
connecting to the I/O terminals.
• When servicing the device, use only the specified replacement
parts. Do not operate the device with the removable cover
removed or loosened.
• Do not connect any cables and terminal block prior to performing
the self-test process.
• Use only the power adapter supplied by the manufacturer to avoid
any unexpected hazards.
CAUTION
• Do not load the output terminals above the specified current limits.
Applying excessive voltage or overloading the device will cause
irreversible damage to the circuitry.
• Applying excessive voltage or overloading the input terminal will
damage the device permanently.
• If the device is used in a manner not specified by the manufacturer,
the protection provided by the device may be impaired.
• Always use dry cloth to clean the device. Do not use ethyl alcohol or
any other volatile liquid to clean the device.
• Do not permit any blockage of the ventilation holes of the device.
IV
U2600A Series User’s Guide
Environmental Conditions
This instrument is designed for indoor use and in an area with low condensation. The table
below shows the general environmental requirements for this instrument.
Environmental conditions
Requirements
Operating temperature
0 °C to +55 °C
Operating humidity
15% to 85% RH non-condensing
Storage temperature
–20 °C to 70 °C
NOTE
The U2600A Series USB Isolated Digital Input/Output Modules complies with the
following safety and EMC requirements.
• IEC 61010-1:2001/EN 61010-1:2001
• Canada: CAN/CSA-C22.2 No.61010-1-04
• USA: ANSI/UL 61010-1: 2004
• IEC 61326-1:2002/EN 61326-1:1997+A1:1998+A2:2001+A3:2003
• CISPR 11: 1990/EN55011:1990 – Group 1 Class A
• Canada: ICES-001: 2004
• Australia/New Zealand: AS/NZS CISPR11:2004
Regulatory Markings
The CE mark is a registered trademark
of the European Community. This CE
mark shows that the product complies
with all the relevant European Legal
Directives.
The C-tick mark is a registered
trademark of the Spectrum
Management Agency of Australia. This
signifies compliance with the Australia
EMC Framework regulations under the
terms of the Radio Communication Act
of 1992.
ICES/NMB-001 indicates that this ISM
device complies with the Canadian
ICES-001. Cet appareil ISM est
confomre a la norme NMB-001 du
Canada.
The CSA mark is a registered
trademark of the Canadian Standards
Association.
U2600A Series User’s Guide
V
Waste Electrical and Electronic Equipment (WEEE) Directive 2002/96/EC
This instrument complies with the WEEE Directive (2002/96/EC) marking requirement.
This affixed product label indicates that you must not discard this electrical or electronic
product in domestic household waste.
Product Category:
With reference to the equipment types in the WEEE directive Annex 1, this instrument is
classified as a “Monitoring and Control Instrument” product.
The affixed product label is as shown below.
Do not dispose in domestic household waste.
To return this unwanted instrument, contact your nearest Agilent Service Centre, or visit:
www.agilent.com/environment/product
for more information.
VI
U2600A Series User’s Guide
In This Guide…
1
Getting Started
This chapter contains instructions on how to get started with U2600A Series USB isolated
digital input/output modules that begins from system requirements checking, to
installations of hardware and software, and to the launching of the Agilent Measurement
Manager application software.
2
Connector Pins Configuration
This chapter describes the U2600A Series USB isolated digital input/output modules pins
configuration and the theory operation of isolated DIO.
3
Features and Functions
This chapter describes the features and functions of the Agilent U2600A Series USB
isolated digital input/output modules. This includes the operations of the isolated digital
input/output, group function, interrupt function and trigger function.
4
Product Characteristics and Specifications
This chapter provides the information on general product characteristics and product
specifications.
5
Dismantle Procedures
This chapter describes the step-by-step disassemble procedures and list the available
replacement parts for U2600A Series USB isolated digital input/output modules.
U2600A Series User’s Guide
VII
DECLARATION OF CONFORMITY
According to EN ISO/IEC 17050-1:2004
Generic example
Manufacturer’s Name:
Manufacturer’s Address:
Agilent Technologies Microwave Products (M) Sdn. Bhd
Bayan Lepas Free Industrial Zone,
11900, Bayan Lepas, Penang, Malaysia
Declares under sole responsibility that the product as originally delivered:
Product Name:
Models Number:
Product Options:
Agilent U2600A Series USB Isolated Digital Input/Output
Modules
U2651A, U2652A, U2653A
This declaration covers all options of the above product(s)
complies with the essential requirements of the following applicable European Directives, and
carries the CE marking accordingly:
Low Voltage Directive (2006/95/EC)
EMC Directive (2004/108/EC)
and conforms with the following product standards:
EMC
IEC 61326:2002 / EN 61326:1997+A1:1998+A2:2001+A3:2003
CISPR 11:1990 / EN55011:1990
IEC 61000-4-2:1995 / EN 61000-4-2:1995
IEC 61000-4-3:1995 / EN 61000-4-3:1996
IEC 61000-4-4:1995 / EN 61000-4-4:1995
IEC 61000-4-5:1995 / EN 61000-4-5:1995
IEC 61000-4-6:1996 / EN 61000-4-6:1996
IEC 61000-4-11:1994 / EN 61000-4-11:1994
Class A Group 1
4 kV CD, 8 kV AD
3 V/m, 80-1000 MHz
0.5 kV signal lines, 1 kV power lines
0.5 kV line-line, 1 kV line-ground
3 V, 0.15-80 MHz
1 cycle / 100%
Canada: ICES-001:2004
Australia/New Zealand: AS/NZS CISPR11:2004
The product was tested in a typical configuration with Agilent Technologies test systems.
Safety
IEC 61010-1:2001 / EN 61010-1:2001
Canada: CAN/CSA-C22.2 No. 61010-1-04
USA: ANSI/UL 61010-1:2004
This DoC applies to above-listed products placed on the EU market after:
19 Oct 2007
Mack Soh
Date
Quality Manager
For further information, please contact your local Agilent Technologies sales office, agent or distributor,
or Agilent Technologies Deutschland GmbH, Herrenberger Straße 130, 71034 Böblingen, Germany.
Template: A5971-5302-2, Rev. E.00
VIII
U2600A series
DoC Revision 1.0
U2600A Series User’s Guide
Product Regulations
Performance Criteria
IEC 61326-1:2002 / EN 61326-1:1997+A1:1998+A2:2001+A3:2003
CISPR 11:1990 / EN 55011:1990 – Group 1 Class A
IEC 61000-4-2:1995 / EN 61000-4-2:1995 (ESD 4kV CD, 8kV AD)
IEC 61000-4-3:1995 / EN 61000-4-3:1996 (3V/m, 80% AM)
IEC 61000-4-4:1995 / EN 61000-4-4:1995 (EFT 0.5kV line-line, 1kV line-earth)
IEC 61000-4-5:1995 / EN 61000-4-5:1995 (Surge 0.5kV line-line, 1kV line-earth)
IEC 61000-4-6:1996 / EN 61000-4-6:1996 (3V, 0.15~80 MHz, 80% AM, power line)
IEC 61000-4-11:1994 / EN 61000-4-11:1994 (Dips 1 cycle, 100%)
A
A
B
A
A
B
Canada: ICES-001:2004
Australia/New Zealand: AS/NZS CISPR11:2004
IEC 61010-1:2001 / EN 61010-1:2001
Canada: CAN/CSA-C22.2 No. 61010-1-04
USA: ANSI/UL 61010-1:2004
Additional Information:
The product herewith complies with the essential requirements of the Low Voltage Directive 2006/95/EC and the
EMC Directive (2004/108/EC) and carries the CE Marking accordingly (European Union).
1
Performance Criteria:
A Pass - Normal operation, no effect.
B Pass - Temporary degradation, self recoverable.
C Pass - Temporary degradation, operator intervention required.
D Fail - Not recoverable, component damage.
N/A – Not applicable due to the product is a battery operated device
Models Description:
U2651A: Isolated 32-bit Digital Input (DI) and 32-bit Digital Output (DO).
U2652A: Isolated 64-bit Digital Input (DI).
U2653A: Isolated 64-bit Digital Output (DO).
Notes:
Regulatory Information for Canada
ICES/NMB-001:2004
This ISM device complies with Canadian ICES-001.
Cet appareil ISM est confomre à la norme NMB-001 du Canada.
Regulatory Information for Australia/New Zealand
This ISM device complies with Australian/New Zealand AS/NZS CISPR11:2004
U2600A Series User’s Guide
IX
X
U2600A Series User’s Guide
Table of Contents
U2600A Series User’s Guide
XI
Table of Contents
Table of Contents
1
Getting Started
Introduction
2
Product Overview 3
Product outlook 3
Product dimension 4
Terminal Block Overview
5
Standard Purchase Items Checklist
Software Installation
7
L-Mount Kit Installation
General Maintenance
6
8
10
Additional Information 11
Hardware verification 11
Sample code 13
2
Connector Pins Configuration
Introduction
3
16
Connector Pins Configuration for U2651A
17
Connector Pins Configuration for U2652A
19
Connector Pins Configuration for U2653A
21
55-pin Connector (J1) Pins Configuration
23
Features and Functions
Digital Input/Output 26
Isolated digital input channels 27
Isolated digital output channels 28
Virtual Port Group Function
XII
31
U2600A Series User’s Guide
Table of Contents
Interrupt Function
Trigger Function
4
32
36
Product Characteristics and Specifications
Product Characteristics
46
Product Specifications 48
U2600A series DIO specifications
5
48
Dismantle Procedures
General Disassemble 52
Mechanical disassemble
Troubleshooting
56
Self-Test Procedures
U2600A Series User’s Guide
52
57
XIII
Table of Contents
XIV
U2600A Series User’s Guide
List of Figures
List of Figures
Figure 2-1
Figure 2-2
Figure 2-3
Figure 2-4
Figure 2-5
Figure 2-6
Figure 3-1
Figure 3-2
Figure 3-3
Figure 3-4
Figure 3-5
Figure 3-6
Figure 3-7
U2600A Series User’s Guide
Connector in vertical view 16
Connector in horizontal view 16
Pins configuration for U2651A 17
Pins configuration for U2652A 19
Pins configuration for U2653A 21
Connector (J1) 55-pin 23
Isolated digital input bit through a photo coupler 27
The maximum and minimum allowable input voltage at DIin and DICOM
and the absolute voltage range for DIO to see a logic high 27
Isolated digital output is switched on with load 29
Isolated digital output is switched off with load 29
Enabling the Interrupt Operation Register will allow it to send a signal,
“1” to the Status Byte Register when either the logic level for bit 301
or bit 302 changes from “0” to “1”. 32
Flowchart for interrupt function operation 34
Flowchart for trigger function operation 36
XV
List of Figures
XVI
U2600A Series User’s Guide
List of Tables
List of Tables
Table 2-1
Table 2-2
Table 2-3
Table 2-4
Table 2-5
Table 3-1
Table 4-1
Pins legend for U2651A 18
Pins legend for U2652A 20
Pins legend for U2653A 22
U2600A series J1 connector pin assignment 23
U2600A series J1 connector legend 23
Step-by-step descriptions for trigger function flowchart 37
Digital input product specifications for U2600A series DIO (U2651A,
U2652A, and U2653A) 48
Table 4-2 Digital output product specifications for U2600A series DIO (U2651A,
U2652A, and U2653A) 49
Table 4-3 Power supply product specifications for U2600A series DIO (U2651A,
U2652A, and U2653A) 49
Table 4-4 General product specifications for U2600A series DIO (U2651A, U2652A,
and U2653A) 50
U2600A Series User’s Guide
XVII
List of Tables
XVIII
U2600A Series User’s Guide
Agilent U2600A Series USB Isolated Digital Input/Output Modules
User’s Guide
1
Getting Started
Introduction 2
Product Overview 3
Product outlook 3
Product dimension 4
Terminal Block Overview 5
Standard Purchase Items Checklist 6
Software Installation 7
L-Mount Kit Installation 8
General Maintenance 10
Additional Information 11
Hardware verification 11
Sample code 13
This chapter contains instructions on how to get started with U2600A
Series USB isolated digital input/output modules that begins from system
requirements checking, to installations of hardware and software, and to
the launching of the Agilent Measurement Manager application software.
Agilent Technologies
1
1
Getting Started
Introduction
Introduction
The U2600A Series USB isolated digital input/output modules (DIO)
consists of three models:
• U2651A: Isolated 32- bit DI and 32- bit DO
• U2652A: Isolated 64- bit DI
• U2653A: Isolated 64- bit DO
These series can be used as a standalone unit or as a modular unit.
However, if used as a modular unit, the module needs to be installed into
the U2781A USB Modular Instrument Chassis.
All three models are high performance modules with up to eight channels.
High digital I/O lines increases the utility of the product and offers you
added flexibility.
The U2600A Series USB isolated DIO modules recognizes a wide range of
digital input (10 V to 24 V) as logic high. This provides you with more
choices when choosing external sensors with different DC output levels.
The U2600A Series modules are also equipped with a high voltage
isolation protection of up to 1250 Vrms to prevent the internal circuits
from severe damage.
In addition, these modules are capable of driving most actuators in
industrial automation applications with a high output driving capability of
up to 35 V. The U2600A Series USB isolated DIO modules also offer a
wide range of compatibility with Application Development Environments
(ADE) such as Agilent VEE, LabVIEW, MATLAB, and Microsoft Visual
Studio.
The U2600A Series USB isolated DIO modules are user friendly modules
as setting up is quick and easy with the Hi- speed USB connection
interface (up to 480 Mb/s). Moreover, the modules are bundled with the
Agilent Measurement Manager application software for ease of
management.
2
U2600A Series User’s Guide
Getting Started
Product Overview
1
Product Overview
Product outlook
Front View
Bumper
DI/DO indicator
Power indicator
Connector
Rear View
USB connector
Power inlet
Top view
Plastic casing
U2600A Series User’s Guide
3
1
Getting Started
Product Overview
Product dimension
With plastic casing
Without plastic casing
Top view
Top view
182.39 mm
174.54 mm
Front view
Front view
25.00 mm
44.00 mm
105.00 mm
120.00 mm
4
U2600A Series User’s Guide
Getting Started
Terminal Block Overview
1
Terminal Block Overview
Top view
118.60 mm
158.00 mm
Side View
51.50 mm
28.40 mm
U2600A Series User’s Guide
5
1
Getting Started
Standard Purchase Items Checklist
Standard Purchase Items Checklist
Inspect and verify that you have all the following items upon your
standard purchase of the U2600A Series USB isolated DIO modules. If
there are missing items, please contact the nearest Agilent Sales Office.
✔ DC power adapter
✔ Power cord
✔ USB extension cable
✔ L- Mount kit (used with the Agilent U2781A modular instrument
chassis)
✔ Agilent USB Modular Products and Systems Quick Start Guide
✔ Agilent USB Modular Products and Systems Product Reference
DVD- ROM
✔ Agilent Automation- Ready CD- ROM (contains the Agilent IO Libraries
Suite)
✔ Certificate of Calibration
WA R N I N G
6
Use only power adaptor provided by manufacturer to avoid
unexpected hazard.
U2600A Series User’s Guide
Getting Started
Software Installation
1
Software Installation
If you would like to use the U2600A Series USB isolated DIO modules
with the Agilent Measurement Manager application software, follow the
step- by- step instructions as shown in the Agilent USB Modular Products
and Systems Quick Start Guide.
NOTE
U2600A Series User’s Guide
You may require to install IVI-COM driver before using the U2600A Series
USB isolated DIO modules with other ADEs.
7
1
Getting Started
L-Mount Kit Installation
L-Mount Kit Installation
The L- Mount kit is to be used with Agilent U2781A USB modular
instrument chassis.The following instructions describes simple procedures
of installing the L- Mount kit to a U2600A Series USB isolated DIO
modules.
1 Unpack the L- Mount kit from
the packaging.
2 Remove your USB device from
its plastic casing by pulling the
bumper (front end of the casing)
outward direction. Then, lift the
plastic body casing and remove
it from your USB device.
3 Using the Philip screw driver,
screw the L- Mount kit to your
USB device.
8
U2600A Series User’s Guide
Getting Started
L-Mount Kit Installation
1
4 To slot in the USB module to
your chassis, turn your module
perpendicularly and ensure that
the 55- pin backplane connector
is at the bottom side of the USB
module.
5 Your USB module is now ready
to be plug into an instrument
chassis.
U2600A Series User’s Guide
9
1
Getting Started
General Maintenance
General Maintenance
NOTE
Repair or service which are not covered in this manual should only be
performed by qualified personnel.
To remove the dirt or moisture the USB device, follow the instructions
below.
1 Power off the USB device and remove the AC/DC adapter cord and USB
cable from your device.
2 Remove your USB device from its plastic casing by pulling at the
bumper (front end of the casing) outward direction. Then, lift the
plastic body casing and remove it from your USB device.
3 Holding your USB device, shake out any dirt that may have accumulated
on the panel of your USB device.
4 Wipe your USB device with a dry clean cloth.
10
U2600A Series User’s Guide
Getting Started
Additional Information
1
Additional Information
Hardware verification
Agilent Connection Expert is one of the utilities of Agilent IO Libraries. It
can automatically detects the USB devices that were connected to the PC
and enables the communication between the USB device and the PC. To
verify that your USB device has established a connection with your PC, do
the following steps.
1 Go to Start > All Programs > Agilent IO Libraries Suite > Agilent Connection Expert
to launch the Agilent Connection Expert.
2 The connected USB device will be visible in the Instrument I/O on this PC
panel as indicated in the following. Select the DIO connection interface
and right- click.
Select the
DIO module
U2600A Series User’s Guide
11
1
Getting Started
Additional Information
3 A context menu will appear. Click Send Commands To This Instrument. The
Agilent Interactive IO dialog box will appear as shown below. Click Send
& Read to send the *IDN? default SCPI command. The instrument's
response will be displayed in the Instrument Session History panel.
4 Successful communication between the PC and the connected hardware
indicate successful hardware installation and connection establishment.
12
U2600A Series User’s Guide
Getting Started
Additional Information
1
Sample code
Sample codes for Agilent VEE, LabView and Microsoft (C#, C++, VB7 and
VB6) are provided to help you get started and familiarized with the
instrument. The sample codes provided for each language are as follows.
• Example1: Demonstrates the initialization of the instrument
• ReadWriteChannel: Read data from instrument and write data to
instrument
• Interrupt: Demonstrates how the interrupt function works
• Trigger: Demonstrates how the trigger function works. An error will be
shown if user tries to write the value after the trigger has been
executed.
• Custom channel: User can group eight DI bits to form a new DI
channel or group eight DO bits to form a new DO channel. The new DI
or DO channels can then be used to perform normal DIO operation.
To view the sample code
Select Sample Code on the Agilent Modular Products Installation Menu and
choose the type of language. See the following figure.
U2600A Series User’s Guide
13
1
14
Getting Started
Additional Information
U2600A Series User’s Guide
Agilent U2600A Series USB Isolated Digital Input/Output Modules
User’s Guide
2
Connector Pins Configuration
Introduction 16
Connector Pins Configuration for U2651A
Connector Pins Configuration for U2652A
Connector Pins Configuration for U2653A
55-pin Connector (J1) Pins Configuration
17
19
21
23
This chapter describes the U2600A Series USB isolated digital
input/output modules pins configuration and the theory operation of
isolated DIO.
Agilent Technologies
15
2
Connector Pins Configuration
Introduction
Introduction
The U2600A Series USB isolated digital input/output modules were
equipped with 100- pin SCSI- II connector. The connector pins
configuration for all of the U2600A Series USB isolated DIO modules are
provided in this chapter. When the DIO module is used in a modular
instrument chassis (U2781A), see Figure 2- 1 for the pins numbering.
When the DIO module is used as a standalone unit, see Figure 2- 2.
(100)
(99)
(98)
(50)
(49)
(48)
First part
Second part
Second part
(53)
(52)
(51)
(50) (49) (48)
(03) (02) (01)
(100) (99) (98)
(53) (52) (51)
(03)
(02)
(01)
Figure 2-1 Connector in vertical view
16
First part
Figure 2-2 Connector in horizontal view
U2600A Series User’s Guide
Connector Pins Configuration
Connector Pins Configuration for U2651A
2
Connector Pins Configuration for U2651A
First Part
Second Part
DI_101.0/301
1
51
DI_102.0
DO_201.0
26
76
DO_202.0
DI_101.1/302
2
52
DI_102.1
DO_201.1
27
77
DO_202.1
DI_101.2
3
53
DI_102.2
DO_201.2
28
78
DO_202.2
DI_101.3
4
54
DI_102.3
DO_201.3
29
79
DO_202.3
DI_101.4
5
55
DI_102.4
DO_201.4
30
80
DO_202.4
DI_101.5
6
56
DI_102.5
DO_201.5
31
81
DO_202.5
DI_101.6
7
57
DI_102.6
DO_201.6
32
82
DO_202.6
DI_101.7
8
58
DI_102.7
DO_201.7
33
83
DO_202.7
COM_101
9
59
COM_102
VDD_201
34
84
VDD_202
COM_101
10
60
COM_102
DO_GND
35
85
DO_GND
COM_101
11
61
COM_102
DO_GND
36
86
DO_GND
COM_101
12
62
COM_102
DO_GND
37
87
DO_GND
DI_103.0
13
63
DI_104.0
DO_203.0
38
88
DO_204.0
DI_103.1
14
64
DI_104.1
DO_203.1
39
89
DO_204.1
DI_103.2
15
65
DI_104.2
DO_203.2
40
90
DO_204.2
DI_103.3
16
66
DI_104.3
DO_203.3
41
91
DO_204.3
DI_103.4
17
67
DI_104.4
DO_203.4
42
92
DO_204.4
DI_103.5
18
68
DI_104.5
DO_203.5
43
93
DO_204.5
DI_103.6
19
69
DI_104.6
DO_203.6
44
94
DO_204.6
DI_103.7
20
70
DI_104.7
DO_203.7
45
95
DO_204.7
COM_103
21
71
COM_104
VDD_203
46
96
VDD_204
COM_103
22
72
COM_104
DO_GND
47
97
DO_GND
COM_103
23
73
COM_104
DO_GND
48
98
DO_GND
COM_103
24
74
COM_104
DO_GND
49
99
DO_GND
NC
25
75
NC
+5 V
50
100 +5 V
Figure 2-3 Pins configuration for U2651A
U2600A Series User’s Guide
17
2
Connector Pins Configuration
Connector Pins Configuration for U2651A
Table 2-1 Pins legend for U2651A
18
Pin
Descriptions
DI_10n.0...7
Isolated digital input channel “n” and bit 0 to 7; n = 1, 2, 3, 4
DO_20n.0...7
Isolated digital output channel “n” and bit 0 to 7; n = 1, 2, 3, 4
COM_101
Common junction for input channel 1
COM_102
Common junction for input channel 2
COM_103
Common junction for input channel 3
COM_104
Common junction for input channel 4
VDD_201
VDD pin for output channel 1
VDD_202
VDD pin for output channel 2
VDD_203
VDD pin for output channel 3
VDD_204
VDD pin for output channel 4
DO_GND
Ground return path of isolated channels
+5 V
On board +5 V regulated power supply
NC
No connection
U2600A Series User’s Guide
Connector Pins Configuration
Connector Pins Configuration for U2652A
2
Connector Pins Configuration for U2652A
First Part
Second Part
DI_101.0/301
1
51
DI_102.0
DI_105.0
26
76
DI_106.0
DI_101.1/302
2
52
DI_102.1
DI_105.1
27
77
DI_106.1
DI_101.2
3
53
DI_102.2
DI_105.2
28
78
DI_106.2
DI_101.3
4
54
DI_102.3
DI_105.3
29
79
DI_106.3
DI_101.4
5
55
DI_102.4
DI_105.4
30
80
DI_106.4
DI_101.5
6
56
DI_102.5
DI_105.5
31
81
DI_106.5
DI_101.6
7
57
DI_102.6
DI_105.6
32
82
DI_106.6
DI_101.7
8
58
DI_102.7
DI_105.7
33
83
DI_106.7
COM_101
9
59
COM_102
COM_105
34
84
COM_106
COM_101
10
60
COM_102
COM_105
35
85
COM_106
COM_101
11
61
COM_102
COM_105
36
86
COM_106
COM_101
12
62
COM_102
COM_105
37
87
COM_106
DI_103.0
13
63
DI_104.0
DI_107.0
38
88
DI_108.0
DI_103.1
14
64
DI_104.1
DI_107.1
39
89
DI_108.1
DI_103.2
15
65
DI_104.2
DI_107.2
40
90
DI_108.2
DI_103.3
16
66
DI_104.3
DI_107.3
41
91
DI_108.3
DI_103.4
17
67
DI_104.4
DI_107.4
42
92
DI_108.4
DI_103.5
18
68
DI_104.5
DI_107.5
43
93
DI_108.5
DI_103.6
19
69
DI_104.6
DI_107.6
44
94
DI_108.6
DI_103.7
20
70
DI_104.7
DI_107.7
45
95
DI_108.7
COM_103
21
71
COM_104
COM_107
46
96
COM_108
COM_103
22
72
COM_104
COM_107
47
97
COM_108
COM_103
23
73
COM_104
COM_107
48
98
COM_108
COM_103
24
74
COM_104
COM_107
49
99
COM_108
NC
25
75
NC
NC
50
100 NC
Figure 2-4 Pins configuration for U2652A
U2600A Series User’s Guide
19
2
Connector Pins Configuration
Connector Pins Configuration for U2652A
Table 2-2 Pins legend for U2652A
20
Pin
Descriptions
DI_10n.0...7
Isolated digital input channel “n” and bit 0 to 7; n = 1 to 8
COM_101
Common junction for input channel 1
COM_102
Common junction for input channel 2
COM_103
Common junction for input channel 3
COM_104
Common junction for input channel 4
COM_105
Common junction for input channel 5
COM_106
Common junction for input channel 6
COM_107
Common junction for input channel 7
COM_108
Common junction for input channel 8
NC
No connection
U2600A Series User’s Guide
Connector Pins Configuration
Connector Pins Configuration for U2653A
2
Connector Pins Configuration for U2653A
First Part
Second Part
DO_201.0
1
51
DO_202.0
DO_205.0
26
76
DO_206.0
DO_201.1
2
52
DO_202.1
DO_205.1
27
77
DO_206.1
DO_201.2
3
53
DO_202.2
DO_205.2
28
78
DO_206.2
DO_201.3
4
54
DO_202.3
DO_205.3
29
79
DO_206.3
DO_201.4
5
55
DO_202.4
DO_205.4
30
80
DO_206.4
DO_201.5
6
56
DO_202.5
DO_205.5
31
81
DO_206.5
DO_201.6
7
57
DO_202.6
DO_205.6
32
82
DO_206.6
DO_201.7
8
58
DO_202.7
DO_205.7
33
83
DO_206.7
VDD_201
9
59
VDD_202
VDD_205
34
84
VDD_206
DO_GND
10
60
COM_102
COM_105
35
85
COM_106
DO_GND
11
61
COM_102
COM_105
36
86
COM_106
DO_GND
12
62
COM_102
COM_105
37
87
COM_106
DO_203.0
13
63
DO_204.0
DO_207.0
38
88
DO_208.0
DO_203.1
14
64
DO_204.1
DO_207.1
39
89
DO_208.1
DO_203.2
15
65
DO_204.2
DO_207.2
40
90
DO_208.2
DO_203.3
16
66
DO_204.3
DO_207.3
41
91
DO_208.3
DO_203.4
17
67
DO_204.4
DO_207.4
42
92
DO_208.4
DO_203.5
18
68
DO_204.5
DO_207.5
43
93
DO_208.5
DO_203.6
19
69
DO_204.6
DO_207.6
44
94
DO_208.6
DO_203.7
20
70
DO_204.7
DO_207.7
45
95
DO_208.7
VDD_203
21
71
VDD_204
VDD_207
46
96
VDD_208
DO_GND
22
72
DO_GND
DO_GND
47
97
DO_GND
DO_GND
23
73
DO_GND
DO_GND
48
98
DO_GND
DO_GND
24
74
DO_GND
DO_GND
49
99
DO_GND
NC
25
75
NC
+5 V
50
100 +5 V
Figure 2-5 Pins configuration for U2653A
U2600A Series User’s Guide
21
2
Connector Pins Configuration
Connector Pins Configuration for U2653A
Table 2-3 Pins legend for U2653A
22
Pin
Descriptions
DO_20n.0...7
Isolated digital output channel “n” and bit 0 to 7; n = 1 to 8
VDD_201
VDD pin for output channel 1
VDD_202
VDD pin for output channel 2
VDD_203
VDD pin for output channel 3
VDD_204
VDD pin for output channel 4
VDD_205
VDD pin for output channel 5
VDD_206
VDD pin for output channel 6
VDD_207
VDD pin for output channel 7
VDD_208
VDD pin for output channel 8
DO_GND
Ground return path of isolated channels
+5 V
On board +5 V regulated power supply
NC
No connection
U2600A Series User’s Guide
Connector Pins Configuration
55-pin Connector (J1) Pins Configuration
2
55-pin Connector (J1) Pins Configuration
55-pin connector (J1)
Figure 2-6 Connector (J1) 55-pin
Table 2-4 U2600A series J1 connector pin assignment
11
10
9
8
7
6
5
4
3
2
1
GND
GND
GND
GND
GND
GND
GND
GND
GND
GND
GND
Z
+12 V
+12 V
+12 V
NC
NC
NC
NC
NC
NC
NC
NC
A
+12 V
+12 V
+12 V
BRSV
GA0
GA1
GA2
STAR_TRIG
GND
NC
GND
B
GND
+12 V
+12 V
GND
NC
GND
NC
GND
NC
GND
NC
C
USB_D+
GND
GND
NC
GND
NC
GND
NC
GND
NC
GND
D
USB_DGND
USB_VBUS
NC
NC
NC
NC
NC
NC
NC
NC
E
GND
GND
GND
GND
GND
GND
GND
GND
GND
GND
GND
F
Table 2-5 U2600A series J1 connector legend
Pin
Descriptions
+12 V
+12 V power from backplane
GND
Ground
BRSV
Reserved pin
STAR_TRIG
Star trigger
USB_VBUS
USB bused power, +5 V
USB_D+, USB_D-
USB differential pair
U2600A Series User’s Guide
23
2
24
Connector Pins Configuration
55-pin Connector (J1) Pins Configuration
U2600A Series User’s Guide
Agilent U2600A Series USB Isolated Digital Input/Output Modules
User’s Guide
3
Features and Functions
Digital Input/Output 26
Isolated digital input channels 27
Isolated digital output channels 28
Virtual Port Group Function 31
Interrupt Function 32
Trigger Function 36
This chapter describes the features and functions of the Agilent U2600A
Series USB isolated digital input/output modules. This includes the
operations of the isolated digital input/output, group function, interrupt
function and trigger function.
Agilent Technologies
25
3
Features and Functions
Digital Input/Output
Digital Input/Output
The U2600A Series USB isolated digital input/output modules provide up
to 64- bit of high density opto- isolated digital input and output for USB
2.0 interface- based industrial applications.
The 32- bit U2651A DIO model is segmented into eight channels with four
channels as digital input channels (CH101 to CH104) and four channels as
digital output channels (CH201 to CH204). Each channel consists of eight
data bit. Refer to “Connector Pins Configuration for U2651A” on page 17
for more information on the pins configuration.
The 64- bit U2652A digital input model is segmented into eight channels
where all channels are digital input channels (CH101 to CH108). Each
channel consists of eight data bit. Refer to “Connector Pins Configuration
for U2652A” on page 19 for more information on the pins configuration.
The 64- bit U2653A digital output model is segmented into eight channels
where all channels are digital output channels (CH201 to CH208). Each
channel consists of eight data bit. Refer to “Connector Pins Configuration
for U2653A” on page 21 for more information on the pins configuration.
26
U2600A Series User’s Guide
Features and Functions
Digital Input/Output
3
Isolated digital input channels
The U2600A Series USB isolated digital I/O modules are equipped with up
to 64- bit of opto- isolated digital input, which provides electrical isolation
protection to the inner DIO circuitry. The circuit diagram of an isolated
input bit is shown in Figure 3- 1. The maximum and minimum allowable
input voltage at DIin and DICOM are 24 V and –24 V, respectively;
regardless of its polarity as shown below:
1 24 V at DIin and –24 V at DICOM or
2 24 V at DICOM and –24 V at DIin.
Figure 3-1 Isolated digital input bit through a photo coupler
Maximum allowable input votlage = +24 V
48 V
absolute voltage difference:
10 V to 24 V = logic high
Minimum allowable input voltage = –24 V
Figure 3-2 The maximum and minimum allowable input voltage at DIin and DICOM and the
absolute voltage range for DIO to see a logic high
U2600A Series User’s Guide
27
3
Features and Functions
Digital Input/Output
For the DIO module to read the digital input as logic high, the absolute
input voltage range (regardless of its polarity) across the DIin and DICOM
should be in the range from 10 V to 24 V (see Figure 3- 2). For example,
the voltage at DIin should be greater than DICOM by at least 10 V (up to
24 V) or the voltage at DICOM should be greater than DIin by at least 10 V
(up to 24 V). As long as there is an absolute potential difference of more
than 10 V (up to 24 V) across DIin and DICOM, the DIO module will see a
logic high at that bit.
CAUTION
Do not supply excessive voltage to the digital input bits as it will cause
excessive heating on the resistor and damage the instrument. The
maximum absolute voltage difference is 24 V.
Isolated digital output channels
The common ground connection of isolated digital output is shown in the
Figure 3- 3. When the isolated digital output is switched ON, the current
will conduct on the power MOSFET (see Figure 3- 1) and the current will
flow as indicated by the arrow. When the isolated digital output is
switched OFF, the current will not conduct through the load (see
Figure 3- 4).
CAUTION
28
When the load is of an inductance nature such as relay, coil or motor,
the VDD pin should be connected to an external power source.
U2600A Series User’s Guide
Features and Functions
Digital Input/Output
3
Figure 3-3 Isolated digital output is switched on with load
Figure 3-4 Isolated digital output is switched off with load
U2600A Series User’s Guide
29
3
Features and Functions
Digital Input/Output
A fly- wheel diode is provided at the drain of the MOSFET. It is used in
closed loop current release and to protect the MOSFET from any high
reversed voltage, which may be generated by the inductive load when the
output stage is being switched from ON to OFF.
The following SCPI examples show the way to read a digital input channel
and to output a digital output signal.
SCPI Example 1, Read one bit of a digital input channel
& DIG:DATA:BIT? 1,(@101)
//Read bit 1 of channel 101
$ 1
//The return value will be either 1 or 0. 1 means there is a input
at that particular bit.
SCPI Example 2, Read a digital input channel
& DIG:DATA:BYTE? (@101)
//Read digital input at channel 101
& 9
//The return value is in decimal, where 9 means bit 0 and bit 3
of channel 101 have digital inputs.
SCPI Example 3, Output a signal at one bit of a digital output channel
& SOUR:DIG:DATA:BIT 1,6,(@201)
//Set to “1” for bit 6 of channel 201.
& SOUR:DIG:DATA:BIT? 6,(@201)
//Query the output signal at bit 6 of channel 201.
$ 1
//Return of “1” means there is an output signal.
SCPI Example 4, Output a signal at a digital output channel
& SOUR:DIG:DATA:BYTE 123,(@201:204) //Output 123 (in decimal) at channel 201 to 204.
& SOUR:DIG:DATA:BYTE? (@201:204)
//Query the output signal at channel 201 to 204.
$ 123,123,123,123
30
U2600A Series User’s Guide
Features and Functions
Virtual Port Group Function
3
Virtual Port Group Function
The U2600A Series USB isolated digital I/O modules allow you to
randomly select any eight input bits or output bits and group them into
one channel as a virtual DIO port. You must select exactly eight bits to
group them to a virtual channel. However, only input bits canbe grouped
with input bits and output bits with output bits. Therefore, the input bits
should not be grouped with the output bits.
NOTE
You must select exactly eight input bits and group them into virtual
channel 199 or exactly eight output bits and group them into channel 299.
For input operations, the channel number is 199 and for output
operations, the channel number is 299. The grouping does not need to be
sequential in nature, since the bits in channel 199 or 299 will link the
specified bits to its reference points.
The following shows the examples of SCPI commands on how to group the
input bits in channel number 199 and output bits in channel number 299.
SCPI Example 1, Grouping the input bits
//Group the eight input bits in channel number 199
& CONF:DIG:GRO 101.0,101.3,102.5,102.2,102.5,102.7,101.2,102.6, (@199)
& DIG:DATA? (@199)
//Query the values at the channel
SCPI Example 2, Grouping the output bits
//Group the eight output bits in channel number 299
& CONF:DIG:GRO 202.0,202.3,202.5,202.7,203.5,203.7,204.0,204.5, (@299)
& SOUR:DIG:DATA 0, (@299)
//Set channel number 299 to output all zeros
//Group different output bits in channel number 299
& CONF:DIG:GRO 202.0,202.1,202.5,202.7,203.5,203.7,204.0,204.5, (@299)
& SOUR:DIG:DATA 1, (@299)
U2600A Series User’s Guide
//Set channel number 299 to output with ones
31
3
Features and Functions
Interrupt Function
Interrupt Function
This feature is available for the U2651A and U2652A. There are two
interrupt sources for the interrupt function, which are bit 301 and bit 302
located at input channel 101. They are actually physically sharing the
same bit with bit 101.0 and bit 101.1. See “Connector Pins Configuration
for U2651A” on page 17 and “Connector Pins Configuration for
U2652A” on page 19 for the location of bit 301 and bit 302.
To use this feature, the user has to enable the interrupt first by selecting
the triggering source (i.e. bit 301 or bit 302). For example, the following
SCPI command is used to set bit 301 as the triggering source.
SENS:DIG:INT:ENAB ON, (@301)
When the logic level of bit 301 changes from “0” to “1” (i.e. an interrupt
has occurred), the bit 0 of Event Register (EV) is set to “1”. See
Figure 3- 5. To alert the Status Byte Register that an interrupt has
occurred, the user has to enable the Enable Register (EN) at the Interrupt
Operation Register using the following SCPI command:
STAT:INT:ENAB 1
Figure 3-5 Enabling the Interrupt Operation Register will allow it to send a signal, “1” to
the Status Byte Register when either the logic level for bit 301 or bit 302
changes from “0” to “1”.
32
U2600A Series User’s Guide
Features and Functions
Interrupt Function
3
The Enable Register acts like a gate for the Interrupt Operation Register.
If the Event Register is not enabled (i.e. gate is close), the interrupt signal
will not be sent to the Status Byte Register. If the Event Register is
enabled, the interrupt signal will be sent to bit 0 of the Status Byte
Register. To check whether the Enable Register is enabled, use the
following SCPI command:
STAT:INT:ENAB?
If the return value is “1” (in binary is 01), it means that the information
at bit 0 of Event Register in Interrupt Operation Register will be sent to
bit 0 of Status Byte Register. If the return value is “2” (in binary is 10), it
means that the information at bit 0 of Event Register in Interrupt
Operation Register will be sent to bit 0 of Status Byte Register. To enable
both bit 0 and bit 1 of Enable Register to send the information in bit 0
and bit 1 of Event Register in Interrupt Operation Register, send the
following SCPI command:
STAT:INT:ENAB 3
The user may send the SCPI command “*STB?” to query the status of the
Status Byte Register and observe bit 0 of the return value to check
whether an interrupt has occured provided that the user has previously
select the trigger source and enable the Enable Register of the Interrupt
Operation Register.
The flowchart in Figure 3- 6 shows an example of the interrupt function
operation.
U2600A Series User’s Guide
33
3
Features and Functions
Interrupt Function
Clear the register
Select interrupt
trigger source
Enable Interrupt
Operation Register
*STB?
Return 1 from bit
0 of *STB?
No
Yes
Do Something
Figure 3-6 Flowchart for interrupt function operation
Firstly, it is recommended to clear the register prior to enabling the
interrupt function. Use the SCPI command “*CLS” to clear the register.
Secondly, choose the trigger source (for example bit 301) using the SCPI
command “SENS:DIG:INT:ENAB ON,(@301)”.
Then, enable the Interrupt Operation Register so that it will alert the
Status Byte Register whenever an interrupt has occured.
Finally, check the status in Status Byte Register with the SCPI command
“*STB?”. If bit 0 of STB returns “1”, it means that an interrupt has
occurred. If bit 0 of STB returns “0”, continue to check its status. The
user may do something when an interrupt has occured, for example
output a signal from the DIO device.
34
U2600A Series User’s Guide
Features and Functions
Interrupt Function
3
SCPI Example 1, Enable interrupt at bit 301 and
& *RST;*CLS
//Clears the register to start from known state
& SENS:DIG:INT:ENAB ON, (@301)
//Enable interrupt for bit 0
& ...
//Interrupt occurs in bit 301
& *STB?
//Query Status Byte Register
$ +0
//Interrupt occurred but STB doesn't see it yet
& STAT:INT:ENAB 1
//Enable the bit so STB can see it
& *STB?
//Query STB again
$ +1
//Now STB sees that an interrupt has occurred
& STAT:INT:EVEN?
//Find out which interrupt source
$ +1
//“1” means the interrupt source is from bit 301
& STAT:INT:EVEN?
//Once read the event is cleared
$ +0
//0 now. If there is another interrupt, it will be set to 1 again
NOTE
U2600A Series User’s Guide
Refer to U2600A Series Programmer’s Reference under the topic
“[SENSE:]DIGital:INTerrupt[:ENABle]” for more example
on interrupt function.
35
3
Features and Functions
Trigger Function
Trigger Function
The major difference between interrupt function and trigger function is
that after the user selects any trigger source, the IO operation will be
frozen. In other words, the output will stay at the previous stage and the
input reading values will also be frozen. Whereas for the interrupt
function, the IO operation is still running.
The following flowchart illustrates the way the trigger function operates.
Step 1: Normal IO
Step 2: Configure output
Step 3: Select trigger source
Step 4: Users may configure
the output
Yes
Step 5: Stop trigger
operation?
Step 7: Users may
stop the trigger
operation
Step 6: Start
Trigger
No
Yes
Step 8: New output to DIO
Figure 3-7 Flowchart for trigger function operation
36
U2600A Series User’s Guide
Features and Functions
Trigger Function
3
Table 3-1 Step-by-step descriptions for trigger function flowchart
Steps
Descriptions
Step 1
By default, no trigger souce is selected (TRIG:SOUR NONE). Hence, all digital inputs
and digital outputs will operate immediately.
Step 2
Users may configure the desired output values before a trigger occurred. For example:
& SOUR:DIG:DATA:BYTE 123,(@201:204)
And read the input values, for example:
& SENS:DIG:DATA:BYTE? (@101:104)
$ 111,111,111,111
Step 3
Select one of the trigger source. (TRIG:SOUR 301|302|STRG)
The star trigger “STRG” trigger source can only be used when the DIO module is installed
in a modular instrument U2700A chassis.
Step 4
All IO operation will freeze when the user select one of the trigger source. So, if the user
supply 98 to the input, sending the query command “SENS:DIG:DATA:BYTE?
(@101:104)” will return “111,111,111,111” even the supply value at the DIO
module has changed to 98 (for this case).
At this stage, users are allow to configure the output values. For example:
& SOUR:DIG:DATA:BYTE 220, (@201:204)
& SOUR:DIG:DATA:BYTE? (@201:204)
No
$ 220,220,220,220
Even though the query command returns “220,220,220,220”, the real output value
at the hardware DIO module will remain the same as previous stage (Step 2), which is 123
in this case. The output value will remain at 123 until the DIO module receives the trigger
signal.
Step 5
Users may stop trigger operation at this stage by sending the command “TRIG:SOUR
NONE”. If this command is sent without receiving any trigger signal, then the query of this
command “SOUR:DIG:DATA:BYTE? (@201:204)” should give back the previous
stage (Step 2) value, which is 123 in this example but not 220.
Step 6
Send the command “TRIG:MON ON” to start monitoring the trigger signal. Users are
NOT allowed to change the output setting at this stage.
U2600A Series User’s Guide
37
3
Features and Functions
Trigger Function
Table 3-1 Step-by-step descriptions for trigger function flowchart (continued)
Steps
Descriptions
Step 7
Users can stop monitoring the trigger signal manually at any time. To stop monitoring,
send the command “TRIG:MON OFF”.
Step 8
If trigger happen, DIO module will output 220 (as configured in Step 4). The device will
return to normal IO operation. So, when read the input value, it will return 98 (in this case).
The command “TRIG:MON:STAT?” is used to query the current monitoring status
process. For example, when this command is sent at this stage:
& TRIG:MON:STAT?
$ +1
& TRIG:MON:STAT?
$ +0
The “+1” indicates that trigger has happened. But this will only be shown once. If the
query command is sent for the second time, it will reset to “+0”.
The monitoring process will stop after trigger signal is received.
& TRIG:MON?
$ 0
Example 1, Trigger did not happen
& *RST; *CLS
& SOUR:DIG:DATA:BYTE
123,(@201,203)
& SOUR:DIG:DATA:BYTE 99,(@202,204)
& SOUR:DIG:DATA:BYTE? (@201:204)
$ 123,99,123,99
// Actual hardware value at 123,99,123,99
& TRIG:SOUR 301
// Setting trigger source will not affects the output value.
Thus, output values remained
& SOUR:DIG:DATA:BYTE? (@201:204)
$ 123,99,123,99
38
U2600A Series User’s Guide
Features and Functions
Trigger Function
3
& SOUR:DIG:DATA:BYTE 44, (@201,202) // Configure output value only. The actual hardware output
& SOUR:DIG:DATA:BYTE 222,
(@203,204)
& SOUR:DIG:DATA:BYTE? (@201:204)
$ 44,44,222,222
did not change yet, still remain at 123,99,123,99
// Actual hardware value is 123,99,123,99 but SCPI show
44,44,222,222. The SCPI value will be source out, if the DAQ
receives the trigger signal
& TRIG:SOUR NONE
// User decides not to use trigger function anymore. Trigger
does not happen
& SOUR:DIG:DATA:BYTE? (@201:204)
// Since trigger did not happen, the output value did not
change. Thus SCPI return 123,99,123,99 to show the actual
hardware status
$ 123,99,123,99
Example 2, Trigger happen
& *CLS; *RST
& SOUR:DIG:DATA:BYTE 11,(@204)
& SOUR:DIG:DATA:BYTE 233,(@201)
& SOUR:DIG:DATA:BYTE 9,(@202)
& SOUR:DIG:DATA:BYTE 205,(@203)
& SOUR:DIG:DATA:BYTE? (@201:204)
& 233,9,205,11
// Actual hardware value at 233,9,205,11
& TRIG:SOUR 302
// Set trigger source at 302
& SOUR:DIG:DATA:BYTE? (@201:204)
// SCPI value remain
$ 233,9,205,11
& SOUR:DIG:DATA:LWOR
40154879,(@201)
& SOUR:DIG:DATA:WORD? (@201,203)
// User may configure the output value as many times as
they like using different type “SOUR” command. But the
actual hardware value will not change until a trigger signal is
received
$ 46847,612
& SOUR:DIG:DATA:BYTE? (@201:204)
& 255,182,100,2
U2600A Series User’s Guide
39
3
Features and Functions
Trigger Function
& SOUR:DIG:DATA:BYTE 33,(@202)
& SOUR:DIG:DATA:BYTE 145,(@201)
// The last configured SOUR value will determine the later
hardware value when a trigger signal is received
& SOUR:DIG:DATA:WORD 6523,(@203)
& SOUR:DIG:DATA:BYTE? (@201:204)
& 145,33,123,25
// Start monitor the trigger signal
-> TRIG:MON ON
// After start monitor trigger signal, users are not allow to change SOUR command
& SOUR:DIG:DATA:BYTE 23,(@201)
& SYST:ERR?
$ +308,“Channel not able to perform requested operation; Chan 201”
& SOUR:DIG:DATA:BYTE? (@201:204)
$ 145,33,123,25
// However, user is still allow to make query on SOUR
command. Note that the actual hardware is still at
233,9,205,11 but SCPI value is at 145,33,123,25
*** Trigger happen ***
& TRIG:MON:STAT?
$ +1
// Check whether trigger had happened and reset to zero
when user query for second time
& TRIG:MON:STAT?
$ +0
& TRIG:MON?
$ 0
& SOUR:DIG:DATA:BYTE? (@201:204)
$ 145,33,123,25
// This command will also be reset to OFF, indicating that
the trigger monitoring process has been stopped
// Now the SCPI and actual hardware value are the same,
which is 145,33,123,25
*** From here onwards, user may choose to continue with trigger or turn off trigger ***
& TRIG:SOUR NONE
// Turn off trigger function
& SOUR:DIG:DATA:BYTE?(@201:204)
// Now the SOUR query command shows the actual
hardware value, which is 145,33,123,25
$ 145,33,123,25
40
U2600A Series User’s Guide
Features and Functions
Trigger Function
3
Example 3, Interrupt commands during trigger are not allow
E.g. 1: After trigger source is selected, interrupt function feature is not
allowed
& *CLS; *RST
// Set 302 as trigger source
& TRIG:SOUR 302
// Interrupt command is not allow in trigger mode. If used, an error will occur.
& DIG:INT 1,(@301)
& SYST:ERR?
$ +308,”Channel not able to perform requested operation; Chan 301”
& DIG:INT 1,(@302)
& SYST:ERR?
$ +308,”Channel not able to perform requested operation; Chan 302”
& DIG:INT? (@301:302)
// However, user can check whether the interrupt is enabled
$ 0,0
E.g 2: Interrupt feature is disabled if a trigger source is selected
& *CLS; *RST
& DIG:INT 1,(@302)
& DIG:INT? (@301:302)
// Interrupt command is not allow in trigger mode. If used, an
error will occur.
$ 0,1
& TRIG:SOUR 301
// Select 301 as trigger source
& DIG:INT? (@301)
// Interrupt feature will be automatically disabled when user
select trigger source. “0” means the interrupt function is not
enabled.
$ 0
& DIG:INT? (@302)
$ 0
& DIG:INT? (@301:302)
$ 0,0
U2600A Series User’s Guide
41
3
Features and Functions
Trigger Function
& TRIG:SOUR NONE
// Turn off the trigger source
& DIG:INT? (@301:302)
// This query command will still return 0,0
$ 0,0
E.g. 3: STRG as the trigger source when used in the instrument modular
chassis (U2781A)
& *CLS; *RST
& TRIG:SOUR STRG
// Select STRG as trigger source
& STAT:INT:ENAB 3
// No error generated when enable the “STRG” trigger source.
This command can still be use because it is only an enable
register. Since interrupt comand has been disabled, this
command have no effect on interrupt or trigger.
& STAT:INT ENAB?
$ +3
& STAT:INT?
$ +0
Example 4, Group command during trigger
& *CLS; *RST
& CONF:DIG:GRO 101.3,104.2,101.7,102.5,103.6,102.0,103.4,102.1,(@199)
& CONF:DIG:GRO 203.2,201.4,204.3,202.7,201.5,204.1,203.0,201.2,(@299)
& SOUR:DIG:DATA:BYTE 234,(@299)
& SOUR:DIG:DATA:BYTE? (@299)
$ 234
& SOUR:DIG:DATA:BYTE? (@201:204)
// Actual hardware value at 20,128,1,2
$ 20,128,1,2
& TRIG:SOUR 302
42
// Set 302 as trigger source
U2600A Series User’s Guide
Features and Functions
Trigger Function
3
& SOUR:DIG:DATA:BYTE? (@201:204)
$ 20,128,1,2
& SOUR:DIG:DATA:BYTE? (@299)
$ 234
& SOUR:DIG:DATA:BYTE 31,(@299)
& SOUR:DIG:DATA:BYTE? (@299)
$ 31
& SOUR:DIG:DATA:BYTE? (@201:204)
$ 48,128,4,8
& TRIG:MON ON
& SOUR:DIG:DATA:BYTE 23,(@299)
& SYST:ERR?
$ +308,”Channel not able to perform requested operation; Chan 299”
// However, users are still allow to re-arrange the channels in 299 or 199 since it will not alter the SCPI value, 48,128,4,8
& CONF:DIG:GRO 201.2,202.4,203.3,204.7,201.5,202.1,203.0,204.2,(@299)
& CONF:DIG:GRO 101.3,102.2,103.7,104.5,101.6,102.0,103.4,104.1,(@199)
& SOUR:DIG:DATA:BYTE? (@299)
$ 16
& SOUR:DIG:DATA:BYTE? (@201:204)
// Although this value has changed from 31 to 16 due to
re-configured of the channels, it will not affect the SCPI value.
The value in channel 201:204 still remain unchanged. Note that
before the trigger occur, the hardware value still at 20,128,1,2
but SCPI value is at 48,128,4,8
$ 48,128,4,8
U2600A Series User’s Guide
43
3
Features and Functions
Trigger Function
*** TRIGGER OCCURED ***
& TRIG:MON:STAT?
// Check whether a trigger signal is detected
$ +1
// “1” mean trigger signal is detected
& TRIG:MON:STAT?
// Query the second will receive “0” because this command
auto-reset the register to “0”
// Trigger monitoring process will be auto turned off when a
trigger source is detected
$ +0
& TRIG:MON?
$ 0
& SOUR:DIG:DATA:BYTE? (@201:204)
$ 48,128,4,8
// After the trigger signal is detect, the SCPI and actual
hardware value are the same, which is 48,128,4,8
& SOUR:DIG:DATA:BYTE? (@299)
$ 16
*** From here onwards, users may choose to continue with trigger or turn off trigger function ***
& TRIG:SOUR NONE
44
// Turn off trigger function
U2600A Series User’s Guide
Agilent U2600A Series USB Isolated Digital Input/Output Modules
User’s Guide
4
Product Characteristics and
Specifications
Product Characteristics 46
Product Specifications 48
U2600A series DIO specifications 48
This chapter provides the information on general product characteristics
and product specifications.
Agilent Technologies
45
4
Product Characteristics and Specifications
Product Characteristics
Product Characteristics
REMOTE INTERFACE
• USB 2.0 High Speed
• USBTMC-USB488[1]
POWER REQUIREMENT
• +12 VDC (Typical)
• 2 A (maximum) input rated current
• Installation Category II
POWER CONSUMPTION
+12 VDC, 260 mA (maximum)
OPERATING ENVIRONMENT
Operating temperature from 0 °C to +55 °C
•
•
•
•
Relative humidity at 15% to 85% RH (non-condensing)
Altitude up to 2000 meters
Pollution Degree 2
For indoor use only
STORAGE COMPLIANCE
–20 °C to +70 °C
SAFETY COMPLIANCE
Certified with:
• IEC 61010-1:2001/EN 61010-1:2001
• Canada: CAN/CSA-C22.2 No.61010-1-04
• USA: ANSI/UL 61010-1: 2004
EMC COMPLIANCE
•
•
•
•
IEC 61326-1:2002/EN 61326-1:1997+A1:1998+A2:2001+A3:2003
CISPR 11: 1990/EN55011:1990 – Group 1 Class A
Canada: ICES-001: 2004
Australia/New Zealand: AS/NZS CISPR11:2004
SHOCK & VIBRATION
Tested to IEC/EN 60068-2
IO CONNECTOR
100-pin SCSI-II connector
DIMENSION (WxDxH)
Module dimension:
• 120.00 mm x 182.40 mm x 44.00 mm (with plastic casing)
• 05.00 mm x 174.54 mm x 25.00 mm (without plastic casing)
Terminal block dimension:
• 158.00 mm x 118.60 mm x 51.50 mm
46
U2600A Series User’s Guide
Product Characteristics and Specifications
Product Characteristics
4
WEIGHT
• 535 g (with plastic casing)
• 370 g (without plastic casing)
WARRANTY
• Please refer to http://www.agilent.com/go/warranty_terms
• Three years for the product
• Three months for the product’s standard accesories, unless otherwise specified
• Please take note that for the product, the warranty does not cover:
• Damage from contamination
• Normal wear and tear of mechanical components
• Manuals
[1] Compatible with Microsoft Windows operating systems only.
U2600A Series User’s Guide
47
4
Product Characteristics and Specifications
Product Specifications
Product Specifications
U2600A series DIO specifications
Table 4-1 Digital input product specifications for U2600A series DIO (U2651A, U2652A, and U2653A)
Digital Input
Model Number
U2651A
U2652A
U2653A
32-bit
64-bit
N/A
Opto-isolated
Opto-isolated
N/A
Maximum input voltage
range[1]
24 V, non-polarity
24 V, non-polarity
N/A
Digital logic levels[2]
High: 10 V to 24 V
High: 10 V to 24 V
N/A
Low: 0 V to 2.0 V
Low: 0 V to 2.0 V
24 kΩ at 0.75 W
24 kΩ at 0.75 W
N/A
1.5 mA per bit
1.5 mA per bit
N/A
Isolation voltage
1250 Vrms
1250 Vrms
N/A
Interrupt sources
DI 301 and 302
DI 301 and 302
N/A
Number of isolated bits
Input type
Input resistance
Input current (maximum)
[1] Maximum input voltage range is 24 V with reference to COM pin
[2] Voltage level with reference to COM
48
U2600A Series User’s Guide
Product Characteristics and Specifications
Product Specifications
4
Table 4-2 Digital output product specifications for U2600A series DIO (U2651A, U2652A, and U2653A)
Digital Output [1] [2]
Model Number
U2651A
U2652A
U2653A
Number of isolated bits
32-bit
N/A
64-bit
Open drain power MOSFET
driver
N/A
Open drain power MOSFET
drive
External supply voltage
range
5 V to 35 V
N/A
5 V to 35 V
Voltage drop at MOSFET
when on
VDrop < 1.0 V
N/A
VDrop < 1.0 V
500 mA (100 % duty cycle)
per bit,
N/A
500 mA (100 % duty cycle)
per bit,
Output type
Output sink
current per bit[3]
400 mA (100% duty cycle)
when full 32-bit loaded
Isolation voltage
1250 Vrms
400 mA (100% duty cycle)
when full 64-bit loaded
N/A
1250 Vrms
[1] Maximum input voltage range is 24 V with reference to COM pin.
[2] Voltage level with reference to COM.
[3] If you have an application or a need that will approach the full load of 26.5 A, then a wider width is advisable. You are also
advised to use some other terminal board for such a purpose because the standard terminal board for the U2600A is for
regular DIO usage only and most applications do not require the instrument to reach the full load.
Table 4-3 Power supply product specifications for U2600A series DIO (U2651A, U2652A, and U2653A)
On Board Isolated +5 V Power Supply
Model Number
U2651A
U2652A
U2653A
Output voltage (Typical)
+5 V
N/A
+5 V
Output current (Typical)
150 mA
N/A
150 mA
Maximum power
0.85 W
N/A
0.85 W
U2600A Series User’s Guide
49
4
Product Characteristics and Specifications
Product Specifications
Table 4-4 General product specifications for U2600A series DIO (U2651A, U2652A, and U2653A)
General Specification
Model Number
U2651A
U2652A
User interface
Dimensions (W x D x H)
U2653A
Hi-speed USB 2.0
120.00 mm x 182.40 mm x 44.00 mm (with plastic casing)
105.00 mm x 174.54 mm x 25.00 mm (not including plastic cover)
Connector type
100-pin SCSI-II connector
Operating temperature
0 °C to +55 °C
Storage temperature
Relative humidity
–20 °C to +70 °C
Operating: 15 to 85% at 40°C non-condensing
Non-operating: 90% RH at 65°C for 24 hours
Power consumption
50
+12 VDC at 235 mA typical
+12 VDC at 115 mA typical
+12 VDC at 260 mA typical
U2600A Series User’s Guide
Agilent U2600A Series USB Isolated Digital Input/Output Modules
User’s Guide
5
Dismantle Procedures
General Disassemble 52
Mechanical disassemble 52
Troubleshooting 56
Self-Test Procedures 57
This chapter describes the step- by- step disassemble procedures and list
the available replacement parts for U2600A Series USB isolated digital
input/output modules.
Agilent Technologies
51
5
Dismantle Procedures
General Disassemble
General Disassemble
This chapter provides the step- by- step guides on how to dismantle the
module and install the replacement assembly. To assemble back the
module, follow the instructions in reverse order.
NOTE
The parts shown in the following figures are representative
and may look different than what you have in your module.
The removable assemblies include:
• Plastic casing
• Metal casing
• Rear metal casing
• Front metal casing, which is attached to the carrier board and
measurement board
Mechanical disassemble
Follow the instructions in this section for the instrument disassemble
process.
Step 1: Pull the bumper out to remove the plastic casing.
Plastic casing
52
U2600A Series User’s Guide
Dismantle Procedures
General Disassemble
5
Step 2: Flip the plastic casing open.
Step 3: Slide the metal casing out of the plastic casing.
Metal casing
U2600A Series User’s Guide
53
5
Dismantle Procedures
General Disassemble
Step 4: Unscrew all the following indicated screws from metal casing.
Front metal piece
Step 5: Gently pull the front metal piece out, which is attached to the carrier and
measurement boards.
Step 6: Unscrew all the following indicated screws from the metal casing and
remove the rear metal piece.
Metal casing
Rear metal casing
54
U2600A Series User’s Guide
Dismantle Procedures
General Disassemble
5
Disassembled parts
Metal casing
Rear metal casing
Carrier board and
measurement board
Front metal casing
U2600A Series User’s Guide
55
5
Dismantle Procedures
Troubleshooting
Troubleshooting
This section provides suggestions for solving general problems that you
may encounter with the instrument. It guides you on what to check in the
following situations:
1 Power Indicator LED is not lit
Verify that the ac power cord is connected to the power inlet in the DAQ
device.
2 Power Indicator LED is lit but the AO/ AI Indicator LED is not lit
Verify that the USB cable is connected to the PC and the USB inlet in the
DAQ device.
3 Power Indicator LED is lit and AO/ AI Indicator LED is lit
Verify if the SCPI commands are correct with “SYSTem:ERRor?”
command.
Refer to U2600A Series USB Multifunction Programming Guide for SCPI
error messages.
NOTE
56
If there are no response from the instrument, contact the nearest Agilent
Service Center to obtain further assistance.
U2600A Series User’s Guide
Dismantle Procedures
Self-Test Procedures
5
Self-Test Procedures
WA R N I N G
Do not connect any cables and terminal block prior to performing
self-test procedures.
1 Go to Start > All Programs > Agilent IO Libraries Suite > Agilent Connection Expert
to launch the Agilent Connection Expert.
2 Go to Start > All Programs > Agilent T&M Toolkit > Agilent Interactive IO to
launch the Interactive I/O dialog box.
3 Send the SCPI command “*TST?” to the instrument to start perform
the self- test of the instrument.
4 The command will return either "+0" to indicate all tests passes or "+1"
to indicate one or more tests failed.
5 If the command returns "+1" , apply SCPI command “SYSTem:ERRor?”
to enquire the error message.
NOTE
U2600A Series User’s Guide
Refer to Agilent U2600A Series USB Multifunction Data Acquisition
Programming Guide for SCPI error messages.
57
5
58
Dismantle Procedures
Self-Test Procedures
U2600A Series User’s Guide
www.agilent.com
Contact us
To obtain service, warranty or technical
assistance, contact us at the following
phone or fax numbers:
United States:
(tel) 800 829 4444
(fax) 800 829 4433
Canada:
(tel) 877 894 4414
(fax) 800 746 4866
China:
(tel) 800 810 0189
(fax) 800 820 2816
Europe:
(tel) 31 20 547 2111
Japan:
(tel) (81) 426 56 7832 (fax) (81) 426 56 7840
Korea:
(tel) (080) 769 0800 (fax) (080) 769 0900
Latin America:
(tel) (305) 269 7500
Taiwan:
(tel) 0800 047 866
(fax) 0800 286 331
Other Asia Pacific Countries:
(tel) (65) 6375 8100 (fax) (65) 6755 0042
Or visit Agilent World Wide Web at:
www.agilent.com/find/assist
Product specifications and descriptions in
this document are subject to change
without notice. Always refer to Agilent
Web site for the latest revision.
© Agilent Technologies, Inc., 2007 - 2011
Fourth Edition, November 1, 2011
U2651-90011
Agilent Technologies