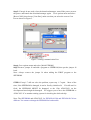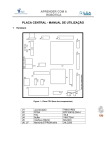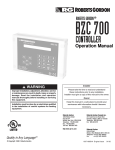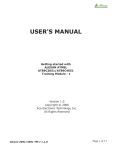
1
Troubleshooting the Program Download for CIC-310
When you launch the download program, and you cannot see the program store inside
the EEPROM, you can do the procedure from the attachment to fix the EEPROM.
STEP1. Double click the download manager program, which can be found in
supplied CD.
Figure 1.
Make sure that
(a) The system is powered by the supplied power adaptor.
(b) You have connect the RS-232 cable between PC and the CPLD/FPGA
development board.
(c) you launch the correct program
(1).
(2).
(3).
(4).
DNLD3.exe for EPF8282ALC84 under WIN 98
DNLD10.exe for EPF10K10LC84 under WIN 98
DNLD82.exe for EPF8282ALC84 under WIN 2000/NT/XP
DNLD102.exe for EPF10K10LC84 under WIN 2000/NT/XP
You will see some programs stored in SEEPROM, as shown in Figure2.
Configuration files in
SEEPROM.
The file marked by *
will auto-execute
when power up or
system reset.
Display the
files in
SEEPROM
Download the
selected
configuration
file to
SEEPROM
Configure
FPGA with
SEEPROM file
selected
Figure 2
Set
auto-exec
utable file
Select the
configuration
file on disk
Remove the
selected file
from
SEEPROM
Select the
folder on disk
Configure
FPGA with
disk file
selected
Download manager window
STEP 2. If you can’t see the files in the SEEPROM, as shown in Fig.3
Figure 3
STEP 3. Remove the EXE MODE jumper (J6) and press the RESET button S1
several times on CPLD/FPGA module, as shown in Figure 4. After press S1 several
times, place the jumper back to J6.
Reset button:
Reset the FPGA to
EXE MODE jumper (J6)
Figure 4
Step 4: Launch the download manager and click the [Dir] button, the stored program
may show in SEEPROM section if it is not damaged, as shown in Figure 2.
Step 5: If step 4 do not work, close the download manager, turn off the power, turn on
the power, and launch the download manager again. Go to options menu and select
[Reset COM], then choose [Com Port], make sure that you select the correct Com
Port as shown in Figure 5.
Figure 5: Setting communication Port
Step 6 Go to options menu and select [Initial EEROM].
Step7 Remove jumper J6 and add a program to SEEPROM, then put the jumper J6
back.
Note: Always remove the jumper J6 when adding the FIRST program to the
SEEPROM.
STEP 8 If step1~7 still not solve the problem, repeat step 1~7 again. Most of the
time, if the SEEPROM is damaged, it can be fixed by initialized it. If it still can’t be
fixed, the SEEPROM MIGHT be damaged, or the Chip AT89C2051 on the
development board might be damaged. We suggest you to move the SEEPROM or
AT89C2051 IC to another training system for checking the defected chip.
Note: The SEEPROM and AT89C2051 for EPF8282ALC84 and EPF10k10LC84 are
different. You cannot exchange the EEPROM for both models.