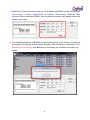
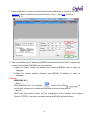
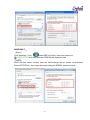
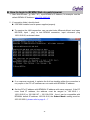
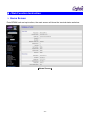
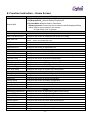
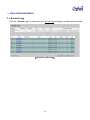
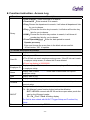
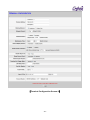
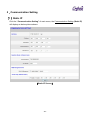
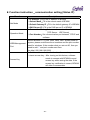
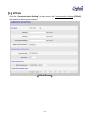
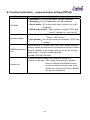
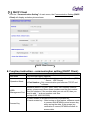
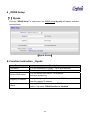
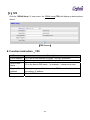
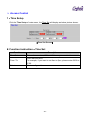
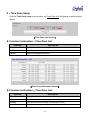
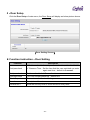
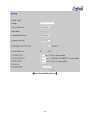
1
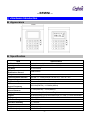
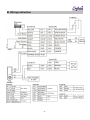
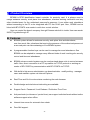
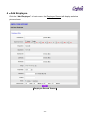
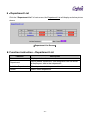
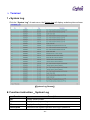
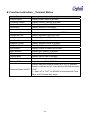
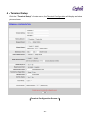
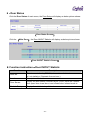
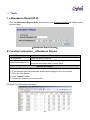
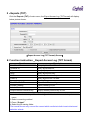
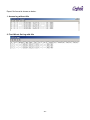
BFMini Series User Manual Document Version 1.1 Web Version 4.0.00 2011-12-19 Firmware Version 4.00.00,Dec 30 2011 【Revision History】 1、Add external reader status(IN/OUT) in Terminal Status. -------------------------------------------------------------------page『 23~24 』《2012-01-03》 2、Add AGENT MODE and define function of external reader in Terminal Configuration -------------------------------------------------------------------page『 26~28 』《2012-01-03》 【Index】 Ⅰ、Hardware Introduction.........................................................................................................1 Ⅱ、Product Overview................................................................................................................3 Ⅲ、WEB Login ..........................................................................................................................4 Ⅳ、Web Function Instruction ..................................................................................................10 Home Screen ....................................................................................................................10 User Administration ...........................................................................................................12 1、Access Log ..............................................................................................................12 2、Daily First IN/Last OUT ............................................................................................14 3、Employee List ..........................................................................................................15 (1)Modify Employee Record..................................................................................16 4、Add Employee..........................................................................................................18 5、Designation List .......................................................................................................20 6、Department List........................................................................................................21 Terminal ............................................................................................................................22 1、System Log ..............................................................................................................22 2、Terminal Status ........................................................................................................23 3、Administrator Setup .................................................................................................25 4、Terminal Setup .........................................................................................................26 5、Communication Setting ............................................................................................29 (1)Static IP.............................................................................................................29 (2)PPPoE ..............................................................................................................31 (3)DHCP Client......................................................................................................33 6、DDNS Setup ............................................................................................................34 (1)Dynds................................................................................................................34 (2)TZ0 ...................................................................................................................35 (3)Peanut Hull .......................................................................................................36 7、Clock Setup..............................................................................................................37 8、Fkey Auto Trigger.....................................................................................................38 9、Func. Key Setup ......................................................................................................39 Access Control ..................................................................................................................40 1、Time Setup...............................................................................................................40 2、Time Zone Setup......................................................................................................41 3、Group List ................................................................................................................42 4、Holiday Setup...........................................................................................................43 5、Door Setup...............................................................................................................44 6、Door Status ..............................................................................................................47 7、Door Remote Control ...............................................................................................48 8、Event Handle ...........................................................................................................49 Tools .................................................................................................................................50 1、Attendance Report(XLS) ..........................................................................................50 2、Exports (TXT)...........................................................................................................51 3、Exports (XLS)...........................................................................................................53 4、Backup .....................................................................................................................55 5、Restore/Import .........................................................................................................56 6、Device Admin ...........................................................................................................57 7、Reboot .....................................................................................................................58 8、Upgrade Firmware ...................................................................................................59 9、Reset........................................................................................................................60 Trouble shooting of some questions.........................................................................................61 Copyright @ 2011. All Rights Reserved. All trademarks and trade names are the properties of their respective owners. -BFMINI- Ⅰ、Hardware Introduction Appearance Specification Item Verification Option Capacity Log Data System Parameters Modification Record Relay Communication Interface Wiegand Output Connection Speed RFID Sensor Frequency RFID Sensor Distance Language Keypad Display Operation Temperature Operation Humidity Power Weight Dimension(mm) Specification card、pin、card+pin 5,000 users (option extendable to 20,000) 32,768 entries 2,000 entries 1 RS-485 x 1→Relay Box(BF-20/ BF-50) / TCP/ IP→PC 26/ 34 bit Ethernet 10/ 100M, Auto Crossing. 125 KHz(EM/TM) / 13.56MHz(Mifare) 7~12cm(EM/TM) / 3~5cm(Mifare) Chinese、Simplified Chinese/ English 10 numeric keys (0~9)+6 function keys (F1~F4,#,*)+1 door bell button 128 x 64 Dots LCD 0˚C~ 65˚C 5 ~ 95%RH DC 9~24V, 1A 400 g. 130 x 100 x 52 mm -1- Wiring instruction -2- Ⅱ、Product Overview BFMINI is RFID identification based controller for proximity card. It is always used to mange entrance security, work place time attendance, overtime working verification and any other situation/event for the authorized personnel’s presence. It can either work standalone without connecting to the PC or be integrated with PC thru RJ-45 port. Also , BFMINI can be linked with BF-670/870 as a reader in multi door control solution. User can control the branch company through Chinese web built in inside. User can search IN/OUT log data through IE. Features BFMINI system allows for entrance security, work place time and attendance, over-time work. Also, situations that require the presence of the authorized persons at a secured point can take advantage of our BFMINI system 4 programmable function keys can be used to manage time and attendance. One BFMINI can be adapted to manage many different kinds of work involving site security control and time and attendance. BFMINI entrance control system may be used as stand-alone units to control entrance traffic. Also, direct connection to a PC is possible via TCP/IP protocol or working as reader of BF-670/870 by communication with BF-670/870 via TCP/IP. With build-in http server administrator can download data、modify setting、manager users and maintain system via Internet Explorer. Real-Time and On-Line door status monitoring thru web browser. Double badge and dual-doors interlocking are available. Support Card + Password / Lock Release / Exit button Time Zone Anti pass back (no tolerance / period timer) can support unlimited levels without online software support when offline. Internet time server for automatic time check Door Bell support. -3- Ⅲ、WEB Login BFMINI contains a HTTP server, thus BFMINI can link and connect through Web browser, and then conduct setting. Preparation Before conducting BFMINI setting, please assure the following: PC has connected to BFMINI, and PC and BFMINI are situated in the same WAN with power supplied. If the default IP address (192.168.0.66 ) is occupied by else device, then it is a must to shut down that device first till the setting is over, and then allocate new IP address to BFMINI. How to search BFMINI 1、After installation of BFMINI and network cable is completed, use BFMINI’s IP Search to search all BFMINI in a certain LAN, or download IP Search tool from CHIYU homepage. Desktop icon as below: 2、Click IP Search icon, will display a window, as shown: -4- 3、While the IP Search window shows up, it will display all BFMINI in LAN, and show its Device name、Location、Model Name、IP Address、Subnet Mark、Gateway、Mac Address. Select particular BFMINI, then its related information will appear below the window, as shown: 4、The showed information of BFMINI can be revised directly in the window, the part can be modified: IP Address, Subnet Mask, Gateway. After modification completed ( MAC Address can not modify ),click Alter then it will display the modified information, as shown: -5- 5、After modification, if want to confirm whether the modification is correct or not, click Refresh button to refresh and check information ( Fig-1 ), click Exit button to leave.(Fig-2) 6、After modification, the IP address of BFMINI has matched with its WAN, if want to get access into the Web of BFMINI, has two methods: (1)Open IP Search, select and double click particular BFMINI, then to enter its webpage. (2)While the internet explorer opened, input BFMINI IP address to enter its webpage Remark: WINDOWS XP: 《Step 1》 Click WINDOWS XP my computer , Open Control Pan the left side, please turn to traditional overview and select network link 《Step 2》 on Click LAN, then select content, the link configuration will be shown, click Internet Protocol (TCP/IP), then input the same setting as BFMINI, as below figure: -6- WINDOWS 7: 《Step 1》 Click Windows 7 icon, select , open and search for , click Alter Interface Card on the upper-left side. 《Step 2》 Click LAN link, select content, then the LAN settings will be shown, click Internet Protocol(TCP/IPv4) , then input the same setting as BFMINI, as below figure: -7- How to login to BFMINI Web via web browser 1、Start Web browser ( ig: WIN 7 IE ), input BFMINI’s IP Address, for example: use the default BFMINI IP Address: http://192.168.0.66 2、If connection failed, should check: If BFMINI installed and its power supplied properly To examine the LAN connection, can use start toolsExecuteInput cmd open MS-DOS, Input “ ping” to test BFMINI connection, input command: ping 192.168.0.66, as shown below: If no response received, it explains the link has troubles either the connection is not proper or the PC’s IP address can not match with BFMINI’s IP address Set the PC’s IP address with BFMINI’s IP address with same segment, if the PC uses fixed IP address, the address must be ranged in: 192.168.0.1 ~ 192.168.0.65 or 192.168.0.67 ~ 192.168.0.254 , thus it can be compatible with BFMINI’s default IP address: 192.168.0.66, the Subnet Mask’s setting must be: 255.255.255.0, please refer to page 6 ~ 7 -8- 3、If the connection with BFMINI is successful, then it will display a message window for User name and Password, the default for user name and Password is: admin/admin, as shown below: 4、While the user name and password entered, a Web setting interface of BFMINI will be showed, enter it will then display a “ Terminal Status “ page. -9- Ⅳ、Web Function Instruction Home Screen Enter BFMINI web set up interface, the main screen will show the terminal status as below: 【Home Screen】 - 10 - Function instruction – Home Screen Function Search Staff Access Log Daily First IN/Last OUT View User List Add Employee Designation List Department List System Log Terminal Status Administrator Setup Terminal Setup Communication Setting DDNS Setup Clock Setup Fkey Auto Trigger Func. Key Setup Time Se Time Zone Setup Group List Holiday Setup Door Setup Door Status Door Remote Control Attendance Report(XLS) Exports(TXT) Exports(XLS) Backup Restore/Import Device Admin Reboot Upgrade Firmware Reset Description By Card ID:Search Staff by card ID By Employee ID:Search Staff by Employee ID By Last Name:Search Staff by Last Name Operate process: Choose the way to search (card ID/employee ID/last name) Enter query number in the column Push button “GO” to operate User Administration Change to the screen of log browse. Change to the screen of employee first in/last out of today. Change to the screen of registered user browse, can modify、 delete、active and deactivate user. Change to the screen of add user. Change to the screen of designation list. Change to the screen of department list. Terminal Change to the screen of system log browse. Change to the screen of terminal information browse (Home Screen). Change to the screen of administrator and user password configuration. Change to the screen of terminal configuration. Change to the screen of communication configuration. Change to the screen of DDNS configuration. Change to the screen of Date/Time configuration. Change to the screen of IN/OUT trigger configuration. Change to the screen of function key configuration. Access Control Change to the screen of time configuration. Change to the screen of time zone configuration. Change to the screen of group configuration. Change to the screen of holiday configuration. Change to the screen of door configuration. Change to the screen of door status browse. Change to the screen of event handle. Tools Change to the screen of attendance report.(Excel format) Change to the screen of log export.(Text format) Change to the screen of log export.(Excel format) Change to the screen of user’s data backup. Change to the screen of user’s data restore/import. Change to the screen of device administration. Change to the screen of reboot. Change to the screen of firmware upgrade. Change to the screen of delete all data. - 11 - User Administration 1、Access Log Click the “Access Log” of main menu, the Access Log will display as below picture shows: 【Access Log Screen】 - 12 - Function instruction –Access Log Function Description User /Card ID:Enter user/card ID to search Terminal ID:Enter terminal ID to search Dep:Choose the department to search, it will show all department lists for you to choose. Fkey:Choose the function key to search, it will show all function key Query lists for you to choose. NUM:Choose the function key number to search, it will show all number key lists for you to choose. From/To(mm/dd/yyyy):Enter the date period to search. Operate process: ▼ Enter and choose the query item in the blank column and list. Push button “GO” to operate. Column Description of Record No. Display serial number Card ID Display card ID The ID link can reach employee setup screen. If the ID link can’t reach employee setup screen, it means the ID was deleted. Event log display is 000000000 Employee ID Display employee ID, “----, ----” mean user’s employee ID does not input in employee setup. Name Display user’s name, “----,----” mean user’s name does not input in employee setup. Date Display date of log. Time Display time of log. Terminal Show terminal’s name, “----” mean terminal’s name does not input in terminal setup. Display the function key which user enters. EX:IN Haven’t press function button before identification IN/OUT OUT BFMINI connect with BF-20 and door open when punch the card on the Wiegand reader F1…F4、F1+1…F4+9 Setting display The field is also related with IN/OUT Trigger Setup and Function Key Setup. Door Means the door control by BFMINI - 13 - 2、Daily First IN/Last OUT Click the “Daily First IN/Last Out” of main menu, the Daily First IN/Last Out will display as below picture shows: 【Daily First IN/Last OUT Screen】 Function instruction–Daily First IN/Last OUT Function Description No. Display serial number Card ID Display card ID The ID link can reach employee setup screen. If the ID link can’t reach employee setup screen, it means the ID was deleted. Employee ID Display employee ID, “----,----” mean user’s employee ID does not input in employee setup. Name Display user’s name, “----,----” mean user’s name does not input in employee setup. Date Display Date of log. First IN Display first enter time log. Last OUT Display last out time log. - 14 - 3、Employee List Click the “Employee List” of main menu, the Employee List will display as below picture shows: 【Employee List Screen】 Function instruction-Employee List Function No. Description Display serial number If you want to active、deactivate or delete user please click check box on the left of serial number. Multiple choice Card ID Display card ID Card ID link can reach employee setup screen Employee ID Display employee ID “----” mean user’s employee ID does not input in employee setup. Last/First Name Display the name of user. “----” mean user’s name does not input in employee setup. Active Display state of active. Green:Active, Gray:Deactive. P Only Green:Password verify、Gray:Other verify. C Only Green:Card verify、Gray:Other verify. Registered Display registered data of user. P:Card + Password, C:Card only - 15 - (1)Modify Employee Record Click employee card number can link to employee record screen as below: 【Modify Employee Record Screen】 - 16 - Function instruction-Modify Employee Record Function Description Card / User ID Display card/user ID , can’t be modified Can not be set more than 4294967295 Expire Date Check Select to enable or disable employee’s expire date If select to enable employee’s expire date, it will show year, month, date to choose. Designation Select the designation Department Select e the department Employee ID Fill in the employee ID, default is blank Needs to fill if you want to display employee’s name after verification. Fill in the last name of user, default is blank Last Name Needs to fill if you want to display employee’s last name after verification. First Name Fill in the first name of user, default is blank Needs to fill if you want to display employee’s first name after verification. Group Select the group Verify Mode Select the way to verify use, it will show the list for you to select. Password: Card + Password Card: Card only Password Fill in user’s verify password Confirm Confirm users verify password. Status Select to activate or deactivate user’s right. Work Time Fill in the start and end work of employee for attendance report. If the employee’s work time from 8AM to 5PM, please fill in 08:00 to 17:00. - 17 - 4、Add Employee Click the “Add Employee” of main menu, the Employee Record will display as below picture shows: 【Employee Record Screen】 - 18 - Function instruction-Add Employee Function Description Card / User ID Display card/user ID , can’t be modified Can not be set more than 4294967295 Expire Date Check Select to enable or disable employee’s expire date If select to enable employee’s expire date, it will show year, month, date to choose. Designation Select the designation Department Select e the department Employee ID Fill in the employee ID, default is blank Needs to fill if you want to display employee’s name after verification. Fill in the last name of user, default is blank Last Name Needs to fill if you want to display employee’s last name after verification. First Name Fill in the first name of user, default is blank Needs to fill if you want to display employee’s first name after verification. Group Select the group Verify Mode Select the way to verify use, it will show the list for you to select. Password: Card + Password Card: Card only Password Fill in user’s verify password Confirm Confirm users verify password. Status Select to activate or deactivate user’s right. Work Time Fill in the start and end work of employee for attendance report. If the employee’s work time from 8AM to 5PM, please fill in 08:00 to 17:00. - 19 - 5、Designation List Click the “Designation List” of main menu, the Designation List will display as below picture shows: 【Designation List Screen】 Function instruction-Designation List Function Description No. Display serial number Designation Display added designation. Use designation link can check all employees’ data in that designation Add New Designation Fill in designation which you want to add Delete Delete added designation - 20 - 6、Department List Click the “Department List” of main menu, the Department List will display as below picture shows: 【Department List Screen】 Function instruction-Department List Function Description No. Display serial number Department Display added department. Use designation link can check all employees’ data in that department Add New Department Fill in department which you want to add Delete Delete added department - 21 - Terminal 1、System Log Click the “System Log” of main menu, the System Log will display as below picture shows: 【System Log Screen】 Function instruction-System Log Function Description No. Display serial number Date Display date of system log Time Display time of system log Description Describe Enter system operator WEB logon password. - 22 - 2、Terminal Status Click the “Terminal Status” of main menu, the Terminal Status will display as below picture shows: 【Terminal Status Screen】 - 23 - Function instruction-Terminal Status Function Description Product Name Display product name of BFMINI Firmware Version Display firmware Version of BFMINI System Time Display system Time of BFMINI Terminal ID Display terminal ID of BFMINI Terminal Name Display terminal name of BFMINI Standalone/Reader only Display standalone or reader only of BFMINI Registered User Display registered User of BFMINI Log Count Display log count of BFMINI Anti-Pass-Back Display enable or disable anti-pass-back Weigand Format Display Weigand format of BFMINI Weigand Output Display Weigand output of BFMINI Anti-Duress Display enable or disable anti-duress MAC Address Display MAC address of BFMINI IP Address Display IP address of BFMINI Subnet Mask Display subnet mask of BFMINI Default Gateway Display default gateway of BFMINI Primary DNS Display primary DNS of BFMINI External Reader IN/OUT Display data from external reader IN or OUT. If External Reader is defined as “IN”, then data from BFMINI would be “OUT” ※ Data “IN” or “OUT” for BFMINI is concerned with Time Zone and Functional Key setup. - 24 - 3、Administrator Setup Click the “Administrator Setup” of main menu, the WEB Logon Setting will display as below picture shows: 【WEB Logon Setting Screen】 Function instruction-Administrator Setup Function Description Administrator WEB Logon User Name Fill in administrator web logon user Name Administrator WEB Logon Password Fill in administrator web logon password Operator WEB Logon Fill in operator web logon user name User Name Operator WEB Logon Fill in operator web logon password Password Terminal Logon Password Fill in terminal logon password Assign Administrator Fill in administrator ID If you assign administrator ID, you can not use terminal logon password to enter the management menu of Terminal. - 25 - 4、Terminal Setup Click the “Terminal Setup” of main menu, the Terminal Configuration will display as below picture shows: 【Terminal Configuration Screen-1】 - 26 - 【Terminal Configuration Screen-2】 - 27 - Function instruction-Terminal Setup Function Description Terminal Setting Terminal ID:Set terminal ID of BF-BFMINI,default setting is 1,please notice terminal ID cannot repeat if you set BFMINI as a reader Title On LCD:Set LCD title of BFMINI Description:Fill in terminal description Working Behavior Standalone:Set BFMINI to work standalone (Verify by itself) Reader Only:Set BFMINI to work as a reader of BF-670/870 Wiegand Format Set the format of wiegand input (26 bits or 34 bits) Wiegand output Enable and disable wiegand output and choose output format (26 bits or 34 bits) Maintenance Time Set system maintenance time everyday, possibly set the time that no one using system Card ID Display Format Choose card ID display format, there are Raw Data & Facility Code + ID can be select Double Check IN control Enable or disable double check in control , default setting is disable Max. is 86400 seconds Disable Key-in ID Enable or disable to enter card ID by using the keypad Illegal Access Event Choose if you want to record the log of fail verification. Allowed late IN Limit Allowed the last in limit time, this setting will effect the attendance report Function Key Trigger Mode Select manual or auto of function key trigger mode Manual: Keep function status that last user pushed until other function be pushed. For example, the first user press”F1” and if the next user also need to press “F1”, then he does not need to press “F1” because the function key status already keep on the last users status Auto: system can judge itself for the setting of “IN/OUT TRIGGER SETUP” and “Function Key Setup” LCD Sleep Time Set the time to turn off of LCD backlight Card No. Display Select Hex or Dec of card number display Agent Mode Select agent mode I or II. 1. Agent mode I: In Agent mode I, IP address of BFMINI have to be set up in “Agent” software” to be able to communicate with “Agent”. Please refer to figure “Terminal Configuration Screen-1”. 2. Agent mode II: In Agent mode II, IP address of “Agent” and port number (default is 2000) have to be set up in 630 terminal setup page. Please refer to figure “Terminal Configuration Screen-2”. External Reader This function will define data from external reader whether is IN or OUT. The drop down menu will list all the option for user reference. If External Reader is defined as “IN”, then data from BFMINI would be “OUT” ※ Data “IN” or “OUT” for BFMINI is concerned with Time Zone and Functional Key setup. - 28 - 5、Communication Setting (1)Static IP Click the “Communication Setting” of main menu, the Communication Setting (Static IP) will display as below picture shows: 【Static IP Screen】 - 29 - Function instruction-communication setting (Status IP) Function Net Mode Operation Mode Description IP Address:Fill in the IP address of BFMINI Subnet Mask:Fill in the subnet mask of BFMINI Default Gateway IP:Fill in the default gateway IP of BFMINI DNS Server IP:Fill in the DNS server IP of BFMINI Connection Mode:Set connection mode with software. (TCP Server、UDP Server) Port Number:Set communication port between TCP/IP and software WEB Management Port Revise BFMINI HTTP port. 2000, 5850, 5851 already used for system, please avoid these three numbers and the port number used for windows. If the number what you set not 80, than you need to add “:” and port number next time. (ex.http://192.168.0.66:5000) Select enable or disable the function of access key Insert access key:After turning on this feature, software Access Key needs to connect with BFMINI to send access key while saving the data. If the access key verification is correct, BFMINI will allow to access data. - 30 - (2)PPPoE Click the “Communication Setting” of main menu, the Communication Setting (PPPoE) will display as below picture shows: 【PPPoE Screen】 - 31 - Function instruction-communication setting (PPPoE) Function Net Mode Operation Mode Description Username:Fill in the user name, up to 47 characters Password:Fill in the password, up to 35 characters Server Name:Fill in the service name (optional), up to 47 characters PPPoE with fixed IP:Select disable or enable PPPoE with fixed IP, if enable, fill in the fixed IP Connection Mode:Set connection mode with software.(TCP Server、UDP Server) Port Number:Set communication port between TCP/IP and software Revise BFMINI HTTP port. 2000, 5850, 5851 already used for WEB Management Port system, please avoid these three numbers and the port number used for windows. If the number what you set not 80, than you need to add “:” and port number next time. (ex.http://192.168.0.66:5000) Select enable or disable the function of access key Insert access key:After turning on this feature, software Access Key needs to connect with BFMINI to send access key while saving the data. If the access key verification is correct, BFMINI will allow to access data. - 32 - (3)DHCP Client Click the “Communication Setting” of main menu, the Communication Setting (DHCP Client) will display as below picture shows: 【DHCP Client Screen】 Function instruction-communication setting (DHCP Client) Function Net Mode Operation Mode WEB Management Port Access Key Description Fill in the host name (optional) Connection Mode:Set connection mode with software.(TCP Server、UDP Server) Port Number:Set communication port between TCP/IP and software Revise BFMINI HTTP port. 2000, 5850, 5851 already used for system, please avoid these three numbers and the port number used for windows. If the number what you set not 80, than you need to add “:” and port number next time. (ex.http://192.168.0.66:5000) Select enable or disable the function of access key Insert access key:After turning on this feature, software needs to connect with BFMINI to send access key while saving the data. If the access key verification is correct, BFMINI will allow to access data. - 33 - 6、DDNS Setup (1)Dynds Click the “DDNS Setup” of main menu, the DDNS setup (dynds) will display as below picture shows: 【Dynds Screen】 Function instruction-Dynds Function Username Description Fill in the username for DDNS,up to 31 characters Password Fill in the password for DDNS,up to 31 characters Device DNS Name Registry IP Address Status Fill in the device DNS name,for example: hostname.dyndns.org Display the registry IP address,when DDNS is enabled, It will show the registry IP address Display DNS Serve status,when DDNS server does not enable ,it will show “DDNS function is disabled” - 34 - (2)TZ0 Click the “DDNS Setup” of main menu, the DDNS setup (TZ0) will display as below picture shows: 【TZ0 Screen】 Function instruction-TZ0 Function E-mail Address Password key Device DNS Name Description Fill in the E-mail address for DDNS , up to 47 characters Fill in the password key for DDNS,up to 31 characters Fill in the device DNS name,for example:hostname.tzo.com Registry IP Address Display the registry IP address,when DDNS is enabled, It will show Status Display DNS Serve status the registry IP address - 35 - (3)Peanut Hull Click the “DDNS Setup” of main menu, the DDNS setup (Peanut Hull) will display as below picture shows: 【Peanut Hull Screen】 Function instruction-Peanut Hull Function Service Provider Link Description Username Click the link to the service provider website Fill in the username for DDNS,up to 31 characters Password Fill in the password for DDNS,up to 31 characters Registry DNS Name Display the registry DNS name Current Status Display the current status, when DDNS is enabled, It will show the registry IP address Registry Type Display the registry type - 36 - 7、Clock Setup Click the “Clock Setup” of main menu, the System Clock Setup will display as below picture shows: 【System Clock Setup Screen】 Function instruction-Clock Setup Function Description Time Server Enable or Disable adjusting time from Time Server. If enable the function then network timer server is required. BFMINI can adjusts time automatically itself through the network time server Time Zone Select time zone New Date The present date of connected PC New Time The present time of connected PC - 37 - 8、Fkey Auto Trigger Click the “Fkey auto trigger” of main menu, the IN/OUT trigger setup will display as below picture shows: 【IN/OUT trigger setup Screen】 Function instruction-IN/OUT trigger setup Function Description Function Key Select function key. (F1~F4) Number Select function key number. (1~9) IN:enter start time OUT:enter end time IN/H/M---OUT/H/M Delete Delete confabulated time - 38 - 9、Func. Key Setup Click the “Func.Key setup” of main menu, the Function key setup will display as below picture shows: 【Function key setup Screen】 Function instruction-Function key setup Function Description Function key Choose function key. (F1-F4) Number Choose function key number. (1-9) Define Enter the description of definition function key. Delete Delete configured function key. - 39 - Access Control 1、Time Setup Click the Time Setup of main menu, the Time Set will display as below picture shows: 【Time Set Screen】 Function instruction-Time Set Function Description Time Set Choose time number, 000 and 001 are system set inside. From -To Enter start/end time. For example, if you want to set 8am to 5pm, please enter 08:00 to 17:00. Delete Delete configured time. - 40 - 2、Time Zone Setup Click the Time Zone Setup of main menu, the Time Zone List will display as below picture shows: 【Time Zone List Screen】 Function instruction-Time Zone List Function Description Time Zone ID Choose time zone number, 000 and 001 are system set inside. Set Enter time zone information screen. Delete Delete configured time zone. 【Time Zone Information Screen】 Function instruction-Time Zone List Function Description Time Zone Name Enter time zone name. Day Choose set time everyday, at most set 3 times. Holiday Choose set time on holiday, at most set 3 times. Save Save time zone information. - 41 - 3、Group List Click the Group List of main menu, the Time Zone List will display as below picture shows: 【Group List Screen】 Function instruction-Time Zone List Function Description Group ID Choose group number, 000 and 001 are system set inside. Set Enter group setup screen. Delete Delete configured group. 【Group Information Screen】 Function instruction-Group Information Function Description Group Name Fill in the group name Time Zone ID Set time zone of that group. Allow Door Choose the door for that group. - 42 - 4、Holiday Setup Click the Holiday Setup of main menu, the Holiday Setup will display as below picture shows: 【Holiday Setup】 Function instruction-Holiday Setup Function Description Month/Date Choose holiday. Holiday Name Fill in the holiday name. Add Add holiday. Delete Delete configured holiday. - 43 - 5、Door Setup Click the Door Setup of main menu, the Door Setup will display as below picture shows: 【Door Setting Screen】 Function instruction-Door Setting Function Anti pass back Description Enable or disable the anti-pass back function, default is disable Tolerance Time:Set the time that the user restricted can enter again next time,default is 0 second. Anti pass back Anti pass back Enable or disable Anti-Duress function Fill in Anti-Duress password,default is 9 Door Properties Choose it can link to door Setting screen Location Description of the door APB IN/OUT Show the security level of in/out device on every door. - 44 - 【Main Door Setting Screen】 - 45 - Function instruction-Main Door Setting Screen Function Description Location Fill in description of main door. Card+Pin Time Zone Choose time zone to verify by card + password. Relay Trigger Choose to use BFMINI built in relay trigger or connect BF-20/50 outside to control. Lock Release Time Zone Choose unlock time zone. Exit Button Time Zone Choose exit button time zone. Double badge control time zone Choose the time zone that needs 2 users to verification. Applied On:Choose Both、IN or OUT Anti Pass Back Level IN:Set this exit level. OUT:Set next exit level. Lock Release Time Set lock release time. The default time is 10 seconds. Door Open Delay Time Set door open delay time, need collocate with BF-20/50. The default time is 10 seconds. Access Log Door Sensor Mode Choose to record the access log or not. Choose Door Sensor Mode,there are N/A and Normal Open/Close can be selected,the default is N/A - 46 - 6、Door Status Click the Door Status of main menu, the Door Setup will display as below picture shows: 【Door Status Screen】 Click the 【Main Door】,the Door IN/OUT Statistic will display as below picture shows: 【Door IN/OUT Statistic Screen】 Function instruction-Door IN/OUT Statistic Function Description Door No. The door controlled by BFMINI, choose it can link to door In / out statistics. (Separate from an hour.) Location Description of the door. Door Sensor Display the door status controlled by BF-20/50, there are 4 status: door open/ door close/ door is not closed/ door is been break in. Statistic Today Display the statistic today of the door. - 47 - 7、Door Remote Control Click the Door Remote Control of main menu, the Security Bypass will display as below picture shows: 【Security Bypass Screen】 Function instruction-Security Bypass Function Description Security ON Turn on main door control, only in/out after verify success. Security OFF Turn off main door control. The door open. - 48 - 8、Event Handle Click the Event Handle of main menu, the Event Trigger on BF20’s Relay NO. will display below picture shows: 【Event Trigger on BF20’s Relay NO.】 Function instruction-Event Trigger on BF20’s Relay NO. Function Description Door open too long Set the relay number and time if the door does not close in specific time. Unauthorized Badge Set the relay number and time if the verification failed. Anti Pass back Reject Set the relay number and time if anti pass back rejected. Intruded door Set the relay number and time if the door opened by force. Tamper Switch Breakdown Set the relay number and time if the tamper switch touched. Anti Duress Set the relay number and time if the user verify with duress. - 49 - Tools 1、Attendance Report(XLS) Click the Attendance Report (XLS) of main menu, the Attendance Report will display below picture shows: 【Attendance Report Screen】 Function instruction-Attendance Report Function All Employee Specified Employee ID Description Count the data in one day Fill in the Specified Employee ID and select the date,can count the attendance date in many days Operate procedure 1. Choose all employees or specified employee 2. If you choose specified employee, please enter employee ID in the column 3. Fill in the time period 4. Push “export” button 5. Choose the location you want to save. File export format is shown as below: - 50 - 2、Exports (TXT) Click the Exports (TXT) of main menu, the Export Access Log (TXT format) will display below picture shows: 【Export Access Log (TXT format) Screen】 Function instruction-Export Access Log (TXT format) Function User/Card ID Terminal ID Department FKey NUM. From/To Access Log First IN/Last OUT Include Heading Include Event Output Defined Function Key Description Query by User/Card ID. Query by terminal ID. Query by department. Query by function key. Choose the function key number. Query by the from / to date. Export all log Export first in/last out log. Export heading or not. Export event or not. Output defined function key or not. Operate procedure 1.Insert and select the input filter converting in the blank columns and drop-down menu 2.Select converting method 3.Press “Output” 4.Select the file saving folder The record file can only convert the record which comforts to both insert criteria and selection criteria. - 51 - Export file format is shown as below: 1. Access log without title 2. First IN/Last Out log with title - 52 - 3、Exports (XLS) Click the Exports (XLS) of main menu, the Export Access Log (XLS format) will display below picture shows: 【Export Access Log (XLS format) Screen】 Function instruction-Export Access Log (XLS format) Function Description User/Card ID Query by User/Card ID. Terminal ID Query by terminal ID. Department Query by department. FKey Query by function key. NUM. Choose the function key number. From/To Query by the from / to date. Access Log Export all log First IN/Last OUT Export first in/last out log. Include Heading Export heading or not. Include Event Export event or not. Output Defined Function Key Output defined function key or not. Operate procedure 1.Insert and select the input filter converting in the blank columns and drop-down menu 2.Select converting method 3.Press “Output” 4.Select the file saving folder The record file can only convert the record which comforts to both insert criteria and selection criteria. - 53 - Export file format is shown as below: 1. Access log with title 2. First IN/Last Out log with title - 54 - 4、Backup Click the Backup of main menu, the Backup will display below picture shows: 【Backup Screen】 Function instruction-Backup Screen Function Description Database(database.cfg) Backup database of all users and the file format is cfg. User List(userlist.txt) Backup card ID, employee ID, name, group number and the file format is txt Operate procedure 1. Choose the backup format 2. Push “backup” 3. Choose the location you want to save. - 55 - 5、Restore/Import Click the Restore/Import of main menu, the Restore/Import will display below picture shows: 【Restore/Import Screen】 Function instruction-Restore/Import Function Description Database(database.cfg) Backup database of all users and the file format is cfg. User List(userlist.txt) Backup card ID, employee ID, name, group number and the file format is txt Operate procedure 1. Choose the restore format 2. Push “Browse…” to choose the file. 3. Push “Restore” to restore/import the data. - 56 - 6、Device Admin Click the Device Admin of main menu, the Device Administration Setting will display below picture shows: 【Device Administration Setting Screen】 Function instruction-Device Administration Setting Screen Function Factory Default Description Reset system to factory default. - 57 - 7、Reboot Click the Reboot of main menu, the Device Administration Setting will display below picture shows: 【Device Administration Setting Screen】 Function instruction-Device Administration Setting Screen Function Reboot System Description Reboot BFMINI, just like PC warm up to turn on. - 58 - 8、Upgrade Firmware Click the Upgrade Firmware of main menu, the Firmware Upgrade will display below picture shows: 【Firmware Upgrade】 Function instruction-Firmware Upgrade Operate procedure 1. Push “Browse…” button to search and choose the firmware 2. Push “upgrade” button to upgrade the firmware Attention 1. Different firmware version maybe has the compatible problem, please delete all items. 2. If you want to save the data, please contact with us to confirm the data format or how to save the data before upgrade to avoid the data losing. 3. Please upgrade system code then upgrade web code - 59 - 9、Reset Click the Reset of main menu, the Reset will display below picture shows: 【Reset】 Function instruction-Reset Function Description Delete all user data Delete all user data of BFMINI Delete all title Delete all title setting of BFMINI Delete all department Delete all department setting of BFMINI Delete all function key Delete all function key setting of BFMINI Delete all access log Delete all access log of BFMINI Delete all system log Delete all system log of BFMINI Delete all time set Delete all time set of BFMINI Delete all time zone Delete all time zone of BFMINI Delete all group Delete all group of BFMINI Delete all holiday Delete all holiday of BFMINI - 60 - Trouble shooting of some questions Question 01:Can’t connect with BFMINI Check Step: 1. To Execute IP Search and if reach BFMINI, please jump to step 4 and if not, please continue. 2. Check if the installation is correct and power on. 3. Check Lan and cable connection is working. 4. Check the PC setting and BFMINI is at the same IP address. If the BFMINI is at IP 192.168.0.66, the IP address of PC will be in between192.168.0.1 to 192.168.0.65 or 192.168.0.67 to 192.168.0.254. Beside, the subnet mask need to be 255.255.255.0. In Windows, you can check console-internet-content to check the TCP/IP protocol. 5. Check if there is any IP address setting conflicts with BFMINI. Question 02:WEB connection is not stable Check Step: 1. Check if there is any IP address setting conflicts with BFMINI. 2. Log in WEB management screen 3. Click the left side options from top to the bottom, and record which selections cause the disconnection of web page. 4. Execute “delete setting” to delete these related settings. Question 03:System is not stable and the buzzer keeps beeping after power on. Check Step: 1. Check if the power supply provides enough voltage (12V) and electric current (1A) 2. Check the power terminal has been fastened. 3. Check if share the power with other equipments. 4. Of sharing power with other equipments, please remote the equipment and provide power to BFMINI only to test. Question 04:Push button no reaction Check Step: 1. Check if the push button is working. 2. Check the wire connection is correct. 3. Check the door setting and if the time zone setting is on (any time) - 61 - Question 05:No LCD Display Check Step: 1. Check if the transformer can provide enough voltage (12V) and electric current (1A) 2. Check the LCD wire connection. 3. After turn off the power, pull out the LCD wire and re-plug. 4. Power on to test again. Question 06:Forget IP address Check Step: 1.Solve from PC side::Please execute IP search tool attached to BFMINI and set the correct IP address 2. Solve from terminal side: Enter user menu system setupIP address Question 07:Web screen can not save the value Check Step: 1. Contact with us. 2. Inform the firmware version 3.Get the correct firmware(WEB code 及 System code) 4. Upgrade the firmware and test again. - 62 -