1
Table of Contents
1166/1266 Bluetooth Wireless Scanners
User’s Manual
Document Number: 1X66-2
Release Date: Dec. 2005
© 2005, SYNTECH INFORMATION Co., Ltd..
All rights reserved. CipherLab is a registered trademark of SYNTECH
INFORMATION Co., Ltd.
Revision History .......................................................................................iv
Restore Default Settings ...........................................................................1
Exit Setup without Changes .....................................................................1
Set Connection...........................................................................................1
RF Auto Shutdown Duration ...................................................................1
Transmit Buffer Setting............................................................................1
Memory Mode Parameters ......................................................................2
List Setting.................................................................................................3
Buzzer Settings ..........................................................................................3
Reading Redundancy Setting...................................................................4
Scan Mode Setting.....................................................................................4
Auto-Sense Setting ....................................................................................4
Scanner Time-out Duration .....................................................................5
Negative Barcode Setting .........................................................................5
Delay between Reread ..............................................................................5
Keyboard Wedge Parameters ..................................................................6
RS-232 Parameters ...................................................................................9
Bluetooth Serial Port Parameters..........................................................11
Bluetooth HID Parameters.....................................................................12
Prefix / Postfix Settings...........................................................................15
Character Substitution ...........................................................................15
Code ID Selection....................................................................................15
Code ID Setting .......................................................................................16
Length Code Setting (2 digits) ...............................................................17
Select Readable Codes ............................................................................20
Code39 Parameters.................................................................................25
Italy Pharmacode Parameters ...............................................................25
French Pharmacode Parameters ...........................................................26
Industrial 25 Parameters........................................................................26
Interleave 25 Parameters........................................................................27
Matrix 25 Parameters.............................................................................29
Codabar Parameters...............................................................................30
Plessey Parameters..................................................................................31
Telepen Parameters ................................................................................31
MSI Parameters ......................................................................................32
EAN128 Parameters ...............................................................................33
EAN8 Parameters ...................................................................................34
UPCA Parameters...................................................................................34
UPCE Parameters ...................................................................................35
EAN13 Parameters .................................................................................36
RSS Code ID Selection ...........................................................................37
RSS14 Parameters ..................................................................................37
RSS Limited Parameters........................................................................38
RSS Expanded Parameters ....................................................................38
Activate Editing Formats .......................................................................39
Editing Format Parameters ...................................................................40
Decimal Digits .........................................................................................52
Hexadecimal Digits .................................................................................53
Key Type..................................................................................................54
Key Status................................................................................................54
KBD Wedge Character Table................................................................55
RS-232 Character Table.........................................................................55
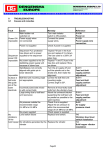
Revision History
Version
V 1.00
V 2.00
Release
Date
Oct. 31, 2005
Dec.30, 2005
V2.10
Jan.18, 2006
Notes
First release.
Supports Bluetooth HID.
Firmware version: V4.10
Updated:
Bluetooth HID: The default
setting of Capital Lock Setting
is
changed
from
Auto
Detection to Capital Lock
OFF.
Bluetooth HID doesn’t support
the following functions on
PDA for Win CE.
Capital Lock Setting:
Auto Detection
Digit
Transmission:
Numeric Key
Alt Composing
Firmware version: V4.20
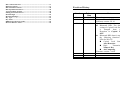
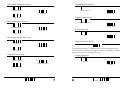
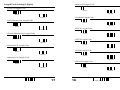
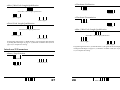
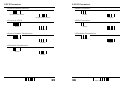
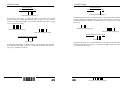
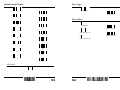
Restore Default Settings
Memory Mode Parameters
• Memory Mode
Exit Setup without Changes
Enable
< Disable >
•
Set Connection
*
Clear Data
Clear
Programming Instructions: (1) Read the label. (2) Read the Serial Number barcode
on the bottom of the desired 3666 Base Station within 5 seconds to complete this
setting.
Confirm
• Send Data
RF Auto Shutdown Duration
• Memory Data Delay
*
<0>
Programming Instructions: (1) Read the label. (2) Program the desired auto
shutdown duration (in minutes) by reading Decimal Digits on page 53. (3) Read
the “Validate” label (also on page 53) to complete this setting.
2 sec
250 ms
Transmit Buffer Setting
3 sec
500 ms
Enable
5 sec
1 sec
< Disable >
8 sec
Update
1
2
Enter Setup
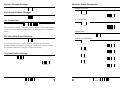
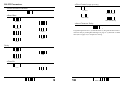
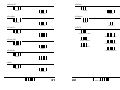
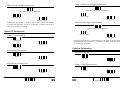
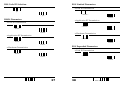
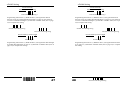
List Setting
Reading Redundancy Setting
< No Redundancy >
Page1
2 Times
Page 6
3 Times
Page 2
4 Times
Page 7
Scan Mode Setting
Page 3
Page 8
< Auto Off Mode >
Page 4
Continuous Mode
Page 9
Auto Power Off Mode
Page 5
Alternate Mode
Page 10
Momentary Mode
Buzzer Settings
Repeat Mode
Laser Mode
< Buzzer Enable>
Test Mode
Auto-Sense Setting
Buzzer Disable
• Buzzer Frequency
Enable
8 kHz
<Disable>
< 4 kHz >
2 kHz
1 kHz
Update
3
4
Enter Setup
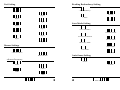
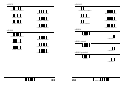
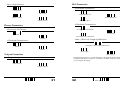
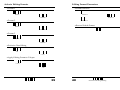
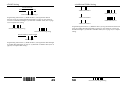
Keyboard Wedge Parameters
Scanner Time-out Duration
• Activate and Select Keyboard Type
*
Programming Instructions: (1) Read the label. (2) Program the desired time-out
duration by reading Decimal Digits on page 53. (3) Read the “Validate” label (also
on page 53) to complete this setting.
*
Programming Instructions: (1) Read the label. (2) Program the desired keyboard
number (shown in the following table) by reading Decimal Digits on page 53. (3)
Read the “Validate” label (also on page 53) to complete this setting.
Negative Barcode Setting
• Keyboard Table
No.
1
2
3
4
5
6
7
8
9
10
11
12
13
14
15
16
17
18
19
20
21
22
23
24
25
26
27
28
Enable
< Disable >
Delay between Reread
100 ms
1 sec
200ms
2 sec
< 400 ms >
3 sec
800 ms
5 sec
Update
5
6
Keyboard Type
PCAT (US)
PCAT (French)
PCAT (German)
PCAT (Italy)
PCAT (Swedish)
PCAT (Norwegian)
PCAT (UK)
PCAT (Belgium)
PCAT (Spanish)
PCAT (Portuguese)
PS55 A01-1
PS55 A01-2
PS55 A01-3
PS55 001-1
PS55 001-81
PS55 001-2
PS55 001-82
PS55 001-3
PS55 001-8A
PS55 002-1, 003-1
PS55 002-81, 003-81
PS55 002-2, 003-2
PS55 002-82, 003-82
PS55 002-3, 003-3
PS55 002-8A, 003-8A
IBM 3477 (Japanese)
PS2-30
IBM 34XX/319X, Memorex Telex 122 Keys
Enter Setup
• Keyboard Alphabets Layout
• Alphabet Transmission
< Default Layout >
< Case Sensitive >
Ignore Case
AZERTY
• Digits Transmission
QWERTZ
• Keyboard Digits Layout
< Alphanumeric Key >
Numeric Key
< Default Layout >
• Alt Composing
Lower Row
Upper Row
Yes
• Keyboard Capital Lock Type
< No >
• Inter-Character Delay
< Default >
*
Shift Lock
Programming Instructions: (1) Read the label. (2) Program the desired intercharacter delay by reading Decimal Digits on page 53. (3) Read the “Validate”
label (also on page 53) to complete this setting.
Capital Lock
• Capital Lock Setting
• Laptop Support
Capital Lock ON
<Disable>
< Capital Lock OFF >
Enable
Auto Detection
Update
7
8
Enter Setup
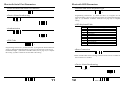
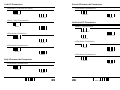
• Flow Control (single port only)
RS-232 Parameters
• Activate RS232 Interface
< None >
Scanner Ready
• Baud Rate
Data Ready
INV. Data Ready
115200
• Inter-Character Delay
38400
*
119200
Programming Instructions: (1) Read the label. (2) Program the desired intercharacter delay by reading Decimal Digits on page 53. (3) Read the “Validate”
label (also on page 53) to complete this setting.
< 9600 >
4800
2400
1200
Parity
Even
Odd
< No Parity >
• Data Bit
<8>
7
Update
9
10
Enter Setup
Bluetooth Serial Port Parameters
Bluetooth HID Parameters
• Activate Bluetooth Serial Port Interface
• Activate and Select Keyboard Type
*
• Device Name Broadcasting
Programming Instructions: (1) Read the label. (2) Program the desired
keyboard number (shown in the following table) by reading Decimal Digits on
page 53. (3) Read the “Validate” label (also on page 53) to complete this
setting.
< Yes >
• HID Keyboard Table
No
• Authentication
No.
64
65
66
67
68
69
70
71
72
73
Yes
< No >
• PIN Code
Keyboard Type
PCAT (US)
PCAT (French)
PCAT (German)
PCAT (Italy)
PCAT (Swedish)
PCAT (Norwegian)
PCAT (UK)
PCAT (Belgium)
PCAT (Spanish)
PCAT (Portuguese)
*
Programming Instructions: (1) Read the label. (2) Program the desired character
string by reading Hexadecimal Digits on page 54. One character consists of 2
hexadecimal digits. (3) Read the “Validate” label (also on page 54) to complete
this setting. (4) Max 6 characters for this PIN Code setting.
• Reset Connection
Please read this label when switching connection from one PC to another and
the reconnection is needed.
• Device Name Broadcasting
< Yes >
No
Update
11
12
Enter Setup
• Authentication
• Keyboard Capital Lock Type
Yes
< Default >
< No >
Shift Lock
• PIN Code
Capital Lock
• Capital Lock Setting
*
Programming Instructions: (1) Read the label. (2) Program the desired character
string by reading Hexadecimal Digits on page 54. One character consists of 2
hexadecimal digits. (3) Read the “Validate” label (also on page 54) to complete
this setting. (4) Max 6 characters for this PIN Code setting.
Capital Lock ON
< Capital Lock OFF >
• Keyboard Alphabets Layout
Auto Detection
• Alphabet Transmission
< Default Layout >
AZERTY
< Case Sensitive >
QWERTZ
Ignore Case
• Keyboard Digits Layout
• Digits Transmission
< Default Layout >
< Alphanumeric Key >
Lower Row
Numeric Key
• Alt Composing
Upper Row
Yes
<No>
Update
13
14
Enter Setup
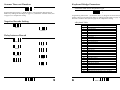
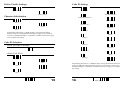
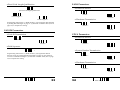
Prefix / Postfix Settings
Code ID Setting
Prefix Code *
Code 39 *
Postfix Code *
Italy Pharmacode *
Character Substitution
French Pharmacode *
Industrial 25 *
Set 1 *
Interleave 25 *
Set 2 *
Matrix 25 *
Set 3 *
Codabar *
Programming Instructions: (1) Read the label. (2) Program the desired
character string by reading Hexadecimal Digits on page 54. One character
consists of 2 hexadecimal digits. (3) Read the “Validate” label (also on page
54) to complete this setting.
UPCA *
UPCE *
EAN8 *
Code ID Selection
EAN13 *
• Clear All Code ID Settings
Code 93 *
Code 128 *
• Select Code ID Set
MSI *
Plessey *
Set 1
Telepen *
Set 2
Programming Instructions: (1) Read the label. (2) Program the desired character
string by reading Hexadecimal Digits on page 54. One character consists of 2
hexadecimal digits. (3) Read the “Validate” label (also on page 54) to complete
this setting.
Set 3
Set 4
Set 5
Update
15
16
Enter Setup
• Matrix 25 Length Code
Length Code Setting (2 digits)
• Code 39 Length Code
Enable
< Disable >
Enable
• Codabar Length Code
< Disable >
• Italy Pharmacode Length Code
Enable
< Disable >
Enable
• UPCA Length Code
< Disable >
• French Pharmacode Length Code
Enable
< Disable >
• UPCE Length Code
Enable
< Disable >
Enable
• Industrial 25 Length Code
< Disable >
• EAN8 Length Code
Enable
< Disable >
Enable
• Interleave 25 Length Code
< Disable >
• EAN13 Length Code
Enable
< Disable >
Enable
< Disable >
Update
17
18
Enter Setup
• Code 93 Length Code
Select Readable Codes
• Code 39
Enable
< Disable >
< Enable >
• Code 128 Length Code
Disable
• Italy Pharmacode
Enable
< Disable >
Enable
• EAN128/RSS Length Code
< Disable >
• French Pharmacode
Enable
< Disable >
Enable
• MSI Length Code
< Disable >
• Industrial 25
Enable
< Disable >
< Enable >
• Plessey Length Code
Disable
• Interleave 25
Enable
< Disable >
< Enable >
• Telepen Length Code
Disable
Enable
< Disable >
Update
19
20
Enter Setup
• Matrix 25
• Plessey
Enable
Enable
< Disable >
< Disable >
• Codabar
• Telepen
< Enable >
Enable
Disable
< Disable >
• Code 93
• UPCA
< Enable >
< Enable No Addon >
Disable
Disable No Addon
• Code 128
Enable Addon2
< Disable Addon2 >
< Enable >
Enable Addon5
Disable
• EAN128
< Disable Addon5 >
Enable
< Disable >
• MSI
Enable
< Disable >
Update
21
22
Enter Setup
• UPCE
• EAN13
< Enable No Addon >
< Enable No Addon >
Disable No Addon
Disable No Addon
Enable Addon2
Enable Addon2
< Disable Addon2 >
< Disable Addon2 >
Enable Addon5
Enable Addon5
< Disable Addon5 >
< Disable Addon5 >
• RSS14
• EAN8
Enable
< Enable No Addon >
< Disable >
Disable No Addon
• RSS Limited
Enable Addon2
< Disable Addon2 >
Enable
Enable Addon5
< Disable >
• RSS Expanded
< Disable Addon5 >
Enable
< Disable >
Update
23
24
Enter Setup
Code39 Parameters
French Pharmacode Parameters
• Standard / Full ASCII Code39
• Checksum Transmission
< Standard >
< Enable >
Full ASCII
Disable
• Start / Stop Transmission
Industrial 25 Parameters
• Start / Stop Selection
Enable
< Disable >
< Industrial 25 >
• Checksum Verification
Interleave 25
Matrix 25
Enable
• Checksum Verification
< Disable >
• Checksum Transmission
Enable
< Disable >
< Enable >
• Checksum Transmission
Disable
Italy Pharmacode Parameters
< Enable >
• Checksum Transmission
Disable
< Enable >
Disable
Update
25
26
Enter Setup
• Checksum Verification
• Max / Min Code Length Qualification
Enable
Select Max / Min Length Qualification
< Disable >
• Checksum Transmission
Max Length *
Min Length *
< Enable >
• Fixed Code Length Qualification
Disable
• Max / Min Code Length Qualification
Select Fixed Length Qualification
Fixed Length 1 *
Select Max / Min Length Qualification
Fixed Length 2 *
Max Length *
Programming Instructions: (1) Read the label. (2) Program the desired length
by reading Decimal Digits on page 53. (3) Read the “Validate” label (also on
page 53) to complete this setting.
Min Length *
Programming Instructions: (1) Read the label. (2) Program the desired length by
reading Decimal Digits on page 53. (3) Read the “Validate” label (also on page
53) to complete this setting.
Interleave 25 Parameters
• Start / Stop Selection
Industrial 25
< Interleave 25 >
Matrix 25
Update
27
28
Enter Setup
• Max / Min Code Length Qualification
• Fixed Code Length Qualification
Select Max / Min Length Qualification
Select Fixed Length Qualification
Max Length *
Fixed Length 1 *
Min Length *
Fixed Length 2 *
Programming Instructions: (1) Read the label. (2) Program the desired length
by reading Decimal Digits on page 53. (3) Read the “Validate” label (also on
page 53) to complete this setting.
• Fixed Code Length Qualification
Select Fixed Length Qualification
Matrix 25 Parameters
• Start / Stop Selection
Fixed Length 1 *
Fixed Length 2 *
Programming Instructions: (1) Read the label. (2) Program the desired length by
reading Decimal Digits on page 53. (3) Read the “Validate” label (also on page
53) to complete this setting.
Industrial 25
Interleave 25
< Matrix 25 >
Codabar Parameters
• Checksum Verification
• CLSI Conversion
Enable
Enable
< Disable >
< Disable >
• Checksum Transmission
• Start / Stop Transmission
< Enable >
Enable
Disable
< Disable >
Update
29
30
Enter Setup
MSI Parameters
Start / Stop Selection
• Checksum Verification
< abcd / abcd >
abcd / tn*e
< Single Modulo 10 >
ABCD / ABCD
Double Modulo 10
ABCD / TN*E
Modulo 11 & 10
• Checksum Transmission
Plessey Parameters
• Convert to UK Plessey
< Last digit not Transmitted >
Transmitted
Enable
Last 2 Digits not Transmitted
< Disable >
• Max / Min Code Length Qualification
• Checksum Transmission
Select Max / Min Length Qualification
< Enable >
Disable
Max Length *
Telepen Parameters
Min Length *
• Telepen Output
Programming Instructions: (1) Read the label. (2) Program the desired length by
reading Decimal Digits on page 53. (3) Read the “Validate” label (also on page
53) to complete this setting.
< AIM Telepen >
Original Telepen
Update
31
32
Enter Setup
• Fixed Code Length Qualification
EAN8 Parameters
• Convert to EAN13
Select Fixed Length Qualification
Enable
Fixed Length 1 *
< Disable >
• Checksum Transmission
Fixed Length 2 *
Programming Instructions: (1) Read the label. (2) Program the desired length
by reading Decimal Digits on page 53. (3) Read the “Validate” label (also on
page 53) to complete this setting.
< Enable >
Disable
EAN128 Parameters
UPCA Parameters
• Code ID Transmission
• Convert to EAN13
Enable
<disable>
< Enable >
• Field Separator
Disable
• System Number Transmission
*
Programming Instructions: (1) Read the label. (2) Program the desired
character string by reading Hexadecimal Digits on page 54. One character
consists of 2 hexadecimal digits. (3) Read the “Validate” label (also on page
54) to complete this setting.
< Enable >
Disable
• Checksum Transmission
< Enable >
Disable
Update
33
34
Enter Setup
UPCE Parameters
EAN13 Parameters
• System Number Selection
• ISBN Conversion
System Number 0 and 1
Enable
< System Number 0 only >
< Disable >
• Convert to UPCA
• ISSN Conversion
Enable
Enable
< Disable >
< Disable >
• System Number Transmission
• Checksum Transmission
Enable
< Enable >
< Disable >
Disable
• Checksum Transmission
< Enable >
Disable
Update
35
36
Enter Setup
RSS Code ID Selection
RSS Limited Parameters
• Code ID Transmission
]C1
< Enable >
< ]e0 >
Disable
RSS14 Parameters
• Application ID Transmission
• Code ID Transmission
< Enable >
< Enable >
Disable
Disable
• Checksum Transmission
• Application ID Transmission
< Enable >
< Enable >
Disable
Disable
RSS Expanded Parameters
• Checksum Transmission
• Code ID Transmission
< Enable >
< Enable >
Disable
Disable
Update
37
38
Enter Setup
Activate Editing Formats
Editing Format Parameters
• Format 1
• Format Selection
Enable
Format 1
< Disable >
Format 2
• Format 2
Format 3
• Restore Default Format
Enable
< Disable >
• Format 3
Enable
< Disable >
• Exclusive Data Editing
Yes
< No >
• Apply Editing Format to Telepen
< Yes >
No
Update
39
40
End of Format Programming
• Applicable Data Length
• Total Number of Fields
Maximum Length *
1
Minimum Length *
4
Programming Instructions: (1) Read the label. (2) Program the desired length
by reading Decimal Digits on page 53. (3) Read the “Validate” label (also on
page 53) to complete this setting.
2
5
• Matching String of Applicable Data
3
6
*
Programming Instructions: (1) Read the label. (2) Program the desired
character string by reading Hexadecimal Digits on page 54. One character
consists of 2 hexadecimal digits. (3) Read the “Validate” label (also on page
54) to complete this setting.
• Location of Matching String
*
Programming Instructions: (1) Read the label. (2) Program the desired
location by reading Decimal Digits on page 53. (3) Read the “Validate” label
(also on page 53) to complete this setting.
Update
41
42
End of Format Programming
• Applicable Code Type
•
All
EAN13 No Addon
Clear
EAN13 Addon2
Code 39
Italy Pharmacode
EAN13 Addon5
French Pharmacode
UPCA No Addon
Industrial 25
Interleave 25
UPCA Addon2
Matrix 25
UPCA Addon5
Codebar
MSI
Code 93
Code 128
Plessey
EAN128/RSS
UPCE No Addon
UPCE Addon2
UPCE Addon5
EAN8 No Addon
EAN8 Addon2
EAN8 Addon5
Update
43
44
End of Format Programming
• Field1 Setting
• Field2 Setting
Divide Field by
Field Terminating String
Divide Field by
Field Terminating String
Field Terminating String *
Field Terminating String *
Programming Instructions: (1) Read the label. (2) Program the desired
character string by reading Hexadecimal Digits on page 54. One character
consists of 2 hexadecimal digits. (3) Read the “Validate” label (also on page
54) to complete this setting.
Programming Instructions: (1) Read the label. (2) Program the desired character
string by reading Hexadecimal Digits on page54. One character consists of 2
hexadecimal digits. (3) Read the “Validate” label (also on page 54) to complete
this setting.
Include Terminating String
Include Terminating String
Discard Terminating String
Discard Terminating String
Divide Field by Field Length
Divide Field by Field Length
Field Length *
Field Length *
Programming Instructions: (1) Read the label. (2) Program the desired length
by reading Decimal Digits on page 53. (3) Read the “Validate” label (also on
page 53) to complete this setting.
Update
45
Programming Instructions: (1) Read the label. (2) Program the desired length by
reading Decimal Digits on page 53. (3) Read the “Validate” label (also on page
53) to complete this setting.
46
End of Format Programming
• Field3 Setting
• Field4 Setting
Divide Field by
Field Terminating String
Divide Field by
Field Terminating String
Field Terminating String *
Field Terminating String *
Programming Instructions: (1) Read the label. (2) Program the desired
character string by reading Hexadecimal Digits on page 54. One character
consists of 2 hexadecimal digits. (3) Read the “Validate” label (also on page
54) to complete this setting.
Programming Instructions: (1) Read the label. (2) Program the desired
character string by reading Hexadecimal Digits on page 54. One character
consists of 2 hexadecimal digits. (3) Read the “Validate” label (also on page
54) to complete this setting.
Include Terminating String
Include Terminating String
Discard Terminating String
Discard Terminating String
Divide Field by Field Length
Divide Field by Field Length
Field Length *
Field Length *
Programming Instructions: (1) Read the label. (2) Program the desired length
by reading Decimal Digits on page 53. (3) Read the “Validate” label (also on
page 53) to complete this setting.
Update
47
Programming Instructions: (1) Read the label. (2) Program the desired length
by on page 53. (3) Read the “Validate” label (also on page 53) to complete
this setting.
48
End of Format Programming
• Field5 Setting
• Additional Fields Setting
Divide Field by
Field Terminating String
Additional Field 1 *
Additional Field 4 *
Field Terminating String *
Additional Field 2 *
Programming Instructions: (1) Read the label. (2) Program the desired
character string by reading Hexadecimal Digits on page 54. One character
consists of 2 hexadecimal digits. (3) Read the “Validate” label (also on page
54) to complete this setting.
Additional Field 5 *
Additional Field 3 *
Programming Instructions: (1) Read the label. (2) Program the desired character
string by reading Hexadecimal Digits on page 54. One character consists of 2
hexadecimal digits. (3) Read the “Validate” label (also on page 54) to complete this
setting.
Include Terminating String
Discard Terminating String
Divide Field by Field Length
Field Length *
Programming Instructions: (1) Read the label. (2) Program the desired length
by reading Decimal Digits on page 53. (3) Read the “Validate” label (also on
page53) to complete this setting.
Update
49
50
End of Format Programming
• Field Transmission Sequence
Decimal Digits
Start
0
5
Field 1
1
Additional Field 1
6
Field 2
2
Additional Field 2
7
Field 3
3
Additional Field 3
8
Field 4
4
Additional Field 4
9
Field 5
• Validate
Additional Field 5
Field 6
End
Programming Instructions: (1) Read the “Start” label. (2) Program the desired
transmission sequence by reading the Field / Additional Field labels. (3) Read
the “End” label to complete this setting.
Update
51
52
Enter Setup
Hexadecimal Digits
Key Type
0
< Normal >
Scan Code
8
1
Key Status
9
2
Add Shift
A
Add Control (L)
3
Add Alternate (L)
B
Add Control (R)
4
Add Alternate (R)
C
5
D
6
E
7
F
• Validate
Update
53
54
Enter Setup
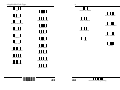
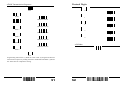
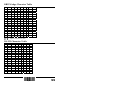
KBD Wedge Character Table
0
1
2
3
4
5
6
7
8
0
F2 SP 0 @ P
`
p
1
Ins
F3
!
1 A Q a
q
2
Del F4
"
2 B R b
r
3 Home F5
#
3 C S c
s
4 End F6
$
4 D T d
t
5
Up
F7 % 5 E U e
u
6 Down F8 & 6
F V f
v
7 Left F9
'
7 G W g
w
8
BS F10 (
8 H X h
x
9
HT F11 )
9
I
Y i
y
A
LF F12 *
:
J
Z
j
z
B Right ESC +
;
K
[
k
{
C PgUp Exec ,
< L
\
l
|
D Enter
= M ] m
}
E PgDn
.
> N ^
n
~
F
F1
/
? O _
o Dly Enter*
Enter* : Enter Key of the Numeric Key Pad
… : Digits of Numeric Key Pad
RS-232 Character Table
0
0
1
2
3
4
5
6
7
8
9
A
B
C
D
E
F
SOH
STX
ETX
EOT
ENQ
ACK
BEL
BS
HT
LF
VT
FF
CR
SO
SI
1
2
DLE SP
DC1 !
DC2 "
DC3 #
DC4 $
NAK %
SYN &
ETB '
CAN (
EM
)
SUB *
ESC +
FS
,
GS
RS
.
US
/
3
0
1
2
3
4
5
6
7
8
9
:
;
<
=
>
?
4
@
A
B
C
D
E
F
G
H
I
J
K
L
M
N
O
5
P
Q
R
S
T
U
V
W
X
Y
Z
[
\
]
^
_
6
`
a
b
c
d
e
f
g
h
i
j
k
l
m
n
o
7
p
q
r
s
t
u
v
w
x
y
z
{
|
}
~
DEL
Update
55