1
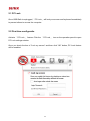
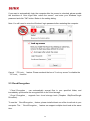
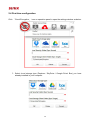
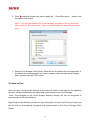
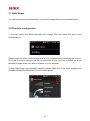
Manual Download Please visit SUNIX website http://www.sunix.com by searching keyword “iSafe” or “KEY-256UN1” for detail. 1 User’s Manual Copyright Copyright© 2014 SUNIX Co., Ltd. All Rights Reserved. No part of this publication may be reproduced, transcribed, stored in a retrieval system, translated into any language, or transmitted in any from or by any means, photocopying, manual, or otherwise, without prior written permission from SUNIX Co., Ltd. Disclaimer SUNIX Co., Ltd. Shall not be liable for any incidental or consequential damages resulting from the performance or use of this equipment. SUNIX Co., Ltd. makes no representations or warranties regarding the contents of this manual. Information in this manual has been carefully checked for reliability; however, no guarantee is given as to the correctness of this content. In the interest of continued product improvement, this company reserves the right to revise the manual or include change in the specifications of the product described within it at any time without notice and without obligation to notify any person of such revision or changes. The information contained in this manual is provided for general use by the customers. Trademarks SUNIX is a registered trademark of SUNIX Co., Ltd. Other registered marks used herein are for identification purposes only and may be trademarks of their respective owners. Safety Information 1. Keep this User’s Manual for future reference. 2. Always read the safety information carefully. 3. Keep this equipment away from direct sunlight, or in humid or damp places. 4. Do not place this equipment in an unstable position, or on vibrating surface before setting it up. 5. Do not use or place this equipment near magnetic fields, televisions, or radios to avoid electronic interface that affects device performance. 6. Do not attempt to disassemble or repair the equipment or the warranty would be useless. 7. To avoid damaging your system and equipment, please make sure that your computer is off before you install the product. 2 Regulatory Compliance FCC Class B Declaration This equipment has been tested and found to comply with the limits for a Class B digital device, pursuant to part 15 of the FCC rules. These limits are designed to provide reasonable protection against harmful interference when the equipment is operated in a commercial environment. This equipment generates, uses and can radiate radio frequency energy and, if not installed and used in accordance with the instruction manual, may cause harmful interference to radio communications. Operation of this equipment in a residential area is likely to cause harmful interference in which case the user will be required to correct the interference at his own expense. Modifications not authorized by the manufacturer may void users authority to operate this device. This equipment meets the requirements of EC Electromagnetic Compatibility Directive (2004/108/EC) For EU (European Union) member users: According to the WEEE (Waste electrical and electronic equipment) Directive, do not dispose of this product as household waste or commercial waste. Waste electrical and electronic equipment should be appropriately collected and recycled as required by practices established for your country. For information on recycling of this product, please contact your local authorities, your household waste disposal service or the shop where you purchased the product. 3 Table of Contents Chapter 1 Introduction 1.1 Features.......................................................................................................................................... 6 1.2 System Requirements .................................................................................................................... 6 1.3 Support Language .......................................................................................................................... 6 1.4 Getting Started ............................................................................................................................... 7 1.5 iSafe Operation Panel .................................................................................................................... 8 1.6 Exit / Uninstall program ................................................................................................................. 9 Chapter 2 Windows OS- iSafe 2.1 PC Lock ......................................................................................................................................... 11 2.2 First time configuratio .................................................................................................................. 11 2.3 How to Use ................................................................................................................................... 12 2.3 Cloud Encryption .......................................................................................................................... 13 2.4 First time configuration................................................................................................................ 14 2.5 How to Use ................................................................................................................................... 15 2.6 Security Disk ................................................................................................................................. 18 2.7 First time configuration................................................................................................................ 18 2.8 How to Use ................................................................................................................................... 20 2.9 Add Security Folder ...................................................................................................................... 21 2.10 First time configuration.............................................................................................................. 21 2.11 How to Use ................................................................................................................................. 22 2.12 File Encryption/ Decryption ....................................................................................................... 24 2.13 File Encryption for share ............................................................................................................ 25 Chapter 3 Android Device 3.1 iSafe Viewer ................................................................................................................................. 28 3.2 First time configuration................................................................................................................ 28 3.3 How to Use ................................................................................................................................... 29 3.4 Contact Information ..................................................................................................................... 30 4 1. Introduction Thanks for your purchasing and using USB iSafe ! The iSafe application has been pre-loaded in USB iSafe device. Follow the instructions to install the USB iSafe application. iSafe will provide the best protection for your cloud storage and your computer. You can browse and edit the encrypted files in your cloud storage via Android phones. The following topics covered in this chapter: 1.1 Features 1.2 System Requirements 1.3 Support Language 1.4 Getting Started 1.5 iSafe Operation Panel 1.6 Exit / Uninstall program 5 1.1 Features ■ PC Lock provides screen and keyboard lock functions. Once USB iSafe device is unplugged from the computer, the computer’s screen and keyboard shall be immediately locked to prevent others to use it. ■ Cloud Encryption can automatically encrypt files dropped in the selected folder, the encrypted files shall be automatically synchronized to the cloud storage. ■ You can browse and edit your encrypted files in cloud storage via your Android phone. After editing a file, you can choose to encrypt the file and upload the file to the cloud in your Android phone. ■ Security Disk creates a virtual disk drive, which is encrypted by AES 256Bit codes. Once log off the virtual disk drive or unplug the USB iSafe device, the virtual drive will hide immediately. ■ 「File Encryption」 and 「File Decryption」 can protect files and folders on your and computer for your personal privacy. ■ Add Security Folder function automatically encrypt the file(s) dropped in the specified folder. 1.2 System Requirements ■ PC or Notebook: Windows 7/ 8/8.1 32 or 64Bit ■ Android device: OS 4.0 and above 1.3 Support Language The application will display the appropriate language interface according to your operating system’s language settings. These products support a total of 3 languages—Simplified Chinese, Traditional Chinese and English. 6 1.4 Getting Started Follow the steps below to install the USB iSafe: Plug the USB iSafe device to your computer’s USB, please note that only USB iSafe device with license key can be used. Please refer to the following steps: 1. When the device is plugged into the computer, iSafe software will be automatically launched. 2. When the AutoPlay window pops up, click the option "Run SPStarter.exe". 3. If the “User Account Control” window appears on the screen, click Yes to continue. 7 4. After the application is installed successfully, please restart the computer. 1.5 iSafe Operation Panel Click iSafe Pack icon ( ) in the taskbar to launch iSafe operation panel. USB iSafe operation panel: 1 2 menu description Main Menu : Click the menu to open the function. Click the menu to configure the settings for your first time to use. Minimize :To minimize the operation panel to the system tray. 3 Close :To close the operation panel. 4 Company Information: Click it to open the company information, and open the company's Web site. 5 To turn on / off Top Most Toggle : If you would like to have the operation panel stayed topmost on desktop, please turn on “Top Most Toggle” button. 8 When iSafe panel is hidden, you can left click iSafe Security Pack icon ( ) in the taskbar to launch AES Key operation panel again. Right clicking the icon ( ) from the taskbar to start the function menu, and you also can click the function you want to use. 1.6 Exit / Uninstall program 1. Exit : Click “Exit” from the function menu on the taskbar to exit the program, then all the functions and the icon on taskbar will be closed. 2. Unistall : Please note that if you uninstall iSafe application, program and configured settings will be removed from your computer. 9 2. Windows OS- iSafe This chapter includes information about Windows OS- iSafe for SUNIX iSafe. The following topics are covered: 2.1 PC Lock - 2.2 First time configuration : - 2.3 How to Use 2.4 Cloud Encryption - 2.5 First time configuration - 2.6 How to Use 2.7 Security Disk - 2.8 First time configuration - 2.9 How to Use 2.10 Add Security Folder - 2.11 First time configuration - 2.12 How to Use 2.13 File Encryption/ Decryption 2.14 File Encryption for share 10 2.1 PC Lock Once USB iSafe is unplugged, 「PC Lock」 will lock your screen and keyboard immediately to prevent others to access the computer. 2.2 First time configuratio Activate 「PC Lock」 feature: Click the 「PC Lock」 icon on the operation panel to open PC Lock settings window. Once you check the box of “Lock my screen” and then click “OK” button, PC Lock feature will be enabled. 11 2.3 How to Use After 「PC Lock」 feature is enabled, 「PC Lock」 will lock the computer when iSafe is unplugged. Below is the lock screen. If you want to unlock screen, please plugin your iSafe and enter the login password. 12 If you want to automatically login the computer after the screen is unlocked, please enable the checkbox of “Auto logon after unlock the screen”, and enter your Windows’ login password and click "OK" button. Below is the setting dialog. Note: You still need to enter the Windows’ login password after restarting the computer. Cancel 「PC Lock」 feature: Please uncheck the box of “Lock my screen” to disable the 「PC Lock」 function. 2.3 Cloud Encryption 「 Cloud Encryption 」 can automatically encrypt files in your specified folder, and immediately synchronize the encrypted files to the cloud storage. 「 Cloud Encryption 」 supports four cloud storage tools (Dropbox /SkyDrive/Google Drive/Box). To use the 「Cloud Encryption」 feature, please install at least one of the cloud tools in your computer. The 「Cloud Encryption」 feature can support multiple cloud tools at the same time. 13 2.4 First time configuration Click 「Cloud Encryption」 icon on operation panel to open the settings window as below: 1. Select cloud storage type (Dropbox / SkyDrive / Google Drive/ Box) you have already installed in your computer. 14 2. Click to select the folder you want to apply the 「Cloud Encryption」 feature, and then press "OK" button. Note : If you use the Dropbox for Clound storage, the name of the local security folder must be “ Security Folder”. There is no restrication for other Cloud storage tools. 3. Select Cloud Storage Client Folder: iSafe will use the default cloud storage path. If the default cloud storage path isn’t correct, please select the right cloud storage path, and then click the "OK" button. 2.5 How to Use After you have configured the settings on the previous section, files added to the specified directory will be automatically encrypted and synchronized to the Cloud storage. Note: Files dropped to the cloud storage directory directly will not be encrypted or synchronized to the local directory. Right-Click on the file that you want to copy and paste it to the Local Security Folder and the file will be automatically encrypted and synchronized to the Cloud Storage Client Folder. 15 Please refer to the following pictures for details. Delete file(s) in the Local Security Folder and the file(s) will be automatically removed from the cloud storage drive. Please refer to the following pictures for details. Note: When deleting file(s), please always delete file(s) in Local Security Folder. iSafe only supports file synchronization from Local Security Folder to Cloud Storage Client Folder. If you delete file(s) in Cloud Storage Client Folder, but keep the file(s) in the Local Security Folder. Those file(s) will be synchronized to the Cloud Storage later. 16 If you want to open an encrypted file, simply double-click the file and it will be decrypted and open for edit. After closing the file, it will be automatically encrypted. Note: If you fail to open an encrypted file by double-clicking, please right-click the file and select [File decryption], and then the file should be open. If your use one iSafe to encrypt file(s), you cannot open the file(s) by other iSafe. If the iSafe is not plugin, you can not open the file either. Delete Cloud Encryption settings: Choose the Cloud Encryption setting you want to cancel, click "delete" button, then click "OK" button, the Cloud Encryption settings will be removed. 17 2.6 Security Disk Security Disk creates a virtual disk drive, which is encrypted by AES 256Bit codes. Once log off the virtual disk drive or unplug the USB iSafe device, the virtual drive will hide immediately. Re-plugin the USB iSafe, the virtual drive will show up. 2.7 First time configuration Left Click 「Security Disk」 icon on operation panel to open Security Disk Setting window. 1. Must setup the virtual disk drive for your first time to use. You can click to choose a disk. Flash drive or portable hard drive for your virtual disk drive. 18 You can adjust the virtual disk space by clicking the drag bar, or enter the volume for your virtual disk capacity. In addition, you can change the name of your virtual disk. The maximum length of the virtual disk name is 9 English characters. 2. Click "OK" button, please do not remove Source Disk while the program is running. 3. If create the security disk successfully, message dialog like below will show up. Click "OK" button to enter your virtual disk drive. The security disk can also be found in 「My Computer」. 19 2.8 How to Use 1. After Security Disk successfully is created, once you unplug the USB iSafe device, the virtual disk drive will be immediately hidden; plugin the USB iSafe device, the virtual disk drive will appear. 2. To change the Security Disk settings, check the "To check on to make change" box and then make modifications. Logout Security Disk: "Logout" and the virtual disk will be disappeared. Open up Security Disk: You can manually click "Open up" to open your virtual disk which you can read files in it.. Check on to make change: When space is not enough or you want to enlarge your virtual disk, you can check "Check on to make change" to adjust the virtual disk space by clicking the drag bar, or enter the volume for your virtual disk capacity, then press "OK". 20 Note: If you adjust the virtual disk space smaller, the file stored in the original virtual disk might be deleted. 2.9 Add Security Folder Automatically encrypt the file(s) dropped in the specified folder. 2.10 First time configuration Left Click 「Add Security Folder」 on operation panel to open the settings window. Click to choose your path and folder name, then click "OK" for Add Security Folder setting. You can setup multi-group Add Security Folder settings. 21 2.11 How to Use After setup security disk successfully, your important files copied or dragged to the specified folder will be automatically encrypted. 22 If you want to open the encrypted file, simply double-click the file and the program will decrypt the file for reading and editing. Note: If you fail to read the decrypted file by double-clicking, please right-click the file and select [File decryption], then the file should open. Delete Add Security Folder Settings Click to select the drop-down menu that you want to delete, click "delete" then press "OK", the settings and all files of Add Security Folder will be deleted. 23 2.12 File Encryption/ Decryption 「File Encryption」and 「File Decryption」 can secure important files and folders on your computer for your personal privacy. 1. Right-click on a file or several files to select 「File Encryption」. After a file is successfully encrypted, a lock will be added to the file icon. 24 2. File Decryption If you want to read the encrypted file, simply double-click on the file or right-click to select 「File Decryption」 and the program will decrypt file. [Note] You should use the same USB iSafe device to decrypt a file as the one you use to encrypt the file. 2.13 File Encryption for share If you want to share encrypted files to your friends for reading, you can use the 「File Encryption for share」, but people who wants to read the encrypted file also need to install the iSafe application. 1. Right click on the file you want to share and choose 「File Encryption For Share」. 25 2. Setup password for encryption sharing and then to click “OK " to encrypt the file. After a file is successfully encrypted, a lock will be added to the file icon. 3. To read the shared encrypted files in a different computer, you must have your USB iSafe plugin your computer, right-click the encrypted file, select 「File Decryption」or double-click the encrypted file, enter the correct password, and then the file will automatically decrypted. 26 3. Android Device The following topics covered in this chapter: 3.1 iSafe Viewer 3.2 First time configuration 3.3 How to Use 3.4 Contact Information 27 3.1 iSafe Viewer You can browse your encrypted files in your cloud storage disk via your Android phone. 3.2 First time configuration 1. You can search the iSafeViewer.apk from Google Play and install the app to your Android device. Please install one of the cloud storage tools in your computer before executing the function. All of the four cloud storage tools can be executed, at first you have to install the cloud software program which you want to execute on your computer. 2. After iSafeViewer is successfully installed, please install one of the cloud storage tools (Dropbox/GoogleDrive/SkyDrive) in your Android phone. 28 3.3 How to Use If you want to read the file which encrypted by iSafe:Take Dropbox for example: Click the file encrypted by iSafe (「~ODKE」) as showing in the following red box. Refer to the following prompt to decrypt the file. 29 3.4 Contact Information Customer satisfaction is our number one concern, and to ensure that customers receive the full benefit of our products, SUNIX services has been set up to provide technical support, driver updates, product information, and user’s manual updates. The following services are provided E-mail for technical support ................................... [email protected] World Wide Web (WWW) Site for product information: ............................http://www.sunix.com 30