1
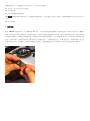
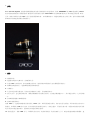
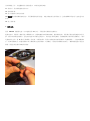
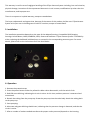
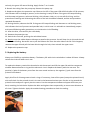
F.I.T. PRO Vacuum system 防水殼下潛前的防漏水偵測系統 防水壳下潜前的防漏水侦测系统 Pre-dive leak detection system for underwater DSLR/imaging housings 使用說明書 使用说明书 USER MANUAL 繁體中文 / 簡體中文 / English 感謝您選擇 F.I.T. Vacuum System 抽真空氣密檢測系統 – 可在單眼相機防水殼下水前就偵測會不會漏水。在安裝和使用前, 請先詳細閱讀本文: 1. 使用安全須知 請不要在抽真空系統的保護蓋還沒蓋上前,就帶防水殼下潛或是將防水殼浸泡在水裡。黃色的橡皮閥雖能維持住抽真空過程中 的壓力差,但若沒蓋上保護蓋就下潛或是泡水,可能會進水而損壞防水殼內部零件、相機或是抽真空檢測器。請在抽真空測試 後立即將保護蓋蓋上。 請使用 CR1632 規格的電池,安裝的時候要注意正負極的方向,正極 (+) 是接觸金屬扣具的一端, 負極 (-) 接觸電路板。極 性弄錯可能會損壞電路板並且讓保固失效。新的電池可以連續使用 29 小時,下水前請先確保電池殘餘電量足夠。 安裝後請立即進行抽真空的標準程序(請見本文的操作說明)以確認不會漏水。所有的組件在工廠出貨前都測試過。如果測試 的結果顯示不是氣密的,請重新檢查抽真空系統和防水殼之間有沒有鎖緊與密合。使用者必須自行負責並檢查抽真空系統和防 水殼之間有沒有連結緊密。若是因為安裝或使用上的人為錯誤造成的損失,F.I.T. 概不負責。如果問題一直存在,請停止使用 並立刻通報經銷商。 蓋上保護蓋以及/或者唧筒管線接頭時,請用另一隻手扶住抽真空系統以確保不會從防水殼上轉開而鬆掉(怕轉緊保護蓋的過程 中,也旋轉了抽真空系統,讓抽真空氣密檢測系統從防水殼上轉鬆開)。 並不建議在安裝抽真空系統的情況下不抽負壓就直接下潛。雖然不會造成任何裝備損壞,但還是建議您先測試防水殼和抽真空 系統有沒有緊密才下水。況且,這也是您安裝抽真空系統的理由。所以請在規劃潛水的時候,排出時間進行測試。 請在乾燥的環境下進行抽真空測試,橡皮閥並無法水密,飛濺的水花如果噴到橡皮閥有可能會損壞電路板。在登上小船之前請 先進行測試。F.I.T. Vacuum System 抽真空系統很省電,可以連續使用 29 小時,所以沒有必要冒險為了省電而在船上下水 前才測試,尤其是在有水花會飛濺的環境下。 2.保固條款 在購買後一年內,如果產品在製造過程中被證明有瑕疵或是材料品質有問題,F.I.T. 會維修或是換新的零件。 使用抽真空氣密檢測系統時,F.I.T. 將不負責任何因為防水殼進水造成的設備損壞,或是照片資料流失和收入損失或是任何衍 生出的意外。 不恰當的使用抽真空系統將會失去保固資格,包 括但不限於以下情況: 物理碰撞損害 未蓋上保護蓋就泡水造成電路板淹水 非原廠許可的改裝 保養不當 3. 安裝 F.I.T. Vacuum System 安裝的時候要根據防水殼的廠牌和接頭來決定轉接環,例如 SEA&SEA 的 5-Pin 接座或是 Nexus 的光纖接座就得使用不同的轉接環。而有機頂閃燈的機型,例如 Nexus D810 因為熱靴部比較突出,所以得選用較長的 L 版。 另外,旋緊後如果閃燈的 LED 燈號不是面向攝影師本身,可以將螺絲鬆開,將透明窗轉向自己後再上鎖,這樣下潛的時候攝 影師就可以持續監控抽真空系統的燈號。 4. 操作 1. 移除保護蓋 2. 透過橡皮閥按下電源開關,直到看到燈號。 3. 紅色 LED 燈開始閃爍,表示電路板已經啟動,這時候表示環境的壓力已經被測量並被記憶。 4. 將唧筒管線接頭鎖上,連接唧筒管線接頭和塑膠管。 5. 開始抽氣。 6. 燈號應該會紅綠交替閃爍,代表已經偵測到壓力變化,且電路板有啟動。 7. 抽了幾次後,會達到足夠的負壓(抽的次數跟防水殼內部空間有關,空間越大要抽越多下),然後就會閃綠燈。之後再多抽 一下。 8. 拿開唧筒管線接頭和唧筒管線。 9. 蓋回並旋緊保護蓋。 觀察 LED 燈。建議持續觀察有沒有閃綠光 15-20 分鐘,如果全程都是閃綠燈,表示已經是氣密狀態,所以防水殼已經可以下 潛使用。如果綠燈 LED 停止閃爍,然後紅綠交替閃爍或是閃紅燈,表示會進水,不能安全地下潛,請檢查可能沒安裝妥當的 地方並檢查可能會進水的點,重新安裝後再進行抽真空檢測。 10. 潛水過程中,觀察 LED 燈號,如果綠燈停止閃爍,變成紅綠交替,代表內部壓力上升,而這可能也意味著開始漏水。建 議開始準備上升,並遵循潛水安全停留程序,以減少進水的風險。 11. 潛水後,用淡水浸泡沖洗並風乾。 12. 移除保護蓋。 13. 按下電源開關以關閉電路。 14. 輕輕地撥開橡皮解除密閉狀態,不需要將橡皮整個拔起,以便平衡防水殼內外的壓力。會聽到嘶嘶聲代表空氣已經進入防 水殼。 15. 蓋上保護蓋。 5. 更換電池 使用 CR1632 規格的電池,可以連續使用 29 小時,不使用的時候請將電源關閉。更換電池時,需要用六角扳手把三顆螺絲 打開,移除底部的 O 圈和電路板,更換新的電池,利用扳手將電池從側邊缺口往外推,就可以將舊的電池取出,電池正極 (+) 必須面向金屬扣具,負極 (-) 面向電路板。電路板放回去的時候記得要朝上,而不是朝防水殼方向。將 O 圈塗上薄薄的一層 矽油,必要的時候,利用乾淨的軟布清理所有部件(電路板除外)。將電路板放回去,將 O 圈放回去,將透明的窗口和上部 的鋁合金組件放回,對齊螺孔。利用扳手將螺絲依序鎖上,確保鎖緊程度平均且有鎖緊,再進行真空測試以確保有緊密。 感谢您选择 F.I.T. Vacuum System 抽真空气密检测系统 – 可在单眼相机防水壳下水前就侦测会不会漏水。 在安装和使用前,请先详细阅读本文: 1. 使用安全须知 请不要在抽真空系统的保护盖还没盖上前,就带防水壳下潜或是将防水壳浸泡在水里。黄色的橡皮阀虽能维持住抽真空过程中 的压力差,但若没盖上保护盖就下潜或是泡水,可能会进水而损坏防水壳内部零件、相机或是抽真空检测器。请在抽真空测试 后立即将保护盖盖上。 请使用 CR1632 规格的电池,安装的时候要注意正负极的方向,正极 (+) 是接触金属扣具的一端, 负极 (-) 接触电路板。极 性弄错可能会损坏电路板并且让保固失效。新的电池可以连续使用 29 小时,下水前请先确保电池残余电量足够。 安装后请立即进行抽真空的标准程序(请见本文的操作说明)以确认不会漏水。所有的组件在工厂出货前都测试过。如果测试 的结果显示不是气密的,请重新检查抽真空系统和防水壳之间有没有锁紧与密合。用户必须自行负责并检查抽真空系统和防水 壳之间有没有连结紧密。若是因为安装或使用上的人为错误造成的损失,F.I.T. 概不负责。如果问题一直存在,请停止使用并 立刻通报经销商。 盖上保护盖以及/或者唧筒管线接头时,请用另一只手扶住抽真空系统以确保不会从防水壳上转开而松掉(怕转紧保护盖的过程 中,也旋转了抽真空系统,让抽真空气密检测系统从防水壳上转松开)。 并不建议在安装抽真空系统的情况下不抽负压就直接下潜。虽然不会造成任何装备损坏,但还是建议您先测试防水壳和抽真空 系统有没有紧密才下水。况且,这也是您安装抽真空系统的理由。所以请在规划潜水的时候,排出时间进行测试。 请在干燥的环境下进行抽真空测试,橡皮阀并无法水密,飞溅的水花如果喷到橡皮阀有可能会损坏电路板。在登上小船之前请 先进行测试。F.I.T. Vacuum System 抽真空系统很省电,可以连续使用 29 小时,所以没有必要冒险为了省电而在船上下水 前才测试,尤其是在有水花会飞溅的环境下。 2.保固条款 在购买后一年内,如果产品在制造过程中被证明有瑕疵或是材料质量有问题,F.I.T. 会维修或是换新的零件。 使用抽真空气密检测系统时,F.I.T. 将不负责任何因为防水壳进水造成的设备损坏,或是照片数据流失和收入损失或是任何衍 生出的意外。 不恰当的使用抽真空系统将会失去保固资格,包括但不限于 以下情况: 物理碰撞损害 未盖上保护盖就泡水造成电路板淹水 非原厂许可的改装 保养不当 3. 安装 F.I.T. Vacuum System 安装的时候要根据防水壳的厂牌和接头来决定转接环,例如 SEA&SEA 的 5-Pin 接座或是 Nexus 的光纤接座就得使用不同的转接环。而有机顶闪灯的机型,例如 Nexus D810 因为热靴部比较突出,所以得选用较长的 L 版。 另外,旋紧后如果闪灯的 LED 灯号不是面向摄影师本身,可以将螺丝松开,将透明窗转向自己后再上锁,这样下潜的时候摄 影师就可以持续监控抽真空系统的灯号。 4. 操作 1. 移除保护盖 2. 透过橡皮阀按下电源开关,直到看到灯号。 3. 红色 LED 灯开始闪烁,表示电路板已经启动,这时候表示环境的压力已经被测量并被记忆。 4. 将唧筒管线接头锁上,连接唧筒管线接头和塑料管。 5. 开始抽气。 6. 灯号应该会红绿交替闪烁,代表已经侦测到压力变化,且电路板有启动。 7. 抽了几次后,会达到足够的负压(抽的次数跟防水壳内部空间有关,空间越大要抽越多下),然后就会闪绿灯。之后再多抽 一下。 8. 拿开唧筒管线接头和唧筒管线。 9. 盖回并旋紧保护盖。 观察 LED 灯。建议持续观察有没有闪绿光 15-20 分钟,如果全程都是闪绿灯,表示已经是气密状态,所以防水壳已经可以下 潜使用。如果绿灯 LED 停止闪烁,然后红绿交替闪烁或是闪红灯,表示会进水,不能安全地下潜,请检查可能没安装妥当的 地方并检查可能会进水的点,重新安装后再进行抽真空检测。 10. 潜水过程中,观察 LED 灯号,如果绿灯停止闪烁,变成红绿交替,代表内部压力上升,而这可能也意味着开始漏水。建 议开始准备上升,并遵循潜水安全停留程序,以减少进水的风险。 11. 潜水后,用淡水浸泡冲洗并风干。 12. 移除保护盖。 13. 按下电源开关以关闭电路。 14. 轻轻地拨开橡皮解除密闭状态,不需要将橡皮整个拔起,以便平衡防水壳内外的压力。会听到嘶嘶声代表空气已经进入防 水壳。 15. 盖上保护盖。 5. 更换电池 使用 CR1632 规格的电池,可以连续使用 29 小时,不使用的时候请将电源关闭。 更换电池时,需要用六角扳手把三颗螺丝打开,移除底部的 O 圈和电路板,更换新的电池,利用扳手将电池从侧边缺口往外 推,就可以将旧的电池取出,电池正极 (+) 必须面向金属扣具,负极 (-) 面向电路板。电路板放回去的时候记得要朝上,而不 是朝防水壳方向。将 O 圈涂上薄薄的一层硅油,必要的时候,利用干净的软布清理所有部件(电路板除外)。将电路板放回 去,将 O 圈放回去,将透明的窗口和上部的铝合金组件放回,对齐螺孔。利用扳手将螺丝依序锁上,确保锁紧程度平均且有 锁紧,再进行真空测试以确保有紧密。 Thank you for choosing FITpro Vacuum System, pre dive vacuum leak detection system for underwater camera housings. Please read this manual carefully before installing and using FITpro Vacuum System. 1. Safety precautions Never dive or immerse the housing in the water without the protective cap. The yellowish rubber valve is not watertight, it serves only to hold the under-pressure during the evacuating process. Diving or immersing the housing without the protective cap will result in flood and/or damage of your housing, camera and FITpro Vacuum System. Replace the protective cap immediately after achieving the testing under-pressure. Always use CR1632 battery or equivalent. Watch the polarity, positive (+) side contact is on the metal casing, negative (-) contact is on the printed circuit. Wrong polarity can damage the circuit and void the warranty. Follow the standard pre dive testing procedure immediately after installation (see instructions in this manual) to confirm there is no leak. All units are tested thoroughly prior to shipping. In case the test shows there is a leak, recheck the seal between the FITpro Vacuum System and the housing. It is the sole responsibility of the user to ensure the tightness between the FITpro Vacuum System and the housing. FIT will not be held responsible for any damage that may result from the faulty installation and use of the product. If the problem persists, please do not use the product and contact the dealer/sales representative. When putting the protective cap and/or pump cap, always hold the valve body with other hand to ensure it doesn't unwind from the housing. It is not advisable to dive without under-pressure with FITpro Vacuum System installed. While this shouldn't result in any damage, it is only reasonable to always test the tightness of the housing and FITpro Vacuum System prior to diving. After all, this is the reason for installing the device in the first place, so be advised to plan the dive so that you have time for the test procedure. Always do the test procedure in a dry place. Rubber valve is not watertight, and water splash could damage the circuit. Do the procedure before boarding small boats, the power consumption of the circuit is small and the battery capacity is sufficient for 29 hours, so there is no need to risk when there is a possibility of water splash. 2. Warranty FIT will repair or replace at its option any product that proves to be defective in construction or materials within one year from the date of purchase. FIT is not liable for damage to the equipment caused by leakage of water into the housing, nor for loss of data or income that may result from such leakage, or any accident during which FITpro Vacuum System was in use. This warranty is void in case of negligent handling of the FITpro Vacuum System including, but not limited to, physical damage, immersion of the unprotected electronic circuit in water, modifications by other than the manufacturer, and improper care. There is no express or implied warranty, except as stated above. The buyer understands and agrees that, because of the nature of this product, he/she uses FITpro Vacuum System at his/her own risk and agrees to hold FIT harmless, except as stated above. 3. Installation The installation procedure depends on the type of the adapter/housing. Compatible DSLR/imaging housings include Nexus, INON, SEA&SEA, Subal, Gates and Nauticam. FITpro Vacuum System is installed by either replacing the bulkhead, bulkhead cap, or screwed in the corresponding accessory port. For more details, please refer to the instructions from the local dealer. 4. Operation 1. Remove the protective cap 2. Press the power button under the yellowish rubber valve downwards, until the switch clicks. 3. Red LED starts blinking, indicating the circuit is active. At this time, ambient pressure is measured and memorized. 4. Detach the tubing from the pump cap. Screw the pump cap into the valve body. Attach the tubing back to the pump cap. 5. Start pumping. 6. Alternate red-green blinking should start, indicating that the pressure change is detected, and that the circuit is active. 7. After a number of strokes needed to achieve the proper under-pressure (depends on the housing volume), the green LED starts blinking. Apply further ½ to 1 stroke. 8. Detach the tubing from the pump cap. Remove the pump cap. 9. Replace and tighten the protective cap. Observe the LED. If the green LED still blinks after 15-20 minutes, this indicates that no leakage is present, so the housing is ready for dive. If the green LED stops blinking, and alternate red-green or red starts blinking, this indicates a leak, so it is not safe for diving, and the procedure of locating and eliminating the cause of the leak should be followed, and the test procedure repeated afterwards. 10. During the dive, observe the LED. If the green LED stops blinking and alternate or red blinking starts, this indicates the rise of pressure and possible leak, in which case it is advisable to immediately prepare and ascend following safety procedures, to minimize the risk of flooding. 11. After the dive, rinse and dry the valve body. 12. Remove the protective cap. 13. Switch the circuit off, pressing the red rubber button. 14. Gently move the rubber button sideways to equalize the pressure. You will hear the air hiss and the red LED will start blinking. Be careful not to pull the bottom disc from the other side of the lid. If this happens, remove the upper lid and pull the lower disc through the hole, then reinstall the upper cover. 15. Replace the protective cap. 5. Replacing the battery Always use CR1632 or equivalent battery. The battery life with circuit switched on is about 29 hours. Always switch the circuit off when not in use. To replace the battery, unwind the three bolts with hex wrench and lift the upper lid and the transparent window. Remove bottom o-ring and the electronic circuit. Replace the battery with the new one. The positive (+) pole of the battery must face the outer metal enclosure, the negative (-) pole must face the printed circuit board. Apply thin film of silicone grease to both o-rings. If necessary, clean all the parts (except the printed circuit) with soft cloth. Put the printed circuit in its seat in the bottom aluminum part. Put the o-ring around the printed circuit and press it gently into the recess. Put the transparent window and upper aluminum part back, matching the bolt holes. Replace the bolts and tighten them sequentially, to ensure even distance at all times. Tighten the bolts. Apply the standard testing procedure to check the sealing.