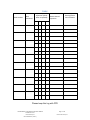
1
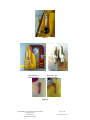
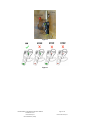
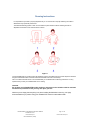
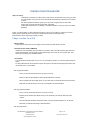
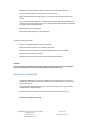
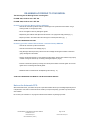
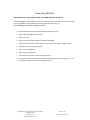
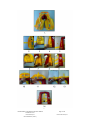
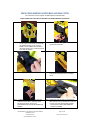
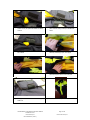
 SMA1060 OWNERS MANUAL THIS DOCUMENT IS THE COPYRIGHT OF SAFETY MARINE AUSTRALIA PTY LTD Date Saved Sep‐14 OM sma1060.docx [Status] Page 1 of 19 Date Printed 22‐Sep‐14 SMA1060 OWNER'S MANUAL September 14 CONTENTS INTRODUCTION ....................................................................................................................................... 1 DESCRIPTION ........................................................................................................................................... 1 TYPES OF PFDS APPLICABLE TO THIS MANUAL ....................................................................................... 1 SMA1060 ‐ DESIGN & CONSTRUCTION ................................................................................................... 2 TO OPERATE SMA 1060........................................................................................................................... 3 VISUAL INSPECTION CHECKLIST PRIOR USAGE ....................................................................................... 4 Donning Instructions ............................................................................................................................... 7 TESTING YOUR PFD IN WATER ................................................................................................................ 8 3 Ways to Inflate Your PFD ............................................................................................................ 8 Deflating the Inflatable PFD ............................................................................................................ 9 RE‐ARMING ACCORDING TO YOUR MODEL .......................................................................................... 10 Re-arming Your PFD after Manual Inflation -SMA1061 ........................................................... 10 Re-arming your after inflation PFD as Manual / Automatic Backup SMA1062 .................... 10 Note on the Automatic PFD: ......................................................................................................... 10 Repacking SMA1060 ............................................................................................................................. 11 REPACKING MARINE SAVER MKIII AND MAXI PFDS .............................................................................. 13 ROUTINE INSPECTIONS OF YOUR PFD .................................................................................................. 15 CARE AND MAINTENANCE INSTRUCTIONS ........................................................................................... 15 Roaring Forties Accessories ......................................................................................................... 15 Cleaning and Storing of Your Inflatable PFD SMA1061 .......................................................... 16 Cleaning and Storing of Your Inflatable PFD SMA1062 .......................................................... 16 WARNINGS: ........................................................................................................................................... 16 SMA1060 OWNER'S MANUAL September 14 INTRODUCTION
Roaring Forties Lifejackets or Personal Flotation Devices (PFDs) are essentially survival equipment and as such they should be
properly stored, maintained & handled. This Equipment may not be suitable for all situation and the life of the wearer, apart
from the physical condition of the wearer may well depend on the water condition, the condition of the PFD and it’s attachments.
This manual provides information for the inspection, testing and maintenance of SMA 1060 series of Personal Flotation Devices.
These series are approved to the Australian Standard AS1512 as a TYPE 1 PFD for persons weighing 40kg and above.
Any assistance required in regard to the manual should be directed to:
Safety Marine Australia Pty Ltd
P.O. Box 1121
Moorabbin
VIC 3189
AUSTRALIA
Tel: +61 03 9555 5211
Fax: +61 03 9553 4380
Email: [email protected]
DESCRIPTION
SMA 1060 SERIES are designed to provide sufficient buoyancy to turn an unconscious person face upwards within 5 seconds
of immersion. Most adults require less than 5kg of flotation to keep their heads above water. However, this PFD will provide a
minimum buoyant force of 16 kg (157 Newtons) when it is fully inflated.
SMA1060 is very light weight & is designed to provide mobility.
SMA1060 will fit teenager & most adult with a chest range of 75 – 140 cm & weighing 40kg and above comfortably. It is
designed to be worn over outer clothing and is secured to the body with an adjustable waist belt system which also provides
maximum freedom of movement.
TYPES OF PFDS APPLICABLE TO THIS MANUAL
SMA1061 ‐ MANUAL INFLATION CRUISER SMA1062 ‐ AUTO INFLATION SMA1061‐11 MANUAL INFLATION MAXI AND MAXI PLUS SMA1062‐11 AUTOMATIC INFLATION VES1061 MANUAL INFLATION MARINE SAVER VEST VES1062 AUTOMATIC INFLATION SMA1060 - DESIGN & CONSTRUCTION
There are 2 models of SMA1060, namely:‐
Manual Inflation System (SMA1061)
‐
Automatic Inflation System( SMA1062)
The difference between them is that the SMA 1062 is a manual type with an automatic backup inflation. In other
words, if you opt to use your PFD as a manual, you need to remove the automatic cartridge. With the automatic
cartridge screwed onto the inflator, your PFD will inflate when the cartridge is immersed in water. All other
features are the same for both models.
SMA 1060 is basically made up of a bladder enclosed in a valise. Both the bladder & the valise are made from
polyurethane coated materials .However the bladder has a thicker coating than the valise.
The bladder has the following items on
‐
33gm co2 gas cylinder inflation mechanism with the pull toggle( Tab);
‐
Oral inflation tube ;
‐
Whistle;
‐
Water activated rescue light which serves as a beacon for an emergency rescue situation ( optional
feature);
‐
40cm of SOLAS Grade reflective tapes appropriately distributed on the front side of the bladder;
‐
A collar strap.-
‐
For SMA1062, automatic cartridge.
The front of the bladder has indelible donning & operating instructions. The back of the bladder contains care
instructions, warning alerts and a service record section.
The valise is not part of the inflation system but acts as a protective covering and as an enclosure for the bladder
when it is deflated by sealing the Velcro fastener which is sewn along the side edges. A small protruding tab at
the bottom right hand side of the valise is used to assist in opening the valise to inspect or service the
bladder inflation system (see fig 1). The valise also houses the adjustable waist belt system but the latter can
be detached from the bladder. Like the bladder, there are donning, operating instructions markings. It also has a
marking to identify whether the PFD is a manual or an automatic model.
The waist belt is made out of durable nylon material and is fastened using a quick release buckle and an
adjustable mechanism. Provision is made for excess belt to tucked away after fastening without any physical
hindrance
RECOMMENDATION:
We strongly recommend that you initially buy 2 re-arming kits for your respective model, one for initial
familiarisation and the other to serve as a spare.
We also recommend that you routinely check your PFD as instructed below. If you are not confident, please send
it to Roaring Forties authorised service agent to attend to your PFD.
THIS DOCUMENT IS THE COPYRIGHT OF SAFETY MARINE AUSTRALIA PTY LTD Date Saved Sep‐14 OM sma1060.docx [Status]
Page 2 of 19 Date Printed 22‐Sep‐14 TO OPERATE SMA 1060
By jerking the pull toggle of the 33g carbon dioxide gas inflation system, the PFD will inflate. This is for both models. However,
for the automatic model, the PFD will inflate when the automatic cartridge is immersed in water. Hence there is choice for the
automatic model.
SOFTENING EFFECT OF THE BLADDER
A common characteristic of carbon dioxide is that being an unstable gas, it will gradually permeate through the coated fabric of
the bladder of all PFDS over an extended period. Thus a softening effect of the bladder can be observed over time. For
SMA1060, this can be overcome by topping up the pressure of the bladder through the oral tube inflation system.
Another characteristic of carbon dioxide gas is that under colder conditions, it will not expand greatly as in warmer
temperatures. Hence, when experiencing these situations, the bladder pressure needs to be top up using the oral inflation
system.
Finally, in the event that the carbon dioxide inflation system fails to inflate the bladder, the oral system should be used to fully
inflate the PFD.
THIS DOCUMENT IS THE COPYRIGHT OF SAFETY MARINE AUSTRALIA PTY LTD Date Saved Sep‐14 OM sma1060.docx [Status]
Page 3 of 19 Date Printed 22‐Sep‐14 VISUAL INSPECTION CHECKLIST PRIOR USAGE
It is advisable to conduct the following checks periodically after purchasing SMA1060. It must be emphasised
here that your SMA106 should be properly maintained in order for it to perform effectively in times of need. By
doing so may extend it’s life span.
Figure 3 illustrates how the valise Velcro sides can be separated by using the small yellow tab to expose the
inflation mechanism & the bladder.
1
Ascertain whether the gas cylinder has been used.
- For both models, unscrew to remove the gas cylinder from the inflator. Replace the gas
cylinder if it is pierced on the head end. (See Fig 3)
2
For both models check whether the green indicator clips are intact --- not missing or broken (See
Figure1 for SMA1061 & Figure 5 & 6 for SMA1062).If missing or broken, replace them.
For the SMA1062, ensure that the green auto firing indicator is not missing. If missing, it may suggest that
the unit has been fired. Hence, replace the green indicator & the auto cartridge (See Figure 6)
3
Check the physical condition of the bladder fabric and its attachments. Replace the PFD if it is damaged
or has deteriorated.
4
Check for inflation leakage
- Gently uncap the dust cap of the re colour oral tube;
- Inflate the buoyancy bladder by mouth until it is firm and leave it overnight;
- If it is airtight, it should remain inflated and firm the next day;
- If the buoyancy bladder is soft the next day, it indicates a leakage. Replace the PFD or get in
touch with Safety Marine Australia.
5
Deflate the Buoyancy Bladder
- Reverse dust cap of the oral tube and insert it into the valve or gently depress the valve with
your fingertip.
- Gently squeeze the inflated bladder until all air or gas has been expelled.
- Put back the dust cap back in its stowed position (see fig 4).
6
If everything is intact, ensure that the gas cylinder is screwed onto the inflator hand tight.
7
For both models, ensure the manual pull toggle is in the up and ready position with the green manual
indicator clip is in place. (See figures 1 & 5) For SMA 1062, ensure that the automatic cartridge auto firing
indicator is screwed on to the inflation unit hand tight (see fig 5).
8
Your buoyancy bladder is now ready for repacking into the valise. Please refer to the repacking
instructions section outlined in this manual.
9
Once your PFD is repacked, your Inflatable PFD is ready for use.
THIS DOCUMENT IS THE COPYRIGHT OF SAFETY MARINE AUSTRALIA PTY LTD Date Saved Sep‐14 OM sma1060.docx [Status]
Page 4 of 19 Date Printed 22‐Sep‐14 Figure 1
Figure 2
Figure 3
Dust cap in the
stowed position
Dust cap in the
deflate position
Figure 4
THIS DOCUMENT IS THE COPYRIGHT OF SAFETY MARINE AUSTRALIA PTY LTD Date Saved Sep‐14 OM sma1060.docx [Status] Page 5 of 19 Date Printed 22‐Sep‐14 Figure 5
Figure 6
THIS DOCUMENT IS THE COPYRIGHT OF SAFETY MARINE AUSTRALIA PTY LTD Date Saved Sep‐14 OM sma1060.docx [Status] Page 6 of 19 Date Printed 22‐Sep‐14 Donning Instructions
It is important that your PFD is properly adjusted to fit you. An incorrect fit or improper fastening of the belt or
attachments may impede its performance.
The waist belt fastening system is sewn on and it utilises a quick release buckle for fastening and has an
adjustable mechanism to fit an average person properly.
Figure 7
Put the Inflatable PFD on just like a jacket as depicted by Figure 7 and fasten the front buckle. Adjust the waist belt
using the side release buckle on the belt and secure the belt’s loose end in the belt loop.
This is a constant wear PFD and it is recommended that you are familiar with the donning instructions .It is very
important that you wear your Inflatable PFD over a clothing.
CAUTION:
Do not wear your Inflatable PFDs under clothing or harnesses as the inflation could be restricted
and affects its performance and you may also injure yourself
Now that you are happy that everything is in place including familiarisation in donning, it is highly
recommended that you practice using your inflatable PFD & test it in safe shallow water.
THIS DOCUMENT IS THE COPYRIGHT OF SAFETY MARINE AUSTRALIA PTY LTD Date Saved Sep‐14 OM sma1060.docx [Status] Page 7 of 19 Date Printed 22‐Sep‐14 TESTING YOUR PFD IN WATER
Object of Testing:
‐
To familiarise yourself with your PFD and to provide you with the first experience of using your PFD
in a water situation so that you will not be overwhelmed should there be a need to use it on another
occasion.
‐
‐
Also to test whether the PFD will support you on your back or slightly back from the vertical
position with your mouth well above the surface of the water.
To ascertain whether there is any leakage in the inflation bladder i.e. when you notice any bubbles
appearing.
To test, you need to inflate your PFD and there are basically 2 ways you can inflate if your PFD has a manual
inflation system ( SMA1061) and 3 ways for the Automatic backup inflation system(SMA 1060).
Described below are the three ways to inflate your PFD.
3 Ways to Inflate Your PFD
- Manual inflation
By jerking firmly downward on the pull toggle, the PFD should fully inflate within 5 seconds
- Automatic backup inflation (SMA1062)
Inflation will occur immediately when the inflator is immersed in water. The water sensitive paper element or
bobbin will disintegrate. This will trigger a spring-loaded plunger to puncture the CO2 cylinder head .Thus
allowing the escaping gas to inflate the bladder.
- Oral inflation
In the event that the inflation does not occur or in a non-emergency situation, you can fully inflate the PFD by
mouth.
To orally inflate the PFD, remove the dust cap from the top end of the oral tube and gently blow into the tube
until the PFD is firm or fully inflated.
Test using Manual Inflation
- Put on your fully armed PFD and secure it firmly to your body
- Inflate your PFD as described above and it should inflate within 5 seconds.
- Get into shallow water at the depth where you can stand with your head just above the water surface.
- Relax and your PFD will float you in the way it is designed to as described above.
Test using Automatic Inflation
- Put on your fully armed PFD and secure it firmly to your body.
- Likewise get into shallow at the depth where you can stand with your head just above the water
surface.
- Once the automatic cartridge is immersed in water, your PFD will inflate between 5 to 10 seconds.
- Relax and your PFD will float safely as described above.
Test using Oral Inflation
THIS DOCUMENT IS THE COPYRIGHT OF SAFETY MARINE AUSTRALIA PTY LTD Date Saved Sep‐14 OM sma1060.docx [Status]
Page 8 of 19 Date Printed 22‐Sep‐14 - Remove the CO2 cylinder & also the automatic cartridge if your PFD is SMA 1062 model.
- Put on your inflatable PFD and ensure that it fits you properly & firmly.
- Get into the shallow water at the depth where you can stand with your head just above the water
surface.
- For non swimmers & weak swimmers, it is advisable that you partially inflate your PFD initially and
gradually move yourself to depth whereby you are well supported enough to be able to complete the
oral inflation without touching the bottom.
- Inflate the PFD fully using the oral tube.
- Relax and allow the PFD to float you to a safe position.
Procedures to follow after Testing
- Remove your inflatable PFD after you get out of the water.
- Deflate your PFD in accordance to the instructions given below.
- Allow your PFD to dry thoroughly in dry but well ventilated area away from direct sunlight.
- Rearm your PFD according to your model.
- Repacked your PFD in accordance to your model’s instructions outlined below.
CAUTION:
Do not co2 inflate your PFD after you have orally inflated it using the oral tube? This is called double
inflation. Your PFD may over pressurise causing damage to it and personal injury.
Deflating the Inflatable PFD
- To deflate the Inflatable PFD, reverse the oral-inflation tube dust cap and place it into the valve or
depress valve with fingertip. Since the dust cap will not lock in the deflate position, it is necessary to
hold it in place (Fig. 5).
- Gently squeeze the inflated bladder until all air or gas has been expelled. Do not wring or twist the
Inflatable bladder to avoid damaging it.
.
- Put the inflation tube dust cap back in its stowed position on the oral inflation tube (Fig. 5).
- Your device is ready to be re-arming
THIS DOCUMENT IS THE COPYRIGHT OF SAFETY MARINE AUSTRALIA PTY LTD Date Saved Sep‐14 OM sma1060.docx [Status]
Page 9 of 19 Date Printed 22‐Sep‐14 RE-ARMING ACCORDING TO YOUR MODEL
The following are the Roaring Forties re-arming kits:For SMA 1061, the kit to use is KIT 160.
For SMA 1062, the kit to use is KIT 400.
Re-arming Your PFD after Manual Inflation -SMA1061
- Unscrew the used CO2 cylinder & install an unused 33gm CO2 cylinder back to the inflator using a
Roaring Forties re- arming kit (KIT 160).
- Do not over-tighten as this may damage the gasket
- Replace the green indicator and adjust the manual lever to an upright and ready position (Fig. 1)
- Repack your PFD in accordance with instructions given in subsequent section (pg
).
YOUR PFD IS NOW READY FOR USE.
Re-arming your after inflation PFD as Manual / Automatic Backup SMA1062
- Unscrew the used CO2 cylinder and discard it
- Unscrew and remove the auto cartridge (Fig. 6).
- Using Roaring Forties kit (KIT 400), install a new auto cartridge with the green indicator at base and
gently hand tighten to the inflator.
- Check to see the manual lever is in the upright and ready position with the green indicator clip properly
installed. If the green indicator clip is missing or damaged, replace it (Fig. 6).
- Install an unused CO2 cylinder by screwing it into the top of the inflator and hand- tighten. Do not overtighten as this can damage the internal gasket.
- Refold the PFD in accordance with the Repacking instructions (p. 11).
YOUR PFD IS NOW READY FOR MANUAL USE WITH AUTOMATIC BACKUP
Note on the Automatic PFD:
With all automatic PFDs, your PFD is also prone to premature inflation without your knowledge especially when it
is exposed to a moist, wet or humid environment. Unless you inspect it frequently, your PFD may not be armed
when needed.
Do not store your automatic in a very tight & confined area as inflation may damage your PFD.
THIS DOCUMENT IS THE COPYRIGHT OF SAFETY MARINE AUSTRALIA PTY LTD Date Saved Sep‐14 OM sma1060.docx [Status]
Page 10 of 19 Date Printed 22‐Sep‐14 Repacking SMA1060
CHECK AGAIN THAT YOUR PFD IS PROPERLY RE-ARMED BEFORE YOU REPACK.
Completely deflate the inflation bladder of any air or gas. Force excess air out through the inflation tube (Fig. 5).
Do not wring bladder. Put the inflation tube cap back in the stowed position (Fig. 5).
The following are the steps to repack your PFD:-
1
Right Hand Side. Fold (A) across the front along the dotted line (Fig 9 2.).
2
Fold side (B) underneath along dotted lines.
3
Fold (C) up on top
4
Fold (D) on top ensure Inflator toggle is not folded inside bladder.
5
Close Valise cover and secure with Hook loop closure ensure Inflator toggle is outside of jacket.
6
Left Hand Side. Fold E up along dotted line
7
Fold F on top along dotted line
8
Fold G on top along dotted line
9 Close Valise cover and secure with Hook and loop closure
.
10 Head support. Concertina fold the head support ensuring the retro tape is not creased Fig 9 10 – 13.
11 The PFD final appearance when correctly folded per Fig 9 14
THIS DOCUMENT IS THE COPYRIGHT OF SAFETY MARINE AUSTRALIA PTY LTD Date Saved Sep‐14 OM sma1060.docx [Status]
Page 11 of 19 Date Printed 22‐Sep‐14 Figure 9
THIS DOCUMENT IS THE COPYRIGHT OF SAFETY MARINE AUSTRALIA PTY LTD Date Saved Sep‐14 OM sma1060.docx [Status] Page 12 of 19 Date Printed 22‐Sep‐14 REPACKING MARINE SAVER MKIII AND MAXI PFDS
This instruction can be used for all SMA zippered enclosed PFDs CHECK AGAIN THAT YOUR PFD IS PROPERLY RE-ARMED BEFORE YOU REPACK Step 1.
Completely deflate the inflation bladder of
any air or gas. Force excess air out through
the inflation tube (Fig. 5). Do not wring
bladder. Put the inflation tube cap back in
the stowed position (Fig. 5). PFD and lay flat
on a clean dry surface
Step 2. Locate Zip slider disengage and return to the
cylinder side of the PFD.
Step 3. Re-engage zip
Step 4. Concertina fold the cylinder side of PFD
ensuring the operating lanyard is not folded
inside
Step 5. Fold the bottom of PFD so it fits within the
valise and zip the valise up at least 50mm
above the first velcro closure point
ENSURE NO PART OF PFD IS TRAPPED IN
ZIPPER
Step 6. At the Velcro closure point you will find some
teeth missing in the zip carefully with blunt end
of a pen or key pull apart the teeth upwards
DO NOT PULL APART TEETH BELOW
VELCRO CLOSURE
THIS DOCUMENT IS THE COPYRIGHT OF SAFETY MARINE AUSTRALIA PTY LTD Date Saved Sep‐14 OM sma1060.docx [Status]
Page 13 of 19 Date Printed 22‐Sep‐14 Step 7. Insert operating lanyard through opening.
Careful not to pull apart teeth below the Velcro
closure.
Step 8. Zip Slider back towards operating lanyard and
then continue closing valise up towards PFD
collar
Step 9. Close Velcro closure ensure operating toggle
sits outside
Step 10. Concertina fold PFD collar and enclose in
valise by continuing to pull close zipper
Step 11. Concertina fold the last side of PFD
Step 12. Fold the bottom of PFD so it fits within the
valise and zip the valise to the end point.
Step 13. If applicable close Velcro closure over zipper
weak link
Step 14. Your PFD is now operational
THIS DOCUMENT IS THE COPYRIGHT OF SAFETY MARINE AUSTRALIA PTY LTD Date Saved Sep‐14 OM sma1060.docx [Status]
Page 14 of 19 Date Printed 22‐Sep‐14 ROUTINE INSPECTIONS OF YOUR PFD
Warning:
Seek help if you are not confident in the self inspection and servicing of your Inflatable PFD in
accordance with these instructions. Take your Inflatable PFD to a Roaring Forties service station for
professional servicing or contact Safety Marine Australia (see contact information on front of this
manual).
Before each boating outing, it is crucial that you check your PFD for the following:‐
It is properly armed;
‐
It is free of tears and punctured holes;
‐
The straps, sewing seams & stitching are strong & intact;
‐
All other components are in good condition.
Inspect the inflatable portion of the PFD in accordance with the CARE AND MAINTENANCE INSTRUCTIONS.
CARE AND MAINTENANCE INSTRUCTIONS
Check the following at the intervals listed below.
1) After Each Use: Remove and inspect the CO2 cylinder from the inflator. If your model is SMA1062, also
remove the automatic cartridge.
i. Check and clean all components to remove the dirt. Where there is corrosion, replace the component.
ii. Check that the CO2 cylinder has not been pierced. If pierced or used, replace with an unused 33 gram CO2
cylinder. The cylinder for the SMA1061 is contained in accessory pack KIT160. The cylinder for the SMA1062
is contained in accessory pack KIT400.
iii. Check the manual lever to ensure it is in the upright and ready position with the green indicator pin properly
installed.
2) Periodically: Recommended that you test your PFD for inflation leakage every 3 months.
i. Inflate your PFD orally until it is firm and leave it overnight. If your PFD does not hold its firmness the next
day, it means a leakage is present. You should replace your PFD or take it to a Roaring Forties service station
for evaluation and/or servicing.
If no leakage is found, repack the Inflatable PFD as outlined in the Repacking section.
3) Annually:
i. Fully inflate your PFD and hold oral tube valve under water to test for valve leakage. If bubbles appear,
deflate and reinflate to test again. If it continues to leak, take your Inflatable PFD to your nearest Roaring
Forties dealer for proper attention.
ii. Visually examine your PFD for physical damage like excessive abrasion, wear & tear, suspect stitching and
contamination. Send it to your Roaring Forties service station for evaluation and/or servicing if you are
confident in undertaking the task.
iii. Replace the automatic cartridge
If the results of all the required tests and visual inspections are satisfactory, you now have to rearm your PFD and
repack PFD as described above.
Record details in Table 1 Roaring Forties Accessories
Re-arm kit (KIT160)
For SMA 1061
Re-arm kit (KIT400).
For SMA 1062
THIS DOCUMENT IS THE COPYRIGHT OF SAFETY MARINE AUSTRALIA PTY LTD Date Saved Sep‐14 OM sma1060.docx [Status]
Page 15 of 19 Date Printed 22‐Sep‐14 Cleaning and Storing of Your Inflatable PFD SMA1061
Remove the CO2 cylinder. Use warm, soapy water to hand wash your PFD with a sponge and rinse it off with
clean water. Dry your PFD using a plastic coat hanger. After drying, remember to re-reinstalled the CO2 cylinder
to the inflator. See Re-arming your PFD After Manual Inflation (SMA1061).
Your Inflatable PFD should be stored in a warm, well ventilated & dry place & out of direct sunlight.
Cleaning and Storing of Your Inflatable PFD SMA1062
Remove the CO2 cylinder and auto cartridge. Keep the cartridge dry. Use warm, soapy water to hand you’re your
PFD with a sponge. Rinse your PFD with clean water. Dry Inflatable PFD using a plastic coat hanger. Ensure the
inflator is thoroughly dry before installing the automatic cartridge. Make sure to re-install an unused CO2 cylinder,
(see Re-arming your PFD SMA1062 as Manual with Automatic Backup or Manual only).
Your Inflatable PFD should be stored in a warm, well ventilated & dry place and out of direct sunlight.
.
WARNINGS:
Do not repair or alter the design of your PFD;
Do not double inflate your PFD – an action where an oral inflation is followed up with
a COs gas cylinder inflation. This may over pressurise your PFD. Thus causing
unnecessary damage to your PFD & even personal injury;
Do not use other size CO2 cylinder except 33gm CO2 gas cylinder;
Do not flex, twist or wring your PFD unnecessary;
Do not store your PFD in confined areas for an automatic. Inadvertent
may cause damage;
inflation
Do not place your PFD in front of heater or direct sunlight. Your PFD welded seams
may delaminate rendering your PFD as unusable.
Do not forget to routinely check the integrity of you PFD
THIS DOCUMENT IS THE COPYRIGHT OF SAFETY MARINE AUSTRALIA PTY LTD Date Saved Sep‐14 OM sma1060.docx [Status]
Page 16 of 19 Date Printed 22‐Sep‐14 TABLE
Serial Number Quarterly visual inspection (Check when completed) Date Purchased I II III Owners Annual Inspection V Biannual Inspection Roaring Forties Service Station Please keep this log with PFD
THIS DOCUMENT IS THE COPYRIGHT OF SAFETY MARINE AUSTRALIA PTY LTD Date Saved Sep‐14 OM sma1060.docx [Status]
Page 17 of 19 Date Printed 22‐Sep‐14