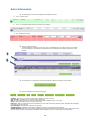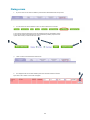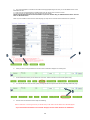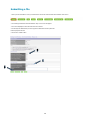
1
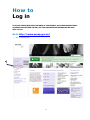
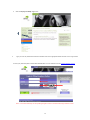
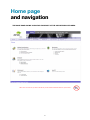
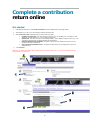
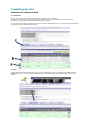
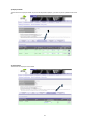
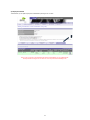
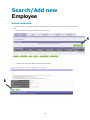
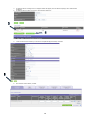
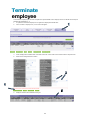
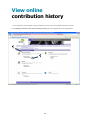
Entering Contributions Online USER GUIDE Employer Services Online 1 Contents How to log in Home Page and Navigation 3 5 Complete a contribution online: Getting Started Completing the Grid Extras Fixing errors Submitting a file 6 7 10 11 13 Search/Add new employee Terminate an employee View online contribution history 15 17 18 2 How to Log in TO ACCESS THE SECURE EMPLOYER AREA OF THE WEBSITE, INCLUDING SUBMITTING A CONTRIBUTION RETURN ONLINE, USE THE USERNAME AND PASSWORD WE HAVE SENT TO YOU. Go to http://www.pssap.gov.au/ 1. Click “for employers” link 3 2. 3. Click the Employers PSSap ‘log in’ link. Type your User ID, Password and Visual verification code in the appropriate fields and click on the ‘Login’ button To reset your password please contact Pillar Administration on 1300 308 806 or email [email protected] Note: It is recommended only one user updating the grid at a time to ensure that all changes made are saved. 4 Home page and navigation THE HOME PAGE SHOWS ICONS FOR EACH PART OF THE SECURE EMPLOYER AREA. Note: this is a secure site you will not be able to you the forward and back buttons on your browser 5 Complete a contribution return online Get started 1. Under Making contributions - Select Send Contribution from the navigation bar or home page options. 2. This will take you to step 1 of 4, select employer code from drop down box 3. Select Contribution data method (the way you want to enter your data): 4. Complete an empty grid— this option should be used if you are not uploading a file – this option is most suitable for a smaller number (e.g. <20) of employee payments) Upload a file -This will be used if you are uploading a PIF file - most suitable for a larger number (e.g. >20) of employee payments. See The Payroll Interface File Specifications Continue with previously saved data - this option is used if you have loaded a file but have not yet completed the steps to submission Copy a previous contribution return - The option should be used if you are copying from a previous completed return. Click Continue. Please note: as website contribution data is updated at the end of each business day, you may send contributions for only one Pay Period on any given day. 6 Completing the Grid THERE ARE FIVE TABS IN THE GRID 1) Contributions (a) If you are using the empty grid this tab will allow you to manually type the information. (b) If you are using a PIF file / Continue with previously saved data / Copy a previous contribution return you will see the contributions in the grid under the Contributions tab after the file is uploaded. Any new employees will appear on the top section of the screen under “Other Employee(s)”. You will be able to manually add them by clicking on the green ‘Add New Employee’ button 2) Salary This tab will show the latest salary information. If there isn’t any information on the PIF, it will show the information stored in our administration system. If you have manually added employees in the contribution tab, their information will be required to be updated. 7 3) Employee Details This tab will show the employees details. If you have manually added employees, you will be required to updated the data in this tab. 4) Contact Detail This tab shows the employees contact details 8 5) Employment details This tab allows you to update employment related data by clicking on the ‘i’ button Note: If you see errors on any tab these will need to be fixed before you can submit the file. Please proceed to ‘Fixing errors’’. If there are no errors proceed to ‘Submitting a file’. 9 Extra Information The employee lines in the grid may appear in three different colours. 1) Green - data is correct 2) Grey - no contribution details have been entered for this employee 3) Pink - Employee has errors There are 2 parts to the grid a) Other Employees- employees who are new, have no association with your employer code or have ceased b) Current employees- This will show all employees that are associated to the employer code that you have selected. You can search for an employee in the grid by selecting the “Search for Employee in Grid” button There are 8 buttons on the bottom of the page Continue - If there are no errors the continue button will take you to the next step. Save for later - This allows you to save and return at a later time. Edit - The edit button returns to the “making contributions-sending contributions- step 1 of 4” page Cancel - The Cancel button returns you to the “home” page. Next error - When in a tab that has errors, this will take you to the next error that requires fixing. Note, this button will only display when there are errors in the grid. Error messages - Provides a list of all errors and warnings Validate this page - Validates current page and displays any errors or warning that may require fixing. Validate All Data- Required to perform further validates once data has been altered to ensure that the update made is correct and does not cause any further errors/warning. Validates all data and displays any errors or warning that may require fixing 10 Fixing errors 1. If you see errors in one of the five tabs they will need to be fixed before the file can proceed. 2. You can click on the ‘Error messages’ to give you a list of all the errors on the file a) You can then sort the warnings and errors by selecting the tick box and selecting “show” b) You can also export errors/warnings to an excel document by selecting “export to excel’ c) Click “back to entry” to return to the main screen. 3. When you click on the tab that has “Data errors” 4. The employees with errors will be shaded a pink colour and there will be an 'i'button If you click on the ‘i' button a new screen will appear 11 5. The errors will appear in a red box on the bottom of the page, depending on the error you can the details correct on the table above this box a) Once errors are corrected select the ‘Validate’ button, this will clear all errors out of the red box b) Once all errors are cleared select the ‘save changes and return’ button Please note this button does not save information if you are to exit the site, you will still need to select “save for later” on the main screen Note: If you are unable to correct the error from this page you may have to correct it from the PIF file and re upload file b 6. When you return to the grid and the errors have been corrected the employee row will be green 7. In each tab that has errors you can click on the ‘next error’ button to find the next error that requires fixing. 8. You can also fix some errors from the grid by entering data into the required white box and selecting validate this page. 9. Once all errors are cleared the file is ready for submitting Note: to avoid error re-occurring next time you submit a file you will need to correct details in the data base/payroll. If you need further information on error details “Employer services online business rule Validations” 12 Submitting a file 1. Once you have fixed all the errors you will be able to click on the continue button at the bottom of the screen. 2. The ‘Making Contributions-Send Contribution- Step 3 of 4’ screen will appear 3. The screen displays the amounts which have been entered 4. In the Payment details section, choose a payment method from the drop down list Enter the payment amount 5. Click on the ‘submit’ button 13 6. ‘Making contributions – Send Contribution – Step 4 of 4’ screen will display. This is a confirmation page which may be printed or saved 14 Search/Add new Employee Search employee To add an employee you can either complete the required details in the payroll system to create new member on the PIF file or: 1. Add the member on the grid by Selecting ‘Add New Employee’ 2. Complete all or some of the Employees details and select search 15 3. 4. 5. 6. If employee has an existing account employee details will appear, tick box add as employee, then “Add selected employee” If employee does not have an account, click “add new employee” If this is a brand new member you will need to complete Employees details, click Save New member will be added / created. 16 Terminate employee To terminate a employee you can either complete the required details on the employee line on the PIF file See the Payroll Interface File Specifications or 1. To update an terminated employee on the grid select “Employment details tab” 2. Click “i” button in employee row, a new screen will appear. 3. Under “Employment Cessation Date” enter date and under “reason code” select reason from the drop down box 4. Select “Save Changes & Return” button 5. Employee will show as terminated on the grid 17 View online contribution history You can download or view full details of online contribution returns that you have submitted in the last 12 months. 1. Select Making Contributions then Online Contribution History from the navigation bar or home page options. 18