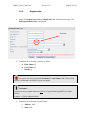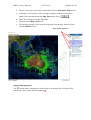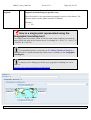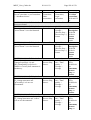
1
MEST_User_Guide.doc 2011-11-23 Page 1 of 159 MEST User Guide 2011-11-23 1. GENERAL OVERVIEW – Getting Started...............................................................4 1.1. Using this Guide..................................................................................................4 1.1.1. Audience.......................................................................................................4 1.1.2. Navigation and Icons....................................................................................4 1.1.3. Feedback.......................................................................................................5 1.2. Metadata Entry and Search Tool (MEST)...........................................................6 1.3. Supported Browsers............................................................................................ 6 1.3.1. Printing.........................................................................................................6 1.4. Metadata and the Data Standard..........................................................................7 What is metadata used for?............................................................................... 7 What are the benefits to the researcher for submitting their data?....................8 1.5. Data Access.........................................................................................................8 1.5.1. Registration.................................................................................................. 9 1.5.2. Logging In..................................................................................................12 1.5.3. Change Password....................................................................................... 12 1.5.4. Forgotten Password....................................................................................13 1.5.5. Logging Out............................................................................................... 14 1.5.6. Clear Browser Cache..................................................................................14 1.6. Configuring Internet Explorer to enable Opening Data Files........................... 18 2. SEARCH..................................................................................................................19 2.1. Output Options..................................................................................................19 2.2. Tips for Searching............................................................................................. 19 2.3. Simple Search....................................................................................................21 2.3.1. To Search – Free Text:...............................................................................21 2.3.2. To Search – Geographic Location:.............................................................22 2.3.3. Reset Search:..............................................................................................23 2.4. Advanced Search...............................................................................................23 2.4.1. How to Use Advanced Search:...................................................................24 2.4.2. What?..........................................................................................................25 Why have my search results returned metadata records without downloadable data, even though I searched using the ‘Data for download’ option? .................27 How do I search for particular funding schemes and/or organisations associated with a resource? ................................................................................. 27 2.4.3. Where? .......................................................................................................27 How can I select a more precise geographic location?................................... 28 How come the results are not how I expected when I used the ‘is completely contained by’ option?...........................................................................................28 2.4.4. When?.........................................................................................................29 What time zone is being used when I search?.................................................30 2.4.5. Other Advanced Search Options ............................................................... 30 2.4.6. Reset Search:..............................................................................................31 2.5. Remote Search...................................................................................................32 2.5.1. How to Use Remote Search:...................................................................... 32 2.5.2. What?..........................................................................................................33 2.5.3. Where? .......................................................................................................33 How come the results are not how I expected when I used the ‘is completely contained by’ option?...........................................................................................34 2.5.4. From?......................................................................................................... 34 2.5.5. Other Remote Search Options....................................................................35 MEST_User_Guide.doc 2011-11-23 Page 2 of 159 Why didn’t all results return from the Remote search?...................................35 2.5.6. Remote Search Results:..............................................................................36 2.5.7. Reset Search:..............................................................................................36 2.6. Customised Searching.......................................................................................36 2.6.1. Table of Custom Search Parameters.......................................................... 37 3. MAP VIEWER.........................................................................................................40 3.1. The Map............................................................................................................ 41 3.2. Top toolbar icons:..............................................................................................42 3.3. Layers................................................................................................................43 3.4. Bottom toolbar icons......................................................................................... 44 3.5. Adding interactive maps to the Map Viewer.....................................................47 4. VIEWING AND DOWNLOADING.......................................................................50 4.1. Search Results................................................................................................... 50 4.1.1. Remote Search Results:..............................................................................50 4.2. Output Display.................................................................................................. 50 4.2.1. Select Options.............................................................................................50 4.2.2. Sort Output List..........................................................................................51 4.2.3. Refine Output List......................................................................................51 4.3. View Results......................................................................................................52 4.3.1. View Record...............................................................................................52 4.3.2. By Profile................................................................................................... 52 4.3.3. By Group....................................................................................................53 4.3.4. XML view.................................................................................................. 56 4.4. Download Data Set(s)....................................................................................... 56 4.4.1. Search Output.............................................................................................57 4.4.2. Metadata Record.........................................................................................57 5. RECORD MANAGEMENT....................................................................................60 5.1. Metadata Creation Information......................................................................... 61 5.1.1. Basic Layout of a Metadata Record...........................................................61 5.1.2. Field Obligations........................................................................................61 5.1.3. Additional Elements or Fields....................................................................62 5.1.4. Suppressing Elements or Fields................................................................. 62 5.1.5. Field Information........................................................................................63 5.1.6. Metadata Creation Tips.............................................................................. 64 5.2. Create Metadata Record.................................................................................... 64 5.2.1. Metadata Record – Template and Group Selection....................................64 5.2.2. Creation View – By Group.........................................................................65 How do I ensure my contact details remain up-to-date?.................................79 How do I decide which ‘Role’ is correct to describe the function performed? ..............................................................................................................................80 When are c-squares necessary?.....................................................................106 5.2.3. Validate the Record..................................................................................119 How come clicking on a calendar icon does not bring up the calendar? .....126 What happens if I have an error that is not listed in the table above? ..........126 How come I can not find the field (-block) where the error originates? ......126 The error table above refers to a field name that appears multiple times on the edit screen, I don’t know which one to edit? .....................................................126 How come clicking on a calendar icon does not bring up the calendar? .....131 What happens if I have an error that is not listed in the table above? ..........132 MEST_User_Guide.doc 2011-11-23 Page 3 of 159 How come I can not find the field (or element) where the error originates? ............................................................................................................................132 The error table above refers to a field name that appears multiple times on the edit screen, I don’t know which one to edit? .....................................................132 5.3. Adding Thumbnail Images..............................................................................133 5.4. Upload File(s) .................................................................................................135 What characters are permitted in a file name?.............................................. 136 What kind of file formats can the attachment have?.....................................137 Can I rename uploaded files? ....................................................................... 137 What happens if the wrong file is attached? .................................................138 Can I update the saved data file with additional file versions? ....................138 How are multiple files uploaded?..................................................................138 5.5. Upload URL....................................................................................................138 5.6. Assign/Alter Access Privileges....................................................................... 139 5.7. Assigning Categories.......................................................................................141 5.8. Cloning Records..............................................................................................141 5.9. Edit Metadata Record......................................................................................143 Are there limits to how much content I can store in a metadata record?......144 5.9.1. Editing in XML View.............................................................................. 145 5.10. Delete Metadata Record................................................................................ 145 5.11. Simple Metadata Form..................................................................................146 Appendix 1: Contact details...................................................................................... 152 Appendix 2: Country ID Reference List................................................................... 156 We would like to acknowledge the work of the staff at eMII IMOS, for allowing us to edit their MEST User Guide to create this IMAS specific MEST User Guide. MEST_User_Guide.doc 1. 2011-11-23 Page 4 of 159 GENERAL OVERVIEW – Getting Started 1.1. 1.1.1. Using this Guide Audience The Metadata Entry and Search Tool (MEST) User Guide provides a comprehensive guide to understanding and using the MEST. It is not a technical guide to the MEST, nor does it discuss MEST-related software, rather, it provides guidance for users to browse, search, analyse and download MEST holdings of metadata, data and related materials. Information about creation of a metadata record, attaching files and related materials and maintenance functions is also discussed. The intended audience for the MEST User Guide are those with an interest in Marine Science, including academics, scholars, students, as well as industry and management within the Marine Science community and research space. 1.1.2. Navigation and Icons In addition to the navigation available via the contents pages, throughout the user guide references to other sections of the document will contain links to assist navigation between relevant sections (on the reference select ‘CTRL + Click’ to follow the link). Throughout the guide information will be presented that supplements the current discussion. The information will be presented within a grey box. The following icons will provide an indication of the content of the sub-text boxes. Frequently Asked Questions Important Information Hints and Tips Warnings/Known Issues/Future Developments MEST_User_Guide.doc 2011-11-23 Page 5 of 159 It is possible to navigate directly to the Frequently Asked Questions via the contents page. 1.1.3. Feedback Feedback and comments are welcome regarding the User Guide. The guide is a living document to be amended with future software releases and implementation of enhancements. If you would like to submit feedback please select the Contact us link, and in the Contact us form fill out the following fields: • Name • Organisation / department • Email • Feedback / comments Follow this by selecting the Accept button. Example form shown below. Back to Top MEST_User_Guide.doc 1.2. 2011-11-23 Page 6 of 159 Metadata Entry and Search Tool (MEST) Welcome to the Metadata Entry and Search Tool (MEST), a tool which aids in the discovery and distribution of data. The MEST allows browsing, uploading, downloading and online analysis of data. The descriptive information gathered by this tool is based on ISO19115 and its subset the Marine Community Profile (MCP of ISO 19115), for the development and accurate description of geo-spatial metadata records. The MEST offers a range of functions including: • A searchable catalogue of metadata records describing both geospatial and non-geospatial data and other resources, • Capacity to search for, edit and publish metadata records (conforming to several metadata standards) on the local MEST catalogue, • Capacity to place permissions on records, to allow controlled public release, • Data files and related ancillary information (including documents) can be directly uploaded, downloaded from metadata records, • Capacity to search for records on remote catalogues, • Links within local metadata records that will display mapped data, • A web mapping tool which allows viewing of mapped data from a range of remote servers. Back to Top 1.3. Supported Browsers The Metadata Entry and Search Tool (MEST) is optimised to operate with the latest stable versions of Internet Explorer and Mozilla Firefox. At the time of writing (February 2010) the latest stable version of Internet Explorer is v7, and for Mozilla Firefox it is v3.5.7 Browsers such as IE 5 and older, and Firefox 1 and older are not compatible with the MEST. More recent versions of Internet Explorer (6+) and Mozilla Firefox (2+) may or may not have full functionality, and shall remain unsupported. Alternative browsers are to be used with this website at your own risk. 1.3.1. Printing Read your browser’s help guide for information on printing. Internet Explorer: 1. From the menu, select Help > Contents and Index. MEST_User_Guide.doc 2011-11-23 Page 7 of 159 2. Type in the field: ‘printing webpages, changing how a webpage looks’ and select the Display button. Mozilla Firefox: http://support.mozilla.com/en-US/kb/Printing+a+web+page?s=printing Back to Top 1.4. Metadata and the Data Standard Metadata is commonly known as ‘data about data’, it is the information pertaining to the entire dataset, describing the name, format, context, content, structure and control of, or over, data. It may also provide information related to the purpose, quality, and location of the data as well as information related to its creation. Australian Ocean Data Centre, Marine Community Profile of ISO 19115 - The Marine Community Profile has been developed in accordance with the rules established by the international standard under the authority of the Australian Ocean Data Centre Joint Facility (AODCJF). The Marine Community Profile is a subset of the international standard and includes all ISO 19115 core metadata elements. In addition, the Marine Community Profile has defined supplementary elements, codelists and vocabularies to assist in the description of marine resources. The metadata profile provides information related to the identification, maintenance and constraints, spatial and temporal extent, spatial representation and reference, quality and distribution of a data set. In this guide the Marine Community Profile of ISO 19115, By Group will be described (see section 4.3.3 By Group) as it is the suggested method for the creation and viewing of metadata records. What is metadata used for? The use of metadata includes, providing: • An adequate description of a dataset, so that someone other than the owner of the data can interpret it, and decide if the dataset may be useful, • A way for the data to be found using a search tool. A useful example of metadata would be a library catalogue record. A catalogue record provides information about an article or book, where it is located and its current status. It also contains keywords, title, author and other fields to enable finding the relevant material through a search engine. MEST_User_Guide.doc 2011-11-23 Page 8 of 159 What are the benefits to the researcher for submitting their data? The IMAS infrastructure using the MEST, will provide secure, long-term data archiving facilities, a platform for collaboratively using and sharing datasets and datamanipulation processes. Submitting your data will: • Encourage communication and collaboration among researchers. • Advertise your research. • Secure your data over the long term. • Allow you to satisfy requirements associated with the funding of the research, such as data archival and sharing. Back to Top 1.5. Data Access It is not necessary to apply for a user name and password to search publically available metadata records and public data, however, a user name and password is required to create metadata records or download and view restricted data. Registration is free and will allow you to download data that has been made available only to registered users. To indicate if data is available for the resource, • Public records with public data will have a Data for Download button visible within the search output or listed in the record in the Distribution element. • Records with restricted data will have, for registered users, a Data for Download button visible within the search output or listed in the record in the Distribution element. For non-registered users the following message will display: ‘Data attached but you cannot download unless you register’. Some datasets are restricted to certain groups made up of registered users, please contact helpdesk (see 1.1.3 Feedback) to enquire about gaining access to higher level restricted data. MEST_User_Guide.doc 1.5.1. 2011-11-23 Page 9 of 159 Registration 1. Select the Register to access or submit data link from the home page. The Self-Registration Form is displayed; Postcode 2. Complete the following compulsory fields: a. First Name (*) b. Last Name (*) c. Email (*) No spaces are allowed in the First Name or Last Name fields. These fields are used to determine the MEST system username. Surnames Surnames with non-alpha characters will be recognised during MEST user name creation. Example – O’Neil or Banks-Smith 3. Complete the following optional fields: a. Address field b. State field MEST_User_Guide.doc 2011-11-23 Page 10 of 159 c. Zip (also known as Postcode) field d. Country drop-down list e. Organisation/department field f. Kind drop-down list g. Profile drop-down list (available options Registered user and Editor). For MEST Versions up to 1.2, DO NOT select any of the other profiles listed. These roles (Administrator, User Administrator, and Content Reviewer) are reserved for staff who administer the website. User Profiles Registered User – select for viewing available metadata records and accessing data. Editor – select for users who, in addition to viewing metadata and data, are interested in creating metadata records and depositing/submitting data. 4. Check that the data entered is correct, and select the Register button. 5. A message will display a. If successful, this message will appear: “Your registration was successful, please check your username and password in your e-mail. Thanks. Key registration details entered: <firstname> <lastname> (<email address>)” The registration email should appear in the inbox of the submitted email address shortly. Follow the instructions in the email. Registration may fail due to incorrect or insufficient information listed in the form. A warning message will appear to prompt you for the required correction. b. If registration fails for reasons such as incorrect validation of the information supplied, the following message will appear: “Sorry, registration failed, please try again later.” OR MEST_User_Guide.doc 2011-11-23 Page 11 of 159 “Sorry, registration has FAILED because we could not send an email to the address you gave us. Please check your details and try registering again.” OR “Sorry, registration has FAILED because you are already a registered user. If you have forgotten your password, please contact IMAS Data Manager on [email protected] A reset password option will be available soon. If you urgently need to logon and cannot contact the IMAS data manager then re-register using a slightly different name as an interim measure. Key registration details entered: <firstname> <lastname> (<email address>)” The registration will need to be restarted (read through the trouble shooting steps below and then return to step 1). For MEST Version 1.1.1+, the MEST creates usernames based on the initial of the First Name and the complete Last Name. For newly registered users with identical names to existing users, a number is added at the end of the username (for example, SmithJ001 is the username for John Smith who was second to register). i. If the username already exists because you forgot you had signed up previously (using the same First Name, Last Name and Email), check in the email account for an email that contains login details. ii. If you have lost your password, follow the Forgotten Password instructions to regain access to your account. iii. If signing up for a second time with the same name but a different email address, to use the same account instead, contact (Feedback) the MEST administrator and they can update the email address details held against the original account. c. It is advised to change the password upon receiving the registration email. Follow the instructions in the section: Change Password. Back to Top Change to User Name To change user name details please select the Contact us link from the main page. MEST_User_Guide.doc 2011-11-23 Page 12 of 159 The MEST administrator can update the user name details held against the account. 1.5.2. Logging In To log into the MEST, 1. On the home page, enter the account details in the Username and Password fields. 2. Select the Login button. The Username and Password fields are case sensitive. Make sure the Username matches the case as given upon registration, and the Caps Lock key is off. Back to Top 1.5.3. Change Password Once a username and password have been provided, it is a recommendation to change the password. 1. Select the Administration link from the home page. 2. Select Change password from the Personal info list. The following Change Password screen is displayed: MEST_User_Guide.doc 2011-11-23 Page 13 of 159 3. Enter the old (current) password in the Old Password field. 4. Enter the New Password and to reconfirm enter the new password a second time in the Confirm new password field. Passwords must be a minimum of 6 characters long, and must not contain spaces. Non-printable characters can not be used. 5. Select the Save button. If the password selection was successful the following screen is displayed: If it was unsuccessful, a message will appear indicating what needs to be fixed. • Was the Old Password typed in correctly? • Does the New Password field match the Confirm new password field? • Do spaces need to be removed from the New Password? • Is the password a minimum of 6 characters? • Were any of the fields left empty? 6. Close the screen and select Close window ( ) for the Administration screen. 1.5.4. Forgotten Password If the user name or password has been forgotten please select the Contact us link, and in the Contact us form fill out the following fields: • Name • Organisation / department • Email • Feedback / comments stating that password has been forgotten Follow this by selecting the Accept button. MEST_User_Guide.doc 1.5.5. 2011-11-23 Page 14 of 159 Logging Out Always log out when finished using the MEST. 1. If - in addition to the main MEST window - there is a window containing a metadata record open, close it first and return to the main MEST window. Doing this prevents the metadata record becoming locked. Otherwise, continue to step 2. 2. In the main MEST window, select the Logout button. 3. For additional security, close the window that was used for the MEST. Back to Top 1.5.6. Clear Browser Cache Prior to using the MEST for the first time, and after an upgrade, it is recommended to clear the existing browser cache. Failure to do so may result in limited functionality. Internet Explorer 1. On the Tools menu, select Delete Browsing History. MEST_User_Guide.doc 2011-11-23 Page 15 of 159 2. In the Delete Browsing History dialog box, locate the Temporary Internet Files section and select Delete files. MEST_User_Guide.doc 2011-11-23 Page 16 of 159 3. A Delete Files dialog box will appear, asking you to confirm you want to delete the temporary Internet Explorer files. Select Yes. 4. Select Close when in the Delete Browsing History dialog box to continue with using the MEST. Mozilla Firefox 1. On the Tools menu, select Clear Private Data. a. If this option is not available, see instructions for Mozilla Firefox 3.5.x. 2. In the Clear Private Data dialog box, tick the checkboxes next to Cache and Cookies. MEST_User_Guide.doc 2011-11-23 Page 17 of 159 3. Select Clear Private Data Now. Back to Top Mozilla Firefox 3.5.x 4. On the Tools menu, select Clear Recent History… 5. Expand the Details section using the ‘expand’ button. 6. Select Cache and deselect all other options. Select OK. MEST_User_Guide.doc 1.6. 2011-11-23 Page 18 of 159 Configuring Internet Explorer to enable Opening Data Files Earlier versions of Internet Explorer did not show a dialog box providing the options to save or open files. If you are using a version of Internet Explorer earlier than version 6, and want to download files of a particular kind, e.g. Microsoft Office applications Word, Excel etc, then configuration of Internet Explorer will be required. To configure Internet Explorer 1. Open My Computer 2. On the Tools menu, select Folder options. 3. Select the File Types tab. 4. In the Registered file types list, select the specific Office document type (for example, Microsoft Excel Worksheet), and then select Advanced (or Change…). If the Advanced and Change… buttons are not available to select and are greyed-out, it is possible that these options have been disabled. Contact your System Administrator. 5. In the Edit File Type dialog box, select to clear the Browse in same window check box (or select to clear the Open Web documents in place check box). 6. Select OK. MEST_User_Guide.doc 2011-11-23 Page 19 of 159 Datasets should be saved with a file extension matching the document type e.g. size_lip.xls for Microsoft Excel spreadsheets or survey.csv for comma separated value files. Back to Top 2. SEARCH The following options are available to users of the MEST: • Simple Search (the default search type) - a simple free text or location search; • Advanced Search - a more detailed search where users can specify which areas of a record the search term will apply, Advanced Search also performs a more detailed geographic search, and can filter results based on date created/modified, catalogues, categories, and associated groups. • Remote Search - the default search option searches the content of the local MEST, Remote Search includes the function of searching geospatial catalogues of data not hosted on the server, e.g. US catalogues. 2.1. Output Options To adjust the presentation of the search results, select the [+] button for Options or the Options link itself. The output options include adjusting how results are sorted, the number of Hits per page, and whether results are presented in Output that is Full (including thumbnail images and ratings area) or Text only (just text and small logos). Back to Top 2.2. Tips for Searching The number of likely hits for a search topic will be determined by the search method and selection criteria, listed below are general tips worth noting. MEST_User_Guide.doc 2011-11-23 Page 20 of 159 • Avoid being too specific in the search, start with more general search terms before narrowing the search with very specific terms, e.g. if you are looking for data on coral spawning, start by typing in ‘coral’ to determine the extent of coral data available. • Avoid using odd punctuation such as ?, *, ~, etc. (Some symbols are acceptable in certain circumstances: full-stop (.) and comma (,) for search terms like “A.R.C” and “2,000”; single quote (‘) for words like “owner’s”; ampersands (&) and at symbols (@) can be used once in a search term made of letters, such as “[email protected]”; hyphens (-) and underscores (_) can only be used in a search successfully when in terms containing numbers or number-letter combinations). • Boolean operators (e.g. “AND”, “OR”, “NOT”) can be used to search the MEST, and remote catalogues. They are not case sensitive. Please note that “NOT” can not be used at the start of the search terms. • A wildcard symbol (*) can be used to truncate terms and expand a search (but only at the end of a partial word, e.g. trunc* - not inside a word like trunc*te). It is important to use the wild card symbol (*) while using Simple Search if you are uncertain about spelling. Simple Search will find whole words only. *Alternative – Using the Advanced Search change the Spelling match level. • Phrase searching? Double quotes can be used around text to look for an exact phrase. Because it is an exact phrase the Boolean operators (e.g. “AND”, “OR”, “NOT”) will not work inside “double quotes”. • To search using a phrase when searching, for example, a record with odd punctuation (non-alphanumeric characters) in the title, remove non-standard characters, so a record containing "Where? Australia." is found using the search terms "where australia", and "(1942 - 2005)" is found in a search for "1942 2005". An exception to this is when hyphens (-) are within a keyword containing numbers, in which case a record containing "30-42" will be found by searching for "30-42". • Text and operators are not case sensitive. • Nested searches are not available. • Related records in the local MEST can be searched for and discovered via two mechanisms: o Parent Identifiers: A record is identified as a parent record if its unique File Identifier is listed in the Parent Identifier field of any other record. A parent record is used to indicate that a child record inherits information from a higher record order within the MEST therefore alerting the user to the file id of the parent record. It is possible to find child records by conducting a search by the File Identifier of the parent record (using the To Search – Free Text: search option). The first 5-6 MEST_User_Guide.doc 2011-11-23 Page 21 of 159 characters of the File Identifier (also known as the UUID – Universal Unique IDentifier), truncated with a ‘*’, is sufficient to find the record (e.g. ‘2b4cfcf0*’ ) When searching for related records, should I put the File Identifier (UUID) in the ‘Free Text’ field or the UUID field? The Free Text field. Putting the UUID in the UUID field would tell the search form to only look for records that own that file identifier, instead of files that are related to that file identifier. o Aggregations: Related records can be linked by a common generic title in the Aggregation Information section of each record. Find these records by conducting a Free Text phrase search, using part of the title of the aggregation. Aggregation information is a more flexible way of linking metadata records. Understanding the Search Results There are a number of situations where the search results are not as expected, in particular when using the free text Simple Search. Examples include, searching for a particular author, UUID or record ID. • The author may also be referenced within other records as the record contact or within the credit or supplemental information. • If parent and child records exist each will have a reference to the same UUID. Back to Top 2.3. Simple Search The Simple Search option allows searches to be conducted in two main ways: either a free text search for words or phrases, including keywords, occurring anywhere in a published metadata record, or to conduct a search for metadata describing a resource associated with a particular geographic area. 2.3.1. To Search – Free Text: 1. From the home page, select the Simple Search tab. 2. Enter the search term, or terms, in the What? (also known as ‘free text’) field. 3. Press return or select the Search button . MEST_User_Guide.doc 2011-11-23 Page 22 of 159 Free Text Search – One or more thematic keywords or strings in quotes can be typed. For example, Keywords, Names, Surnames and Species Names can be searched. If the words Estuary Macroalgae are typed, the search will look for any occurrence within the metadata of the word Estuary and any occurrence of the word Macroalgae. 2.3.2. To Search – Geographic Location: Adjust the map to the appropriate scale using the zoom and pan options on the Map Tool Bar, located above the map. 1. Select the required zoom or pan icon from the Map Tool Bar. 2. Click on the map and drag across the required location. 3. Select the area to search using the Select an Area of Interest icon (the icon on the right hand side of the Map Tool Bar), drag across the required area on the map. 4. Select the Search button Geographic Area Selection Ensure that the Select an Area Of Interest option from the Map Tool Bar is used to identify the search area. A red dotted area will indicate that an area of interest has been selected. Using the Zoom in option is not sufficient to define the required search area. Caution – it is possible to select the area of interest prior to using the Zoom in option, this may result in the area boundary lines to be outside of the view. The “simple” geographic search will search for resources with a geographic coverage overlapping the area selected on the map (indicated by red dotted line). Example: This ‘Area of Interest’ geographic area does This geographic not overlap area overlaps This geographic area overlaps Map Tool Bar MEST_User_Guide.doc 2.3.3. 2011-11-23 Page 23 of 159 Reset Search: Search options can be reset at any time – To reset a Search (Free Text or Geographic) in MEST version 1.1+: Select the Reset option located below the Search button. To reset a Free Text Search in MEST version 1.0: Select the Reset option located below the Search button. To reset a Geographic Location Search in MEST version 1.0: When the map area of a search has been used, the search options need to be reset manually. Select the Zoom to full map extent icon above the map (or select the ‘Any’ option of the Geographic Area drop-down list below the map), and then select the Reset option located below the Search button. Selecting the Reset button only is not sufficient to return the complete Map Area. Refreshing the search page or switching between search options does not reset the search. You must select Reset to remove any saved searches. Back to Top 2.4. Advanced Search The Advanced Search allows the users to be more specific in the search criteria. Options include, search particular metadata fields, search by geographic or temporal extent and search particular resource types (categories). Within the Advanced Search it is possible to enter text into specific fields and/or modify the search as follows Restrict search to records that: • have Data for download attached; • have Interactive Maps attached; • match additional geographic search options; MEST_User_Guide.doc • 2011-11-23 Page 24 of 159 match the selected time coverage. Conduct more or less Precise matching of search terms. The available search fields are organised into 3 main sections: What?, Where? and When? 2.4.1. How to Use Advanced Search: 1. From the home page, select the Advanced Search tab. 2. Enter the specific content, geographical or temporal search criteria. 3. Select the Search button . Information can be added into one or more field(s) to complete a search. If you do not want to search by a given field simply leave that field blank. The following Advanced Search screen is displayed to non-registered MEST users. The following Advanced Search screen is displayed to registered MEST users. A registered user has more viewing rights to metadata records on the MEST and can restrict their viewing options to their own records, or to specific groups they are part of. MEST_User_Guide.doc 2011-11-23 Page 25 of 159 Question mark symbol provides tips on how to use field Restrict viewing options to own record(s) Restrict viewing options to records published by certain usergroups 2.4.2. What? In the What? section it is possible to search either for text located anywhere in a metadata record, the Free Text field, or for text located in some of the main fields contained within a metadata record. The metadata fields that can be directly searched • Title (identify records that contain search terms anywhere in a metadata record), • Abstract (identify search terms specifically in the abstract of the record), • Credit, • Keywords (identify records by entering commonly used word(s), formalised word(s) (see further information below) and/or phrase(s) used to describe the dataset), and • Data Parameter (identify records with parameters or variables used to describe the data set e.g. Degrees Celsius, Metres, etc.). MEST_User_Guide.doc 2011-11-23 Page 26 of 159 Search Tips for the Data Parameter and Keywords fields The section Tips for Searching also applies to the Data Parameter and Keywords fields. Typing in the first few letters of words that exist in either the Keyword or Data Parameter fields will result in a selection list being presented. If no list is presented the word has not been stored within a Keyword or Data Parameter field. Keywords The pre-emptive words are resultant of words that have been entered into existing metadata records; includes GCMD thesaurus selections, free text, geographic locations and CAAB codes. Data Parameters The data parameter field facilitates focussed searching of particular types of data and assists the searcher to identify the content of the data files, and search for similar elsewhere. The pre-emptive words appearing within the Data Parameters field are those already stored within a record. The search results can be restricted to records with – • Data for download, or an • Interactive map MEST_User_Guide.doc 2011-11-23 Page 27 of 159 Why have my search results returned metadata records without downloadable data, even though I searched using the ‘Data for download’ option? *This question applies to MEST versions up to and including version 1.1, but does not apply to MEST version 1.2 and later. The search results return records that contain downloadable data, based on the protocol used during file upload, whether or not that data is accessible. Some data is only accessible when you are logged in as a registered user, while other data is only available to members of private groups. Records with only files with the protocol of Other file for download will not be found in a search restricted to Data for download. If you are interested in what the data of an associated record may contain, contact the Point of Contact person listed on the record. Previous versions of the MEST used different criteria for searching “Downloadable Data”. MEST versions 1.2 and later will prevent the occurrence of records showing in search results without available data being displayed. How do I search for particular funding schemes and/or organisations associated with a resource? The Credit field is used to indicate records related to a particular funding scheme or organisation, such as IMOS, ARC, CSIRO or University of Western Australia. To search for a particular funding scheme or organisation, e.g. IMOS, enter “IMOS” in the Credit field. 2.4.3. Where? The Where? section allows searching for metadata associated with a particular geographic area. The Where? option allows manual entering of coordinates or the ability to quickly select an area using the drop-down menu from the bounding box of. It is possible to request that records/metadata presented in the search result describe either: • the exact geographic area specified (equals); MEST_User_Guide.doc 2011-11-23 Page 28 of 159 • an area/location that overlaps with the geographic area specified (overlaps); • an area/location completely enclosing the geographic area specified (completely contains); • an area/location located outside the geographic area specified (is completely outside of); • an area/location located inside the geographic area specified (is completely contained by) How can I select a more precise geographic location? If you wish to make a more precise geographical search: 1. Navigate to the Map Viewer. 2. Use the Add Marker tool to establish the boundaries of the area you want to search (such as one marker for the top left corner and one marker for the bottom right corner). a. It is possible to specify a single point location. To do so, the maximum latitude - lat (max) must be equal to the minimum latitude lat (min) and the maximum longitude long (max) must match the minimum longitude long (min). 3. Make a note of the latitude and longitude coordinates of each marker (select the Marker List tool to view details). 4. Return to the Advanced Search page, and enter the coordinates into the lat and long fields. More information about the Map Viewer is available in the MAP VIEWER chapter. How come the results are not how I expected when I used the ‘is completely contained by’ option? While this option is visible, it is not functional in MEST version 1.0. Please do not use this option unless the MEST is version 1.1+. Coordinates entered manually – The following icon will appear if the map coordinates have been altered manually; , select this to update the displayed Area of Interest boundary on the map image or to display received warning messages. MEST_User_Guide.doc 2011-11-23 Page 29 of 159 Refer To Search – Geographic Location: to use the Map Area to define the geographic search criteria. Geographic Area Selection Ensure that the Select an Area Of Interest option from the Map Tool Bar is used to identify the search area. A red dotted area will indicate that an area of interest has been selected. Using the Zoom in option is not sufficient to define the required search area. Caution – it is possible to select the area of interest prior to using the Zoom in option, this may result in the area boundary lines to be outside of the view. 2.4.4. When? The When? section allows searching for records/metadata describing a resource (typically a dataset) which has particular time coverage known as the temporal extent section of the metadata. The temporal extent refers to the coverage of a resource (e.g. sampling start and end dates). When searching using the From and To fields, the MEST looks for records that overlap the specified time period (from MEST version 1.2 onwards). For example, a search for the period ranging from 26 August 2009 to 29 August 2009 will find a record with a temporal extend of 28 August 2009 to 31 August 2009. In earlier MESTs up to version 1.2, an identical search would return records that were contained within that time period, such that a search for the period ranging from 26 August 2009 to 29 August 2009 would not find a record with a temporal extend of 28 August 2009 to 31 August 2009. To select a From and To date and time, click on the calendar icons on the right. Refer to the below diagram for guidelines on how to select a date and time using a calendar. Help on use of calendar Decrease year* Decrease month* Close calendar Advance year* Advance month* Change the starting day of the week Click to select day (and return to search form) * Hold mouse-click for faster selection Click to advance time or shift click to decrease* MEST_User_Guide.doc 2011-11-23 Page 30 of 159 What time zone is being used when I search? When performing an advanced search using the When? section, the time zone used in searching for records is the standard coordinated universal time (UTC). The When? section searches the temporal extent area of each record. It does not search in creation, revision, or publication dates. In future releases, users will be able to pick the time zone they are in. 2.4.5. Other Advanced Search Options What? • Data for download – By ticking this checkbox the search can be limited to only records that contain downloadable data. • Interactive map – By ticking this checkbox the search can be limited to only records that have interactive maps attached. The interactive map is viewed using the MAP VIEWER. • Spelling match - Fuzzy logic can be used to correct for spelling mistakes by selecting an option between Precise and Imprecise. • Universal Unique Identifier (UUID) – search for a file based on its Universal Unique Identifier. This is especially useful in situations where multiple metadata records might have an identical title, or where one metadata record’s title has changed over time. Click on the [+] or the link Universal Unique Identifier (UUID) to reveal where to enter the UUID field. When? The following options are available by expanding the Restrict to section [+]. It is advised that once the Restrict to section has been expanded and changes made, it should not be collapsed. This is because the Restrict to section remembers settings even when collapsed, making it possible for a search to be inadvertently restricted. If in doubt, select the Reset link. • Catalog – restrict a search according to which catalog the records belong to. MEST_User_Guide.doc 2011-11-23 Page 31 of 159 • Category – search for certain record or data types by choosing an option from the category list. • Kind – option to choose to search either for metadata records or templates of metadata records (editors only). • Group – Once logged in, search for (and view) records belonging to a particular MEST user-group. The drop-down list of groups will only list those groups that have given you permission to view their records. Note that leaving the option as - Any - will show all records that you are allowed to view. Not all records made by a user group have been made available to the public. This search option is unavailable, unless a registered user is logged in. The following options are available in the Options section [+]. • Sort by – arrange results by Relevance, Rating (available in a future release), Popularity, or Change Date. • Hits per page – the number of metadata summaries displaying on each page. • Output – display results with or without thumbnail images. 2.4.6. Reset Search: Search options can be reset at any time – To reset a Search (Free Text or Geographic) in MEST version 1.1+: Select the Reset option located below the Search button. To reset a Free Text Search in MEST version 1.0: Select the Reset option located below the Search button. To reset a Geographic Location Search in MEST version 1.0: When the map area of a search has been used, the search options need to be reset manually. Select the Zoom to full map extent icon above the map (or select the ‘Any’ option for the bounding box of), and then select the Reset option located below the Search button. Selecting the Rest link only is not sufficient to return the complete Map Area. MEST_User_Guide.doc 2011-11-23 Page 32 of 159 Back to Top 2.5. Remote Search The Remote Search tool allows users to search the MEST and other remotely located catalogues simultaneously. A Remote Search will provide matching metadata records from the remote catalogues that have been selected. 2.5.1. How to Use Remote Search: 1. From the home page, select the Remote Search tab. 2. Enter the search terms or geographical search criteria (see What? and Where? below for more details). To display more hits per page, change the Hits per page option now before selecting servers, to prevent the server choices being lost. 3. Enter the Profile and Server criteria in the From? section (see From? below). 4. Change the remaining Remote Search options as required (see Other Remote Search Options). 5. Select the Search button MEST_User_Guide.doc 2.5.2. 2011-11-23 Page 33 of 159 What? • Free Text – Identify records that contain search terms anywhere in a metadata record. • Title - Identify records that contain search terms specifically in the title of a record. • Abstract - Identify records that contain search terms specifically in the abstract of a record. • Keywords - Identify records that are associated with a keyword or set of keywords. 2.5.3. Where? The Where? section allows searching for metadata associated with a particular geographic area. The Where? options allow manual entering of coordinates or the ability to quickly select an area using the drop-down menu from the bounding box of. Records/metadata presented in the search result (from MEST version 1.2.2+) describe: • an area/location that overlaps with the geographic area specified (overlaps). Do not use these options if the MEST version is prior to 1.2.2: • the exact geographic area specified (equals); • an area/location completely enclosing the geographic area specified (completely contains); • an area/location located outside the geographic area specified (is completely outside of); • an area/location located inside the geographic area specified (is completely contained by). These options are not available in MEST version 1.2.2 onwards, as external Z39.50 servers are unable to interpret them. MEST_User_Guide.doc 2011-11-23 Page 34 of 159 How come the results are not how I expected when I used the ‘is completely contained by’ option? While this option is visible, it is not functional in MEST version 1.0. Please do not use this option unless the MEST is version 1.1+. Coordinates entered manually – The following icon will appear if the map coordinates have been altered manually; , select this to update the displayed Area of Interest boundary on the map image or to display received warning messages. Refer To Search – Geographic Location: to use the Map Area to define the geographic search criteria. Geographic Area Selection Ensure that the Select an Area Of Interest option from the Map Tool Bar is used to identify the search area. A red dotted area will indicate that an area of interest has been selected. Using the Zoom in option is not sufficient to define the required search area. Caution – it is possible to select the area of interest prior to using the Zoom in option, this may result in the area boundary lines to be outside of the view. 2.5.4. From? To display more (or less) hits per page, change the Hits per page option before selecting Server. If Hits per page is selected after selecting Server, the server preferences may be lost. The servers picked by automatically selecting servers through choosing a Profile will remain, but the servers selected manually will be deselected. Profile - By selecting a profile, it is possible to automatically select a predefined list of servers. For example, you might want to select all the servers with ocean data, so you would then select the profile named Ocean-related nodes. Servers - Use the Server drop-down list to select the preferred remote servers. For multiple selections, hold down the control key (Ctrl) and click on the selections. To MEST_User_Guide.doc 2011-11-23 Page 35 of 159 deselect one server at a time, hold down the control key and click the selection once more. The local MEST server (also known as Local GeoNetwork) is also listed in the list of remote servers (useful for some of our users). Want an unlisted remote server added? Contact the Helpdesk (see 1.1.3 Feedback) with the remote server details and they will arrange for the server to be listed. Metadata results obtained from a third party server, via the Remote Search option, may not have been created with the same standards or be ISO compliant. 2.5.5. Other Remote Search Options Timeout – This option specifies how long the MEST can search remote servers before it must stop. It is recommended that the maximum Timeout option in the dropdown menu is selected. Display remote html - It is possible to view the metadata records in either the format of the MEST or the format of the original record. Images within records may not be visible if the record is viewed in the MEST format and you may not be able to access data. To view all records in their original format check the Display remote html box. Hits per page - Regulate the number of Hits per page by using the drop-down menu. Why didn’t all results return from the Remote search? Some records are only visible when registered users are logged into the local MEST. These records will not be retrieved (even if logged in) when a search is conducted against the local MEST using this Remote Search tab. The remote search conducts a search only for records available to the general public (i.e. only records that are available via a local search of the MEST, not to the general public, will be identified in a remote search). MEST_User_Guide.doc 2.5.6. 2011-11-23 Page 36 of 159 Remote Search Results: In addition to the common elements of the search results area, there are elements of the results that are specific to the Remote Search tab. Details about the common elements of the search results area are available at the start of the VIEWING AND DOWNLOADING chapter. The server title, displayed in red text, is the server the record originated from. 2.5.7. Reset Search: Search options can be reset at any time – To reset a Search (Free Text or Geographic) in MEST version 1.1: Select the Reset option located below the Search button. To reset a Free Text Search in MEST version 1.0: Select the Reset option located below the Search button. To reset a Geographic Location Search in MEST version 1.0: When the map area of a search has been used, the search options need to be reset manually. Select the Zoom to full map extent icon above the map (or select the Any option for the bounding box of), and then select the Reset option located below the Search button. Selecting the Rest button only is not sufficient to return the complete Map Area. To return to a Simple Search of the MEST select the Simple Search tab, at the top of the Search options area. 2.6. Customised Searching This feature is available in MEST version 1.2 and 1.2.1 onwards. In addition to finding data using the available search forms (as covered in chapter 2. SEARCH), it is also possible to perform searches as part of the URL. This enables searches to be saved as links. MEST_User_Guide.doc 2011-11-23 Page 37 of 159 To create a custom search from a URL, use the available parameters from the Table of Custom Search Parameters below. The parameters can be added to the end of one of the below URLs: IMAS: http://mest.imas.utas.edu.au/geonetwork/srv/en/main.home Combined parameters example http://mest.imas.utas.edu.au/geonetwork/srv/en/main.home? tab=advanced&northBL=-10&southBL=44&eastBL=180&westBL=0&hitsPerPage=100 Phrase, truncation and boolean searching apply to Free Text, Title, Abstract, Keywords, Data Parameter, and Credit. Reset the search form before using a link to a MEST custom search if there is already an instance of the MEST open. Performing a search from the URL adds search options to the form, however, any fields that have previously been filled in that are not used in the URL parameters will not be reset; hence the resulting search could become more restricted than expected. 2.6.1. Table of Custom Search Parameters Example ?tab=advanced Options include: [simple|advanced|remote| mapviewer] Automatic search ?search=true Options include: [true|false] Hits Per Page ?tab=simple&hitsPerPage=50 Options include: [10|20|50|100] Sort By ?tab=simple&sortBy=date&output=text Options include: [relevance|rating|popularity| date] Output ?tab=simple&sortBy=date&output=text Options include: [text|full] Free Text any=example Title Abstract Credit title=example abstract=example credit=IMOS Tabs N/A simple |advanced | remote simple |advanced | remote simple |advanced | remote simple |advanced | remote simple |advanced | remote advanced |remote advanced |remote advanced |remote MEST_User_Guide.doc Keywords Data Parameter Data for Download Interactive Map (dynamic) Spelling Match: Precise = 1 Imprecise = .2 Universal Unique Identifier (UUID): Uuid ‘Any’ dropdown box The bounding box of the resource (relation) …the bounding box of (region) Lat (min) (northBL) Long (min) (westBL) Long (max) (eastBL) Lat (max) (southBL) 2011-11-23 Page 38 of 159 themeKey=%22oceans%22 themeKey is the parameter name for Keywords. %22 replaces "double quotes". dataparam=%22sea water temperature%22 Data Parameter "sea water temperature". %22 replaces "double quotes". ?download=on&search=true To leave switched off, omit this parameter. dynamic=on To leave switched off, omit this parameter. any=tent&similarity=.6 Options include: [1|.8|.6|.4|.2] advanced |remote uuid=ac1dea4a-1bb4-495c-938e-b4468ae6bee5 Constraints: must be a hexadecimal number like format shown in example. ffffffff-ffff-ffff-ffff-ffffffffffff ?tab=simple®ion=10 (see …the bounding box of (region) for info) region=338&relation=equal Search for records with area matching Africa. Options include: (advanced) [overlaps|equals| encloses|fullyOutsideOf|fullyWithin]; (remote) [overlaps] region=338&relation=equal Search for records with area matching Africa. To find out the code that belongs to the corresponding geographic location, refer to Appendix 2: Country ID Reference List, or use ‘the bounding box of’ region field and perform an advanced search. Look in the ‘Your advanced search was’ message for the region code. ?tab=advanced&northBL=-10&southBL=44&eastBL=180&westBL=0 Options include: northBL: [-90 to 90] (but greater than southBL) eastBL: [-180 to 180] (but greater than westBL) westBL: [-180 to 180] (but less than eastBL) southBL: [-90 to 90] (but less than northBL) advanced advanced |remote advanced advanced advanced simple advanced |remote advanced |remote simple |advanced | remote Definition of axes: Latitude positive North • -90 = south pole, • 90 = north pole Longitude positive East • 0-360 where 0 = Greenwich Meridian From ?tab=advanced&dateFrom=2009-07- advanced MEST_User_Guide.doc (dateFrom) To (dateTo) Catalog Category My Groups 2011-11-23 01T15:19:03&dateTo=2009-07-31T15:19:03 Constraints: must be in format shown in example. [YYYY-MM-DDThh:mm:ss] ?tab=advanced&siteId=27903d5d-940a-44da8f87-04cfbff6b194 Where emiidev siteId is 27903d5d-940a-44da8f87-04cfbff6b194. To find out what the siteID of the catalog is, perform an advanced search with the chosen catalog, and look in the ‘Your search results were’ message for the parameter pair that starts with siteId. ?tab=advanced&category=audioVideo To find out what the category ID is, perform an advanced search with the chosen category, and look in the ‘Your search results were’ message for the parameter pair that starts with category. ?tab=advanced&groups=2 Where ID of Sample Group is 2. To find out the ID of the group you want to perform a custom search upon, Page 39 of 159 advanced advanced advanced 1. Login and navigate to the Advanced Search form. 2. In the Restrict to section, select the preferred group (no more than one group at a time) from the My Groups field. 3. Select search. 4. On the results page, look through the Your search results were message for the data parameter pair that starts with groups. The associated number is the ID of the group you selected. Records NOT published to these groups Display remote html? (serverhtml ) Timeout Profile ?tab=advanced¬groups=on If you wish to search for the default ‘records published to these groups’, omit this parameter. ?tab=remote&serverhtml=on If you wish to search for the default of not displaying remote html, omit this parameter. ? tab=remote&timeout=30&servers=localhost:21 00/geonetwork,147.109.254.5:5550/tas Options include: [after 10|20|30 seconds] ? tab=remote&profile=203.49.66.2:5550/product %20134.178.63.133:6668/bom_meta %20150.229.226.17:6668/marlin %20150.229.226.17:6668/neptune advanced remote remote remote MEST_User_Guide.doc Server (servers) 2011-11-23 %2059.154.117.67:5550/pages_xml To find out what the correct term is for the chosen profile, contact helpdesk (see 1.1.3 Feedback) and they can provide the correct term for you. ?tab=remote &servers=203.49.66.2:5550/product For searching a single server instance Page 40 of 159 remote ? tab=remote&timeout=30&servers=localhost:21 00/geonetwork,147.109.254.5:5550/tas For searching multiple server instances To find out what the correct term is for the chosen profile, contact helpdesk (see 1.1.3 Feedback) and they can provide the correct term for you. Back to Top 3. MAP VIEWER Map Viewer is an interactive map generated by the Geonetwork that allows the user to create, view and manipulate map layers over a chosen area and/or scale. The Map Viewer can be used to: view Interactive Maps; change the viewing area of the map; change the order, style, opacity and visibility of map layers; add, view and edit markers; and export maps as PDF. In future releases, there will also be the ability to open, save, and email map contexts. MEST_User_Guide.doc 2011-11-23 Page 41 of 159 3.1. The Map The map is the primary focus of the Map Viewer area. It allows the user to view an area over different scales, from a global scale (map ratio: 1:190,488,192) to a local scale (map ratio: 1:1,000). The surrounding toolbar options provide different viewing options including zooming, panning, marking and identifying landmasses on the map. These are explained below (see section 3.2 Top toolbar icons:). Map ratio Resize tool Map ratio drop-down list MEST_User_Guide.doc 2011-11-23 Page 42 of 159 Avoid clicking the map area repeatedly in quick succession in order to avoid slow loading times or potentially crashing the browser. The Map Viewer utilizes the Blue Marble map from NASA’s Visible Earth website: http://visibleearth.nasa.gov/. Back to Top 3.2. Top toolbar icons: Zoom to the full map Refocuses the map view back to the default view (global perspective). Zoom in Zooms the map into a closer view of the selected area. To use – Select the button from the toolbar. Hold the mouse button down while dragging over the desired area. Zoom out Brings the map back to a larger view of the selected area. To use – Select the button from the toolbar. Hold the mouse button down while dragging over the desired area. Pan Allows the user to view other areas of the map other than those in current view while keeping the same scale. To use – Select the button from the toolbar. Drag the mouse in desired direction. Add Marker Adds a marker to the map to record the name and coordinates of a specific location. To use – Select the button from the toolbar and click on desired location on the map. A small box will appear, displaying the coordinates of the location (Lat and Lon), and a marker name field. Enter a name and select the icon to save the marker, or to cancel. Identify a feature on the map MEST_User_Guide.doc 2011-11-23 Page 43 of 159 Identifies landmasses on the map. To use – Select the button from the toolbar and click on the part of the map to be identified (this applies only to landmasses – oceans are not included). A separate window is generated containing details of the landmass. A yellow background behind the tool icons indicates the current tool in use. Refresh Refreshes the map viewing area. Reset Returns the map to the default settings. Back to Top 3.3. Layers The Layers in the MEST Map Viewer utilize the OpenLayers geographical tool. This allows for multiple maps to be layered over each other. The OpenLayers website is: http://www.openlayers.org/. The current layer selected in the LAYERS section is indicated by a blue background. Each entry in the layer section contains the following: Title The Title of the layer (by default, there are two layers included: Country boundaries and Blue Marble world image). Show or hide layers Hides or displays the selected layer on the map. MEST_User_Guide.doc 2011-11-23 Page 44 of 159 Move layer up/Move layer down Shifts selected layer downwards or upwards. Set transparency Sets the transparency of the selected layer. Select transparency % from a drop down menu. Default view is Opaque. Metadata Displays the LAYER INFORMATION box, below the map area (scroll down if necessary). View and select styles The tool that displays information on the available styles, located below the map area. Show the legend Clicking on this icon shows the legend. Click on the legend to hide from view again. Note: some legends, such as the Country boundaries layer legend (available by selecting the Show the legend icon) can be difficult to view due to similar background and foreground colours. Remove layer Removes the layer from the list of layers and the map viewer. Back to Top 3.4. Bottom toolbar icons Add more layers by connecting to other Web Map Servers – ADD A NEW LAYER box This area contains a list of map servers with access to additional layers for adding to the map viewer. To add a new layer 1. Select the include: button and choose a map server. Default map servers listed a. Local GeoServer Web Mapping Server (WMS) i. contains layers that display on the map by default b. NASA JPL OneEarth Web Mapping Server (WMS) c. BlueNet WMS MEST_User_Guide.doc 2011-11-23 Page 45 of 159 d. ‘- Other WMS server’ i. Add a link to an online Web Mapping Service here (for example: http://wms.jpl.nasa.gov/wms.cgi). 2. Press the button once a map server has been chosen. 3. Tick the checkboxes next to the Web Mapping Services to pick the layer(s) for viewing. a. A Metadata link may be available for more details about the layer. b. The 4. Click the icon links to a short abstract about the layer. button. MEST_User_Guide.doc 2011-11-23 Page 46 of 159 You can double click a layer to bring the complete layer into view. Export this map as a PDF This feature allows you to save the map in PDF format. 1. Export the current map view by filling in the following details: a. Title Enter text in this field to display as a Title in the PDF. b. Page Size Select the preferred Page Size of the PDF to be generated. Options are A4, Letter, and Legal. c. Orientation Select the preferred Orientation of the PDF to be generated. Options are Portrait and Landscape. d. Print Layerlist Select Print Layerlist to display the Layerlist in the PDF. e. Print details Select Print details to display details in the PDF. f. Print bounding box Select Print bounding box to display the bounding box in the PDF. g. North arrow Leave this option unselected - when selected, the North arrow option causes an error that stops the PDF from generating. The North arrow option will be available in future releases as an option that allows a North Arrow to be displayed in the PDF. h. Scale Selecting this option enables a Scale to display in the generated PDF. i. Copyright info Enter text in this field to enable Copyright information to display within the PDF. 2. Select the Generate PDF button. Markers will not be saved or displayed in the PDF. Send current context Upload a context Download current context Marker list MEST_User_Guide.doc 2011-11-23 Page 47 of 159 Lists the details of markers added to the map viewer. When there are multiple marker entries, the marker details will display in list form. 1. Select a marker to edit either on the map or from the MARKER LIST. If there is only one marker in the list, it will immediately be editable. 2. From here, edit the Title and Description fields, or copy the Latitude and Longitude numbers. Click the button to save. Latitude and Longitude fields can not be edited. 3. Delete the marker from here by clicking the corner. icon on the bottom right-hand Back to Top 3.5. Adding interactive maps to the Map Viewer 1. Perform an Advanced Search (as detailed in How to Use Advanced Search:), with the Interactive map checkbox ticked (see Other Advanced Search Options). MEST_User_Guide.doc 2011-11-23 Page 48 of 159 2. Choose a record from the search results and click the Interactive Map button. 3. A dialog box will pop up with a message saying the map chosen has been added to the search map and the Map Viewer tab. Select . 4. Select more interactive maps (Optional). 5. Navigate to the Map Viewer tab. 6. The interactive maps will be present in the map viewing area, and also listed in the LAYERS section. Newly added map layers Suppressing map layers The button hides or displays the selected layer on the map. By clicking on this button, the selected layer becomes hidden . MEST_User_Guide.doc 2011-11-23 Suppressed map layers Page 49 of 159 Visible map layers Closing and opening the map viewer using the Close Map Viewer/Open Map Viewer link will not remove recently changed settings. Ensure that you Reset the Map Viewer and/or the search pages before performing a new search. Back to Top Close The cross icon closes the information box below the map viewer. An information box only appears when a tool from the bottom toolbar or the Layers area has been selected. Firefox Firefox Users: often after clicking the ‘Close Map Viewer’ link, clicking ‘Open Map Viewer’ fails to open the map viewer. Refresh the page (F5, or alternately Ctrl+R) to re-display the map viewer. Back to Top MEST_User_Guide.doc 4. 2011-11-23 Page 50 of 159 VIEWING AND DOWNLOADING 4.1. Search Results Once the search is complete the output will be a list of metadata results matching the search criteria. Each metadata record listed in the output will detail the Title, a section of the Abstract, Keywords, Extent (for searches in a geographical constraint), Schema and if applicable a thumbnail displaying a relevant picture or map of the associated location. Metadata records in some instances may also contain an Interactive Map, a link to View in Google Earth, or information regarding data attached to the record. 4.1.1. Remote Search Results: In addition to the common elements of the search results area, there are elements of the results that are specific to the Remote Search tab. The server title, displayed in red text, is the server the record originated from. Back to Top 4.2. Output Display The metadata records within the output list can be viewed and sorted in a number of ways. 4.2.1. Select Options • all – selects all metadata records listed in the output. • none – removes all selections of metadata records. • Actions on selected metadata – at least one metadata record must be selected to use this option. The available options will vary in relation to the ownership privilege level of the record and user security. Actions on selected metadata The following are the available selections for a non-registered user; • Display selected only • PDF - Save search results as PDF MEST_User_Guide.doc 2011-11-23 Page 51 of 159 Display selected only and PDF do not display the selected records when a logged-in user has chosen Templates from the Kind drop-down list as part of their Advanced Search. The following, in addition to the above, are available for registered users with sufficient privileges; • Delete (see section 5.10 Delete Metadata Record) • Update categories (see section 5.7 Assigning Categories) The Categories feature allows users with sufficient privileges to assign categories to the associated record. Check the box next to each category required and press the Submit button. • Update privileges (see section 5.6 Assign/Alter Access Privileges) The Privileges feature displays the privileges associated with a record, and for sufficiently privileged users, will be editable. It will show which Groups a record is Published to, whether members of that group have Editing privileges for that record, whether the Downloadable data and Interactive Map is published to that group, whether the record should be Featured on the home page, and Notify signifies whether the owner of the associated group is notified whenever the record is accessed. Check the box next to each privilege required and press the Submit button. 4.2.2. Sort Output List If the search criteria have returned multiple metadata records it is possible to sort the output results. The sort options are – • Relevance • Rating • Popularity – displayed in the order of the number of times viewed • Change Date – displayed in order of metadata with the most recent revision date (the revision date is updated automatically during the edit process) 4.2.3. Refine Output List The output list can be refined by altering the search criteria, refer to Tips for Searching. The number of metadata records shown in the output list can also be reduced by performing the following steps – MEST_User_Guide.doc 2011-11-23 Page 52 of 159 1. Select the record(s) by placing a ‘tick’ in the box preceding the Title. 2. Expand the available options from the Actions on selected metadata field. 3. Select Display selected only. Only the metadata records selected will be listed in the output. Back to Top 4.3. View Results The metadata profile is organised into a collection of elements and fields (sections or sub-sets of the metadata), the elements and fields available for view will be dependant on the view option selected. For further information about each group see the section view results By Group. 4.3.1. View Record Once the metadata record is identified, 1. Select the record Title within the output list to open the metadata. Once the metadata record is open, there are three viewing options available. To switch view options, select the option in the left hand column of the page. The view in bold is the default view displayed. The three view options – • By Profile • By Group • XML view 4.3.2. By Profile The By Profile option formats the metadata record to a particular view of a metadata standard/profile. Current options for the Marine Community Profile are for - MEST_User_Guide.doc 2011-11-23 Page 53 of 159 • MCP Minimum: Contains the Data Identification and Metadata Info sections (groups) of the Marine Community Profile. • MCP Core: The core metadata components of ISO19115 and, • MCP All: An expanded version of the MCP v1.3 that is also compliant with ISO 19139. This is for users used to working with or reading a simpler subset of the metadata standard. Choosing MCP Core allows detailed content to be suppressed that may not be of interest to the user. 4.3.3. By Group Viewing By Group selects and displays a sub-set or section of the metadata record. Note - a blank page will be presented if the metadata record is not complete for that particular section. Metadata The metadata section contains information about the metadata record itself, including – • Unique File Identifier (UUID), • Language and Character Set, • Hierarchy Level • Date Stamp of when the metadata record was created, • Metadata Standard Name and Version, • Contact details for record author and resource contact. • latest Revision Date For further information regarding elements and fields within the group Metadata see section 5.2.2.1 Metadata. Identification (Data Identification) The identification info contains basic information about the resource, including – • Citation of the resource, • Abstract, • Credit to contributors, • Status of the resource, MEST_User_Guide.doc 2011-11-23 Page 54 of 159 • Maintenance details (any maintenance details are relating to the resource, metadata maintenance details are listed within the Maintenance group), • Resource format, • Descriptive keywords, • Copyright (and other) constraints on the resource/data. Constraints on the metadata are listed within the Constraints group, • Aggregation information, • Language and character set, • Topic Category of the resource, • Temporal and spatial extent, • Sampling frequency, • Data parameters. The extent element of data identification is conditional, either the bounding box or the description subclass of extent’s geographic element role shall be included if the resource is a dataset. Both bounding box and description can be used. For further information regarding elements and fields within the group Identification see section 5.2.2.2 Identification. Maintenance The maintenance section contains information about the frequency and scope of planned updates for the metadata. The maintenance information entity is optional and contains one mandatory element. Metadata Re-use – In MEST versions up to 1.2.0, Metadata Re-use was previously labeled Constraints. The constraint information contains the limitations on the access and re-use of the metadata record. The constraints entity is optional and may be specified as legal constraints, security constraints, Creative Commons, and/or Data Commons. Spat. Info. (Spatial Information) The spatial information section carries content about the geographic, vertical and temporal extent covered by the resource. The spatial extent is represented by the bounding box. The temporal extent is described by the starting and ending date of the period (Spatial/GIS data only). Ref. system (Reference System) - MEST_User_Guide.doc 2011-11-23 Page 55 of 159 The reference system contains information about the spatial and temporal reference system used to generate spatial data (Spatial/GIS data only). Distribution The distribution information contains the distributor of, and options for obtaining, a resource. The distribution element allows for on-line access to resources by using a URL address. The distribution information is an aggregate of the – • format for distribution, • identification of the distributor, and • digital distribution (i.e. Online resource in the Transfer Options section). In some cases the resource is a data file or related file, which can be downloaded directly from the MEST via a link in this section. Users may need to apply for a username and password to download some data (see Data Access - Registration). For further information regarding elements and fields within the group Distribution see section 5.2.2.7 Distribution. Data quality The data quality information helps the user decide on the quality of the resource described, e.g. sampling protocols, calibration information, equipment model information, degree of accuracy, details of any QA/QC procedures. A lineage statement (general explanation of the production process used for creating the data) would be created for most metadata records within the data quality section. However, more advanced users may enter a substantial amount of detail in this area. For further information regarding elements and fields within the group Data quality see section 5.2.2.8 Data quality. App. schema – (Appl… schema) Information about the conceptual schema of the resource, this field is only used when the resource is a dataset. IMAS data users: App. schema is currently not utilised by IMAS. Catalog – Information about the catalogue of rules defined for the portrayal of the resource. IMAS data users: Catalog is currently not utilised by IMAS. Content Info – MEST_User_Guide.doc 2011-11-23 Page 56 of 159 Information about the feature catalogue. Describes the coverage and image data characteristics of the resource. IMAS data users: Content Info is currently not utilised by IMAS. Ext. Info (Metadata Extension Information) – IMAS data users: Ext. Info is currently not utilised by IMAS. The metadata extension information is the same for all records created using the same metadata standard/profile. The section contains information on how the metadata standard used (for most MEST records this is the Marine Community Profile) relates to its parent standard, ISO19115. This information is required to ensure interoperability with other metadata profiles also based on ISO19115. 4.3.4. XML view This XML view is for those users familiar with the encoding language, XML (Extensible Markup Language). The XML view shows the entire content of the metadata in the original hierarchical structure. The element name and value can be distinguished by the colour of the text. XML can be used to import records into the MEST. Back to Top 4.4. Download Data Set(s) The availability of data to download will be dependant on – • Data files being attached to the record • The privileges that have been assigned to the dataset Generally if data is available for the resource a Data for Download button will be visible within the search output or listed in the record in the Distribution element, for registered users. For non-registered users the following message will display ‘Data attached but you cannot download unless you register’. There are two available ways to download files attached to the record: • From the search output, or • Within the metadata record, from the Distribution group MEST_User_Guide.doc 4.4.1. 2011-11-23 Page 57 of 159 Search Output 1. Find the record from one of the SEARCH options. 2. From the search output select the Data for Download button. Go to 4.4.2 below 4.4.2. Metadata Record 3. Find the record from one of the SEARCH options. 4. Open the record. 5. Select Distribution from the By Group list on the right hand side of the screen. 6. Select Show File Download Summary. Go to 4.4.2 below a. If Show File Download Summary button is not available, select the link next to Data for Download. Go to 4.4.2 below 7. A Download Summary screen similar to one of the following is displayed: MEST_User_Guide.doc 2011-11-23 Page 58 of 159 Point of Truth URL When a record has been harvested, the Point of Truth URL exists as a link back to the original location of the metadata record. This is important for comparing license information to make sure nothing has been changed. a. If the data you wish to select is type Data Link, click on the link and you will be taken to an external website to download files. Finished b. If the data you wish to download is type Local, continue following the instructions. Go to 4.4.2 below MEST_User_Guide.doc 2011-11-23 Page 59 of 159 8. Check the file(s) required and select the Download Selected button OR select the Download All Local button. The following Download Summary screen is displayed: The second Download Summary screen details all constraints attached to the dataset. Acceptance of this screen indicates agreement to abide by the listed constraints and license. 9. Review the constraints and any attached license information by selecting the link provided. If you agree with the license, you may proceed by selecting the Accept button. The file(s) with file types will be displayed. 10. Select the Download button. MEST_User_Guide.doc 2011-11-23 Page 60 of 159 It is possible to directly open a zip containing the files or to save the files. 11. Which browser are you using? a. Internet Explorer Go to 4.4.2 below b. Firefox Go to 4.4.2 below Internet Explorer users: 12. Select Open or Save. If choosing to save the file(s) it will be possible to navigate to the required location. Select Save, and once the file(s) have completed downloading; select Close. 13. Select Close window. Firefox users: 14. Choose between Open with and Save to Disc, and then select OK. 15. Select Close window. License Details License details must be read prior to accepting to download files. To review the license details at a future date, navigate to the location of the downloaded zip file (from steps 10 – 15) and open the file. License details will be included within the zip file. Back to Top 5. RECORD MANAGEMENT This section describes the basic information of a metadata record including the layout, elements and fields, field obligations and information, and guides through the process of adding and creating new records. MEST_User_Guide.doc 2011-11-23 Page 61 of 159 5.1. Metadata Creation Information 5.1.1. Basic Layout of a Metadata Record The metadata record is made up of elements (field-blocks) and fields. Elements are headers for particular sections of the record, and fields are used to enter the information. Fields are either free text or drop-down lists. Free text means that any text can be entered into that field. Elements Fields 5.1.2. Field Obligations Most fields within the Marine Community Profile are entirely optional; however some fields are mandatory and others conditional. Mandatory fields must be completed, whereas the optional fields can be provided but are not essential. Conditional fields are optional fields that become mandatory under certain field entry conditions. The conditional fields are not marked. A conditional requirement indicates that the presence of a specified data element is dependant on the value or presence of other data elements in the same section. The mandatory fields do not have a [X] symbol next to the field name. A mandatory field contained within an optional element (i.e. a field block that can be deleted) is only mandatory if the field block is used. Note that a mandatory field contained within an optional field block (e.g. a field block that can be deleted) is only mandatory IF you elect to use that field block. The obligations of the fields will need to be observed in order to complete a valid metadata record. MEST_User_Guide.doc 2011-11-23 Page 62 of 159 Mandatory Field Optional Field 5.1.3. Additional Elements or Fields It is possible, for some elements and fields, to add multiple entries of the same kind by clicking the [+] symbol next to the element or field. Before expanding some elements and fields, a selection must be made from a dropdown menu, to indicate the type of expansion required. In the following example an option must be selected from the drop-down prior to selecting the [+] symbol. The expanded result will be dependant on the initial selection. Select an option here and then click the [+] symbol. Clicking the [+] symbol can – • Expand a suppressed field • Create an additional element or field • Expand a field block Drop-down menus associated with expanding fields do not have a different appearance to other fields with drop-down menus. Care should be taken to ensure the field is expanded and the data entered. If uncertain, select the [+], if the result is a new occurrence of one field then it is a simple drop-down menu. 5.1.4. Suppressing Elements or Fields Elements or fields that are not mandatory or conditional can be suppressed from view by clicking on the [X] symbol next to the element or field. MEST_User_Guide.doc 2011-11-23 Page 63 of 159 Clicking the [X] symbol, during creation or editing, on an element or field with content will remove the content from the field(s) prior to suppressing it. Please note, that suppressing an element or field that is mandatory will affect the validation process. 5.1.5. Field Information The standard definition for each field can be read by clicking on the field name. If a field is mandatory or conditional, this will be noted within the information box. Details of the obligations associated with the field are printed in red. To remove the information box, single click on the field name. Field Information is explained in more detail below (see section 5.2.2 Creation View – By Group). Back to Top MEST_User_Guide.doc 5.1.6. 2011-11-23 Page 64 of 159 Metadata Creation Tips Saving a metadata record You do not need to complete a metadata record in one sitting. By selecting the ‘Save and Close’ button, the record is saved but is only visible to yourself if you are the only member of your user-group. If you share your user-group with other people they will also be able to see your record. It is recommended you put the string [**DRAFT**] at the beginning of the title, while you are still working on the record to make it easily identifiable. When you would like to continue editing your record, simply conduct a search for the record and select the ‘Edit’ button. 5.2. Create Metadata Record The following steps through the process of adding a new metadata record using the template system; with the Marine Community Profile (MCP) Group view of metadata (under view By Group). The following process will include the selection of the template and group, adding thumbnails and images, uploading data, record validation and setting the access privileges to the metadata and data. 5.2.1. Metadata Record – Template and Group Selection To create a metadata record – 7. Enter Username and Password details and select Login. 8. Select New metadata from the MEST home page. The following screen is displayed: 9. Select the appropriate Template from the drop-down options. For IMAS users select either: IMAS Template (+ Vertical Extent relative to Mean Sea Level Depth CRS EPSG::5715), if the record will contain depth information, MEST_User_Guide.doc 2011-11-23 Page 65 of 159 OR IMAS Template (with no vertical extent information), when the record will contain no depth information. If the first template is selected, and then no depth information is required to be added to the record, the Vertical Element field can just be closed. All required elements to complete the record have been expanded out, and where possible, content has been suggested. IMAS preferred fields (includes all mandatory fields), in order of appearance in the record: Title, date and type, Cited responsible parties, Abstract, Credit, Status of data, Point of Contact details, Resource maintenance, Resource format, Descriptive keywords, Resource constraints, Aggregation information (if required), Geographic element, Temporal Element: start/end date, Vertical Element, Supplemental information, Sampling frequency, Data Parameters and Units, Data Quality statement., Distribution format, Metadata contact (in addition to IMAS data manager, same as POC). 10. Select the appropriate Group from the drop-down options. Under the Group drop-down menu choose the appropriate working group that will “own” this record; (Most people will only be a member of a single user-group, so will only see one group listed.) 11. Select Create. 5.2.2. Creation View – By Group Creation view for a metadata record can either be By Profile or By Group. The following instructions demonstrate the creation of a metadata record By Group. If there is a requirement to add or remove metadata elements the view can be switched to MCP Minimum, MCP Core or MCP All, at any stage during creation or editing. 5.2.2.1. Metadata Information about the metadata record itself. 12. Select Metadata from the By Group list on the left hand side of the screen. A new metadata form based on the selected template will be displayed to complete. Complete the relevant elements and fields within Metadata. File Identifier M The unique identifier for the metadata record. MEST_User_Guide.doc 2011-11-23 Page 66 of 159 The metadata identification number permanently identifies a metadata file. The identifier of a metadata file should never change while the associated dataset is deemed to be the same. This includes over time, when the dataset is transferred between custodian or when the metadata record is shared between metadata applications. To ensure the file identifier is universally unique, a Universal Unique Identifier (UUID) is used to generate the identifier. Example – f81d4fae-7dec-11d0-a765-00a0c91e6bf6. Language C The language used for documenting the metadata. Format – Values are selected from a controlled codelist. The default is English. Obligation – Must exist if not defined by the end encoding. Character Set C Name of character coding standard used for the metadata set. DO NOT change this data. Default value = ‘utf8’. Parent Identifier C The file identifier to which this metadata record is a subset (child). Obligation - Must exist if there is an associated parent metadata record. Example – f81d4fae-7dec-11d0-a765-00a0c91e6bf6. Hierarchy Level C The scope of the metadata. Enter the class of information to which the referencing entity applies. The default is dataset. Format – Values are selected from a controlled codelist. Obligation – Must exist if parent element exists and hierarchy level not equal to dataset. Hierarchy Level Name O The name of the hierarchy levels of the metadata where the metadata is a subset of a previous described metadata. Example – Coastline (feature type). Date Stamp M The date the metadata was created. This element is automatically generated by the MEST. MEST_User_Guide.doc Metadata Standard Name 2011-11-23 Page 67 of 159 Name of the metadata standard, including the profile used. This element is automatically generated by the MEST. Metadata Standard Version Version of the metadata standard used. This element is automatically generated by the MEST. Contact – Party responsible for the metadata record. Responsible party M Identification of, and means of communication with, person(s) and/or organisation(s) associated with the metadata record. Format - List current contact information. It may not be necessary to fill out all field blocks within this element. Refer to Appendix 1 for Contact information summary. (Appendix 1: Contact details) See Point of contact for a list of definitions describing all fields within contact details. (Point of contact). MEST_User_Guide.doc Data Set URI O 2011-11-23 Page 68 of 159 Uniform Resource Identifier (URI) of the dataset to which the metadata applies. Example – MEST_User_Guide.doc • 2011-11-23 Page 69 of 159 ftp://ftp.is.co.za/rfc/rfc/1808.txt This field is currently not utilised by IMAS. Locale This field is currently not utilised by IMAS. Series This field is currently not utilised by IMAS. Describes This field is currently not utilised by IMAS. Property type This field is currently not utilised by IMAS. Feature type This field is currently not utilised by IMAS. Feature attribute This field is currently not utilised by IMAS. Revision Date Date that the metadata record was last revised. DO NOT change this data. The revision date will automatically be updated once editing occurs on the record. The time zone for the dates are determined by the time zone of the MEST server. MEST_User_Guide.doc 2011-11-23 Page 70 of 159 Back to Top 5.2.2.2. Identification Basic information about the resource to which the metadata applies. MEST_User_Guide.doc 2011-11-23 Page 71 of 159 13. Select Identification from the By Group list on the left hand side of the screen. A new metadata form based on the selected template will be displayed to complete. Complete the relevant elements and fields within Identification. Identification info Title M The name of the resource. A default of the template name will appear in the Title field. The Title should be a clear and concise description of the content of the resource. Format – No set format is required, however, the Title should be descriptive enough so that the user can determine the general content of the dataset. In order to make the Title descriptive, important elements about the data can be included, i.e., parameters measured, geographic location, instrument, investigator, project, temporal coverage, and/or taxonomic names. Examples – • Foraging behaviour in the sooty shearwater (Puffinus griseus) on Rottnest Island, Western Australia; • Wind statistics at Governor Head Meteorological Station, Jervis Bay over a one year period (Nov 1988 - Oct 1989); • Quantifying the isotopic composition of oxygen and carbon with increasing depth in core GC14, located in the Capricorn Channel, October 2004. Avoid – Alternate Title • The use of the term ‘template’, which is used to identify Template records in the MEST, • Using the same Title for different metadata records, • Leaving the Title field blank, • Using all capital or lower case letters, use the appropriate case, • Acronyms, • Full stops. Short name or abbreviated name by which cited information is known. Examples – • OBIS Marine Data as an alternative title for Ocean Biogeographic Information System (OBIS) Marine Data; MEST_User_Guide.doc • Date M 2011-11-23 Page 72 of 159 CLAM: Myall Lakes as an alternative for Coastal Lake Assessment and Management Tool (CLAM): Myall Lakes, Great Lakes Council. The reference date for the described resource. Enter the reference Date. Format – Selecting the field will activate the use of the calendar. Navigate the calendar to select the reference Date. The time and date stamp will be created in the following format YYYY-MM-DDT00:00:00 where Y, M and D are values representing the year, month and day and T the time. Example – • 2008-11-28T17:45:45. Date Type M The method used to identify the event associated with the date. Enter the correct identification for when the event occurred for the resource i.e. does the date identify the creation, publication or revision of the resource. Format – Values are selected from a controlled codelist. Edition Version of the Cited Resource. This field is currently not utilised by IMAS. Edition Date Date of the edition. This field is currently not utilised by IMAS. Identifier Unique Identifier for the Resource. Format – values are selected from a controlled codelist. The default is RS identifier. Metadata Title Details Prior to saving and closing the new metadata record ensure that a Title has been entered onto the record. Access to the record will NOT be possible if it has been saved and closed without Title details. If a record has been saved and closed without a Title select the Contact us link from the main page (see 1.1.3 Feedback for further details). The MEST administrator can update the Title details held against the account. Access will then be available MEST_User_Guide.doc 2011-11-23 Page 73 of 159 through the normal way. 14. Expand the Cited Responsible Party field group (if applicable). Refer to Appendix 1: Contact details for the completion of contact information. Cited responsible party Party responsible for the resource. Responsible party M Identification of, and means of communication with, person (s) and/or organisation(s) associated with the resource. Format – List contact information for person(s) and/or organisation(s) where the resource was produced. It may not be necessary to fill out all field blocks within this element. Refer to Appendix 1 for Contact information summary. (Appendix 1: Contact details) See Point of contact for a list of definitions describing all fields within contact details. (Point of contact). ** The remaining fields within Citation are currently not utilised by IMAS. Cited Responsible Party The cited responsible party are the intellectual property owners, usually the primary researcher or organisation involved in the research. MEST_User_Guide.doc 2011-11-23 Page 74 of 159 The address details refer to where the research was conducted and the position held at that time. Back to Top MEST_User_Guide.doc Abstract M 2011-11-23 Page 75 of 159 Brief narrative summary of the content of the resource. Enter a brief summary of the resource content, starting with a topic sentence, including – • What information was collected (e.g. variables measured), • How it was collected (equipment used, methodology), • A brief statement about the location and/or temporal extent, • Other statements to assist the user to determine if the resource and dataset will be useful. Examples – • A unique relationship exists between neighbouring males and females in the fiddler crab, Uca capricornis. This experiment was designed to determine if males and females are unable to associate with multiple partners because their partners aggressively repel same-sex intruders. Experiments were conducted in the East Point Reserve, Darwin from November-January in 2002-2006. 15 male-female pairs were located and the burrow of the male or the female (in a random order) was blocked. We tethered a size-matched same-sex or opposite sex intruder (in a random order) half way between the burrows. Once the focal individual emerged we documented whether it pushed or grappled (fought) with the intruder within 5 minutes. After each trial, we unblocked the burrow and allowed the pair to interact normally for 10 minutes before running the next trial. In this way we observed the reactions of both pair members to same- and opposite-sex intruders. Therefore for each pair, 4 experiments were undertaken: original female vs. intruder female, original female vs. intruder male, original male vs. intruder male, original male vs. intruder female. The results indicated that males and females were equally likely to respond aggressively to intruders of the same sex. Both were less likely to fight intruders of the opposite sex. • In recent years the term 'enhanced greenhouse effect' has become well known in modern society and yet aspects of this possible 'future climate' are poorly understood. The characteristics of the geological record provide a basis to understand this possible future climate through the examination of alternating glacial (cold) and interglacial (warm) stages. Understanding the variability of sea-surface temperature and biological processes in the water column provides insight into general circulation of present and paleo-ocean currents. The core obtained offshore from Sumatra (BAR9043, 104.0316E, 5.82S) highlights an upwelling signal at 14,000 yrs BP that disrupts the warm stratified water column, which was a feature between Marine Isotope MEST_User_Guide.doc 2011-11-23 Page 76 of 159 Stage (MIS) 3 to present. This upwelling is timed to a regional pattern of an intensified Australasian Monsoon. Purpose O Brief summary of the intention for which the resource was developed. Examples – • To determine the impact of introduced species in the Derwent River; • To measure reproductive success of seal species in the Southern Ocean; • This data was collected as part of the Beachwatch program. Credit O Recognition of the contributors to the resource. Examples – • University of Tasmania; • Australian Research Council (ARC); • Dr Ruth Cullen. Status O Status of the resource. Format - Values are selected from a controlled codelist. Point of contact Identification of and means of communication with, person(s) and/or organisation(s) associated with the resource. Format - List current contact information. Full contact details are always listed under Point of contact. Individual Name C Identification of and means of communication with, person(s) and/or organisation(s) associated with the resource. Detail the individual responsible for the creation and management of a resource. MEST_User_Guide.doc 2011-11-23 Page 77 of 159 Format - Surname, given name, title separated by a delimiter. Examples – • Magierowski, Regina, Dr • Magierowski, Regina • Magierowski, R.H., Dr • Magierowski, R.H. • Magierowski, R., Dr • Magierowski, R. Obligation – Conditional. Must exist if Organisation Name and Position Name are not documented. Organisation Name C Where the person(s) and/or organisation(s) are currently located. Detail the organisation responsible for the creation and management for the resource. Examples – • Geoscience Australia • University of Tasmania Obligation – Conditional. Must exist if Individual Name and Position Name are not documented. Avoid – • Position Name C Acronyms The current position of the person(s) responsible for the resource (within the organisation). Detail the position of the person within an organisation responsible for the creation and management of the resource. Examples – • Data Manager • Director Obligation – Conditional. Must exist if Individual Name and Organisation Name are not documented. MEST_User_Guide.doc Voice O 2011-11-23 Page 78 of 159 Identifies the telephone number by which enquirers can speak to the responsible party. Enter the telephone contact details that will allow an enquirer to speak with the responsible party. Format – [International Code][Area Code] [Number] Examples – Fax O • Landline – 61 3 1234 5678 • Mobile – 61 123 456 789 Identifies the fax number by which enquirers can contact the responsible party. Enter the fax details that will allow an enquirer to communicate with the responsible party. Format – [International Code][Area Code] [Number] Example – • Delivery Point O 61 3 1234 5678 Identifies the address of the location. Enter the first line of address details that will allow the enquirer to communicate with the organisation responsible for the resource. Format – The first line of address to be entered. Where required separated by a delimiter Examples – • PO Box 123 • Level 3, 123 Main Street City O Identifies the city of the location. Enter the City details that will allow the enquirer to communicate with the organisation responsible for the resource. Example – • Hobart MEST_User_Guide.doc State O 2011-11-23 Page 79 of 159 Identifies the state of the location. Enter the state details that will allow the enquirer to communicate with the organisation responsible for the resource. Abbreviations can be used. Example – • Tasmania • TAS Postcode O Identifies the postcode of the location. Enter the postcode details that will allow the enquirer to communicate with the organisation responsible for the resource. Example – • 7005 Country O Identifies the country of the location. Enter the Country details that will allow the enquirer to communicate with the organisation responsible for the resource. Example – • Australia Avoid – • Email O Using abbreviations Identifies the email address of the cited responsible party. Enter the email contact details that will allow an enquirer to speak with the responsible party or organisation. Example – • [email protected] How do I ensure my contact details remain up-to-date? MEST_User_Guide.doc 2011-11-23 Page 80 of 159 Contact IMAS data manager: [email protected], with the required changes, and they will update the relevant metadata records (see 1.1.3 Feedback for more details). . Online resource O The location (address) for online access for the contact person(s). Avoid – • Links to resource and/or data sets ** Remaining fields within Online Resource are currently not utilised by IMAS. Role M Identifies the function performed by the responsible party. Select the role of the designated contact for the resource. Format – Values are selected from a controlled codelist. How do I decide which ‘Role’ is correct to describe the function performed? The role should be the most obvious one as it relates to the research. An individual’s Role should not change throughout the metadata record, so that if a person is the principal investigator, they should be identified as such throughout the record. Back to Top MEST_User_Guide.doc 2011-11-23 Page 81 of 159 15. Expand the Resource Maintenance field block. Complete the relevant fields. MEST_User_Guide.doc 2011-11-23 Page 82 of 159 Resource maintenance Provides information about the frequency of resource updates, and the scope of those updates. Maintenance And Update Frequency M Frequency with which changes and additions are made to the resource after the initial resource is completed. Format - Values are selected from a controlled codelist. Date Of Next Update Scheduled Revision Date for resource (YYYY-MM-DD). Date is selected from an automated calendar. This field is currently not utilised by IMAS. User Defined Maintenance Frequency Maintenance period other than those defined. This field is currently not utilised by IMAS. Update Scope This field is currently not utilised by IMAS. Update scope description This field is currently not utilised by IMAS. Maintenance Note Information regarding specific requirements for maintaining the resource. This field is currently not utilised by IMAS. Contact Party responsible for resource maintenance. This field is currently not utilised by IMAS. Format - List current contact information. It may not be necessary to fill out all field blocks within this element. Refer to Appendix 1 for Contact information summary. (Appendix 1: Contact details) See Point of contact for a list of definitions describing all fields within contact details (Point of contact). MEST_User_Guide.doc 2011-11-23 Page 83 of 159 MEST_User_Guide.doc 2011-11-23 Page 84 of 159 16. Expand the Resource Format field block. Complete the relevant fields. Resource format Provides a description of the format of the resource. Name M Name of the resource format. Examples – • Microsoft Excel • Microsoft Office Document Imaging • Adobe Reader 8 Version M Version of the format (date, Number, Etc.) Examples – • 2007 • 11.0 • v.8.1.2 ** Remaining Fields within Resource Format are currently not utilised by IMAS. MEST_User_Guide.doc 2011-11-23 Page 85 of 159 17. Expand the Descriptive Keywords field block. Complete the relevant fields. Back to Top MEST_User_Guide.doc 2011-11-23 Page 86 of 159 Descriptive keywords Commonly used word(s), formalised word(s) and/or phrase(s) used to describe the dataset. Format – There are several options when entering Descriptive keywords. Keywords can be selected by the resource owner (e.g. free text), from a formalised thesaurus (e.g. Global Change Master Dictionary (GCMD) and Codes for Australian Aquatic Biota (CAAB)), and/or entered as a geographic location. The GCMD thesaurus opens automatically when using the Descriptive Keywords field, however the additional options described can be added simply by selecting on the thesaurus. Below are descriptions of the possible Keyword options you can enter in this element. If selecting more than one option, expand the descriptive keywords field using the [+] button. Obligation – All Descriptive keyword options are optional - a user may only need the GCMD thesaurus or free text to describe their resource. Select the appropriate category (ies) to describe your data. MEST_User_Guide.doc 2011-11-23 Page 87 of 159 MEST_User_Guide.doc 2011-11-23 Page 88 of 159 It is not mandatory to fill out all fields within the Descriptive Keyword element. Those that are relevant to each option are listed below. The Global Change Master Dictionary (GCMD) opens automatically when clicking on the Descriptive Keywords field. To avoid this, before entering text, first click to the left of the field and press the tab button on your keyboard. Free text (content example) The resource owner’s keywords to describe the dataset. Subject Enter free text. Examples – salinisation, larvae provisioning, variability, mortality, larvae Expand subject line for each word by clicking the [+] symbol. Type Select theme from controlled codelist. GCMD (content example) A formalised thesaurus of default keywords, automatically opens when click on the field box. Subject Click on the field box to open the automated thesaurus. Format – count the set of three words generated by GCMD a single keyword. Examples – • Oceans | Marine Biology | Marine Invertebrates; • Biosphere | Ecological Dynamics | Primary Production; • Hydrosphere | Snow/ice | Ice Extent Expand subject line for each keyword category by clicking the [+] symbol. Type Select theme from controlled codelist. Thesaurus name This category requires a citation of the thesaurus responsible for generating the keywords. MEST_User_Guide.doc 2011-11-23 Page 89 of 159 Title Global Change Master Directory Earth Science Keywords v5.3.8 Date 2007-04-17T10:31:12 Date Type Revision Cited responsible party Organisation that owns the reference. Organisation Name NASA Online resource – Linkage http://gcmd.gsfc.nasa.gov/Resources/valids/ Online resource Name Global Change Master Directory - NASA Role Select owner from the controlled codelist. ** Remaining fields within Thesaurus name are currently not utilised by IMAS. CAAB codes (content example) A standardised 8-digit coding system for aquatic organisms in the Australian region. Includes, invertebrates, vertebrates, plants and algae. Subject Enter CAAB code, scientific name (free text), common name (free text). Format – Codes for Australian Aquatic Bioga (CAAB) can be found at: http://www.cmar.csiro.au/caab/ Examples – • 37 013001, Orectolobus ornatus, Banded Wobbegong; • 40 041042, Puffinus griseus, Sooty shearwater. Expand subject line for each entry by clicking the [+] symbol. Type Select taxon from controlled codelist. MEST_User_Guide.doc 2011-11-23 Page 90 of 159 Thesaurus name This category requires a citation of the thesaurus responsible for generating the keywords. Title CAAB - Codes for Australian Aquatic Biota v2. Date 1999-09-01T19:00:00 Date Type publication Cited responsible party Organisation that owns the reference. Organisation Name CSIRO Marine and Atmospheric Research Online resource – Linkage http://www.marine.csiro.au/caab/ Online resource Name CSIRO CAAB codes website Role Select owner from the controlled codelist. ** Remaining fields within Thesaurus name are currently not utilised by IMAS. Geographic location (content example) The geographic location of the resource. This can be entered manually or selected from a controlled codelist. Subject Either enter in own geographic location or select from controlled codelist provided. Examples – • Tasmania; • Port Phillip Bay; • Sandringham Yacht Club. Type Select place from controlled codelist. Thesaurus name This category requires a citation of the thesaurus responsible for generating the keywords. Title Marine Community Profile v1.4 Geographic extent names MEST_User_Guide.doc Date 2008-10-30 Date Type revision 2011-11-23 Page 91 of 159 Cited responsible party Organisation that owns the reference. Organisation Name Australian Ocean Data Centre Joint Facility (AODCJF) Online resource – Linkage http://www.aodc.gov.au/ Online resource Name AODC website Role Select owner from the controlled codelist. ** Remaining fields within Thesaurus name are currently not utilised by IMAS. Back to Top 18. Expand the Resource specific usage field block. Complete the relevant fields. This is not currently utilised by IMAS. Resource specific usage Provides basic information about specific application(s) for which the resource has/has been or is being used by different users. Refer to Appendix 1: Contact details for further information about the Contact info field-block. MEST_User_Guide.doc 2011-11-23 Page 92 of 159 13. Expand the Resource Constraints field block. Complete the relevant fields. Resource Constraints Provides information about constraints which apply to the resource. Legal constraints Restrictions and legal prerequisites for accessing and using the resource. Use Limitation Access Constraints MEST_User_Guide.doc 2011-11-23 Page 93 of 159 Use Constraints Other Constraints Security constraints Restrictions imposed on the resource for security concerns. Use Limitation Classification User Note Classification System Handling Description Constraints Any other restrictions on the access or use of the resource Use Limitation Creative Commons Use Limitation Licence Selector Attribution Constraints Other Constraints ** Remaining fields within Resource constraints are currently not utilised by IMAS. Copyright licensing By making your resource available you are allowing someone to exercise one or more of the exclusive rights of your copyright ownership. To ensure that you are appropriately attributed as the copyright owner and/or to limit the way the resource is used, you should attach a copyright licence to your metadata record. A licence does not assign (transfer) ownership of copyright to another person, it simply grants a permission to exercise certain rights. There are a number of standard-form licences that can be adopted by organisations or individuals, the most commonly used type for information published on the internet is the Creative Commons licence. Creative Commons licensing is based on the U.S. Copyright Act, it thus functions within the vast majority of legal systems operating across the world. For more information about Creative Commons Licensing visit http://creativecommons.org/, the FAQ page on this site should cover most of your questions (http://wiki.creativecommons.org/Frequently_Asked_Questions ). The rights given via a Creative Commons licence are the rights to copy, distribute, display and perform the work. A Creative Commons licence can subject these rights to certain conditions, such as: 1. Attribution – this applies to every Creative Commons licensed work and means that whenever the work is copied or redistributed the author/creator must be reasonably credited; 2. Non-commercial – the work can be used for non-commercial purposes only; MEST_User_Guide.doc 2011-11-23 Page 94 of 159 3. Non-derivative – only exact copies of the work (not derivative works based on the original work) can be made, displayed and performed; and 4. Share-Alike – users may distribute derivative works, but only under a license identical or similar to the one that governs the original work. These conditions can be used individually or can be combined. The only conditions that are incompatible and therefore cannot feature in the same license are the nonderivative and share-alike options. For most resources submitted to IMAS, a Creative Commons Attribution licence will be most appropriate copyright licence to use. The current convention for IMAS records is to select a creative commons licence and add the appropriate content as follows (omitting the statement about access to the data, if the data is uploaded): Resource constraints Creative Commons Current License Jurisdiction: au Attribution 2.5 Australia Attribution Constraints The citation in a list of references is: citation author name/s (year metadata published), metadata title. Citation author organisation/s. File identifier and Data accessed at (add http link). Other Constraints Please contact the researcher for access to data. Resource constraints Security constraints Classification unclassified: available for general disclosure Resource constraints Constraints Use limitation The data described in this record are the intellectual property of the University of Tasmania through the Institute of Marine and Antarctic Studies. MEST_User_Guide.doc 2011-11-23 Page 95 of 159 MEST_User_Guide.doc 2011-11-23 Page 96 of 159 Back to Top 14. Expand the Aggregation info field block. Complete the relevant fields. Aggregation info Provides details on aggregate datasets associated with the resource. Aggregation data set name Citation details identifying the aggregated data resources. Title M Title for the aggregated dataset. Examples • World Ocean Atlas 2005 • Phytoplankton concentrations in Sydney Harbour, 2007 Alternate Title Date Short name or abbreviated name by which aggregated dataset is known. This field is currently not utilised by IMAS. M The reference date for the aggregated dataset. Format – Selecting the field will activate the use of the calendar. Navigate the calendar to select the reference Date. The time and date stamp will be created in the following format YYYY-MM-DDT00:00:00 where Y, M and D are values representing the year, month and day and T the time. Example – • 2008-11-28T17:45:45. Date Type M The method used to identify the event associated with the date. Enter the correct identification for when the event occurred for the resource i.e. MEST_User_Guide.doc 2011-11-23 Page 97 of 159 does the date identify the creation, publication or revision of the resource. Format – Values are selected from a controlled codelist. Edition Version of the Cited aggregation. This field is currently not utilised by IMAS. Edition Date Date of the edition. This field is currently not utilised by IMAS. Identifier Unique Identifier for the aggregation. Format – values are selected from a controlled code list. The default is RS identifier. Cited responsible party Contact details for the person(s) who created the aggregation. This field is currently not utilised by IMAS. Format - List current contact information. It may not be necessary to fill out all field blocks within this element. Refer to Appendix 1 for Contact information summary. (Appendix 1: Contact details) See Point of contact for a list of definitions describing all fields within contact details (Point of contact)). **Remaining fields within Aggregation Info are currently not utilised by IMAS. MEST_User_Guide.doc 2011-11-23 Page 98 of 159 MEST_User_Guide.doc Spatial Representation Type O 2011-11-23 Page 99 of 159 The method used to spatially represent geographic information. Enter the method used to represent geographic information in the dataset. Format – Values are selected from a controlled codelist. This field is currently not utilised by IMAS. Spatial resolution Factor which provides a general understanding of the density of spatial data in the dataset. Equivalent scale -Denominator O The level of detail expressed as a scale factor or a ground distance. Enter the Denominator information regarding the scale of the original data. Example – • 5000 This field is currently not utilised by IMAS. Distance Topic category This field is currently not utilised by IMAS. C The main theme(s) of the dataset. MEST_User_Guide.doc 2011-11-23 Page 100 of 159 Format – Values are selected from a controlled codelist. The default value is oceans. Obligation – Must exits if the quality scope is “dataset” or “series”. Environment Description O Description of the resource in the producer’s processing environment. Includes items such as the software, the computer operating system, file name and data file size. Format – There is no set format at present, but it is recommend to include as much detail as possible. Examples – • Microsoft Excel 2003 (xls): Barren Island Kelp bed dive data (Barren_kelpbed_comparison_divedata_20090101.xls) 1091k; • Microsoft Windows 2000 Version 5.1 (Build 2600) Service Pack 1; ESRI ArcCatalog 8.3.0.800. This field is currently not utilised by IMAS. Back to Top Extent The extent section of a metadata record is used to document geographic, temporal and/or vertical extent of a resource. This section is not mandatory; one of the extent elements must be completed if the record describes a dataset (the signifier that a record describes a data set is that the “Hierarchy level” field content is set to “dataset”). Geographic element Description of the spatial extent of the dataset. The user has the option of entering the following – • Bounding Polygon, • Bounding Box, and/or • Geographic Description. MEST_User_Guide.doc 2011-11-23 Page 101 of 159 Each selection is detailed separately below. 15. Select the relevant element, and then expand the field by clicking the [+] symbol. Geographic bounding box Used as a quick and simple way of representing spatial extent. It is possible to select the region from the predefined drop-down list or to enter the longitude and latitude coordinates for the location. It should be used to represent a single location or simple arrangements of sites. Bounding box M Select the geographic position/region of the dataset. Format – Values are either selected from a controlled codelist or can be entered individually. North bound latitude M Northern-most coordinate of the limit of the dataset extent, expressed in latitude in decimal degrees (positive north). Enter the details for the approximate geographic position of the dataset. The element assists to make spatial enquiries of datasets. Example – • -15.47 West bound longitude M Western-most coordinate of the limit of the dataset extent, expressed in longitude in decimal degrees (negative west). Enter the details for the approximate geographic position of the dataset. The element assists to make spatial enquiries of datasets. Example – • 150 South bound latitude M Southern-most coordinate of the limit of the dataset extent, expressed in latitude in decimal degrees (negative south). Enter the details for the approximate geographic position of the dataset. The element assists to make spatial enquiries of datasets. Example – • -18.5 MEST_User_Guide.doc East bound longitude M 2011-11-23 Page 102 of 159 Eastern-most coordinate of the limit of the dataset extent, expressed in longitude in decimal degrees (positive east). Enter the details for the approximate geographic position of the dataset. The element assists to make spatial enquiries of datasets. Example – • 150 How is a single point represented using the Geographic bounding box? For a single point the northern extent will be the same as the southern extent and the eastern extent the same as the western extent, for example N = -38.117, S = -38.117, E = 114.533, W = 114.533 If no thumbnail picture is selected (see 5.3 Adding Thumbnail Images), a thumbnail will be created automatically based on the coordinates in the Geographic bounding box. A handy tool for helping you define your geographic bounding box can be found at: http://www.fao.org/geonetwork/srv/en/main.home MEST_User_Guide.doc 2011-11-23 Page 103 of 159 EX_BoundingPolygon Boundary enclosing the dataset, expressed as the closed set of (x,y) coordinates of the polygon (last point replicates first point). Obligation - Used for complex arrangements of sampling sites. A bounding polygon can create triangles, rhombuses, or polygons with greater than 4 sides. Mandatory if bounding area is not a perfect oblong. Extent Type Code Indication of whether the bounding polygon encompasses an area covered by the data or an area where data is not present. Possible values: ‘1’ for inclusion, or ‘0’ for exclusion. Polygon Set of points defining the bounding polygon. The last point replicates the first point. Enter coordinates as decimals. Examples – • 150.58, -31.45; 151.45, -31.46; 151.56, -32.46; -151.40, -32.47, 150.58, -34.45 MEST_User_Guide.doc 2011-11-23 Page 104 of 159 Geographic description Description of the geographic area within which data is available. Format – There are several options when entering a Geographic description. Two that are commonly used are csquares and geographic locations. Below are descriptions of the possible Geographic description options you can enter in this field. If selecting more than one option, expand the Geographic description field using the [+] button. Obligation – All Geographic description categories are optional – a user may only need to enter a geographic location to describe their resource. Select the appropriate category (ies) to describe your data. MEST_User_Guide.doc 2011-11-23 Page 105 of 159 It is not mandatory to fill out all fields within the Geographic Description element. Those that are relevant to each option are listed below. MEST_User_Guide.doc 2011-11-23 Page 106 of 159 C-squares (content example) A system of coded squares, generated from latitude and longitude coordinates, used to display spatial information. Geographic identifier Identifier used to represent a geographic area. Title C-squares Date 2001-12-13T20:05:00 Date Type creation Cited responsible party Organisation that owns the reference. Individual Name Rees, Tony, Mr Organisation Name CSIRO Marine and Atmospheric Research Online resource – Linkage http://www.marine.csiro.au/csquares/index.html Online resource – Name C-squares online index Role owner Code Enter c-squares notation. C-squares are generated from the latitude and longitude coordinates. Please refer to web link below for instructions: http://www.marine.csiro.au/csquares/index.html **Remaining fields within Geographic description are currently not utilised by IMAS. When are c-squares necessary? MEST_User_Guide.doc 2011-11-23 Page 107 of 159 When research is collected from more than one location. The use of c-squares creates a specific reference for the location (in comparison to using a Bounding box or Bounding polygon, which creates excess space between research locations). Visit the CSIRO’s site http://www.marine.csiro.au/csquares/index.html for further information on c-squares. Geographic Extent Names (content example) The geographic location(s) where the data was collected. Geographic identifier Identifier used to represent a geographic area. Title Marine Community Profile v1.4 Geographic extent names Date 2008-10-30 Date Type revision Cited responsible party Organisation that owns the reference. Individual Name Australian Ocean Data Centre Joint Facility (AODCJF) Online resource – Linkage http://www.aodc.gov.au// Online resource – Name AODC website Role owner Code Either enter in own geographic location or select from controlled codelist provided. **Remaining fields within Geographic description are currently not utilised by IMAS. Back to Top Temporal Element MEST_User_Guide.doc 2011-11-23 Page 108 of 159 The Temporal Element describes the time period covered by the content of the resource. Enter a begin date, end date and, if necessary, time. There are a few other fields in this section designed for more advanced users. IF further fields or support is required to complete these fields, contact helpdesk (see 1.1.3 Feedback). 16. Expand the Temporal Element field block. Complete the relevant fields. Temporal Extent (MCP) Extent M Date and time for the content of the data resource. Can be described as temporal instant (a single date/time) or a temporal period (start date and/or end time). Make selection and expand the field. Example – • 2005-09-15 T15:17:42 Choice: Begin Date M Expand the field and enter the starting date for the validity of the period. Select from automated calendar. Choice: End Date M Expand the field and enter the ending date for the validity of the period. Select from automated calendar. **Remaining fields within Temporal Element are currently not utilised by IMAS. Vertical Element Vertical element provides the vertical component of the extent of the referring object. 17. Expand the Vertical Element field block. Complete the relevant fields. MEST_User_Guide.doc 2011-11-23 Page 109 of 159 Vertical Element Minimum Value M Enter a minimum value in metres. Example – • 0 Maximum Value M Enter a maximum value in metres. Example – • 4000 Vertical CRS The coordinate reference system used for recording height or depths. This element provides information on the vertical datum used for the data resource. This information is prefilled if the appropriate IMAS template is selected: IMAS template (+ vertical extent relative to mean sea level depth CRS EPSG::5715). MEST_User_Guide.doc 2011-11-23 Page 110 of 159 18. Expand the Supplemental Information field block. Complete the relevant fields. Supplemental Information O Any additional information that will assist the users understanding of the data. This element can be used to describe certain characteristics of the dataset which are not covered by any of the other ISO 19115 metadata elements including, publications, taxonomic information, software, equipment, problems encountered, and discrepancies/anomalies. Example – • Data were collected aboard the R/V AHI (Acoustic Habitat Investigator), a 25’ survey launch owned and operated by the NOAA Pacific Islands Fisheries Science Centre in Honolulu, HI. The R/V AHI’s survey sensors include a 240 kHz RESON 8101-ER sonar providing bathymetry and imagery data, a TSS/Applanix POS/MV Model 320 which measures position, velocity, attitude and heading, and a Seabird SBE 19 CTD used to measure sound velocity profiles. Sampling MEST_User_Guide.doc Frequency O 2011-11-23 Page 111 of 159 Describes the frequency the resource is sampled. Format – Values are selected form a controlled codelist. **Remaining fields are currently not utilised by IMAS. 19. Expand the Data Parameters field block. Complete the relevant fields. Data Parameters Describes the parameters or variables used in the dataset. Parameter Name For each data parameter expand the Data Parameter Info field by selecting the [+] symbol and enter the Name of the parameter under Parameter Name. Examples – • Water temperature; • Length; • Barometric pressure. Select a Type from the drop-down list to describe the type of name belonging to the parameter. Examples – • longName – Copper, University of Tasmania; • shortName – Cop., Uni. of Tas.; • code – Cu, UTas; • other; When a parameter name is used in the dataset, type 'yes' in the Used in Dataset? field. Parameter unit of Enter units for that parameter under Parameter unit of measurement. MEST_User_Guide.doc 2011-11-23 Page 112 of 159 measurement Format – unit of measurement written in full followed by symbol in brackets. Examples – • degrees celsius (°C); • metres (m); • decibars (db). ** Remaining fields within Data Parameters are currently under construction. Back to Top 5.2.2.3. Maintenance MEST_User_Guide.doc 2011-11-23 Page 113 of 159 This Group is currently not utilised by IMAS. 5.2.2.4. Metadata Re-use (Constraints) This Group is currently not utilised by IMAS. 5.2.2.5. Spat. Info This Group is currently not utilised by IMAS. 5.2.2.6. Ref. system This Group is currently not utilised by IMAS. 5.2.2.7. Distribution Information about the distributor and options for obtaining the resource. In many cases the resource is a data file or related file, which can be downloaded directly from the MEST via a link in this section. 20. Select Distribution from the By Group list on the left hand side of the screen. A new metadata form based on the selected template will be displayed to complete. Complete the relevant elements and fields within Distribution. Distribution format Information about the format used by the distributor. Name M Name of the resource format. Examples – • Microsoft Excel; • Microsoft Office Document Imaging; • Adobe Reader 8. Version M Version of the format (date, Number, Etc.) Examples – • 2007; • 11.0; • v.8.1.2. MEST_User_Guide.doc 2011-11-23 Page 114 of 159 ** Remaining fields within Distribution format are currently not utilised by IMAS. 21. Expand the Distributor field block. Complete the required fields. MEST_User_Guide.doc 2011-11-23 Page 115 of 159 Distributor contact Responsible Party Party responsible for distributing the resource. This field is currently not utilised by IMAS. Format - List current contact information. It may not be necessary to fill out all field blocks within this element. Refer to Appendix 1 for Contact information summary. (Appendix 1: Contact details) See Point of contact for a list of definitions describing all fields within contact details (Point of contact). ** Remaining fields within Distributor contact are currently not utilised by IMAS. Transfer options Provides information about technical means and media by which the resource is obtained from the distributor. Units of Distribution This field is currently not utilised by IMAS. Transfer Size This field is currently not utilised by IMAS. Online resource This is the location where data files, other files, and online links are uploaded to the metadata record. This section can be expanded for each file/resource for upload by selecting the [+] symbol. Instructions on how to upload a file are addressed in Section 5.4 Upload File(s). ** Remaining fields within Transfer Options are currently not utilised by IMAS. MEST_User_Guide.doc 2011-11-23 Page 116 of 159 Back to Top 5.2.2.8. Data quality Used to describe a number of aspects about the resource such as sampling equipment (collection hardware), methodology, precision and resolution. All of these aspects can be described in a single occurrence of Data quality info or in multiple occurrences by selecting the [+] symbol. The use of this section will largely depend on the type of resource you are describing. For experimental data, it is recommended that you have at least two occurrences of this element: • the first to describe the collection hardware and • the second to describe the dataset more generally. 22. Select Data quality from the By Group list on the left hand side of the screen. A new metadata form based on the selected template will be displayed to complete. Complete the relevant elements and fields within Data quality. Unless you are trying to describe Geospatial (GIS) data or data collected by a complicated sensor or instrument, you really need only complete the field blocks “Scope - Hierarchy level”, “Level description” and “Lineage statement” within ‘Data Quality Information’. MEST_User_Guide.doc 2011-11-23 Page 117 of 159 Data quality info Provides overall assessment of quality of the resource. Hierarchy Level The specific data to which the data quality information applies. Categorises the resource being described. Format – Values are selected from a controlled codelist. Extent C Information about the spatial, vertical and temporal extent of the data specified by the scope. This field is currently not utilised by IMAS. Level description C Detailed description about the level of the data specified by the scope “Hierarchy Level”. Format - Values are selected from a controlled codelist. Obligation – Must be completed (for the record to validate), if you indicate that the scope hierarchy level is other than a “dataset” or “series”. MEST_User_Guide.doc Lineage Statement C 2011-11-23 Page 118 of 159 General explanation of the data producer’s knowledge about the lineage of a dataset. Presents a history of how the resource was derived and is intended to provide a statement regarding the nature and quality of the resource. Can include; • Details on sampling, methodologies, precision, resolution, • The equipment and software used, • A description of the data. Examples – • The Territorial Sea Baseline (TSB) data was originally derived from the AUSLIG 1:100:000 scale coastline data supplemented with coastal aerial photography in some areas. Since 1994 the data has been extensively validated and revised using the best available data from AUSLIG, the RAN Hydrographic Office and all State and Territory mapping agencies. Satellite imagery and recent aerial photography were also used. • Roughened black Perspex plates (110 x 110 x 15 mm) were used to establish sessile invertebrate assemblages. Square cages (130 mm x 130 mm x 150 mm height) were constructed using either 10 mm mesh plastic Gutter Guard TM or 2 mm mesh flyscreen. Unlike the Gutter Guard TM, the flyscreen was not rigid so an internal frame was built with the Gutter Guard TM which was then completely covered with the 2 mm mesh flyscreen. Partial cages had half of the roof and half of two side walls removed to allow predators access to plates whilst leaving as much of the cage intact as possible. Species identification and counts were made using a binocular dissecting microscope. Obligation – Must if exist if quality scope is “dataset” or “series”. ** Remaining fields within Data quality are currently not utilised by IMAS. The actual data quality statement is entered in Lineage statement. If you would like to describe the resource with a single occurrence of “Data Quality Info”, select either “dataset” or “nonGeographicDataset” as the Hierarchy level under Scope. MEST_User_Guide.doc 2011-11-23 Page 119 of 159 Back to Top 5.2.2.9. App. Schema This Group is not utilised by IMAS. 5.2.2.10. Catalog This Group is not utilised by IMAS. 5.2.2.11. Content Info This Group is not utilised by IMAS. 5.2.2.12. Ext. Info This Group is not utilised by IMAS. 5.2.3. Validate the Record A metadata record will be valid when – • All mandatory fields are complete; • All conditional requirements are met; • Constrained fields contain appropriate content. See section 5.1.2 Field Obligations for information about mandatory and conditional fields. MEST_User_Guide.doc 2011-11-23 Page 120 of 159 Constrained fields require specified content or format. The three types of constrained fields within the MEST metadata records are – • Numerical fields; • Fields with drop-down codelists; • Dates. The MEST will only test if the metadata conforms to the selected schema, it will not validate the content of unconstrained fields (e.g. spelling). Validation is a two step process, first the MEST tests if all mandatory fields have been completed and that all constrained fields have appropriate content, it then uses a schematron to test whether conditional requirements have been met. It will not use the schematron until the record passes the first test. Validation Step 1 Mandatory fields are complete and constrained fields contain appropriate content. Select the Check button. If the metadata passes this first test, the following message will display: “Validation against schema definitions succeeded” If the metadata doesn’t pass this test, a list of the errors in the metadata will be provided. We are currently developing the error messages that describe non-valid metadata records. If you receive a message that you do not understand, please contact helpdesk (see 1.1.3 Feedback). Note - During validation and/or viewing of the metadata record, fields where information has not been entered during creation of the record will not be visible. The absence of content in a field may affect the validation process. Error Identification Table This error identification table shows the error message that may appear, the field that is affected by the error, the field block(s) where the relevant field can be located, and the solution that should remove the error. To save space, the field blocks listed in the column below that are within the Identification > Data Identification (MCP) field block - as shown when using the By Profile view MCP All - have had ‘Identification > Data Identification (MCP)’ removed from the Field Block column. # refers to the error number, which changes from record to record. Validation Error Field affected Field Block Solution MEST_User_Guide.doc 2011-11-23 Page 121 of 159 ERROR(#) org.xml.sax.SAXParseException: cvcdatatype-valid.1.2.1: '' is not a valid value for 'dateTime'. (Element: gco:DateTime with parent element: gmd:date) Date Type, Date Date ERROR(#) org.xml.sax.SAXParseException: cvctype.3.1.3: The value '' of element 'gco:DateTime' is not valid. (Element: gco:DateTime with parent element: gmd:date) Date Type, Date Date ERROR(#) org.xml.sax.SAXParseException: cvcdatatype-valid.1.2.1: '' is not a valid value for 'dateTime'. (Element: gco:DateTime with parent element: gmd:date) Date Type, Date Descriptive keywords > Keywords > Thesaurus name > Date ERROR(#) org.xml.sax.SAXParseException: cvctype.3.1.3: The value '' of element 'gco:DateTime' is not valid. (Element: gco:DateTime with parent element: gmd:date) Date Type, Date Descriptive keywords > Keywords > Thesaurus name > Date ERROR(#) org.xml.sax.SAXParseException: cvcdatatype-valid.1.2.2: '' is not a valid value of list type 'Date_Type'. (Element: gco:Date with parent element: gmd:editionDate) ERROR(#) org.xml.sax.SAXParseException: cvctype.3.1.3: The value '' of element 'gco:Date' is not valid. (Element: gco:Date with parent element: gmd:editionDate) ERROR(#) org.xml.sax.SAXParseException: cvccomplex-type.2.4.a: Invalid content was found starting with element 'gmd:dateType'. One of '{"http://www.isotc211.org/2005/gmd":dat e}' is expected. (Element: gmd:dateType with parent element: gmd:CI_Date) Edition Date Descriptive keywords > Keywords > Thesaurus name Edition Date Descriptive keywords > Keywords > Thesaurus name Date Type, Descriptive Date keywords > Keywords > Thesaurus name > Identifier > RS Identifier > Authority > Date Select calendar icon, select date, select option from Date Type list Select calendar icon, select date, select option from Date Type list Select calendar icon, select date, select option from Date Type list Select calendar icon, select date, select option from Date Type list Select calendar icon, select date Select calendar icon, select date Select item from Date Type list, select option from Date list, select the plus [+] button adjacent to Date, select on the MEST_User_Guide.doc 2011-11-23 ERROR(#) Date Type, org.xml.sax.SAXParseException: cvcDate complex-type.2.4.a: Invalid content was found starting with element 'gmd:dateType'. One of '{"http://www.isotc211.org/2005/gmd":dat e}' is expected. (Element: gmd:dateType with parent element: gmd:CI_Date) ERROR(#) org.xml.sax.SAXParseException: cvcdatatype-valid.1.2.2: '' is not a valid value of list type 'Date_Type'. (Element: gco:Date with parent element: gmd:date) Date Type, Date ERROR(#) org.xml.sax.SAXParseException: cvctype.3.1.3: The value '' of element 'gco:Date' is not valid. (Element: gco:Date with parent element: gmd:date) Date Type, Date ERROR(#) org.xml.sax.SAXParseException: cvcenumeration-valid: Value '' is not facetvalid with respect to enumeration '[farming, biota, boundaries, climatologyMeteorologyAtmosphere, economy, elevation, environment, geoscientificInformation, health, imageryBaseMapsEarthCover, intelligenceMilitary, inlandWaters, location, oceans, planningCadastre, society, structure, transportation, utilitiesCommunication]'. It must be a value from the enumeration. (Element: gmd:MD_TopicCategoryCode with parent element: gmd:topicCategory) ERROR(#) org.xml.sax.SAXParseException: cvctype.3.1.3: The value '' of element 'gmd:MD_TopicCategoryCode' is not valid. (Element: gmd:MD_TopicCategoryCode with parent element: gmd:topicCategory) Topic Category Code Topic Category Code Page 122 of 159 Descriptive keywords > Keywords > Thesaurus name > Identifier > Identifier > Authority > Date Descriptive keywords > Keywords > Identifier > Identifier > Authority > Date Descriptive keywords > Keywords > Identifier > Identifier > Authority > Date Topic category Topic category calendar icon, select a date (and time). Select an item from the Date drop-down list, press the adjacent plus [+] button Select the calendar icon, pick a date Select the calendar icon, pick a date Press the plus [+] icon, press the close [X] icon on the field block missing a field, select a topic from the list (example: oceans) Press the plus [+] icon, press the close [X] icon on the field block missing a MEST_User_Guide.doc 2011-11-23 ERROR(#) org.xml.sax.SAXParseException: cvcdatatype-valid.1.2.1: '' is not a valid value for 'boolean'. (Element: gco:Boolean with parent element: gmd:extentTypeCode) Extent Type Code ERROR(#) org.xml.sax.SAXParseException: cvctype.3.1.3: The value '' of element 'gco:Boolean' is not valid. (Element: gco:Boolean with parent element: gmd:extentTypeCode) Extent Type Code ERROR(#) org.xml.sax.SAXParseException: cvccomplex-type.2.4.b: The content of element 'gmd:EX_BoundingPolygon' is not complete. One of '{"http://www.isotc211.org/2005/gmd":pol ygon}' is expected. (Element: gmd:EX_BoundingPolygon with parent element: gmd:geographicElement) ERROR(#) org.xml.sax.SAXParseException: cvccomplex-type.2.4.b: The content of element 'gml:Point' is not complete. One of '{"http://www.opengis.net/gml":metaData Property, "http://www.opengis.net/gml":description, "http://www.opengis.net/gml":description Reference, "http://www.opengis.net/gml":identifier, "http://www.opengis.net/gml":name, "http://www.opengis.net/gml":pos, "http://www.opengis.net/gml":coordinates }' is expected. (Element: gml:Point with parent element: gmd:polygon) ERROR(#) org.xml.sax.SAXParseException: cvcdatatype-valid.1.2.1: '' is not a valid value for 'decimal'. (Element: gco:Decimal with parent element: gmd:westBoundLongitude) Polygon Page 123 of 159 Extent > Geographic element > EX_Boundi ngPolygon > Extent type code Extent > Geographic element > EX_Boundi ngPolygon > Extent type code Extent > Geographic element > EX_Boundi ngPolygon field, select a topic from the list (example: oceans) Enter either 0 or 1, otherwise remove the field by clicking close [X] Enter either 0 or 1, otherwise remove the field by clicking close [X] Select an item from the list then click the adjacent plus [+] button gml: metaDataPr operty gml: description gml: description Reference gml: identifier gml:name Extent > Geographic element > EX_Boundi ngPolygon > Polygon > Point Select the plus [+] button next to the item to be expanded, then fill in the field. West bound latitude Extent > Geographic element > Geographic bounding box Either enter a coordinate in the field, or select from the list MEST_User_Guide.doc 2011-11-23 ERROR(#) org.xml.sax.SAXParseException: cvctype.3.1.3: The value '' of element 'gco:Decimal' is not valid. (Element: gco:Decimal with parent element: gmd:westBoundLongitude) ERROR(#) org.xml.sax.SAXParseException: cvcdatatype-valid.1.2.1: '' is not a valid value for 'decimal'. (Element: gco:Decimal with parent element: gmd:eastBoundLongitude) West bound latitude ERROR(#) org.xml.sax.SAXParseException: cvctype.3.1.3: The value '' of element 'gco:Decimal' is not valid. (Element: gco:Decimal with parent element: gmd:eastBoundLongitude) ERROR(#) org.xml.sax.SAXParseException: cvcdatatype-valid.1.2.1: '' is not a valid value for 'decimal'. (Element: gco:Decimal with parent element: gmd:southBoundLatitude) East bound latitude ERROR(#) org.xml.sax.SAXParseException: cvctype.3.1.3: The value '' of element 'gco:Decimal' is not valid. (Element: gco:Decimal with parent element: gmd:southBoundLatitude) ERROR(#) org.xml.sax.SAXParseException: cvcdatatype-valid.1.2.1: '' is not a valid value for 'decimal'. (Element: gco:Decimal with parent element: gmd:northBoundLatitude) South bound latitude ERROR(#) org.xml.sax.SAXParseException: cvctype.3.1.3: The value '' of element 'gco:Decimal' is not valid. (Element: gco:Decimal with parent element: gmd:northBoundLatitude) ERROR(#) org.xml.sax.SAXParseException: cvcdatatype-valid.1.2.1: '' is not a valid value for 'boolean'. (Element: gco:Boolean with parent element: gmd:extentTypeCode) North bound latitude ERROR(#) Extent Type East bound latitude South bound latitude North bound latitude Extent Type code Page 124 of 159 Extent > Geographic element > Geographic bounding box Extent > Geographic element > Geographic bounding box Extent > Geographic element > Geographic bounding box Extent > Geographic element > Geographic bounding box Extent > Geographic element > Geographic bounding box Extent > Geographic element > Geographic bounding box Extent > Geographic element > Geographic bounding box Extent > Geographic element > Geographic description Extent > Either enter a coordinate in the field, or select from the list Either enter a coordinate in the field, or select from the list Either enter a coordinate in the field, or select from the list Either enter a coordinate in the field, or select from list Either enter a coordinate in the field, or select from the list Either enter a coordinate in the field, or select from the list Either enter a coordinate in the field, or select from the list Enter either 0 or 1, otherwise remove the field by clicking close [X] Enter either MEST_User_Guide.doc 2011-11-23 Page 125 of 159 org.xml.sax.SAXParseException: cvctype.3.1.3: The value '' of element 'gco:Boolean' is not valid. (Element: gco:Boolean with parent element: gmd:extentTypeCode) code Geographic element > Geographic description ERROR(#) org.xml.sax.SAXParseException: cvccomplex-type.2.4.b: The content of element 'gmd:EX_GeographicDescription' is not complete. One of '{"http://www.isotc211.org/2005/gmd":ge ographicIdentifier}' is expected. (Element: gmd:EX_GeographicDescription with parent element: gmd:geographicElement) Geographic Identifier Extent > Geographic element > Geographic description ERROR(#) org.xml.sax.SAXParseException: cvccomplex-type.2.4.b: The content of element 'gmd:EX_SpatialTemporalExtent' is not complete. One of '{"http://www.isotc211.org/2005/gmd":ext ent}' is expected. (Element: gmd:EX_SpatialTemporalExtent with parent element: gmd:temporalElement) ERROR(#) org.xml.sax.SAXParseException: cvcdatatype-valid.1.2.1: '' is not a valid value for 'double'. (Element: gco:Real with parent element: gmd:minimumValue) ERROR(#) org.xml.sax.SAXParseException: cvctype.3.1.3: The value '' of element 'gco:Real' is not valid. (Element: gco:Real with parent element: gmd:minimumValue) ERROR(#) org.xml.sax.SAXParseException: cvcdatatype-valid.1.2.1: '' is not a valid value for 'double'. (Element: gco:Real with parent element: gmd:maximumValue) ERROR(#) org.xml.sax.SAXParseException: cvctype.3.1.3: The value '' of element 'gco:Real' is not valid. (Element: gco:Real with parent element: gmd:maximumValue) Extent, Spatial Extent Extent > Temporal element > Spatial temporal extent Minimum Value Extent > Vertical element > Vertical extent Extent > Vertical element > Vertical extent Extent > Vertical element > Vertical extent Extent > Vertical element > Vertical extent Minimum Value Maximum Value Maximum Value 0 or 1, otherwise remove the field by clicking close [X] Select an option from the dropdown list and then press the plus [+] button. Then fill the newly displayed fields. Select plus [+] on both field names, fill in necessary fields Enter a numerical value in this field Enter a numerical value in this field Enter a numerical value in this field Enter a numerical value in this field Back to Top MEST_User_Guide.doc 2011-11-23 Page 126 of 159 Troubleshooting How come clicking on a calendar icon does not bring up the calendar? Click Save and Close to go to the view record screen, click Edit to return to the edit screen, and then try clicking on the calendar icon again. What happens if I have an error that is not listed in the table above? If a message displays that is not understood, please contact helpdesk (see 1.1.3 Feedback). If you would prefer to analyse the error yourself, please try the following: Analyse the part of the error that says (Element: ____ with parent element: _____). Back on the edit record screen, look for the symbols, and see if a field name or field block is similar to the code in the error. If so, check for: • • empty fields drop-down lists that have an option selected, but also have a plus [+] icon indicating a field block needs to be added. How come I can not find the field (-block) where the error originates? Check that the By Profile view is set to MCP All (top left hand corner). Use Ctrl-F to search for the field (-block) name within the browser screen. The error table above refers to a field name that appears multiple times on the edit screen, I don’t know which one to edit? MEST_User_Guide.doc 2011-11-23 Page 127 of 159 There are often multiple headings with common field block names. To find the right one quickly, search the web page by using Ctrl-F. Look for either a field name with a symbol next to it, or alternatively a field name within a field-block displaying the symbol. Validation Step 2 Schematron test of conditional requirements. Once the metadata record has passed the first test, the MEST will automatically run the schematron. If the metadata passes this second test the following message will display: “Validation against schematron rules succeeded” If the metadata does not pass the schematron test, the below message will be shown. Click the phrase “Schematron report available here” to find out where the error occurred. This section of the MEST is not particularly user-friendly, if there are difficulties interpreting the schematron output either contact helpdesk (see 1.1.3 Feedback) or go back to the record in edit mode and look for elements containing the symbol, . The output of the schematron will look like the figure below. Each row is a rule tested by the schematron. If the metadata conformed to the rule, the text will be white on a black background. If the metadata did not conform to the rule the text will not have a black background. Once a rule that failed has been identified, return to the metadata record and repair it, then select the Check button again. MEST_User_Guide.doc 2011-11-23 Page 128 of 159 Rules the record passe Failed rule Schematron Error Identification Table This error identification table shows the error message that may appear, the field that is affected by the error, the field block(s) that the field can be found in, and the solution that should remove the error. To save space, the field blocks listed in the column below that are within the Identification > Data Identification (MCP) field block - as shown when using the By Profile view MCP All - have had ‘Identification > Data Identification (MCP)’ removed from the Field Block column. Schematron Error Field affected Field Block Solution ANZLIC Metadata Profile Version 1.1.1 Annex B Table 5 row 3 - fileIdentifier required∗ CharacterString must have content or it's parent must have a valid nilReason attribute.Error: Reference source not found CRS attributes constraintsError: Reference source not found ISOFTDS19139:2005-TableA1-Row24 - name requiredError: Reference source not found ISOFTDS19139:2005-TableA1-Row07 - otherConstraints required if otherRestrictions otherConstraints: documented if Access Resource Expand [+] accessConstraints or useConstraints Constraints, Constraints, the Other = "otherRestrictions." Other Legal constraints constrsaints constraints field and fill This error category does not contain errors. MEST_User_Guide.doc 2011-11-23 Page 129 of 159 in. otherConstraints: documented if Use Resource Expand [+] accessConstraints or useConstraints Constraints, Constraints, the Other = "otherRestrictions." Other Legal constraints constrsaints constraints field and fill in. ISOFTDS19139:2005-TableA1-Row16 - units required for valuesError: Reference source not found ISOFTDS19139:2005-TableA1-Row13 - description required if no sourceExtent "description" is mandatory if Source Lineage > Fill in "sourceExtent" is not documented. Lineage > description [Process Step > field OR Process Step >] fields in Source Source Extent block ISOFTDS19139:2005-TableA1-Row14 - sourceExtent required if no description "description" is mandatory if Source Lineage > Fill in "sourceExtent" is not documented. Lineage > description [Process Step > field OR Process Step >] fields in Source Source Extent block ISOFTDS19139:2005-TableA1-Row10 - content mandatory for dataset or series If(count(source) + Statement, Data quality Expand and count(processStep) =0) and Process Step, info > Data fill in (DQ_DataQuality.scope.level = Source. quality > field/block 'dataset' or 'series') then statement is Lineage > for mandatory. Lineage Statement, Process Step, or Source. ISOFTDS19139:2005-TableA1-Row11 - source required if no statement or processStep "source" role is mandatory if Statement, Data quality Expand and LI_Lineage.statement and Process Step, info > Data fill in "processStep" role are not Source. quality > field/block documented. Lineage > for Lineage Statement, Process Step, or Source. ISOFTDS19139:2005-TableA1-Row12 - processStep required if no statement or source "processStep" role is mandatory if Statement, Data quality Expand and LI_Lineage.statement and "source" Process Step, info > Data fill in role are not documented. Source. quality > field/block Lineage > for Lineage Statement, Process Step, or MEST_User_Guide.doc 2011-11-23 Page 130 of 159 Source. ISOFTDS19139:2005-TableA1-Row08 - dataset must have report or lineage "report" or "lineage" role is Report, Data quality Expand and mandatory if scope.DQ_Scope.level Lineage info > Data fill in = 'dataset'. quality field/block for Report or Lineage ISOFTDS19139:2005-TableA1-Row09 - levelDescription needed unless dataset or series "levelDescription" is mandatory if Hierarchy Data quality Select an "level" notEqual 'dataset' or 'series'. level, info > Data option from Level quality > Scope the Level Description > Scope Description drop-down list and click plus [+], fill in the field ISOFTDS19139:2005-TableA1-Row17 - units required for density valuesError: Reference source not found ISOFTDS19139:2005-TableA1-Row18 - MD_Format required count (distributionFormat + Distribution Distribution Expand [+] distributor/MD_Distributor/distribut format, info > the orFormat) > 0. Distributor, Distribution Distributio [Transfer n format options] and Distributor field blocks ISOFTDS19139:2005-TableA1-Row23 - element required count(description + Extent Data quality Fill in geographicElement + info > Data description temporalElement + verticalElement) quality > Scope field > 0. > Scope > Extent ISOFTDS19139:2005-TableA1-Row04 - dataset must have extentError: Reference source not found ISOFTDS19139:2005-TableA1-Row05 - dataset or series must have topicCategoryError: Reference source not found ISOFTDS19139:2005-TableA1-Row06 - either aggregateDataSetName or aggregateDataSetIdentifier must be documentedError: Reference source not found ISOFTDS19139:2005-TableA1-Row01 - language indicationError: Reference source not found ISOFTDS19139:2005-TableA1-Row02 - character set indicationError: Reference source not found ISOFTDS19139:2005-TableA1-Row19 - detail required unless simple termError: Reference source not found ISOFTDS19139:2005-TableA1-Row20 - conditionError: Reference source not found ISOFTDS19139:2005-TableA1-Row21 - domainCodeError: Reference source not found ISOFTDS19139:2005-TableA1-Row22 - shortNameError: Reference source not found MEST_User_Guide.doc 2011-11-23 Page 131 of 159 ISOFTDS19139:2005-TableA1-Row15 - checkPointDescription required if availableError: Reference source not found hierarchy level nameError: Reference source not found gmd:MD_Metadata/gmd:dateStamp requiredError: Reference source not found gmd:identificationInfo/mcp:MD_DataIdentification requires citation, abstract, credit, status, pointOfContact MD_(Data)Identification is missing Citation Data Fill in citation. Identification Citation (MCP) area MD_(Data)Identification is missing Abstract Data Fill in abstract. Identification Abstract (MCP) field MD_(Data)Identification is missing Point of Data Click the pointOfContact. Contact Identification plus [+] (MCP) button if resourceMaintenance then must have maintenanceAndUpdateFrequency maintenanceAndUpdateFrequency is Maintenance Data Select an mandatory if resourceMaintenance is and update Identification option from documented. frequency (MCP) > the dropResource down list maintenance > Maintenance information dataset must have temporal extent MD_Metadata/hierarchyLevel = Temporal Extent Select an "dataset" (i.e. the default value of element option from this property on the parent) implies Temporal count element (extent//temporalElement/EX_Temp and click the oralExtent) >=1. plus button [+]. Fill in the newly displayed fields. Schematron Troubleshooting How come clicking on a calendar icon does not bring up the calendar? Click Save and Close to go to the view record screen, click Edit to return to the edit screen, and then try clicking on the calendar icon again. MEST_User_Guide.doc 2011-11-23 Page 132 of 159 What happens if I have an error that is not listed in the table above? If a message displays that is not understood, please contact helpdesk (see 1.1.3 Feedback). If you would prefer to analyse the error yourself, try the following: Analyse the part of the error that says (Element: ____ with parent element: _____). Back on the edit record screen, look for the symbols, and see if a field name or field block is similar to the code in the error. If so, check for: • • empty fields drop-down lists that have an option selected, but also have a plus [+] icon indicating a field block needs to be added How come I can not find the field (or element) where the error originates? Check that the By Profile view is set to MCP All (top left hand corner). Use Ctrl-F to search for the field (-block) name within the browser screen. The error table above refers to a field name that appears multiple times on the edit screen, I don’t know which one to edit? There are often multiple headings with common field block names. To find the right one quickly, search the page by using Ctrl-F. Look for either a field name with a symbol next to it, or alternatively a field name within a field-block displaying the symbol. Back to Top MEST_User_Guide.doc 2011-11-23 Page 133 of 159 5.3. Adding Thumbnail Images A thumbnail is a graphic overview of the resource. A large and small thumbnail image may be uploaded to illustrate the content of the research, for example a map or a photo (users will be able to access the large thumbnail by clicking on the small thumbnail). A small thumbnail will be displayed in search results. Thumbnail images can only be inserted during the creation or editing the metadata record. 1. Is the metadata record being created? No Continue (to get to the editing menu) Yes Go to 5.3 below 2. Find the record from one of the SEARCH options. 3. Open the record. 4. Select the Edit button. 5. Select the Thumbnails button. The following Thumbnail management screen is displayed: MEST_User_Guide.doc 2011-11-23 Page 134 of 159 File Types GIF, PNG and JPEG images can be used as input for the thumbnails. To use the same image for the small and large thumbnails 6. Select the Browse button for the Large thumbnail (to locate the image file). 7. A pop up window will appear to browse files on the computer. 8. Select the required file by double-clicking on it. 9. Select the Add button to load both images simultaneously onto the record. Go to 5.3 below To use different images – 10. Select the Browse button for the Small thumbnail (to locate the image file). 11. A pop up window will appear to browse files on the computer. 12. Select the required file by double-clicking on it. 13. Select the Add button. 14. Select the Browse button for the Large thumbnail (to locate a different image file). 15. A pop up window will appear to browse files on the computer. 16. Select the required file by double-clicking on it. 17. Select the Add button. 18. Select the Back to editing button to return to the record view. 19. Select the Save button. To make changes, return to the thumbnail management view and click on both of the Delete buttons to reset the images. Image Size and Settings The default settings have been set to the recommended size but it is important to ensure that the thumbnails are scaled to display the image(s) to their best effect and clarity. The size of the thumbnails can be scaled up or down by changing the pixel size. Images can be scaled either vertically or horizontally to a fixed number of pixels. Back to Top MEST_User_Guide.doc 2011-11-23 Page 135 of 159 5.4. Upload File(s) Once the metadata record is complete it is possible to upload a dataset and create a link between the data and related description. Any documentation that can assist with the interpretation of the data should be uploaded, including related reports, detailed descriptions, base data used to create the dataset specified and/or other relevant information. Data can be uploaded directly into the MEST or a URL to link to the data stored in another location. Uploading data or providing URL details is done by completing the Distribution section of the metadata record, available from the left menu. Three (3) field blocks, within the Distribution section, must be completed – Distribution format, Distributor and Transfer Options. Point of Truth URL If an OnLine resource box contains information about a Point of Truth URL, do not modify it, but instead add a new OnLine resource box (see 5.1.3 RECORD MANAGEMENT for instructions on how). Any modifications made to this area will be overridden. The Point of Truth URL exists as a way for users to find the original metadata record in situations where the record may have been harvested. 16. Is the metadata record being created? No Continue (to get to the editing menu) Yes Go to 7 17. Find the record from one of the SEARCH options. 18. Open the record. MEST_User_Guide.doc 2011-11-23 Page 136 of 159 19. Select the Edit button. 20. Select Distribution from the By Group list on the left hand side of the screen. 21. Enter the format details of the file to be uploaded in the Name and Version fields (For further information refer to Distribution format). 22. If the Distributor element is not already open, open it by selecting the [+] (expand) symbol. This field is currently not utilised by IMAS. 23. Enter the name and contact details of the individual and organisation distributing the resource (For further information refer to Distributor contact). 24. If the OnLine resource element under Transfer options is not already open, open it by selecting the [+] symbol. 25. Select the connection Protocol for the data from the available codelist. Once a protocol has been selected the Upload File button will be available. Data Protocol The Protocol for the majority of files will be either Data File for download or Other File for download. 26. Enter the Description of the file. The file Description should include the file, size, type and format. Examples – • East Gippsland Survey (data file) [100mb][ascii] • East Gippsland Survey (image loop of lake after flood)[1mb][vdx] • East Gippsland Survey (documentation on collection rational)[75kb][.doc] 27. Select the Upload File button. The following file upload screen is displayed: What characters are permitted in a file name? It is recommended that the filename is edited before the upload is started. Letters, MEST_User_Guide.doc 2011-11-23 Page 137 of 159 numbers, hyphens and underscores are permitted. If a file is uploaded that contains prohibited characters in its name, all spaces within the file name are replaced with underscores and the remaining prohibited symbols are stripped from the file name. 28. Select the Browse button and navigate to locate the required file. 29. Select the file by either double clicking, or, clicking once and selecting Open. What kind of file formats can the attachment have? Files in any format can be uploaded including but not limited to PDF, doc, xls, images, and vector layers can be used as input for the data for download. Large files should be compressed. 30. Select the Upload button. The following upload screen is displayed for successful file upload: 31. Close the File Upload screen. Can I rename uploaded files? Renaming files after they have been uploaded is discouraged. If the filename needs to be changed, edit it locally before uploading the file. Files will not be found if they are renamed after uploading. 32. Select Save to ensure all changes are maintained. MEST_User_Guide.doc 2011-11-23 Page 138 of 159 What happens if the wrong file is attached? If an error is made or a replacement file is required, select the remove button to delete the existing file and repeat the file upload process (see 5.4 Upload File(s)). Can I update the saved data file with additional file versions? If working on a continuous dataset, select the overwrite checkbox in the upload window. A file of the same name will not be saved unless the overwrite checkbox is selected. When downloading files the user will be able to determine that there are previous versions. To validate that the file has been recorded and available for download see section 4.4 Download Data Set(s). It will not be possible to download the data file(s) unless Resource Constraint information is added. How are multiple files uploaded? Consider if multiple files can be uploaded as one unique zip file, i.e. the files have the same data profile, or as multiple separate downloads. To upload additional files as separate downloads, add a new online resource box by selecting the [+] (expand) symbol. Back to Top 5.5. Upload URL 1. Is the metadata record being created? No Continue (to get to the editing menu) Yes Go to 7 below 2. Find the record from one of the SEARCH options. MEST_User_Guide.doc 2011-11-23 Page 139 of 159 3. Open the record. 4. Select the Edit button. 5. Select Distribution from the By Group list on the left hand side of the screen. 6. If the OnLine resource element is not already open, open it by selecting the [+] (expand) symbol. 7. Select the connection Protocol for the data, Web address (URL), from the available codelist. 8. Remove the BlueNet URL from the Linkage URL field. 9. Enter the required web address. 10. Enter the Description for the file. When creating external links from the MEST records, please ensure that – • The resource is freely available, • The URL does not contain or link to any material that could be considered offensive. Back to Top 5.6. Assign/Alter Access Privileges Once a metadata record has been created and saved, the viewing privileges can be adjusted. This is the identification of the work groups access i.e. Publish, Download, etc. for the particular record. Privileges are assigned on a per group basis. The access to these functions may differ on a per user basis depending on the user profile (i.e. Guest, User, Editor, Admin, etc.). To assign/alter privileges – 1. Find the record from one of the SEARCH options. The Privileges option is available from the search output or within the metadata record. 2. Select the Privileges button. The following screen is displayed: MEST_User_Guide.doc 2011-11-23 Page 140 of 159 The following is a brief description of each privilege, to assist with identifying the correct one to assign to which group(s). Publish – Members of the selected user group can view the record (if searching with matching criteria). These users can not edit the record. Download – Members of the selected user group can view the record and download any attached data or associated file(s). Editing – Members of the selected user group will be able to view and edit the metadata record. Interactive Map – Members of the selected user group can view the record and if a Web Map Server layer is available, use the interactive map. Featured – Members of the selected user group may see the record on the home page of the MEST. The record is placed in the Features Maps of the home page and it appears there randomly. Notify – the administrator of the selected user group will be notified whenever the attached files are downloaded. 3. Select the small box next to the privilege to place or remove a checkmark. MEST_User_Guide.doc 2011-11-23 Page 141 of 159 Set All and Clear All buttons allow all of the checkmarks to be placed or removed at once. 4. Select Close window for the Set/Show Privileges screen Back to Top 5.7. Assigning Categories A metadata record can be assigned to a category to assist the user in refining their search result. Assigning categories allows a user to identify data and/or metadata records at a more generic level. Category options include; Applications, Audio/Video, Case study and best practices, Conference proceedings, Datasets, Directories, Interactive resources, Maps and graphics, Other information resources, Photo. To assign categories – 1. Find the record from one of the SEARCH options. The Categories option is available from the search output or within the metadata record. 2. Select the Categories button: 3. From the Set/Show Categories screen, select the option that best describes the resource. 4. Select the Submit button. Search By Category Assigning a category is optional; however it may increase the chance of the resource being discovered by another user, as users are able to search by these category types via the home page of the MEST. This field is currently not utilised by IMAS. Back to Top 5.8. Cloning Records Along with creating records from scratch, it is possible to create a clone of already existing records. Cloning records can be a time saver when there are collections of information that could be reused in multiple records (for example, contact details). MEST_User_Guide.doc 2011-11-23 Page 142 of 159 Be careful when cloning records, as some unwanted information could be hidden if the record is not reviewed in MCP All view before publishing. To clone a record – 1. After performing a search (see SEARCH section), select a record. 2. In the view record screen, select the Create button at the top of the window. 3. A dialogue box will appear, as shown: 4. Select a group for the record to belong to. Group Selection It is advised to select one group only. When multiple groups are selected, only the top group will be saved as the assigned group. 5. If the metadata record contains thumbnails and downloadable data, two checkboxes will display on the screen, providing the option to copy these files across. Thumbnails and Downloadable Files MEST_User_Guide.doc 2011-11-23 Page 143 of 159 By leaving the checkboxes unchecked, references to the file name and other file specifications will still be present in other areas of the record. The file itself will not be copied. It may be necessary to read through the record manually and remove any file references. 6. Select the Create button to submit. By selecting Cancel at this point instead of Save or Save and Close, the record will still exist, with an identical title to the record just cloned. It is safer to save with a retitled record (say with ‘[DELETE]’ in the Title) so it is easier to know which record to delete should if it is decided not to clone the record after all. 7. The record will appear in edit mode. Make the desired changes and then select Save and Close. When making changes to the metadata record, ensure characters (letters, words, numbers, etc.) are entered in the Title before closing the record. If no title has been entered, the record becomes inaccessible. If, while making changes to the record, the Save button has been selected, be aware that this could stop the calendar pop up for the date fields from appearing. To rectify this, press the Save and Close button, and then in the view record screen click Edit to return to the edit screen. Make changes to the date fields before pressing the Save button to avoid this issue. Back to Top 5.9. Edit Metadata Record It is possible to return to add to or complete an incomplete metadata record at any time, even once it has been made public. The Edit option is only available within the record. User record ownership and privileges determines the access to the Edit button. The user must be logged into the MEST to edit a record. Editing a record will automatically update the Revision Date stamp, to the current date and time, within the record. MEST_User_Guide.doc 2011-11-23 Page 144 of 159 The Edit option is used to – • Add additional information, • Complete an incomplete record, • Upload new/additional files, • Delete files. If in edit mode and viewing the data By Profile the content of the fields suppressed from view will not be altered or deleted. To edit a record – 1. Find the record from one of the SEARCH options. 2. Select the Edit button. 3. Once all editing is complete select the Save and Close button. While editing a record it is possible to cancel edits, by selecting the Cancel button. This will not delete the record. Are there limits to how much content I can store in a metadata record? Yes. A limit applies to the total amount of content that fills the fields and drop-down lists of the form in any edit mode, whether by MCP All view, MCP Core, MCP Minimum or By Group. The character limit is 142,652 – the equivalent of 28,531 words, or 28 pages. If more than 28 pages worth of content needs to be added, it may be worth splitting the information into an Aggregation set (see Aggregation info for further information on Aggregation sets). Save record before and during the entering of large amounts of data to prevent loss in the event that the data limit is exceeded. MEST_User_Guide.doc 5.9.1. 2011-11-23 Page 145 of 159 Editing in XML View The XML view is another way for metadata editors to directly alter the content of metadata records (rather than manually typing information into the elements, By Group and By Profile options). Care should be taken when editing XML since the validation schema expects field tags to occur in a certain order and the content of some fields may be fixed by a codelist. XML editing software can be accessed at http://www.oxygenxml.com/ Back to Top 5.10. Delete Metadata Record The Delete option is available from the search output or within the metadata record. User record ownership and privileges determines the access to the Delete button. The user must be logged into the MEST to delete a record. To delete a record – 1. Find the record from one of the SEARCH options. 2. Select the Delete button. The following screen is displayed: 3. Select OK. The following confirmation is displayed once the record has been deleted: MEST_User_Guide.doc 2011-11-23 Page 146 of 159 4. Select Close window for the Delete Metadata Confirmation screen to return to the MEST home page. 5.11. Simple Metadata Form This section applies to MEST version 1.2.1 and above. If users do not wish to fill out a complete metadata form, a streamlined form is available to make it easier to submit data. As of MEST version 1.2.1, you do not need to register or log in prior to submitting data, as the process has been integrated. 1. From the top navigation menu, select Want to submit your data? 19. Select an option for Are you already registered? a. No Go to 5.11 below b. Yes Go to 5.11 below MEST_User_Guide.doc 2011-11-23 Page 147 of 159 20. A registration form will need to be submitted. c. Fill in the following fields for the Enter registration information area: First Name (*) Last Name (*) Email (*) Address State Zip (Postcode) Country Organisation / department Kind Profile Note: Fields with asterisks (*) are compulsory. d. Review the details entered, make any corrections needed, and then select the Next button. MEST_User_Guide.doc 2011-11-23 Page 148 of 159 If registration fails, follow the hints provided in the error message, review troubleshooting information in section 1.5.1 Registration or, failing that, contact helpdesk (see section 1.1.3 Feedback). Go to 5.11 below 21. A login form will need to be submitted. e. Fill in the following fields for the Enter registration information area: Enter registration details Username (*) Password or Email Note: Username is compulsory and must be filled in. While Password and Email are both optional, it is still compulsory to fill in at least one of these fields. f. Review the details entered, make any corrections needed, and then select the Next button. MEST_User_Guide.doc 2011-11-23 Page 149 of 159 If logging in fails, follow the hints provided in the error message, review troubleshooting information in 1.5.2 Logging In or, failing that, contact helpdesk (see section 1.1.3 Feedback). Go to 5.11 below 22. When the form is successfully submitted, fill out the relevant fields in the following screen: Note: If fields are already filled, they may be skipped. Note: Fields with asterisks (*) are compulsory. o Details of individual providing data/metadata Individual name (*) Organisation name (*) MEST_User_Guide.doc 2011-11-23 Position name Phone (eg. 61 3 9265-1111) Address • Delivery point (*) • City State (*) (eg. NSW) • Postcode (*) • Country (*) • Email (*) Page 150 of 159 o Details of dataset which will be uploaded Title (*) Abstract (*) No. of Files Approx. Size Format (eg. Excel, netcdf, Access, etc) Contact for Data Set (if different from details above) • Individual name • Organisation name • Position name Phone • Address o Delivery point o City State o Postcode o Country o Email o Comments Comments or Questions 23. Review the details entered, make any corrections needed, and then select the Submit button. If the form submission fails, follow the hints provided in the error message, or contact helpdesk (see section 1.1.3 Feedback). 24. When the form is submitted successfully, the following message appears: MEST_User_Guide.doc 2011-11-23 Page 151 of 159 25. “It's not really that difficult is it? The Simple Metadata Information you supplied has been sent. Thanks. Our helpdesk will contact you to help you build a complete metadata record and upload your data shortly.” Appendix 1: Contact details There are a number of places within a metadata record that require you to enter contact details. It is designed this way to accommodate organisations that create data and have a number of different people administer it (e.g. principal investigator, point-of-contact, metadata point-of-contact). For the average user, the same person(s) and/or organisation(s) is likely to be in all of these sections. If this is the case we recommend supplying complete contact details in the Point of contact section (POC) and just fill out the basics in all other sections (see below). Note: a person(s) role will not change throughout the metadata record, so that if you are the principal investigator, you should be identified as such throughout the record. Some organisations use “Position titles” rather than Individual names, and some prefer not to release some forms of contact detail to the general public (e.g. phone numbers). Before entering contact details, check with the organisation. Group Field Title Definition Requirement Metadata Contact Identification of, and means of communication with, person(s) and/or organisation(s) associated with the metadata record. Only list full contact details if different from the Point of Contact section (POC), or person(s) and/or organisation(s ) differ from those listed in POC Only list full contact details if different from POC, or Identification Cited Responsible Party List current contact information Identification of, and means of communication with, person (s) Individual Name Y if applicable Organisation name Y if applicable Position name Y if applicabl e Phone Address Online Role Resource N Email N Y only Y if applicable Y if applicable Y if applicabl e N Email only N Y Group Field Title Definition Requirement and/or organisation(s) associated with the resource. person(s) and/or organisation(s ) differ from those listed in POC List contact information for person(s) and/or organisation(s) where the resource was produced. Identification Point of Contact (POC) Identification of, and means of communication with, person(s) and/or organisation(s) associated with the resource. List current contact information Identification Resource Party responsible maintenance for resource - Contact maintenance. List current contact information Individual Organisation Position Name name name Phone Address Online Role Resource Always list full details Y if applicable Y if applicable Y if applicabl e Y Y Y Y Only list full contact details if different from POC, or person(s) and/or organisation(s ) differ from those listed in POC Y if applicable Y if applicable Y if applicabl e N Email only N Y Group Field Title Identification Descriptive Keywords Identification Resource specific usage Identification Geographic element – Geographic description Cited Responsible Party Identification Aggregation Info – Cited Definition Requirement Individual Organisation Position Name name name Phone Address Online Role Resource When using GCMD, CAAB codes or Marine Community Profile geographic extent names, the organisation that owns the reference must be cited. Identification of, and means of communicating with, person(s) and organisation(s) using the resource(s) Only have when using a formalised thesaurus or geographic reference. N Y N N N Y Y Only list full contact details if different from POC, or person(s) and/or organisation(s ) differ from those listed in POC Only have when using a geographic reference. Only cite relevant area Y if applicable Y if applicable Y if applicabl e Y Y Y Y N Y N N N Y Y Only list full contact details Y if applicable Y if applicable Y if applicabl N Email only N Y When using a geographic reference (e.g. csquares, Marine Community Profile geographic extent names), the organisation that owns the reference must be cited. Contact details for the person(s) Group Field Title Definition Requirement Responsible Party who created the aggregation. if different from POC, or person(s) and/or organisation(s ) differ from those listed in POC Only list full contact details if different from POC, or person(s) and/or organisation(s ) differ from those listed in POC List current contact information Distribution Distributor -Distributor contact Party responsible for distributing the resource. List current contact information Individual Organisation Position Name name name Phone Address Online Role Resource e Y if applicable Y if applicable Y if applicabl e N Email only N Y Appendix 2: Country ID Reference List ID Country 2 338 3 4 1220 5 6 7 258 30 8 1008 9 1 22 337 1016 1012 1010 1009 1015 1014 1011 10 11 Afghanistan Africa Albania Algeria All fishing areas American Samoa Andorra Angola Anguilla Antarctica Antigua and Barbuda Arctic Sea Argentina Armenia Aruba Asia Atlantic, Antarctic Atlantic, Eastern Central Atlantic, Northeast Atlantic, Northwest Atlantic, Southeast Atlantic, Southwest Atlantic, Western Central Australia Austria 52 12 13 16 14 57 255 23 53 17 18 19 80 20 31 21 24 239 26 27 233 29 115 32 33 35 317 Azerbaijan, Republic of Bahamas Bahrain Bangladesh Barbados Belarus Belgium Belize Benin Bermuda Bhutan Bolivia Bosnia and Herzegovina Botswana Bouvet Island Brazil British Indian Ocean Ter British Virgin Island Brunei Darussalam Bulgaria Burkina Faso Burundi Cambodia Cameroon Canada Cape Verde Caribbean 36 312 37 316 39 40 41 214 42 43 44 45 250 46 47 48 98 49 50 167 54 72 55 56 324 176 313 Cayman Island Central Africa Central African Republic Central America Chad Chile China, Mainland China, Taiwan Prov of Christmas Island Cocos Islands Colombia Comoros Congo, Dem Republic of Congo, Republic of Cook Islands Costa Rica Croatia Cuba Cyprus Czech Republic Denmark Djibouti Dominica Dominican Republic East & South East Asia East Timor Eastern Africa Group 334 58 59 60 61 178 63 238 335 427 64 65 322 66 67 68 69 70 71 74 75 76 73 79 81 82 84 85 86 87 88 Field Title Definition Eastern Europe Ecuador Egypt El Salvador Equatorial Guinea Eritrea Estonia Ethiopia Europe Europe, Non-EU Countries Faeroe Islands Falkland Islands Far East Fiji Islands Finland France French Guiana French Polynesia French South Terr Gabon Gambia Gaza Strip Georgia Germany Ghana Gibraltar Greece Greenland Grenada Guadeloupe Guam Requirement 89 90 175 91 93 92 95 97 99 100 1019 1018 1017 101 307 102 103 104 264 105 106 107 109 110 112 108 114 83 116 117 118 Individual Organisation Position Name name name Guatemala Guinea Guinea-Bissau Guyana Haiti Heard and McDonald Is Honduras Hungary Iceland India Indian Ocean, Antarctic Indian Ocean, Eastern Indian Ocean, Western Indonesia Intergvt Author Devpment Iran, Islamic Rep of Iraq Ireland Isle of Man Israel Italy Ivory Coast Jamaica Japan Jordan Kazakhstan Kenya Kiribati Korea, Dem People's Rep Korea, Republic of Kuwait 113 120 315 348 119 121 122 123 124 125 126 256 154 129 130 131 132 133 134 127 135 136 137 270 1013 138 145 139 146 140 141 Phone Address Online Role Resource Kyrgyzstan Laos Latin Amer & Caribbean Latin America Latvia Lebanon Lesotho Liberia Libyan Arab Jamahiriya Liechtensten Lithuania Luxembourg Macedonia Madagascar Malawi Malaysia Maldives Mali Malta Marshall Island Martinique Mauritania Mauritius Mayotte Mediterran and Black Sea Mexico Micronesia,Fed States of Midway Islands Moldova, Republic of Monaco Mongolia Group 142 143 144 28 147 148 319 325 320 321 149 151 150 156 153 157 158 159 160 161 421 428 310 163 162 221 1026 1023 1021 1020 1025 Field Title Definition Montserrat Morocco Mozambique Myanmar Namibia Nauru Near East Near East and North Africa Near East in Africa Near East in Asia Nepal Neth Antilles Netherlands New Zealand NewCaledonia Nicaragua Niger Nigeria Niue Norfolk Island North Africa North America North Western Africa Northern Mariana Is Norway Oman Pacific, Antarctic Pacific, Eastern Central Pacific, Northeast Pacific, Northwest Pacific, Southeast Requirement 1024 1022 165 166 168 169 170 171 172 173 174 177 179 182 183 185 184 187 188 189 190 191 244 192 193 194 195 196 197 200 199 Individual Organisation Position Name name name Pacific, Southwest Pacific, Western Central Pakistan Panama Papua New Guinea Paraguay Peru Philippines Pitcairn Islands Poland Portugal Puerto Rico Qatar Reunion Romania Russian Federation Rwanda Saint Helena Saint Kitts and Nevis Saint Lucia Saint Pierre & Miquelon Saint Vincent/Grenadines Samoa San Marino Sao Tome and Principe Saudi Arabia Senegal Seychelles Sierra Leone Singapore Slovakia 198 25 201 202 318 323 390 271 314 203 38 206 207 260 209 210 211 212 208 215 216 217 218 219 220 222 223 213 224 227 232 Phone Address Online Role Resource Slovenia Solomon Islands Somalia South Africa South America South Asia South of Sahara SouthGeorgia/Sandwich Is Southern Africa Spain Sri Lanka Sudan Suriname Svalbard Is Swaziland Sweden Switzerland Syrian Arab Republic Tajikistan Tanzania, United Rep of Thailand Togo Tokelau Tonga Trinidad and Tobago Tunisia Turkey Turkmenistan Turks and Caicos Is Tuvalu US Minor Outlying Is Group 240 469 226 230 225 229 231 234 235 155 236 237 242 243 245 311 303 205 9999 249 251 181 Field Title Definition US Virgin Islands USSR, Former Area of Uganda Ukraine United Arab Emirates United Kingdom United States of America Uruguay Uzbekistan Vanuatu Venezuela Viet Nam Wake Island Wallis and Futuna Is West Bank Western Africa Western Europe Western Sahara World Yemen Zambia Zimbabwe Requirement Individual Organisation Position Name name name Phone Address Online Role Resource