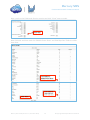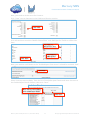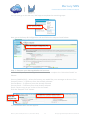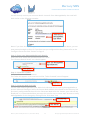
1
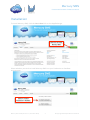
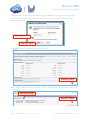
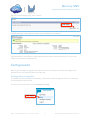
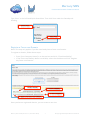
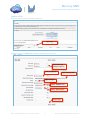
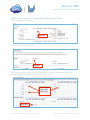
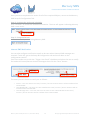
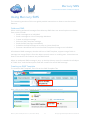
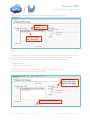
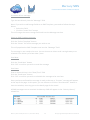
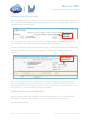
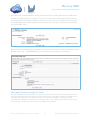
User Guide Mercury SMS Connected Customer Communications Version 1.7 | December 2014 Driven to Exceed | www.aprika.com.au Mercury SMS Connected Customer Communications Table of Contents Table of Contents ................................................................................................................................... 1 Introduction ........................................................................................................................................... 2 What is Mercury SMS ............................................................................................................................. 2 How Mercury SMS works ....................................................................................................................... 2 Installation .............................................................................................................................................. 3 Configuration .......................................................................................................................................... 6 Configure Force.com Site ................................................................................................................... 6 Configuration Options ...................................................................................................................... 16 Using Mercury SMS .............................................................................................................................. 17 Outbound SMS ................................................................................................................................. 17 Creating an SMS Template ............................................................................................................... 17 Sending an Individual SMS Message ................................................................................................ 19 Sending a Bulk SMS Message ........................................................................................................... 21 Sending an SMS via a Workflow Rule ............................................................................................... 21 Inbound SMS ........................................................................................................................................ 23 Receiving Inbound SMS Messages ................................................................................................... 23 Receiving Opt-‐Out Requests ............................................................................................................. 23 Contact Information ............................................................................................................................. 24 Technical Support ............................................................................................................................. 24 Sales ................................................................................................................................................. 24 Social Media Forums ........................................................................................................................ 24 Mercury User Guide (Version 1.7, December 2014) 1 © Copyright 2014 Aprika Business Solutions Mercury SMS Connected Customer Communications Introduction Welcome to Mercury SMS, the application that enables you to communicate with your clients via SMS directly from your Salesforce.com CRM system! In a world where we are connected to our clients in so many ways, via so many channels it is important to streamline the growing number of systems we use to communicate. Which is why it is so great that you’re able to send your SMS communications to your clients from your familiar Salesforce.com environment. This user guide will assist you with the installation, configuration and administration of Mercury SMS. It is anticipated that you will have Mercury SMS fully configured and operational within approximately 30 minutes. However, if you require assistance, please don’t hesitate to contact us on [email protected]. What is Mercury SMS Mercury SMS is an application that runs on the Force.com platform. It enables Salesforce.com users to communicate with their clients via SMS. It provides Salesforce.com users with the ability to send individual SMS messages and bulk messages to Lead and Contact records. Outbound messages can be constructed ad-‐hoc as required or selected from a previously created template library. Field value merging is supported allowing SMS messages to be personalised ‘on the fly’. Sending SMS messages via Workflow is also supported. Mercury SMS also provides inbound messaging allowing clients to reply to a message or to opt-‐out of receiving further SMS communications. How Mercury SMS works Mercury SMS uses an API to connect Salesforce.com with MessageMedia to send individual and bulk SMS messages to Leads and Contacts held within Salesforce.com. To use Mercury SMS, a MessageMedia account is required. A free trial account will be provided for evaluation purposes during the 14 day free trial of Mercury SMS. This can be upgraded to a live account once subscription to Mercury SMS has been completed. Mercury User Guide (Version 1.7, December 2014) 2 © Copyright 2014 Aprika Business Solutions Mercury SMS Connected Customer Communications Installation To install Mercury SMS, click the Get It Now link on the AppExchange. Click here to install Mercury SMS Select whether you wish to install Mercury SMS into your Production or Sandbox environment. Select to install in Production or Sandbox Mercury User Guide (Version 1.7, December 2014) 3 © Copyright 2014 Aprika Business Solutions Mercury SMS Connected Customer Communications Enter your Salesforce.com User Name and Password and click Login. Accept the Terms & Conditions and click Confirm & Install. Agree to the terms and conditions. Click to Confirm and Install Review the package contents and click Continue Select to install in Production or Sandbox Mercury User Guide (Version 1.7, December 2014) 4 © Copyright 2014 Aprika Business Solutions Mercury SMS Connected Customer Communications Approve the third-‐party access by selecting the checkbox for “Yes, grant access to these third party web sites” and clicking “Continue” (note: this is to communicate with the MessageMedia API) Agree to grant access Then click Continue Approve the package API access by clicking “Next” Click Next to continue Next, choose your security level and click “Next”. (We recommend selecting to grant access to all users.) Select security settings Click Next to continue Mercury User Guide (Version 1.7, December 2014) 5 © Copyright 2014 Aprika Business Solutions Mercury SMS Connected Customer Communications On the Install Package page, click “Install”. Click Install You will now get a message that states your installation is complete. Congratulations! Your Mercury SMS application has been installed correctly. You are now ready to move on to Configuration. Configuration Before you can begin using Mercury SMS, there are a few steps required to configure the application to your specific Salesforce.com org. Configure Force.com Site To enable the inbound SMS functionality, a Site needs to be configured, which can be done by following the steps below. To access the setup menu, click Your Name > Setup Click Setup Mercury User Guide (Version 1.7, December 2014) 6 © Copyright 2014 Aprika Business Solutions Mercury SMS Connected Customer Communications Type ‘Sites’ in the left hand Quick Search box. Then click Sites under the Develop sub heading. Search Sites Select Sites Register a Force.com Domain Note: This step only applies if you do not already have a force.com Domain. To register a domain, follow these steps: • Enter [Your Company Name] in to the text box and click “Check Availability” • If the Force.com Domain Name is available, select the checkbox and click “Register My Force.com Domain” 1. Enter a domain 2. Check availability 4. Click to Register 3. Agree to the terms and conditions Once you have a registered domain, you can create a new site. Mercury User Guide (Version 1.7, December 2014) 7 © Copyright 2014 Aprika Business Solutions Mercury SMS Connected Customer Communications Create a Site Click the ‘New’ button to create a new site. Click ‘New’ Configure your Site EXACTLY as shown below and click “Save” Name and Label should be ‘Mercury’ Add yourself here. Type ‘mercury’ here Make it Active. Select ‘InMaintenance’ Select ‘SiteTemplate’ Click to Save Mercury User Guide (Version 1.7, December 2014) 8 © Copyright 2014 Aprika Business Solutions Mercury SMS Connected Customer Communications Grant the Site Access to the Relevant Objects and Fields Click on Public Access Settings Click here On the next screen, click “Edit” Click Edit Ensure the profile has Read access to the Account, Contact and Leads Objects in the Standard Object Permissions section, then click “Save”. Ensure these objects have read access. Click ‘Save’ Mercury User Guide (Version 1.7, December 2014) 9 © Copyright 2014 Aprika Business Solutions Mercury SMS Connected Customer Communications Next, scroll to the Field-‐Level Security section and click “View” next to Leads. Click ‘View’ Now click edit and then mark the ‘Mobile Phone Short’ and ‘SMS Opt Out’ fields as visible then Save. Tick visible for Mobile Phone Short Tick visible for SMS Opt Out Click ‘Save’ Mercury User Guide (Version 1.7, December 2014) 10 © Copyright 2014 Aprika Business Solutions Mercury SMS Connected Customer Communications Now, you need to do the same for Contacts. Click “View” next to Contacts in the Field-‐Level Security section. Click ‘View’ Click edit and then mark the ‘Mobile Phone Short’ and ‘SMS Opt Out’ fields as visible then Save. Tick visible for Mobile Phone Short Tick visible for SMS Opt Out Click ‘Save’ Next, you need to scroll down to the “Enabled Apex Class Access” related list and click “Edit” Click ‘Edit’ Select ‘mercury.mercuryReply’ from the list of Available Apex Classes and move it across to the Enabled Apex Classes column, then click “Save” Move ‘mercury.mercuryReply’ to the enabled apex classes. Click ‘Save’ Mercury User Guide (Version 1.7, December 2014) 11 © Copyright 2014 Aprika Business Solutions Mercury SMS Connected Customer Communications You can now go to the Mercury SMS app to complete the remaining steps. Click ‘Mercury SMS’ Now, go to the Setup & Configuration tab and follow the steps as listed below: Go to the Setup & Configuration tab. Step 1 – Request your MessageMedia trial account. In order to request your MessageMedia trial account, complete the ‘Activation Details’ as follows: Country (Mobile/Cell) – select the Country you would like your messages to be sent from Company Name – if different from that already selected Contact Name – if different from that already selected Contact Email – if different from that already selected Check “Send a copy to me” to be cc’d on the email Click the “Request Trial” button Then click Complete the activation details section. Request Trial. The ‘Activation Sent’ icon will appear. Mercury User Guide (Version 1.7, December 2014) 12 © Copyright 2014 Aprika Business Solutions Mercury SMS Connected Customer Communications You will shortly receive your account details via email from MessageMedia, the email will look similar to the following example: These are your MessageMedia login details. Note: if you have already configured the Site as outlined in the instructions above, you can now proceed straight to Step 3. If you have not yet configured the Site, please refer to the ‘Configure Force.com Site’ section on Page 8. Step 3 – Enter your MessageMedia Login Details. Enter your User name and Password and click “Save”. The ‘Account Details Saved’ icon should appear. Enter your MessageMedia login details here. Click update. Step 4 – Generate a Token Click the “Generate Token” button. The Token will appear in the text box and the ‘Token Created’ icon will appear. Click here Step 5 – Generate Web Push URL You are now ready to generate your Web Push URL that will be used by MessageMedia to process inbound messages. Select the Secure Web Address, this should be the Mercury Site previously configured and then click the ‘Generate Web Push URL’ button, your URL will be displayed. It is recommended that you copy this now for use in a later step. Be sure to notify MessageMedia of this change by clicking on the ‘Click Here’ link. Generate URL Click this link. Mercury User Guide (Version 1.7, December 2014) 13 © Copyright 2014 Aprika Business Solutions Mercury SMS Connected Customer Communications You are now Ready to set up your MessageMedia Trial Account. Trial Account Setup • Go to www.message-‐media.com • Click Sign In • Enter your MessageMedia User Name and Password (you would have received this following successful completion of Step 1 above) • Click ‘Create a new broadcast’ • Set the ‘Internal Tracking Name’ as Token • Paste your Web Push URL into the ‘Message’ box • Click ‘Save as template’ • Click Logout • Return to the Mercury SMS Setup & Configuration page and click the ‘click here’ (as shown on the screenshot above) link to notify MessageMedia you have completed this setup process Live Account Setup 1. Go to www.message-‐media.com 2. Click Sign In 3. Enter your MessageMedia User Name and Password (you would have received this following successful completion of Step 1 above) 4. Click ‘Settings’ on the Account you need to update 5. Click the ‘Reply Settings’ Tab 6. Paste your Web Push URL into the ‘Inbound message processing URL’ field 7. Click Update 8. Click Close 9. Click Logout Step 6 – Specify an Orphan Message Owner Type in the name of the User that will be the Orphan Message Owner (Note, as you begin to type a User’s name, a list of possible Users will appear) and then click “Save”. Specify orphan message owner and then click Save. Step 7 – Adjust Page Layouts Add the Custom Button and SMS Opt Out Field to the page layouts as per the table below: Object Components to add Lead Custom Button: Send SMS Custom Field: SMS Opt Out Contact Custom Button: Send SMS Custom Field: SMS Opt Out Case Custom Button: Send SMS Campaign Custom Button: Send Bulk SMS Campaign Member Custom Button: Send SMS Mercury User Guide (Version 1.7, December 2014) 14 © Copyright 2014 Aprika Business Solutions Mercury SMS Connected Customer Communications Below are the instructions on how to add the Custom Button and the Custom Field to the Lead Object. The same process should be followed for the other Objects. Click Your Name > Setup > Customise > Leads > Page Layouts > Edit In Fields drag ‘SMS Opt Out’ on to the page layout In Buttons drag ‘Send SMS’ on to the page layout Click “Save” Mercury User Guide (Version 1.7, December 2014) 15 © Copyright 2014 Aprika Business Solutions Mercury SMS Connected Customer Communications Once you have completed this action for all of the required Objects, return to the Mercury SMS Setup & Configuration Tab. Step 8 – Activate the outbound scheduler Click “Activate” to enable the Outbound Scheduler. The icon will appear indicating Mercury SMS is now active. Click ‘Activate’ Step 9 – Congratulations! You are now ready to start using Mercury SMS. Inbound SMS Notification You can also configure notification emails to be sent when inbound SMS messages are received. To do this, go to the Setup & Configuration tab and scroll down to the configuration section. From here make sure to tick the “Trigger User Email” checkbox and select the user to notify for Lead and Contact/Person Account messages then click the “Save” button. Tick here. Click ‘Save’ Select users to notify. The users you can choose to notify are as follows: • • • Owner – The User who is the Lead / Contact / Person Account Owner will be notified of the inbound SMS Last Modified By – The User who last modified the Lead / Contact / Person Account will be notified of the inbound SMS Last Message Sent – The User who sent the most recent outbound SMS to the Lead / Contact / Person Account will be notified of the inbound SMS Mercury User Guide (Version 1.7, December 2014) 16 © Copyright 2014 Aprika Business Solutions Mercury SMS Connected Customer Communications Using Mercury SMS The remaining sections of this user guide provide instructions on how to use the various features. Outbound SMS When sending outbound messages from Mercury SMS there are several options to choose from, which include: • Send a message to an individual • Send a message to a list of Campaign Members • Create an ad-‐hoc message • Select an SMS Template message • Send the SMS message immediately • Schedule the SMS message to be sent at a later date/time • Execute a Workflow Rule to send an SMS Template message to an individual All outbound SMS messages, whether ad-‐hoc or SMS Template, support merge fields. A message can merge fields in from the object record, owner or sending user. Instructions on how to use each of the features are provided below. When an outbound SMS message is sent, an Activity History record is created with a Subject of “SMS: Sent” and the Description field will contain the actual SMS message. Creating an SMS Template To create an SMS Template, first click on the SMS Template Tab Click on the SMS Templates tab. Now, click on the “New” button to create a new SMS Template record Click ‘New’ Mercury User Guide (Version 1.7, December 2014) 17 © Copyright 2014 Aprika Business Solutions Mercury SMS Connected Customer Communications Enter the SMS Template Name and Message, using merge fields if you wish. Give your template a name. Type your message text in this section. Note: If you wish to add merge fields to an SMS Template, you need to follow the steps below: 1. Select the Object. This is the Object that the template will work for. You need to create specific templates for each Object you wish to send SMS from. Selecting an Object automatically generates the fields that are available for merge for that Object. 2. Select the Field 3. Click the “Insert Text” button This will merge the correct merge field code into the Message text box. Once the SMS Template is complete, click “Save” Use this section to select and add merge fields to your message. Save your message template. Mercury User Guide (Version 1.7, December 2014) 18 © Copyright 2014 Aprika Business Solutions Mercury SMS Connected Customer Communications Sending an Individual SMS Message Mercury SMS provides the ability to send an SMS to an individual, including: • Lead • Contact • Person Account • Campaign Member • Case (Contact associated to the Case) To send an SMS message to an individual, click on the “Send SMS” button on the detail page for the record. Click ‘Send SMS’ This will open up a new browser window that will let you create an ad-‐hoc message or select an SMS Template from the library. Select an existing message template. Type an ad-hoc message. Mercury User Guide (Version 1.7, December 2014) 19 © Copyright 2014 Aprika Business Solutions Mercury SMS Connected Customer Communications Create an ad-‐hoc message Type the text directly into the “Message” field Note: If you wish to add merge fields to an SMS Template, you need to follow the steps below: • Select the Field • Click the “Insert Text” button This will merge the correct merge field code into the Message text box. Select an SMS Template message Click the “Select Template” button Click the “Name” link of the message you wish to use This will populate the SMS Template text into the “Message” field The message is now ready to be sent. You can choose to either send it straight away or to schedule it for delivery at a later date / time. Send Now Click the “Send Now” button Click “OK” to confirm you wish to send the message Send Later Enter a date and time in the “Date/Time” field Click the “Send Later” button Click “OK” to confirm you wish to schedule the message to be sent later Once you have confirmed the message is ready to be sent, a “Success” message will appear at the top of the page. At this point, you can choose to click the “Send Another” button or close the window, returning you to the detail page of the record. All SMS messages sent or received via Mercury SMS will appear in the “Activity History” related list. Mercury User Guide (Version 1.7, December 2014) 20 © Copyright 2014 Aprika Business Solutions Mercury SMS Connected Customer Communications Sending a Bulk SMS Message Mercury SMS provides the ability to send a ‘bulk’ message to a list of Campaign Members. To send a bulk SMS message to Campaign Members, click the “Send Bulk SMS” button on the detail page of the Campaign. Click ‘Send Bulk SMS’ The same options are available as for sending an SMS message to an individual. You can create an ad-‐hoc message or select from the SMS Template library. You can also choose to only send the SMS message to Campaign Members with a particular Status. In addition, you can choose to update the Status of for recipient Campaign Members. Filter campaign members here. Note: If you would like to use merge fields on an SMS message to Campaign Members comprising of both Leads and Contacts, you will need to include both the Lead and the Contact merge field. For example, to include the First Name value, you will need to insert both values e.g. {!Lead.FirstName}{!Contact.FirstName}. Sending an SMS via a Workflow Rule Mercury SMS can send SMS Template messages via a Workflow Rule. To send an SMS Template message via a workflow rule, you will need to follow the steps below. Create a Workflow Rule Mercury User Guide (Version 1.7, December 2014) 21 © Copyright 2014 Aprika Business Solutions Mercury SMS Connected Customer Communications Create a Field Update Workflow Action, which performs a field update on the “SMS Code” field on the Object (Lead or Contact). The value the field should be updated with needs to be the Record ID of the SMS Template record you wish to send. To access this value, go to the detail page of the SMS Template record where you can copy and paste the value from the “SMS Code” field. Note: The Record ID should be inserted into Formula Field section of the Field Update rule in double quotes e.g. “a0190000007coVy” see the below screenshot for reference. Message Character Length & Credits There is no hard limit on the number of characters you can send within your message, however we recommend keeping your messages short to avoid using too many SMS credits per message. Each message credit gives you up to 160 characters. So if you were sending a message with 200 characters for example, this would cost 2 message credits. The number of characters being used in your message is displayed underneath the message area as follows: Mercury User Guide (Version 1.7, December 2014) 22 © Copyright 2014 Aprika Business Solutions Mercury SMS Connected Customer Communications . Inbound SMS Mercury SMS provides inbound message capability. This means a Lead or Contact can reply to a message they received and it will be inserted as an “Activity History” record relating to their record. Note: where there are multiple records containing the same Mobile number, an Activity History records will be created for each record. Receiving Inbound SMS Messages When an inbound SMS message is received, an Activity History record is created with a Subject of “SMS: Received” and the Description field will contain the actual SMS message. An email notification will also be sent to the designated user if the ‘Trigger User Email’ setting has been configured. Receiving Opt-Out Requests If a Lead or Contact no longer wishes to receive SMS messages, they can unsubscribe by sending a message with the word STOP. This will automatically set the “SMS Opt Out” field for the record to TRUE. Note: If the “SMS Opt Out” field is set to TRUE, no outbound SMS messages can be sent to that Lead or Contact. Mercury User Guide (Version 1.7, December 2014) 23 © Copyright 2014 Aprika Business Solutions Mercury SMS Connected Customer Communications Contact Information 7/16 Gilbert Street Torquay, VIC 3228 Australia Tel: 1300 446 133 Web: www.aprika.com.au Technical Support Mon-‐Fri: Email: 8.30am -‐ 5.30pm (AEST) [email protected] Sales Email: [email protected] Social Media Forums www.aprika.com.au/twitter www.aprika.com.au/facebook www.aprika.com.au/linkedin www.aprika.com.au/blog Mercury User Guide (Version 1.7, December 2014) 24 © Copyright 2014 Aprika Business Solutions