1
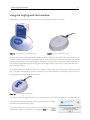
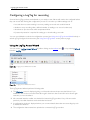
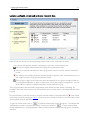
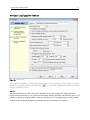
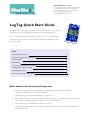
ROLLEX MEDICAL NZ LTD
44c Crooks Road, East Tamaki, Auckland 2013
PO Box 204159, Highbrook, Auckland 2161
Phone: 09 274 0707 Fax: 09 274 0709
Web: www.rollexmedical.co.nz
Email: [email protected]
LogTag Quick Start Guide
This guide will cover how you prepare your LogTag recorders for use, how to
start them and how to retrieve and analyse the recorded information.
You can download the full User Guide to explain this in more detail, which
also shows you how you can customise LogTag Analyzer's settings to make
your work easier.
Index
Connecting the Interface
2
Using the LogTag with the Interface
3
The Workspace
4
Initial Set-up
4
Configuring a LogTag for recording
5
Starting and using the LogTag
11
LogTag light patterns
12
Retrieve information from LogTag
13
Rollex Medical’s Recommended Configuration
•
Set the recording interval to 10 minutes as air temperature changes faster than product
temperature and this allows for minor fluctuations
•
Set the LogTag to Continuous Readings so no data is lost
•
Set a prestart delay of around 15 minutes to allow the logger to cool down to fridge temperature
•
Set an alert on a High temperature of 8°C for 2 consecutive readings
•
Set an alert on a Low temperature of 2°C for 1 reading
•
Enable Power Saving mode in the advanced configuration which dims the display after 30 seconds
to save battery life.
LogTag Quick Start Guide
2
Connecting the Interface
The interface cradles available from LogTag Recorders connect to either a serial (RS232) port or a USB
(Universal Serial Bus) port, depending on the model you purchased.
The ports for serial (RS232) communication devices are typically located at the rear of the computer as
shown here:
Figure 6: Rear of PC with one serial port (RS232)
Insert the plug into the port with the correct orientation. We recommend you tighten the securing screws
when the connector is plugged in so that it does not accidentally pull out during use.
The ports for USB devices are typically also located at the rear of the computer, but you may find other
ports at the front or sides of your computer. If you are using a USB hub we recommend it has its own
power supply.
Figure 7: Rear of PC with 4 USB ports
Connectors for USB devices will often display a USB logo such as
this one so you can identify them easier:
LogTag Analyzer can communicate with multiple interface cradles at the same time; you may connect as
many serial and USB interface cradles as the computer supports, although we find that connecting more
than 4 interfaces becomes impractical.
If you install LogTag Analyzer on a computer with no internet connection you must ensure USB interface
cradles are not connected until the installation is completed, since the required drivers are installed as part
of LogTag Analyzer.
If the software cannot identify a connected USB interface cradle there may have been a problem during the
installation of the software. Please refer to the FAQ on the LogTag Recorders website for further
information.
LogTag Quick Start Guide
3
Using the LogTag with the Interface
Depending on the product you will need one of two different interface cradle types.
Figure 8: Standard interface cradle with LogTag
Figure 9: TICT/TIC20 interface cradle
Most products use the standard interface cradle, where the LogTag is inserted into the slot from the top as
shown to enable communication. You will be able to see the contact pins inside the slot that meet with the
matching contact pads on the LogTag. When inserting a LogTag into the slot you feel a slight resistance as
the contacts engage. Removing the LogTag will cause a slight clicking noise as the contacts snap back into
their unloaded position.
The indicator products TIC20 and TICT use a special cradle in which the contact pins are exposed at the
top. To enable communication locate the indicator's lug on the interface's boss and firmly press it down, so
the contact pins pierce through the rear label.
Figure 10: TICT in interface with adapter
You can connect both interface types to your computer at the same time, provided you use different ports.
LogTag Analyzer will automatically download and display any readings
or statistics stored inside the LogTag.
The download process will only take a few seconds, but you can stop it
if needed by clicking on the button or pressing the ESC key.
LogTag Quick Start Guide
4
The Workspace
Once you have started LogTag Analyzer, the main window will open. From here you have access to menu
commands, option settings and many other controls.
Figure 11: LogTag Analyzer Workspace, showing areas of interest
Initial Set-up
Before you start configuring and downloading recorders we recommend you customise some of the
settings which are available through the Edit-Options menu.
• Define the display language and temperature units used
• Choose how time and date are displayed
• Select how LogTag Analyzer names downloaded files and where these are stored
• Decide which communication ports LogTag Analyzer uses
Sometimes your network administrator will ask you to import settings from a configuration file.
LogTag Quick Start Guide
5
Configuring a LogTag for recording
Some of the LogTag products are delivered to you ready to start. Others will need to be configured before
they can record data. During the configuration process of a recorder you define settings such as:
• how and when to start recording, how many readings to record and at which interval
• whether to stop recording after a defined number of readings or to record continuously
• what alerts to process and at which temperature limits
• if password protection is required for setting up or downloading a recorder
You can use a Wizard to assist in the configuration process (see Using the LogTag Access Wizard below) or
select LogTag-Configure from the menu (see Using the LogTag Menu on the previous page).
Using the LogTag Access Wizard
You can use the LogTag Access Wizard by either clicking on the toolbar icon ( ) or by selecting Wizard
from the LogTag menu.
Figure 12: LogTag Access Wizard from toolbar
Figure 13: LogTag Access Wizard from menu
The LogTag Access Wizard performs following tasks:
1. The Welcome screen is displayed, giving you information about the process that follows. If you
enable the "Do not show me this information again" check box, the screen will not be shown again
next time you run the wizard.
2. All connected interface cradles are checked for inserted LogTag products. If any of them contain
previously recorded data these are downloaded and saved.
3. A configuration window is displayed where you can enter details about the next recording trip, such
as interval and duration.
4. The configuration data entered are uploaded to connected LogTag recorders.
LogTag Quick Start Guide
6
Using the LogTag Menu
You do not need to use the LogTag Access Wizard to prepare recorders. You can perform the
configuration by clicking on Configure from the LogTag menu or by pressing the F3 key.
Figure 14: Configure LogTag from menu
In this case downloading and saving data from a previous trip is skipped.
1. LogTag Analyzer finds all communication ports (USB or Serial) with interface cradles attached.
2. It checks all connected interface cradles for inserted LogTag products.
3. It displays a configuration window where you can enter details about the next recording trip, such as
interval and duration.
4. It uploads the configuration data entered into any connected LogTag recorders.
You can also use pre-configured profiles, or quickly re-configure a LogTag with the same settings as used
for the previous recording.
LogTag Quick Start Guide
7
Welcome Screen
First the Wizard has a welcome screen (this is "1" on the Action List). This asks you to make sure you the
LogTag is placed firmly in the Interface Cradle.
The Wizard is responsible for certain "Action Steps" and these are clearly listed at the left in the wizard
window.
To get to the next screen, click on
indicate you have moved to Step 2.
and the next wizard screen will appear. The green arrow will
LogTag Quick Start Guide
8
Locate LogTag(s), download and save relevant data
In this screen you will see one of the following pictures next to each of the items in the list:
• (no picture) indicates the software is still trying to access this communications port.
l
l
l
l
Data was successfully retrieved from the LogTag and stored/saved to disk.
Data was successfully retrieved from the LogTag but there was no need to save the information
to disk.
The software was unable to detect an Interface Cradle connected to the communications port or
was unable to detect a LogTag in the Interface Cradle.
The LogTag is a single use recorder and cannot be prepared for use again. It should be returned
to the supplying distributor or agent or disposed of in accordance with local regulations. You will
still be able to continue to retrieve information stored within the LogTag.
The LogTag should be almost instantly recognized by serial number and the number of readings. It is
possible to have and use more than one communication port at a time and if so, the wizard will find all the
LogTags.
The communication ports that are not in use (the ones that initially are reported with the
mark) can be
removed from view by selecting an option. You don't have to do that now, but you can do it later to clean
up the "wizard window" appearance.
To get to the next screen, click on
and the third wizard step screen will appear. The software will
automatically proceed to the next wizard step, as if the user clicked on
, if each of the Interface
Cradles detected have a LogTag detected in them and the information within the LogTag was successfully
retrieved.
LogTag Quick Start Guide
9
Configure LogTag(s) for next use
Figure 15: Wizard Screen
The options are available so you have appropriate control over the way the LogTags will behave and store
data for the upcoming period of recording. Click
to record the configuration data and you will see
the final confirmation screen.
NOTE:
We recommend that you select Continuous Readings so the latest readings are always kept if the
LogTag is left in the fridge too long. We recommend that readings should be 10-15 minutes apart, not 5
minutes to extend the reading duration. And you should also set a small delay before starting readings
to allow for the LogTag to be placed in the fridge and for the temperature to equalise.
LogTag Quick Start Guide
10
Prepare LogTag(s) for next use
The last Wizard screen involves sending the new configuration data to each LogTag to prepare them for
their next use. While the software is sending the new configuration data to each LogTag the top of the
window will look similar to the following picture. The process of sending the new configuration data to
each LogTag should take less than 20 seconds in total to complete.
Once the software has finished uploading the updated configuration information into each LogTag, the
window displaying the progress will look similar to the following picture.
In this screen you will see one of the following pictures next to each of the items in the list:
• (no picture) indicates the LogTag is still in the process of being prepared for its next use.
l
The LogTag was successfully prepared for its next use.
l
The LogTag failed to be prepared for next use. Press
l
to try again.
The battery within the LogTag is low and is unlikely to have enough capacity to record all the data
you want during its next use. In this situation the LogTag should no longer be used.
When all LogTags have finished receiving their new configuration data, click
Your LogTag (s) are now ready to be started and used.
to close the wizard.
Please note that the automatic download feature is disabled in this screen. If you use the
configure a different LogTag, you may update the configuration of a LogTag with unsaved data.
button to
LogTag Quick Start Guide
11
Starting and using the LogTag
Once a LogTag has been successfully configured for use it is ready to be started. There are two discrete
methods available to start a LogTag recording, which are selected during configuration.
1.
By pressing and holding the START MARK button on the LogTag until both the OK and Alert
lights alternately flash on and off.
2.
By waiting until the date/time defined during configuration is reached, at which time recording will
automatically commence. Pressing the START MARK button will have no effect until recording has
commenced.
You can also have the LogTag record an "inspection" mark at any time while it is recording, simply by
pressing and holding the START MARK button on the LogTag until both the OK and Alert lights flash on
and off at the same time. You may have the LogTag record as many inspection marks as you want while it
is recording, however only one inspection mark can be recorded per reading. In other words, if your
LogTag is configured to take readings at 15 minute intervals, inspection marks can be recorded at intervals
of 15 minutes or more. If the LogTag has finished recording then pressing the START MARK button will
have no effect until after the LogTag has been prepared for next use.
Once the LogTag has started recording (either via Start button or date/time start) the Alert and OK
indicator lights operate.
LogTag Quick Start Guide
12
LogTag light patterns
LogTag's without a display signal a number of different events or status information by using their LED's.
The table below contains a summary of the light patterns you may come across during use.
Table 1: LogTag light patterns
Signal
Sequence
Occurrence
LogTag wake-up
signal
Sequence of four
alternate flashes of
green-red LED's
displayed after configuration has been successfully applied to
the LogTag.
when a LogTag is woken up from hibernation state.
Not to be mixed up with...
LogTag start-up
signal
Sequence of sixteen
alternate flashes of
green-red LED's
displayed when the LogTag starts its recording cycle.
Mark signal
Sequence of five
simultaneous flashes of
green and red LED's
displayed when pressing start/mark button while recording to
indicate an inspection mark in the software.
displayed directly after the start-up signal following a push
button start where a recording delay has been configured. In
this instance the start-up signal is repeated when the actual
recording begins.
Logging active, no
alert present
Single flash of green
LED every 4 seconds
(approx.)
indicates LogTag is recording.
Logging finished, no
alert present
Single flash of green
LED every 8 seconds
(approx.)
indicates LogTag has finished recording.
This is not displayed when pre-start is active and the main
logging cycle has not yet started. It is also not displayed when
the green LED has been turned off in the configuration
screen.
This is not displayed when the green LED has been turned
off in the configuration screen.
Will also be displayed when unit has been woken up from
hibernation.
Alert condition
present
Single flash of red LED
every 4 seconds
displayed when the LogTag has detected an alert condition
and the Alert LED has been activated.
If an alert is present you cannot determine if the unit is still
logging or has finished its log cycle. The Alert LED will flash
every 4 seconds to ensure an alarm condition is not
overlooked.
Communication
The green LED will flash
occasionally
during communication with the interface the green LED will
flash occasionally; no information is conveyed in this.
Start button press
red LED glows faintly
This is by design but conveys no information.
It is also possible you see no LED lights at all. This could represent one of a number of conditions:
• The LogTag is ready to start, but has not been started yet.
• The LogTag has been configured so the LED flashing is turned off.
• The LogTag is in "Hibernation".
• The battery is empty and the LogTag has reached the end of its life.
LogTag Quick Start Guide
13
Retrieve information from LogTag
When you are ready to view the recordings that are stored within the LogTag, just place the LogTag into
the Interface Cradle as before. If the LogTag is still recording when you go to retrieve the readings it will
continue to record without interruption so you will be able to download again later if you choose.
If the LogTag has readings stored within its memory, the software will automatically start to retrieve a copy
of the recording contained within the LogTag and will also display an animated picture during the download
process, similar to the following picture.
Figure 16: Downloading a LogTag recorder
Once the readings have been successfully retrieved from the LogTag(s), the software will display the
information for you.
Your LogTag may now also be reconfigured for another trip with the same settings as before, if you have
this option activated.