1
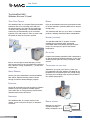
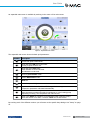
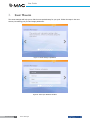
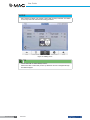
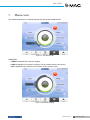
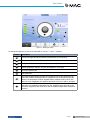
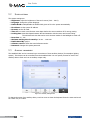
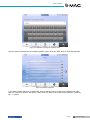
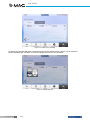
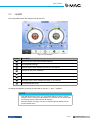
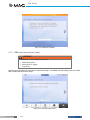
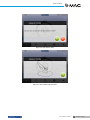
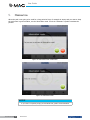
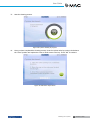
USER GUIDE
Translation of original text
English
User Guide
General
safety
• Never disassemble, modify or attempt to repair the AstralPool MAC or any of its
parts, as you may be exposed to an electric shock or the AstralPool MAC could
operate abnormally. If you believe that the AstralPool MAC is not working properly,
please contact AstralPool.
• Make sure that the AstralPool MAC is safe from possible flooding and receives dry
ventilation.
• All installation, maintenance, repair and dismantling operations must be carried
out only by authorized AstralPool personnel only.
• The electrical installation, servicing and maintenance must be done by someone
qualified in working with electrical equipment.
• Connect the AstralPool MAC to the specified voltage: 220-240 V c.a. Do not try to
connect the AstralPool MAC to other working voltage.
• Use an appropriate 220/240 Vca electrical cable with phase, neutral and ground
cables to connect the power supply to the electrical box.
• Plugs need to have IPX4 or higher.
• Installation need to follow DIN VDE 0100 Part 702.
• This device must be stored and used in accordance with the regulations applicable
in the relevant country or region.
• The pool's water must be maintained at a level of alkalinity of between 50 and
250 ppm CaCo3. The use of water outside these limits may constitute a hazard
to bathers.
• AstralPool MAC should only be installed for the treatment of the water in pools
with a minimum volume of water of 40 m³. Where the machine is being used with
pools smaller than 40 m³ will need to use external methods to verify the pH levels
and chlorine concentrations periodically.
• The on/off switch needs to be in the installation.
• The machine must be installed at a distance and with the protective measures
required by local regulations for electrical devices used in swimming pools.
• Turn off the AstralPool MAC and disconnect its power supply before doing the
installation or maintenance.
• It is essential that you use a multiple disconnection device with a space of at least
3 mm between surfaces to disconnect the equipment from the electrical current.
• Use a rigid cable to connect to the mains. If you use a flexible cable to connect to
the mains, it must have cable lugs to connect to the terminals. We recommend a
minimum section of 2.5 mm², for example, a 2.5 mm² H05RN-K3G cable.
• The equipment should be connected to an alternating current supply (see data on
the pump’s plate) with earth connection, protected by a residual current device
(RCD) having a rated residual operating current not exceeding 30 mA.

3 AstralPool MAC
User Guide
• Adjust the value of the thermal relay, which is located in the switch box to an
appropriate value depending on the device's nominal current, which will be listed
on its rating plate.
• Do not manipulate any lead or plug provided initially.
• Install the AstralPool MAC on a strong and stable flat surface or floor. Placing the
AstralPool MAC in an unstable site could lead to injury or trouble. When selecting
the installation site, take into account the installation guidelines.
• The AstralPool MAC is not intended to be used by people (including children)
with reduced physical, sensory or mental capabilities, or lack of experience and
knowledge, unless they have been given supervision and instruction concerning
the use of the AstralPool MAC by a person responsible for their safety.
• Only operations and adjustments described in this manual may be performed.
Performing operations other than those described in this manual may pose a risk
to users, for which you will be exclusively liable.
• Only the products and materials referred to in this manual should be used. The use
of any other materials or products may pose risks to users, for which you will be
exclusively liable.
• A drainage pipe must be provided at the location where the AstralPool MAC is to
be installed for the disposal of any water discharges that may occur at any time
during its useful life.
• Do not permit children nor adults to sit or lean on the AstralPool MAC. Children
should be supervised to ensure that they do not play with the AstralPool MAC.
• When the useful life of the product has concluded it must be disassembled and
transported to a place of collection in accordance with local regulations. In any
case of doubt, contact your local AstralPool office.
AstralPool MAC - Characteristic data
Ref. 56748
Voltage: 220-240 Vac
Frequency: 50/60 Hz
Power rating: 1350 W
IP X4
AstralPool MAC 4

User Guide
Due to continuous product development, information in this document is subject to change without notice.
During its lifespan, this device may undergo improvements and updates that may have the effect that its
functioning may differ from the descriptions contained in this manual. The latest version of the manual can
be found on the following pages: www.astralpool.com or www.astralpoolmac.com.
No part of this Service Manual may be reproduced or transmitted in any form or by any means, electronic or
mechanical, including photocopying, recording, or by any information storage and retrieval system without
express written permission from AstralPool.
The company names, organization names and product names in this manual are trademarks or registered
trademarks of the companies and organizations concerned.

5 AstralPool MAC
User Guide
The AstralPool MAC:
Welcome the new 3.0 pool
Total Pool Control
Dosing
The AstralPool MAC is a compact filtering and water
treatment device for swimming pools that uses
the salt dissolved in the water for the production
of chlorine using electrolysis. The AstralPool MAC
controls the pH automatically by the controlled
injection of an acid solution in order to ensure that
the quality of water in the pool is optimal.
Enjoy an automatized clear and crystal water thanks
to its salt chlorinator (including ORP control) and pH
dosing pump.
This treatment will save you up to 90% on chemical
products, avoiding chemical products manipulation.
Heating (optional)
The AstralPool MAC has a “by-pass” to make
installing the heat pump easier, preventing
chlorinated water from passing through the heat
pump. You can enjoy the pool at the desired
temperature.
All-in-one
Easy-to-use through its Smart Manager, you will
have a total control of all pool parameters (efficiency
level, filtration, dosing, temperature,...) at the most
efficient way.
Smart Manager
Choose your pool specifications and the AstralPool
MAC will be adjusted avoiding waste of power
through its intuitive Smart Manager program.
Compact and modular, AstralPool MAC is designed to
do the physical and chemical treatment of your pool.
It takes up little space and easy to transport, install
and use.
Tailor-made
for your pool
Adjusted to your pool (up to 80 m³). Enter your
pool parameters and the software will adapt all the
parameters to the selected pool size, saving energy
and water, thus avoiding waste of power thanks to
the variable pump speed.
Filtration
Control all the filtration process through its software.
Filtration pump can operate at variable speeds
(more than 50% on energy savings) and therefore
optimizes performance and noise.
Innovation
The AstralPool MAC is a unique product in the
market, a new concept for the pool, an authentic
revolution.
AstralPool MAC 6

Remote
control
Manage your pool from
anywhere through a
tablet, smartphone or PC.
User Guide
About
this manual
This User Guide is intended for the end user of the AstralPool MAC who normally operates and control the
AstralPool MAC on a daily basis. We will refer to this mode of usage as “Normal Mode”.
To ensure that you can make full use of the performance and functions of your AstralPool MAC, read this
User Guide carefully and use the equipment correctly in accordance with the directions in the guide.
This User Guide is considered an integral part of the AstralPool MAC and should remain in the designated
safe place in the AstralPool MAC, so you and others can refer to it at any time.
In case of accidental damage or lost, ask for a new one at:
ASTRALPOOL
Passeig Sanllehy 25 | 08213 Polinyà (Barcelona) | Spain
Tel.: + 34 93 713 18 55 | Fax: + 34 93 713 41 11
Or visit www.astralpool.com to find your nearest dealer

7 AstralPool MAC
User Guide
Safety
warning system
Pay attention to the safety warnings showed in this User Guide. Please read the explanations detailed below.
DANGER
DANGER indicates a hazardous situation which, if not avoided, will result in death
or serious injury.
WARNING
WARNING indicates a hazardous situation which, if not avoided, could result in
death or serious injury.
CAUTION
CAUTION indicates a hazardous situation which, if not avoided, could result in
minor or moderate injury.
NOTICE
NOTICE is used to address practices not related to personal injury.
For other information:
TIP
TIP is used to show other useful information, like best practices and other
practical advices.
AstralPool MAC 8

User Guide
Table of Contents
General safety . . . . . . . . . . . . . . . . . . . . . . . . . . . . . . . . . . . . . . . . . . . . . . . . . . . . . . . . . 3
About this manual . . . . . . . . . . . . . . . . . . . . . . . . . . . . . . . . . . . . . . . . . . . . . . . . . . . . . . 7
Safety warning system . . . . . . . . . . . . . . . . . . . . . . . . . . . . . . . . . . . . . . . . . . . . . . . . . . . 8
1. Normal Mode Start Up . . . . . . . . . . . . . . . . . . . . . . . . . . . . . . . . . . . . . . . . . . . . . . . . 10
2. Main screen . . . . . . . . . . . . . . . . . . . . . . . . . . . . . . . . . . . . . . . . . . . . . . . . . . . . . . . 12
3. Smart Manager . . . . . . . . . . . . . . . . . . . . . . . . . . . . . . . . . . . . . . . . . . . . . . . . . . . . . 14
4. Scheduler . . . . . . . . . . . . . . . . . . . . . . . . . . . . . . . . . . . . . . . . . . . . . . . . . . . . . . . . . 17
5. Manual mode . . . . . . . . . . . . . . . . . . . . . . . . . . . . . . . . . . . . . . . . . . . . . . . . . . . . . . 19
6. Setup . . . . . . . . . . . . . . . . . . . . . . . . . . . . . . . . . . . . . . . . . . . . . . . . . . . . . . . . . . . . 20
6.1. Electrolysis . . . . . . . . . . . . . . . . . . . . . . . . . . . . . . . . . . . . . . . . . . . . . . . . . . . . . . 20
6.2. System settings . . . . . . . . . . . . . . . . . . . . . . . . . . . . . . . . . . . . . . . . . . . . . . . . . . 22
6.3. Auxiliary management . . . . . . . . . . . . . . . . . . . . . . . . . . . . . . . . . . . . . . . . . . . . . . 22
6.4. pH/ORP . . . . . . . . . . . . . . . . . . . . . . . . . . . . . . . . . . . . . . . . . . . . . . . . . . . . . . . . 25
6.4.1. pH calibration . . . . . . . . . . . . . . . . . . . . . . . . . . . . . . . . . . . . . . . . . . . . . . . . . 26
6.4.1.1. Fast pH calibration . . . . . . . . . . . . . . . . . . . . . . . . . . . . . . . . . . . . . . . . . 26
6.4.1.2. ORP probe calibration (blue probe) . . . . . . . . . . . . . . . . . . . . . . . . . . . . . 27
6.4.1.3. ORP probe calibration (red probe) . . . . . . . . . . . . . . . . . . . . . . . . . . . . . . 30
6.5. Heat pump . . . . . . . . . . . . . . . . . . . . . . . . . . . . . . . . . . . . . . . . . . . . . . . . . . . . . . 32
6.6. How to remove the pH reducer bottle . . . . . . . . . . . . . . . . . . . . . . . . . . . . . . . . . . . 33
7. Connecting up to networks . . . . . . . . . . . . . . . . . . . . . . . . . . . . . . . . . . . . . . . . . . . . . 34
7.1. Connection to a network with a router using a network cable . . . . . . . . . . . . . . . . . . 34
7.2. Connection to a network with a router using a WiFi . . . . . . . . . . . . . . . . . . . . . . . . . 35
7.3. Set up your own WiFi network . . . . . . . . . . . . . . . . . . . . . . . . . . . . . . . . . . . . . . . . 35
8. Pool Cleaner mode . . . . . . . . . . . . . . . . . . . . . . . . . . . . . . . . . . . . . . . . . . . . . . . . . . . 36
9. Hibernation . . . . . . . . . . . . . . . . . . . . . . . . . . . . . . . . . . . . . . . . . . . . . . . . . . . . . . . . 38
10.Cleaning the cyclone . . . . . . . . . . . . . . . . . . . . . . . . . . . . . . . . . . . . . . . . . . . . . . . . . 39
11.Cleaning the pre-filter . . . . . . . . . . . . . . . . . . . . . . . . . . . . . . . . . . . . . . . . . . . . . . . . 43

9 AstralPool MAC
User Guide
1.
Normal Mode Start Up
The first time you start up the AstralPool MAC, the initial system screen will be displayed. Please wait a few
minutes for the system to fully start up.
Figure 1: System initialization screen
Once the system has started, the initial screen is shown. Touch “Menu” to proceed.
Figure 2: Initial screen
Touch “OK” in the password screen to continue to the Normal Mode.
AstralPool MAC 10
Normal Mode Start Up
User Guide
Figure 3: Password screen. Touch “OK”.
The system is now ready to be used. The next screen shows the Normal Mode menu options (setup options
are shown opened in the following screenshot).
Figure 4: Normal user menu options
Touch “Main” to show or hide the menu bar.
Normal Mode Start Up
11 AstralPool MAC
User Guide
2.
Main
screen
The main screen shows a reduced view of the normal AstralPool MAC operation.
1
4
2
3
Figure 5: Main screen
Number
Description
1
AstralPool MAC 12
Low
speed
pumping
Machine
stopped
Machine
on
standby,
pending
next
start-up
High
speed
pumping
2
Status
Green: no incidents.
Red: alarm.
3
Countdown
Time until next action (start / stop).
- Timed sensing excluded.
- If the time left is unknown (for example, heating pump in master mode) the
bar that is shown will be full and time will be set to 0 m 0 s.
4
Time elapsed from last action to next action.
Main screen
User Guide
An expanded main screen is available by touching in the center of the main screen:
10
1
9
2
8
3
4
5
7
6
Figure 6: Expanded main screen
The expanded main screen shows the basic pool parameters:
Number
Description
1
Shows the actual ORP (Oxidation Reduction Potential) level in the water.
The set ORP point is also shown.
2
Shows the actual pH level in the water.
The set pH point is shown too.
3
Shows the actual salt status.
Green indicates a correct salt level.
Red indicates low salt level.
4
Access to pool cleaner mode.
5
Activate hibernation mode.
6
Menu bar.
7
Access the system help.
8
Approximate indication of machine efficiency with the setup parameters entered,
compared to parameters calculated automatically.
9
Shows the actual water temperature.
Water temperature measured inside the equipment or in the heating pump
(depending on setup). The temperature set is also shown.
10
Touch once: Stops the operation of the AstralPool MAC (stops the pump).
Touch and hold for more than 3 seconds: Close the current session.
By touching each of the different sections you will access to the specific Setup dialogs. See “Setup” on page
20.
Main screen
13 AstralPool MAC
User Guide
3.
Smart Manager
The smart manager will help you to find the most optimal setup for your pool. Follow the steps in the next
screens, introducing your pool and usage parameters.
Figure 7: Smart manager explanation
Figure 8: Select your filtration schedule
AstralPool MAC 14
Smart Manager
User Guide
Figure 9: Select the regular use
Figure 10: Select environment
Smart Manager
15 AstralPool MAC
User Guide
Figure 11: Calculating
Figure 12: Schedule successfully completed
AstralPool MAC 16
Smart Manager
User Guide
Figure 13: Suggested schedule
This last screen shows the suggested schedule calculated by the AstralPool MAC. Nonetheless, you can edit
each day options by touching each specific circle in the right side of the screen. Read the following chapter
to know how to set up the scheduler.
4.
Scheduler
The scheduler shows the suggested schedule created by the smart manager. However, you can create new
rules and edit or delete the already existing ones. Each rule has three parameters:
• The “From” and “To” parameters set the start and end time respectively.
• The “mode” parameter set the “high” or “low” pumping mode.
You can create your specific rules for a single day or for a group of days:
• To create or edit a rule for a single day:
1- Select the day by touching its gray circle (which will turn into yellow).
2- Touch the edit arrow (the one pointing to the right) to access to the selected day’s schedule.
When a single day is selected, the screen displays all the rules associated with that day’s schedule.
3- Edit the rule according to your needs.
4- Touch the “Visualize” arrow (the one pointing to the left) to save the schedule and return to the
Scheduler.
• To create the same rule simultaneously for a group of days:
1- Select the two or more days by touching their gray circles (which will turn into yellow).
2- Touch the “More” arrow (the one pointing to the right).
3- Touch the “+” symbol to create the rule.
4- Edit the rule according to your needs.
5- Touch the “Visualize” arrow (the one pointing to the left) to save the schedule and return to the
Scheduler.
Scheduler
17 AstralPool MAC
User Guide
NOTICE
Rules cannot be edited, just created, if more than one day is selected. The edition
screen only shows the rules that are being generated.
Figure 14: Editing a rule
TIP
Touch “Select all” to select all days at once.
When more than 4 rules exist, use the up and down arrows to navigate through
the different pages.
AstralPool MAC 18
Scheduler
User Guide
5.
Manual
mode
The manual mode allows to manually activate and operate the AstralPool MAC.
Figure 15: The manual mode
OPERATION:
• START is displayed if the pump is stopped.
• STOP is displayed if the pump is pumping. The flow measurement is also shown.
• GO is displayed when selecting a new position for the selection valve.
Figure 16: Backwash pumping
Manual mode
19 AstralPool MAC
User Guide
Should 12 seconds elapse before confirmation, the screen displays the current status of the AstralPool MAC again.
If GO is touched before the 12 seconds elapse, the valve begins to move to make the change and the screen
displays the selected position flashing until the valve reaches that position.
After the new position is reached, the screen displays the new valve position and the indicator switches to
START/STOP, depending on whether the machine is stopped or pumping.
If the machine is stopped, touch START to display the flow measured; the push button will switch to STOP.
If the pump is on, touch STOP to switch the push button to START; the flow measurement will disappear.
In the rest of the positions, the maximum time is fixed (full bar).
TIP
In washing and rinsing, the bar shows the time remaining to change the position.
In filter and recirculate modes, the flow can be changed using the circular slide. The default values displayed
when the motor is activated in these positions will correspond to the high speed filtering flow parameters of
the machine.
The flow cannot be displayed, because the flow meter is installed after the selection valves in the rinsing,
washing and emptying positions. However, the “Pumping” message is shown.
NOTICE
The pump cannot be activated in the closed position.
6.
Setup
The Setup menu lets you configure and adjust several functions and setting points in the AstralPool MAC,
such as electrolysis, pH, ORP and other system settings.
6.1.
Electrolysis
The benefits of salt systems in pools are the convenience and the constant delivery of pure chlorine-based
sanitizer. The reduction of irritating chloramines versus traditional chlorinating methods and the “softening”
effect of electrolysis reducing dissolved alkali minerals in the water are also great benefits.
AstralPool MAC 20
Setup
User Guide
8
1
2
7
3
4
6
5
Figure 17: Electrolysis setup
To change the setpoints, touch the circular slide or use the “+” and “-” symbols.
Number
Description
1
Low salt and high salt alarms indicate insufficient/too much salt level.
2
This indicates whether the ORP is set to AUTO mode (or to MANUAL mode).
3
Polarity mode of the electrolysis cell (Direct/Inverted).
4
Chlorine production setpoint. This can be changed in 10% steps.
5
Access the system help.
6
Runs a salt test.
7
The Low flow/gas indicator will show the presence of air in the electrolysis cell.
When flow is under electrolysis Qmin or insufficient flow is detected by the gas
detector, the electrolysis must be stopped and the setpoint must be set to 0%.
When the error disappears, the setpoint value prior to the error will be set again.
8
The level of salinity detected in the water is shown in gr/L.
This value is an estimation calculated from the qualitative level returned by the
electrolysis equipment after a salt test, and the ambient temperature detected at
that time.
Setup
21 AstralPool MAC
User Guide
6.2.
System
settings
The system settings are:
•
•
•
•
•
•
•
•
•
•
•
•
Brightness: adjust the brightness of the touch screen (20% - 100%).
Language: change the system language.
Enable DCHP: enable/disable the DCHP which gives an IP to the system automatically.
IP address: set the system IP address.
IP mask: set the IP mask.
Time off: how much user idle time must elapse before the screen switches off for energy saving.
Locking time: time that elapses between the last interaction with the screen and screen locking.
The minimum lock time that can be set is the time it takes for the backlight to switch off.
Boot time: 1s - 10s.
Minimum waiting time in stand by: 30 min. - 1.440 min.
Enable Stand-By: yes/no.
Software version: shows the actual software version.
Password: changes the system password.
6.3.
Auxiliary
management
The AstralPool MAC can be connected up to a maximum of three auxiliary devices (for example a lighting
system). This devices can be controlled from the AstralPool MAC. You can specify a name for each of the
auxiliary devices. Each one has an auxiliary output relay.
Figure 18: Auxiliary management
To change the name of an auxiliary device, touch its name to show the keyboard. Enter the name and touch
the “Enter” key to confirm.
AstralPool MAC 22
Setup
User Guide
Figure 19: Keyboard to change the auxiliary name
Once the name is changed, set the auxiliary operation mode. Touch the “Edit” arrow to show the scheduler.
Figure 20: Auxiliary scheduler
If you want to apply changes to a specific day, select it first by touching its gray circle located on the right
side of the screen (it will turn into yellow). Then, touch the “Edit” arrow. Create a new schedule by touching
the “+” symbol.
Setup
23 AstralPool MAC
User Guide
Figure 21: Create a new schedule
To change the schedule and mode, touch them and enter the desired values. Use the “Cross” symbol to
delete a schedule and “Visualize” to save the changes and return to aux scheduler.
Figure 22: Change the time
AstralPool MAC 24
Setup
User Guide
6.4.
pH/ORP
The pH and ORP values and setpoints can be set here.
1
2
8
3
7
4
5
6
Figure 23: pH and ORP
Number
Description
1
Touch to see the current pH and ORP setpoints.
2
Recommended pH range.
3
Actual pH value. Green indicates proximity to the setpoint.
4
Executes the pH probe calibration.
5
Executes the ORP probe calibration.
6
Access the system help.
7
Actual ORP value. Green indicates proximity to the setpoint.
8
Recommended ORP range.
To change the setpoints, touch the circular slide or use the “+” and “-” symbols.
NOTICE
If the ORP AUTO mode is set to “no”, the indicator will not be shown; when an
attempt is made to change the ORP setpoint, the measured value is replaced with
the following message: “Manual Mode. No setpoint”.
When the setpoint is changed, a second “I” indicator appears flashing over the
previous setpoint value.
Setup
25 AstralPool MAC
User Guide
6.4.1.
pH calibration
To run the pH sample calibration process, touch the “pH calib.” symbol. Two methods are available: fast and
standard.
Figure 24: pH calibration methods
6.4.1.1. Fast pH calibration
This will launch the fastest pH calibration method, that involves using an external pH metering kit.
Figure 25: pH probe calibration (fast)
AstralPool MAC 26
Setup
User Guide
Figure 26: pH probe calibration (fast)
Enter the value measured by your external pH testing kit to calibrate the pH probe.
6.4.1.2. ORP probe calibration (blue probe)
Immediately after the system priming process, the AstralPool MAC will ask you to calibrate the pH probe.
Stop the pump and close the inlet valve to pool as first steps. The next screens will guide you through the
process.
Figure 27: Standard pH probe calibration
Setup
27 AstralPool MAC
User Guide
Figure 28: Standard solution (green)
Figure 29: Calibrating
AstralPool MAC 28
Setup
User Guide
Figure 30: Standard solution (red)
Figure 31: Calibrating
Setup
29 AstralPool MAC
User Guide
Figure 32: Calibration completed
6.4.1.3. ORP probe calibration (red probe)
WARNING
Chemical burn. Tissue damage. Always wear:
• Alkali-resistant gloves
• Safety glasses or goggles
• Long sleeves
Stop the pump and close the inlet valve to pool as first steps. To calibrate the ORP sample, press the "Calib.
ORP" symbol and follow these steps:
Figure 33: Close outlet valve to pool
AstralPool MAC 30
Setup
User Guide
Figure 34: Introduce standard solution
Figure 35: Calibration process
Setup
31 AstralPool MAC
User Guide
Figure 36: Calibration process
Figure 37: Calibration done
6.5.
Heat
pump
The heat pump is an optional accessory. You can check the heating pump status and change the pool
temperature setpoint from here. Please, contact AstralPool for more information in case you want to install a
heat pump.
AstralPool MAC 32
Setup
User Guide
6.6.
How
to remove the pH reducer bottle
The AstralPool MAC has a pH reducer bottle located behind the frontal door. The pH reducer is introduced
by the peristaltic pump into the water to control the pool water pH level. When the level of the pH reducer
is low inside the bottle, a warning will show in the touch screen. Be careful with the pH reducer, it is a
corrosive liquid.
WARNING
Chemical burn. Tissue damage. Always wear:
• Alkali-resistant gloves
• Safety glasses or goggles
• Long sleeves
Figure 38: pH reducer bottle
To replace the pH reducer bottle:
1- Open the frontal door.
2- Unscrew the top of the bottle which is equipped with a level sensor.
3- Be careful with the particle filter. It may contains some rest of pH reducer liquid, which is corrosive.
Shake the level sensor inside the bottle a few times to make sure the level sensor is empty before
taking it outside the bottle.
Setup
33 AstralPool MAC
User Guide
Figure 39: Particle filter
Now you can remove the empty bottle and replace it with a new one. Insert the level sensor inside the new
pH reducer bottle to finish.
7.
Connecting
up to networks
You can control the AstralPool MAC remotely using a variety of devices, such as a PC, a tablet or a smart
phone. For this to be possible, the AstralPool MAC must be connected up to a network via a router;
alternatively you can create a WiFi network without any need for a router.
7.1.
Connection
to a network with a router using a network cable
To connect the AstralPool MAC to a router using a network cable:
1- Connect the AstralPool MAC to the router using the standard UTM Ethernet cable provided with the
new device, which can be found in the switch box of the device. The connection is made between
the outside edge of the touchscreen, which is where you can find an RJ-45 terminal.
2- Select "Network Cable" in "Connection Type" from the "System Settings" menu.
3- Configure the DCHP, the IP address and the IP mask. Recommended settings:
• DCHP: no
• IP mask: 255.255.255.0
• IP Address: select an address that is not already being used in the network in order to prevent
conflicts.
4- Open the internet browser and type the following address :http://”IP address assigned to AstralPool
MAC" (for example: http://192.168.0.163).
AstralPool MAC 34
Connecting up to networks
User Guide
7.2.
Parameter
Description
Enable DCHP
YES: the router will supply an IP address to the
AstralPool MAC automatically.
NO: allows you to assign a fixed IP address to
the AstralPool MAC.
IP Address
The IP address assigned to the AstralPool MAC
IP mask
The IP masked used for the AstralPool MAC
Access port
Not used
IP DNS 1
Not used
IP DNS 2
Not used
Connection
to a network with a router using a
WiFi
To connect the AstralPool MAC to a network using a WiFi:
1-
2-
3-
4-
5-
6-
7-
8-
7.3.
Select "WiFi" in "Connection Type" from the "System Settings" menu.
In "Available networks" select the WiFi network to which you want to connect the AstralPool MAC.
Type in the password for the network you have selected in the "Network password" field.
Make sure that the router has DHCP enabled. Assign a fixed IP address to the AstralPool MAC. You
will normally do this using a list of IP addresses reserved for DCHP using the "MAC address" of the
AstralPool MAC.
Go to "Make WiFi connection" and select "Yes".
Wait until the antenna symbol, which appears at the top left-hand corner of the screen has stopped
blinking.
Make sure that the IP shown on the next screen is the one reserved in the router for the AstralPool MAC.
Open the Internet browser and type the following address :http://”IP address assigned to AstralPool
MAC" (for example: http://192.168.0.163).
Set
Parameter
Description
Available networks
The list of available networks
Network password
Password for your selected WiFi network
Make your WiFi connection
Select "Yes" to try to connect
IP Address for WiFi
The IP address assigned to the AstralPool MAC
IP mask for WiFi
The IP masked used for the AstralPool MAC
up your own
WiFi
network
To create a WiFi network using the AstralPool MAC:
1-
2-
3-
4-
Select "Create WiFi Network" in "Connection Type" from the "System Settings" menu.
Type in the name of the network. This is the name that you will see on your WiFi devices.
Type in the device's name in "Name of Device".
Select the country in which you have installed the AstralPool MAC from the list that appears under
"Location".
5- Select a WiFi channel.
6- Select the authentication, encryption and decryption. Recommended settings:
• Authentication: WAP2
• Encryption: WPA-PSK
• IP Address: CCMP
7- Type a password for the WiFi network created by AstralPool MAC.
Connecting up to networks
35 AstralPool MAC
User Guide
8- Check that the antenna symbol appears in the top left-hand corner of the screen. If not, turn the
AstralPool MAC off, wait at least 10 seconds and turn it back on again.
9- Connect the device you want to use to the WiFi network created by AstralPool MAC.
10-Open the web browser on the device and type http://”name of device”.local (for example,
http://poolmac092c.local) or type http://”IP of AstralPool MAC” (for example, http://192.168.4.16)
8.
Parameter
Description
Name of network
The name of the WiFi network
Name of device
The name assigned to the device
IP of the device
The IP assigned to the device
Web access
This is related to the name of the device You
can access directly by typing the name in the
browser instead of the IP address.
Location
Country in which you have installed the
AstralPool MAC (the power rating and the
frequency of the radio transmission may vary
depending on the standards of the relevant
country)
WiFi Channel
The WiFi channel using which communication
is established
Encryption
Security protocol
Authentication
Distribution of the authentication key
Encryption
Mechanism for cryptographic encapsulation
WiFi password
The password you need to connect to the WiFi
network created by AstralPool MAC.
Pool Cleaner
mode
The pool cleaner mode is intended to operate the AstralPool MAC with a vacuum pool cleaner. Other types
of pool cleaners do not need the pool cleaner mode.
NOTICE
Make sure to have the pool cleaner correctly connected before activating the pool
cleaner mode. The aspiration valves must also set accordingly.
To enter the pool cleaner mode, touch the “Clean” symbol in the expanded main screen. See “Main screen”
on page 12. Touch “Yes” to activate the pool cleaner mode.
AstralPool MAC 36
Pool Cleaner mode
User Guide
Figure 40: Pool Cleaner mode
Figure 41: Pool cleaner mode operative
Pool Cleaner mode
37 AstralPool MAC
User Guide
9.
Hibernation
When the pool is not going to be used for a long period of time, for example in winter, and you want to keep
the pool water in good condition, use the hibernation mode. Touch the “Hibernate” symbol to activate the
process.
Figure 42: Hibernation mode confirmation
Figure 43: Hibernation mode
NOTICE
If you want to completely empty your AstralPool MAC, please contact AstralPool.
AstralPool MAC 38
Hibernation
User Guide
10. Cleaning the cyclone
The periods between the regular cleaning operations on the cyclone are controlled automatically by the
AstralPool MAC. A message will tell you when you need to wash the cyclone. Touch “OK”.
Figure 44: The cyclone needs to be cleaned
When you touch “OK” the following screens are shown (you will have to take some of the steps manually):
1- Wait until the automatic multiport valve moves into the correct position.
Figure 45: Waiting for the automatic multiport valve
Cleaning the cyclone
39 AstralPool MAC
User Guide
2- Follow the steps listed on the following screen and touch "OK".
Figure 46: Follow the steps shown
The plastic access cover to the key for cleaning the cyclone can be found on the side of the
machine. To release the key, turn it anti-clockwise, as shown.
Figure 47: Open the cover and turn the key to the "Open" position.
AstralPool MAC 40
Cleaning the cyclone
User Guide
3- Start the cleaning process.
Figure 48: Cyclone cleaning in progress
4- Once you have completed the cleaning process, close the cyclone valve by turning it clockwise to
the "Close" position and replace the cover to block access to the key. Touch "OK" to continue.
Figure 49: Follow the steps shown
Cleaning the cyclone
41 AstralPool MAC
User Guide
5- Finishing the cleaning process, waiting for the automatic multiport valve.
Figure 50: Washing completed
6- Once washing has been completed, you are brought back to the opening screen.
Figure 51: The opening screen
AstralPool MAC 42
Cleaning the cyclone
User Guide
11. Cleaning the pre-filter
The pre-filter prevents incoming leaves and larger objects to get into the pump’s water intake, easing the
workload of the main filter. Keeping the pre-filter clean makes the pump life longer.
NOTICE
The AstralPool MAC will show a warning in the touch screen when a problem
in the aspiration circuit occurs. This could be due to a pre-filter obstruction.
Clean the pre-filter at least once per week, depending on water conditions.
Daily visual inspections through the transparent lid are also recommended.
Do not use any solvents or abrasive cleaning products to clean the pre-filter
elements. You may use a non-abrasive, all-purpose cleaner.
CAUTION
Impacts. Possible entanglement.
Leaving the top cover open may pose a risk of entanglement or of impact against
the head or arms if it is left open without monitoring. Never leave the cover in the
open position if you are not working with the pre-filter.
To clean the pre-filter:
1- Stop the AstralPool MAC.
2- Close all inlet and outlet valves manually.
3- Lift the pre-filter cover.
4- Turn the orange cover counterclockwise to open it.
5- Remove the transparent lid.
6- Grab the strainer’s handle and pull the strainer out.
7- Clean the strainer and remove any dirt, using plain water.
8- Once clean, put the strainer back in place again.
9- Place the plastic lid. Make sure that the O-Ring is in place and in good condition.
10-Turn the orange cover clockwise to close it.
11-Open all valves manually leaving them as they were before the pre-filter cleaning process.
12-Start filtering again.
Cleaning the pre-filter
43 AstralPool MAC
User Guide
The pre-filter elements are:
2
1
4
AstralPool MAC 44
Cleaning the pre-filter
3
Element
Description
1
Strainer
2
Transparent lid
3
Orange cover
4
Strainer’s housing
User Guide
EVIDENCE
OF
CONFORMITY
/
DECLARACIÓN
DE
CONFORMIDAD
/
DÉCLARATION
DE
CONFORMITÉ
/
KONFORMITÄTSERKLÄRUNG
/DICHIARAZIONE
DI
CONFORMITA
/
OVEREENSTEMMINGSVERKLARING
/
DECLARAÇÃO DE CONFORMIDADE
- The products listed above are in compliance with the safety
prescriptions:
2006/42/EC Machine Directive Safety prescriptions.
2004/108/EC Electromagnetic compatibility Directive.
2006/95/EC Low voltage Directive.
2000/14/EC Noise emission Directive.
Standards IEC EN 60335-1 and 60335-2-41.
2002/95/EC European Directive (RoHS)
EN 13451, Swimming pool equipment. General safety
requirements and test methods
¥ DIN 19643-1, Treatment of water of swimming pools and
baths - Part 1: General requirements
¥ Harmonized standards applied, in particular:
o
DIN EN 809
o
EN ISO 14121-1
o
DIN EN 60034-1
¥
¥
¥
¥
¥
¥
¥
- Los productos arriba enumerados se hallan conformes con :
Directiva de seguridad de máquinas 2006/42/CE.
Directiva de compatibilidad electromagnética 2004/108/CE.
Directiva de equipos de baja tensión 2006/95/CE.
Directiva de emisión sonora 2000/14/CE.
Normas IEC EN 60335-1 y 60335-2-41.
Directiva Europea 2002/95/CE (RoSH)
EN 13451, equipo de la piscina. Requisitos generales de
seguridad y métodos de ensayo
¥ DIN 19643-1, Tratamiento de agua de piscinas y baños Parte 1: Requisitos generales
¥ Normas armonizadas aplicables, particularmente:
o
DIN EN 809
o
EN ISO 14121-1
o
DIN EN 60034-1
¥
¥
¥
¥
¥
¥
¥
- Les produits énumérés ci-dessus sont conformes aux presciptions
de sécurité:
Directive de sécurité de machines 2006/42/CE.
Directive de compatibilité électromagnétique 2004/108/CE.
Directive d´équipes de basse tension 2006/95/CE.
Directive d´émission sonore 2000/14/CE.
Norme Européenne IEC EN 60335-1 et 60335-2-41.
Directive Européenne 2002/95/CE (RoSH)
EN 13451, Piscine Equipements. Exigences générales de
sécurité et méthodes d'essai
¥ DIN 19643-1, traitement de l'eau des piscines et des bains Partie 1: Exigences générales
¥ Normes harmonisés utilisées, notamment :
o
DIN EN 809
o
EN ISO 14121-1
o
DIN EN 60034-1
¥
¥
¥
¥
¥
¥
¥
-
Die
oben
angeführten
Sicherheitsbestimmungen:
Produkte
entsprechen
den
¥ Richlinie 2006/42/EWG über die Sicherheit von Maschinen.
¥ Richtlinie
2004/108/EWG
über
elektromagnetische
Verträglichkeit.
¥ Richtlinie 2006/95/EWG über die Sicherheit von elektrischen
Betriebsmitteln (Niederspannungsrichtlinie).
¥ Richtlinie 2000/14/EWG über Geräuschemissionen.
¥ Normen IEC EN 60335-1 und 60335-2-41.
¥ Europäischen Richtlinie 2002/95/EWG (RoSH).
¥ EN
13451,
Schwimmbad
Ausrüstung.
Allgemeine
sicherheitstechnische Anforderungen und Prüfverfahren
¥ DIN
19643-1,
Aufbereitung
von
Schwimm-und
Badebeckenwasser - Teil 1: Allgemeine Anforderungen
¥ Angewendete harmonisierte Normen, insbesondere:
o DIN EN 809
o EN ISO 14121-1
o
DIN EN 60034-1
Direttiva sulla sicurezza delle macchine 2006/42/CE.
Direttiva sulla compatibilità elettromagnetica 2004/108/CE.
Direttiva apparecchiatura in bassa tensione 2006/95/CE.
Direttiva sulle emissioni sonore 2000/14/CE.
Norme IEC EN 60335-1 e 60335-2-41.
Direttiva Europea 2202/95/CE (RoSH).
EN 13451, attrezzature piscina. Requisiti generali di sicurezza
e metodi di prova
¥ DIN 19643-1, Trattamento delle acque di piscine e vasche Parte 1: Requisiti generali
¥ Norme armonizzate applicate, in particolare:
o DIN EN 809
o EN ISO 14121-1
o
DIN EN 60034-1
¥
¥
¥
¥
¥
¥
¥
- De bovengenoemde produkten zijn conform de zekerheidsrichtlijnen:
¥ De machinerichtlijn 2006/42/EEG
¥ De richtlijn betreffende elektromagnetische compatibiliteit
2004/108/EEG
¥ De laagspanningsrichtlijn 2006/95/EEG
¥ De geluidsrichtlijn 2000/14/EEG
¥ Normen IEC EN 60335-1 und 60335-2-41.
¥ Europese Richtlijn 2992/95/EEG (RoSH).
¥ EN 13451, Zwembad apparatuur. Algemene veiligheidseisen
en beproevingsmethoden
¥ DIN 19643-1, Behandeling van het water van zwembaden en
baden - Deel 1: Algemene eisen
¥ toegepaste geharmoniseerde normen, in het bijzonder:
o DIN EN 809
o EN ISO 14121-1
o
DIN EN 60034-1
- Os productos da lista acima estáo conformes as:
Directiva de segurança de máquinas 2006/42//CE.
Directiva de compatibilidade electromagnética 2004/108/CE.
Directiva de equipamentos de baixa tensão 2006/95/CE.
Directiva de emissão sonora 2000/14/CE.
Normas IEC EN 60335-1 e 60335-2-41.
Directiva Europeia 2002/95/CE (RoSH)
EN 13451, equipamentos da piscina. Requisitos gerais de
segurança e métodos de ensaio
¥ DIN 19643-1, tratamento de água de piscinas e banheiras Parte 1: Requisitos gerais
¥ Normas harmonizadas aplicadas, em particular:
o DIN EN 809
o EN ISO 14121-1
o DIN EN 60034-1
¥
¥
¥
¥
¥
¥
¥
Signed the present conformity evidence / Signe la présente
déclaration / Firma la presente declaración / Firma la seguente
dichiarazione / Unterzeichnet diese Erklärung / Assina a presente
declaração:
Polinyà, 02/05/2013
Signature / Firma/ Unterschrift / Assinatura
D. José Manuel Aquilue Ferrer , Managing Director of Metalast
S.A.U.
- I prodotti su elencati sono conformi al quanto segue:

45 AstralPool MAC
User Guide
Notes
AstralPool MAC 46
User Guide
47 AstralPool MAC
56748-0015-01
[email protected] | www.astralpool.com