Transcript
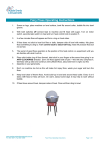
Snow Cone Machine Operating Instructions We suggest you spend a few moments reading these instructions to get the maximum benefit from your hire. You will need some kind of shelter or shade and a table or counter to work from. 1. Place the perspex cabinet in position with the door side to the operator. 2. Carefully place the cast aluminium shaver in position on top of cabinet with motor on operators left. Slip cone holder into bracket and fill with cones. 3. Switch on machine BEFORE ice is added. Lift out ice pusher to rest position, drop ice into shaver followed by pusher arm. Shaved ice will flow into the cabinet. Continue adding ice until you have an attractive mountain of snow, this is important as it attracts customers. 4. Draw nylon ladle across the snow surface with a rolling action to form a ball of snow. (This takes a little practice.) With other hand take paper cone from the holder and place ball of snow in cone, hand to assistant for dose of cordial. Hollow ice is the most suitable ice to use – Do not use hard blocks of ice as this will jam the machine and damage the blades. Ice is not included with your hire - a 5kg bag of ice provides approximately 30 serves. WARNING Do not at any time put hands, fingers, screwdrivers or any objects except ice into shaver head - It will rapidly chew up all of these. This machine is hired to you in a clean and good condition – returning dirty or broken from mis-use will result in additional charges. This unit is not insured and is the responsibility of person(s) hiring it. Your hire will include Shaver head Cone holder Ice cabinet 400 waxed paper cones Two flavours of syrup for 400 serves 2 syrup bottles Scoop 400 straws www.aussieeventsandamusements.com.au Ph. 9561 6877 | Fax 9561 6899 Snow Cone Machine Operating Instructions Page 1 of 1