1
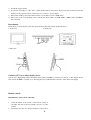
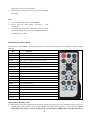
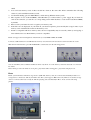
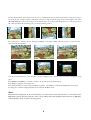
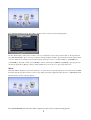
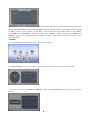
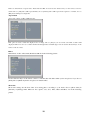
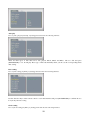
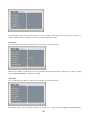
Digital Photo Frame
Operating Instructions
Index
Index ………..………………………………………..…….………………………………………..…..….1
Getting started ……………..……………………..………….………………………….……….…..…2
Package…..……………………………………………………………………………………….…………2
Main functions………..…………………..……….………………………………………………....……2
First operation…..…….………………………..……..…….………………………………….……..3
Introduction……………….………………………………………………………………………….……...3
Connect to TV set or other display devices…………………………………………………….……...4
Remote controller……..………………………..………………………….…………..………………….4
Functions of remote controller………………………………..…….……………………………..…….4
Operation of memory cards …………..…………………………………..……………..……...5
Photo……..……………….………..…………….…..……………..…………………………….……6
Music………….….……………………...…………..….……………...……………………………….…..…………..……....……8
Movie…………...…………..……………..………….…………………...…..………………………………….……..……............8
Time and calendar ….……….…………...…………..……………...……………………………………………... ……...........9
Setting ….…………………………..……………………………..………………..……….……..………..………... 10
Technical specification…………...………………………………………………………………...……15
Maintenance…..….………….…………………………………………………...………………..….15
After service…..…….………….…………………………………………………...………………..…..……...15
Troubleshooting….…………….…………………………………………………...………………..………….. 15
1
Getting started
Thank you for purchasing the Kogan digital photo frame (DPF). This manual will provide you with step by step
instructions on all the functions and features of the Kogan DPF. You can use this digital photo frame to view photos
and play video files and music. You can also insert the memory card of your digital camera to view photos directly.
All functions of this product are controlled by remote control and no computer and network access are needed.
To obtain the best results from your Kogan DPF:
Please convert the resolution of your photo into 480 x 234
Convert the resolution of video files into 640×480
Package
Your package should include:
One Digital Photo Frame
One Support Frame
One DC Adapter
One Remote Controller
One Operating Instructions
One AV Output Cable
Main functions
1.
2.
3.
4.
5.
6.
7.
8.
9.
10.
11.
12.
13.
14.
Simple operation: You can simply insert your memory card into the frame and choose video, photo or music,
then, the frame will begin to play the item you choose without connecting to a computer or the internet.
USB access function-support media playing function of USB devices.
Memory Card Support – The following popular memory cards are supported: SD Card
MMC – Memory Card
High definition LCD screen - High quality 7″ 16:9 wide screen TFT-LCD with 480×234 definition. TFT screen
has wide display angle and abundant color.
Music support – The built-in 1W×2 loudspeaker of DPF can play both MP3 and WMA file formats.
Photo support – Play JPEG files in two different ways with functions of rotation, zooming and moving.
Video support – Support video playback in the following formats: MPEG1 (VCD/DAT), MPEG2 (DVD/VOB)
and MPEG4 (Divx).
Functions of zooming and moving of photos.
Support photo thumbnail of 6-image preview.
Support headphone output.
Support AV output function and can connect to TV set directly to view video files and photos.
Support English OSD menu.
Use remote control to operate and manage all media modes: photo, video file, music, and play cyclically.
Support clock and calendar.
Support alarm clock.
First operation
Please set your frame according to the following instructions:
1. Unpack and remove the protective foam case.
2. Take out the main part of frame
2
3.
4.
5.
6.
Install the support frame.
If you have saved photos, video files or music in the memory card, please insert it into the slot. Please insert the
memory card properly but do not insert by force. Connect to power supply.
Please turn off the power before the insertion of your memory card or USB device..
Please choose the corresponding card to read the data from if there are USB andSD or MMC card in the DPF at
the same time.
Introduction
The methods to insert memory card and operate frame will be introduced specifically below.
1. Front view
2. Back view
3. Side view
Connect to TV set or other display device
You can enjoy high quality images and audio effects when your DPF is connected to a TV set or other display device.
Just connect the DPF to your TV set or other display device with the audio and video cable and it will display.
Remote control
Install battery of the remote controller
1.
2.
Slide the button at the bottom of the remote control to
the right and remove the tray which is used to store the
battery.
Put battery into the tray and pay attention to the positive
3
3.
and negative electrode of the battery.
Push the tray back into the slot properly after installing
the battery.
Note
1. You can only install battery of 3V/CR2025.
2. Please treat the used battery according to local
regulations.
3. To extend the service life of the remote control, please
remove the battery if you won’t be using the frame for an
extended period of time.
Functions of remote control
Most functions of the DPF are operated by the remote control. The following table is a simple introduction of these
functions.
Key
Function
STAND BY
Turn on/off DPF
LCD
Adjust LCD
OSD
Display playing state
ZOOM
1/2/3/4 times zooming of photo and video image
STOP/BAND
Stop, stop playing movie, music and lantern slide
Up Arrow
Upwards key, rotate and move photo
Down Arrow
Downwards key, rotate and move photo
Left Arrow
Leftwards key, rotate and move photo
Right Arrow
Rightwards key, rotate and move photo
ESC
Return, exit
PLAY/PAUSE
Play, pause, enter
PREV
Previous program
NEXT
Next program
TIMER
View calendar and clock
Fast rewind
Fast rewind playing of video and audio files
Fast forward
Fast forward playing of video and audio files
Circular play
Circular play in modes of File\All\DIR\OFF
MUTE
Mute control
- (Volume)
Turn down volume
+ (Volume)
Turn up volume
Operation of memory cards
1.
The memory card can be inserted in one direction only. Do not insert by force if you find the memory card is not
suitable. Take out the memory card to check whether it has been placed properly or turn and check it. If the
media files in the memory card are being played, you should press STOP before removing the memory
4
2.
3.
4.
5.
6.
7.
card.
You can insert memory cards of three models into frame at the same time. Please remember the following
clauses if you insert different memory cards.
Use the Disk Setting option in Main Menu to switch among different memory cards.
The sequence of slots is SD and MMC, and USB when you connect frame to power supply. If you insert two
cards at the same tine, you can choose corresponding card in main interface to read. It will read SD and MMC,
by default.
Please restart your frame if it can’t recognize your memory card.
If the files can’t be displayed on your frame in your desired sequence, please modify the storage format of your
memory card or initialize the format of the memory card.
Frame is compatible with most memory cards; the non-compatibility may be caused by memory card ageing or
inner technical reasons. Brand memory cards are compatible.
Frame can support the following kinds of flash memory cards: MMC CARD/ SD CARD
Connect to USB interface if it is USB interface memory card; insert into SD card slot if it is SD card and choose the
fifth menu in main interface; press PLAY/PAUSE to switch cards as in the following picture:
You can enter Photo, Photo+ Music and Movie menus only when one of the memory cards introduced above is inserted
into frame.
These menus provide four functions: view photo, play music while viewing photo, play music and play movie.
Photo
Frame system will detect whether storage devices (USB disk, memory card) are connected automatically. If there is no
storage device connected, it will stay in LOGO state. The system supports JPG format only in Photo mode when storage
device is connected and read correctly. It will enter playing state automatically in Photo mode as in the following
picture:
5
Use the direction keys on the remote control to choose a folder in the card you have inserted. Choose the photo and you
can view the type, storage sequence, and folder of the photo and preview the photo at the bottom right corner. Press
[PLAY/PAUSE] and you can view the photos in lantern slides. You can use the direction keys to rotate the photo 0°,
90°, 180° and 270° in the browsing process as in the following pictures:
Choose the photo you want to browse and press [ZOOM] to zoom. The zooming scales are ×2, ×3, ×4, ×1/2, ×1/3 and
×1/4 as in following pictures:
You can use direction keys to move the photo on the zooming process so that you can view some special parts of the
photo.
Press [PREV] and [NEXT] to switch if you want to browse the previous and next photo.
Press [ESC] to quit photo browsing mode.
The operation in Photo+ menu is same as in Photo menu; the only difference is that it has background music when
browsing photos and the background music is the audio file in Music menu.
Music
The menu will be displayed on the screen when any one of the memory cards introduced above is inserted into the
DPF. Insert card into the player and choose the corresponding card in the equipment menu, then choose [MUSIC]
in main interface menu, as in the following picture:
6
Press [PLAY/PAUSE] and audio files will be displayed on the screen as in the following picture:
Use the direction keys on the remote control to choose a folder in the card you have inserted. Choose the mp3 file and
press [PLAY/PAUSE] to play. You can press [Fast forward] and [Fast rewind] to play the music faster in either forward
or reverse. There are four kinds of fast forward and fast rewind speed: ×2, ×4, ×8 and ×16.Press [-VOLUME] and
[+VOLUME] to adjust the volume, press [MUTE] to cancel sound and press [PREV] and [NEXT] to play the previous
and next program. Press [ESC] to return to functional files and you can choose to play other music here.
Movie
The menu will be displayed on the screen when any one of the memory cards introduced above is inserted into the DPF.
Insert the card into the player and choose the corresponding card in the equipment menu, then choose [MOVIE] in main
interface menu, as in the following picture:
Press [PLAY/PAUSE] and video files will be displayed on the screen as in the following picture:
7
Use direction keys on the remote controller to choose a folder in the card you have inserted. Choose the movie
and press [PLAY/PAUSE] to play. You can press [Fast forward] and [Fast rewind] to speed up the video playback
in either forward or reverse. There are two kinds of fast forward and fast rewind speed: ×2 and ×4.Press
[-VOLUME] and [+VOLUME] to adjust the volume, press [MUTE] to cancel sound and press [PREV] and
[NEXT] to play previous and next movie. Press [ESC] to return to functional files and you can choose to play
other videos here.
Calendar
Choose [CLOCK] in the main interface menu as in the following picture:
Press [PLAY/PAUSE] on the remote control to view the calendar and current time as in the following picture:
You can set the [CLOCK] in [TIME] in [SETTING] menu. Press [PLAY/PAUSE] again and enter the following
interface:
8
The time is displayed in numbers in this interface.
Setting
Choose [SETTING] in main interface menu as in the following picture:
Press [PLAY/PAUSE] on the remote control and enter setting interface. You can set [OSD language], [Repeat mode],
[Aspect ratio], [Effect], [Show time], [Date setting], [Clock setting], [Clock mode], [Alarm time] and [Night mode time]
here.
OSD language
The setting of [OSD language] is introduced as in the following picture:
There are two kinds of OSD language: English and Chinese. You can use direction keys on the remote control to select
and press [PLAY/PAUSE] to confirm. The caption will switch to the corresponding language after selection. The above
picture is the interface of [Chinese] caption.
Repeat mode
Set repeat mode and enter the following interface:
9
There are three kinds of repeat mode: All, Folder and File. You can use the direction keys on the remote control to
switch. Choose [All] and it will repeat all files; choose [Folder] and it will repeat in the sequence of folders; choose
[File] and it will repeat a single file.
Aspect Ratio
Aspect ratio setting: 4:3PS, 4:3LB and 16:9.
This option is used to switch the display modes of image. Choose [16:9] if you use a wide screen TV set and it will
display in full screen; choose 4:3 and both the left and right sides are black edges. You can use the direction keys on the
remote control to select.
Effect
Three kinds of video effect: Fade, Random, OFF. As in the following picture:
Use the direction keys on the remote control to switch. It has fade effect when you browse photos if you choose
[Fade].Choose [Random] and browse photos in lantern slides.
Show time
Show time setting: Set the show time of browsing photos according to your needs. Choose [Show time] in
[General] of [Setting] menu. There are five options: 3sec, 5sec, 10sec, 30sec and 60sec. As in the following
picture:
10
Auto play
Choose [Auto play] in [General] of [Setting] menu and enter the following interface:
There are three types of files that can be auto played: Movie, Music and Photo. Choose a file and press
[PLAY/PAUSE] to set. It will play these type of files automatically when you choose the corresponding menu
after setting.
Date setting
Choose [Date setting] in [Time] of [Setting] menu and enter the following interface:
Use the direction keys on the remote control to set in this interface and press [PLAY/PAUSE] to confirm. Browse
it in [Clock] after date setting.
Clock setting
Choose [Clock setting] in [Time] of [Setting] menu and enter the following interface:
11
Use the direction keys on the remote control to set. For example: when setting the first item, press the Up key to
switch to [PM] state if it is in [AM] state. Browse it in [Clock] after time setting.
Clock mode
Choose [Clock mode] in [Time] of [Setting] menu and enter the following interface:
There are two kinds of clock modes: 12-hour and 24-hour.Use the direction keys on the remote control to switch
and press [PLAY/PAUSE] to confirm after setting.
Alarm time
Choose [Alarm time] in [Time] of [Setting] menu and enter the following interface:
Press [Alarm time] to enter setting state and then press the Up key to switch to ON from OFF. Press [PLAY/PAUSE] to
12
confirm after setting. The alarm clock will ring when it reaches this time. You can set two separate alarm clocks in the
Kogan DPF. The alarm clock interface is as follows:
Alarm mode
Choose [Alarm mode] in [Time] of [Setting] menu and enter the following interface:
Set the mode of alarm clock in [Alarm mode], which has four modes: Once, Every day, Monday to Friday and
Monday to Saturday. The alarm clock will ring once in [Once] mode; it will ring at the set time everyday if you
choose [Every day] mode. Similarly, it will ring at the set time from Monday to Friday and from Monday to
Saturday in both other modes.
Night mode time
Choose [Night mode time] in [Time] of [Setting] menu and enter the following interface:
Technical specification
Size
Display Size
22.5 x 15.7x 3.2 cm
, Resolution 480X234
7″TFT display
13
Colors
Full Color
Brightness
250cd/m2 max
Input voltage
, 1A
10V
Operating Temp
0℃---50℃
Weight
0.6kg
Media Types
MP3/WMA/JPEG/MPEG1/MPEG2/MPEG4
Memory Cards
SD/MMC
Maintenance
Please pay attention to the following clauses:
Dropping or excess vibration may damage your DPF.
Do not put your DPF in any place with moisture. This may increase the chances of electric shock and/or fire.
If you want to clean the screen of your DPF, please use a soft cloth to wipe. Do not spray water on the screen
under any circumstances.
After service
For full warranty terms and conditions please go to www.kogan.com.au/support
Troubleshooting
Please read the following answers for some frequently asked questions.
1.
I have followed these instructions but I still can’t browse my photos or play audio and video files. What
should I do?
It may be a card error. Please check your memory card. Save the files on the card to your computer, format
your card and load the files again.
2.
Why is the resolution not correct when I browse photos? How do I change the resolution?
The screen of your LCD is 16:9. Please press VIDEO on the remote controller to choose the correct
resolution of 4:3/16:9. Many kinds of photo management software provide the function of adjusting photo size in
batch. The full screen resolution of the DPF is 480 x 234.
3.
My video files can’t be played in full screen. How do I solve this problem?
AVI files have different kinds of resolution. Please check the resolution of your video file and adjust to
DIVX/XVID 640X480. Also make sure you are using a high speed memory card.
4.
What is the maximum capacity of memory card that the Kogan DPF supports?
It is influenced by many factors. It mainly depends on the using time, internal technology of the memory
card and the capacity of pictures you save. Generally, the maximum capacity of brand memory card in market that
our DPF is compatible with includes 1G/2G/4G
5.
Why can’t the DPF start to work immediately when keys on the remote control are pressed?
You may have executed too many functions at the same time and the DPF can’t react immediately. Please
14
wait for a few seconds. It is because too many programs are trying to run at the same time.
6.
What is the difference between type I and type II memory cards? Which is supported?
Type I memory card is a general compatible flash card and type II is a little thicker. Both types are
compatible.
7.
Can I play one or several memory cards at the same time?
Although you can install several cards at the same time, you can choose only one memory card to operate at
a time. Use the remote control to select the card you wish to use.
8.
Can I save photos, video files and music in one card?
Yes. You only need to have a multi-functional memory card. We suggest you classify folders to make file
management more convenient.
9.
Can I play the contents in one folder only?
Yes. Choose a folder you prefer and press repeat play key on the remote control to play.
10. Why is the display of the LCD disordered when switching memory card?
Please turn off the DPF before removing or inserting a memory card for most compatible functions of DPF.
11. How do I acquire photos, music and video files? How do I copy them to my DPF from my computer?
You need a memory card to transfer the files from computer. Many computers have built-in card readers.
You can also acquire data from computer through USB interface.
12. Why can’t I browse a picture on TV when it is connected to TV set?
Connect the audio output cables to left and right audio output of TV set and video output cables to video
output of TV set, then press LCD key on remote controller and your desired files will be played on TV.
15