1
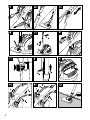
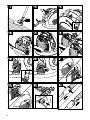
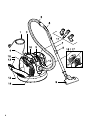
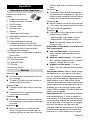
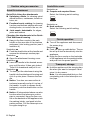
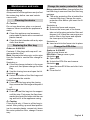
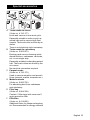
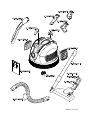
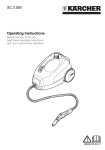
VC 6100 Operating Instructions Before first use of the unit read these operating instructions and act in accordance with them. 59659640 02/13 2 3 4 Contents General notes. . . . . . . . . . . . . . . Safety instructions . . . . . . . . . . . Operation . . . . . . . . . . . . . . . . . . Maintenance and care . . . . . . . . Customer Service. . . . . . . . . . . . Technical specifications . . . . . . . Special accessories . . . . . . . . . . Environmental protection . . .5 . . .6 . . .7 . . .9 . .10 . .10 . . 11 General notes Dear Customer, Please read and comply with these original instructions prior to the initial operation of your appliance and store them for later use or subsequent owners. Proper use This vacuum cleaner is meant for use in private households and not for commercial purposes. The manufacturer is not responsible for any damages that may occur on account of improper use or wrong operations. Use the vacuum cleaner only with: Original filter bags. Original spare parts, accessories and special accessories. The vacuum cleaner is not suitable for: Sucking in human beings or animals. Suction of: Small living creatures (for e.g. flies, spiders, etc.). Substances that are harmful for health, have sharp edges, are hot or burning. Moist or fluid substances. Mildly inflammable or explosive materials and gases. The packaging material can be recycled. Please do not place the packaging into the ordinary refuse for disposal, but arrange for the proper recycling. Notes about the ingredients (REACH) You will find current information about the ingredients at: www.kaercher.com/REACH Old appliances contain valuable materials that can be recycled. Please arrange for the proper recycling of old appliances. Please dispose your old appliances using appropriate collection systems. Disposing the filters and filter bags Filters and filter bags are made from environment-friendly materials. They can therefore be disposed off through the normal household garbage provided you have not sucked in substances that are not permitted to be thrown into household garbage. Warranty The terms of the guarantee applicable in each country have been published by our respective national distributors. We will repair possible faults on your unit free of charge within the warranty period, insofar as the faults are caused by material defects or defective workmanship. Guarantee claims should be addressed to your dealer or the nearest authorized customer service centre, and supported by documentary evidence of purchase. Customer Service Our KÄRCHER branch will be pleased to help you further in the case of questions or faults. See address on the reverse. English 5 Ordering spare parts and special attachments At the end of the operating instructions you will find a selected list of spare parts that are often required. You can procure the spare parts and the attachments from your dealer or your KÄRCHER branch office. Risk of electric shock – – – Safety instructions – – – – – – – 몇 – This appliance is not intended for use by persons with limited physical, sensoric or mental capacities or lack of experience and/or skills, unless such persons are accompanied and supervised by a person in charge of their safety or if they received precise instructions on the use of this appliance. Children must only use this appliance if they are older than 8 and if they are supervised by a person responsible for their safety or if they are instructed on the use of the appliance by such person. Keep packaging film away from children - risk of suffocation! Switch the appliance off after every use and prior to every cleaning/maintenance procedure. Risk of fire. Do not vacuum up any burning or glowing objects. The appliance may not be used in areas where a risk of explosion is present. In case of extended downtimes, switch the appliance off at the main switch / appliance switch or remove the mains plug. Electrical connection The appliance may only be connected to alternating current. The voltage must correspond with the type plate on the appliance. 6 English – – – 몇 Never touch the mains plug and the socket with wet hands. Do not pull the plug from the socket by pulling on the connecting cable. Check the power cord with mains plug for damage before every use. If the power cord is damaged, please arrange immediately for the exchange by an authorized customer service or a skilled electrician. Do not use the power cord to carry/ transport the machine. Do not scrape the power cord across sharp edges and ensure that it does not get pressed. First pull out the plug from the mains before carrying out any tasks on the machine. Caution Never vacuum clean without the filter bag. This can cause damage to the appliance. Avoid vacuum cleaning using nozzle or suction tubes close to the head. There is risk of injury! Always pull out the power cord fully during operation. Protect the appliance against external weather, humidity and heat sources. Turn off the appliance while you do not vacuum. Operation Description of the Appliance Illustrations on fold-out pages! 1 2 3 4 5 6 7 8 9 10 11 12 13 14 15 16 17 18 Power cord with plug Push button take-up cable On/Off button Suction control Suction hose Handle Teleskopic suction pipe Adjustable teleskopic suction pipe Floor nozzle Cover attachment housing Attachment housing QuickClick: includes upholstery nozzle, telescopic gap nozzle and a furniture brush Change filter indicator Shutter lever, lid filter bag/ motor protection filter Motor protection filter Filter bag holder Cover EPA filter EPA-filter Carrying handle Start up Illustration Lock the suction hose neck in the suction opening. To take off, push both lock devices together and pull the tube. Illustration Connect handle and suction tube and insert. Connect the floor nozzle and telescopic suction pipe and insert. Illustration Use the adjustment in order to adjust the telescopic suction pipe to the length you wish. Illustration When you stop or you take a short break, hang the floor nozzle into the parking position on the back of the ap- pliance, and push it into the resting position. Illustration To remove, press handle backwards in the direction of the appliance. The floor nozzle is thus unlocked from the parking holder and can be removed upwards. Illustration Hold the power cord at the plug and pull it out. Insert the mains plug into a socket. Turn on/off the appliance. Illustration The power suction adjustment is at the power suction control: - Marking MAX, high power suction - Marking MIN, low power suction Note: the marking shows the current suction power. Adjust the suction power to suit the suction requirement: Low suction power – for laced curtains, textiles, upholstered furniture, cushions Medium suction power – for slightly dirty carpets/ carpeted floors, precious carpets, bridges and runners Highest suction power – for hard floors, very dirty carpets and carpeted floors Please take notice! Should, while turning the appliance on, the mains furse tripper shut off, possibly, other electrical appliances are connected and are operating on the same electric circuit. Should this be the case, put the appliance in its lowest power stage, before turning the appliance on. Afterwards you may select a higher power stage. Refer to chapter "Technical data" for power fuse protection. Important notice! The appliance will shutdown automatically, if there is danger of overheating. Turn the appliance off and pull the power plug. Make sure, that the nozzle, the suction pipe or the tube is not clogged, failing all the above the filter must be changed. After the elimination of the interference let the appliance cool down for a minimum of 1 hour, before using it again. English 7 Suction using accessories QuickClick attachment QuickClick Using the attachments Upholstery nozzle: for cleaning upholstered furniture, mattresses, laced curtains, etc. Furniture brush, rotating: for cleaning furniture and delicate objects with care, dusting books, air vents in the car, etc. Joint nozzle, detachable: for edges, joints and heaters Changing the attachments in the QuickClick attachment housing Hang in the floor nozzle in the park holder on the rear side of the machine and press it into locking position (see illustration 4) Illustration Push the dead button at the handle and remove the telescopic suction pipe. Illustration Open the attachment housing cover. Illustration Insert the handle in the desired accessory until the stop. It then gets locked. Then tilt it downwards and pull it out. Illustration To store, put the attachment using the handle into the attachment housing and click it up into place. Remove the handle. Notice: You also can remove the attachment manually and put it on top of the handle. In order to release the attachment, push the dead button on the handle. Notice: All steps stated above can also be done when the telescopic suction pipe is connected. Hang the floor nozzle on the backside of the appliance into the parking holder, and push into the pause position. Pull the telescopic suction pipe straight up. 8 English ComfoGlide nozzle Illustration Carpets and carpeted floors: Select the following switch setting: Illustration Hard surfaces: Select the following switch setting: Finish operation Turn off the appliance and disconnect the mains plug. Illustration Push the take-up cable button. The cable will pull itself automatically into the appliance. Hang the floor nozzle on the backside of the appliance into the parking holder, and push into the pause position. Transport, storage Hold the appliance at the carrying handle when you want to transport it and store it in dry rooms. Note: It is recommended that you first completely push in the telescopic suction pipe. Maintenance and care Risk of injury Always switch off the appliance and pull out the mains plug before care and maintenance work. Cleaning the device 몇 Caution Do not use abrasives, glass or universal cleaners! Never immerse the appliance in water. Clean the appliance and accessory parts made of plastic with a commercial plastic cleaner. Clean the dust chamber with a dry wipe cloth/ dust brush. Replacing the filter bag Order no. 6.904-329 Contents: 5 filter bags with cap and 1 engine protection filter. Note: Separate the telescopic suction pipe from the handle to see the filter change indicator. Illustration If the filter change indicator in the cover glows red, then please change the filter bag. Use the closing lever and open the lid. Illustration Unlock the holder of the filter bags and pull towards the outside. Illustration Close the filter bag using the closing flap, remove the filter bag and dispose it off. Illustration Push the new filter bag into the support until the stop. First press the flap downwards; then push the holder into the casing and lock it at the appliance casing. 몇 Caution Close the lid only, if there is a filter bag inserted. After picking up small dust particle (as for example plaster, cement etc) clean the motor protection filter, change if necessary. Change the motor protection filter Motor protection filter: change before the last filter bag is removed from the filter bag package. The motor protection filter is behind the inserted filter bag. Change the motor protection filter before you insert the filter bag. Illustration Unlock the frame and remove. Remove the lower part of the frame, take out old engine protection filter and dispose it off. Insert the new engine protection filter in the frame and replace the lower part of the frame. Illustration Insert and click the frame into its place. Change the EPA-filter Order no. 6.414-805 Filter for pure blower air. EPA filter: Change once a year. Illustration Open cover. Unlock the EPA filter and remove. Illustration Insert the new EPA filter and click it into place. Close the lid. English 9 Cleaning of the ComfoGlide nozzle The ComfoGlide nozzle must be cleaned regularly! Remove the nozzle from the suction pipe. Illustration Clean the back steering roller: The easiest way to do this, is to remove the roller. Unscrew the axle and pull out. Dust fluff, hair etc. can now be removed easily. Fit the steering roller back into place. Cleaning the accessories Illustration Handle and suction tube can be disconnected in order to clean or if clogged. Push the 2 interlocks and pull apart. Connect handle and suction tube and insert. Customer Service Australia KÄRCHER Pty. Ltd. 40 Koornang Road Scoresby, Victoria 3179 1800 675 714 (Free Call) www.karcher.com.au New Zealand Karcher Ltd. 12 Ron Driver Place East Tamaki, Aukland (09) 274-4603 www.karcher.co.nz 10 English Technical specifications VC 6100 Voltage V 220 - 240 Current type Hz 50/60 Mains fuse (slow-blow) A 16 Protective class II Output Pnom W 1600 Output Pmax W 1800 Weight (without accessories) kg 7,0 Action radius m 10 Dimensions mm ø 380 x 380 Nominal width, accessories mm 35 Subject to technical modifications! Special accessories A Turbo nozzle for floors (Order no. 4.130-177) brush and vacuum in one work cycle. Especially suitable in order to pick up animal hair and to vacuum high floor carpets. The brush roller is driven by air steam. There is not electrical outlet necessary. B Turbo nozzle for upholstery (Order no. 2.903-001) Brushing and vacuum cleaning upholstered furniture, mattresses, car seats, etc. in one single step. Especially suitable for absorbing animal hair. The brush rollers are driven by the air current. No electrical connection required. C Parquet nozzle (Order no. 4.130-172) Used to vacuum sensitive and smooth floors (parquet, marble, terracotta etc.). D Mattress nozzle (Order no. 6.906-755) For absorbing dust from mattresses and upholstery. E Filter bag (Order no. 6.904-329) Content: 5 filter bags with cover and 1 motor protection filter F EPA-filter (Order no. 6.414-805) Additional filters for cleaner exhausting air. Recommended for allergy sufferers English 11 59659640 14.02.2013 www.karcher.com.au www.karcher.co.nz