1
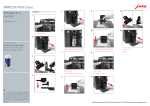
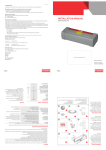
Jura Impressa XF50
Operating & cleaning
Instructions
My Coffee Shop Pty Ltd
ACN 102 850 037
[email protected]
9 Hall St
Hawthorn East VIC 3123
ph: 03 9946 4160
fax: 03 9822 6269
1300 365 487
Shop 93,1-5 Harwood Street
Pyrmont NSW 2009
ph: 02 9034 6580
fax: 02 9034 6586
www.mycoffeeshop.com.au
11
Control elements
22
1. Rotary Switch
13
2. Illuminated ring
3. Maintenance button
4. Preparation button, 1 espresso
5. Preparation button, 2 espressi
21
12
6. Preparation button, 1 coffee
7. Preparation button, 2 coffees
10
9
13
78
3 4 5 6
8. Steam preselection button
9. Display dialogue system
10. Water tank with handle
14
2
11. Filler funnel for preground coffee
12. Bean container cover
15/16
1
13. Aroma preservation cover
14. Steam / hot water draw-off tap
17
15. Removable Professional Cappuccino Frother with milk pipe
16. Removable hot-water nozzle (see Fig. 5)
18
17. Height-adjustable coffee spout
18. Coffee grounds container
19. Cup grille
19
Rotary Switch
20. Drip tray
21. On/Off button (= Zero-Energy Switch)
22. Metal shelf
20
Operating Instructions – Jura XF50 fine foam
Cappuccino
1. Place your cup / mug under the milk / coffee spout on the right.
2.
Turn the milk selector to the foam milk position – See diagram below.
3. Press the cappuccino key. Your cappuccino will now be poured
Flat white
1. Place your cup/mug under the spout on the right.
2. Turn the milk selector to the flat milk position – See diagram below.
3. Press the Latte macchiato key. Your flat white will now be poured
Café Latte
1.
Follow the procedure for making a cappuccino.
2.
When your cup or glass 1/3 full of foam milk, turn the milk selector to the flat milk position.
Espresso or Long Black
1.
Place your cup / mug under the middle spouts and press espresso or coffee key. Your drink
will now be poured. Press the button twice for a double espresso or two long blacks.
Note: Each key is fully programmed however you can stop the milk and coffee flow short by pressing
any key while it is pouring. Adjustments to suit personal preference can also be made using
the rotary dial. These changes do not affect the programmed settings.
My Coffee Shop Pty Ltd
ACN 102 850 037
[email protected]
9 Hall St
Hawthorn East VIC 3123
ph: 03 9946 4160
fax: 03 9822 6269
1300 365 487
Shop 93,1-5 Harwood Street
Pyrmont NSW 2009
ph: 02 9034 6580
fax: 02 9034 6586
www.mycoffeeshop.com.au
Jura Impressa Xf50 – End of Day cleaning
1. Fill a cleaning jug with 250 ml of cold water and add 15ml of cappuccino
cleaning solution.
2. Lift the milk pipe up out of the cooler and place it into the cleaning jug. Place the second
cleaning jug under the steam outlet.
3. Select steam. The machine will heat for 20 sec and then display ready.
4. Open the steam tap. Draw half of the cleaning solution through the milk frother in the froth milk
position and half in the flat milk position.
5. Rinse the cleaning container jug and fill it with 250 ml of cold water. Repeat step 4 to rinse
the auto frother.
My Coffee Shop Pty Ltd
ACN 102 850 037
[email protected]
Warehouse 4
41 Rose Street
Richmond Vic 3121
ph: 03 9946 4160
fax: 03 9429 0055
1300 365 487
Level 26
44 Market Street
Sydney NSW 2000
ph: 02 9034 6580
fax: 02 9034 6586
www.mycoffeeshop.com.au
Weekly cleaning proceedure – Milk system
Complete this procedure once a week after the daily milk system clean.
1. Remove the automatic milk frother from the machine. (Fig 1 - 2)
2. Separate the automatic milk frother into 4 parts. (Fig 3)
3. Soak the parts in 250ml of warm water (not hot) and 15ml of Jura cappuccino cleaner for 15 – 20 min
(max).
4. Remove the parts from the solution and rinse them under cold tap water.
5. Re-assemble the auto frother and refit onto the machine.
Figure 1
Figure 2
My Coffee Shop Pty Ltd
ACN 102 850 037
[email protected]
Figure 3
9 Hall Street
Hawthorn East Vic 3123
ph: 03 9946 4160
fax: 03 9822 6269
93/1-5 Harwood Street
Pyrmont NSW 20009
ph: 02 9034 6580
fax: 02 9034 6586
1300 365 487
www.mycoffeeshop.com.au
IMPRESSA XF50 Classic
Cleaning the machine
Precondition: READY / CLEAN
5
9
13
6
10
14
1
Approximate duration 15 min.
EMPTY TRAY
2
Equipment required:
2-phase cleaning tablets
Tub of 25 (Art. 62535)
PRESS RINSE
Pack of 6(Art. 62715)
7
PRESS RINSE
11
HEATING
READY
3
4
J
These short instructions do not replace
the ‘IMPRESSA XF50 Instructions for Use’.
Make sure you read and observe the
safety information and warnings first in
order to avoid hazards.
CLEANING
ADD TABLET
8
CLEANING
EMPTY TRAY
12
JURA Elektroapparate AG, Kaffeeweltstraße 10, CH-4626 Niederbuchsiten, www.jura.com
IMPRESSA XF50 Classic
Descaling the machine
Approximate duration 40 min.
Precondition: READY /
5
10
14
11
15
DE-SCALE
1
AGENT IN TANK
6
EMPTY TRAY
2
Equipment required:
Descaling tablets
Tub of 36 (Art. 70751)
DE-SCALING
CLOSE TAP
Pack of 3 (Art. 61848)
8
FILL WATER TANK
16
12
3x
3
c
9
17
DE-SCALING
EMPTY TRAY
4
J
These short instructions do not replace
the ‘IMPRESSA XF50 Instructions for Use’.
Make sure you read and observe the
safety information and warnings first in
order to avoid hazards.
13
OPEN TAP
AGENT IN TANK
OPEN TAP
JURA Elektroapparate AG, Kaffeeweltstraße 10, CH-4626 Niederbuchsiten, www.jura.com
18
22
DE-SCALING
CLOSE TAP
19
DE-SCALING
EMPTY TRAY
20
21
READY
IMPRESSA XF50 Classic
Changing the filter
Precondition: READY / FILTER
5
9
1
HEATING
READY
6
CHANGE
OPEN TAP
2
Equipment required:
CLARIS Pro Blue filter cartridge
Pack of 4 (Art. 69670)
7
3
8
4
J
These short instructions do not replace
the ‘IMPRESSA XF50 Instructions for Use’.
Make sure you read and observe the
safety information and warnings first in
order to avoid hazards.
FILTER RINSING
CLOSE TAP
JURA Elektroapparate AG, Kaffeeweltstraße 10, CH-4626 Niederbuchsiten, www.jura.com
Trouble shooting:
Milk not frothing
No milk flow
Milk spluttering
Not filling cups
Milk not hot enough
Froth milk is flat & cool
Note: If there is no steam or the steam pressure is low, follow the steam trouble shooting procedure first.
Solution:
1. Remove the air suction. (Fig 1)
2. Check the valve on the tip of the air suction is clean and is able to open and close freely. Squeeze the valve
between your figures, it should open, release it and it should close. (Fig 2)
3. Refit the air suction. Turn the milk selector to the froth position (Fig 3), and test the milk. If the milk is still
cool and flat, replace the air suction and test again. If the problem has been resolved, order in a spare air
suction (part no. 71210) otherwise go to step 4.
4. Remove the auto frother from the machine. (Fig 4)
5. Separate the auto frother into 4 parts. (Fig 5)
6. Soak the parts in 250ml of warm water and 15ml of Jura cappuccino cleaner for 15 – 20 min.
7. Remove the parts from the solution and rinse them under tap water.
8. Clean the milk and air paths with the cleaning brush (part no. 71161) (Fig 6 – 9)
9. Re-assemble the auto frother and refit onto the machine.
10. Test the milk function. If the problem has not been resolved contact customer support on 1300 365 487 to
arrange the repair of your machine.
Figure 1
Figure 2
Figure 3 – Froth
Figure 4
Figure 6 - Milk
Figure 7 - Milk
Figure 8 - Air
Figure 9 - Milk
My Coffee Shop Pty Ltd
ACN 102 850 037
[email protected]
Figure 5
9 Hall Street
Hawthorn East Vic 3123
ph: 03 9946 4160
fax: 03 9822 6269
93/1-5 Harwood Street
Pyrmont NSW 20009
ph: 02 9034 6580
fax: 02 9034 6586
1300 365 487
www.mycoffeeshop.com.au
Trouble shooting:
Steam
No steam
Low steam
Steam coming from the wrong location
Solution:
1. Unplug the machine for 10 seconds, plug the machine back in, turn it on and test the milk function. If the
problem has not been resolved go to step 2.
2. Remove the auto frother from the machine. (Fig 1)
3. Pull the chrome steam nozzle cap toward you until it un-clips from the steam nozzle below it. (Fig 2)
4. Unscrew the steam nozzle from the steam arm turning it clockwise as you look down onto it. (Fig 3)
5. Clean the 1mm diameter steam hole in the steam nozzle using the cleaning brush (part no.71161) (Fig 4 – 5)
6. Screw the steam nozzle back onto the steam arm turning it anti-clockwise as you look down onto it. Using a
tea towel, grip the steam nozzle and tighten so that it is hand tight.
7. Re-fit the chrome steam nozzle cap by placing it into position, supporting the steam nozzle below it with one
hand and with the other hand pushing the steam nozzle cap down as you rock it forwards and backwards. It
will clip onto the steam nozzle. (Fig 6)
8. Re-fit the auto frother. (Fig 7)
9. Test the steam using the milk function.
a. If there is steam coming from the steam nozzle however the pressure is low, descale the machine
and test the steam pressure again. Note: If you normally use Claris filters, descale with 1 tablet only.
See manual – Descaling machine.
b. If there is still no steam or steam is escaping from the wrong location, please contact customer
support on 1300 365 487 to arrange the repair of your machine.
Figure 1
Figure 2
Figure 6
Figure 7
My Coffee Shop Pty Ltd
ACN 102 850 037
[email protected]
Figure 3
Figure 4
Figure 5
9 Hall Street
Hawthorn East Vic 3123
ph: 03 9946 4160
fax: 03 9822 6269
93/1-5 Harwood Street
Pyrmont NSW 20009
ph: 02 9034 6580
fax: 02 9034 6586
1300 365 487
www.mycoffeeshop.com.au