1
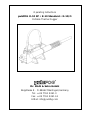
Operating Instructions
pulsFOG K-10 SP • K-10 Standard • K-10/O
Portable Thermal Fogger
Dr. Stahl & Sohn GmbH
Abigstrasse 8 · D-88662 Überlingen/Germany
Tel: ++49 7551 9261 0
Fax: ++49 7551 9261 61
E-Mail: [email protected]
1.
SAFETY INSTRUCTIONS AND ACCIDENT PREVENTION
Warning: Read, understand and respect these safety precautions before
operating machine. Failure may lead to a fire hazard. Operator must be
trained by pulsFOG authorized personnel.
•
•
•
•
•
•
•
•
•
•
•
•
•
•
•
•
•
•
•
Check the functional safety of the unit each time before using it.
For stationary operation, ensure safe standing for the unit.
Never fill in fuel when the unit is hot!
Never fill fuel into the solution tank!
When filling one of the tanks or when inspecting the carburettor,
smoking is prohibited in the immediate environment.
Never let the unit run without supervision.
Operator shall close the fogging tap immediately after sudden stop of engine.
Do not fog in rooms where there is a danger of dust explosion. (e.g. grain mills)
Do not fog directly into a pipe with a similar diameter as the fogging
pipe of the unit (cooling effect of the unit is interrupted and a combustible concentration
of aerosols may occur).
Do not fog with combustible liquids into pipes or tunnels without ventilation (except with
BlO-units ) because of fire and explosion hazard.
Do not fog any liquids with a flash point of less than 75 ° C.
For fogging inflammable products, only use „O” series units or „BIO” series units with
separate water injection (e.g. K-10/O or K-22 BIO) equipped with automatic cut off
device for the fogging solution.
Never fog more than 2,5 Itr. of an oilbased or similar inflammable liquid into an
enclosed space of 1000 m3 and never more than 10 Itr. of a waterbased liquid (with
less of 50% water) into a space of 1000 m3 or another corresponding amount of liquid
in a corresponding space volume.
If a combustible atmosphere is established a source of ignition may cause fire (e.g.
electric sparks). Therefore such sources have to be eliminated or turned off.
When fogging liquids with a possible fire hazard (e.g. oils, alcohols ....) a fire
extinguisher shall be provided near the unit.
Do not transport hot units in enclosed vehicles. Never ship the unit with fuel or agent in
the tank. If there is still fuel in the tank during transportation, the unit must be upright
and secured against tilting.
Do not touch the fogging pipe while the engine is running and up to 30 min after run.
Do not touch the protection jacket (cooling jacket) for 30 minutes after stopping the
engine (danger of injury due to radiated heat)!
Eliminate any leakage occurring on the unit without delay.
Have the unit checked regularly by a suitable qualified technician able
to service it in accordance with the safety rules and the accident preventive regulations
or at the manufacturer's service workshop.
Observe the instructions for use supplied by the pesticide manufacturer.
When fogging, use protective equipment such as protective clothing, gas mask,
protective gloves and ear protectors as applicable. The type and quality of the
protective equipment to be used depend on the national legal obligations. In Europe
the filter for the gas mask (full-face mask) must meet the protection category A2 B2-P3
as a minimum requirement.
2.
SPECIFICATIONS
pulsFOG type:
Dimensions
Empty weight
Gross weight (filled tanks)
Capacity of chemical tank
Capacity of fuel tank
Starting current (4x1,5 V cells)
Combustion chamber volume
Gross max. power of engine
Max. fuel consumption
Flow rate with 0,8 nozzle
Operating pressure in chemical tank
Max. sound pressure
level during fogging
Operating temperature*
(ambient air temperature 20 ° C)
on cooling jacket, max.
Temperature on cooling jacket
10 minutes after engine stop
Temperature of combustion gas
at resonator outlet when idling
OPTIONAL EQUIPMENT
ACCESSORIES
RECOMMENDED ACCESSORIES
SPARE PARTS
* measured during fogging
K-10/O
K-10 Standard
K-10 SP
129x30x36 cm
106x29x33 cm
8,5 kg
7 kg
19,5 kg
13,5 kg
9 Itr.
5 Itr.
2 Itr.
2 Itr.
6 V DC
6 V DC
300 cm³
300 cm³
17,5 kW/24,1 h.p./15300 kcal/h
1,9 Itr./h
1,9 Itr./h
see 7.2
0,2-0,35 bar
0,2-0,35 bar
98 db
98 db
35 ° C
35 ° C
120 ° C
120 ° C
550 ° C
550 ° C
Automatic cut off device
for inflammable fogging solutions
Extralong protective grating
Flame head
Air-agitator
Funnel for chemicals
Fuel pitcher
Cleaning brush for resonator
Ear protectors
Protective clothing
Gas mask with filter A2B2P3
Horticultural kit cpl. consisting of:
Bucket 10 ltr., 2 stirring sticks, Measure 2 ltr.
Measure 0,25 ltr.
Spare parts set with gaskets
and diaphragms
Subject to technical changes
pulsFOG K-10 SP • K-10 Standard • K-10/O
Portable thermal foggers, type K-10 SP and K-10/O suitable for use in greenhouses,
storerooms, warehouses and livestock buildings with suitable fogging solutions.
K-10/O type not suitable for wettable powder formulations.
Portable thermal fogger, type K-10 Standard suitable for use in greenhouses with waterbased, non flammable fogging solutions.
3.
SUMMARY OF OPERATION
3.1 Preparations
a) Fill the fuel tank completely using the pulsFOG fuel pitcher (1,8 Itr. max.). Close the
lid tightly.
b) Remove the solution tank and fill in the solution to be fogged using the red solution
funnel.
c) Remount the solution tank to the unit and firmly tighten the lid with the passage.
d) Close the fog tap.
3.2 Starting the engine
a) Open the adjustable screw on the carburettor by up to 1/3 - 1/2 turn (with the unit
heated up, 1/3 of a turn only).
b) Press the primer slowly several times with your left and flat hand until the engine
starts (pump no more than 5 times). If the engine does not start after having pumped
5 times, open the fuel tank lid and continue pumping until the engine starts. Close
the lid.
c) After starting the engine, turn the adjustable screw on the carburettor (usually it
requires slight opening) so that a powerful, deep engine sound is obtained. (Avoid
high frequency engine-run).
3.3 Fogging
With the engine running, open the fog tap: The unit starts fogging.
3.4 Interrupting the fogging process
With the engine running, close the fog tap, re-open as necessary.
3.5 Stopping the fogging process (proceed in the following order):
1) With the engine running, loosen the chemical tank lid (pressure is released).
2) Close the fog tap by hand. Close the chemical tank lid.
3) Stop the engine (close the adjustable screw on the carburettor).
3.6 Posterior action
Let the unit cool down, rinse the solution tank with water or cleaning oil and fog briefly.
4.
TECHNICAL DESCRIPTION
The unit works according to the pulse-jet principle without any mechanically moving parts.
When pressing on the primer or starting button, a fuel/air mixture is produced in the
carburettor, blown into the combustion chamber and ignited by the spark plug. A pulsating
combustion forms at approximately 80 – 100 explosions per second, controlled by an air
diaphragm valve and a fuel adjustable screw on the carburettor. A limited overpressure of
0,2 – 0,35 bar is redirected from the carburettor to the chemical tank through a non-return
valve. The pressure in the chemical tank conveys the fogging liquid through an ON/OFF
valve and a dosing nozzle to the end of the exhaust pipe. There it is injected into the exhaust
stream coming from the combustion chamber. For a fraction of a second (0,05 – 0,1 s),
kinetic and thermal energy (600 – 700 kcal/litre of fogging liquid) acts on the injected
solution, which is thereby torn to ultra-fine aerosols. The liquid partially vaporizes and
converts into a visible fog by immediate condensation in the relatively cool ambient air.
5.
PREPARATIONS FOR STARTING
5.1 Fill the fuel tank with pure common
petrol (gasoline) of normal grade
(also unleaded); avoid supergrade
fuel, if possible. The maximum filling
capacity is sufficient for emptying the
chemical tank. When filling in fuel,
always use the graduated fuel pitcher
with sieve.
Warning:
Never start a fogging process with the
tank less than half filled. If fuel
temperature is less than 10 ° C the
engine may start but without powerful
run. Allow the fuel to warm up to
room temperature.
filling the fuel tank
5.2 Run the engine briefly and stop it
again (see 6.0). If the tank is less than
1
/4 full, you should avoid sudden
movements with the unit as far as
possible and not exceed an angle of
45 upwards or downwards.
5.3 Fill the chemical tank as follows:
Open the tank lid, remove the tube
from the tank and hang it over the
dosing nozzle on the fogging pipe.
Release the tank holding strap and
remove the chemical tank with the
opening pointing upwards. The tank
may only be filled with a maximum of
9 Itr. of fogging solution (K-10 SP =
4,5 ltr.). Use the funnel with sieve for
filling. After filling, close tank with lid.
Remount solution tank to the unit.
Remove lid. Refix lid with passage and
laminate gasket.
detaching the chemical tank
Warning
Viton hoses are not resistant to
chemicals containing dichlorvos
(DDVP) or Aceton as solvent. Use in
that case the yellow Novoprene hoses
from pulsFOG.
filling the chemical tank
5.4 Check tightness of dosing nozzle
Warning:
Toxic chemicals of fogging solution may be
sprayed by tank pressure onto your body
and face if dosing nozzle is not well sealed.
6.
STARTING THE ENGINE
a) Set the fog tap to the closed position.
b) Open the fuel adjustable screw on the
carburettor to the starting position
(approx. 1/3 to 1/2 turn).
Warning:
a)
set the fog tap to the closed position
Opening too far would feed excessive fuel
to the engine, which would cause engine
and carburettor choking (flooding). Read
6.2 c.
c) With your left hand press the primer
slowly down several times and each time
keep it pressed for some seconds to
prolong the ignition. Do not pump more
than 5 times. Read 6.2 c.
Warning
With the fuel tank full, do not press the
primer powerfully since this would cause
carburettor flooding (excessive fuel
injected). Read 6.2 c
b)
open fuel adjustable screw
1
/2 turn cold engine, 1/3 turn hot engine
6.1 Adjusting for continuous operation
After the engine has started and warmed up
(approx. 1/2 minute), readjust the adjustable
screw on the carburettor (usually, open
further) until the engine runs with a
powerful, deep sound (low frequency =
optimum performance).
Warning:
A high sound (high-frequency engine run)
means poor engine performance which
causes overheating and an excessively large
droplet spectrum.
c)
press primer slowly
6.2
If the engine does not start:
a) Check the fuel supply, i.e. fuel
must be visible in the transparent
tube above the red fuel valve (No.
7980); if this is not the case,
continue pumping until fuel
becomes visible. Even if no fuel
becomes visible the red fuel valve
may be blocked (moving part
sticks). Disassemble the valve and
blow with the mouth through
(respect arrow direction). Also the
fuel filter inside the tank may be
choked.
a)
b) Check spark plug and clean it.
fuel visible in the transparent tube
c) If the carburettor is flooded
(pumped too strongly or too often),
proceed as follows: Loosen the fuel
tank lid and continue pumping (i.e.
blow through and dry the
carburettor) until the engine starts,
or single explosions occur. When
the engine runs, close the fuel tank
lid.
Reason:
If the tank lid is not hermetically
closed, the overpressure created by
pumping escapes, and no fresh fuel is
injected into the carburettor. On the
other hand, fresh air is supplied which
gasefies the excessive fuel. Since the
ignition is also actuated with each
pumping operation, the unit starts
immediately as soon as the carburettor
is sufficiently dry and an ignitable
mixture has formed.
Warning:
Do not forget to close the fuel tank lid
again!
c)
open fuel tank lid and pump again
7.
FOGGING
Open the fog tap. The unit starts fogging
immediately.
Note: The engine frequency may now
vary slightly under load. In this case,
readjust the adjustable screw on the
carburettor once more (usually, open a
little more).
7.1 Interrupting the fogging process
With the engine running, close the fog
tap; re-open as necessary.
fogging: open the fog tap
Warning:
For short interruptions (1/2 minute), it is
not necessary to stop the engine.
Warning:
Towards the end of the fogging process,
usually there is only little fuel left in the
tank. Therefore you should avoid sudden
movements in order to prevent air from
being taken in by the fuel suction piece. A
single air bubble may cause engine
standstill. This may lead to a fire hazard if
unit is not equipped with an automatic
cut- off device for the fogging solution or
if operator forgets to shut immediately the
fog tap.
7.2 Flow rate and droplet size
are controlled by interchangeable dosing
nozzles. The flow rate depends on the unit
type, the set power of the motor and the
viscosity of the liquid. This should be
checked on a case-to-case basis.
i
interchangeable dosing nozzle
Flow rate with dosing nozzle size
0,8 mm with automatic
cut-off device
Flow rate with dosing nozzle size
0,8 mm without automatic
cut-off device
Fogging solution:
diesel-oil
10 l/h
Fogging solution:
water
9 l/h
13,5 l/h
13 l/h
7.3 Stopping the fogging process
Proceed in the following order:
a) Loosen the lid of the chemical
tank (release pressure) and wait
until the unit stops fogging.
b) Close the fog tap.
c) Stop the engine (by closing the
adjustable screw on the
carburettor).
Warning:
When you have finished fogging,
always release the solution tank
from pressure first and close the fog
tap before stopping the engine.
a)
loosen the lid of chemical tank (release pressure)
Never stop the engine before
the fog tap is closed.
Reason:
(In case the unit is not equipped with
an automatic cut off device.)
If you stop the engine before having
closed the fog tap, the fogging
solution remaining in the tank
continues to flow to the very hot
fogging pipe where it may cause fire
hazard or form black sooty clouds
causing dirt on the spark plug and
in the carburettor. Venting the
solution tank by releasing the tank
lid before stopping the engine
offers the additional advantage that
the liquid still present in the fog
solution conduits fogged off and
does not remain in the conduits.
b)
close the fog tap before stopping the engine
Warning:
Refill fuel only with the unit
cooled down.
The heat radiation after stopping the
engine will heat up the double
cooling jacket of the fogging tube.
Do not touch the unit for approx. 20
minutes.
c)
close adjustable screw to stop the engine
8.
CLEANING
8.1 The unit must be cleaned after each fogging application. For this purpose, remove the
solution tank and rinse it with water. Subsequently, fog approx. 1 Itr. of clear water in
order to clean the fog solution conduit. Adding a small quantity of alcohol or just a few
drops of dishwashing agent is helpful.
8.2 Final cleaning
As described in section 10.1, but with additional cleaning of the carburettor diaphragm,
since some fog usually penetrates the carburettor during a fogging application and may
cause blocking. The carburettor diaphragm can be cleaned as follows:
a) Unscrew the diaphragm valve
and blow through from both sides
with compressed air.
b) Unscrew the diaphragm valve
and rinse in hot water (approx.
60 ° C).
c) Unscrew the diaphragm valve
and rinse with hand-warm water
to which cleaning alcohol has
been added. Cleaning with water
and alcohol is especially
recommended after fogging with
formalin.
d) Unscrew the diaphragm valve
and put it into a vessel with fuel for 5 minutes.
air.
9.
Subsequently dry it with compressed
STORAGE
If you want to keep residual quantities for a short time in the solution tank, remove the
suction tube from the tank.
When the unit is not going to be used for some time, drain the fuel tank and store the
unit in a cool and clean condition in the cardboard packaging. If you use the unit
weekly, refill the fuel tank completely after the unit has cooled down and store it in a
safe place, protected against tilting or falling down. The formation of condensate is
prevented by the tank being either completely full or completely empty!
Warning
Condensation in the fuel tank causes considerable malfunctions since the fuel suction
piece (No. 169z) and the red fuel valve (No. 7980) will clog. Only store the unit in a dry
and cool place, protected from direct sunlight and dust.
10.
MAINTENANCE
a)
10.1 Cleaning the fogging pipe
After fogging critical agents, or
every 10 hours of operation at the
latest, the resonator (exhaust pipe)
should be cleaned with the
cleaning brush.
b)
For this purpose, the cleaning brush
must be inserted into the
combustion chamber over its full
length and then pulled again.
For the K-10 model, this is
facilitated by unscrewing the nozzle
cane (Ref.No. 151) a little.
c)
10.2 Servicing
After 50 hours of engine operation,
replace the diaphragm (no. 72) on
the carburettor.
Trouble Shooting
Fault Identified:
Possible Cause:
1. pulsFOG engine does not start
No fuel
Fuel tank is empty
No fuel
Adjustable screw is closed
No fuel reaches the
Fuel nozzle is choked
carburettor when
pressing the primer
No fuel is visible in
Fuel valve sticks or is choked
the transparent hose
Fuel filter is choked
between fuel valve
and carburettor
Fuel in the transparent
Red fuel valve not tight
hose flows back after
Fuel valve dirty
pumping
No ignition spark at
Batteries corroded or empty,
the spark plug
spark plug defective or wet/dirty
ignition coil defect
Micro-switch defective
No contact between spark plug
and spark plug socket
No correct air supply
through the
membrane-valve
Membrane (72) is dirty
and/or pasted up or
assembled incorrectly
2. pulsFOG engine has bad running behaviour
Air bubbles in the fuel
Fuel pipes or fuel valve leak
Fuel supply to the
carburettor is not
sufficient
Adjustable screw
incorrectly adjusted
Air does not pass at
the right measure
Membrane (72) is
dirty and/or pasted
up or assembled incorrectly
Remedy:
Fill fuel tank
Open adjustable screw
Clean fuel nozzle
and/or blow through
ring slot nozzle
Blow through or
exchange
the fuel valve
Exchange fuel valve
or try to clean it by low
air pressure
Replace batteries,
exchange spark plug
resp. dry/clean it.
Space between
electrodes of spark
plug = 1 mm.
Replace micro-switch/
ignition coil
Fix the high-tension
cable to
the spark plug socket
Assemble cleaned
membrane-valve
correctly
(see drawing)
Tighten fuel pipes and
exchange fuel valve
Turn adjustable screw to
the left until the engine
runs with a
deep powerful sound
Clean membrane-valve
and membrane
resp. exchange
or assemble correctly
Fault Identified
Fuel supply is irregular
Primer is blown up
Sparks are thrown out
of the exhaust pipe
Possible Cause
Fuel nozzle is choked
or destroyed
by the adjustable screw
Block valve is defective
Resonator or combustion
chamber is choked
with chemical residues
3. pulsFOG unit fogs irregularly or not at all
No pressure in
Tank lid not tight, pressure valve
chemical tank
(green/grey) defective
Dosing nozzle(s) is (are)
too hot
No fogging solution
arrives at dosing
nozzle(s).
No fogging solution
arrives at dosing
nozzle(s).
Idle running (without fogging) of
the engine not longer
than 1/2 minute
Fogging solution conduit (122z),
suction piece (139), fog tap (128z)
or dosing nozzle (149) choked
Viton (Novoprene) tube in
chemical tank is buckled
Remedy
Clean fuel- and ring
slot nozzle or replace
fuel nozzle
Clean block valve, blow
through or exchange it
Clean resonator and
combustion chamber
with cleaning brush
Close tank lid of
chemical tank more
tightly. Exchange laminate
gasket (No. 119) at
passage (No. 115) and
replace pressure valve
Cool down cautiously
dosing nozzle(s) and
nozzle cane(s) with water
Clean suction piece
and/or dosing nozzle
and/or fog tap, blow
through with
compressed air.
Unscrew dosing nozzle
and clean nozzle cane
with a small screw-driver
or a wire piece.
Replace Viton
(Novoprene) tube
Resonator side pulsFOG K-10 SP
with extralong protective grating