1
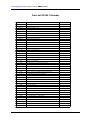
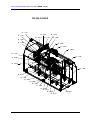
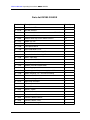
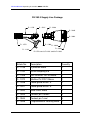
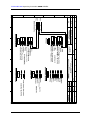
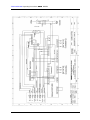
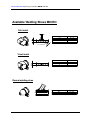
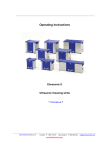
TECHSPAN Operating Instructions MICRO
Techspan Extruder Welder
model "micro"
Operating Instructions
- 28 -
TECHSPAN Operating Instructions MICRO
Article No. / Machine type
:
DX283, Micro
Machine No.
:
...........
Required mains power
:
230 V / 50 - 60 Hz
Overall power consumption :
1500 W
These operating instructions, including all texts, drawings and appendices contained herein,
are copyrighted by DOHLE Extrusionstechnik GmbH. Any reproduction or duplication
and/or forwarding to third parties of these operating instructions or any part(s) thereof is
prohibited without our express written permission.
Please carefully read and understand these operating instructions before starting or
operating your Micro hand welding extruder (Micro HWE) as we are not in any way liable for
damages caused by or associated with improper use. Should you consider modifying your
Micro HWE, please consult us in advance as any modifications made without our approval
render its warranty invalid.
Use the Micro HWE only for its normal intended use.
Ensure availability of these operating instructions at all times to the
personnel operating the Micro HWE.
For service or parts please contact:
TECHSPANGROUP
Australia:
P. 1-800 148 791
F. 1-800 148 799
E. [email protected]
New Zealand:
P. 0800 603 603
F. (09) 827 6596
E. [email protected]
- 29 -
TECHSPAN Operating Instructions MICRO
Attention:
Do not operate the Micro HWE from mains sources with impedances greater than
Zmax. = 0.264+j0.165. Contact your local utilities company to get impedance
data of your mains network if it is not available.
Safety Information :
Operate the Micro HWE only when powered from a mains network protected by a RCCB
(residual current operated circuit breaker) or an isolation transformer, as specified in German
Electricians Association specification VDE 0 100 § 55 .
Do not permit the Micro HWE to become damp or contact water.
When operating the Micro HWE, observe all local and national safety regulations in their
currently valid versions.
Observe all accident prevention regulations in their currently valid versions and applicable
technical regulations for safe and technically proper work procedures.
Observe all applicable parts of Council Directive 92 / 57 / EEC of 24 June 1992.
Information Concerning Use:
DOHLE Micro hand welding extruders are designed in accordance with state-of-the-art
technology and current safety regulations.
However if they are used improperly, safety hazards for users or third parties and/or damage
to machines and other property may result.
Use the Micro HWE only when in technically sound condition and only in accordance with its
intended application purpose as well as these operating instructions.
The manufacturer / supplier cannot be held responsible for damages resulting from
or associated with users’ non-observance of these operating instructions.
Any use of the Micro HWE other than its intended application purpose is prohibited without
the prior approval of the manufacturer / supplier.
Maintenance or other work on the electrical systems of the Micro HWE must be carried out
by qualified electricians only in accordance with accepted technical practice and regulations.
- 30 -
TECHSPAN Operating Instructions MICRO
The Micro HWE may be used by qualified technicians only following thorough training
on the Micro HWE.
Extruders are not intended for use by persons (including children) with reduced
physical, sensory oder mental capabilities or persons with insufficient experience
and/or knowledge unless they are supervised by a person responsible for their safety
or have been instructed in the safe use of the Micro HWE.
Do not permit children to play with the Micro HWE!!
Information Regarding Particular Safety Hazards:
MICRO hand welding extruders may only be held and manipulated by their hand grips
intended for those purposes.
Bare metal parts of the Micro HWE can reach temperatures of up to 350 °C, therefore do
not touch them.
Warning: Heat may be conducted to flammable materials which are not immediately
visible and ignite them.
Safety zone:
Do not point the hot air jet of the Micro HWE towards people, animals or heat-sensitive
objects. Maintain a downstream safety clearance of 2 m to people, animals and heatsensitive objects.
Do not point the hot air jet towards any one spot for an extended period of time.
Operation :
Do not operate the Micro HWE without air supply.
Be certain that the extruder (DX283), the supply line package (DX285), and the E box
(DX284) are properly connected before starting the Micro HWE.
- 31 -
TECHSPAN Operating Instructions MICRO
Working overhead:
When working above head level, wear appropriate safety equipment (helmet, goggles etc.).
Electric Safety :
Power the Micro HWE only from an easily accessible, grounded (earthed) socket outlet.
Before connecting the Micro HWE to a mains outlet, check the voltage of the outlet to be
sure that it is the same as the nominal voltage given on the nameplate of the Micro HWE.
Operate the Micro HWE only when protected by a RCCB (residual current operated circuit
breaker) or an isolation transformer, as specified in German Electricians Association
specification VDE 0 100 § 55 .
Extension Cords:
When using extension cords, be sure that they have at least the following minimum
conductive cross-sectional areas:
Cord lengths up to 18 m: 2.5 mm ²
Cord lengths up to 50 m: 4.0 mm² .
Any extension cords used must be approved by the national electric safety authority for the
site of use and marked accordingly.
Do not operate the Micro HWE if:
-
its power cable or plug are damaged (in this case arrange for repair, by manufacturer or
qualified electricians only), or
-
any of its safety-related components are damaged, or
-
foreign materials or liquids have entered the Micro HWE, or
-
the Micro HWE has been damaged or operates differently than usual.
- 32 -
TECHSPAN Operating Instructions MICRO
Never spray the Micro HWE with water (this can cause short circuiting).
Do not use the Micro HWE in explosive or flammable areas.
Operating the Micro HWE with insufficient care can cause fires.
Setting down the Micro HWE:
When setting the Micro HWE down, always do so on its support surfaces provided for this
purpose to avoid undesired movement or tipping over.
- 33 -
TECHSPAN Operating Instructions MICRO
Starting Up the Micro HWE
General Information:
Observe all safety-related instructions and information given in these operating instructions.
In addition observe all accident prevention regulations and national safety regulations valid in
the country in which the Micro HWE is operated.
Post-Delivery Assembly of Micro HWE
Micro hand welding extruders require only minimum assembly following shipping to your
plant.
Connect the E Box (air and electric feed-in lines) to the extruder.
Screw the included hand grip (if required) onto the extruder.
Welding Shoes
Use the two welding shoe blanks included in the scope of delivery to fabricate the welding
shoes required for the welding seams you intend to make.
Note: When doing this, observe DVS 2207 Guidelines Part 4 (DVS = Deutscher Verband für
Schweißen = German Welding Society).
If you prefer, we can supply two ready-to-use welding shoes instead of the blanks. In this
case please specify with your order the desired seam dimensions and thickness of the
panels to be welded together.
- 34 -
TECHSPAN Operating Instructions MICRO
Installation of Welding Shoe
Welding shoe is only to be changed by manual power. Do not use any tools in order to avoid damage
of the welding shoe.
Caution: Very hot! Can cause burns! – use appropriate gloves.
1) Installation
Clamp collar
Notch
Slot
To install the welding shoe, place it on the die
such that its notch is even with the vertical slot in
the die.
Cylindrical pin
Die
Welding shoe
2) Working Position
90°
Groove
Cylindrical pin
To bring the welding shoe into its working
position, turn it 90° clockwise. The notch in
the welding shoe should now be even with
the groove in the die. The cylindrical pin
retains the components to prevent
decoupling due to melt pressure. Maintaining
this position, tighten and lock the clamp
collar.
3) Removal
90°
Loosen the clamp collar and turn the welding shoe
90° counter-clockwise. The welding shoe is now no
longer arrested and can be removed.
- 35 -
TECHSPAN Operating Instructions MICRO
Available Air Nozzles for Micro HWE
The standard air nozzle supplied with the Micro HWE is a tubular nozzle, Article No. D-1148.
D - 1148 Tubular die Micro
An optional nozzle version is also available, a tubular nozzle with a pivoting tacking nozzle,
Article No. D-1340.
Additional part
D - 1149 Tubular nozzle for
pivoting tacking nozzle
Additional part
D - 150 Pivoting tacking nozzle
D - 1340 Tubular nozzle with pivoting tacking nozzle,
complete unit
- 36 -
TECHSPAN Operating Instructions MICRO
Starting Up the Micro HWE
Observe all safety-related instructions and information given in these operating
instructions.
Do not operate the Micro HWE without air supply. Operating the Micro HWE without air
supply will damage it.
Before plugging your Micro HWE into the mains socket, please check to ensure that:
-
the "HEAT" switch for the heater units is in the "OFF" position,
-
the air supply is properly connected,
-
all electrical connections are properly connected and
-
the drive motor switch is in the "OFF" position.
All DOHLE hand welding extruders are equipped with a patented melt temperature
sensor (a melt-immersed thermocouple located between the screw and the die) and
cold-start lockout protection.
Now plug the power plug of the Micro HWE into a suitable mains socket (230 V, 16 A).
Operate the Micro HWE only from easily accessible grounded (earthed) socket outlets. Air
supply starts automatically when the power plug is plugged into the mains socket. Now flip
the "HEAT" switch on the E Box front panel to the "ON" position .
The Micro HWE now heats up to the temperature setpoints most recently selected.
To change temperature setpoints, please refer to the section of these operating instructions
entitled "Changing Temperature Setpoints" (p. 13).
Do not leave the Micro HWE unattended when in operation.
- 37 -
TECHSPAN Operating Instructions MICRO
Controller Panel – Control
Housing
D - 2113,AIR temp controller
D - 2112,Melt temp controller
D - 2305,Fuse holder
with D - 2304 Fuse 6.3AT
D - 2231,Switch, 2-pole
Display and Operating Controls of E Box Front Panel
Temperature unit
Actual temperature
AL (alarm)
lights up when
alarm output is
actuated
Temperature
setpoint
"Down" key
"Up" key
- 38 -
TECHSPAN Operating Instructions MICRO
Entering Controller Setpoints
All controllers can be changed in their setpoints only and incorporate an electronic lockout
function preventing false entries.
Changing Temperature Setpoints:
The controller simultaneously displays the actual temperature and the temperature setpoint.
To change the temperature setpoint, proceed as follows:
Do not press these keys!
"Down" key
"Up" key
Each time this key is pressed, the setpoint goes
down. If the key is held down continuously, the
setpoint goes down continuously.
Each time this key is pressed, the setpoint
goes up. If the key is held down continuously, the setpoint goes up continuously.
- 39 -
TECHSPAN Operating Instructions MICRO
Processable Resins:
The Micro HWE can be used to process the following thermoplastic resins:
PE, PP, PVC-U, PVDF, ECTFE. Special equipment: PVC-C
Observe all instructions and information provided by the resin manufacturers.
Change in Resin Processed
When you change the resin processed, you must first remove all of the resin last processed
from the Micro HWE. To do this, first heat up the Micro HWE to the selected operating
temperature and remove the welding shoe.
Warning: Take appropriate measures to prevent burns when working on the hot Micro
HWE
Next, purge the Micro HWE for approx. 20 minutes with the new resin. Then install the
replacement die which must be either new or last used with the resin now to be processed.
When interrupting welding work
Do not leave the Micro HWE unattended.
Maintain the air supply to the Micro HWE.
Warning: when processing PVC or PVDF, do not interrupt operation for more than 3 minutes.
Should interruption occur for over 3 minutes or when you are stopping welding work with
either of these resins, remove them from the barrel by purging for approx. 5 minutes with PE
or PP.
- 40 -
TECHSPAN Operating Instructions MICRO
Shutting Down the Micro HWE
Set the Micro HWE down on the integrated support surfaces provided for this purpose.
Flip the "HEAT" switch on the E Box front panel to the "OFF" position. Approx. 2 minutes
later, unplug the power plug out of the socket outlet.
After usage, always clean the nozzles and the welding shoe (refer to page 9 mounting
welding shoe).
Warning: Burns can be suffered when touching bare metal parts, even 15 minutes
after the Micro HWE has been shut down.
Do not apply water or any other materials to accelerate cooling.
Servicing
Unplug the power plug of the Micro HWE from the socket outlet before doing servicing work
of any kind on the Micro HWE.
Servicing may be done by qualified electricians only!
Observe all safety-relevant instructions and information given in these operating
instructions!
Maintenance:
The extruder and air compressor drives are brushless motors and therefore essentially
maintenance free.
Thrust Bearing / Extruder Screw
Every 250 operating hours, the extruder screw should be cleaned and the thrust bearing
replaced (Attention: replace with original DOHLE thrust bearing only, which is filled with hightemperature grease).
- 41 -
TECHSPAN Operating Instructions MICRO
Trouble Shooting
Malfunction
Error No.
Drive motor does not start.
01,02,04,05,06,07,08,09,10,11
Drive motor shuts down.
03,04,05,06,07,08,09
Extruder remains cold.
01,02,04,05,06,07,08,09,12,14
Hot air remains cold.
01,02,05,07,08,09,11,12,14,16
Hot air temperature does not attain
10
setpoint.
Melt temperature does not attain
10
setpoint.
Extruder does not propel
10
melt from die.
42
TECHSPAN Operating Instructions MICRO
Controller Malfunctions
Display on Controller
Error No.
Display does not light up.
01,06,07
Display: S . e r r
12
Display is not stable.
14
Wrong incremental direction on display
15
43
TECHSPAN Operating Instructions MICRO
Possible cause
Resolution
01
No power supply
Connect power supply
02
Incorrect mains voltage
Have mains supply checked by qualified
Error
No.
specialist
03
Extension cord gets hot
04
Defective melt temp thermocouple
Check conductive cross section
Unroll cable drum completely
Replace thermocouple
05
Defective air temp thermocouple
Replace thermocouple
06
Defective melt temp controller
Replace controller
07
Defective air temp controller
Replace controller
08
"HEAT" switch on front panel
Switch to "ON"
in "OFF" position
09
Defect(s) in cable connections
Have checked by qualified specialist
10
Preheating period too short
Allow extruder to heat up.
11
No supply of outside air
Connect outside air intake line
12
Thermocouple damage monitor signal Replace thermocouple
13
Unsuccessful attempt to change
blocked parameter
Have parameter deblocked, by
qualified specialist only
14
Thermocouple malfunction or
loose connections
Check thermocouple
Check connections
15
Improperly connected sensor,
+ and - interchanged
Check connections
- 44 -
D - 0567
- 45 -
D - 1318
D - 1148
D - 1147
D - 1207
D - 1214
D - 1299
D - 1144
D - 1199
5113412
D - 1139
D - 1253
D - 1201
D - 0164
D - 1154
D - 1196
D - 1138
D - 1143
D - 1298
D - 1142
D - 1155
D - 0130
D - 1153
D - 1197
D - 1371
D - 0286
D - 1122
D - 1235
6100295
D - 1146
D - 1202
D - 0907
D - 1203 D - 1305
D - 1122
TECHSPAN Operating Instructions MICRO
DX 283.1 Extruder
TECHSPAN Operating Instructions MICRO
Parts list DX283.1 Extruder
Article No
Description
Quantity
5113127
Mica insulation tube 19x89.5
1
5113412
Heating element 33C Micro
1
6100295
Rubber ring seal
1
D - 0129
Socket head cap screw M4x10 DIN912
3
D - 0130
Socket head cap screw M4x16 DIN912
17
D - 0164
Axial deep-groove ball bearing 51103
1
D - 0286
Spcket head cap screw M3x10 DIN912
8
D - 0567
Cylindrical pin 3x8 DIN7
2
D - 0907
22K potentiometer
1
D - 1122
Cover Micro
1
D - 1138
Resin intake unit Micro
1
D - 1139
Heating-element seal Micro
1
D - 1142
Extruder barrel Micro
1
D - 1143
Extruder screw Micro
1
D - 1144
Drive motor Micro
1
D - 1146
Connector Micro
1
D - 1147
Hot air infeed tube Micro
1
D - 1148
Tubular nozzle Micro
1
D - 1150
Pivoting tacking nozzle
1
D - 1153
Die Micro
1
D - 1154
Spacer ring Micro
1
D - 1155
Melt temp thermocouple Micro
1
D - 1156
Air temp thermocouple Micro
1
D - 1163
Clamp collar 18/9
1
D - 1181
Welding shoe Micro V8
1
D - 1195
SOFTLINE hand grip
1
D - 1196
Deep groove ball bearing 61903 2Z
1
D - 1197
Cylindrical pin 2.5x10 DIN7
1
D - 1199
Headed press-fit bush 5x12 DIN172A
1
D - 1201
Socket head cao screw M4x12 DIN912
4
D - 1202
Push switch on/off IP67
1
D - 1203
Motor control unit Micro
1
D - 1206
Head plate Micro
1
D - 1207
Housing Micro
1
D - 1214
Head-plate gasket
1
D - 1235
Spacer bolt 3.6x7x12
3
D - 1253
Cable plug-in connector Micro
1
D - 1298
Socket head cap screw M4x45 DIN912
4
D - 1299
Flange socket Micro
1
D - 1302
Potentiometer scale Micro
1
D - 1305
on-off adhesive label Micro
1
D - 1307
Cover gasket Micro
1
D - 1318
Thermocouple gasket Micro
1
D - 1371
Mica heating band Micro
1
D - 1390
Spacer washer Micro
1
- 46 -
TECHSPAN Operating Instructions MICRO
DX 283.2 E-BOX
D - 1157
D - 1160
D - 1127
D - 1161.1
D - 1161
D - 1349
D - 1246
D - 1365
D - 1160
D - 3045
D - 3039
D - 0885
D - 1158
D - 1346
D - 2305
D - 2229
D - 1348
D - 2231
D - 1250
D - 0745
D - 0955
D - 1251
D - 1252
D - 0169
D - 2112
D - 2002
D - 2113
- 47 -
D - 1252
TECHSPAN Operating Instructions MICRO
Parts list DX283.2 E-BOX
Article No.
Description
Quantity
D - 0169
Washer 6.4 VZ
4
D - 0745
Nut M6 DIN934
8
D - 0864
Round-head sheet-metal screw 2.9x6.5 DIN 7981
12
D - 0885
Main board II
1
D - 0955
Socket head cap screw M6x8 DIN912
10
D - 1127
Elbow a-a 3/8"
1
D - 1157
Station Micro
1
D - 1158
Front panel Micro
1
D - 1160
Sound absorber G1/2
2
D - 1161
Sound absorber housing Micro
1
D - 1161.1
Sound absorber housing Micro
1
D - 1246
Mains input filter
1
D - 1250
Compressor CB10
1
D - 1251
Rubber pad 20x15xM6i
6
D - 1252
Rubber pad 20x15xM6ixM6a
8
D - 1346
Power supply unit Micro
1
D - 1348
Retaining panel for power supply unit Micro
1
D - 1349
GEKA coupling 1/2", outside threading
1
D - 1365
Reducer 1/2"- 3/8"
1
D - 2002
Plastic cable gland PG9
2
D - 2112
Melt temp controller
1
D - 2113
AIR temp controller
1
D - 2229
Triac 25A
2
D - 2231
Switch, 2-pole
1
D - 2305
Fuse holder
2
D - 3039
Socket insert Micro
1
D - 3041
Contact socket 0.5mm²
4
D - 3042
Contact socket 1mm²
6
D - 3045
Connector housing CHI 10
1
- 48 -
TECHSPAN Operating Instructions MICRO
DX 283.3 Supply Line Package
D - 1159
D - 2321
D - 2298
D - 3043
D - 3044
D - 1306 D - 3046
D - 1372
D - 3040
D - 1162
D-1372 consist D-1261 and 2x D-1366
Article No.
Description
Quantity
D - 1159
Y junction Micro
1
D - 1162
GEKA coupling 3/8"
1
D - 1306
HELUKABEL HK-So Micro
1
D - 1372
Miniflex PU PG21 Micro
1
D - 2298
Cable gland M25x1.5
1
D - 2321
Cable gland M20x1.5
1
D - 3040
Male insert Micro
1
D - 3043
Contact pin 0.5mm²
4
D - 3044
Contact pin 1mm²
6
D - 3046
Plug connector housing Micro
1
- 49 -
TECHSPAN Operating Instructions MICRO
- 50 -
TECHSPAN Operating Instructions MICRO
- 51 -
TECHSPAN Operating Instructions MICRO
Available Welding Shoes MICRO
s
fillet weld
a = s x 0,7
Panel thickness (s)
3-4
5-6
8
10
Article No.
D-1175
D-1176
D-1177
D-1178
Panel thickness (s)
3-4
5-6
8
Article No.
D-1179
D-1180
D-1181
a
s
V butt weld
Round welding shoe
Ø7
Ø9
- 52 -
Article No.
D-1183
D-1184