1
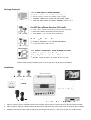
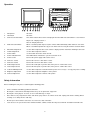
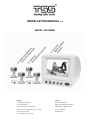
INSTALLATION MANUAL V1.0
MODEL: DIYCAM2B
Monitor
Camera
5.5” High Resolution CRT
Compact Mini Camera
Contrast Adjustment
Sturdy Design with Metal Housing
Two Channel Camera Signal Input
CMOS Black and White Sensor
Automatic Camera Switching (2~20 seconds)
0.5 LUX Sensitivity
350 TV Line Resolution
Swivel Bracket
12-15VDC Operational Voltage
Package Contents
Before commencing installation, please ensure you have all the parts listed above.
Installation
1. Connect cameras to the supplied camera leads and then connect to the camera inputs on the back of the monitor.
2. Connect power supply to a power point and connect the lead to the DC 12V IN connector on the back of the monitor.
3. Optional: Connect AV cable (sold separately) to your AV input on your TV / VCR (refer to your TV/ VCR manual).
1
Operation
1.
Microphone
Not Used
2.
Talk button
Not Used
3.
Camera Selection Switch
This switch controls what camera is displayed when the Mode Selection Switch is set to manual:
Depressed – Display Camera 1
Raised – Display Camera 2
4.
Mode Selection Switch
When set to Auto (button depressed) the cameras will automatically switch between each other.
When set to Manual (button raised) you can switch cameras using the Camera Selection Switch.
5.
Dwell Time Adjustment
Use this dial to adjust the time each camera is displayed, when automatic switching is turned on.
6.
Volume Adjustment
Use this dial to adjust the volume.
7.
Power Switch
Use this button to turn the unit on and off.
8.
Power Indication LED
This LED indicates whether the system is turned on or off.
9.
Power Socket
Connect the power supply cable to this socket.
10. Camera 1 Socket
Connect the camera 1 cable to this socket.
11.
Connect the camera 2 cable to this socket.
Camera 2 Socket
12. Audio Output Socket
Connect the audio part of your AV cable, from your TV / VCR to this socket.
13. Video Output Socket
Connect the video part of your AV cable, from your TV / VCR to this socket.
14. Vertical Hold Adjustment
Use this dial to adjust the vertical hold of the picture if necessary i.e. to stop your picture scrolling.
15. Brightness Adjustment
Use this dial to adjust the brightness of the picture.
16. Contrast Adjustment
Use this dial to adjust the contrast of the picture.
Safety Information
Before installing this unit, please read through the following points:
•
Service should be handled by qualified technicians.
•
Do not place cords from the AC adapter where they can be pinched or stepped on.
•
Do not place heavy objects on cords, or cover cords with rugs or carpet.
•
Never immerse any component in water, and do not spray cleaners of solvents on the unit. Unplug units before cleaning. When
cleaning, use a damp, lint-free cloth only.
•
Do not expose the monitor or camera to excessive heat, cold, or moisture
•
Leave at least a 2” space between the monitor and walls, cabinets and/or other objects to allow air circulation around the unit.
2
Limited Warranty
TSS (Seller) warrants its products to be in conformance with its own plans and specifications and to be free from defects in materials
and workmanship under normal use and service for twelve months from the date of original purchase. Sellers obligation shall be limited
to repairing or replacing, at its option, free of charge for materials or labor, any part which is proved not in compliance with Sellers
specifications or proves defective in materials or workmanship under normal use and service. Seller shall have no obligation under this
Limited Warranty or otherwise if the product is altered or improperly repaired or serviced by anyone other than Seller.
For Warranty Service: Return transportation prepaid with a copy of your purchase receipt and contact details to:
TSS
9 Hannabus Place
McGraths Hill
NSW 2756 Australia.
Seller has no obligation to attend the buyer’s location to retrieve the goods or make repairs onsite.
•
There are no warranties, expressed or implied, of merchant ability, or fitness for a particular purpose or otherwise, which extend
beyond the description on the face hereof. In no case shall seller be liable to anyone for any consequential or incidental damages
for breach of this or any other warranty, express or implied, or upon any other basis of liability whatsoever, even the loss or
damage is caused by its own negligence or fault.
•
Seller does not represent that the products it sells may not be compromised or circumvented; that the products will prevent any
personal injury or property loss by burglary, robbery, fire or otherwise; or that the products will in all cases provide adequate
warning or protection. Customer understands that a properly installed and maintained alarm system may only reduce the risk of a
burglary, robbery, or fire without warning, but it is not insurance or a guarantee that such will not occur or that there will be no
personal injury or property loss as a result.
•
Consequently, seller shall have no liability for any personal injury; property damage or other loss based on a claim the product
failed to give any warning. However, if seller is held liable, whether directly or indirectly, for any loss or damage arising under this
limited warranty or otherwise, regard less of cause or origin, seller'
s maximum liability shall not in any case exceed the purchase
price of the product, which shall be the complete and exclusive remedy against seller.
This warranty replaces any previous warranties and is the only warranty made by the Seller on this product. No increase or alteration,
written or verbal, of the obligations of this Limited Warranty is authorised.
HELDESK: Phone 02 4577 4708
9am – 5pm Mon- Fri
3