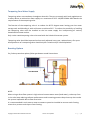
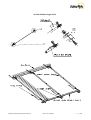
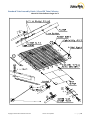
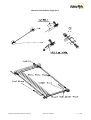
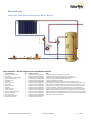
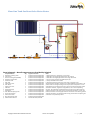
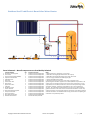
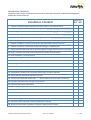
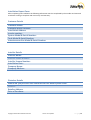
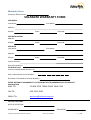
1
Solar Hot
Water
Installation Manual
Systems
Providing Insight into hot water, solar systems and various components used
within a SolarArk Solar Hot Water System. This is a confidential document for
SolarArk representative use only. This document is to be taken as a
comprehensive introduction into solar heating. This document is for the use
of SolarArk accredited installers only.
July 2012
Table of Contents
Introduction to Solar Water Heating ....................................................................................................................5
Key Features .........................................................................................................................................................6
Tempering Your Water Supply .............................................................................................................................7
Boosting Options ..................................................................................................................................................7
Gas Boosting .........................................................................................................................................................8
Water Flow ...........................................................................................................................................................9
Electric Boosting ...................................................................................................................................................9
Water Delivery & Recovery Rates ........................................................................................................................9
Local Standards.................................................................................................................................................. 10
SolarArk Accreditations ..................................................................................................................................... 10
SolarArk System Compliance ............................................................................................................................. 10
Authorised Installers.......................................................................................................................................... 11
Safety Precautions and Legionella..................................................................................................................... 11
Pressure and Temperature Control and Relief .................................................................................................. 12
Water Quality .................................................................................................................................................... 12
Corrosion ........................................................................................................................................................... 13
Freeze protection and Snow Loading ................................................................................................................ 13
Hail Resistance ................................................................................................................................................... 13
Wind Stress ........................................................................................................................................................ 13
Lightning Protection .......................................................................................................................................... 14
Collector Dimensions & Weights ....................................................................................................................... 14
Roof Structural Integrity .................................................................................................................................... 14
Stagnation and Excess Heat............................................................................................................................... 14
Water Boiling Point............................................................................................................................................ 16
Automatic Air Eliminator ................................................................................................................................... 16
Piping Connection and Valves ........................................................................................................................... 16
Storage Tanks .................................................................................................................................................... 19
Galvanic Reaction .............................................................................................................................................. 19
Safety Reminders............................................................................................................................................... 19
Tanks – Stainless Steel ....................................................................................................................................... 20
Tanks – Vitreous Enamel (Glass Lined) .............................................................................................................. 20
Safety Drip Tray ................................................................................................................................................. 21
Gas Boosted Storage Tank ................................................................................................................................. 21
Copyright © SolarArk Installation Manual
version 4.6 July 2012
P a g e |2
Basic System schematic ..................................................................................................................................... 22
Collector Positioning.......................................................................................................................................... 23
Storage Tank Location ....................................................................................................................................... 24
Pipe Insulation ................................................................................................................................................... 24
Installation Procedure ....................................................................................................................................... 24
Mounting frame ................................................................................................................................................ 24
Manifold and Bottom Track Attachment .......................................................................................................... 25
Manifold and Bottom Track Attachment Process ............................................................................................. 25
Installation Planning .......................................................................................................................................... 26
Positioning Manifold ......................................................................................................................................... 26
Attachments to Roof Frame .............................................................................................................................. 26
Wind Loading ..................................................................................................................................................... 27
Snow Load ......................................................................................................................................................... 28
Tiled Roof Attachment....................................................................................................................................... 28
Colorbond/Zincalume/Galvanised Corrugated Roof ......................................................................................... 29
Asphalt Tiled Roof.............................................................................................................................................. 30
Flat Roof Installation (Adjustable Frame) .......................................................................................................... 30
Adjustable frame Front Track ............................................................................................................................ 30
Adjustable frame Round Feet Anchoring .......................................................................................................... 30
Adjusting Frame Angle ...................................................................................................................................... 31
Collector Plumbing ............................................................................................................................................ 31
System Filling and Air Purging ........................................................................................................................... 32
Draining Solar Collector ..................................................................................................................................... 33
Tempering Valve ................................................................................................................................................ 33
Flow Control Valve............................................................................................................................................. 34
Automatic Air Eliminator ................................................................................................................................... 34
Circulating Pump ............................................................................................................................................... 35
Controller Function & operation ....................................................................................................................... 37
Controller Temperature Sensors ....................................................................................................................... 38
Pump and Controller Box .................................................................................................................................. 39
System Start Up ................................................................................................................................................. 39
Installation Reference Guide ............................................................................................................................. 40
Troubleshooting ................................................................................................................................................ 41
Troubleshooting Guide ...................................................................................................................................... 42
Copyright © SolarArk Installation Manual
version 4.6 July 2012
P a g e |3
Installation Instructions ..................................................................................................................................... 45
Flat Roof Frame Assembly Guide-30 Tube Collector ......................................................................................... 49
Standard Tubes Assembly Guide -30 Tube Collector ........................................................................................ 53
Flat Roof Frame Assembly Guide-10 and 20 Tube Collector ............................................................................. 55
Standard Tube Assembly Guide -10 and 20 Tube Collector .............................................................................. 58
Bill of Materials.................................................................................................................................................. 60
Glass Line Electric Boost ................................................................................................................................ 60
Glass Line Gas Boost ...................................................................................................................................... 61
Stainless Steel Electric Boost ......................................................................................................................... 62
Stainless Steel Gas Boost ............................................................................................................................... 63
Installation Checklist.......................................................................................................................................... 64
Installation Report Form.................................................................................................................................... 65
Customer Details ............................................................................................................................................... 65
Installer Details .................................................................................................................................................. 65
Distributor Details ............................................................................................................................................. 65
SolarArk Maintenance ....................................................................................................................................... 67
PTRV................................................................................................................................................................... 67
Glass Breakage................................................................................................................................................... 67
Replacement of Broken Tubes .......................................................................................................................... 67
Unpacking New Tubes ....................................................................................................................................... 67
Evacuated Tube Installation .............................................................................................................................. 69
Insulation Inspection ......................................................................................................................................... 69
Cleaning Of Solar Collector ................................................................................................................................ 69
Other System Components ............................................................................................................................... 70
Precautions and Warnings................................................................................................................................. 70
Warranty Warranty Conditions ......................................................................................................................... 71
Warranty Exclusions .......................................................................................................................................... 72
Component Warranty........................................................................................................................................ 74
SolarArk Warranty Claim Procedure ................................................................................................................. 76
Disclaimer .......................................................................................................................................................... 77
SolarArk Frequently Asked Questions ............................................................................................................... 78
Copyright © SolarArk Installation Manual
version 4.6 July 2012
P a g e |4
Thank you for your decision to purchase a SolarArk Evacuated Tube
Solar Hot Water System.
The content of this manual provides detailed information on
maintenance, troubleshooting, safety precautions and warranty that
should be thoroughly read and adhered to following installation.
Should you have any questions regarding the information contained,
please contact SolarArk on Ph: 1300 760 966 for support.
Introduction to Solar Water Heating
The design of the cylindrical evacuated tubes allows maximum absorption of the sun’s energy to
convert it to heat.
The cold water from the bottom of the storage tank is pumped up to the insulated manifold of the
solar collector, which passes through the heat exchanger. It absorbs the heat and is returned back
to the storage tank.
The controller measures the differential temperature between the water supply from the bottom of
the tank and the water return from the collector to maintain the set temperature within the
storage tank.
The circulating pump operates intermittently throughout the day to maintain maximum hot water
output and minimise energy consumption.
Copyright © SolarArk Installation Manual
version 4.6 July 2012
P a g e |5
Key Features
SolarArk utilizes copper, aluminium and titanium as part of a three target film technology.
This provides excellent heat retention that exceeds other standard tubes by more than 12%.
The diameter of the heat exchanger has been
specifically designed to maintain low pressure drop.
High density Rockwool insulation is used to ensure
maximum solar heat gain by minimising the amount of
heat loss even in cold temperatures.
The solar controller will maintain the temperature at the bottom of the tank to a pre-set
temperature of 65°C to 70°C. The on/off differential settings of the controller are designed
to ensure optimum pump cycling as the water in the manifold heats up. If the collector
reaches 8°C hotter than the tank the controller turns the circulating pump on, and off again
once the temperature decreases to 2°C.
SolarArk solar collector tubes and heat exchanger are individually tested for vacuum and
pressure to guarantee high quality and performance.
The tubes are designed to withstand hail and high winds, have long lasting performance and
are cheap and easy to replace if damaged.
The complete system is lightweight for easy installation and the stainless steel frame is
resilient to corrosion.
SolarArk are proud to provide a 15 year warranty on their complete solar collector.
Copyright © SolarArk Installation Manual
version 4.6 July 2012
P a g e |6
Tempering Your Water Supply
Tempering valves are mandatory throughout Australia. They are to comply with local regulations as
a safety device to reduce hot water supply to a maximum of 50°C. AS/NZS 3500.4:2003 details the
requirements of the tempering valve.
The function of the tempering valve is to reduce the 65-75 degree water leaving your hot water
storage tank and blending it with cold water to achieve 50°C .To reduce the possibility of scalding
the tempering valve must be installed to the hot water supply line incorporating all sanitary
household hot water outlets.
Only a solar rated tempering valve to be used with the SolarArk hot water system.
Tempering valve should be inspected and correctly adjusted every year, replaced every five years.
All adjustments of a tempering valve should only be carried out by a licensed plumber.
Boosting Options
For further procedures please follow gas booster model instructions.
Gas Boosted
NOTE:
When using a direct flow system in high mineral content water areas (hard water), scale may form
in the solar loop reducing collector performance and increasing pressure drop that may also render
the system inoperable due to flow restriction.
It is recommended in such areas a water treatment system be installed to remove scale forming
minerals or prevent scale layers from forming.
Copyright © SolarArk Installation Manual
version 4.6 July 2012
P a g e |7
During periods of low solar contribution, gas or electric boosting is required to maintain 60°
temperature.
Gas Boosting
The instantaneous gas booster is activated if the water passing through is less than 55°C. The gas
booster will automatically turn off when boosting is not required, therefore increases energy
efficiency.
The gas booster is designed for outdoor installation and can be mounted on the storage tank or on
the wall within a short distance of the storage tank. For indoor installation an indoor flued model
can be used. If wall mounting is used insure that the piping from the storage tank to the gas booster
is as short as possible and well insulated without any exposed section.
Points to Note:
The gas booster operates when there is a minimum of flow rate of 2.4 l/m of hot water
flowing through the booster. The use of water saving devices that have
less than 9lpm flow rate or that have restrictors may interfere with the
operation. To ensure operation, open the hot tap fully to check if the
gas booster comes on.
The S20 gas booster requires a minimum of 120 KPa water pressure
and the S26 requires a minimum of 160 KPa water pressure to achieve
the maximum flow rate and optimal function. If the pressure is less
than the required pressure, a water pressure pump should be installed.
Instantaneous gas booster electronic temperature controllers will not work with SolarArk
systems and are not to be used.
Copyright © SolarArk Installation Manual
version 4.6 July 2012
P a g e |8
Water Flow
S21 or S26 hot water gas boosters have limited hot water flow due to the flow rate of the gas
booster (21 or 26 litres per minute).
To ensure that your instantaneous unit functions effectively, it is advisable to use a AAA rated
showerhead with a minimum flow of 9 l/m. It is also recommended to periodically check
showerhead for any debris or deposit built-ups as this may affect water flow and temperature.
Model Number
Model Name
Factory Default Temp
°C
S20
S26
70
70
Dune
Colour
120
Min
Water Pressure (kPa)
160
1000
Max
Min
11.3
14.7
Max
Min
125
10.9
188
13.8
Flow Rate 25°C Rise (lpm)
Max
Min
125
16
188
24
Flow Rate Max (lpm)
Max
20
26
Connection Sizes Gas/Hot/Cold
(mm)
Gas Rate LPG (Mj/hr)
Gas Rate NG (Mj/hr)
20/20/20
Electric Boosting
An electric boosted water cylinder is supplied with a 3.6kW
electric boosting element as standard. The thermostat is set
to 60°C. If the solar contribution is low, the electric boosting
element will activate to compensate for heat loss.
Generally, the required heating time would occur overnight
during the off-peak Tariff. If off-peak is not available, the
continuous Tariff will require an automatic timer setting to
be activated early evening or overnight when solar radiation
is at its lowest. Depending on the water usage pattern the
timer can be operated manually to activate boosting as you need it to avoid running out of hot
water, however it may take 3-4 hours to heat your water.
Water Delivery & Recovery Rates
Delivery /
Recovery Rate
Gas Boosted
250L - S21
Available Water
Delivery in First
Hour ( Litres)
Hot Water
Recovery for 50⁰C
rise (litres)
Copyright © SolarArk Installation Manual
Electric Boosted
315 – S21
315L – S26
S160L
S250L
S315L
873
936
1089
210
330
395
609
609
762
80
80
80
version 4.6 July 2012
P a g e |9
Local Standards
Installation must be completed in accordance with the requirements of AS/NZS 3500.4
(AS/NZS3500.4.2 “National Plumbing and Drainage Code Hot Water Supply Systems – Acceptable
Solutions”), or in New Zealand, Clause G12 of the New Zealand Building Code, as well as any
relevant local standards and regulations.
SolarArk Accreditations
BSI Benchmark Certification is an Australian Company originally established in 1993 to provide
independent certification services to companies wishing to achieve formal recognition of their
management systems. ISO 9001, QS-9000 and ISO 14001 and Product Certification.
Accreditation by JAS-ANZ also implies that companies approved by BSI Benchmark Certification is
recognised and accepted in each country where JAS-ANZ has signed a Memorandum of
Understanding with other National Accreditation Board.
The Institute for Thermodynamics and Thermal Engineering (ITW) has been working in thermal
solar energy since the early 1970s. In 1993 the Research and Testing Centre for Thermal Solar
Systems (TZS) was established. TZS is the largest testing centre for solar thermal components and
systems in Europe. TZS has long standing established experience in testing the full spectrum of solar
thermal experience in testing the full spectrum of solar thermal products as well as in conducting
research and development projects with partners from research organisations and industry.
SolarArk System Compliance
SolarArk solar hot water system approved to AS/NZS 2712:2007 Solar and Heat Pump Heaters
Design and Construction. The system is designed to allow stagnation when tank maximum
temperature is reach without dumping a large amount of water from the TPRV.
All SolarArk evacuated tubes solar collectors are modelled to meet the following standards and
requirements for thermal performance, energy consumption calculations, potable water
suitability.AS/NZS 2535, AS/NZS 4234:1994, AS/NZS 4020:2005.
All electric and gas storage water heaters are manufactured to Australian Standards AS 1056.1 and
AS 3142.
SolarArk solar collector has been tested to pass the frost tolerance to -15°C level 2 frost protection.
Copyright © SolarArk Installation Manual
version 4.6 July 2012
P a g e | 10
Authorised Installers
All installation of SolarArk solar hot water systems must be installed and checked by a SolarArk
authorised licensed plumber who holds all relevant qualifications.
Any installation, inspections, repairs or maintenance that is required should only be carried out by a
person authorised by SolarArk Pty Ltd.
Safety Precautions and Legionella
In order to kill Legionella bacteria it is an Australian standards requirement (AS3498-2009) that the
hot water in the storage tank be heated up to at least 60°C on a regular basis, either while in the
storage tank (solar electric) or to 70°C by a post boost (gas continuous flow).
Bottom element electric: The hot water storage tank must reach 60°C at least once a week. The
element should be activated at least once weekly during winter months and overcast weather. The
element is located at the bottom of the tank.
Mid element electric: The hot water storage tank must reach 60°C at least once daily. The element
should be activated daily during winter months and overcast weather. The element is located in the
middle of the tank, lowering boosting costs by boosting half of the tank until the solar unit kicks in
again.
Gas boosted systems: Gas booster must be left on at all times. It will only boost the water if it is less
than 60°C.
Copyright © SolarArk Installation Manual
version 4.6 July 2012
P a g e | 11
Pressure and Temperature Control and Relief
The pressure & temperature Relief Valve is supplied with the water heater
from the manufacturer. The valve must be installed into the socket marked
“RELIEF VALVE”. No hot water storage tank should be operated without the
PTRV fitted and functional. The PTRV should be checked for correct
operation or replaced at intervals not exceeding 5 years. .
The lever on the relief valve must be lifted and lowered very slowly to
operate the valve at least once every 6 months. Failure to operate the relief
valve at least once every six (6) months may result in the water heater
exploding.
The relief valve and its drain outlet pipe must not be sealed or blocked.
Water Quality
All hot water storage tanks have been manufactured to suit water conditions of most Australian
metropolitan supplies. Water supplies outside of the specifications specified can have a damaging
effect on the water heater and its longevity. Information can be obtain from your local water supply
authority regarding water quality details
Water Acceptability Composition Range for Stainless Steel Tanks
Water Quality
Total Dissolved Solids
Total Hardness
Chloride
Sodium
Magnesium
PH Levels
Electrical Conductivity
<600 mg/litre or ppm
<200 mg/litre or ppm
<250 mg/litre or ppm
<150 mg/litre or ppm
<10 mg/litre or ppm
6.5 – 8.5
850 µS/cm
Water Acceptability Composition Range for Vitreous Enamel Tanks
Water Quality
Total Dissolved Solids
Total Hardness
Chloride
Sodium
Magnesium
PH Levels
Calcium
Iron
<600 mg/litre or ppm
<200 mg/litre or ppm
<300 mg/litre or ppm
<150 mg/litre or ppm
<10 mg/litre or ppm
6.5 – 9.5
20 mg/Litre
1 mg/litre
The water heater is designed for use in areas where the Total Dissolved Solids (TDS) content of the
water supply is less than 2500 mg/L. In areas where the TDS exceeds 600mg/L it is possible that the
magnesium alloy anode (supplied in glass lined heaters only) may become over reactive.
Copyright © SolarArk Installation Manual
version 4.6 July 2012
P a g e | 12
To alleviate this, the magnesium alloy anode should be replaced with an aluminium alloy anode,
available from your local plumbing supplier. Water can also be very corrosive, the measure of this
is the saturation index, if the water saturation index is greater than 0.40 an expansion control valve
should be fitted and where the index is greater than 0.80 the water heater installed should be a
Hard Water Model. Please consult SolarArk for advice if required. In regions with “hard” water
(<200mg/L or ppm), it is advisable to install a water softening device. This will ensure the long term
efficient operation of the solar collector.
Corrosion
When high concentrations of chloride are present, both copper and stainless steel are susceptible
to corrosion. Therefore, the use of this system to heat chlorinated pool or spa water will void
warranty. SolarArk will not warrant any equipment failure due to corrosion related damage.
Chloride levels present in most reticulated public potable water supplies are safe for use in the solar
collector provided there is no use of bore waters in the reticulated supply.
Freeze protection and Snow Loading
The solar collector is protected by a frost protection controller. Evacuated tubes are impenetrable
against damage due to cold weather. A low manifold temperature pump circulation feature turns
the pump on if the manifold temperature drops to 4°C and turns off again when the temperature
rises to 6°C.In areas prone to heavy snow fall, the solar collectors should be installed at an angle of
50° or greater to promote snow sliding off the tubes. Each tube is tested to withstand >50kg of
loading.
Water is the most suitable heat transfer fluid in regions where freeze protection is not a concern.
A closed loop system should be used in regions subject to freezing temperatures, a food grade heat
transfer fluid to be used normally polypropylene glycol or glycerine based product.
POWER TO THE CONTROLLER SHOULD NEVER BE INTERRUPTED AS IT IS ESSENTIAL FOR THE
OPERATION OF THE FREEZE PROTECTION FEATURE.
WARRANTY WILL BE VOID IF DAMAGE OCCURS DUE TO POWER SUPPLY INTERRUPTED
Hail Resistance
The SolarArk evacuated tubes are able to handle significant impact from hail of up to 25mm/1” in
diameter. The ability of the evacuated tubes to withstand impact from hail is greatly influenced by
the angle of impact and so installing collectors at low angles will reduce their impact resistance.
Wind Stress
When installing the SolarArk collector please consider the following points: wind resistance caused
by high strength winds and the stress applied upon attachment points due to these winds. The
Copyright © SolarArk Installation Manual
version 4.6 July 2012
P a g e | 13
pitched roof frame and angle frame are designed to withstand high wind speeds without damage.
However the roof attachment points may not be as strong. For areas with the possibility of high
winds, additional arrangements for reinforcing attachment points should be considered.
Lightning Protection
Where the solar collector is installed in an area that is prone to lightning it is recommended to earth the
solar collector copper circulation loop to aid in avoiding lightning related damage and safety issues,
installers should refer to the local building codes and regulation regarding lightning protection and
grounding.
Collector Dimensions & Weights
Collector Size:
Gross Weight (Empty):
Absorber Area:
Aperture Area:
Gross Area:
Fluid Capacity:
Overall Width:
Overall Height:
Overall Length:
Distance between Inlet
and Outlet
10 tubes
45 Kg
0.8m²
0.94m²
1.57m²
754ML
810mm
155mm
2000mm
930mm
20 tubes
78Kg
1.6m²
1.88m²
2.96m²
1546ML
1560mm
155mm
2000mm
1680mm
30 tubes
115 Kg
2.4m²
2.82m²
4.35m²
2338ML
2310mm
155mm
2000mm
2435mm
Roof Structural Integrity
Collector weight is minimal and will not cause excessive weight stress on the roof structure. No
reinforcement of the roof structure is required for flush mounted collectors. The SolarArk collectors
weigh approximately 78kg for 20 tubes and 115kg for 30 tubes.
If installing at a raised angle (adjustable frame) in a high wind region, high winds will cause vertical
and horizontal loads on the frame. Please ensure that the roof structure is able to withstand such
forces.
Stagnation and Excess Heat
Evacuated tube solar systems have the ability to heat water well above 100°C during periods of high
solar radiation and minimal hot water usage. The controller has an inbuilt guard against hot water
entering the storage tank. Once the bottom sensor has reached the pre-determined setting of 65°C,
or 70°C (known as TOPOUT) power is no longer sent to the pump. This is needed as it is a
requirement that heat in storage tanks does not exceed 80°C. During these periods of high solar
contribution and minimum hot water usage, the solar collector can generate more heat than is
Copyright © SolarArk Installation Manual
version 4.6 July 2012
P a g e | 14
required at these times, the controller will turn off the pump to prevent the tank from overheating
and the hot water tank temperature will not increase further, when water is no longer circulating
through the solar collector that would cause stagnation due to the energy still getting absorbed and
not getting used, the temperature will rise in the manifold there for pressure will start to build-up.
In some cases a crackling noise may be heard in the pipes when the hot water tap is opened if
steam had formed in the solar collector. This noise may occur recurrently if the cold water supply
pressure is low <400 KPa. Installation of a pressure pump may help reduce the occurrence of this
noise.
Not having the pump cycling will cause stagnation in the manifold. This could potentially occur
during periods of high radiation and little to no water usage in the home. Throughout these
conditions the manifold will reach around 160°C. At this temperature the water does not boil as it is
under pressure, the pressure relief valve on the tank is set to 850kPa. This means that the water
would have to reach roughly 180°C before any steam could form. Whenever the hot water in the
home is used pressure in the system will drop equalizing with the water supply pressure which is
normally between 500 to 800 kpa depending on your local water pressure supply and the pressure
limiting valve. Due to that pressure drop steam may form.
If the pump stops running due to power blackout or pump failure, a Pressure Temperature Relief
Valve (PTRV) is incorporated into the hot water storage tank as a safety precaution which releases
high temperature water and steam from the tank should it reach 95°C or 850KPa. The PTRV must
have a downward facing copper pipe connected, running expelled water to an appropriate drainage
point. It is important to ensure the relief valve or drain tube not be sealed or blocked. A regular
maintenance check at six month intervals is recommended.
During stagnation conditions or for households with a cold water delivery <400kPa, large amounts
of steam may be formed in the collector when the hot water tap is opened causing a loud
“banging” sound within the copper pipes and the storage tank. Installing a pressure booster pump
that can achieve >400kpa pressure is recommended. An air eliminator should be installed on the
water return outlet of the solar collector to help reduce or eliminate this problem. This is applicable
for installations with main water supply or tank water. A check valve must also be installed on the
cold main line before the tank.
If noises is heard when hot water is not used that may indicate a fault with the cold water supply
check valve (duo-valve) or check valve not installed. A check valve must be installed to allow the
system to operate at high pressure and prevents hot water flowing back down the cold water inlet
line damaging low temperature rated components.
SolarArk can provide a closed loop system for application with low water pressure situation to
eliminate the noisy piping, as a closed loop system is not governed by the water supply pressure it
has a constant pressure with an independent pressure relief valve rated at 850kpa. Solar loop has
an operating pressure between 650 to 750kpa.
Copyright © SolarArk Installation Manual
version 4.6 July 2012
P a g e | 15
Water Boiling Point
When operating a hot water system under pressure the boiling point at which the water will turn to
steam will change as per the following chart.
Gauge Pressure KPa
Boiling Point °C
0
100
200
300
400
500
600
700
800
850
100
120
133
143
152
159
165
170
175
177
Automatic Air Eliminator
An automatic air eliminator should be installed on the solar collector to provide an escape point for
any air that may be trapped in the solar loop supply and return lines. It will aid in preventing the
solar collector from overheating in high levels of solar gain and low water usage also in the event of
a power outage.
An automatic air eliminator should also be installed for systems with low water pressure supply and
systems with water supply booster pumps to aid in venting steam from the solar collector manifold.
Piping Connection and Valves
Only well insulated copper piping to be used for solar flow and return lines as per AS/NZS
3500.4:2003 Section 8 details insulation requirements. Any material used for the solar loop must be
appropriately rated for high temperatures and operating pressures that a SolarArk system capable
of producing in normal and high stagnation conditions. Fitting should be temperature rated to
>180°C. Component within a 50cm of collector inlet or out let should be >230°C rated.
Always use copper or brass fittings for the installation of a SolarArk solar hot water system never
use plastic olives or synthetic piping.
Brazing copper piping directly to manifold ports is not recommended as brazing may damage
rubber components on solar collector header .do not over tighten or twist the copper piping on
manifold that could also cause damage only use brass compression fittings supplied.
There are two 22mm ports on the manifold of the solar collector both ports have a 6mm sensor
well located near them that can be used for inlet or outlet. The roof sensor should be installed on
manifold outlet (solar return) an air eliminator also to be installed on solar return.
Copyright © SolarArk Installation Manual
version 4.6 July 2012
P a g e | 16
There are two compression fittings supplied with the solar collector manifold 22mm compression to
½ inch flare connection if connecting multiple collectors for commercial applications a 22mm
compression to ¾ BSP brass fittings may be used. Only Australian standard approved brass fittings
should be used. For domestic heating application up to 60 tubes DN 15 / ½” copper piping can be
used.
For applications above 60 tubes or with a pipe run longer the 40m of combined flow and return
lines it is recommended the use of DN18 / 3/4” copper piping.
Pipe Sizing
Recommended Total Pipe Run Flow +
Return
DN 15
DN20
Up to 40 Metres
Up to 60 Metres
Applications with the use of multiple collectors a specified pipe size should be used based on the
flow rate and pressure props of the system.
Flexible connection should always be used when connecting multiple collectors to avoid damage
due to expansion and contraction of the copper header with temperature changes.
Flow control valve should be used to insure the correct solar loop water flow. The system
performance is based on the correct water flow passing through the solar collector and returning to
the hot water storage tank.
An expansion control valve (ECV) can be installed as it limits the maximum pressure in pressurised,
unvented water heating systems by reliving excess pressure to an approved drain point.700KPa
rated ECV should be used.
Expansion control valve to be installed on the cold water supply into the hot water storage tank.
One of the benefits of installing an expansion control valve, it releases pressure at the cold water
supply saving energy by not purging heated water. It is mandatory to install an expansion control
valve in some states in Australia where the water heater is installed in scaling water area. It is also
mandatory to install a non return and an isolating valve for the installation of pressurised water
heaters throughout Australia.
A combined non return isolating valve can be installed to prevent the backflow of water from a
water heater to the main cold water supply. This serves the dual purpose of protecting the mains
supply from contamination and the loss of water that has already been heated. The isolating valve
component is useful as a means of controlling inlet water supply to unvented storage water
heaters.
A pressure limiting valve of 500-550KPa must be fitted to reduce the main water supply pressure to
protect the storage tank from damage, failure to install a pressure limiting valve will void the
warranty .
Copyright © SolarArk Installation Manual
version 4.6 July 2012
P a g e | 17
For closed loop system an expansion vessel/tank should always be used to prevent the system from
dumping the heat transfer fluid. For domestic use of up to 90 tubes a 10-12L expansion vessel
should be used. The expansion vessel will accept system pressure increase; refer to expansion
vessel manufactures for correct sizing on large systems.
Copyright © SolarArk Installation Manual
version 4.6 July 2012
P a g e | 18
Storage Tanks
The storage tank is typically an insulated metal tank with an electric heating element in the bottom
or middle of the tank. Gas boosting is also available as an alternative option to electric boosting.
The storage tanks promote thermal stratification that prevents incoming cold water from mixing
with the hot water at the top of the tank.
Gas boosted systems provides optimum energy conservation, as it is only required when the
temperature in the tank falls below 55°C.
A thermostatically controlled electric element in the bottom of the cylinder can be connected to full
tariff or "off Peak" power supply. The heated water rises up the cylinder by natural convection to
the top where it is ready for use. As hot water leaves the storage cylinder, it is replaced by cold
water, which enters at the bottom of the cylinder. SolarArk recommends flushing the water heater
at regular intervals as advised by your licensed plumber flushing will clear any build up solids that
have escaped the line strainer. The tank may be used either indoor or outdoor and should be
installed by and located in accordance with your licensed plumber’s recommendation, but usually
close to the outlet where there is the greatest usage of hot water. Installation must comply with
Australian Standard AS 3500.4 and any local authority regulations.
Galvanic Reaction
Some metals can cause corrosion when in direct contact with one another, Zinc or Zn/AL galvanised
components should not be installed in direct contact with the collectors’ stainless steel frame.
Always use stainless steel roofing screws along with the rubber frame mounting blocks provided, if
using different metals to fix the collector in place always use neoprene washers for contact
separation.
Safety Reminders
•
•
•
•
•
Water heater and control box access covers will expose 240V wiring high risk of
electrocution only to be removed by authorised personnel.
Care should be taken when handling evacuated glass tubes, if knocked or dropped they may
break. Do not expose the tube to direct sunlight during installation, as the heat pipe will get
very hot in just a short exposure to sunlight.
Always wear leather gloves and safety glasses at all times during installation and
commissioning
Solar pipes and fittings can reach temperatures of over 100°C extreme care should be taken
when installing or servicing SolarArk solar hot water systems
If hot water system is not used for two weeks or more, a quantity of highly flammable
hydrogen gas may accumulate in the water heater. To discharge this gas safely, it is
recommended to turn on a hot water tap for several minutes until all gas discharge is
ceased. A sink, basin or bath outlet should be used. DO NOT USE THE DISHWASHER, CLOSE
Copyright © SolarArk Installation Manual
version 4.6 July 2012
P a g e | 19
•
WASHER.DRYER OR ANY OTHER APPLIANCE. During this procedure there must be no,
SMOKING OPEN FLAMES OR ANY ELECTRICAL APPIANCES OPERATING NEARBY. If hydrogen
is discharged through a tap similar to air escaping noise will be herd.
All safety percussion should be taken before any parts of the installation are started.
Tanks – Stainless Steel
Stainless steel storage tank can be heated using “full” or "off-peak" Tariff electricity.
Long life marine grade stainless steel capable of handling high temporisers up to
95°C
The latest aspects of design and material selection include:
Hi-grade stainless steel cylinder
Control of thermal stratification
Dual Positive Domed Cylinder resulting in optimum location of element(s)
water supply and delivery and flushing-through of suspended solids
Highest level of insulation due to the use of a polymeric external casing
combined with thick polyurethane insulation
Tanks – Vitreous Enamel (Glass Lined)
The Vitreous Enamel (glass lined) tanks are an efficient option for water
heaters. Some features include:
Glass lined tanks have a magnesium sacrificial anode that ensures
potable water quality. Suitable to poor water quality areas as an
aluminium anode can be installed to extend the life of the tank.
The release of hydrogen can sometimes occur if the water is not used for
long periods of time. To combat hydrogen built up, all water heaters
have a pressure and temperature release (PTR) valve fitted to Australian
Standards.
If the water has been stagnant for two or more weeks, pull the lever on
the PTR valve to “purge” the system for 30 seconds. This will expel any
hydrogen built up. Caution need to be taken when purging as the water
will be HOT.
Copyright © SolarArk Installation Manual
version 4.6 July 2012
P a g e | 20
Safety Drip Tray
The safety tray is a requirement for all water heaters to protect property from damage. As per The
National Plumbing Code AS/NZS 3500.4:2003. The safety tray must comply with Clause 4.4 and Sub
Clauses 1 to 5 of the Code.
Gas Boosted Storage Tank
The gas boosted hot water storage tank is a standard tank with an instantaneous gas booster that
can be attached to the tank or mounted on the wall close by the gas booster is a Type-A appliance.
The gas boosters are available for connection to either Natural Gas (NG) or Liquefied Petroleum Gas
(LPG).
The S20, S26, and S 32 solar gas boosters are pre-set to 70˚C all general work and safety
requirements should be followed as per relevant codes and standard.
Wall Mounted
Copyright © SolarArk Installation Manual
Stainless Steel
version 4.6 July 2012
Glass Lined
P a g e | 21
Basic System schematic
System Schematic-Electric Boosted Stainless Steel Tank
Parts Schematic – Not all components are Provided by SolarArk
a
b
c
d
e
f
g
h
i
j
k
l
m
n
o
p
q
Component Name
Non-Return Isolating Valve
Line Strainer
Pressure Limiting Valve (500kPa)
Expansion Control Valve
Cold Water Inlet
Solar Flow
Lower Sensor Port
Solar Return
Upper Sensor Port
PTR Valve
Hot Water Supply
Electric Element
Solar Rated Tempering Valve
Pump and Controller
Flow Control Valve
Brass Swing Check Valve
SolarArk Solar Collector
Qty
1
1
1
1
1
1
1
1
1
1
1
1
1
1
1
1
1
Supplier: Part Code
Australian Standards Approved
Australian Standards Approved
Australian Standards Approved
Australian Standards Approved
Australian Standards Approved
Australian Standards Approved
Australian Standards Approved
Australian Standards Approved
Australian Standards Approved
Australian Standards Approved
Australian Standards Approved
Australian Standards Approved
Australian Standards Approved
Australian Standards Approved
Australian Standards Approved
Australian Standards Approved
SolarArk SA-M-20, SA-M-30
Copyright © SolarArk Installation Manual
Notes
1. Optional Inclusion, compulsory in some states
2. Allow 30cm of straight pipe before either side of pump
3. Allow 50cm of straight pipe before brass swing check valve
4. For runs longer than 20m use DN18 copper pipe
5. Temper valve MUST be installed
6. Only brass flip swing check valve can be used, no synthetic seats.
System diagrams have been approved in line with S/NZS2712 requirements. The
installer must not change the design of the major system components. It is the
responsibility of the installer/contractor to ensure that the system design meets
all relevant standards, regulations and guidelines, and is safe and operating
correctly. The installation of SolarArk products must be in accordance with the
guidelines outlined in the latest version of the SolarArk installation manual. Any
installer/contractor must be legally certified to install solar water heating systems
and have attended an accredited SolarArk training session before completing the
installation of any SolarArk products.
version 4.6 July 2012
P a g e | 22
Collector Positioning
Some major factors need to be considered when installing the evacuated tube collector
Location
Latitude
Acceptable Pitch Angle
Optimum Angle
Adelaide
Alice Springs
Brisbane
Canberra
Darwin
Hobart
Melbourne
Perth
Sydney
35˚
23˚
27˚
35˚
12˚
42˚
37˚
32˚
34˚
20-55˚
20-43˚
20-47˚
20-55˚
20-32˚
20-62˚
20-57˚
20-52˚
20-54˚
55˚
43˚
47˚
55˚
32˚
62˚
57˚
52˚
54˚
To achieve optimum efficiency, the solar collector needs to face the equator in Australia and New
Zealand is due north. With the cylindrical shape of the evacuated tube solar collector installation
angles of up to 45° away from north have minimal effect on the yearly solar production. Collectors
facing east, achieve higher solar input of the morning. Collectors facing west, achieve higher solar
input of the afternoon. However if the solar collector is installed east or west facing a pitching
frame can be installed at an angle between 35-40° to improve output by exposing the tube to
perpendicular sunlight.
To avoid over heating in summer it is recommended to install the solar collector for winter sun
exposure which is 15-20° above the latitude angle. This angle reduces collector output in summer
and increases in winter. Attention needs to be payed to shading from nearby trees or buildings at
any time of the day, predominantly between 8am and 4pm, the highest solar input times.
Remember that longer shadows are cast in winter than in summer.
The solar collector installation angle range is in between 20-80° due to the working fluid contained
within the heat pipe is gravity influenced.
Copyright © SolarArk Installation Manual
version 4.6 July 2012
P a g e | 23
Storage Tank Location
The hot water storage tank should be installed as close as possible to the most frequently used hot
water outlet point. Electrically boosted hot water storage tank can be installed indoor or outdoor.
The ideal location of the solar collector should be around the 10m range away from the hot water
storage tank.
Pipe Insulation
Regardless of the length of the pipe run, it is vital the flow and return lines are insulated with high
temperature closed cell insulation, no less than 15mm wall thickness. Ensure that the manifold inlet
and out let are insulated all the way and no exposed fittings are visible to minimise any heat loss,
Any insulation that is exposed to sunlight should be UV protected with a metallic foil wrap. Ensure
the sensor ports are sealed after installing roof sensor with high temperature silicon sealant to
prevent water from entering sensor port; the insulation should also have a watertight seal. Ensure
the structure of the roof is suitable to sustain the weight of the collectors. The SolarArk collectors
weigh approximately 78kg for 20 tube and 115kg for 30 tube collector.
Installation Procedure
The following installation procedure will cover the requirement for the SolarArk evacuated tube
solar hot water system detailed installation instruction to be followed in order to achieve a
correctly functioning solar hot water system. The installation must only be carried out by a SolarArk
accredited installer.
Mounting frame
All SolarArk Collectors come with a 1.5mm stainless steel flush mount roof frame that is suitable for
tiled or corrugated pitched roof equal or greater than 20°. For roofs lower than 20° an adjustable
roof frame should be used. The frame is strong and corrosion resistant, it is important that all frame
attachment points and fasteners are also of suitable structural strength and corrosion resistance.
Stainless steel fasteners are made from 304 grade therefore is susceptible to locking if excessive
force is used, it is virtually impossible to remove without snapping off. Using a suitable lubricant
may reduce the locking effect (Silicon based lubricant).
SolarArk adjustable roof frame kit is an all in one framing system which will suit most installation
situations, adjustment range between 30°- 67° components can be used creatively. Additional holes
may be drilled in the frame as required, drilling a 9mm bolt holes will suit bolts supplied. The frame
comes with a bottom track as standard however round feet can also be supplied as an optional
extra for concrete slab mounting or for wall mounting.
Copyright © SolarArk Installation Manual
version 4.6 July 2012
P a g e | 24
Manifold and Bottom Track Attachment
The manifold and the bottom frame tube holders track are secured to the frame front track using
special holding attachment plates. The plates are design in such a way that when loosed it allows
the front frame tracks to slide left and right to simplify adjustment process for rafter locating.
Manifold and Bottom Track Attachment Process
1. Position the front tracks parallel and laying flat on the roof, as seen in
image on the side.
2. Insert the front of manifold casing into the top raised grooved section
of the front track be sure to hold each track firmly while you insert
the manifold into place.
3. Once in place secure the top of manifold with the attachment plate
and finger tighten repeat the process to all front tracks.
4. Insert the bottom tube holder bottom track into bottom raised
grooved section of the front track in place.
5. Align the bottom track with the manifold using the centre of the
bottom tube holders as a visual guide to align with the centre of the
manifold tube holes.
6. Once in place secure the top of the tube holder bottom track with the
attachment plates and finger tighten repeat the process to all front
tracks.
7. Once the frame is correctly aligned tighten all nuts and bolts.
Copyright © SolarArk Installation Manual
version 4.6 July 2012
P a g e | 25
Installation Planning
The location of the manifold should be carefully planned for tiled roofs in order to minimize the
number of tiles that needs to be removed and returned into place for the correct pipe and frame
locations.
Positioning Manifold
The frame front tracks should be located such that they lay flat and even on the roof, the manifold
and frame track can slide left and right in relation to the frame front tracks
tracks so there is some
flexibility when selecting suitable location for the frame front tracks.. Generally it should match the
tiles/shingles and also line up with the roofs rafters or as close as possible.
Attachments to Roof Frame
The collectors mounting frame should be fixed to the roof in accordance with SolarArk guidelines
contained within this document .For non-cyclonic
non cyclonic wind regions (wind <100km/h), and a flush
mounting format, one ∅6x75mm
6x75mm stainless steel batten screw may be used per attachment point (3
(
per frame front track and 3 per rear). For high wind/cyclonic regions, two ∅6x75mm
6x75mm stainless steel
batten screws must be used per attachment point. An additional hole may need to be drilled in the
rubber pad to facilitate the second screw (Note there are 3 attachment points per frame front track
and 3 rear). If unsure of regional wind levels treat as cyclonic regions requirements.
Copyright © SolarArk Installation Manual
version 4.6 July 2012
P a g e | 26
Wind Loading
Wind loading and wind resistance issue should always be considered during the planning stage of
the collector installation process. The local Building codes and regulation should always be followed
in regarding to installation of such objects.
The SolarArk standard frame kits are designed to withstand high wind speeds of up to 220km/h, as
per frame kit assembly diagram contained within this document.
For flush mounting in high wind regions refer to roof mounting instruction diagram. Any other
mounting method in high wind areas should only be conceded by obtaining an authorized
engineering design approval.
It is the responsibility of the installer to ensure that the frame mounting is of suitable strength that
meets building regulations and any other relevant requirement.
Copyright © SolarArk Installation Manual
version 4.6 July 2012
P a g e | 27
Snow Load
In heavy snow fall areas the solar collector should ideally be installed at an angle of 50° or greater
to help promote snow sliding off the tubes.
Always install the collector with a raised front tube holder frame. A distance of 20-25cm should be
allowed off the roof surface, allowing snow to settle beneath the collector so it can be easily
cleared away.
A SolarArk front track extension should be used for this purpose. Each evacuated tube is capable of
withstanding a load >50kg. However roof attachment may need to be reinforced. Local snow
loading regulation should be followed.
Tiled Roof Attachment
For flush mounting collector on tiled roofs, the pre drilled stainless steel strap should first be
mounted on the manifold end off the front track using 8mm bolts supplied and the other end of the
strap to be fastened under the tile to the roof rafter using stainless steel batten screws. Repeat the
process to all front tracks.
Copyright © SolarArk Installation Manual
version 4.6 July 2012
P a g e | 28
FRONT FRAME STRAP
Once the upper straps are attached and secured adjust the bottom straps to provide support to the
bottom end of the collector. Attach, adjust and tighten the bottom straps to ensure that they too
are providing adequate support.
The rubber blocks should be fitted to the underside off the front track, secure with a small amount
of silicon. This will eliminate the frame from contact with the roof tiles.
The stainless steel straps should be positioned so that they go down the trough of the tiles. If you
find that the rafter does not exactly line up with the trough in the tiles, you can bend the stainless
steel strap after connecting it to the rafter so it will be in the correct position.
In high wind areas roof attachment straps should NOT be used, instead direct bolting through the
tiles into the roof frame is recommended. Care should be taken when drilling a hole in the tiles to
avoid breakage.
Colorbond/Zincalume/Galvanised Corrugated Roof
For installation on corrugated iron roof the rubber mounting blocks must be used along with M6 x
75mm stainless steel hex head roofing screws to be fastened through the centre hole of the rubber
block.
Small amounts of silicon to be used under the rubber block forming a water tight seal. The hole in
the centre of the rubber block should also be filled with silicon along with the thread of the
stainless steel roofing screw.
Note: additional 9mm holes can be drilled if need be for correct aligning with roof structure. Always
avoid direct contact between the stainless steel screws and roofing sheets to prevent galvanic
reaction. A 10mm Ø hole should be drilled in roof sheets.
NOTE do not over tighten the screws
and cut through the rubber blocks.
Copyright © SolarArk Installation Manual
version 4.6 July 2012
P a g e | 29
Asphalt Tiled Roof
For installation on an asphalt tiled roof the standard frame can be directly mounted to the roof
surface. Alternatively the round feet and rubber feet can also be used; round feet and rubber are
an optional extra to be purchased separately.
Flat Roof Installation (Adjustable Frame)
The adjustable angle frame to be used for flat roofs or with roofs under 20˚ pitch, adjustments from
27˚-67˚ allows for a wide range of installation including reveres pitch slop. Included in the
adjustable frame kit is the entire component required to assemble the complete frame. Round feet
complete with suitable rubber mounts can also be used for installation (round feet and suited
rubber pads are an optional extra).
There are four models of adjustable frames: 10, 20, 22, and 30 tubes the following is the
attachments provided with each frame.
10 tubes frame uses 2 x front tracks, 2 x rear legs, 2 x bottom roof track, 1 x rear cross brace, 1 x
bottom tube holder track, and 1 x front horizontal brace and 4 x rubber blocks.
20 tubes frame uses 2 x front tracks, 2 x rear legs, 2 x bottom roof track, 1 x rear cross brace, 1 x
bottom tube holder track, 1 x front horizontal brace and
4 x rubber blocks.
22 tubes frame uses 3 x front tracks, 3 x rear legs, 3 x
bottom roof track, 2 x rear cross brace, 1 x bottom tube
holder track, 1 x front horizontal brace, and 6 x rubber
blocks.
30 tubes frame uses 3 x front tracks, 3 x rear legs, 3 x
bottom roof track, 2 x rear cross brace, 1 x bottom tube
holder track, 1 x front horizontal brace, and 6 x rubber
blocks.
Adjustable frame Front Track
The front track is fixed in position as directed by the fixing of the rear cross braces and front brace
positioning. If the front racks need to be adjusted for aligning purpose additional holes can be
drilled in different locations on the cross braces and front brace to allow for the new position.
Adjustable frame Round Feet Anchoring
The round feet on the adjustable frame should be bolted through the two predrilled 12mmØ holes
with an M10 or larger stainless steel masonry anchors/ bolts or roofing screws. The installation
surface that the frame to be installed on must be solid and able to withstand significant lifting force
that may be encountered during high winds.
Copyright © SolarArk Installation Manual
version 4.6 July 2012
P a g e | 30
Adjusting Frame Angle
The rear legs of the flat roof frame comprise two interlocking pieces. The top and bottom legs slide
into each other to allow the length of the rear leg to be adjusted, thus changes the collector angle
from between 27˚-67˚.if an angle of less than 27˚ is required the top leg may be cut short to lessen
the angle. However a minimum of 20˚ angle is required for collector performance. If the top leg is
cut short, the rear cross brace holes will not match the rear legs holes, in which case additional
holes in the rear cross brace must be drilled the rear cross brace must be installed, as it provides
lateral rigidity to the frame.
Collector Plumbing
Once the manifold and mounding frame are assembled and fixed in place the manifold can be
connected to the plumbing.
The evacuated tube and heat pipes should only be installed after the system plumbing installation is
completed and filled with water, all the air is purged out. Filling a hot dry solar collector will
generate a large volume of hot steam that could be dangerous and will take a long time to purge
out of the system.
There are two sensor ports located on the manifold near the copper flow and return ports, ether
ports can be used as flow or return sensor to be installed on the solar return port.
The controllers’ temperature sensor should be coated with thermal paste and inserted into the
sensor port the full depth, a small amount of high temperature silicon should be used to cover the
sensor port after insertion of sensor
Do not run the sensor wire underneath the insulation along the copper pipe, high temperature can
damage the sensor wire. Always run sensor wire on top of insulation, securing in place very 15cm
with UV resistant nylon cable ties.
The pipe insulation must be installed tightly and covering all pipe work and fittings all the way to
the manifold and sealed against the end plates of the collector with silicon seal all around to
prevent water from entering the inside of the pipe work.
Copyright © SolarArk Installation Manual
version 4.6 July 2012
P a g e | 31
Braze copper piping directly to manifold ports is not recommended as brazing may damage rubber
components on solar collector header .do not over tighten or twist the copper piping on manifold
that could also cause damage only use brass compression fittings supplied.
There are two compression fittings supplied with the solar collector manifold
•
•
22mm compression to ½ inch flare connection if connecting
multiple collectors for commercial applications
22mm compression to ¾ brass fittings may be used. Only
Australian standard approved brass fittings should be used.
For domestic heating application up to 60 tubes DN 15 / ½”
copper piping can be used.
System Filling and Air Purging
Once the system installation is completed the tank is filled with water and the system itself is
flushed of air. Please be advised this should be carried out prior to installation of glass evacuated
tubes.
•
•
•
•
•
•
•
•
Open cold water supply to tank to commence filling. Ensure PTR valve leaver is held open to
allow release of air. Close PTR valve once tank is full and water is expelled from TPR valve.
For open loop mains pressure systems the collector loop is automatically purged of air for
systems fitted with air eliminators. For systems without air eliminators, loosen the union on
the return end of the collector port to allow air release. Run the circulating pump at full
speed be sure to open the furthest hot water tap from the tank also open TPR valve to
assist in expelling all the air out of the tank.
For low pressure open loop systems with an auto-air eliminator run the pump at high speed,
operate the PTR valve to release any air that may be trapped in top of tank. If no air
eliminator installed loosen the collector outlet fitting to release the air.
For closed loop system the tank is fitted with an internal coil heat exchanger for the solar
loop. The solar loop water is not in direct contact with potable water in the storage tank.
Purging the solar collector loop is as follows.
Open the drain valve and flush the solar loop for several minutes to clear any dirt/debris out
of the system then close the valve.
Run the circulating pump for several minutes and slowly crack open the drain valve slightly
to allow any remanding air out then close valve repeat this process after few minutes of the
system running to be sure all the air is expelled.
Upon commissioning be sure to remove the drain valve handle to avoid accidental water
dumping or tampering.
For closed loop anti-freeze charged systems contact SolarArk for details.
Copyright © SolarArk Installation Manual
version 4.6 July 2012
P a g e | 32
Draining Solar Collector
Draining the solar collector may be required to service, repair or remove. Such work should be
carried out by appropriately qualified personnel only to avoid injury and collector damage.
Turn of the water supply to the hot water storage tank.
Isolate the power supply to the hot water storage tank, pump and controller before any water is
drained.
if the hot water tank is not to be drained and the aim is to drain the collector only, close both valves
on the flow and return lines at the tank end isolating valve should already be fitted, immediately
open both drain cocks CAUTION the water may be extremely HOT, once the water is drained and
the collector is dry repair or disconnection can start.
If there are no isolating valves installed undo both fittings on solar flow and return let water drain
out completely before commencing any repair or disconnection CAUTION HOT PIPING AND
FITTINGS.
Once repair is completed carry out the installation process in this document.
Tempering Valve
Tempering valves are a requirement as a safety device to reduce hot water supply to a maximum of
50°C. AS/NZS 3500.4:2003 details the requirements of the tempering valve.
The function of the tempering valve is to reduce the 65-75 degree water leaving your hot water
storage tank and blending it with cold water to achieve 50°C .To reduce the possibility of scalding
the tempering valve must be installed to the hot water supply line incorporating all sanitary
household hot water outlets.
Only a solar rated tempering valve (99˚) to be used with the SolarArk hot water system.
Tempering valve should be inspected and correctly adjusted every year, replaced every five years.
All adjustments of a tempering valve should only be carried out by a licensed plumber.
Copyright © SolarArk Installation Manual
version 4.6 July 2012
P a g e | 33
Flow Control Valve
For optimum solar collector performance a flow control valve should be installed and set to the
right water flow as nominated by SolarArk.
The water flow valve should be installed on the water flow side of the solar loop after the pump
outlet pointing toward the solar collector as indicated on the water flow valve directional arrow.
The flow control valve can be adjusted using a screwdriver once the pump is running and all the air
is purged from the system set the pump speed to low and turn the dial on the flow control valve
until the bottom of white float indicates the correct flow. The following is the minimum flow rate.
Collector
Number of Tubes
SA-10
SA-20
SA-30
SA-40
10 Tubes
20 Tubes
30 Tubes
40 Tubes
Minimum Flow Rate
0.6L/min
0.8L/min
1.25L/min
1.5L/min
Automatic Air Eliminator
The Automatic Air eliminator is designed to prevent any air from staying in the system in the event
of a power failure or stagnation. The air eliminator will automatically release any air or steam that
may accumulate in the system this will help the solar hot water system to
operate efficiently.
The air vent should be mounted vertically at the same or higher level of the
manifold outlet port on a female T-piece to allow it to operate correctly and
is mounted directly on to the 22C x 15M union via female T-piece at the
collector outlet (return line) or a SolarArk attachment fitting can also be
used. Technical specifications for the Automatic Air Vents are contained in
the SolarArk Component Specification Manual.
SolarArk Attachment Fitting
Copyright © SolarArk Installation Manual
T-Piece
version 4.6 July 2012
P a g e | 34
Circulating Pump
The circulating pump supplied with the SolarArk system is a 3 speed pump to provide adequate
pressure and flow to circulate water through the solar loop. The pump is suitable for use with SASA
10, SA-12, SA-20, SA-22, SA-30
30 and SA-40
SA
flow rate between 0.6 l/min and 2.4 l/min which ensures
maximum system performance.
For multiple collector installation the minimum indicative flow rate of 0.06 l/min per tube should be
used. The water flow may be adjusted
adjusted for higher or lower temperature delivery to suit different
application.
For multiple collector installation consult SolarArk for specific water flow requirement.
When installing solarr loop piping always consider the pressure drop throughout the pipeline,
pipel
bends,
tees, elbows, pipe runs and pipe size all components contribute to pressure drop.
The pressure drop for a SolarArk 30 tube header at 1.5l/min 20°C 0.01
0. 1 KPa. The pressure drop is
influenced by temperature. As the temperature increases the pressure
pressure decreases.
The solar collector installation will differ in pipe runs and height from job to job there for the pump
requirement may change in order to simplify the
the installation SolarArk pump has a 3 speed settings
to suit the site conditions for most installation speed 1 is used for longer pipe runs and two or three
story homes the higher pump speeds can be used to achieve correct flow rate.
rate Always start with
low speed.
A flow control valve should be used to set the correct water flow for optimum
optimum performance. Use
the water flow rates supplied in this document in the flow control valve section as a guide.
If a flow control valve is not installed correct system operation can also be achieved by observing
the pump cycle for correct water flow. Under
Un
normal conditions with sunny
nny weather the pump
should run continually for 10-15
15 min some time longer depending on sun shine. If the pump is
cycling more than once every 2-3
2 3 minutes, these indicate high water flow which is not
recommended. During cloudy days the pump cycles on and of every 3-5
5 minutes or there about.
Copyright © SolarArk Installation Manual
version 4.6 July 2012
P a g e | 35
The return line should be around 5-10°C hotter than the supply. If the return line temperature is to
hot that would indicate that the water flow is too low, if the water return is similar in temperature to
supply that would indicate no water flow. That could be due to an air lock or pump head pressure is
insufficient.
For systems with a digital display model controller the temperature can be monitored. Under
normal operation conditions the collector temperature should gradually increase depending on the
solar radiation levels that would influence the speed at which the temperature will increase by.
Within a few minutes the temperature in the manifold
should rise 8°C higher than the water temperature in the
bottom of the tank. At that point the pump should start
and the temperature in the manifold will initially
increase by 2-3°C as the hot water from the inlet port
passes through the manifold and past the sensor. Within
around 60 seconds or there about the temperature in
the manifold should gradually drop back down to 2°C
higher than the temperature at the bottom of the tank.
If the temperature within the manifold does not
gradually decrease that would indicate inefficient
circulation, however if the temperature props to quick that would indicate that the water flow is
too high. High water flow would lead to turbulence in the storage tank and irregular pump cycling.
Solar circulating pump should always be rated to 110°C and installed on the water supply line to the
solar collector with a high temperature check valve installed on the pump outlet. Always allow
20cm of straight pipe both sides of the pump prior to the installation of any bends or valves to
avoid pump cavitation and pump performance issues.
The GRUNDFOS SOLAR 15-20 CIL2 pump supplied by SolarArk should always be installed in a
vertical position.
Copyright © SolarArk Installation Manual
version 4.6 July 2012
P a g e | 36
Controller Function & operation
The solar hot water system works by extracting heat from the solar collector and storing it in the
hot water storage tank. The controller works by means of cycling the pump on and off through a
temperature differential control. The roof temperature sensor measures the collector outlet
temperature while the tank sensor measures the temperature at the bottom of the tank the
temperature difference is referred to as a delta-t (∆t). For the SolarArk systems when the collector
temperature is 8°C hotter than the temperature in the bottom of the tank the controller will power
up the pump transferring the collected heated water to the storage tank. When the temperature of
the collector drops to a 2°C higher than the temperature at the bottom of the tank the controller
will cut the power to the pump. The cycling process will continue throughout the day the number
and length of cycles will depend on the amount of solar radiation levels throughout the day. Once
the storage tank reaches 70°C the controller will no longer power up the pump until the
temperature in the tanks drops below 70°C.
The solar system controller also provides frost protection in the event that the temperature in the
manifold drops down to 4°C the controller will power up the pump circulating small amount of hot
water through the solar loop to increase the temperature to 6°C once the temperature is at 6°C the
controller will cut the power supply to the pump.
There is no need for the installer to change or program the controller it is preset by SolarArk to the
correct settings.
Both controller models come with a pump override button by holding down the PUMP button that
will run the circulation pump for as long as you keep holding it down. The button is a helpful fetcher
to be used during system commissioning.
Copyright © SolarArk Installation Manual
version 4.6 July 2012
P a g e | 37
The following is the pre-set program settings:
PUMP ON: 8°C
PUMP OFF: 2°C
TOPOUT: 70°
FROST: 4°C
The standard controller that is supplied with the SolarArk system does not have a digital screen
display it is factory set and cannot be reprogrammed on site. There are four indicator lights on the
front of the controllers which indicate the functions. POWER, PUMP ON, FROST, TOPOUT.
POWER: indicates power is on and the controller is active
PUMP: indicates circulating pump is running.
FROST: indicates frost function is active.
TOPOUT: indicates tank has reached 70°C.
Controller Temperature Sensors
The standard SolarArk controller has one roof sensor and one tank sensor or there is an optional
controller with a digital display which has one roof sensor, one bottom tank sensor and one top
tank sensor.
The roof sensor has a 20m long cable that should be installed on the manifold sensor port on the
outlet end (solar return line).
The tank sensor for the standard controller should be installed in the tank
sensor port located at the bottom of the tank.
The controller with the digital display model the upper sensor should be
installed in the tanks upper sensor port and the bottom sensor should be
installed in the tanks bottom sensor port.
All controller temperature sensors should be coated with thermal paste and
inserted into the sensor ports the full depth, a small amount of high
temperature silicon should be used to cover the sensor port after insertion
of sensor.
Do not run the sensor wire underneath the insulation along the copper
pipe, high temperature can damage the sensor wire. Always run sensor wire
on top of insulation, securing in place very 15cm with UV resistant nylon
cable ties.
Copyright © SolarArk Installation Manual
version 4.6 July 2012
P a g e | 38
Pump and Controller Box
The pump and controller can be supplied in one box to assist in installation and provide wether
protection to the circulating pump. The pump is not water proof and should always be installed
avoiding direct water contact. Pump warranty will be void if fault occurred due to water damaged.
System Start Up
Once the cold water supply is opened and all the air expelled from the system allow the main water
supply pressure to completely fill and pressurise the system, check the piping for water leaks.
Power up the solar controller, turn the pump on by pressing the pump button on the solar
controller if the system is fitted with an air eliminator remove the cap on the air eliminator until a
steady flow of water is expelled. Once the process is completed replace the valve cap ensures that
it is tightened then backed off one complete turn.
Gas supply and power to the gas booster may be turned on, gas unit piping should be checked for
leaks it is important to be sure that the gas booster operation is checked and functioning correctly.
Copyright © SolarArk Installation Manual
version 4.6 July 2012
P a g e | 39
Installation Reference Guide
1.
2.
3.
4.
5.
6.
7.
8.
9.
Read and understand this manual for installation process.
Ensure all safety precautions are followed for a safe system installation.
Unpack all parts and check against packing slip.
Select collector position (NORTH FACING ROOF).
Mark frame position on roof and slide back the appropriate tiles for mounting points.
Assemble frame on the roof including roof attachment straps.
Install manifold and bottom track.
Insure that the manifold and bottom tube locking caps are aligned on the front roof frames.
Fix collector frame in place and drill 16mm hole in the roof tiles for the flow and return
piping.
10. Select the best tank position in pace ideal pipe run of 8 to 10 m each way for flow and
return pip run
11. Secure the tank in place on a suitable base.
12. Install the pump away from direct water contact in a vertical position.
13. Install a double power point within 1m of pump and controller location.
14. Connect plumbing supply water to tank complete with solar rated tempering valve and
connection into the home.
15. Connect solar loop plumbing and roof temperature sensor.
16. Check gas booster for compatibility with gas supply NG or LPG.
17. Check gas meter and gas supply piping for suitability.
18. Connect gas booster to gas main line with3/4” copper piping.
19. Plumb up the gas booster from the hot water out let of tank than into the home.
20. Plug in the instantaneous gas booster to power outlet.
21. Fill up the system with water to equalise with water supply pressure and check for leaks.
22. Purge system to release all air that may be trapped in piping and water tank.
23. Power up the controller and plug the pump into controller socket marked pump.
24. Adjust flow control valve for the correct flow rate.
25. Ensure that the pump is cycling on and off as the collector heats up.
26. Open a hot water tap and check instantaneous gas booster is igniting and heating water.
27. Complete and sign the installation report and send back to SolarArk.
28. Complete and sign warranty form.
29. Complete and sign all government rebate forms for the customer to post and claim rebaits.
30. Supply customer with invoice for the installation of the SolarArk solar hot water system
31. Supply the customer with an owner’s manual and a run down on the system operation.
32. Clean collector and remove all rubbish from the installation job site.
33. Complete the SolarArk check list and a copy to SolarArk for job record.
34. Take photos of the job for your record and email a copy to SolarArk.
Copyright © SolarArk Installation Manual
version 4.6 July 2012
P a g e | 40
Troubleshooting
Any system adjustments, repairs or maintenance should only be carried out by a qualified technician.
Insufficient hot water
If the gas booster is not turned on before sending water through, it
may default to 40°C. To reset the system, turn the gas booster off via
the power point or take the plug out of the controller and wait two
minutes before turning the system back on.
If connected to full tariff, the element can be turned on for a few hours
if additional hot water is needed. Ensure there is a timer fitted for full
tariff connection
Lack of hot water will generally be related to the gas or electric heating booster
system. Contact your SolarArk dealer.
It is an Australian standard requirement for the water to be heated to 60°C to
inhibit the growth of Legionella Pneumophilia bacteria, the booster system
should never be turned off or set below 60°C.
Lack of Solar Contribution
During winter months, and periods of rainy or overcast weather, the amount of
energy produced by the solar collector will be reduced.
Firstly, check if there is power supply to the controller - the green light
should be ON at all times. The pump light indicates that the pump is
running and should be cycling ON and OFF. The pump should not be
continuously running for very long periods of time.
Check for broken tubes and/or excessive water leaks.
Incorrect installation or collector configuration.
Should there be a controller or pump malfunction, contact your SolarArk dealer.
For plumbing or electrical related problems always appoint qualified personnel
to carry out repairs.
“Banging” Noise in Pipes/Tank
The hot water has remained stagnant for a long period of time.
Mains water supply to the tank is ≤400kPa.
Solar collector oversized for the tank.
Short pipe run between the collector and the tank.
High Solar contribution and low levels of water usage
Check valve (duo-valve) not installed or faulty – Contact your SolarArk
dealer.
Releasing of Hot Water from
TPR Valve
Few litres daily are normal.
To test the system, run the hot water tap in the bathrooms or kitchen for 3
minutes to release some heat from the system (caution: water is hot). If after
this period the tank is still regularly releasing hot water, it indicates a definite
problem. Contact your SolarArk dealer.
System producing more hot water
than is required.
This will be most apparent in the summer months when solar contribution
levels are high.
Copyright © SolarArk Installation Manual
version 4.6 July 2012
P a g e | 41
Troubleshooting Guide
System Troubles
Insufficient hot water or no hot
water
Insufficient hot water or no hot
water
Circulating pump always ON
Copyright © SolarArk Installation Manual
Possible Fault
Solution
Boosting not working
(Electric)
Check power supply from distribution board and to
the storage tank.
Check tank thermostat if manual reset is triggered.
Check electric element for fault.
Change to full tariff and install a timer set to run
depending on your water usage pattern.
Boosting not
working(Gas)
Check power supply to gas booster.
Check gas supply is available and is turned on.
Open one or two hot water taps to ensure a water
delivery of 2.4l/m or higher to activate booster.
Incorrect Solar Hot
Water sizing for
customer requirement.
Refer to SolarArk owner’s manual for correct sizing
requirement or call SolarArk for selection
assistance.
Hot water wastage
from pressure and
temperature relief
valve(TPRV)
It is normal for the TPRV to allow a small quantity
of hot water to be discharged during heating cycle.
Place a bucket under the TPRV If in 24hour period a
volume of more than 15L is discharged there may
be a problem. Lift the leaver on the TPRV slightly
for a few seconds to reduce pressure HOT WATER
will come out if the valve discharges at high flow
that would indicate water supply pressure to tank is
to high contact your SolarArk dealer.
Replacing TPRV
Never replace the TPRV with a higher rated valve.
Expansion control valve
(ECV)
It is normal for the ECV to allow a small quantity of
hot water to be discharged during heating cycle.
Place a bucket under the ECV If in 24hour period a
volume of more than 15L is discharged there may
be a problem.
If the valve dribbles continually try lifting the leaver
to discharge some water for a few seconds if the
discharge continues contact your SolarArk dealer.
Air lock in manifold
Ensure system is bled properly by opening the
return line drain ball valve and closing the ball valve
on the return line into the tank of the solar loop. If
no ball valve is fitted loosen the union brass fitting
on the solar return line at the tank. Very hot water
or steam will be released.
version 4.6 July 2012
P a g e | 42
Circulating pump always ON
Insufficient or no flow
rate
Roof sensor not
installed correctly
Pump cavitation could cause a lack of water flow
loosen the union on the pump outlet be care full
very hot water or steam will come out.
Ensure there is 20cm of straight pipe both sides of
the pump prior to any bends or elbows installation.
Inspect the check valve for correct operation.
Change pump speed to medium then high observe
the flow control valve for correct water flow.
If necessary remove bends replace with large radius
elbows and remove unnecessary bends.
Flush solar loop to remove and dirt/scale that could
be causing blockage.
Insure that the roof sensor is inserted in the
manifold sensor port correctly and coated with
thermal paste.
Check sensor operation (sensor resistance)
Pump not cycling during good
weather and collector is hot
Pump running at night
Sensor fault
Resistance
0˚C
25˚C
50˚C
75˚C
100˚C
Above 150˚C or ‘short’
Sensor Light Slow Flash
27.25
10.00
4.162
1.925
0.973
< 0.300
Below -40˚C or ‘open
Sensor Light Fast Flash
> 200
Topout
The tank reached maximum temperature the pump
will not run.
Frost mode
This is a normal function however the pump should
not run more than once every hour.
If pump runs frequently upgrade piping insulation
Controller Topout
setting to high
Maximum Topout 70˚C. Check tank sensor for
correct installation.
TPRV Normal operation
It is normal for the TPRV to allow a small quantity
of hot water to be discharged during heating cycle.
Faulty TPRV or Pressure
reducing valve not
fitted
Place a bucket under the TPRV If in 24hour period a
volume of more than 15L is discharged there may
be a problem. Lift the leaver on the TPRV slightly
for a few seconds to reduce pressure HOT WATER
will come out if the valve discharges at high flow
that would indicate water supply pressure to tank is
to high contact your SolarArk dealer.
TPR Valve dumping water
Copyright © SolarArk Installation Manual
Temperature
version 4.6 July 2012
P a g e | 43
Rattling/banging noise in pipes
when hot water is used.
Steam forming in the
manifold due to
stagnation more so in
low pressure water
supply.
Duo-valve not installed
or faulty.
Combined with low
water pressure supply
< 400
Insufficient flow rate
Booster is turned off.
Increased hot water
demand.
Little to no solar gain
Incorrect collector
angle.
Thermal paste not used
/heat pipes not
installed correctly.
Damaged tubes.
Excessive heat loss in
solar loop/damaged
insulation.
Collector shading.
Power to controller
switched off
Water Hammer
Copyright © SolarArk Installation Manual
Plumbing in the
premises
Install an air eliminator on collector outlet.
Increase cold water supply pressure to 400 kpa +.
Install collector for winter sun performance.
Install/replace Duo-valve on cold water supply to
storage tank.
Install pressure booster pump (above 400KPa).
Install Air Eliminator on collector outlet.
ECV or PTRV should be dumping water daily.
Pump cavitation could cause a lack of water flow
loosen the union on the pump outlet be care full
very hot water or steam will come out.
Ensure there is 20cm of straight pipe both sides of
the pump prior to any bends or elbows installation.
Inspect the check valve for correct operation.
Change pump speed to medium then high observe
the flow control valve for correct water flow.
If necessary remove bends replace with large radius
elbows and remove unnecessary bends.
Flush solar loop to remove and dirt/scale that could
be causing blockage.
In winter or cloudy condition there will be a
reduction in solar contribution. The solar may not
heat the tank to full temperature there for the
boosting must not be switched off. It is an
Australian regulation requirement for boosting NOT
to be turned off.
The higher the water consumption the lower the
solar contribution.
To accommodate the increased hot water usage an
additional may be installed.
The solar collector should not be installed at an
angle lower than 20˚ or to latitude angle.
Preferably 15-20˚ greater than latitude.
Ensure that the heat pipe is coated with heat
transfer past and inserted all the way into the
manifolds’ heat pipe port.
Be sure to inspect the tubes for any damage or loss
of vacuum. Replace if necessary.
All exposed copper includes brass fittings should be
well insulated with UV protected insulation. Inspect
the insulation for UV degradation damage and
replace if necessary.
If the solar collectors are shaded by trees or any
other objects the collectors’ output will be reduced.
Trim the trees or relocate collectors.
The solar collectors will NOT operate if power to
the controller is interrupted. Damage to solar
collector due to power interruption will void
warranty.
Pipe work should be clamped. Install a pressure
limiting valve & water hammer arrestors if
required.
version 4.6 July 2012
P a g e | 44
Installation Instructions
Copyright © SolarArk Installation Manual
version 4.6 July 2012
P a g e | 45
Safety – Before you Start
Important Note:
Do not commence an installation until you have satisfied
yourself that all Safety issues associated with working on
and lifting components onto a roof have been addressed
Step 3
Slide front of manifold into slots on frame, followed by
inserting clip into grove on rear of manifold and tighten.
Finish manifold assembly by coating O-rings with solid soap
or oil to aid with insertion of evacuated tubes. Attaché
straps to Frame assembly.
All work associated with the installation must comply with
local authority regulations
•
•
•
Always wear safety glasses when handling
evacuated tubes
Always wear leather gloves when handling
components
Take extreme care when working at heights
It is the responsibility of the installer to adhere to all
relevant health and safety precautions as specified by your
relevant government regulations
Frame and Manifold Assembly
Step 1
The frame can be assembled at ground level then carry
onto roof or assembled on the roof.
Lay main braces on a flat surface and parallel
Frame mounting on roof
Pitched Roof Installation
Installation Planning
For tiled roofs, carefully plan the location of the manifold,
frame front tracks and plumbing pipes in order to minimize
the number of tiles that need to be removed (and returned
into place).
Step 2
Connect the bottom track to main braces using bolts
supplied
Positioning Manifold
The frame front tracks should be located such that they lay
flat and even on the roof (match the tiles/shingles) and also
line up with, or as close as possible to, the roof’s rafters.
Attachment to Roof Frame
For non-cyclonic wind regions (wind <100km/h), and a flush
mounting format, one ∅6x75mm stainless steel batten
screw may be used per attachment point (3 per frame front
track and 3 per rear). For high wind/cyclonic regions, two
∅6x75mm stainless steel batten screws must be used per
attachment point. An additional hole may need to be drilled
in the rubber pad to facilitate the second screw. (Note there
are 3 attachment points per frame front track and 3 rear.
Tiled Roof Attachment
For flush mounting on tiled roofs, there are attachment
straps provided for fixing frame in place; 2 per track one to
be fixed on the bottom and one on the top of track. The
other end is connected to the roof rafter using 2 x
∅6x75mm stainless steel batten screws. Once the upper
straps are attached and tightened, adjust the bottom straps
to ensure that they too are providing support to the frame.
In high wind areas roof attachment straps should NOT be
used, instead direct bolting through the tiles into the roof
frame is recommended. Care should be taken when drilling
a hole in the tiles to avoid breakage.
Copyright © SolarArk Installation Manual
version 4.6 July 2012
P a g e | 46
Corrugated Steel Roof
For installation on a corrugated steel roof, the standard
rubber pads can be used to separate the frame from the
roof and also to seal the hole. It will bend to match the
shape of the ridge. Never install in the valleys.
CONNECTION TO THE COLLECTORS FOR OPEN CIRCUIT
SYSTEMS
Where possible only use stainless steel screws. Direct
contact between the screw and the roofing material should
be avoided to prevent galvanic reaction and therefore a
>10mm diameter hole should be drilled. If the roofing screw
is galvanized steel, direct contact between the screw and
the frame must be avoided by use of a nylon or rubber
washer.
The procedure is as follows:
Cover the bottom side of the rubber pad with a layer of
outdoor grade silicone sealant to ensure a waterproof seal
with the roof is formed. Also put a small amount of silicone
sealant on the thread of the screw to form a waterproof
seal with the rubber pad hole.
System Basics
•
•
•
•
•
•
•
•
•
Collector should be faced due north (+/-20°)
Collector installation angle of ideally 20°+
Locate tank as nominated by SolarArk or an
authorised dealer. Or as indicated with in this
document.
Plumbing
To complete the collector installation and
connections on the collector array
Fit 22mm male thread
compression gland to 1/2”
flare fitting supplied to
flow side of collector
Attach
1/2”insulated
copper pipe from control box to ½” flare fitting
supplied
Fit 22mm male thread compression gland to 1/2”
flare fitting supplied to return side of collector
Fit insulated ½”copper pipe from flow return on
collector to solar return on tank provided.
Coat sensor with heat
paste and insert roof
sensor to return side of
collector. Seal end of
sensor port with high temp
silicon. Ensure that the
connection is secure and
safe. (It is important that
the sensor cable DOES NOT contact the hot
collector return pipe)
CONNECTION FROM TANK AND MOUNTING TO SOLARARK
CONTROL BOX
To complete the mounting of SolarArk control box if used,
connection from tank to SolarArk control box and from
control box to collector
The procedure is as follows:
•
•
•
•
Mount control box on wall no more than 1.5m
from GPO and 1.5m from tank sensor port.
Connect ½”insulated copper pipe from solar loop
feed from tank to flow side of SolarArk control
box with no less than 20cm of straight insulated
copper pipe prior to any bends
Connect flow out from Solar Ark control box using
1/2” insulated copper tube to ½” flare fitting on
Solar Ark collector provided. Always install a
swing type brass check valve with no synthetic
material to pump outlet
Insert tank sensor from Solar Ark control box or
controller to tank sensor port located on the
bottom of the tank. Coat sensor with heat paste
provided and seal end of sensor port with high
temp silicon.
Copyright © SolarArk Installation Manual
Commissioning
Once all flow, return lines are completed, the main cold
feed to the tank can be opened to fill tank. To aid in filling
of tank open a hot water tap, if further clarification is
needed to aid in commissioning refer to details within this
documents.
•
•
•
•
•
•
Check system for leaks
Connect sensors at the controller if they got
removed for installation purpose.
Connect power cord off pump to socket on
controller
Always bleed air from solar loop by disconnecting
solar loop return from tank and running pump on
high speed to discharge air from line. If pump is
not being cycled by controller, press pump button
on the controller or pump can be connected
direct to power.
Do final leak check
Install tubes following instructions listed
version 4.6 July 2012
P a g e | 47
Evacuated Tube installation
•
Pull out each heat pipe by 15cm. Hold top plate in
place. Coat each pipe tip with thermal pastesquirt thermal paste into short piece of insulation,
push over each heat pipe.
•
Lubricate mouth of evacuated tube (outer wall)
with weak dish wash liquid and water mix. Use
sponge or spray bottle
Clip Process
DONT SPRAY WATER INSIDE TUBE
•
•
•
Guide the heat pipe up into the header port push in full depth
Push the evacuated tube into place. Don’t twist
more than 1/8th left and right turn
If the heat pipe is inserted properly no clear glass
should be visible
Final Solar Ark commissioning
•
Wipe and clean tubes using soft clean cloth.
•
Check that the pump is cycling correctly, if there is
good sunlight available the system will cycle every
2-4 minutes for 1 minute at a time depending on
available sunlight. . If pump is not being cycled by
controller, pump can be connected direct to
power or press pump button on controller.
Supply customer with the following:
1.
2.
3.
Owner’s manual
Tank warranty forms
SolarArk Warranty Forms
DO NOT PULL THE EVACUATED TUBE DOWN
•
Once all tubes are installed ensure they are
aligned neatly
•
Clean each tube and any dirty marks
Copyright © SolarArk Installation Manual
version 4.6 July 2012
P a g e | 48
Flat Roof Frame Assembly Guide-30 Tube Collector
30 Tube Collector Pages 1of 4
Copyright © SolarArk Installation Manual
version 4.6 July 2012
P a g e | 49
30 Tube Collector Pages 2 of 4
Copyright © SolarArk Installation Manual
version 4.6 July 2012
P a g e | 50
30 Tube Collector Pages 3 of 4
Copyright © SolarArk Installation Manual
version 4.6 July 2012
P a g e | 51
30 Tube Collector Pages 4 of 4
Copyright © SolarArk Installation Manual
version 4.6 July 2012
P a g e | 52
Standard Tubes Assembly Guide -30 Tube Collector
30 Tube Collector Pages 1 of 2
Copyright © SolarArk Installation Manual
version 4.6 July 2012
P a g e | 53
30 Tube Collector Pages 2 of 2
Copyright © SolarArk Installation Manual
version 4.6 July 2012
P a g e | 54
Flat Roof Frame Assembly Guide-10 and 20 Tube Collector
10 and 20 Tube Collector Pages 1of 3
Copyright © SolarArk Installation Manual
version 4.6 July 2012
P a g e | 55
10 and 20 Tube Collector Pages 2of 3
Copyright © SolarArk Installation Manual
version 4.6 July 2012
P a g e | 56
10 and 20 Tube Collector Pages 3of 3
Copyright © SolarArk Installation Manual
version 4.6 July 2012
P a g e | 57
Standard Tube Assembly Guide -10 and 20 Tube Collector
10 and 20 Tube Collector Pages 1of 2
Copyright © SolarArk Installation Manual
version 4.6 July 2012
P a g e | 58
10 and 20 Tube Collector Pages 2of 2
Copyright © SolarArk Installation Manual
version 4.6 July 2012
P a g e | 59
Bill of Materials
Glass Line Tank Electric Boost Solar Water Heater
Parts Schematic – Not all components are Provided by SolarArk
a
b
c
d
e
f
g
h
i
j
k
l
m
n
o
p
q
Component Name
Non-Return Isolating Valve
Line Strainer
Pressure Limiting Valve (500kPa)
Expansion Control Valve
Cold Water Inlet
Solar Flow
Lower Sensor Port
Solar Return
Upper Sensor Port
PTR Valve
Hot Water Supply
Electric Element
Solar Rated Tempering Valve
Pump and Controller
Flow Control Valve
Brass Swing Check Valve
SolarArk Solar Collector
Qty
1
1
1
1
1
1
1
1
1
1
1
1
1
1
1
1
1
Supplier: Part Code
Australian Standards Approved
Australian Standards Approved
Australian Standards Approved
Australian Standards Approved
Australian Standards Approved
Australian Standards Approved
Australian Standards Approved
Australian Standards Approved
Australian Standards Approved
Australian Standards Approved
Australian Standards Approved
Australian Standards Approved
Australian Standards Approved
Australian Standards Approved
Australian Standards Approved
Australian Standards Approved
SolarArk SA-M-20, SA-M-30
Copyright © SolarArk Installation Manual
Notes
1. Optional Inclusion, compulsory in some states
2. Allow 30cm of straight pipe before either side of pump
3. Allow 50cm of straight pipe before brass swing check valve
4. For runs longer than 20m use DN18 copper pipe
5. Temper valve MUST be installed
6. Only brass flip swing check valve can be used, no synthetic seats.
System diagrams have been approved in line with S/NZS2712 requirements. The
installer must not change the design of the major system components. It is the
responsibility of the installer/contractor to ensure that the system design meets
all relevant standards, regulations and guidelines, and is safe and operating
correctly. The installation of SolarArk products must be in accordance with the
guidelines outlined in the latest version of the SolarArk installation manual. Any
installer/contractor must be legally certified to install solar water heating systems
and have attended an accredited SolarArk training session before completing the
installation of any SolarArk products.
version 4.6 July 2012
P a g e | 60
Glass Line Tank Gas Boost Solar Water Heater
Parts Schematic – Not all components are Provided by SolarArk
a
b
c
d
e
f
g
h
i
j
k
l
m
n
o
p
q
Component Name
Non-Return Isolating Valve
Line Strainer
Pressure Limiting Valve (500kPa)
Expansion Control Valve
Cold Water Inlet
Solar Flow
Lower Sensor Port
Solar Return
Upper Sensor Port
PTR Valve
Hot Water Supply
Gas Booster
Solar Rated Tempering Valve
Pump and Controller
Flow Control Valve
Brass Swing Check Valve
SolarArk Solar Collector
Qty
1
1
1
1
1
1
1
1
1
1
1
1
1
1
1
1
1
Supplier: Part Code
Australian Standards Approved
Australian Standards Approved
Australian Standards Approved
Australian Standards Approved
Australian Standards Approved
Australian Standards Approved
Australian Standards Approved
Australian Standards Approved
Australian Standards Approved
Australian Standards Approved
Australian Standards Approved
Australian Standards Approved
Australian Standards Approved
Australian Standards Approved
Australian Standards Approved
Australian Standards Approved
SolarArk SA-M-20, SA-M-30
Copyright © SolarArk Installation Manual
Notes
1. Optional Inclusion, compulsory in some states
2. Allow 30cm of straight pipe before either side of pump
3. Allow 50cm of straight pipe before brass swing check valve
4. For runs longer than 20m use DN18 copper pipe
5. Temper valve MUST be installed
6. Only brass flip swing check valve can be used, no synthetic seats.
System diagrams have been approved in line with S/NZS2712 requirements. The
installer must not change the design of the major system components. It is the
responsibility of the installer/contractor to ensure that the system design meets
all relevant standards, regulations and guidelines, and is safe and operating
correctly. The installation of SolarArk products must be in accordance with the
guidelines outlined in the latest version of the SolarArk installation manual. Any
installer/contractor must be legally certified to install solar water heating systems
and have attended an accredited SolarArk training session before completing the
installation of any SolarArk products.
version 4.6 July 2012
P a g e | 61
Stainless Steel Tank Electric Boost Solar Water Heater
Parts Schematic – Not all components are Provided by SolarArk
a
b
c
d
e
f
g
h
i
j
k
l
m
n
o
p
q
Component Name
Non-Return Isolating Valve
Line Strainer
Pressure Limiting Valve (500kPa)
Expansion Control Valve
Cold Water Inlet
Solar Flow
Lower Sensor Port
Solar Return
Upper Sensor Port
PTR Valve
Hot Water Supply
Electric Element
Solar Rated Tempering Valve
Pump and Controller
Flow Control Valve
Brass Swing Check Valve
SolarArk Solar Collector
Qty
1
1
1
1
1
1
1
1
1
1
1
1
1
1
1
1
1
Supplier: Part Code
Australian Standards Approved
Australian Standards Approved
Australian Standards Approved
Australian Standards Approved
Australian Standards Approved
Australian Standards Approved
Australian Standards Approved
Australian Standards Approved
Australian Standards Approved
Australian Standards Approved
Australian Standards Approved
Australian Standards Approved
Australian Standards Approved
Australian Standards Approved
Australian Standards Approved
Australian Standards Approved
SolarArk SA-M-20, SA-M-30
Copyright © SolarArk Installation Manual
Notes
1. Optional Inclusion, compulsory in some states
2. Allow 30cm of straight pipe before either side of pump
3. Allow 50cm of straight pipe before brass swing check valve
4. For runs longer than 20m use DN18 copper pipe
5. Temper valve MUST be installed
6. Only brass flip swing check valve can be used, no synthetic seats.
System diagrams have been approved in line with S/NZS2712 requirements. The
installer must not change the design of the major system components. It is the
responsibility of the installer/contractor to ensure that the system design meets
all relevant standards, regulations and guidelines, and is safe and operating
correctly. The installation of SolarArk products must be in accordance with the
guidelines outlined in the latest version of the SolarArk installation manual. Any
installer/contractor must be legally certified to install solar water heating systems
and have attended an accredited SolarArk training session before completing the
installation of any SolarArk products.
version 4.6 July 2012
P a g e | 62
Stainless Steel Tank Gas Boost Solar Water Heater
Parts Schematic – Not all components are Provided by SolarArk
a
b
c
d
e
f
g
h
i
j
k
l
m
n
o
p
q
Component Name
Non-Return Isolating Valve
Line Strainer
Pressure Limiting Valve (500kPa)
Expansion Control Valve
Cold Water Inlet
Solar Flow
Lower Sensor Port
Solar Return
Upper Sensor Port
PTR Valve
Hot Water Supply
Gas Booster
Solar Rated Tempering Valve
Pump and Controller
Flow Control Valve
Brass Swing Check Valve
SolarArk Solar Collector
Qty
1
1
1
1
1
1
1
1
1
1
1
1
1
1
1
1
1
Supplier: Part Code
Australian Standards Approved
Australian Standards Approved
Australian Standards Approved
Australian Standards Approved
Australian Standards Approved
Australian Standards Approved
Australian Standards Approved
Australian Standards Approved
Australian Standards Approved
Australian Standards Approved
Australian Standards Approved
Australian Standards Approved
Australian Standards Approved
Australian Standards Approved
Australian Standards Approved
Australian Standards Approved
SolarArk SA-M-20, SA-M-30
Copyright © SolarArk Installation Manual
Notes
1. Optional Inclusion, compulsory in some states
2. Allow 30cm of straight pipe before either side of pump
3. Allow 50cm of straight pipe before brass swing check valve
4. For runs longer than 20m use DN18 copper pipe
5. Temper valve MUST be installed
6. Only brass flip swing check valve can be used, no synthetic seats.
System diagrams have been approved in line with S/NZS2712 requirements. The
installer must not change the design of the major system components. It is the
responsibility of the installer/contractor to ensure that the system design meets
all relevant standards, regulations and guidelines, and is safe and operating
correctly. The installation of SolarArk products must be in accordance with the
guidelines outlined in the latest version of the SolarArk installation manual. Any
installer/contractor must be legally certified to install solar water heating systems
and have attended an accredited SolarArk training session before completing the
installation of any SolarArk products.
version 4.6 July 2012
P a g e | 63
Installation Checklist
Inspection report to be completed and returned to SolarArk along with installation photographic
evident for future reference
Installation Checklist
Please tick
YES NO
1. Collector orientation (North Facing) if NOT what aspect is the collector facing ________
2. Collectors angle 20˚ or more if NOT what angle
______________________________
3. Collector pipe run less then 8m flow and 8m return if yes Flow ______ Return ________
4. Collector shaded at any time of the day if YES? From what time to what time __________
5. Any risk of damage to collector due to falling objects if YES _________________________
6. Collector installed at an angle greater than 40˚in an area prone to large hail(20Ømm+)
7. Collector installed in a cyclone prone area if YES appropriately fixed to structure _______
8. Collector secured to a structurally sound roof framing or to building wall
9. Piping insulation high temp and UV protected against sunlight with foil wrap or equivalent
10. Pump, controller and all electrical connection are wether protected (rain)
11. Pump installed in a vertical position
12. Pressure limiting valve has been installed.
13. Has the solar loop piping been well insulated
14. Plumbing is leak free and all valve are open
15. Tank fitted with PTR valve and drained correctly.
16. Thermal paste has been applied to heat pipes and sensors.
17. Powered up controller from a separate power supply to electric element.
18. Electric booster wired up and power turned on
19. Is there an air eliminator fitted if YES......... did you back of the vent screw one full turn
20. Controller functional and cycling the pump on/off
21. Is there a flow control valve fitted
22. Has the tempering valve been installed
23. Evacuated tubes cleaned
24. Gas delivery checked
25. Water quality has been checked
26. Commissioning process completed as per SolarArk instructions
27. The basic system operation has been explained to customer
28. All warranty documents supplied to customer include owner’s manual.
Copyright © SolarArk Installation Manual
version 4.6 July 2012
P a g e | 64
Installation Report Form
After completing the installation the following information must be completed by the installer and returned
to SolarArk. Failing to complete and return may void warranty.
Customer Details
Customer Name:
Customer phone Number:
Installation Address:
Invoice number:
System Model & Serial Number:
Tank Model & Serial Number:
Instantaneous Gas Model & Serial Number:
Installer Details
Installer Name:
Installer Phone Number:
Installer License Number:
Installation Date:
Company Name:
Company Address:
Disturber Details
Where did you purchase the SolarArk solar hot water system from?
Retailer:
Retailer Address:
Date of Purchase:
Copyright © SolarArk Installation Manual
version 4.6 July 2012
P a g e | 65
Warranty Form
Customer Reference No:
SOLARARK WARRANTY FORM
CUSTOMER
Last Name:
First Name:
Address:
Suburb:
State:
Postcode:
State:
Postcode:
SITE INSTALLATION
Address:
Suburb:
INSTALLER
Last Name:
First Name:
Address:
Suburb:
State:
Postcode:
License Number:
Date of Installation:
SYSTEM DETAILS
System Installed Model Number: SA
Solar Tube Collector Serial Number: -
-
Hot Water Tank Model and Serial Number:
PLEASE RETURN TO SOLARARK PTY LTD WITHING TEN (10) WORKING DAYS OF PRODUCT
INSTALLATION
MAIL TO:
PO BOX 2719 TAREN POINT NSW 2229
FAX TO:
(02) 9531 4500
EMAIL TO:
[email protected]
OFFICE USE ONLY
DATE OF RECEPTION:
APPROVED BY:
Copyright © SolarArk Installation Manual
SIGNATURE:
version 4.6 July 2012
P a g e | 66
SolarArk Maintenance
PTRV
It is recommended that the lever on the pressure and temperature relief valve (PTRV) on the side of
the hot water tank be operated once every 6 months to ensure reliable operation and replaced
every five years. It is important to raise and lower the lever smoothly. Please be careful as the
water released from the drain pipe will be HOT. If required ask your SolarArk representative to tell
you where the valve is located if in doubt.
Glass Breakage
If adverse weather to prevail causing large hail, debris or falling branches it is possible that a tube or
tubes will be broken. The evacuated tubes are made of glass so please be aware of any glass that
may have found its way from the roof to surrounding grounds. This should be cleaned up and
disposed of in a sensible manner. Your SolarArk service agent is to be called to check the system
and replace any damaged tubes.
Any broken tubes should be replaced as soon as possible to maintain maximum performance.
The SolarArk system will still operate normally even with broken tubes however the system will
operate at a reduced efficiency.
Replacement of Broken Tubes
Open the tube locking cap by unscrewing the tube holder at the base of the solar collector. Slide
the existing tube out and remove any broken glass pieces from the solar collector. If the O-ring in
the manifold pops out while removing the tube, reinstall and spray with soapy water before reinserting the replacement tube. Avoid contact with the Rockwool insulation as this may cause skin
irritation.
Unpacking New Tubes
Ensure that the tubes are unpacked in a shady area (away from direct sunlight) as this may cause
the heat pipe bulbs to heat up and cause major burns if touched.
The heat pipes are pre-inserted into the evacuated tubes. Open the box on the ends to expose the
heat pipes and allow for the heat transfer paste to be applied, keep tubes covered and away from
direct sunlight. Remove tubes from packaging and check that the heat pipe is securely inserted into
the centre of the aluminium fin of the evacuated tube. Ensure that the top of the heat pipe is
straight. The silver at the bottom of the evacuated glass tube indicates good vacuum. The presence
of white colour at the bottom of the tube indicates lack of vacuum and this tube should not be
used. SolarArk does not warrant the evacuated tubes or heat pipes against failure as a result of
damage incurred during transport or installation.
Copyright © SolarArk Installation Manual
version 4.6 July 2012
P a g e | 67
Tube with Loss of Evacuated Air
Tube with Evacuation intact
Copyright © SolarArk Installation Manual
version 4.6 July 2012
P a g e | 68
Evacuated Tube Installation
Pull out each heat pipe by 15cm. Coat each pipe tip with thermal
therma
paste by squirting thermal paste into a short piece of insulation.
insula
Insert
nsert
the heat pipe, rotate clockwise and then anti-clockwise
anti clockwise to ensure the
tip is thoroughly coated with paste. Insert heat pipe fully into the
manifold port.
Lubricate the mouth of evacuated tube (outer wall) with soapy water using a sponge or
spray bottle.
DONT SPRAY WATER INSIDE TUBE
Push the evacuated tube into place. Do not twist more than ⅛th left
and right turn.
If the heat pipe is inserted properly no clear glass should be visible.
visible
DO NOT PULL THE EVACUATED TUBE DOWN
Once all tubes are installed ensure they are aligned neatly and clean each tube of any dirty
marks.
After the insertion of the heat pipe,
pipe, secure the glass tube in the
locking cap by closing the locking cap and carefully tightening
tightening the
screw located at the base of the locking cap until the tube is secure.
Do not over tighten, as the screw only needs to be up against the
protective cap on the base of the evacuated tube to stop it from
moving.
Insulation Inspection
The insulation of the plumbing pipes should be checked annually for damage as deterioration can
occur over time. High temperature UV stabilised foam or metallic wrap are suitable insulation.
Significant heat loss can occur if sub-standard
sub
insulation is used.
Cleaning Of Solar Collector
Regular rain should keep you evacuated tubes clean. However if your evacuated tube solar collector
is located in a positioned that can be accessed safely; it can be cleaned with a soft cloth and warm
soapy water or glass cleaning solution. High-pressure
pressure cleaner can also be used to safely clean your
collector. If the use of a stepladder is needed to access your collector it is recommended to contact
you SolarArk service agent to carry out the cleaning.
Copyright © SolarArk Installation Manual
version 4.6 July 2012
P a g e | 69
Other System Components
The pump, storage tanks and gas/electric boosters should be inspected by a qualified technician
according to the manufacturer’s maintenance guidelines.
Precautions and Warnings
VITREOUS ENAMAL TANKS: For solar collector systems using a vitreous enamel/glass lined storage
tank the following precaution applies:
IF THE HOT WATER SYSTEM IS NOT USED FOR TWO WEEKS OR MORE, A QUANTITY OF HIGHLY
FLAMMABLE HYDROGEN GAS MAY ACCUMULATE IN THE WATER HEATER
TO DISSIPATE THIS GAS SAFELY, IT IS RECOMMENDED THAT A HOT TAP BE TURNED ON FOR
SEVERAL MINUTES OR UNTIL DISCHARGE OF GAS CEASES. USE A SINK, BASIN, OR BATH OUTLET,
BUT NOT A DISHWASHER, CLOTHES WASHER, OR OTHER APPLIANCE
DURING THIS PROCEDURE, THERE MUST BE NO SMOKING, OPEN FLAME, OR ANY ELECTRICAL
APPLIANCE OPERATING NEARBY. IF HYDROGEN IS DISCHARGED THROUGH THE TAP, IT WILL
PROBABLY MAKE AN UNUSUAL SOUND AS WITH AIR ESCAPING
THE TPRV MUST BE OPERATED BY LIFTING AND LOWERING THE LEAVER VERY SLOWLY TO AVOID
DAMAGE TO TPRV
Copyright © SolarArk Installation Manual
version 4.6 July 2012
P a g e | 70
Warranty
Warranty Conditions
i.
The solar water heating system must be installed in accordance with the manufacturer’s
installation instructions, the local, State and National authorities and all relevant statutory
requirements - AS3500.4 & 5, AS5601, AS3000, AS2712 etc.
ii.
This warranty applies only to those components provided as part of the SolarArk solar water
heating product and does not apply to any electrical or plumbing parts provided by the
installer.
iii.
The coverage period is valid for the indicated time from the date of purchase. Should any
part of the complete solar system/water heater product be replaced during this warranty
period, only the balance of the original warranty will continue to remain effective.
iv.
The electrical system components must be installed in a domestic application and
connected to a 240V power supply by a qualified electrician in accordance with AS3000.
v.
The drain cock for flushing must be fitted at the time of installation should this system be
installed in a regional location where regular flushing is required due to sediment build-up.
vi.
Component manufacturers are at liberty to alter the design or construction for the products
not withstanding that the product may have been sold by description or sample, even
though alterations made have been introduced from the date of Contract and the date of
delivery provided that the products are of the same or similar quality and are fit for the
purposes for which they are purchased. Such alterations shall not constitute a defect in
design or construction under this warranty.
vii.
Dated proof of purchase is required prior to commencement of warranty work.
viii.
The Warranty shall be limited to the replacement or repair, at the option of SolarArk Pty Ltd
of any defective products and of such parts as have been damaged in consequence of the
defect. SolarArk Pty Ltd is excluded to the extent allowable by Law from responsibility for
any consequential loss including injury to persons; damage to property; economic loss; pain
and suffering and any legal or other damages flowing from any manufacturing during fault
or defect.
ix.
SolarArk Pty Ltd shall be under no obligation to return parts replaced at its option pursuant
to this warranty.
x.
All independent work carried out must be authorised and prearranged by SolarArk Pty Ltd
before any work commences.
xi.
Labour credit claims must be logged to SolarArk Pty Ltd within 7 days of the service call.
xii.
By law you must observe certain minimum safety precautions when working on high work
sites. These safety precautions are outlined in work cover code of practice “safe work on
roofs” part one and two in the occupation health and safety act 1983.
Copyright © SolarArk Installation Manual
version 4.6 July 2012
P a g e | 71
Warranty Exclusions
The following exclusions shall cause the warranty to become void, and may incur a service charge
and cost of parts that may be required.
i.
Accidental damage, acts of God, failure due to misuse, incorrect installation including but
not limited to, as per owner’s manual, installation guide, installation instruction and any
other requirements set by SolarArk and or lack of maintenance.
ii.
If the system is sold or attempts to repair or alter the system without the consent of or other than by
an authorised SolarArk Pty Ltd representative.
iii.
Where the solar collector leaks or fails to operate normally due to freezing in regions above the
snow line and/or with minimum temperatures below -15oC (in accordance with AS/NZS 2712:2007
freeze level 1), or when power supply to the controller and pump is cut.
iv.
Power surges and/ or voltage fluctuation.
v.
Claims for damage to wall foundations, furnishings, roofs or other losses directly or indirectly due to
leakage from the water heater.
vi.
Damage to the collector due to excessive winds.
vii.
Damage to the evacuated tubes due to impact by any object.
viii.
This warranty does not cover for any damages incurred to the solar collector, valves/fittings and or
storage tank due to incorrect sizing, selection of the solar collector or system water supply pressure
under 400 KPa.
ix.
The use of this solar hot water system to heat chlorinated pools or spa water. Chloride levels present
in most reticulated public potable water supply are safe for use in the solar collector provided there
is no use of bore waters in the reticulated supply.
x.
Damage to Collector as a result of excessive oxygen (Dissolved Oxygen) common in low pressure
systems (Supplied from Rain Water Tank/Gravity supplied).
xi.
The solar collector is left dry (no liquid circulation) and exposed to daily sunlight (i.e. not covered) for
a period exceeding 10 consecutive days.
xii.
Where the solar water heating system component has failed directly or indirectly as a result of
excessive water pressure, negative pressure (partial vacuum), excessive temperature, corrosive
atmosphere, faulty plumbing, electrical wiring, major variations in gas/electrical energy supply.
xiii.
This warranty does not cover the effects of sludge/sediment or corrosion as a result of connection to
a water supply from unfiltered or treated sources i.e. spring, dam, bore, rain water tanks, river or
other. Town supply from a bore or highly mineralized water.
Water Acceptability Composition Range for Solar Collector
Total Dissolved Solids
Total Hardness
Chloride
Sodium
Magnesium
PH Levels
Electrical Conductivity
Copyright © SolarArk Installation Manual
<600 mg/litre or ppm
<200 mg/litre or ppm
<250 mg/litre or ppm
<150 mg/litre or ppm
<10 mg/litre or ppm
Min 7.0 to Max 8.5
850 /cm
version 4.6 July 2012
P a g e | 72
i.
The changing or alternating from one water supply to another can have a detrimental effect on the
operation and/or life expectation of water heaters storage cylinder, pressure temperature relief
valve, heating unit and solar collector.
ii.
SolarArk will not cover resulting faults to the storage cylinder and solar collector if this system is
connected at any time to a water supply where the TDS contents of the water exceeds 600 mg/l.
iii.
Warranty form must be filled out and a copy returned to SolarArk within 10 working days of system
installation date.
iv.
Where the water stored in the cylinder exceeds at any time the following levels:
Water Acceptability Composition Range for Stainless Steel Tanks
Water Quality
Total Dissolved Solids
Total Hardness
Chloride
Sodium
Magnesium
PH Levels
Electrical Conductivity
<600 mg/litre or ppm
<200 mg/litre or ppm
<250 mg/litre or ppm
<150 mg/litre or ppm
<10 mg/litre or ppm
6.5 – 8.5
851 /cm
Water Acceptability Composition Range for Vitreous Enamel Tanks
Water Quality
Total Dissolved Solids
Total Hardness
Chloride
Sodium
Magnesium
PH Levels
Electrical Conductivity
Iron
<600 mg/litre or ppm
<200 mg/litre or ppm
<300 mg/litre or ppm
<150 mg/litre or ppm
<10 mg/litre or ppm
6.5 – 9.5
850 µS/cm
1 mg/litre
v.
Damage caused by animals, birds and rodents.
vi.
Any serial tags/stickers on any of the components are removed or defaced
vii.
The product is relocated from its original point of installation
viii.
Subject to statutory provisions to the contrary, SolarArk Australia shall not be liable for
consequential damage or any incidental expenses resulting from any breach of this warranty.
ix.
The benefits conferred by this warranty are in addition to all other rights and remedies in respect of
the product, which the purchaser has under the Trade Practices Act (Commonwealth) 1975, and
similar State or Territory laws.
Copyright © SolarArk Installation Manual
version 4.6 July 2012
P a g e | 73
Component Warranty
Replacement of major components, including gas heater, evacuated tube solar collector, storage
tanks, solar circulating pump, electric tank heating element, electric tank thermostat that fail due to
faulty manufacturing or workmanship will be provided at no charge to the customer for
replacement.
SolarArk reserves the rights to reject or void warranty if the customer has not paid in full for the
SolarArk hot water system.
Warranty will be covered within Metropolitan areas. Where the system is installed outside the
boundaries of a Capital Cities Metropolitan area (areas on STD), or where the Solar Hot Water
System is installed outside of a 20km radius of an accredited SolarArk Service Agent’s premises, the
costs of transport, insurance and travelling will be charged to the consumer.
The period for which free replacement applies varies for different components and the details
appear below.
Replacement or repair excludes all travel, insurance and/or transport costs. This cost will be passed
on to the consumer.
Faulty parts will only be replaced under warranty after the faulty part has been returned to
SolarArk for inspection to validate the cause of the failure.
Any parts returned for repair may be replaced by refurbished parts of same type rather than
repairing same parts. Refurbished parts may be used to repair or replace the returned parts.
It is a warranty requirement to replace the anode on the SolarArk vitreous enamel tank (glass lined
tank) every three years. Failure to replace anode will void warranty.
The SolarArk warranty is valid from the date of purchase in the event that the date of purchase is
not known the date of manufacture will be used to determine warranty period.
Copyright © SolarArk Installation Manual
version 4.6 July 2012
P a g e | 74
Domestic Use
Parts
Labour
Warranty Warranty
Commercial Use
Parts
Labour
Warranty Warranty
Evacuated Tubes
15 Years
1 Year
5 Years
1 Year
Manifold
15 Years
1 Year
5 Years
1 Year
Mounting Frame
15 Years
1 Year
7 Years
1 Year
Heat Exchanger
10 Years
3 Years
5 Years
1 Year
Other Components
3 Years
3 Years
1 Year
1 Year
SolarArk Vitreous Enamel
Stainless Steel
Solar Controller
Sensor Cable
5 Year
15 Years
1 Year
1 Year
1 Year
1 Year
1 Year
1 Year
1 Year
5 Years
1 Year
1 Year
1 Year
1 Year
1 Year
1 Year
Circulating Pump
2 Year
1 Year
2 Year
1 Year
Tempering Valve and Fittings(If
supplied by SolarArk)
1 Year
N/A
1 Year
N/A
Electric Heating Element
1 Year
1 Year
1 Year
1 Year
Anode (where applicable)
1 Year
1 Year
1 Year
1 Year
Major Component
Evacuated Tube Solar
Collector
S20 and S26 Solar
Compatible Gas Booster
Solar Storage Tanks
Components
•
•
•
Part
In order to comply with Queensland State legislation, in Queensland domestic installations
only, a 2 year warranty on the solar circulating pump 1 year labour warranty applies.
In order to comply with Victorian State legislation, in Victoria domestic installations only, a 5
year warranty on the solar circulation pump, solar controller and components within the gas
booster with 1 year labour warranty applies.
For Everlast stainless steel tanks the 15 years warranty applies for installation in Eastern sea
boarder from Sunshine Cost to Tasmania out to Darling Range and Tamworth all other
States 10 years’ warranty.
Copyright © SolarArk Installation Manual
version 4.6 July 2012
P a g e | 75
SolarArk Warranty Claim Procedure
For all warranty claims on SolarArk Solar Hot Water Systems, please contact your SolarArk
Representative.
Have all information regarding the warranty claim available including:
Copy of Warranty Card
Installer & Customer Details
Installation Compliance Certificate
System Details
Information on Faulty Components
An authorised agent will be allocated to your warranty claim.
In the case that the warranty is not valid, the labour and parts will be charged to the agent or
consumer based on the warranty coverage.
Labour claims will only be honoured based on the SolarArk Schedule of Rates and once the faulty
parts have been received.
For further details on warranty please read the SolarArk Warranty Procedures Guide.
Please find a contact list below outlining the relative suppliers
Component
Contact
Rinnai Gas Booster
Contact: Rinnai 1300 555 545
Everlast Stainless Steel Tank
Contact: Everlast 03 9768 2404
SolarArk Solar Collector
Contact: SolarArk 1300 670 966
SolarArk Solar V.E Tanks
Contact: SolarArk 1300 670 966
Copyright © SolarArk Installation Manual
version 4.6 July 2012
P a g e | 76
Disclaimer
This manual contains an overview of the SolarArk Solar Hot Water System, all
instructions/recommendations must be followed exactly as stated herein. SolarArk Pty Ltd is not
responsible for any loss of damage to any person or property of any type, whether direct or
consequential, arising from the operation of the solar hot water system or any of its components.
OH&S Disclaimer – SolarArk Pty Ltd and its Authorised Dealers work with and recommend various
installation and plumbing companies to install, test and certify correct operation of solar hot water
systems. Each installation must be covered by the installer’s insurances, commercial terms and
conditions and by the applicable OH&S legislation. Each person that installs assembles or services
must comply with all OH&S requirements relevant to the type of work being conducted including,
but not limited to, plumbing work, work on roofs and electrical work. SolarArk Pty Ltd and its
Authorised Dealers do not accept any responsibility for any loss or damages to any person or
property of any type, whether direct or consequential, arising from the installation, maintenance or
operation of the solar hot water system or any of its components.
Copyright © SolarArk Installation Manual
version 4.6 July 2012
P a g e | 77
SolarArk Frequently Asked Questions
Why Choose a SolarArk Hot Water System?
SolarArk is the only system in the Australian market that is backed by a 15 year manufacturing
warranty for all major components. As SolarArk is an Australian owned company with its own
manufacturing facility, you can be assured of the highest quality, ongoing support and service. We
offer the most efficient Solar Collector for both cost efficiency and performance.
How does the SolarArk Evacuated Tube Hot Water System Work?
Sunlight passes through two outer glass layers to an internal tri-layer (comprising an infraredreflection layer, an absorbance layer and an anti-reflection layer). The heat collecting absorbance
layer converts the sunlight into usable heat. The heat generated by the evacuated tube’s
absorbance layer is transferred to the manifold at the top of the tubes, where the cold water is
converted to hot water as it passes through the header pipe to be stored in the hot water tank.
Is Solar Water heating a viable alternative to gas or electricity?
Due to varying weather conditions, solar water heating plays a complementary role to gas and
electricity. Solar water heating cannot completely replace the need for gas or electric heating as
there are some days when solar contributions are low. On average, over a period of a year, a
correctly sized solar system can provide up to 90% of a household’s hot water needs. The hot water
system can be automated so that hot water is guaranteed regardless of sunlight levels.
What is gas or electric boosting?
When solar contribution is low, the gas or electric booster will automatically boost the water
temperature to the required level of 60°C.
What are Small- Scale Technology Certificates (STC’s) or formerly known as (REC’s)?
A Small-Scale Technology Certificate is a new form of currency created by the Federal Government
and is used to demonstrate compliance with the requirements of the Governments Mandatory
Renewable Energy Target (MRET) scheme. Each STC’s represents the equivalent of one megawatt
hour of electricity generation from an accredited renewable energy source. Each SolarArk system
has been assigned a STC’s value based on independent testing authority to establish the
performance and efficiency of each system. The STC’s values assigned to SolarArk systems
represent the amount of energy savings over 10 years. STC’s have a monetary value which changes
weekly based on the renewable energy industry.
Are any structural roof modifications needed to support the hot water system?
There are NO roof modifications required to accommodate SolarArk hot water systems. The
manifold, frame and tubes are lightweight and easily installed by a qualified person.
Copyright © SolarArk Installation Manual
version 4.6 July 2012
P a g e | 78
What is the optimum angle to install the Solar Collector?
The solar collector should be installed for optimum winter performance. The tubes perform best
when installed at an angle of between 20° and 60° from the horizontal. If a roof has an angle less
than 20°, it is advisable to use an adjustable pitched roof frame to ensure optimal heat pipe
operation.
Are the Evacuated Tubes affected by frost?
Frost protection is incorporated into the solar controller. SolarArk evacuated tubes operate at high
efficiency levels in freezing conditions without the use of chemicals such as glycol.
Are the glass tubes hail resistant?
Yes. The evacuated tubes are extremely strong. The SolarArk evacuated tubes are able to handle
significant impact from hail of up to 25mm/1” in diameter.
Copyright © SolarArk Installation Manual
version 4.6 July 2012
P a g e | 79