1
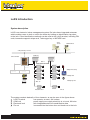
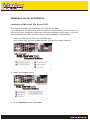
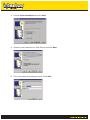
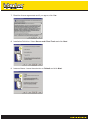
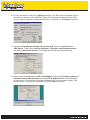
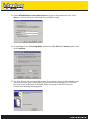
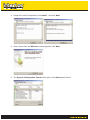
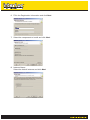
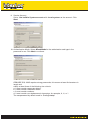
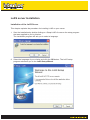
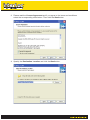
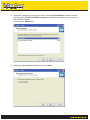
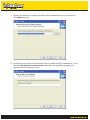
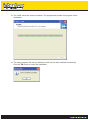
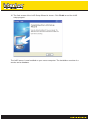
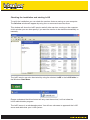
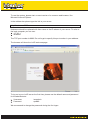
LoXS installation
manual
N.V. Nederlandsche Apparatenfabriek Nedap
Parallelweg 2e
NL-7141 DC Groenlo
The Netherlands
Phone: +31 (0)544 471 666
www.nedap-loxs.com
Distribution or reproduction of this document as well as the use or publication of the
content is not permitted without explicit permission from Interloc.
This manual is written with extreme care. Interloc does not accept any liability for damage
resulting from incorrect or incomplete content in this manual.
The terms and conditions of sales valid at the moment of purchase apply to the systems
discussed in this manual.
Table of Contents
Table of Contents ..............................................................................................................2
LoXS Introduction..............................................................................................................3
System description ............................................................................................................3
Prerequisites .....................................................................................................................4
Operating system installation ............................................................................................5
Microsoft Windows 2000/2003 Server installation.............................................................5
LoXS server Installation ..................................................................................................19
LoXS III installation manual v0.1 EN
Pagina 2 van 29
LoXS Introduction
System description
LoXS is an electronic locker management system. De locks have integrated antennas
which enables users to lock or unlock the locker by holding an identification tag close
to the lock. Other identification methods can be used at the LoXS terminal, including PIN
code, barcaode magnetic stripe card, Technogym key or MIFARE card.
LoXS
Server
Web browser
LAN (ethernet) TCP/IP
COM-unit
LoXS terminal
Max. 2
RS232
Coin hopper
(optionall)
Nedap wrist strap
Card reader
(optional)
Nedap card
Nedap key fob
Max. 62
Electronic lock
Pin set
The system consists basically of four elements, as can be seen in the figure above:
LoXS Terminal
can operate, at most, 124 lockers.
COM-unit
power supply can supply electricity to, at most, 62 locks.
Electronic lock
with integrated antenna to send/receive data.
Pin set
is screwed into the locker door and hooks on to the lock.
LoXS III installation manual v0.1 EN
Pagina 3 van 29
Also, the following elements are optional:
Coin mechanism
for paid use of lockers.
Serial card readers
for barcode, magnetic strip card, Technogym or Mifare.
LoXS server application to administer multiple terminals via a network.
The terminal, electronic locks and the pin sets are the system s only parts visible to the
users.
System administration is possible through using the LoXS Server. Administrators can
connect to the server using a recent web browser. The LoXS Server is connected to the
LoXS terminal and the web based client using a LAN with TCP/IP/
This manual explains how to install the LoXS server.
Prerequisites for installation of the LoXS Server
To install the LoXS Server the following competencies are required:
Basic networking knowledge.
Understanding of IP-adressing and IP-subnetting.
Basic Microsoft Windows Server 2000/2003 administration skills
Basic Microsoft SQL Server 2000/2005 administration skills
Before installing the LoXS server, please make sure the following items are available,
installed and ready to use:
Server hardware:
The following requirements are applicable:
- 1 GB memory
- Intel Pentium IV 2.8 GHz
- 500 MB free disk space for the application
Server software
The following requirements are applicable:
- Windows 2000 / 2003 Server with latest service pack installed
- Microsoft SQL Server 2000 / 2005 with latest service pack installed
An operational LAN based on TCP/IP
- To connect the LoXS Server to the LoXS terminal
LoXS III installation manual v0.1 EN
Pagina 4 van 29
Operating system installation
Microsoft Windows 2000 Server installation
Basically, follow the setup manual for the Windows 2000. In the text below, relevant
choices in the setup are addressed.
This installation assumes that you re installing Windows 2000 Server for the first time.
The lines printed in boldface indicate a menu choice or a window title (caption bar) that
you ll see during the installation.
To install Windows, follow these steps:
1. Insert the CD-ROM and turn on the machine.
2. When the system is started, the Windows 2000 Setup procedure will start and the
Welcome to setup screen appears. Press Enter to set up Windows 2000.
3. When the License Agreement window appears, read this carefully and if you agree,
select I accept this agreement.
4. Windows 2000 Server Setup:
The list below shows existing partitions and spaces available for
creating new partitions.
To setup Windows 2000 on the selected item, press ENTER.
To create a partition in the unpartitioned space, press C.
To delete the highlighted partition, press D.
Press ENTER to use the complete disk as a Windows 2000 disk.
Because we want to use the security of Windows 2000, you need to format the
partition using NTFS. The system will now start formatting the partition.
5. After this is complete, remove the floppy diskette or cd (if there is one present), and
the computer will restart in 15 seconds. When needed, the system will convert FAT
into NTFS and will reboot again.
6. When the system restarts, it will install the necessary devices, such as the keyboard
and mouse. This will take several minutes.
7. Now the system will prompt you to fill in the following information:
Regional settings, such as data/time presentation, keyboard layout. Modify, if
necessary.
Fill in the user name and the company.
Product Key. Type the license key that is printed on the back of the CD-ROM
housing.
LoXS III installation manual v0.1 EN
Pagina 5 van 29
Licensing mode. Leave default.
Per server. Number of concurrent connection = 5
Computer name and administrator password. When the system is installed by
Nedap, this password will be grolle , please make sure that you change this
password after delivery.
Windows 2000 components.
Date and time settings.
8. Network Setup:
Consult your network manager regarding how to configure the network setup of this
server. In this example, the server will be configured into a workgroup.
Choose Typical settings and then select No, this computer is not . and fill in the
workgroup name; for example: Workgroup: XS
During the installation, you may see some extra windows where you are prompted to
fill in information about the type of display you are using, etc. Because these settings
are straightforward, but dependent on the hardware you are using, these dialogs are
not printed in this manual.
9. The Windows 2000 setup is now complete, remove your CD-ROM and click Finish to
restart the computer. After this, you can log on as Administrator , using the
password you entered in the section Administration Account Setup .
10. When logged in after the restart a window Windows 2000 Configure your Server
appears. Consult the network manager regarding how to configure the network setup
of this server. Otherwise do not select anything and close this window.
Note: Please install the most recent Service Pack of Windows 2000. Ensure that
Windows 2000 is running correctly before installing the SQL-Server software.
Microsoft Windows 2003 Server installation
Basically, follow the setup manual for the Windows 2003. In brief the above description
for Windows 2000 can be followed.
LoXS III installation manual v0.1 EN
Pagina 6 van 29
Database server installation
Installation of Microsoft SQL Server 2000
This chapter describes the installation of the SQL-Server 2000.
The installation of an SQL-Server will be explained using illustrations of the screens you
will see during the installation. Before you can start installing the SQL-Server, you must
have installed at least SP1 (Service Pack) on Windows2000 or Windows2003.
1. Insert your SQL-Server CD in the CD-ROM drive.
After a short time, the next window appears. Choose the marked selection.
2. Install the database server.
3. On the Welcome screen, click Next.
LoXS III installation manual v0.1 EN
Pagina 7 van 29
4. Choose Local Installation and click Next.
5. Create a new instance of an SQL-Server and click Next.
6. Fill in your name and company name. Click Next.
LoXS III installation manual v0.1 EN
Pagina 8 van 29
7. Read the license agreement and if you agree, click Yes.
8. Installation Definition. Select Server and Client Tools and click Next.
9. Instance Name. Leave the selection on Default and click Next.
LoXS III installation manual v0.1 EN
Pagina 9 van 29
10. On the next dialog, select the Typical setup type. The SQL-Server specifies a drive
and directory where it will install SQL-Server and the data files delivered with SQLServer. Keep the default or select another drive or directory. Click Next to continue.
11. Activate Customize the settings for each service. Select from Services the
SQL-Server. Then set the Service Settings on Use the Local System account
and enable Auto Start Service. The dialog should look like the figure below.
12. Select now from Services the SQL-ServerAgent. Then set the Service Settings on
Use the Local System account and enable Auto Start Service. A windows pops
up up to warn you that there is a relation between SQL-Server and the Agent. See
picture below. Just press the Ok button and click Next to continue.
LoXS III installation manual v0.1 EN
Pagina 10 van 29
13. Select Mixed Mode for the authorisation and type in the password for sa. Click
Next to continue. After you click Next, the installation starts.
14. In the dialog for the Licensing Mode, choose the Per Seat for 5 devices option and
click Continue.
15. The SQL-Server will now be installed, wait for the setup to end. In the meantime, you
can perform other (non-LoXS) tasks. Do not continue the installation of LoXS until
the setup of the SQLServer is finished. When the setup of the SQL-Server is
finished, the following dialog appears:
LoXS III installation manual v0.1 EN
Pagina 11 van 29
16. Click Finish. Ensure that Windows and SQL-Server are running correctly before
continuing.
Note: If you receive an error at the startup of the server (for example, an error that a
service could not be started), repair the error before continuing. Look in the eventlog for
more details (use the application Event Viewer in the Administrative Tools group).
Microsoft SQL-Server 2005 installation
This paragraph describes the installation of the SQL-Server 2005.The installation of an
SQL-Server will be explained using illustrations of the screens you will see during the
installation. Before you can start installing the SQL-Server 2005, you must have installed
at least:
Windows 2000 with Service Pack 4 or
Windows 2003 with Service Pack 1.
1. Insert your SQL-Server CD in the CD-ROM drive.
2. Read the license agreement and if you agree, click I accept the ... and click Next.
LoXS III installation manual v0.1 EN
Pagina 12 van 29
3. Setup will install Prerequisites, click Install... and click Next.
4. After a short time, the Welcome screen appears, click Next.
5. The System Configuration Check will be done, click Next when finished.
LoXS III installation manual v0.1 EN
Pagina 13 van 29
6. Fill in the Registration Information and click Next.
7. Select the components to install and click Next.
8. Instance Name.
Select the default instance and click Next.
LoXS III installation manual v0.1 EN
Pagina 14 van 29
9. Service Account.
Set to Use build-in System account with Local system as the account. Click
Next.
10. Authentication Mode. Select Mixed Mode for the authorization and type in the
password for sa. Click Next to continue.
BEWARE: SQL 2005 requires strong passwords, this means at least 6 characters in
length and
satisfy at least three of the following four criteria:
a. It must contain uppercase letters.
b. It must contain lowercase letters.
c. It must contain numbers.
d. It must contain non-alphanumeric characters; for example, #, %, or ^.
The sa password by default used is: Grolle@nedap1
LoXS III installation manual v0.1 EN
Pagina 15 van 29
11. Collation Settings
Now you can select the collation and sort order of the database. Leave default and
click Next to continue.
12. Define the Error and Usage Report Settings.
LoXS III installation manual v0.1 EN
Pagina 16 van 29
13. After you click Install, the installation starts.
14. Setup Progress screen.
When setup is finished you will be able to press the Next button
LoXS III installation manual v0.1 EN
Pagina 17 van 29
15. Click Finish. Ensure that Windows and SQL-Server are running correctly before
continuing.
Note: If you receive an error at the startup of the server (for example, an error that a
service could not be started), repair the error before continuing. Look in the eventlog for
more details (use the application Event Viewer in the Administrative Tools group).
Make sure to install the most recent Service Pack of SQL-Server. Ensure that Windows
and SQL-Server are running correctly before installing the LoXS Server software.
LoXS III installation manual v0.1 EN
Pagina 18 van 29
LoXS server Installation
Installation of the LoXS Server
This chapter explains the procedure for installing LoXS on your server.
1. Start the installation by double clicking on Setup LoXS r3c.exe or the setup program
that was supplied to you by Interloc.
The installation program will ask you to select a language.
2. Select the language of your choice and click the OK button. The LoXS setup
program welcomes you to the LoXS Setup Wizard.
LoXS III installation manual v0.1 EN
Pagina 19 van 29
3. Please read the License Agreement and if you agree to the terms and conditions
select the corresponding radio button. Then click the Next button.
4. Specify the Destination Location and click the Next button.
LoXS III installation manual v0.1 EN
Pagina 20 van 29
5. Select the components you wish to install. Select Full Installation, make sure that
that the option Install PreAbXS exchange is checked if you require a connection to
the PreAbXS system.
Then click the Next button.
6. Select the right database instance and click Next.
LoXS III installation manual v0.1 EN
Pagina 21 van 29
7. Specify the location for installing the SQL Server database for your LoXS-server.
Click Next after that.
8. Specify the host name of the computer that you install the SQL Database on. If you
leave the Database server hostname field blank, the installation program will
specify the local computer for you.
LoXS III installation manual v0.1 EN
Pagina 22 van 29
9. Enter the password for the SA account. Make sure to enter the same password that
you specified when installing Microsoft SQL Server.
Then click Next.
10. In the next window you can enter the name of the folder in the Windows Start Menu
that will be used for the LoXS shortcuts.
LoXS III installation manual v0.1 EN
Pagina 23 van 29
11. Select what tasks you want to LoXS Setup program to perform. Usually at least the
options Install LoXS database and Install LoXS service will be checked.
Click Next to continue.
12. The setup program lists the setiings that you provided for installation. You can review
these settings and change them by taking steps back in the installation process. If all
settings are correct, please click Install to install the LoXS server.
LoXS III installation manual v0.1 EN
Pagina 24 van 29
13. The LoXS server will now be installed. The progress bar shows the progress of the
installation.
14. The setup program will tell you when the LoXS service was installed successfully.
Click the OK button to finish the installation.
LoXS III installation manual v0.1 EN
Pagina 25 van 29
15. The final screen of the LoXS Setup Wizard is shown. Click Finish to end the LoXS
setup program.
The LoXS server is now installed on your server computer. The installation consists of a
service and a database.
LoXS III installation manual v0.1 EN
Pagina 26 van 29
Checking the installation and starting LoXS
To verify the installation you can check the services that are running on your computer.
The Services window will appear by using the run-command services.msc .
This window will show the LoXS service and all other services running on the computer.
In this window you can also specify if you want the service to be started automatically or
manually.
The LoXS service can also be started by using the shortcut LoXS in the LoXS folder in
the Windows Start Menu.
Please understand that this shortcut will only start the service, it will not show the
LoXS administration program.
The LoXS server is a web based system. You will use a browser to approach the LoXS
server and administer your LoXS system.
LoXS III installation manual v0.1 EN
Pagina 27 van 29
To use the system, please start a recent version of a common web browser, like
Microsoft Internet Explorer.
In the address bar please type the link to your server:
http://hostname:8888
Hostname should be replaced with then name or the IP-adress of your server. To refer to
the local computer you can use:
127.0.0.1
localhost
The TCP-port number is 8888. Do not forget to specify this port number in your address.
The browser will show the LoXS welcome page:
To log on to your LoXS server the first time, please use the default name and password
for the administrator:
Username:
Password:
loxsadmin
qm826r
We recommend to change the password during the first logon.
LoXS III installation manual v0.1 EN
Pagina 28 van 29
The LoXS Server administration window will appear. It will look like this:
For an explanation about the use of the LoXS Server please see the user manual.
LoXS III installation manual v0.1 EN
Pagina 29 van 29