1
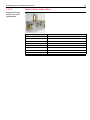
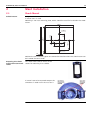
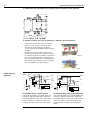
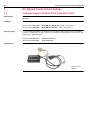
Leica PowerBlade Installation Manual Version 1.1 English Introduction, PowerBlade 2 Introduction Purchase Congratulations on your purchase of PowerBlade machine control system. PowerBlade System is an ideal tool for increasing productivity in all aspects of the construction earthmoving industry. This manual contains important safety directions as well as instructions for setting up the system and operating it. Refer to "6 Safety Directions" for further information. Read carefully through the User Manual before you switch on the product. To ensure safety when using the system, please also observe the directions and instructions contained in the User Manual and Safety Handbook issued by the: Machine manufacturer. Legal, Safety & Environmental Issues / Symbols Legal Copyright Without prior permission in writing by Leica Geosystems AG (Switzerland), this document shall not be reproduced as a whole or in part, by mechanical, photographic, electronic, or other means (including into or transmission in machine-readable form); stored in any retrieval system; used for any purpose other than that/those for which it is intended; nor made accessible or communicated in any form to any third party not expressly authorized by Leica Geosystems AG to have access thereto. Liability This document is strictly for the use of qualified service engineers with the requisite technical skills. Only persons who have successfully completed the appropriate service training provided by Leica Geosystems AG and are in the employ of a company in the Leica Geosystems Group or of an agency, distributor, or service workshop duly authorized by Leica Geosystems AG have the status of qualified service engineer. Leica Geosystems AG accepts no liability whatever for direct or indirect damage that may occur due to the unauthorized or improper use or interpretation of this document by any person who is not a qualified service engineer in accordance with the above definition. Safety / Environment Service technicians have the following obligations: To understand and follow the safety information and instructionson the product and in the user manual. • To be familiar with local regulations relating to industrial andnon-industrial accident prevention in the knowledge that these regulations are up to date. • To inform Leica Geosystems AG immediately in writing if the equipment becomes unsafe. • Dispose of the equipment and its components in accordance with the regulations in force in your country. • PowerBlade, Service Safety Hints 3 Service Safety Hints User manual The user manual also contains important safety notices. Please read the user manual thoroughly before switching on the instrument for the first time. Introduction This handbook is only for use by Leica Geosystems-trained service personnel. It is no substitute for attendance at an appropriate training course. The reader is assumed to be familiar with the user manual supplied with each instrument. Before starting to study the present handbook, the service technician must be able to use the instrument in accordance with the user manual. Opening or Dismantling of Instruments Opening or dismantling of an Instrument may only be attempted inclean, dust-free rooms and only by suitably trained technicians. With this measure, malfunctioning of the instrument caused by dust or other contamination may be prevented. In addition, ESD-precaution must strictly be observed when-ever instruments with electronic components are opened or dismantled. For more information concerning ESD precautions refer to Service News 44/2002. Symbols, PowerBlade 4 Symbols Symbols The symbols used in this manual have the following meanings: Type Description Danger Warning Caution Indicates an imminently hazardous situation which, if not avoided, will result in death or serious injury. Indicates a potentially hazardous situation or an unintended use which, if not avoided, could result in death or serious injury. Indicates a potentially hazardous situation or an unintended use which, if not avoided, may result in minor or moderate injury and/or appreciable material, financial and environmental damage. Important paragraphs which must be adhered to in practice as they enable the product to be used in a technically correct and efficient manner. To use the equipment in the permitted manner, please refer to the detailed safety instructions in the User Manual. © 2010 Leica Geosystems AG Heerbrugg, ® All rights reserved. PowerBlade, General Installation Information 5 General Installation Information Caution Installing near mechanically moving machine components may damage the product. Precautions: Deflect the mechanically moving machine components as far as possible and define a safe installation zone. Warning Unauthorized modification of machines by mounting the product may alter the function and safety of the machine. Precautions: Follow the instructions of the machine manufacturer. If no appropriate instruction is available, ask machine manufacturer for instructions before mounting the product. Important Safety Information for Working on Mobile Hydraulics Prior to installation of an hydraulic system for automatic control of a machine, the installer has to collect data about the type, model, serialnumber, whether it is open center, closed center, load sense or pilot controlled hydraulic system. Refer also to the machines manufacturers user manual or marketing material to get the information and also refer the Leica Geosystems Machine database to collect information on known machines. For hydraulic hoses it is important to find a suitable place for the hydraulic valve on the machine and measure the hose lenght between the connections on the cylinders and hydraulic valve providing sufficient length. Identify the type of hydraulic connections on the machine such as JIC or ORFS-Fittings. Only personal that have been trained and authorised by Leica Geosystems are allowed to perform hydraulic, mechanical or electrical installations on machines. Protective Equipment Always wear protective glasses, protective shoes, and other protective equipment as required by job conditions and machines. In particular, wear protective glasses when using pressurized air to clean surfaces, or cleaning overhead areas. Use welding gloves, hood or goggles, apron and other protective clothing appropriate to the welding job being performed. Do not wear loose clothing or jewelry that can catch on machine parts or tools. Pressurized Items Lower the blade, ripper and other attachments to the ground before performing any work on the machine. Relieve all pressure in oil, air, or water system before any lines, fittings, or related items are disconnected or removed. Use caution when checking the machine for hydraulic leaks, and system operation. Do not use bare hands to check for leaks. Pin-hole leaks can result in a high velocity fluid stream that can penetrate the skin and cause serious injury. Stand clear or use a board or cardboard to check for leaks. Hot Fluids To avoid burns, be alert for hot parts and hoses on machines that have just been stopped. Be careful when removing fill caps, breathers, and hose connections on the machine. Hold a rag over the cap or fitting to prevent being sprayed by liquids under pressure. Pre-Installation Before starting to disconnect hydraulic and electrical components, disconnect the battery cable and attach a “Do Not Operate” or similar tag in the operator’s compartment. A “lockout” box should also be placed and locked onto the battery terminal to avoid the battery from being reconnected and the machine possibly started. If possible, make all modifications to the machine parked on a level, hard surface. Block the wheels to prevent from rolling. While working on or under the machine. Very important Leica Geosystems reserves the right to invalidate warranty in case non-approved valves, hoses and fittings are used without prior written consent of Leica Geosystems. Legal safety instructions from the country where the installation is made must be observed at all times. Table of Contents, PowerBlade 6 Table of Contents In this manual Topic 1 Page Basic Hydraulic Information 1.1 1.2 1.3 2 3 Hydraulic Hose and Fitting Installation 1.1.1 Closed Center - Single Valve 1.1.2 Load Sense Single Valve 1.1.3 Open Center Single Valve Valves Description 1.2.1 Vickers Proportional 1.2.2 Open Center Inlet Valve Hosekit Layout 7 7 7 8 9 10 10 11 12 Mast Installation 13 2.1 13 Shock Mount Hydraulic Installation 14 3.1 3.2 3.3 3.4 14 14 15 17 Operators and Installers Safety Limitation Single Proportional Control Valve with an Open Center Inlet Valve Preparing the Dozer 4 Technician Setup 18 5 PC based tools driver setup 20 5.1 20 21 22 6 Wiring 6.1 6.2 7 Software Update MCP700/700E & MLS700/700E 5.1.1 Software Upload Panel MCP700/700E 5.1.2 Software Upload Panel MLS700/MLS700E 24 General 6.1.1 6.1.2 6.1.3 Information General Connection of the Controller Power Cable Connection of System Power Cable (from Battery to Control Panel) 6.1.4 General Recommendations 6.1.5 Connection of Hydraulic Cables System Drawings 24 24 24 25 26 27 28 Troubleshooting 30 7.1 30 General Notices PowerBlade, Basic Hydraulic Information 7 1 Basic Hydraulic Information 1.1 Hydraulic Hose and Fitting Installation 1.1.1 Closed Center - Single Valve Closed center hydraulic system The valve must be connected into the existing hydraulic system in four places. The following drawing is a generic illustration. All parts and locations may differ acording to machine type and kit purchased. a f b g a) b) c) d) e) f) g) c d e Left Cylinder Valve Manual Valve Pump Tank Raise Lower Existing Lines New Lines System connections 1. Install the pressure hose, which connects the P port of the valve to the pressure line from the pump. A tee fitting must be installed at a convenient (typically at the manual valve bank) location in the existing line to accomplish this. 2. Install a hose from the tank port T on the valve to a line in the hydraulic system, which is connected directly to the hydraulic oil tank (a tee fitting will probably be necessary to accomplish this). 3. Install hoses from the left or right raise and lower ports of the valve to the appropriate line of the blade lift cylinder which will be automatically controlled. A tee fitting must be installed at a convenient location along this line (typically at the blade lift cylinders). Warning All hoses should be of the same inside diameter as the original and rated at a pressure equal to or greater than the system relief pressure. Precautions: Refer to the machine service manual. Basic Hydraulic Information, PowerBlade 8 1.1.2 Load Sense Single Valve General The Valve must be connected into the existing hydraulic system in five places, using new hoses. The following drawing is a generic illustration. All parts and locations may differ acording to machine type and kit purchased. a b f h i c g a) Proportional Valve Assy 12VDC or 24VDC b) Left Cylinder c) Manual Valve d) Pump e) Tank f) LS out g) Shuttle Valve h) Raise i) Lower Existing Lines d e New Lines Load Sense Line LS shuttle valve connections b a c a) Manual valve b) Proportional valve c) Machines hydraulic pump System connections 1. Install the pressure hose which connects the P port of the valve to the pressure line from the pump. A tee fitting must be installed at a convenient (typically at the manual valve bank) location in the existing line to accomplish this. 2. Install a hose from the tank port T on the valve to a line in the hydraulic system, which is connected directly to the hydraulic oil tank (a tee fitting will probably be necessary to accomplish this). 3. Install hoses from the left or right raise and lower ports of the valve to the appropriate line of the blade lift cylinder which will be automatically controlled. A tee fitting must be installed at a convenient location along this line (typically at the blade lift cylinders). 4. Install the load sense hose from the LS port of the valve to the shuttle valve as shown. Disconnect the machine's LS line that runs from the manual valves to the pump compensator and install the external shuttle valve. Warning All hoses should be of the same inside diameter as the original and rated at a pressure equal to or greater than the system relief pressure. Precautions: Refer to the machine service manual. PowerBlade, Basic Hydraulic Information 9 1.1.3 Open Center Single Valve General The Valve must be connected into the existing hydraulic system in five places. The following drawing is a generic illustration. All parts and locations may differ according to machine type and kit purchased. a b f g h i j c a) Proportional Valve Assy 12VDC or 24VDC b) Left Cylinder c) Manual Valve d) Pump e) Tank f) Raise g) Lower h) In i) Out j) Inlet Valve d e Existing Lines New Lines System connections 1. After removing the existing hose from the hydraulic pump to the Manual Valve, a new hose must be added from the pump to the "IN" port of the open center valve. The hose should be of the same inside diameter as the original and rated at a pressure equal to or greater than the system relief pressure (see the machine service manual). 2. Install a second hose from the "OUT" port of the Laser Control Valve to the Manual Valve (where the original hose was connected). This hose should be the same size and pressure rating as the hose in #1. There are two alternate port locations for both the "IN" port and the "OUT port in the valve. By simply moving a plug, the installer may choose the port location, which is most convenient for that particular installation. 3. Install a hose from the "T" port on the Laser Control Valve to a line in the hydraulic system, which is connected directly to the hydraulic oil tank (a tee fitting will probably be necessary to accomplish this). This hose should be the same size or of larger inside diameter as the hoses on the cylinder which will be automatically controlled and rated at a pressure of at least 500 PSI (34 Bar). 4. The fourth hose runs from an "A" port of the Laser Control Valve to the raise line of the cylinder, which will be automatically controlled (a tee fitting must be installed at a convenient location along this line; a good place is often where the hoses from the cylinder connect to steel lines in/on the machine body). Make sure the hose is rated at a pressure equal to or greater than the system relief pressure. 5. The fifth hose runs from a "B" port on the Laser Control Valve to the lower line of the cylinder referenced in #4 (a tee fitting must be installed at a convenient location along this line; a good place is often where the hoses from the cylinder connect to steel lines in/on the machine body). This hose should meet the same specifications as listed in #4. Warning All hoses should be of the same inside diameter as the original and rated at a pressure equal to or greater than the system relief pressure. Precautions: Refer to the machine service manual. Basic Hydraulic Information, PowerBlade 10 1.2 Valves Description 1.2.1 Vickers Proportional Vickers proportional control valve specifications Specifications Description Maximum Flow to Cylinders: Depending on valve pkg. 8, 15, 19 & 22 liter available. Maximum Pressure: 5000 P.S.I. ( 344.8 Bars.) Operating Voltage: 12 VDC @ 3.0 Amps 24 VDC @ 1.5 Amps Temperature Range: -40° to 250° F (40° to 120° C) Dimensions: 4² x 11.1² x 5.5² (9.6 x 26.6 x 13.9 cm) Filtration Required: Standard machine filtration is adequate. Weight: 26 lbs. (11.81 kg) Seals: Viton Port Sizes: Tank & Pressure ¾ - 16 UNF (#8 SAE O-ring) "A" & "B" 9/16 - 18 UNF (#6 SAE O-ring) Load Sense 9/16 - 18 UNF (#6 SAE O-ring) Load Sense "Gage Port" 9/16 - 18 UNF (#6 SAE O-ring) Installed Fitting Sizes for hose Tank & Pressure 13/16 - 16 UNF Thread outside with connection: caps "A" & "B" 11/16 - 16 UNF Thread outside with caps Load Sense 11/16 - 16 UNF Thread outside with cap PowerBlade, Basic Hydraulic Information 1.2.2 11 Open Center Inlet Valve Proportional open center inlet valve specification Specifications Description Flow rating: 5 - 25 GPM (18.9 - 94.5 LPM) Maximum Pressure: 3300 P.S.I. (227.5 Bars) Temperature Range: -40° to 250° F (-40° to 120°C) Dimensions: 3.5² x 8.5² x 6.5² (8.9 x 21.6 x 16.5 cm) Filtration Required: Standard machine filtration is adequate. Weight: 9 lbs. (4.0 kg) Seals: Viton Port Sizes: "IN" & "OUT" 1 1/16 - 12 UNF (#12 SAE O-ring) Basic Hydraulic Information, PowerBlade 12 1.3 Hosekit Layout Example 4 Description 1 Hose Assembly - Tank 2 Hose Assembly - Pump 3 Hose Assembly - Cylinder 4 Existing pressure line 5 ORS-MOR adapter 45 7 ORS-MOR adapter 90 8 ORS swivel run tee 9 ORS tube end reducer 10 ORS tube nut 13 ORS-MOR adapter straight 14 ORS-90 swivel elbow 15 ORS swivel run tee 17 ORS-MOR adapter 45 PowerBlade, Mast Installation 13 2 Mast Installation 2.1 Shock Mount Schock mount Using the shock mount for all installations with a power mast it is also recommended if a manual mast is used. Following is the mast mounting plate, which should be used for installation the shock mount. 260±1 50 100±1 260±1 28.9 57.7 4x Ø18 50 Ø5 50 Weld on the mast mounting plate to a convenient location where the shock mount can be installed free on a blade. Preparing the shock mount for mast Installation The shock mount comes with a set on screws for mounting it on a blade. 4 screws have to be removed to open the U-Brackets in order to fix the mast on it. Hydraulic Installation, PowerBlade 14 3 Hydraulic Installation 3.1 Operators and Installers Safety General Before proceeding with the hydraulic system installation, carefully study the following safety guidelines: • • • • • You may have to drain all hydraulic oil from the tank before proceeding with the installation. Be aware that even after the tank is drained, oil will still remain in any lines that are routed below the level of the tank drain plug! Before removing any hydraulic hoses or fittings, be sure that the machine blade and/or implement is resting on the ground and relieve any trapped hydraulic pressure by operating all manual valves several times in all positions after the machine is shut off. Never remove lines from a cylinder that is holding a load. If the machine was running a short time before the installation, the oil may be hot! WATCH OUT WHEN REMOVING LINES! Hydraulic pressure may be trapped in some parts of the machine hydraulic system and care must be taken as outlined below to avoid possible injury: 1. If a fitting is difficult to remove (unscrew) even after it has been loosened with a wrench, it may be a result of trapped pressure. 2. Proceed cautiously by covering the area around the fitting with a shop towel to shield you from oil spraying out of the joint. 3. Next, wiggle the line from side to side to make a gap where the pressure may relieve itself. 4. If no oil appears, loosen the fitting a little further and repeat the process until you are assured that no more back pressure exists. 5. When the backpressure is relieved, the fitting should come loose the rest of the way by hand. • Safety is the operator’s responsibility! Always place the Automatic/Manual switch on the control panel to the manual position before leaving the operator’s seat or while the machine is not moving. • Never attempt to adjust the position of the laser sensor while the automatic control system is engaged. • Under no circumstances should any service work be performed on the machinery while the automatic system is engaged. • To install laser system components, safety panels or guards my have to be removed. All safety panels and guards must be installed before operating your equipment. • It is important to comply with any safety recommendations of the machine manufacturer as outlined in the machine owner and service manuals. 3.2 Limitation The valve drive output of the control panel is limited to 3.5 Amps. PowerBlade, Hydraulic Installation 3.3 General 15 Single Proportional Control Valve with an Open Center Inlet Valve The following assembly instructions are for all combinations of one Leica Geosystems Control Valve and an Open- Center Inlet Valve Follow the instructions carefully to ensure proper valve operation and leak-free seals. Use only bolts supplied by Leica Geosystems, Inc. Other bolts may cause failure and possible injury. 1. Prepare the Control Valve and Inlet Valve for assembly. a) Remove all plastic plugs from the mating surfaces and remove plug A from the Control Valve. b) If installing the valves on a machine using a Power Beyond, remove Plug B from the Inlet Valve. (If necessary, see the back of this sheet for an explanation.) Plug B Typical machines that are Power Beyond; CAT D3C, D4C & D5C; John Deere 450G, 550G, & 650G; Case 850G, 650H & 850H c) Make sure all three O-Rings are properly posi- Plug B tioned on the Inlet Valve. Plastic Plugs d) Clean the mating surfaces and inspect them to make sure the valves can attach flush. If necessary, smooth the surfaces with a metal file. 1 2 3 2. Attach the Inlet Valve to the Control Valve. a) Put a split lock washer and flat washer on each bolt. b) Apply the anti-seize from the bolt kit to the threads of the three bolts. c) Align the mating surfaces, insert the bolts through the right-side of the Control Valve and hand tighten. d) Tighten the bolts to 10 foot-pounds (13.6 Newton meters) torque in the sequence shown. e) Tighten the bolts to 30 foot-pounds (40.8 Newton meters) torque in the sequence shown. f) Tighten the bolts to 30 foot-pounds (40.8 Newton meters) torque in the sequence shown. Hydraulic Installation, PowerBlade 16 3. Attach the Valve Assembly to a mounting plate or directly to the machine. 4. Before installing the Valve Assembly on a machine, do the following: • • • Choose the IN and OUT ports on the Inlet Valve that are the most convenient for connecting to the machine’s hydraulic system. Seal the unused ports with the plugs provided. Remove the O-Rings from the right-side Control Valve and save them for spare parts. If installing the Valve Assemble on a machine not using a Power Beyond, remove Plug F from the Control Valve. This is the port for the connection to the machine’s tank. (If necessary, see below for an explanation.) OUT Ports IN Ports Plug F Power Beyond Plumbing Manual Valve Bank Power Beyond Manual Valve Bank Lift Cylinder Valve Assembly OUT Lift Cylinder OUT IN Tank Tank Pump Tank New Lines Valve Assembly Pump Existing Lines Tank IN New Lines Existing Lines G 10221.1 G 10221.2 Installations Using a Power Beyond The Valve Assembly is installed after the machine’s Manual Valve Bank. Hydraulic fluid diverted for use by the Laser Control Valve Assembly is returned to the tank through the OUT port of the Inlet Valve. Installations NOT Using a Power Beyond The Valve Assembly is installed before the machine’s Manual Valve Bank. Hydraulic fluid diverted for use by the Laser Control Valve Assembly is returned to the tank through the T tank port of the Control Valve. PowerBlade, Hydraulic Installation 17 3.4 Preparing the Dozer Getting Access Move the Dozer to flat, level ground or a hard surface. It is desirable to do the installation in a well-equipped workshop. 1. Remove the left and right Engine compartment Panels. 2. Remove the front grille. 3. Remove all floor plates in the operator's cabin. 4. Remove all side Panels. 5. Turn Battery lockout to the OFF position and disconnect Battery terminals. Technician Setup, PowerBlade 18 4 Technician Setup Technician Setup The technician setup mode is entered as follows: • • Turn off the panel. Move the AUTO/ MANUAL / SEEK switch to the SEEK position and the Blade switch to the UP/ LIFT position and hold both while pressing the ON/OFF button to turn on the system. After initial power up, release the BLADE switch continue to hold the AUTO / MANUAL / SEEK switch in the SEEK position • The LED numeric display will show the first in a series of menus available, use the Mast Raise/Lower Pushbutton to select the desired menu , then release the AUTO / MANUAL / SEEK switch. Use the Mast Raise/Lower Pushbutton to select the value of the menu item, then move the AUTO / MANUAL / SEEK switch to the SEEK position. Continue to hold the AUTO / MANUAL / SEEK switch and use the Mast Raise/Lower Pushbutton to select another menu , or go o blank menu (LED Display goes blank) and release to save all settings and start operation. • • Choose Hydraulic Valve Choose Hydraulic Valve type (1-7) 1 2 3 4 5 6 7 = = = = = = = Black/White valve - sink Black/White valve - Source Proportional valve - Closed loop temperature compensation, Sink Proportional valve - Closed loop temperature compensation, Source Proportional valve - Open loop, Sink Proportional valve - Open loop, Source Danfoss valve Min speed down (0-999) The minimum hydraulic speed in the lower direction. (The valve Offset Current) Min speed up (0-999) The minimum hydraulic speed in the raise direction. (The valve Offset Current) Max speed down (0-999) The maximum hydraulic speed in the lower direction. (The Gain of the regulation system) Max speed up (0-999) The maximum hydraulic speed in the lower direction. (The Gain of the regulation system) Reverses the hydraulic direction (on/off) This option reverses the hydraulic traveling direction. Enables the external auto switch (on/off) This option enables/disable the external auto switch. If no external auto switch is connected this option shall always be set to off. When set to "on" both the auto/manual switch on the panel and the external auto switch need to be set in auto to activate the automatic hydraulic. When the panels' auto/manual switch is set in manual the external auto switch has no function. Enables Power On auto (on/off) This option decides what will happen if the auto/manual switch already is in auto when the panel is turned on. When set to "on", the hydraulic will run in automatic mode when the panel is powered on. When this option is set to off, you have to set the auto/manual switch down into manual and back up into auto, to run the hydraulic in automatic mode. PowerBlade, Technician Setup 19 Resets the panel (on/off) This menu option can be used to reset all options in the user and technician menu to its standard values. It is done by setting the reset option to "on", and then exit the technician menu. The 7-segment display will then say RESET for a short time. When the display shows the mast height again the reset is done. PC based tools driver setup, PowerBlade 20 5 PC based tools driver setup 5.1 Software Update MCP700/700E & MLS700/700E Information Any new Software update has to be uploaded to the Panel MCP700 and to the Sensor MLS700. Firmware The Files are available for download on the Leica Service Homepage / Download area. Load programs Special tools Filename MCP700/700E: MCP700_ver_r0910.bin ( 0910 = SW version ) Filename MLS700/700E: MLS700_ver_104.bin ( 104 = SW version ) As the loading procedures are different for the Panel and for the sensor, the loading programs are different as well. The Files are available for download on the Leica Service Homepage / Download area. Load Prg MCP700/700E: program_cb10.exe Load Prg MLS700/700E: program32.exe A special Upload Kit is required. Article number: 762621 PowerBlade, PC based tools driver setup 21 5.1.1 Software Upload Panel MCP700/700E Description • • Via RS232 or USB interface Setup Upload Kit as shown 9V Battery or Power Supply • Start load program program_cb10.exe • Select Firmware • Start Download • Procedure takes approx. 30sec.. and will be confirmed with programming successfully. PC based tools driver setup, PowerBlade 22 5.1.2 Software Upload Panel MLS700/MLS700E Description The program for uploading the firmware to the sensor MLS700/700E is a DOS program and not based on windows. User has to be familiar with DOS. Upload runs only via RS232 USB does not work. Furthermore, the power for the Upload Kit must be stable. Two 9 V Batteries ( parallel ) or a Power Supply have to be used - see picture • Setup Upload Kit as shown Entering DOS • Press Start - Press Run • Enter cmd • By means of DOS commands select directory or folder where the upload program and the Firmware are located. Enter the following commands and start program • program32 1 mls700_ver_104.bin COM port SW version PowerBlade, PC based tools driver setup • Test & Adjustments 23 Upload takes a few seconds and will be confirmed with PROGRAMMING OK After uploading the new SW no tests and adjustments are required! The Panel MCP700/700E & Sensor MLS700/700E need to be installed again with the respective systems and will run with the new SW. Wiring, PowerBlade 24 6 Wiring 6.1 General Information 6.1.1 General General Please only use cables supplied with system when wiring the system components. For the installation of the cables of the grader system, the general rules for the installation of electrical wiring apply. • Avoid sharp bends and lay the cable in large loops within the range of rotating- or moving parts. • When installing the cables, please make sure everything complies with the already existing electric and hydraulic system. • Make use of existing holes and ducts when routing cables (e.g. into the driver's cabin, through the frame etc.) • After having completed the installation, please drive through all possible positions with the swivel table and the blade, in order to make sure that the cables are not touching, stretched or even squeezed by any moving parts of the machine. • Please consider that a well-planned and thoroughly carried out electric installation does not only protect the cables against damages, but also looks professional. Power supply of the PowerBlade system should always be provided by the battery, by means of a separate switch, which is integrated in the operators cab of the machine. • • • • Do not install the system on machines with battery plus connected to the frame of the machine. The system's supply voltage must not fall short of 10V during operation, since otherwise safe operation as well as the control function cannot be guaranteed. It is forbidden to use 12V voltage supply on 24V on-board systems. Never replace a defective fuse by a different value, which is not specified. 6.1.2 Connection of the Controller Power Cable Install Power Cable • • • Connect the connector end of this cable to the panel. Route cable throught the machine to the batterie. Route cable through a strain relief. PowerBlade, Wiring • Route cable through far left strain relief. Install spade lugs to the two wires. The blue wire will connect to the negative (-Vbatt) terminal post two and the brown wire will connect to the positive (+ Vbatt) terminal post one. Install the inline fuse in the brown wire and terminals to both brown and blue wires. At the batteries, connect the brown wire to positive and the blue wire to negative. • • 1. No Battery disconnect Fuse 2. Positive Battery disconnect Fuse to Panel to MC1200 To machine Installation of Batterie Cable Most machines are 24 volt using two batteries. Use a meter to insure you have proper voltage. Battery Switch To machine To machine Chassis Chassis 3. Negative Battery disconnect Fuse To machine Connection of System Power Cable (from Battery to Control Panel) To machine 6.1.3 25 to MC1200 Battery Switch To machine Chassis Wiring, PowerBlade 26 6.1.4 General Recommendations • • • • • • • • Always make sure to disconnect the battery poles, before doing any electrical changes to the machine ( e.g. when installing the system to the battery cables) Before disconnecting the battery, the machine should be shut off first, to avoid a load dump condition, which may harm the electronic parts of the machine Disconnect the battery pole which is connected to the frame of the machine first. (on most machines this will be the minus pole) Always disconnect the cables from the system components, when any welding is done on the machine Make sure, the fuse is in place at the battery side of the power cable Never replace a fuse with one of a different value than specified Make sure, that the crimp contacts are well done,so that the cable won't come loose by vibration Always connect the power supply cables of the system to the battery after the battery disconnect switch PowerBlade, Wiring 27 6.1.5 Connection of Hydraulic Cables General The Hydraulic Cable for the hydraulic valve is on one side pre-connected. It will be routed from the control to the hydraulic valve parallel to the hydraulic hoses and fixed with cables ties. Hydraulic connector installation (MCP700 only) 1 A D B C 4 3 2 A) B) C) D) The hydraulic cable is pre-wired. Hydraulic connector installation (MCP700E only) A) B) C) Hydraulic Cable Danfoss MVC702 4 Raise 3 Lower Common This 3-pin connector is only valid for MCP700E. 1 2 3 4 N/C Common Lower Raise Wiring, PowerBlade 28 6.2 System Drawings The cable schematic shown below is only valid for MCP700/MLS700 systems. PowerBlade System with Manual Mast PowerBlade, Wiring PowerBlade System with Power Mast 29 The cable schematic shown below is only valid for MCP700/MLS700 systems. Troubleshooting, PowerBlade 30 7 Troubleshooting 7.1 General Notices Information on Errors In this section, information is provided on measures to take when an error message is displayed. Sources of error can mostly be eliminated by careful and timely maintenance. This prevents annoyance, saves money and unnecessary malfunctions. PowerBlade, Troubleshooting 31 Ask your local Leica dealer for more information about our TQM program. Leica Geosystems AG Heinrich-Wild-Strasse CH-9435 Heerbrugg Switzerland Phone +41 71 727 31 31 www.leica-geosystems.com Original text Printed in Switzerland © 2010 Leica Geosystems AG, Heerbrugg, Switzerland Leica Geosystems AG, Heerbrugg, Switzerland, has been certified as being equipped with a quality system which meets the International Standards of Quality Management and Quality Systems (ISO standard 9001) and Environmental Management Systems (ISO standard 14001). 762668-1.1.0en Total Quality Management: Our commitment to total customer satisfaction.