1
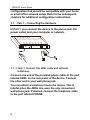
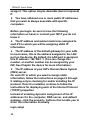
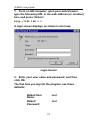
TED8620 ADSL MODEM/ROUTER/FIREWALL USER MANUAL Http://www.tenda.com.cn TED8620 User’s Guide CONTENTS 1 PRODUCTION ··································································· 4 1.1.1 Features ····································································· 4 1.2 SYSTEM REQUIREMENTS ·······································4 2 PACK CONTENTS ································································ 5 2.1 2.2 3 FRONT PANEL ·······················································5 REAR PANEL ·························································6 QUICK START··································································· 7 3.1 PART 1 — CONNECTING THE HARDWARE·············8 3.1.1 Step 1. Connect the ADSL cable and optional telephone. ················································································ 8 3.1.2 Step 3. Attach the power connector. ···························· 9 3.1.3 Step 4. Turn on the ADSL. and power up your systems. ··················································································· 9 3.2 PART 2 — CONFIGURING YOUR COMPUTERS ·······9 3.2.1 Before you begin ························································· 9 3.2.2 Assigning static Internet information to your PCs······· 9 3.3 THE HOME PAGE AND SYSTEM VIEW TABLE ······12 3.3.1 Default Router Settings ············································· 17 3.4 4 USE SOFTWARE DIAL-UP OUTSIDE················· 19 4.1 4.2 4.3 4.4 2 TESTING YOUR SETUP·········································18 PREPARE WORK ···················································19 THE SOFTWARE INSTALL ·····································19 ADSL MODEM PARAMETER SETUP ··················23 DIAL-UP····························································23 TED8620 User’s Guide 5 GETTING STARTED WITH THE CONFIGURATION MANAGER······································ 24 5.1 ACCESSING THE CONFIGURATION MANAGER ···············25 5.2 FUNCTIONAL LAYOUT ···················································25 5.3 COMMITTING CHANGES AND REBOOTING ·····················27 5.3.1 Committing your changes··········································27 5.3.2 Rebooting the device using Configuration Manager ·28 6 CONFIGURING BRIDGING ····································· 28 6.1 6.2 7 CONFIGURING FIREWALL SETTINGS ··········· 31 7.1 8 OVERVIEW OF BRIDGES ······································28 WHEN TO USE THE BRIDGING FEATURE··············29 CONFIGURING GLOBAL FIREWALL SETTINGS ·····31 ADMINISTRATIVE TASKS······································· 33 8.1 CONFIGURING USER NAMES AND PASSWORDS ·············34 8.1.1 Creating and Deleting Logins ····································34 8.2 UPGRADING THE SOFTWARE··········································36 8.3 DIAGNOSING PROBLEM USING IP UTILITIES ··················42 8.3.1 ping ············································································42 3 TED8620 User’s Guide 1 production Congratulations on becoming the owner of the production. Your LAN (local area network) will now be able to access the Internet using your high-speed ADSL connection. This User Guide will show you how to set up the ADSL Bridge/Router, and how to customize its configuration to get the most out of your new product. 1.1.1 Features Internal ADSL modem for high-speed Internet access Network address translation (NAT), Firewall, and IP filtering functions to provide security for your LAN Network configuration through DHCP Server and DHCP Relay Services including IP route and DNS configuration, RIP, and IP and DSL performance monitoring Configuration program you access via an HTML browser 1.2 System Requirements In order to use the ADSL/Ethernet router, you must have the following: 4 TED8620 User’s Guide ADSL service up and running on your telephone line, with at least one public Internet address for your LAN An Ethernet hub/switch, if you are connecting the device to more than one computer on an Ethernet network For system configuration using the supplied webbased program:a web browser such as Internet Explorer v5.0 or later, or Netscape v6.1 or later。 2 Pack Contents In addition to this document, your should arrive with the following: ADSL Ethernet Bridge/Router Power adapter and power cord Ethernet cable (“straight-through” type) Standard phone/DSL line cable ADSL/Ethernet Router Package Contents 2.1 Front Panel The front panel contains lights called LEDs that indicate the status of the unit. 5 TED8620 User’s Guide ADSL MODEM /ROUTER ADSL_ACT ADSL_LINK LAN_ACT LAN_LINK PO WER TED8620 Label Color Function PWR green On: Unit is powered on Off: Unit is powered off LAN -LINK green On: LAN link established and active Off: No LAN link LAN-ACT green twinkle :Computer is data traffic . ADSLLINK green On: ADSL link established and active illuminated:ADSL is no link physical Off: No ADSL link ADSL-ACT IlluminatedFlashes when ADSL data activity occurs. May appear solid when data traffic is heavy. 2.2 Rear Panel The rear panel contains the ports for the unit's data and power connections. Rear Panel Connections 6 TED8620 User’s Guide Label Function PHONE Provides an optional connection to your telephone LINE Connects the device to your PC's Ethernet port, Power Connects to the supplied power converter cable Reset Resets the device to the manufacturer’s default configuration 3 Quick Start This Quick Start provides basic instructions for connecting the to a computer or LAN and to the Internet. Part 1 describes setting up the hardware. Part 2 describes how to configure Internet properties on your computer(s) . Part 3 shows you how to configure basic settings on the to get your LAN connected to the Internet. After setting up and configuring the device, you can follow the instructions on page 18 to verify that it is working properly. This Quick Start assumes that you have already established ADSL service with your Internet service provider (ISP). These instructions provide a basic 7 TED8620 User’s Guide configuration that should be compatible with your home or small office network setup. Refer to the subsequent chapters for additional configuration instructions. 3.1 Part 1 — Connecting the Hardware In Part 1, you connect the device to the phone jack, the power outlet, and your computer or network. 3.1.1 Step 1. Connect the ADSL cable and optional telephone. Connect one end of the provided phone cable to the port labeled ADSL on the rear panel of the device. Connect the other end to your wall phone jack. You can attach a telephone line to the device. This is helpful when the ADSL line uses the only convenient wall phone jack. If desired, connect the telephone cable to the port labeled PHONE. 8 TED8620 User’s Guide 3.1.2 Step 3. Attach the power connector. Connect the AC power adapter to the PWR connector on the back of the device and plug in the adapter to a wall outlet or power strip. 3.1.3 Step 4. Turn on the ADSL. and power up your systems. Plug the power in the back panel of the device to the ON position. Turn on and boot up your computer(s). 3.2 Part 2 — Configuring Your Computers Part 2 of the Quick Start provides instructions for configuring the Internet settings on your computers to work with the Device. 3.2.1 Before you begin By default, the device. automatically assigns all required Internet settings to your PCs. You need only to configure the PCs to accept the information when it is assigned. If you have connected your PC of LAN via Ethernet to the device, follow the instructions that correspond to the operating system installed on your PC. 3.2.2 Assigning static Internet information to your PCs In some cases, you may want to assign Internet information to some or all of your PCs directly (often called “statically”), rather than allowing the device to 9 TED8620 User’s Guide assign it. This option may be desirable (but not required) if: You have obtained one or more public IP addresses that you want to always associate with specific computers. Before you begin, be sure to have the following information on hand, or contact your ISP if you do not know it: The IP address and subnet mask to be assigned to each PC to which you will be assigning static IP information. The IP address of the default gateway for your LAN. In most cases, this is the address assigned to the LAN port on the device. By default, the LAN port is assigned this IP address: 192.168.1.1. (You can change this number, or another number can be assigned by your ISP. See Chapter the device for more information.) The IP address of your ISP’s Domain Name System (DNS) server. On each PC to which you want to assign static information, follow the instructions on pages 9 through 9 relating only to checking for and/or installing the IP protocol. Once it is installed, continue to follow the instructions for displaying each of the Internet Protocol (TCP/IP) properties. Instead of enabling dynamic assignment of the IP addresses for the computer, DNS server, and default gateway, click the property buttons that enable you to enter the information manually. login setup 10 TED8620 User’s Guide 1. From a LAN computer, open your web browser, type the following URL in the web address (or location) box, and press <Enter>: http://192.168.1.1 A login screen displays, as shown in next map Login Screen 2. Enter your user name and password, and then click OK. The first time you log into the program, use these defaults: Default User Name: root Default Password: root 11 TED8620 User’s Guide 3.3 the Home Page and System View Table The Home page displays when you first access the program. This page is one of two options available in the Home tab (the other is the Quick Configuration page, as described on page the device). In order to quick use the adsl ,Please click quick Configuration.configuration base performance, it can work . 12 TED8620 User’s Guide When you press <Return>, the page shown in next should display (see Appendix 0, “Troubleshooting,” if you receive an error message or the page does not display). Quick Configuration 13 TED8620 User’s Guide The fields are described in the following table. Work with your ISP to determine which settings you need to change. Field Description General Settings ATM Interface Select the ATM interface you want to use (usually atm-0). Your system may be configured with more than one ATM interface if you are using different types of services with your ISP. Operation Mode This setting enables or disables the device. When set to “Didable”, the device cannot be used to provide Internet connectivity for your network. Set it to “Enabled” now, if necessary. Encapsulation This setting determines the type of data link your ISP uses to communicate with your ADSL/Ethernet router. Contact them to determine the appropriate setting. VCI and VPI These values are provided by your ISP and determine the unique path your connection uses to communicate with your ISP. IN CHINA ,VCI value is 8 , the VPI Value is 35 usualy. Bridge This setting enables or disables bridging between the Device and your ISP. Your ISPs may also refer to this as “RFC 1483” or “Ethernet over ATM”.If you use software dial-up,please select Enable.or you use dial-up with adsl please select Disable. 14 TED8620 User’s Guide IGMP This setting enables or disables the Internet Group Management Protocol, which some ISPs use to perform remote configuration of your device.the value is disable usually. IP Address and Subnet Mask If your ISP has assigned a public IP address to your LAN, enter the address and the associated subnet mask in the boxes provided. (Note: in some configurations, the public IP address should be entered on your PC rather than on the ADSL/Ethernet router; check with your ISP.) the value is empty usually. Default Route When enabled, this setting specifies that the IP address specified above will be used as the default route for your LAN. Whenever, one of your LAN computers attempts to access the Internet, the data will be sent via the WAN interface. Gateway IP Address Specify the IP address that identifies the ISP server through which your Internet connection will be routed. PPP Settings PPP User Name and Password Enter the username and password you use to log in to your ISP if you dial-up with adsl. When you use software dialup these is empty. Use DNS Enable this feature if the DNS server addresses that your LAN will use should be supplied dynamically each time you connect to the ISP. If you click 15 TED8620 User’s Guide Disable, you must configure DNS addresses manually on each PC or on the fields below. DNS Settings Primary/ Secondary DNS Server Enter the Primary and Secondary Domain Name System (DNS) server addresses provided by your ISP. 3.When finished customizing these settings, click SUBMIT. The settings are now in effect; however, if you reboot or if the power is disconnected, your settings will be lost. In step 3, you save the changes to permanent memory: 4.Click the Admin tab that displays in the upper right of the page, and then click Commit & Reboot in the task bar. 5.Click COMMIT. A page will display briefly to confirm your changes, and then you will be returned to the Commit & Reboot page. You can click DELETE to remove all existing Quick Configuration settings and return to the default values. You are now finished customizing basic settings. Read the following section to determine if you need to change additional settings. 16 TED8620 User’s Guide 3.3.1 Default Router Settings In addition to handling the DSL connection to your ISP, the Device. ADSL/Ethernet router can provide a variety of services to your network. The device is preconfigured with default settings for use with a typical home or small office network. Table 1 lists some of the most important default settings; these and other features are described fully in the subsequent chapters. If you are familiar with network configuration, review the settings in Table 1 to verify that they meet the needs of your network. Follow the instructions to change them if necessary. If you are unfamiliar with these settings, try using the device without modification, or contact your ISP for assistance. Before you modifying any settings, review Chapter 5 for general information about accessing and using the Configuration Manager program. We strongly recommend that you contact your ISP prior to changing the default configuration. Table 1. Default Settings Summary Option Default Setting Explanation/Instructions DHCP (Dynami c Host Configur ation Protocol ) DHCP server enabled with the following pool of addresses: 192.168.1.1 through 192.168.1.2 The device maintains a pool of private IP addresses for dynamic assignment to your LAN computers. To use this service, you must have set up your computers to accept IP information dynamically, as described in Part 2 of the Quick Start. 17 TED8620 User’s Guide Option Default Setting Explanation/Instructions See Chapter the device for an explanation of the DHCP service. NAT (Networ k Address Translati on) NAPT rule enabled Your computers’ private IP addresses (see DHCP above) will be translated to your public IP address whenever they access the Internet. See Chapter the device for a description of the NAT service. LAN Port IP Address Assigned static IP address: 192.168.1.1 This is the IP address of the LAN port on the device. The LAN port connects the device to your Ethernet network. Typically, you will not need to change this address. See Chapter the device for instructions. Subnet mask: 255.255.255.0 3.4 Testing Your Setup The Quick Start process should enable any computer on your LAN to use the device’s ADSL connection to access the Internet. To test the connection, turn on the device, wait about 30 seconds, and then verify that its LEDs are illuminated as shown in device. 18 TED8620 User’s Guide 4 use software dial-up outside 4.1 prepare work Before you set up , You must get the parameter from your ISP and the parameter is VCI , VPI, user dial-up mode and encapsulation mode( the mode ADSL IS Bridge ,so select 1483 Bridged IP LLC),the dial-up accout , and the password. 4.2 The software install The software of outside is third party go along vitual dial-up.。the software install is single and use is easy of WinPoET,and support many OS. Before you install, please contact your ISP and get the software of WinPoET v4.00。The sample is WinPoET v4.00。 When you get the software ,please double click install file of WINPOET4.EXE, display follow interface, click “yes”and install. display follow interface ,click button “Next”,continue install. 19 TED8620 User’s Guide display follow interface ,click button “Yes”,continue install 20 display follow interface ,click button “Next” TED8620 User’s Guide select the install place ,click “Next>”。 display follow interface ,click button “OK”,continue install 21 TED8620 User’s Guide please insert the install CD of windows 98 and continue install. The install program need windows 98 files, when you insert CD and click “OK”,the install continue . display follow interface ,click button “Finish”,the install has finished. Restart your computer then you can use the software of dial-up. 22 TED8620 User’s Guide 4.3 ADSL MODEM parameter setup and dial-up with inside compare ,the quick configuration is difference。Because use software outside dial-up, ADSL MODEM work mode is bridge, so the encapsulation is 1483 Bridged IP LLC mode。 Accout and password fill in the Winppoe. For sample of shenzhen CHINA, the parameter configuration. ISP Accout:[email protected] password:123456。 ISP offer ATM parameter :VPI Is 8,VCI is 35, LLC encapsulation。 When you configuration these parameter and click submit . For save the parameter forever, You must save the configuration in Admin interface and restart the ADSL. 4.4 DIAL-UP When you finished above these parameter, you can dial-up with the Winpoet。 23 TED8620 User’s Guide note:your account and password is right, or the program will give you the error answer.. and you must give the right password. 5 Getting Started with the Configuration Manager The Device includes a preinstalled program called the Configuration Manager, which provides an interface to the software installed on the device. It enables you to configure the device settings to meet the needs of your network. You access it through your web browser from any PC connected to the device via the LAN ports. This chapter describes how to use the Configuration Manager. 24 TED8620 User’s Guide 5.1 Accessing the Configuration Manager The Configuration Manager program is preinstalled into memory on the device. To access the program, you need the following: A PC or laptop connected to the LAN port on the device as described in the Quick Start chapter. A web browser installed on the PC. The program is designed to work best with Microsoft Internet Explorer® version 5.0, Netscape Navigator® version 6.1, or later versions. You can access the program from any computer connected to the device the LAN. 5.2 Functional Layout Configuration Manager tasks are grouped into categories, which you can access by clicking the tabs at the top of each page. Each tab displays the available tasks in a horizontal menu at the top of the page. You can click on these menu items to display the specific configuration options. Tab Task bar A separate page displays for each task in the task bar. The left-most task displays by default when you click on a new 25 TED8620 User’s Guide tab. The same task may appear in more than one tab, when appropriate. For example, the Lan Config task displays in both the LAN tab and the Routing tab. 26 TED8620 User’s Guide System View Table The System View table provides a snapshot of your system configuration. Note that some of the settings are links to the software pages that enable you to configure those settings. The following table describes each section of the System View table. 5.3 Committing Changes and Rebooting 5.3.1 Committing your changes Whenever you use the Configuration Manager to change system settings, the changes are initially placed in temporary storage called random access memory or RAM. Your changes are made effective when you submit them, but will be lost if the device is reset or turned off. You can commit changes to save them permanently to flash memory. Follow these steps to commit changes. 1.Click the Admin tab, and then click Commit & Reboot in the task bar. The Commit & Reboot page displays: Commit & Reboot Page 27 TED8620 User’s Guide 2. Click COMMIT. (Disregard the selection in the Reboot Mode drop-down list; it does not affect the commit process.) The changes are saved to permanent storage. The previous settings are copied to backup storage so that they can be recalled if your new settings do not work properly (see the rebooting instructions on page 28). 5.3.2 Rebooting the device using Configuration Manager To reboot the device, display the Commit & Reboot page, select the appropriate reboot mode from the drop-down menu, and then click REBOOT. This chapter describes how to configure an Ethernet-overATM interface on the Device, if one is needed to communicate with your ISP. 6 Configuring Bridging The device can be configured to act as a bridging device between your LAN and your ISP. Bridges are devices that enable two or more networks to communicate as if they are two segments of the same physical LAN. This chapter describes how to configure the device to operate as a bridge. 6.1 Overview of Bridges A bridge is a device used to connect two or more networks so they can exchange data. A bridge learns the unique manufacturer-assigned hardware IDs of each computer or device on both (or all) networks it is attached to. It learns that some of the IDs represent computers attached via one of the 28 TED8620 User’s Guide device's interfaces and others represent computers connected via other interfaces. For example, the hardware IDs of your home computers are attached via the Ethernet port, and the hardware IDs of your ISP's computers are attached via the WAN (DSL) port. It stores the ID list and the interface associated with each ID in its bridge forwarding table. When the bridge receives a data packet, it compares its destination hardware ID to the entries in the bridge forwarding table. When the packet's ID matches one of the entries, it forwards the packet through the interface that connects to the corresponding network. Note that the bridge does not send the data directly to the receiving computer, but broadcasts it to the receiving network, making it available to any node on that network. On the receiving network, a LAN protocol such as Ethernet takes over, helping the packet reaches its destination. When the bridge does not recognize a packet’s destination hardware ID, it broadcasts the packet through all of its interfaces – to each network it is attached to. 6.2 When to Use the Bridging Feature Although the device is preconfigured to serve as a router for providing Internet connectivity to you LAN, there are several instances in which you may also want to configure bridging: Your ISP may use protocols that require bridging with your LAN. The device can be configured to appear as a bridge when communicating with your ISP, while continuing to provide router functionality for your LAN. Your LAN may include computers that communicate using “layer-3” protocols other than the Internet Protocol. These include IPX® and AppleTalk®. In this case, the device can 29 TED8620 User’s Guide be configured to act as a bridge for packets that use these protocols while continuing to serve as a router for IP data. 30 TED8620 User’s Guide 7 Configuring Firewall Settings Configuration Manager provides built-in firewall functions, enabling you to protect the system against denial of service (DoS) attacks and other unwelcome or malicious accesses to your LAN. You can also specify how to monitor attempted attacks, and who should be automatically notified. 7.1 Configuring Global Firewall Settings Follow these instructions to configure global firewall settings: Log into Configuration Manager, click the Services tab, and then click Firewall in the task bar. The Firewall Configuration page displays, as shown in next map. 31 TED8620 User’s Guide Firewall Configuration Page 32 TED8620 User’s Guide Configure any of the following settings that display in the Firewall Global Information table: Click SUBMIT . Click the Admin tab, and then click Commit & Reboot in the task bar. Click COMMIT to save your changes to permanent memory. 8 Administrative Tasks This chapter describes the following administrative tasks that you can perform using Configuration Manager: Configuring User Names and Passwords Viewing System Alarms Upgrading the Software Using Diagnostics Modifying Port Settings You can access these tasks from the Admin tab task bar. The other Admin tasks listed in the Admin tab—Configuring User Logon and Committing and Rebooting—are described in Chapter 5, “Getting Started with the Configuration Manager.” 33 TED8620 User’s Guide 8.1 Configuring User Names and Passwords The Device is configured with a default user name and password combination, or login, for accessing Configuration Manager. If you want to allow other users to access the program, you can create additional user logins and specify their privilege levels. You can also change the password for the default login or for any logins you create. 8.1.1 Creating and Deleting Logins The default login allows the user full access to all Configuration Manager features, including creating up to four additional user logins. You can assign either of two privilege levels to each additional login: Root-level privileges enable the user to modify all the features available in Configuration Manager The default login has root-level privileges. User-level privileges enable the user to log in and view—but not create or modify—system information. These users can change their own password, however. To create additional logins or modify them, follow these instructions: 1. Log into Configuration Manager using the default user name and password, and then click the Admin tab. User Configuration Page 34 TED8620 User’s Guide 2.Click ADD to display the User Config-Add page, as shown in the device. User Config-Add Page 3.Type the User ID and Password in the text boxes provided, and then select the privilege level for this user. The user name can be up to 128 characters, but cannot contain spaces or special characters. The password can be up to eight characters. Be sure to retype the password in the Confirm Password text box, exactly as before, including lower and upper case characters. 4.Click SUBMIT. 5.Click the Admin tab, and then click Commit & Reboot in the task bar. 6.Click COMMIT to save your changes to permanent memory. You cannot change or delete the default login. To delete a in the corresponding subsequently created login, click Action(s) column in the table on the User Configuration page. 35 TED8620 User’s Guide 8.2 Upgrading the Software Your ISP may from time to time provide you with an upgrade to the software running on the ADSL/Ethernet router. All system software is contained in a single file, called an image. The image is composed of several distinct parts, each of which implements a different set of functions. Configuration Manager provides an easy way to upload a new software image, or a specific part of the image, to the memory on the ADSL/Ethernet router. To upgrade the image, follow this procedure: 1.Log into Configuration Manager, click the Admin tab, and then click Image Upgrade in the task bar. The Image Upgrade page is shown in device. Image Upgrade Page 2. In the Source Filename text box, type the path and file name of the file as provided by your ISP. You can click to search for it on your hard drive. The name of the upgrade file must be one of the following: 36 TEImage.bin TEDsl.gsz TED8620 User’s Guide TEAppl.gsz Filesys.bin TEPatch.bin 3.Click UPLOAD. The following message box displays at the bottom of the page: Loading New Software Please do not interrupt the upgrade process. A status page will appear automatically when loading is completed (about 1 minute). When loading is complete, the following message displays (the file name may differ): File: TEDsl.gsz successfully saved to flash. Please reboot for the new image to take effect. 4.Turn power to the unit off, wait a few seconds, and turn it on again. The new software will now be in effect. If the system fails to boot or is not working properly, contact your ISP for troubleshooting assistance. 37 TED8620 User’s Guide Troubleshooting This appendix suggests solutions for problems you may encounter in installing or using the Device, and provides instructions for using several IP utilities to diagnose problems. Contact Customer Support if these suggestions do not resolve the problem. Problem Troubleshooting Suggestion LEDs Power LED does not illuminate after product is turned on. Verify that you are using the power cable provided with the device and that it is securely connected to the device and a wall socket/power strip. LINK WAN LED does not illuminate after phone cable is attached. Verify that a standard telephone cable (called an RJ-11 cable) like the one provided is securely connected to the ADSL port and your wall phone jack. Allow about 30 seconds for the device to negotiate a connection with your ISP. LINK LAN LED does not illuminate after Ethernet cable is attached. Verify that the Ethernet cable is securely connected to your LAN hub or PC and to the device. Make sure the PC and/or hub is turned on. 38 Verify that you are using a straightthrough type Ethernet cable to the uplink port on a hub or a cross-over type cable to a stand-alone PC. If you connected the device to an ordinary hub port (not Uplink), you must use a straight-through cable. (To check: hold TED8620 User’s Guide Problem DIAG LED stays illuminated after turning the device on. Internet Access My PC cannot access Internet Troubleshooting Suggestion the connectors at each end of the cable side-by-side with the plastic spring facing down. Looking at the wires from left to right, if the first, second, third, and sixth wires are the same color on the two connectors, then it is a straightthrough type. On a cross-over type, wire 1 on one connector should be the same color as wire 3 on the other. The same is true of wires 2 and 6.) Verify that your cable is sufficient for your network requirements. A 100 Mbit/sec network (10BaseTx) should use cables labeled CAT 5. A 10Mbit/sec network may tolerate lower quality cables. The DIAG LED should turn off after about 10-15 seconds. If it does not, turn off the device, wait 10 seconds, and then turn it back on. Use the ping utility, discussed in the following section, to check whether your PC can communicate with the device’s LAN IP address (by default 192.168.1.1). If it cannot, check the Ethernet cabling. If you statically assigned a private IP address to the computer, (not a registered public address), verify the following: 39 TED8620 User’s Guide Problem My LAN PCs cannot display web pages on the Internet. 40 Troubleshooting Suggestion Check that the gateway IP address on the computer is your public IP address (see the Quick Start chapter, Part 2 for instructions on viewing the IP information.) If it is not, correct the address or configure the PC to receive IP information automatically. Verify with your ISP that the DNS server specified for the PC is valid. Correct the address or configure the PC to receive this information automatically. Verify that a Network Address Translation rule has been defined on the device to translate the private address to your public IP address. The assigned IP address must be within the range specified in the NAT rules (see Chapter the device). Or, configure the PC to accept an address assigned by another device (see the Quick Start, Part 2). The default configuration includes a NAT rule for all dynamically assigned addresses within a predefined pool (see the instructions in Chapter the device to view the address pool). Verify that the DNS server IP address specified on the PCs is correct for your ISP, as discussed in the item above. If you specified that the DNS server be assigned dynamically from a server, then verify with your ISP that the address configured on the device is correct, then You can use the ping TED8620 User’s Guide Problem Troubleshooting Suggestion utility, discussed on page 42, to test connectivity with your ISP’s DNS server. Configuration Manager Program I forgot/lost my If you have not changed the password Configuration from the default, try using “root” as both Manager user ID the user ID and password. Otherwise, or password. you can reset the device to the default configuration by pressing the Reset button on the back panel of the device three times (using a pointed object such as a pen tip). Then, type the default User ID and password shown above. WARNING: Resetting the device removes any custom settings and returns all settings to their default values. I cannot access Use the ping utility, discussed in the the following section, to check whether Configuration your PC can communicate with the Manager device ’s LAN IP address (by default program from 192.168.1.1). If it cannot, check the your browser. Ethernet cabling. Verify that you are using Internet Explorer v5.0 or later, or Netscape Navigator v6.1 or later. Support for Javascript® must be enabled in your browser. Support for Java® may also be required. Verify that the PC’s IP address is defined as being on the same subnet as the IP address assigned to the LAN 41 TED8620 User’s Guide Problem My changes to Configuration Manager are not being retained. 8.3 Troubleshooting Suggestion port on the device . Be sure to use the Commit function after any changes. This function is described on page the device. .Diagnosing Problem using IP Utilities 8.3.1 ping Ping is a command you can use to check whether your PC can recognize other computers on your network and the Internet. A ping command sends a message to the computer you specify. If the computer receives the message, it sends messages in reply. To use it, you must know the IP address of the computer with which you are trying to communicate. On Windows-based computers, you can execute a ping command from the Start menu. Click the Start button, and then click Run. In the Open text box, type a statement such as the following: ping 192.168.1.1 Click OK. You can substitute any private IP address on your LAN or a public IP address for an Internet site, if known. If the target computer receives the message, a Command Prompt window displays like that shown in Figure 1. Figure 1. Using the ping Utility 42 TED8620 User’s Guide If the target computer cannot be located, you will receive the message “Request timed out.” Using the ping command, you can test whether the path to the device is working (using the preconfigured default LAN IP address 192.168.1.1) or another address you assigned. You can also test whether access to the Internet is working by typing an external address, such as that for www.yahoo.com (216.115.108.243). If you do not know the IP address of a particular Internet location, you can use the nslookup command, as explained in the following section. From most other IP-enabled operating systems, you can execute the same command at a command prompt or through a system administration utility. 43