1
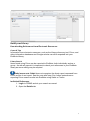
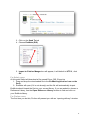
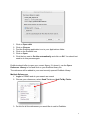
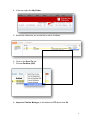
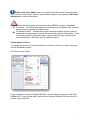
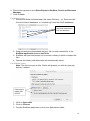
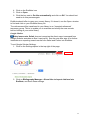
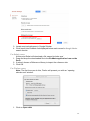
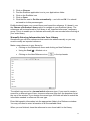
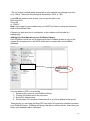
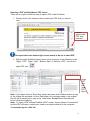
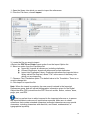
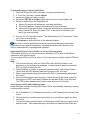
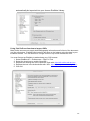
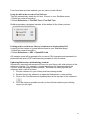
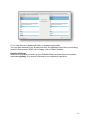
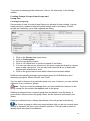
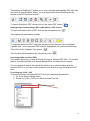
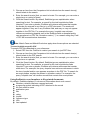
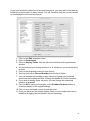
DIVISION OF LIBRARY SERVICES EndNote X7 Mac User Manual – Part 1 Contents Part 1 – Creating and Managing your EndNote Library ........................................................... 2 Getting Started........................................................................................................................... 2 Build your Library ..................................................................................................................... 3 Downloading References from Electronic Resources. .......................................................... 3 General Tips ...................................................................................................................... 3 Primo Search ..................................................................................................................... 3 Editing EndNote Filters ..................................................................................................... 7 Library databases............................................................................................................... 8 Google Scholar ................................................................................................................ 11 Manually Entering Information into Your Library ......................................................... 13 Moving through the document window .......................................................................... 14 Term Lists and Auto Suggest .......................................................................................... 14 Tips for choosing the right reference type ...................................................................... 14 Entering author names ..................................................................................................... 14 Entering Dates ................................................................................................................. 15 Adding File Attachments to your EndNote Library ............................................................ 16 To manually import a PDF file: ...................................................................................... 17 To manually import a folder of PDF files: ...................................................................... 19 Importing PDF Files and/or Folders to Create New References ..................................... 19 Auto-import of PDFs and EndNote groups ..................................................................... 19 Using Find Full text function to import PDFs................................................................. 20 Using the DOI in the record to Find Full text ................................................................. 21 Linking to the record in the Library’s databases to download the PDF .......................... 21 Updating References with missing content ......................................................................... 21 Regular Backups ................................................................................................................. 22 Looking At Your Library ........................................................................................................ 23 Display Modes and Layout Options .................................................................................... 23 Display Modes................................................................................................................. 23 Layout options ................................................................................................................. 24 Examples of layout views ............................................................................................... 25 Selecting and Opening a Reference .................................................................................... 28 Creating Groups, Groups from Groups and Group Sets .................................................... 29 Creating a new group ...................................................................................................... 29 Creating group sets .......................................................................................................... 30 Creating groups from Groups .......................................................................................... 30 Smart groups ................................................................................................................... 31 Working with your PDFs in EndNote ................................................................................. 31 Viewing PDFs in EndNote .............................................................................................. 31 Highlighting and Annotating PDFs with EndNote’s PDF Viewer ................................. 32 Searching within attached PDFs ..................................................................................... 32 Searching Any Field + PDF ............................................................................................ 32 To search within a specific PDF ..................................................................................... 33 Using EndNote’s record numbers to file printed documents .............................................. 33 Part 1 – Creating and Managing your EndNote Library Getting Started These training notes assume that you have installed EndNote into your Applications folder. 1. Open the Applications folder 2. Click on the EndNote X7 folder 3. Click on the EndNote X7 application icon 4. The first time you start the software, you will see the EndNote customizer screens. Click on Next several times, and then Done 5. EndNote displays a welcome screen showcasing the features of X7 If you are upgrading EndNote from a previous version, and you already have an EndNote library, your EndNote library will automatically open. If you have never used EndNote before, a new EndNote library called “My EndNote library” will be created for you and saved in the Documents folder. The new library appears as an empty EndNote library, showing “0 of 0 references” 2 Build your Library Downloading References from Electronic Resources. General Tips Information from electronic resources, such as the Library discovery tool; Primo, and other information databases and Google scholar can all be exported into your EndNote Library. Primo Search Items found using Primo can be exported to EndNote, both individually and as a group. As with all exports it is important to check your references in your EndNote library as some editing may be required. Safari users note: Safari does not recognise the direct export command from Primo as files it can import. See the note after step 5 for further instructions on exporting Primo search results into EndNote using Safari or Firefox. Individual References 1. Login to PRIMO and do your search as normal 2. Open the Details tab 3 3. Click on the Send To tab 4. Choose EndNote (RIS) 5. Import to Citation Manger box will appear, it will default to UTF-8 , click Ok For Safari users: At this point Safari will download a file named Primo_RIS_Export.ris 1. Drag and drop the downloaded file to the EndNote application icon on the Dock 2. EndNote will open (if it is not already) and the file will automatically import. EndNote should import the file into your current library. If you are asked to choose a Reference Library, use the Open Reference Library window to find and click on your EndNote library For Firefox users: The first time you do this, Firefox will present you with an “opening delivery” window: 4 1. 2. 3. 4. 5. 6. Click on Open with Click on Choose Find the EndNote application icon in your Applications folder Click on the EndNote icon Click on Open Click the box next to Do this automatically and click on OK. You should not need to do this process again EndNote should offer to open your current library. If it doesn’t, use the Open Reference Library to find and click on your EndNote library file The reference will be added to your most recently opened EndNote Library. Multiple References 1. Login to PRIMO and do your search as normal 2. Choose your references, select Send To tab and Add To My Folder 3. Do this for all the references you would like to add to EndNote. 5 4. In the top right click My Folder 5. Select the references you would like to add to EndNote 6. Click on the Send To tab 7. Choose EndNote (RIS) 8. Import to Citation Manager, it will default to UTF-8 and click Ok 6 Safari users note: Safari does not recognise the direct export command from Primo as files it can import. See the instructions on page 13 on exporting individual references for further information. There are a few things to note when using PRIMO to export to EndNote: For books – all authors and editors come across into the Author field, so some editing may be required for edited books. Corporate Authors – records that include corporate authors can be made to export with the appropriate comma, the normal filter will not include this. If this is something that you regularly export, you can edit the filter, see below for more instructions. Otherwise you can edit the record. Editing EndNote Filters To change the import of Corporate Authors to include a comma, you will need to go into the EndNote program. Click Edit, Import Filters If you have been using the RefMan RIS filter it will be listed and you can click “Edit RefMan RIS” if not, choose New Filter and then choose RefMan RIS from the list of options, then click Edit. 7 Once you are in the filter, choose the Author Parsing option and under the Last & First Names: click on the drop down menu and change from Smart to Import As Is. If you have any difficulties, contact a Faculty Liaison Librarian for assistance. Library databases You can search the databases from the CSU library webpage, and then export the search results to EndNote. 8 Safari users note: Safari does not recognise the direct export command from database searches as files it can import. See the note after step 7 for further instructions on exporting search results from Safari and Firefox into EndNote. Within the Ebsco databases, you can export citations from the results screen as shown below: 1. Click on the Add to folder icon to save your reference to a folder. You can also select a range of references with one click – look for the link to add all of the displayed records at once. 2. Go through the pages of results selecting all of the relevant articles. 3. Click on Folder view link. 4. The saved items will be listed. You will need to select All again 5. Click on the Export option. 9 6. Ebscohost is preset to do a Direct Export to EndNote, Procite or Reference Manager 7. Click on Save For Safari users: 1. At this point Safari will download a file name ‘Delivery’, (or “Save records” from the Informit databases, or “ovidweb.cgi” from the OVID databases) Variously named files that will be downloaded from the databases 2. Drag and drop the downloaded ‘delivery’ file (or other named file) to the EndNote application icon on the Dock 3. EndNote will open and prompt you to select a Library in which to import the files 4. Choose the Library and references will automatically import. For Firefox users: Note: The first time you do this, Firefox will present you with an “opening delivery” window: 1. Click on Open with 2. Click on Choose 3. Find the EndNote application icon in your Applications folder 10 4. Click on the EndNote icon 5. Click on Open 6. Click the box next to Do this automatically and click on OK. You should not need to do this process again EndNote should offer to open your current library. If it doesn’t, use the Open: window to find and click on your EndNote library file The references will be transferred to your library in an “Imported references” temporary group. This is to enable you to evaluate and modify the new records before looking at your entire library Google Scholar Safari users note: Safari does not recognise the direct export command from Google Scholar searches as files it can import. See the note after step 4 for further instructions on exporting search results from Safari and Firefox into EndNote. To set Google Scholar Settings, 1. Click on the Settings option in the top right of the page. 2. Click on Bibliography Manager = Show links to import citations into EndNote, and Save these settings. 11 3. Locate required reference in Google Scholar 4. Click Import into EndNote link displayed below each record in Google Scholar search results For Safari users: At this point Safari will download a file named ‘scholar.enw’ 1. Drag and drop the downloaded file to the EndNote application icon on the Dock 2. If asked, choose a Reference Library to import the reference into 3. Click OK For Firefox users: Note: The first time you do this, Firefox will present you with an “opening scholar.enw” window: 1. Click on Open with 12 2. 3. 4. 5. 6. Click on Choose Find the EndNote application icon in your Applications folder Click on the EndNote icon Click on Open Click the box next to Do this automatically… and click on OK. You should not need to do this process again EndNote should open your current library and import the reference. If it doesn’t, use the Choose a Reference Library option to navigate to your EndNote Library. The references will be transferred to your library in an “Imported references” temporary group. This is to enable you to evaluate and modify the new records before looking at your entire library Manually Entering Information into Your Library Sometimes you will have references that need to be added manually or you may need to modify an imported reference. Make a new reference in your library by Clicking on the References menu and clicking on New Reference Using the Cmd (⌘) + N short cut or Clicking on the New Reference icon in the top header The default new record is a Journal article reference type. If you need to create a record for a different type of item, choose a reference type from the dropdown list at the top of the window. If you change the record type, the fields will alter to match the information needed to reference the new type. Enter bibliographic information into the appropriate fields in the Reference window. You may not need to enter information in all the available fields. When you are finished, close the reference to save it and add it to the library. 13 Moving through the document window Use the scroll bar to look at the fields, which may change according to the needs of the reference type. The active field is surrounded by a border. Press the Tab key to select the next field in the reference. Press Shift + Tab to select the previous field. ‘Next Reference’ and ‘Previous Reference’ buttons at the top of the reference window allow you to browse references in a library. Closing a reference: Click on the close box or press Command + W to close a reference and save any changes. Special bibliographic formatting and punctuation should not be included when you enter reference data into EndNote. For example, you do not need to put quotes around titles, italicise journal names, or include the abbreviation ‘Vol.’ along with volume numbers. Enter only the raw data and leave the formatting to EndNote. Term Lists and Auto Suggest As you enter new references into your library, EndNote notes any new terms that are typed into the Author, Journal, and Keywords fields. New terms are indicated in red text. EndNote saves these and will auto-suggest them when you enter anything similar, to save you some typing. Tips for choosing the right reference type Use Book Use Edited Book Use Book Section Use Conference Proceedings Use Conference Paper Use Journal Article Use the Web Page Use Personal Communications Use Chart/Table For books written by one or more authors for books edited by one or more editors (whether they are books in a series or not). For references to parts of edited or nonedited books (a chapter, for example, or one article in published conference proceedings). For unpublished proceedings For articles that are published as part of the comprehensive conference proceedings For journal articles that appear either online or in print. For citing material from a Web page or ftp site. For email discussions if you want to include an image and later insert that image as a table in Microsoft Word (Images in all other reference types will insert into Word as figures, which are listed and numbered separately from tables) Entering author names 14 In general, entries with more than one author or editor must be entered one name per line. It is best to enter authors in the following order: <Family name><comma><space><First name><space><middle name or initial> e.g. Suzer, Max E. EndNote abbreviates first and middle names if required, so for maximum flexibility enter whole names whenever possible. If you are entering initials, type a period or a space between initials, (for example ‘Merrell, T.A.’ or ‘T A Merrell’), otherwise EndNote interprets the initials as a single name: ‘Ta.’ If a reference has no author, you should leave the Author field blank. Do not enter ‘Anonymous.’ EndNote will manage this according to the referencing style you choose. The table below demonstrates how EndNote will interpret the author data that you enter. The names in bold indicate what EndNote will identify as the family name. Data Entered EndNote interpretation Data entered EndNote Interpretation Jones, Davey Davey Jones Zhang, Haiyuan Haiyuan Zhang Davey Jones Davey Jones Haiyuan Zhang Haiyuan Zhang van der Laar, Lianne Lianne van der Laar Lianne van der Laar Lianne van der Laar Department of Agriculture, Department of Agriculture Department of Agriculture Department of Agriculture Entering Dates The APA 6th manual states: 15 “Do not include retrieval dates unless the source material may change over time (e.g., Wikis)” (American Psychological Association, 2010, p. 192). If you DO still need to enter a date, you can put the date in as: 28th July 2005 28 Jul 05 or 7/28/05 Note: If you want to use numbers only, you MUST put them in using the American style of Month/Date/Year. Choose one style and use it consistently, or the citations will look odd in a bibliography. Adding File Attachments to your EndNote Library Each EndNote record has a File attachments field. EndNote makes a copy of the original file and places it in the DATA folder that is created with your EndNote database. EndNote library (.enl) and DATA folder You can attach a PDF to a record by 1. Selecting the record in your EndNote Library 2. Clicking on References in the top menu 3. Select File Attachments 4. Select Attach File and then locate the pdf or any file to attach to the record Alternatively you can drag and drop PDF and other file types into selected records in your EndNote Library. EndNote will always be able to access the file, even when you share your database with a colleague. 16 Opening a PDF with EndNote’s PDF viewer There are a couple of different ways to open a PDF within EndNote 1. Double click on the reference that contains the PDF that you want to view: Layout options with PDF view selected The layout tab in the bottom right corner needs to be set to show PDF 2. With the main EndNote Library layout set to show any of the following views: “Right - PDF”, “Right - Split” “Bottom- Split” or “Bottom - PDF”, click on the open PDF icon: “Right PDF” view with ‘open PDF’ option Note: if you attach Word or Excel files, please be aware that EndNote makes a copy of the original file and adds it to the .Data folder. Any changes made to the original file will not be saved to the copy in the .Data folder. Do not attach files that you haven’t finished modifying. Note: To open a PDF outside EndNote’s PDF viewer, choose Option+Command+P and the PDF will open in whichever viewer is set as the default on the computer. To manually import a PDF file: 17 1. Open the library into which you want to import the references. 2. From the File menu, choose Import 3. Locate the file you want to import. 4.Select the PDF file or Folder import option from the Import Option list. 6. Select an option from the Duplicates list: Import All: Imports all references, including duplicates. Discard Duplicates: Imports all references except duplicates. Import into Duplicates Library: Duplicate references are imported into a library called File-Dupl.enl, where ”File" is the name of the library into which you are importing. 7. Choose a Text Translation option. The default value is No Translation. There is no need to change this. 8. Click Import to import the file. Note: When the import is complete, the new record is stored in the Imported References group, and will include bibliographic information given for the Digital Object Identifier (DOI) mined from the PDF file such as title, author, volume, issue, page, year, and DOI. This is a perfect time to add a keyword to the imported reference or to peruse the imported data to make sure it imported as expected. Make sure to check references that contain extended characters (extended characters are any special characters, including characters with diacritics, and Greek, mathematical, or typographical symbols). 18 To manually import a folder of PDF files: 1. Open the library into which you want to import the references. 2. 2. From the File menu, choose Import 3. Locate the folder you want to import. 4. Select the PDF file or Folder import option from the Import Option list. 5. Select an option from the Duplicates list: Import All: Imports all references, including duplicates. Discard Duplicates: Imports all references except duplicates. Import into Duplicates Library: Duplicate references are imported into a library called File-Dupl.enl, where ”File" is the name of the library into which you are importing. 6. Choose a Text Translation option. The default value is No Translation. There is no need to change this. 7. Click Import to import the files in the selected folders. Make sure to check references that contain extended characters (extended characters are any special characters, including characters with diacritics, and Greek, mathematical, or typographical symbols.) Importing PDF Files and/or Folders to Create New References This feature allows you to convert existing collections of PDF files into EndNote references with minimal typing. You can import PDFs one file at a time, or you can import an entire folder of PDFs at once. Note: 1. This function will only work for some PDFs with the DOI number in the document or the document’s metadata. It cannot import data from scanned PDFs or PDFs without the DOI. 2. When EndNote is unable to locate the reference data, it will create a blank record with the PDF attached and the file name in the Title field. 3. When importing data using this method the PDF is automatically attached to the record. 4. When performing the import function, if there are two DOIs found in the first two pages of a PDF document, EndNote will put both DOIs in the DOI field. The PDF is then attached and the file name is put in the Title field. Auto-import of PDFs and EndNote groups EndNote allows a range of methods to import PDFs, automatically importing, naming and sorting the records. 1. Go to EndNote X7 > Preferences and click on PDF handling from the left hand frame 2. Choose the auto renaming convention that you would like to apply and then click Save 3. This screen also gives the option of choosing to enable an auto import from a specific folder. This means that any new pdf that is added to that folder will 19 automatically be imported into your chosen EndNote Library. Using Find Full text function to import PDFs Many online sources now supply both bibliographic information and full text of the document you are referencing. EndNote can locate full text files on the Internet using the data in your EndNote records. You can do this for a single record or up to 250 records at a time. You must first set up EndNote to authenticate your CSU access 1. Select EndNote X7 > Preferences > Find Full Text 2. Select the check box to enable OpenURL 3. Replace the existing text in the OpenURL Path with: http://sfx.unilinc.edu.au:/csu 4. Replace the text in the Authenticate with: URL: http://ezproxy.csu.edu.au/login?url= 5. Click OK 20 From here there are two methods you can use to locate full text. Using the DOI in the record to Find Full text This will automatically attach the full text, if found, to your EndNote record 1. Select the required record(s) 2. Select References > Find Full Text > Find Full Text EndNote provides a progress indicator at the bottom of the Library column: Linking to the record in the Library’s databases to download the PDF Locating full text copies of journal articles listed in your EndNote library: 1. Select the required record(s) 2. Select References > URL > OpenURL Link Off-campus users will be prompted for a current CSU username and password; be presented with a list of SFX services and prompted to click Continue. Updating References with missing content Sometimes, imported references will come into your library with vital sections of the reference missing. For example, a journal article may be imported without the Volume, Issue and page numbers entered. EndNote can often populate the reference with a click of a button 1. Find the reference in your Library that has missing details 2. Double click on the reference to open the Reference in a new window 3. Click on the Find References Update button at the top right of the reference: 4. You’ll be shown a possible record (on the left) that matches your existing record (on the right) 21 5. You can choose to Update all fields, or Update empty fields You can also manually copy & paste text from the potential record into your existing record in this window. When you’re happy, click on Save Updates Regular Backups We recommend that you back up your EndNote library and directories of research materials regularly, to a source other than your computer's hard drive. 22 Looking At Your Library When you have transferred your records, you see the Library window. The newly imported references are displayed. The menu bar: The File dropdown menu allows you to open, close, save and create EndNote libraries. The Edit menu: Cut, copy and select references. Define the output styles that format the display of references. The Preferences option allows you to configure the software to your needs. The References menu: create, edit and delete references custom sort references You can also work with URLs (online files) and file attachments The Groups menu: create groups, smart groups or group sets add references to groups hide groups Display Modes and Layout Options Display Modes Depending on the mode chosen, the panel either hides or shows particular Groups. Users choose the active mode by selecting one of the three toolbar controls: Local Online (Temporary Library) Integrated 23 These toolbar icons remain depressed when clicked, indicating the current mode. The leftmost button is for local mode, the middle is for online mode, and the rightmost is for integrated mode. The default mode when EndNote is installed is Local. However if the user then selects one of the other modes, EndNote will remember that choice when it is shut down, and it will reopen in Local mode. Library windows never open up directly in Online mode. Local Library mode hides the online groups and displays only those groups containing references found in the user's library. Online Search mode presents only the Online Search groups, in addition to the Online References and Online Trash auto-groups. All the references found in these groups are located in a temporary database, separate from the user's library, but displayed in the normal library window. In Online mode, users can search and download references from remote databases without affecting their own library. To copy any required references to their permanent library they must select those references and use the References > Copy References To command. In the Integrated mode, all groups appear in the Groups Pane, including the Online Search groups. When performing an online search, results are downloaded directly into the user's library and added to the All References group (i.e. the complete EndNote library). Layout options The Layout options appear at the top right hand side of the screen There are seven different layout options: 1. Three of the options are combinations of the reference library above and various combinations below the library – known as the “bottom view” 2. Three of the viewing options are combinations of the reference library on the left and various options on the right – known as the “right view” 24 3. The other viewing option shows only the reference library Examples of layout views Bottom preview Bottom split 25 Bottom PDF Right preview 26 Right split Right PDF References only 27 Selecting and Opening a Reference If you want to work with a reference, you must first select it. You can then view its contents, copy, cut, delete, or edit it. To select a record, you can: Click on the reference using the mouse Use the arrow keys Type the first few letters of the field by which the library has been sorted. You can then double click on the selected record to open it or drag the selected item to a group, or add a pdf. You may need to edit some of the fields. Typical transfer issues include: Title field: all titles in all capital letters, or coding instead of punctuation. Reference type: may show ‘Generic’ instead of a Newspaper or Journal article. It won’t look right in your bibliography. Keywords: you may need to press the Enter key after each keyword to put them on separate lines, so that EndNote will recognise each separate keyword. At this stage you can also: Check the notes field and delete any information you do not require. Manually add useful information such as the viewing date, database name and vendor Drag any new records to relevant groups. Download your pdfs and drag them to the relevant records Close a record by using the Cmd () + W shortcut, or by clicking on the Close button in the left corner of the grey toolbar. 28 To go back to showing all the references, click on ‘All references’ in the Groups window. Creating Groups, Groups from Groups and Group Sets Creating a new group Groups make it easy to break a large library into subsets for later viewing. A group simply points to a subset of references that already exist in the library. Custom groups are created by you to help organise the library 1. 2. 3. 4. 5. Click on the Groups drop down menu Click on Create group Give the new group a name. Click on “All references” to see the contents of the library. You can now click on any reference in the main screen and drag it to a group name to add it the group. You can also hold down the key to select and drag several references at once. 6. Click on the group name to see which references have been added. EndNote automatically generates a permanent group for All References, and temporary groups for Search Results, and Trash. You can add a reference to a particular group only once. However, you can add that reference to any number of groups. Note: There is no obvious change when you have added the reference to the group, except for the number that appears next to the group. Deleting a reference from a custom group does not delete it from the library. It removes the reference from the group subset, but the reference still exists in the library. Deleting a reference from a library also deletes it from all groups in that library. Tip: Create a group to collect any imported items that you do not currently have in print or electronic full text in your research collection. This will make it easier to identify items that need to be obtained. 29 Creating group sets Another method of creating groups with subgroups is to use the ‘Group Sets’ option. To use this option, you: 1. Create your groups first as per normal 2. Create and name your Group Set (the group set option is also under the groups menu in the top menu bar) 3. Drag the groups you want to include into your Group Set, which appears in alphabetical order under the ‘My Groups’ area. 4. The groups you include will disappear from the ‘My Groups’ area and will now be listed under the Group Set Creating groups from Groups In EndNote X7 you can create a new group from any combination of two or more existing groups. This is one method of creating more complex groupings with subgroups. This can also be used to create a new group from the overlap of two or more groups. Finally, you can use this option to create a new group based on one group, minus the references that are held in common with another group. To do this, EndNote uses the Boolean operators, AND, OR and NOT. 1. The AND operator will create a new group based on the records that are common to each existing group selected (only those records that are common to both). 2. Groups created using the OR modifier will include all of the references in each group selected. 3. Groups created using the NOT modifier will include references from one group minus any references that are held in common with another group. To create a group that includes all of the references in two or more groups 1. Right-click in the Groups area (or look under the Groups option in the top menu bar) and select ‘Create from Groups…’ 2. Give the new group a name 3. Select the first group you want to include 30 4. Select OR as the operator to combine the groups 5. Select the other groups you would like to include 6. Click on the ‘Create’ button Smart groups Smart groups are built with search strategies that you wish to run in the background, gathering any added references that meet with your search strategy. 1. Click on the Groups dropdown menu 2. Click on Create smart group to set up your custom search strategy 3. You can search for authors, keywords, appearance in any field, date ranges or other requirements. 4. Click on Create. This will create the new group and find any relevant references already in your library. When you add more references to the library, the smart group will collect any that match your search strategy. 5. The new group is listed in the Smart Groups pane as New Smart Group. Click to select it. 6. Use the Groups menu to rename it. Working with your PDFs in EndNote Viewing PDFs in EndNote 31 This feature in EndNote X7 allows you to view, annotate and highlight PDF files that are linked to your EndNote library. You can also perform those functions via the toolbar in the PDF preview window: To launch EndNote’s PDF viewer click on the ‘Open PDF’ button: Highlighting and Annotating PDFs with EndNote’s PDF Viewer To make annotations with a PDF, click on the annotations icon: This displays an annotations toolbar: To highlight part of the PDF, select the sections of text that you wish to highlight (*please note – only text based PDFs can be highlighted, not scanned documents). Then click on the ‘Highlight Text’ button: You can also add annotations by using sticky notes: Searching within attached PDFs This feature allows you to search through the text in attached PDF files. To use this feature, the attached files must be text-based PDFs, not scanned documents. You can choose to search through all the fields in your citations along with the attached PDFs, or you can choose to restrict your search to only the attached PDF files. Searching Any Field + PDF To search all fields and attached PDF files in your selected reference list 1. Go to the Search library option 2. Select Any Field + PDF from the drop down Field list. Drop down field list 32 3. Choose an item from the Comparison list to indicate how the search term(s) should relate to the search. 4. Enter the search term(s) that you want to locate. For example, you can enter a single term or a string of terms 5. Click the Search button. By default, EndNote ignores capitalization when searching for text. For example, a search for the text hospital also finds Hospital. If you enter a phrase, EndNote will retrieve references that contain the words you entered in any field or in a PDF document. The words will appear together if they are in any EndNote field, and may or may not appear together in the PDF file. For example the query, hospital care retrieves references containing hospital care in the EndNote fields or hospital and/or care anywhere in a PDF file. Quotation marks (“ ") in a search using Any Field + PDF will be searched as characters. Note: Match Case and Match Word rules apply when these options are selected. To search within a specific PDF To search PDF files attached to your references: 1. Select PDF from the Field list to restrict your search to just PDF files. 2. Choose an item from the Comparison list to indicate how the search term(s) should relate to the PDF search. 3. Enter the search term(s) that you want to locate. For example, you can enter a single term or a phrase. 4. Click the Search button. By default, EndNote ignores capitalisation when searching for text. For example, a search for the text hospital also finds Hospital. If you enter a phrase, EndNote will retrieve references that contain either term. For example, the query hospital care retrieves references in which the term hospital and/or care appears anywhere in the PDF file. To search for an exact phrase, enclose the phrase in quotation marks. For example, the query "hospital care" will retrieve records that contain this exact phrase. Using EndNote’s record numbers to file printed documents By default, EndNote displays 10 columns of information about each record: Whether a citation has been opened and read a paperclip symbol indicating a PDF attached to the record the first author's name publication year title rating journal reference type URL Last updated 33 If you have extensive collections of printed documents, you may want to file them by EndNote record number for easy access. You will therefore need the record number to be displayed in the summary screen. 1. Click on the Edit dropdown menu 2. Click on Preferences 3. Click on Display Fields, from the list on the left side of the preferences window 4. We recommend you change column 6 or 8, whichever you are least likely to need. 5. Click on the dropdown menu for that column 6. Scroll up and select Record Number from the list of fields 7. You can rename the heading on any column by typing your preferred words into the Heading text box. Change the header to ‘Record number’ 8. If you wish to display fewer columns, you can change the unwanted columns to unused 9. Click on OK to save your changes, or the EndNote Defaults button to reset the display to the original settings 10. Click on your preferred column to sort the order 11. Once you have set the desired display fields, you can adjust the column widths by dragging the bar between column headings. 34