1
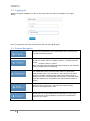
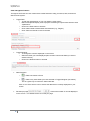
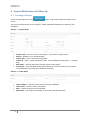
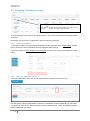
User Manual ProTrack v3.5.1 September, 2014 ProTrack v3.5.1 September 2014 Contents 1 2 3 4 General Information ......................................................................................................................... 4 1.1 System Overview .................................................................................................................... 4 1.2 Authorisation ........................................................................................................................... 4 System Summary............................................................................................................................. 5 2.1 System Configuration .............................................................................................................. 5 2.2 Data Flows .............................................................................................................................. 5 2.3 User Access Level .................................................................................................................. 6 Getting Started ................................................................................................................................. 7 3.1 Accessing ProTrack ................................................................................................................ 7 3.2 Home Page ............................................................................................................................. 7 3.3 Logging On .............................................................................................................................. 8 3.4 System Navigation .................................................................................................................. 8 3.5 Logging Off ............................................................................................................................ 10 Project Maintenance & Follow Up .................................................................................................. 11 4.1 Creating a Project ................................................................................................................. 11 4.1.1 4.2 Changing / Updating a Project .............................................................................................. 13 4.2.1 Changing the Status .......................................................................................................... 13 4.2.2 Adding an additional contact ............................................................................................. 13 4.2.3 Awarding the project ......................................................................................................... 14 4.2.4 Adding Correspondence ................................................................................................... 14 4.2.5 Updating the follow up date – email sent to controlling reps ............................................ 15 4.3 5 6 Email alerts ........................................................................................................................ 12 Projects Whiteboard .............................................................................................................. 16 4.3.1 Adding a project to your whiteboard.................................................................................. 16 4.3.2 Accessing your whiteboard ............................................................................................... 16 4.3.3 Removing a project from your whiteboard ........................................................................ 16 4.4 Follow Up Projects ................................................................................................................ 17 4.5 Weekly follow up emails ........................................................................................................ 17 Contact Maintenance ..................................................................................................................... 18 5.1 Adding a new Company ........................................................................................................ 18 5.2 Adding a new Branch to an existing Company ..................................................................... 19 5.3 Adding a contact to a Branch ................................................................................................ 19 5.4 Changing an associated rep or ranking against a branch .................................................... 20 Dashboards .................................................................................................................................... 21 6.1 Internal Dashboard ................................................................................................................ 21 6.2 Customer Dashboard ............................................................................................................ 23 2 ProTrack v3.5.1 September 2014 6.3 Designer Dashboard ............................................................................................................. 24 7 Reports .......................................................................................................................................... 25 8 Help ................................................................................................................................................ 26 8.1 F.A.Q ..................................................................................................................................... 26 8.2 Download user manual ......................................................................................................... 26 8.3 Version Control – About ProTrack ........................................................................................ 26 8.4 Contact Us............................................................................................................................. 26 3 ProTrack v3.5.1 September 2014 1 General Information 1.1 System Overview ProTrack is a web based application accessible over the internet via any internet browser. The purpose of ProTrack is to allow users to enter and track their projects for Gerard Professional Solutions. 1.2 Authorisation ProTrack uses the Company’s active directory for signing on. What does this mean? It means that you use your Windows username and password to sign on (your username is the first part of your email address). For example, [email protected], the username is jbloggs. It is important to keep your logon details confidential and log off ProTrack when you have finished. You will be automatically logged off the system after 3o minutes of inactivity. 4 ProTrack v3.5.1 September 2014 2 System Summary 2.1 System Configuration The system resides on an SQL and Web server. It is securely accessible via the World Wide Web. It can be accessed via any device which connects to the internet and has a web browser. This includes laptops, desktops and smart phones. The performance of ProTrack is partly dependent on the speed of the internet connection being used We support the following browsers: Internet Explorer 8 and higher Firefox 3.6 and higher Safari 4 and higher Chrome 8 and higher 2.2 Data Flows The status of the project follows certain business rules. These are outlined below. From Status Allowed to Status Further comments Raised Active, Concept, Design Logged, Design in Revision, Cancelled This status is automatically set when the project is entered See Active. Active Active (Builder Awarded), Active (Contractor Awarded), Sample, Design in Revision, Design logged, Lost, On Hold Manual process once order is Raised Concept Active, Design in Revision, Design Logged, Cancelled, On hold Manual process for pipeline projects Sample Active (Builder Awarded, Active (Contractor Awarded), Active (Wholesaler Awarded), Design in Revision, Design Logged, Won, Lost, Cancelled Design Logged Design Completed, Design in Revision, Lost, Cancelled Used by design department Design in Revision Design Completed, Design Logged Used by design department Design Completed Active, Design in Revision, Design logged, Lost, Cancelled Need to change to Active – manual process Active (builder awarded) Awarded (contractor awarded) Awarded (wholesaler awarded) Active (Contractor awarded), Sample, Design in Revision, Design logged, Cancelled, On hold Won, Active (Wholesaler awarded), Sample, Design in Revision, Design Logged, Cancelled, On hold Won, Sample, Design in Revision, Design logged, Lost, On Hold, Cancelled This status is automatically set when the builder is awarded. This status is automatically set when the contractor is awarded. This status is automatically set when the wholesaler is awarded. Lost No changes can be made On hold Active, Design in revision, Design logged You must enter a reason Cancelled No changes can be made You must enter a reason 5 ProTrack v3.5.1 September 2014 Partially Won Won Won This status is set when you enter an order number and value Partially Won This status is automatically set when all project requirements are met and an order number has been placed Other project rules: If project is specified, a consultant or architect must be selected. Specified quote value must be entered. There must be at least one sales representative attached to a project. If project is marked for design, a designer must also be assigned. 2.3 User Access Level There are four types of user access levels: Level User Type Description 1 National Can view all data 2 State Can view all data for their assigned state NB: You can be assigned to multiple states 3 Sales Representative Can view only their own data, i.e., projects assigned to them 4 Designer Can view design projects 6 ProTrack v3.5.1 September 2014 3 Getting Started 3.1 Accessing ProTrack GPS http://protrack.gerardlighting.com.au/ 3.2 Home Page The home page allows you to access projects, dashboards, contacts and user manuals. Your assigned access level controls whether you can access these different areas. Refer to 2.3 for detail on the different levels. Projects – available to users with level 1, 2, 3, 4 access Contacts – available to users with level 1,2 access Dashboard – available to users with level 1, 2, 3, 4 access Admin – available to users with level 1 access only Reports – available to users with level 1, 2 access only Help – available to everyone 7 ProTrack v3.5.1 September 2014 3.3 Logging On With the exception of Help, if you click on any other button you will be prompted for your logon details. Enter your Windows username and password and click the Log in button. 3.4 System Navigation Displays the projects the user is authorised to see. From here you can also create new projects. A user can create, search or update a contact. A contact has three levels: - Company, Branch, Contact Each Company must be assigned at least one Branch. Each Branch must be assigned an associated rep. The dashboards show counts and total values of certain fields against status types. You can click on a value to see the involved projects. All status calculations are based on the Quote Value or Quote Spec Value, except Partially Won and Won. These two status types are based on the calculation of the Order Number section of project Control user’s access levels. Can also view what Company branches are assigned to the user. Allows users to run pre-defined reports depending on their region. As a state user / project champion you will only be authorised to reports in your region 8 ProTrack v3.5.1 September 2014 Other Navigation features Throughout ProTrack we have created some useful features to help you search, filter, and extract data from the system. Toggle Filter o To filter the displayed list so you only display certain values o Below example will display a list of projects containing a Project Name with the word “Apartments” o Click on the Filter button to activate o Click +Add Criteria to add another field selection (e.g., Region) o Click –Remove Criteria to remove the filter Toggle Designer o To change the columns displayed on the screen o Select the fields you want displayed (this can also control what fields you want to extract to Excel) o Click on the Refresh button to activate Data Extraction o o Extract all values to Excel Extract only those fields you have selected in Toggle Designer (see above). This is a great way to reduce the fields extracted. Click on one of the above icons to extract the data that is currently displayed on your screen. Records per page - Control the number of records displayed on the screen. The default will be 10 records per page. 9 ProTrack v3.5.1 September 2014 3.5 Logging Off To log off ProTrack, click the Logout link in the top right hand corner of the application. 10 ProTrack v3.5.1 September 2014 4 Project Maintenance & Follow Up 4.1 Creating a Project On the Projects page click on the screen. button. This can be found at the bottom of the The screen is broken down into four sections. Please note fields followed by an asterisk (*) are mandatory. Section 1 – Project detail Project name – enter the name of your project. This must be a unique name. Region – defaults to your assigned region. Project date – enter / confirm the project date. Follow up – enter / confirm the follow up date. This will default to today’s date + 7 calendar days. Main items – enter the main items, product groups for this project Forecasted – if the probability of winning this project is in excess of 80% you can click the Forecasted option and enter the % likelihood of winning. Section 2 – Order Detail Quote number – enter the quote number from Project Manager Quote value – enter the value of the project Spec – mark if the project is to be specified. Spec Value – if the project is specified you must enter the specified value 11 ProTrack v3.5.1 September 2014 Section 3 – Design Design – mark here if the project requires design Designer – if the project is to be designed you must enter the relevant designer Design No. – this will automatically default to a number. You may change this. Section 4 – Contacts Enter the relevant contact information. If the project is specified you must enter an architect or consultant. You cannot have both in this version. NB: Responsible Rep is the overall rep responsible for the project. This is used by management when reporting on ProTrack. Once you have entered and validated all information click the button to create the project. Any error messages (missing values) will be displayed at the top of the screen. 4.1.1 Email alerts When a new project is added all associated representatives will be emailed about this new project. In the body of this email they have the opportunity to add this to their calendar as a follow up appointment. Click on this icon to add to your calendar 12 ProTrack v3.5.1 September 2014 4.2 Changing / Updating a Project You can click on these headings to change the sorting of the project list. The indicates that it is sorting in ascending. Click again to change to descending, click again to remove the sort. To access a project either click on the project name or click on the pencil on the far right hand side of the project. Remember you can use the “Toggle Filter” feature to filter the project list. 4.2.1 Changing the Status To change the status of a project select the status from the drop down list and click update. Please refer to section 2.2 of this manual for the rules regarding status change. It is very important you click update next to the status for this to work correctly and update the status history. 4.2.2 Adding an additional contact To add an additional contact, click on the relevant button to the left of the screen (e.g., ). This will display a list of current builder, contractor or wholesaler contacts (depending on the button you selected). Click on the “add new” button to add an additional one. Enter the additional contact / branch details and click insert. 13 ProTrack v3.5.1 September 2014 Contr Rep – This will default to yes. This means the rep is a controlling rep for the project – they are responsible for follow up. If you do not want them to receive follow up emails change this to a red cross. All controlling reps will receive the follow up email. 4.2.3 Awarding the project To award the project to a Builder, Contractor or Wholesaler, click on the relevant button to the left of the screen. E.g. to award a contractor click on the attached Contactor contacts. button. This will display a list of Click on the award red cross. This will change to a green tick meaning the project has been awarded. The status of the project must be at least active for this to work. 4.2.4 Adding Correspondence To add any correspondence, select the correspondence button to the left of the screen. A list of already entered correspondence will be displayed. Click on the “add new” button to add some new correspondence. Enter the correspondence type and some comments. 14 ProTrack v3.5.1 September 2014 You can also attach any relevant documentation (e.g., the original quote) and upload to ProTrack. Click the “Insert” button to complete the correspondence. Please note you can upload multiple files at the same time. 4.2.5 Updating the follow up date – email sent to controlling reps To change the follow up date simply click on the calendar icon to the right of the date and change to the new follow update. An email will be sent to all controlling reps for the project. In the body of this email they have the opportunity to add this new follow update date to their calendar as an appointment. Click on this icon to add to your calendar 15 ProTrack v3.5.1 September 2014 4.3 Projects Whiteboard A whiteboard has been created to allow you to add certain projects that you need to particularly focus on and easily navigate to. 4.3.1 Adding a project to your whiteboard To add a project to your whiteboard, from the projects page on the left hand side of the project name mark the projects you want to add to your whiteboard and then click the “Add to Whiteboard” button at the top of your list. 4.3.2 Accessing your whiteboard To access your whiteboard, from the projects page select Projects > My Whiteboard 4.3.3 Removing a project from your whiteboard To remove a project from your whiteboard, from the projects page on the left hand side of the project name mark the projects you want to remove and then click the “Remove from Whiteboard” button at the top of your list. 16 ProTrack v3.5.1 September 2014 4.4 Follow Up Projects To view a list of projects that have passed the follow up date, from the projects page select Projects > My Follow Up This will display a list of projects that have passed the follow up date and must be updated, followed up as soon as possible. It will only show the projects where you are a controlling representative. 4.5 Weekly follow up emails Each Monday every rep associated with a project (note they must be a controlling rep) will be emailed a list of projects that have passed follow up or are due for follow up that week. This will not include Won, Lost or Cancelled projects. They can click on the hyperlink to access the project or they can add to their calendar as an appointment reminder. Individual email appointments will also be sent to associated controlling reps when a follow up date changes. 17 ProTrack v3.5.1 September 2014 5 Contact Maintenance 5.1 Adding a new Company From the Home Page or the navigation section, at the top, click the At the bottom of the screen click the button. button. Company Name – enter a valid Company name. This must be a unique name. Before adding a contact make sure it is not already there. Company Type – click on the Company type and select valid type from the list. Website – enter the Company’s website if known Company ranking – optional field to rank the entire Company. Will be used in reporting. This is not mandatory and it may be more applicable to rank the individual branch. Click on the button. You will now be prompted to enter at least one branch. Every Company must have at least one branch assigned. Suburb – enter the suburb of the branch Postcode 18 ProTrack v3.5.1 September 2014 Region Country Phone, fax and email Branch Ranking – if applicable enter the relevant ranking for this Company / Branch. E.g., is this one of your top contractors? If so select A. Associate Rep – enter the sales representative associated with this branch Click on the button to attach the branch to the Company. 5.2 Adding a new Branch to an existing Company When the Company already exists and you only need to add a new branch, go to the Contacts page and use the + Toggle Filter option to find the Company. Click on the Company Name to maintain. A list of existing branches will be displayed. Click on the button to add a new one. Enter all relevant details for the Branch and click insert to add. 5.3 Adding a contact to a Branch To add a contact name to a branch, go to the Contacts page and use the + Toggle Filter option to find the Company. Click on the relevant Company Name to display a list of attached branches. Click on the relevant Branch name to maintain. Click on the 19 button to add a contact name to the Branch. Enter the details and insert. ProTrack v3.5.1 September 2014 5.4 Changing an associated rep or ranking against a branch Go to the Contact page and filter for the right Company. Click on the Company name to go the relevant branch. This will take you to the “Edit Company” page listing all branches attached To change the rep or ranking either click on the Suburb name or the pencil icon (NOT the company name). This will take you to the “Edit Branch” page You can now change the rep or ranking by clicking on the name to bring up the list 20 ProTrack v3.5.1 September 2014 6 Dashboards 6.1 Internal Dashboard The internal dashboard is available to all user access levels. It contains a summary display of projects in the system by status and by sales representative. If you are a sales representative you can only view project detail you have been assigned to. If you are a state user you can view projects assigned to your state. If you are a National user you can view this information at a National level or by state. There are two columns of information display per status. The first column is the specified value the second column is the project value. For “Won” and “Partially Won” the values are the actual order value and order specified value entered. Click on the bar chart to take you to the project details for the relevant status. You can then extract this information to Excel if you want to further analyse. To restrict the list to a date range (this is by project date) enter the start and finish date in the top right hand corner and click apply. To see the same information but only for projects passed follow up date click on the follow up tab within the internal dashboard 21 ProTrack v3.5.1 September 2014 There is also breakdown by Sales Representative. A state or national user can click on the names on the left hand side to check the data. 22 ProTrack v3.5.1 September 2014 6.2 Customer Dashboard The customer dashboard is available to state and national users only. It contains a summary list of projects by Consultant, Contractor, Wholesaler and Builder. You can display a list of projects for a particular status by clicking on the value. You can filter by Company by clicking the filter icon to the right of the Company heading. Allows you to filter by Company 23 ProTrack v3.5.1 September 2014 6.3 Designer Dashboard The designed dashboard is very similar to the internal dashboard but will only display a summary for projects that are design Projects. Again, you can click on the bar chart to take you to the project detail. 24 ProTrack v3.5.1 September 2014 7 Reports A reports section is available for authorised users to run pre-defined reports. Only National and State users are authorised to the reports section. A state user is only authorised to reports within their assigned state. Clicking on your region will display a list of available reports. Click on the report link to display the results. You can then extract to Excel for further analysis. Any report request must go through Marty Kaye. 25 ProTrack v3.5.1 September 2014 8 Help The Help section of ProTrack contains some useful information regarding ProTrack releases, frequently asked questions and an easy email form to send any questions you may have. 8.1 F.A.Q The frequently asked questions section briefly answers commonly asked questions. 8.2 Download user manual Download this manual so you have a copy with you. 8.3 Version Control – About ProTrack Any changes / bug fixes to ProTrack will be managed using version control. This will allow us to track all requests and give you an estimate as to when they will be uplifted to the live system. ProTrack will be assigned a version number, e.g., v3.0.0. The version number is made up of 3 digits: The first digit – represents a major release. This is for considerable changes to the system requiring project management and considerable resource (e.g., link to Project Manager). The second digit – represents a minor release. This will be for minor approved change requests from the business. There will be 4 minor releases per year. The third digit – represents bug fixes to the current release. These will be applied as soon as possible. You can keep track of change requests, bug fixes under the Help section of ProTrack => About ProTrack This will detail what features will be included in each release. 8.4 Contact Us If you encounter a problem with ProTrack please contact the email address. Please ensure you include as much detail in the message as possible. Any change request to ProTrack must go through Marty Kaye and Fred Nimarota. These will then be analysed, approved (or not) and managed through version control. <End> 26