1
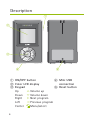
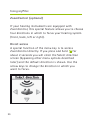
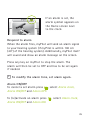
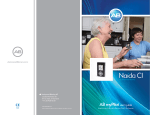
User Guide
0682
!
Contents
Welcome
4
Description
6
myPilot accessories
7
Getting started
8
Charging the battery and general battery info 8
Turning myPilot ON or OFF
10
Keypad lock
11
Operating range
12
Using myPilot
Home screen
Volume control
Program selection
Status information
myPilot battery status
ZoomControl
2
13
13
14
16
17
19
20
Menu functions
Menu overview
ZoomControl
Volume
Lock keypad
Alarm clock
Status information
Settings
22
22
22
23
24
24
26
27
Reset button
32
Important information
Maintenance and care
Safety notice
Important points
Troubleshooting
33
33
34
35
38
iCom (optional)
42
Service and warranty
44
Declaration of conformity
45
Phonak distributors worldwide
46
3
Welcome
Congratulations on choosing a digital hearing system
from Phonak. Your new myPilot is a very important part
of it. myPilot is an elegant and user-friendly remote
control and status reader which gives you access to all
functions of your digital hearing system. Furthermore,
it guarantees easy management of your hearing
programs with visual confirmation on a state-of-theart color display.
You can use myPilot to tune both of your hearing
instruments simultaneously. Or you can control both
hearing instruments individually, allowing you to
perfectly fine-tune your hearing instruments to any
specific hearing situation.
4
Please read this manual carefully to benefit from all
the features of your new myPilot. Ask your hearing care
professional if you have any questions.
For further information, please visit the Phonak website
www.phonak.com.
Phonak – life is on
For your safety, carefully read the chapter
Important information on pages 33–41.
5
Description
햲
햳
햴
햵
햶
햲 ON/OFF button
햵 Mini USB
햳 Color LCD display
connection
햴 Keypad
햶 Reset button
Up
Volume up
Down Volume down
Right Next program
Left
Previous program
Center
Menu/select
6
myPilot accessories
• Case
• Lanyard
• Power supply
Contents may vary depending on country.
7
Getting started
Charging the battery and general battery info
myPilot has an internal, rechargeable battery.
To charge it, connect the charging cable to myPilot
as shown in the picture below. Then plug the
other end of the charging cable into a power outlet.
Do not use myPilot while charging.
For safety reasons, recharge the battery only
with chargers supplied by Phonak.
8
During the charging process, the battery symbol on
the Home screen is blinking. Once the battery is fully
charged, the battery symbol will stop flashing and
remain visible.
Charging an empty battery typically takes about
90 minutes. It is safe to leave the charger connected
overnight—the battery cannot be overcharged.
When charging myPilot for the first time, leave
it to charge for five hours, even if the battery
symbol stops flashing.
i
A new battery’s full performance is achieved only
after two or three complete charge and discharge
cycles.
The myPilot battery can be charged hundreds of
times. If the operating time of your myPilot reduces
substantially, please contact your hearing care
professional.
9
Getting started /
Turning myPilot ON or OFF
Turning ON
To turn myPilot ON,
press and hold the
ON/OFF button for
about a second
until you see the
display turn ON.
Turning OFF
To turn myPilot OFF, press and hold the ON/OFF button
for about two seconds until you see the display turn
OFF.
i
10
For optimal convenience it is suggested to keep
myPilot turned on while wearing the hearing
instruments. To avoid unwanted changes of the
hearing instruments settings you can use the
keypad lock. When you turn your hearing
instruments off please also switch off myPilot.
Getting started /
Keypad lock
Auto keypad lock
myPilot is equipped with an automatic keypad lock
which locks the keys automatically, once the device is
not being used for more than 20 seconds. To enable
the feature, refer to section “Auto keypad lock”.
Manual keypad lock
You also have the possibility of manually activating the
keypad lock via the menu.
To lock
To lock the keypad, press
to enter the menu and
select Lock keypad. The keypad will lock and the device
will enter the sleep mode.
To unlock
Press followed by .
11
Getting started /
Operating range
Operating range
myPilot functions as a remote control (e.g. for setting
volume, selecting different hearing programs). Remote
control operating range is about 100 cm (40”).
Additionally, it is capable of reading status information
from the hearing instruments (e.g. battery status,
programs). Status readout operating range is about 40 cm
(16”).
12
Using myPilot
Home screen 햷
햶
햲
햵
햴
Automatic
햲
햳
햴
햵
햶
햷
햳
Program icon
Program name
Volume setting of left hearing instrument
Volume setting of right hearing instrument
Clock
Battery status
i The screens of your myPilot may look different,
depending on your preferences set by your hearing
care professional.
13
Using myPilot
Volume control
Binaural volume control
To change the volume setting of your hearing
instruments, go to the Volume screen by pressing
either or while in the Home screen. Once in
the Volume screen, you can change the volume
of both hearing instruments simultaneously by pressing
to increase the volume and to decrease the
volume.
The Volume screen shows the volume settings of both
hearing instruments, including the most comfortable
level (MCL) 햲 which was defined by your hearing
care professional during the fitting process. It also
indicates the change compared to MCL in decibels
(dB) 햳.
햲 Most comfortable
level (MCL)
햳 Change compared
to MCL in dB
14
햲
햲
햳
햳
Monaural volume control
Direct access
To change the volume settings of your left (or right)
hearing instrument individually, go to the Volume
screen by pressing either or while in the Home
screen. Once in the Volume screen, press to choose
the left side (or to choose the right side) and use to increase, and to decrease volume.
Access via menu
To change the volume of the left or right hearing
instrument individually, press
, select Volume
and Volume left or Volume right. Change the volume
using the or key and press
to return to the
Home screen.
15
Using myPilot
Program selection
Selecting a hearing program
To select a hearing program use and while in the
Home screen. By pressing , the hearing instruments
change to the next hearing program and the respective
program icon appears for about 3 seconds.
By pressing , the hearing instruments return to the
previous hearing program in the program sequence.
16
i
All program changes made by myPilot are applied
to both hearing instruments simultaneously.
i
The order of the program sequence is set by your
hearing care professional during the fitting process.
For further information on hearing programs, please
ask your hearing care professional.
Status information
햲
햴
햳
햲 Left hearing
instrument battery
햳 Right hearing
instrument battery
햴 myPilot battery
This function allows you to read the status of the
myPilot and hearing instrument batteries, volume and
program settings.
To initiate the readout process, briefly press the ON/OFF
button while in the Home screen. After the status
is read out successfully, the hearing instrument and
myPilot battery levels will be displayed. Subsequently,
the actual volume and program settings are shown.
In order to read out and display status information,
myPilot must be within about 40 cm (16") of the
hearing instruments. Hold the myPilot as shown in the
picture on the next page.
17
Using myPilot
40 cm (16")
In the event that the readout process fails, for example
because the hearing instruments are out of range,
myPilot will indicate this by showing question marks
instead of hearing instrument batteries in the
My instruments screen. Subsequently, the Home screen
will show the previous volume and program settings.
Restart readout process or refer to Troubleshooting
section.
Program ambiguity
There may be situations where myPilot cannot display
the hearing program consistently. If, for example,
you change the hearing program on one of your hearing
instruments manually, the next time you initiate the
readout process on your myPilot, the screen will
alternate between the left & right hearing programs
detected, together with the following symbol:
18
By pressing either the left or right arrow button you
can choose which hearing program you wish to apply
to both hearing instruments.
myPilot battery status
The status of the myPilot battery is shown with a
battery symbol in the Home screen. Battery
consumption and the operating time greatly depend
on the usage of the device. With normal use, myPilot
will run for a few days before needing recharging.
Once the battery is close to being depleted, the low
battery symbol will appear in the top left corner
of the Home screen.
myPilot will still run
for about an hour
but you should recharge
the battery as soon as
possible.
19
Using myPilot
ZoomControl (optional)
If your hearing instruments are equipped with
ZoomControl, this special feature allows you to choose
four directions in which to focus your hearing system
(front, back, left or right).
Direct access
A special function of the menu key is to access
ZoomControl directly. If you press and hold
for
about 2 seconds you will enter the Select direction
screen (bypassing other menu options described
later) and the default direction is shown. Use the
arrow keys to change the direction in which you
want to focus.
20
Access via menu
To access ZoomControl, press
, select ZoomControl
and choose the desired direction using the arrow keys.
After selecting the zoom position, press
to the Home screen.
to return
Once in the Home screen, press or to exit
ZoomControl and return to the default hearing
program.
21
Menu functions
Menu overview
•
•
•
•
•
•
•
ZoomControl (optional)
Volume
Lock keypad
Alarm clock
Status information
Settings
Pressing
will navigate one level back
in the menu structure.
i
Please note that you can directly return to the
Home screen from any submenu point by briefly
pressing the ON/OFF button.
• ZoomControl (optional)
To access ZoomControl, press , select
ZoomControl and choose the desired direction
using the arrow keys.
22
• Volume
With myPilot, you may set/change the volume
of each hearing instrument individually.
i
Please note that volume of both hearing
instruments can conveniently be changed via
direct access, as described on page 15.
Left / right volume
To change the volume of the left or right hearing
instrument individually, press , select Volume
and Volume left or Volume right. Change volume
using the or key and press .
Reset volume
This function resets the volume of both hearing
instruments to the default level as defined by your
hearing care professional during the fitting process.
To reset volume, press
and Confirm.
, select Volume, Reset volume
23
Menu functions
• Lock keypad
To avoid unwanted pressing of buttons (e.g. when
myPilot is in your pocket), you can manually lock the
keypad.
To lock the keypad, press
and select Lock keypad.
To unlock the keypad, press followed by .
• Alarm clock
Set alarm
To set the alarm, press , select Alarm clock and Set
alarm. Enter the alarm time, using the or key to
change the hours / minutes and the or key to turn
from hours to minutes,
and press
.
00:00 AM
24
If an alarm is set, the
alarm symbol appears on
the Home screen next
to the clock.
Respond to alarm
When the alarm fires, myPilot will send an alarm signal
to your hearing system (if myPilot is within 100 cm
(40") of the hearing system). Additionally, myPilot itself
will sound and show an alarm message on the screen.
Press any key on myPilot to stop the alarm. The
alarm will then be set to OFF and has to be set again
if needed.
i To modify the alarm time, set alarm again.
Alarm ON/OFF
To cancel a set alarm press
, select Alarm clock,
Alarm ON/OFF and Alarm OFF.
To (re)activate an alarm press
Alarm ON/OFF and Alarm ON.
, select Alarm clock,
25
Menu functions
myPilot tone
You have the possibility to turn the myPilot alarm
tone ON or OFF. Press , select Alarm clock, myPilot
tone, and choose either ON or OFF.
i
myPilot will only perform the alarm when
turned ON.
i
The alarm will only be audible in the hearing
instruments if myPilot is within 100 cm (40") of
the hearing instruments.
• Status information
My instruments
Similar to initiating the readout process by pressing
the ON/OFF button as described on page 17, you
can read out information by pressing , Status info,
My Instruments.
Serial numbers
To see the serial numbers of your hearing system,
press , select Status info and Serial numbers.
26
• Settings
Clock
myPilot has an internal clock which shows the time
in the Home screen and when entering the sleep mode.
00:00 AM
Set time
To set the time, press , select Settings, Clock and
Set time. Enter the time, using the and keys
to change the hours / minutes and the and keys to
turn from hours to minutes, and press to return.
Show/hide clock
You may choose whether or not to show the clock in
the Home screen.
To show the clock in the Home screen, press ,
select Settings, Clock, Show/hide clock and Show.
27
Menu functions
To remove the clock from the Home screen, press
select Settings, Clock, Show/hide clock and Hide.
,
Time format
You may choose between 2 different time formats in
which the clock will appear.
To choose the 12-hour format, press , select
Settings, Clock, Time format and 12-hour.
To choose the 24-hour format, press , select
Settings, Clock, Time format and 24-hour.
Date
myPilot has an internal date which is shown when
myPilot enters the sleep mode.
Set date
To set the date, press , select Settings, Date and Set
date. Enter the date, using the and keys to change
the day / month / year and the and keys to turn
from days to months to years, and press .
28
MM/DD/YYYY
Date format
You may choose between 2 different date formats.
To choose the DD.MM.YYYY format, press , select
Settings, Date, Date format and DD.MM.YYYY.
To choose the MM/DD/YYYY format, press , select
Settings, Date, Date format and MM /DD / YYYY.
Display
Contrast
To change the contrast, press , select
Settings, Display, and Contrast. In the
contrast screen use the key to decrease
and the key to increase the contrast
level, and press .
Brightness To change the brightness, press , select
Settings, Display, and Brightness. In the
brightness screen use the key to increase
and the key to decrease the brightness
level, and press .
29
Menu functions
Backlight timer
By default, the backlight is lit for 20 seconds.
To change the backlight time, press
, select
Settings, Display and Backlight timer and choose
the desired time (3, 5, 10, 15, 20 or 25 seconds).
When navigating in menu screens the backlight
time is automatically extended.
i myPilot will briefly display a sleep mode screen
before switching off the backlight.
Auto keypad lock
myPilot can be configured to automatically lock
the keys when switching off the backlight.
To activate the auto keypad lock, press
Settings, Auto keypad lock and ON.
To deactivate the auto keypad lock, press
Settings, Auto keypad lock and OFF.
30
,
,
Auto power OFF
To reduce power consumption, you can enable the
auto power OFF feature. By default, the auto power
OFF is disabled.
To enable it and to set the time before myPilot turns
OFF automatically, press
, select Settings, Auto
power OFF and choose the desired time (1 minute,
3 minutes or 5 minutes).
To disable the auto power OFF feature, press
select Settings, Auto power OFF and OFF.
,
31
Reset button (on the back of the device)
If, for some reason, myPilot becomes
unresponsive, press the reset button
on the back of the device
as shown in the picture.
No data will be lost.
32
Important information
Maintenance and care
Clean myPilot using a damp cloth. Never use
household cleaning products (washing powder,
soap, etc.) or alcohol to clean the device.
When myPilot is not in use, turn it OFF and store
it safely.
Protect myPilot from excessive moisture
(bathing, swimming) and heat (radiator, car
dashboard). Protect it from excessive shock
and vibration.
33
Important information
Safety notice
Keep this device out of reach of children
under 3 years.
Interference with medical devices.
This device uses low-power, digitally coded
transmission to communicate to your hearing
instrument.
Although unlikely, interference with medical
devices such as pacemakers is possible.
Interference should not occur with normal use,
keep the device 10 cm (4”) or more from the
body. Therefore, it is recommended that pacemaker
users do not keep this device in a breast pocket.
External devices may only be connected if they
have been tested in accordance with corresponding
IECXXXXX standards.
34
Important points
The digitally-coded, inductive transmission
technology used in this device is extremely
reliable and experiences virtually no interference
from other devices. It should be noted, however,
that when operating the device near a computer
terminal or other strong electromagnetic fields,
it may be necessary to be at least 60 cm (24”)
away to ensure proper operation. If the hearing
instrument do not respond to the device
because of an unusual field disturbance, move
away from the disturbing field.
Do not use this device in locations where it is
forbidden to use electronic devices.
X-ray radiation (e.g. CT scans, MRI scans) may
adversely affect the correct functioning of this
device. We recommend that you turn the device
OFF before undergoing X-ray procedures and keep
it outside the room.
35
Important information
Your hearing instrument and this device were
given a unique communication network code
during the fitting. This ensures that the device
will not affect hearing instruments worn by
others.
High-powered electronic equipment, larger
electronic installations and metallic structures
may significantly reduce the operating range.
Use only original Phonak accessories.
Do not make any changes or modifications to
this device.
Opening myPilot might damage it. If problems
occur which cannot be resolved by following the
remedy guidelines in the troubleshooting section
of this user guide, consult your hearing care
professional.
36
myPilot may only be repaired by an authorized
service center.
The battery may only be replaced by an authorized
service center.
Do not remove this cover:
37
Important information
Troubleshooting
Situation
myPilot turns OFF automatically.
myPilot becomes unresponsive.
The screen is white or dark.
Status information displayed on myPilot
does not correspond with current settings
in hearing instruments.
38
Most probable cause
Remedy
The battery is empty.
Charge myPilot.
myPilot may have
encountered a software
problem.
Reset myPilot.
Brightness and / or
contrast settings might
be sub-optimal.
Adjust the brightness
and / or contrast settings.
Manipulations on the
hearing instruments may
not have been recognized
by myPilot.
Read out the status
information as described
on page 17.
39
Important information
Troubleshooting
Situation
Question mark symbol is displayed after performing
the readout process.
myPilot commands apply only to one hearing
instruments as opposed to both.
40
Most probable cause
Remedy
myPilot may be out
of range of hearing
instruments.
Move myPilot closer
to hearing instruments.
Hearing instruments may
be turned OFF.
Hearing instruments
must be turned ON
to correspond with
myPilot. Turn them ON.
Hearing instrument
batteries may be depleted.
Replace batteries.
myPilot may be out of
range of unresponsive
hearing instrument.
Move myPilot closer to
the hearing instrument.
41
iCom (optional)
iCom is an optional accessory available for your hearing
instruments. With the push of a single button, iCom
connects your hearing system with the technology
around you (mobile phones, audio equipment, FM etc.).
42
Bluetooth connections
iCom offers a simple way to connect your mobile
phone via Bluetooth to your hearing system.
iCom is also capable of transmitting a stereo
audio signal from any Bluetooth enabled device
(built-in or via an adapter).
For further information, please ask your hearing
care professional.
43
Service and Warranty
Phonak offers you a comprehensive global warranty
which becomes effective on the date of purchase.
Please ask your hearing care professional about the
details and duration. This warranty covers any
repairs due to defects in material and/or workmanship.
The warranty does not cover damage from improper
handling or care, exposure to chemicals, immersion in
water or undue stress. Damage caused by third parties
or non-authorized service centers renders the Phonak
warranty null and void. This warranty does not include
any services performed by a hearing care professional
in their office. This warranty applies to the Phonak
products listed below:
Serial number:
Date of purchase:
44
Declaration of conformity
Phonak AG, Laubisrütistrasse 28, CH-8712 Stäfa,
Switzerland declares under its sole responsibility that
myPilot is in conformity with the following standards
or other standardizing documents:
Radio:
EN 300 330
EMC:
EN 60601-1-2
El. Safety: EN/IEC 60601-1
Implementing the provisions of the MDD 93/42/EEC
(Medical Device Directive), R&TTE Directive 1999/5/EC
(Radio and Telecommunications Terminal Equipment),
EMC Directive 2004/108/EC (Electromagnetic
Compatibility) and LVD 2006/95/EC (Low Voltage
Directive).
45
Phonak distributors worldwide
Group companies:
Australia
Austria
Belgium
Brazil
Canada
China
Denmark
France
Germany
India
Italy
Japan
Jordan
Mexico
Netherlands
New Zealand
Norway
Poland
46
(detailed information on
www.phonak.com)
Phonak Australasia Pty. Ltd.
Baulkham Hills N.S.W 2153
Hansaton Akustische Geräte GmbH
5020 Salzburg
Ets Lapperre B.H.A.C. NV
B-1702 Groot-Bijgaarden
Phonak Belgium NV, B-1700 Dilbeek
CAS Produtos Médicos
São Paulo – SP 04363-100
Phonak Canada Limited
Mississauga, Ontario L5W OB3
Phonak (Shanghai) Co. Ltd.
Shanghai City 200233
Phonak Danmark A/S, Nitivej 10
2000 Frederiksberg
Phonak France SA, 69500 Bron
Phonak GmbH, 70736 FellbachOeffingen, EC Representative
Phonak India Pvt. Ltd., 100 034 New Delhi
Phonak Italia S.r.l., 20159 Milano
Phonak Japan Co., Ltd., Tokyo 101-0044
Phonak Middle East, 11181 Amman
Phonak Mexicana, S.A. de C.V. 03920
México, D.F.MEXICO
Phonak B.V., 3439 ME Nieuwegein
Phonak New Zealand Ltd., Takapuna
Auckland 9
Phonak AS, 0105 Oslo
Phonak Polska SP Z.0.0 00-567 Warszawa
Russian Federation
Spain
Sweden
Switzerland
Turkey
United Kingdom
USA
Independent general
distributors:
Manufacturer:
Phonak CIS Ltd., Moscow, 115114
Phonak Ibérica S.A., 03008 Alicante
Phonak AB, 117 43 Stockholm
Phonak AG, Phonak Schweiz, 8712 Stäfa
Phonak Turkey A.S., 34357 Istanbul
Phonak UK Limited
Warrington, Cheshire WA1 1PP
Phonak LLC, Warrenville, IL 60555-3927
A complete list of Phonak distributors
is available at Phonak's Internet site:
www.phonak.com. Please visit us or
ask your hearing care professional for
information.
Phonak AG, Laubisrütistrasse 28
CH-8712 Stäfa, Switzerland
47
Notices
Notice 1
This instrument is certified under:
FCC ID: KWC-MYPILOT1
IC: 2262A-MYPILOT1
This device complies with Part 15 of the FCC Rules
and with RSS-210 of Industry Canada. Operation is
subject to the following two conditions:
1) this device may not cause harmful interference, and
2) this device must accept any interference received,
including interference that may cause undesired
operation.
Changes or modifications made to this equipment
not expressly approved by Phonak may void the FCC
authorization to operate this equipment.
Notice 2
This Class B digital apparatus complies with Canadian
ICES-003.
48
Notice 3
This equipment has been tested and found to comply
with the limits for a Class B digital device, pursuant to
Part 15 of the FCC Rules.
These limits are designed to provide reasonable
protection against harmful interference in a residential
installation. This equipment generates, uses, and can
radiate radio frequency energy and, if not installed and
used in accordance with the instructions, may cause
harmful interference to radio communications. However,
there is no guarantee that interference will not occur
in a particular installation.
If this equipment does cause harmful interference to
radio or television reception, which can be determined
by turning the equipment off and on, the user is
encouraged to try to correct the interference by one or
more of the following measures:
• Reorient or relocate the receiving antenna
• Increase the separation between the equipment
and receiver
• Connect the equipment into an outlet on a
circuit different from that to which the receiver is
connected
• Consult the dealer or an experienced radio/TV
technician for help
49
XXXX
!
The CE symbol is confirmation by Phonak AG that
this Phonak product meets the requirements
of directive 93/42/EEC on medical devices and the
R&TTE Directive 1999/5/EC on Radio and
Telecommunication Terminal Equipment.
The numbers after the CE symbol are the numbers
of consulted certified bodies under the above
mentioned directives. The alert sign means that
potential restrictions on its use are applicable
in one or more EU Member States.
This symbol indicates this product complies with
requirements for a B type applied part according to
EN 60601-1.
This symbol indicates that it is important that the user
refers to associated warnings given in this user guide.
The symbol with the crossed out disposal bin indicates
that this product shall not be treated as household
waste. Please hand over your old or unused product to
the applicable collection point for the recycling of
electrical and electronic equipment or bring your old
product to your hearing care professional for
appropriate disposal. By ensuring this product is
disposed of correctly, you will help prevent potential
negative effects on the environment and human
health.
50
Operating
conditions
This product has been designed for trouble-free
operation without restrictions when used as intended,
unless otherwise stated in this user guide.
Transportation Temperature should not exceed limits of –20°/60°
and storage Celsius at a relative air humidity of 65% for extended
conditions
periods during transportation and storage.
Air pressure between 500 and 1100 hPa is not
detrimental to this device.
Australia & New Zealand
Brazil
China
Japan
South Korea
0682
!
51
www.phonak.com
029-0691-02/V2.00/2008-05/A+W
Printed in Switzerland © Phonak AG All rights reserved
Your hearing care professional