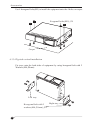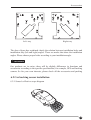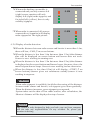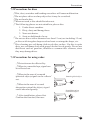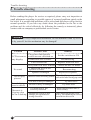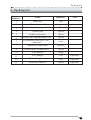
1
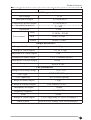
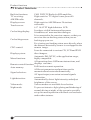
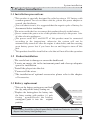
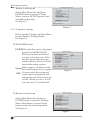
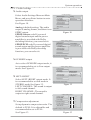
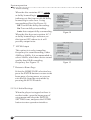
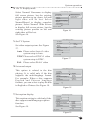
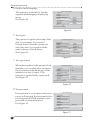
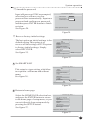
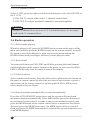
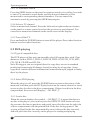
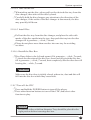
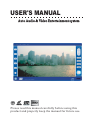
USER'S MANUAL
Auto Audio & Video Entertainment system
VIDEO
Please read this manual carefully before using this
product and properly keep the manual for future use.
Contents
Contents
1. Brief introduction------------------------------------------------------------ 02
2. Product features-------------------------------------------------------------- 02
06
3. Product installation---------------------------------------------------------09
4. Description of buttons------------------------------------------------------5. System operation
12
5.1 Turning on/off the system----------------------------------------------- 12
5.2 adjustment of display angle---------------------------------------------- 12
13
5.3 Audio adjustment--------------------------------------------------------13
5.4 Video mode selection---------------------------------------------------23
5.5 Menu setup---------------------------------------------------------------- 24
5.6 Radio operation----------------------------------------------------------- 24
5.7 AV function--------------------------------------------------------------- 25
28
5.8 TV function --------------------------------------------------------------5.9 DVD playing--------------------------------------------------------------
31
5.10 CDC playing------------------------------------------------------------- 36
6. Accessories
39
6.1
Appearance----------------------------------------------------------------
39
6.2 Car backing sensor installation-----------------------------------------6.3 Car backing camera installation---------------------------------------7. Precautions--------------------------------------------------------------------
41
42
Safety statement
Safety statement
It is prohibited by law in some countries to watch TV or other programs or
do relevant operations while driving. For your safety, please do not watch
any programs or do any associated operations during driving.
As for car backing, this system works simply as an assistant tool. This
company is not responsible for any potential car backing accidents.
! WARNING
㨫 !When using CD changer coming with this product, please do follow the
instructions as stated in 㨫 㨺 CDC operation 㨫 㨻 and 㨫 㨺 CD changer installation 㨫
㨻 in this manual to carry out its operational control, adjustment and
performance control so as to avoid causing physical damage.
㨫 ! Non-professionals please do not dismantle this player or attempt to make
any modifications. Since this player is a very complicated electronic and
mechanical device, please do not dismantle it or modify any parts at will,
so as to avoid damaging the player and causing irreversible loss.
This player contains precision electronic mechanism. Please do not apply
㨫!
external force on it when it is stretching out or drawing back, turning or
halted, lest the mechanism may be damaged.
! NOTE
Due to technical improvement, specification and design are subject to
change without notice.
1
Brief introduction/Product features
1. Brief introduction
Thank you for purchasing this high quality auto audio & video product. This
product is a multifunctional AV system developed for high-end sedans, MPVs
and special cars, which is an on board control center that integrates DVD
player, digital tuner, TV, radar distance detecting, rearview and amplifier. It
applies professional inset style DVD core, plays full-zone DVDs, MP3s, VCDs
and CDs. It applies highly sensitive TV module as well as FM/AM digital tuner
to bring you TV entertainment and various conveniences so that you can get to
know global trends and stock market fluctuations whenever you wish.This
player is supplied with a built-in 4X50W power amplifier and can control
CD/DVD changer, with interface of rear sensor, rearview camera and AV
input/output. The player has a 6.5" 16:9 TFT LCD that fits the structure of
human eyes and has a wide viewing angle in all directions,the screen brightness
can be adjusted automatically according to the environment, also the faceplate
angle is adjustable,which assure your vision in a optimum status. The structural
dimensions of this player in accord with installation dimensions of ISO TWO
DIN.
Professional design for on board electronic products fulfills fully intelligent
operations. It has an OSD menu display and can be operated by panel buttons ,
touch screen and remote controller. All the set parameters and positions can be
memorized and restored automatically, providing you with the easiness and
convenience you want. Wide system voltage range design meets application
requirements of various cars even better. Please read this manual carefully for
correct installation and operation of this product.
2. Product features
2.1 Product specifications
2.2.1 System parameters
Item
Specification
Working voltage
DC 10V~15V
Working current
MAX 15A
Working temperature
㨭㨷20~60 o C
Storage temperature
㨭 㨷30~80 o C
2
Product features
Specification
Item
Input configuration
3-channels video input
Screen dimensions
6.5 inches (diagonal)
(CDC, AV, CAM)
Weight
2.6 Kg
17.8(W)㨫 㩋 20.2(L)㨫 㩋 10(H) cm
Dimensions
Resolutions
1200(H)㨫㩋234(V) pixel
0.119(H)㨫 㩋0.345(V)mm
Pixel dot pitch
2.1.2 Performance parameters
RADIO parameter
Range of frequency
Tuning mode
Display mode
Memory capacity
Search mode
FM87.5-108MHz/AM522-1611KHz
Phase looked loop
Frequency synthesis tuning
LCD panel display or OSD
16 FM stations / 8 AM stations
Automatic / Manual
TV parameters
Channel parameters
VHF-L
48.25~170.00 Mhz
VHF-H
170.00~450.00 Mhz
UHF
Receiving system
Search mode
450.00~863.25 Mhz
PAL or NTSC or SECAM
Automatic/manual
Memory mode
Automatic
Memory capacity
40 channels
Antenna resistance
75 㨰 㩂
DVD parameters
Discs compatible
12cm multi-zone DVD/VCD/MP3/CD/CD-R
Signal noise ratio
>90dB
Dynamic range
>90dB
Distortion
Definition
System
3
< 0.05%
>500 lines
PAL/NTSC
Product features
Items
Parameters
Amplifier parameters
Test voltage
13.8V
Max power output
4㨫 㩋 45W(4㨰 㩂 )
Practicality power output
Speacker resistance
4㨫 㩋 45W(4㨰 㩂 )
4---8㨰 㩂
55dB
Separation
Bass
12.5KHz㨫 㩊 12dB
Mid
1KHz㨫 㩊 12dB
Treble
100Hz㨫 㩊 12dB
Tone control
Output parameters
Range of audio output
1.0 Vpp
Range of video output
1.0㨫 㩊 0.2 Vpp
Impedance of video output
Channels of audio output
75㨰 㩂
2/4/5.1 channel(option)
Impedance of audio output
Video system
600㨰 㩂
PAL or NTSC
CDC parameters
Range of working voltage
CDC type
CDC capability
Range of audio output
Channels of audio output
Imdepance of output
Frequency response
SNR
Range of video output
Video system
10V~ 15V
DVD/VCD/CD (option)
6/8/10 discs (option)
2 Vpp
Two-channel (L/R)
600㨰 㩂
5㨭㨷20000Hz
96 dB
1㨫 㩊 0.2Vpp(using VCD/DVD changer )
PAL or NTSC(using VCD/DVD changer )
4
Product functions
2.2 Product functions:
Built-in functions:
TV receiving:
AM/FM radio:
Display screen:
Touch screen:
CAR DVD,TV,Radio,4x50W amplifier.
High sensitive TV digital tuner preset 40
channels.
High sensitive AM/FM tuner 24 stations
restorable.
6.5" 16:9 TFT high definition LCD.
It reduces visible buttons and increases
Car backing display:
friendliness of man-machine dialogue.
It is connected to the rearview camera, so that you
can view the car-backing status when you are
Car backing sensor:
backing up your car.
For viewing car-backing status more directly when
the distance detected by sensor is overlapped to the
CDC control:
camera image.
It can be connected to various CD, VCD and DVD
disc changers.
Display system:
Automatic PAL/NTSC, wide application range,
highly compatible.
Menu functions:
All operations have OSD menu instructions, and
Remote control function: displays real time.
Full function remote operation.
Auto memory:
All the set parameters and positions can be
memorized and restored automatically.
Signal selection:
AV input/output,convenient external signals
connection.
Light detection:
Automatically detect light intensity and adjust
brightness of the screen.
Video mode:
Various modes are available for selection.
Night mode:
To prevent intensive light glaring and hindering of
normal driving at night, a blue screen is specially
set up for menu operation with black screen shown
under other statuses.
5
System installation
3. Product installation
3.1 Installation precautions
㨫!This product is specially designed for vehicles using a 12V battery with
common ground. For use on other vehicles, please use power adapter or
consult the distributor.
㨫!To avoid short-circuit, it is suggested that the negative pole of battery be
disconnected before installation.
㨫!Do not override the fuse to connect this product directly to the battery.
㨫!Never connect the power wire of this product directly to the power wire
of other electric appliances.
㨫!The power cords ACC and BATT of this product must be connected
according to the instructions, otherwise the system will not be
automatically turned off after the engine is shut down, and thus causing
great battery power lost if you leave the car and forget to turn off this
unit.
㨫!
This product should be installed in a slot that will not affect the operation
3.2 Product installation
㨫!Be careful not to damage or smear the dashboard.
㨫!Locate an empty slot in the instrument panel and clear up adequate
space for installation.
㨫!Install the player into the slot.
㨫!Connect all the wires .
㨫!The installation of optional accessories please refer to the chapter
of Accessries.
3.3 Battery replacement
㨫!Take out the battery seating,press and hold
the clip, and pull the battery seating out.
㨫!Replace the battery,place the battery into
the bttery seating with positive (+) pole
facing
upward.Insert the battery
seating,and push it into the original
position.
Back of Remote Control
Battery seating
Battery +
Battery Clip
! NOTE
Fault battery should be replaced immediately.Abandoned batteries should be
dispose into battery-kind garbage box.
6
System installation
3.4 System connection
㨫!Connect BATT (yellow) to battery (+).
㨫!Connect the ACC (red) to ignition switch.
㨫!Connect the GND (black) to ground.
.
㨫!Connect the BACK (blue) to the car backing switch (car backing lamp
anode).
㨫!Connect the BRAKE (blue/white) to grip brake switch.
㨫!Connect the AMP-C (orange) to the amplifier control cable.
㨫!Connect the antenna control wire ANT-C (blue/black) with the
automatic antenna control wire .
㨫!Connect the speaker of the local amplifier: Front left FL, Front right
FR, Fear left RL, Rear right RR (caution the anode and the canthode)
㨫!Connect the TV antenna wire to TV port.
㨫!Connect the radio antenna wire to radio port.
㨫!Connect the CDC control wire to CDC port,connect the CDC power
wire (yellow) to the battery anode, connect CDC audio wire to CDC L
and CDC R (CDC V only for video independently output of the CD
changer).
㨫!Connect the CAM and RADAR (camera and radar).Please refer to
Accessories.
㨫!Connect audio & video input and output.
Connect AV input with V IN,A LIN, A RIN.
Connect video output with V OUT.
㨫!Connect the audio output.
4-channel : FL, FR
RL, RR
5.1-channel: FL, FR
RL, RR
SW, C
Coaxial output:SPDIF
3.5 System connection diagram
㨫 ! The control of power amplifier and antenna is effective at high electric level.
㨫 ! The control of hand brake is effective at low electric level.
7
%5$.(
$17&
$03&
%$&.
*1'
$& &
%$77
Purple/Black
Purple (RR)
Gray/Black
Gray (FR)
Green/Black
Green (RL)
White/Black
White (FL)
TV antenna wire
TV antenna wire
Blue white (BRAKE)
Blue black (ANT-C)
Orange (AMP-C)
Blue (BACK)
Black (GND)
Red (ACC)
Yellow (BATT+)
55
55
)5
)5
5/
5/
)/
)/
TV ANT
CD changer
TV antenna wire
Power speaker wire
CDC connect wire
CDC
GPS
Radar/CAM
Host unit
AVIN/OUT
5 /28 7
55287
63 ',)
&2 87
Camera wire
Sensor wire
Power wire (BATT+)
&$ 0
5$ '$
Radio antenna wire
5
AV input/output wire
9287
$/, 1
$5 ,1
9, 1
&' &/
&' &5
&' &9
SPDIF digital output
CDC video input
CDC right track input
CDC left track input
AV video input
AV right track input
AV left track input
AV video output
Center output
Subwoofer output
6:2 8 7
FL (left circle) track output
Left track output (white)
GND
) /2 87
FL (left) track output
RR (right circle) track output
Right track output (red)
RADIO ANT
AUDIO OUT
) 52 8 7
FR (right) track output
AUDIO output
System installation
3.5 System connection diagram
8
Description of buttons
4. Description of buttons
4.1 Panel buttons function
Angle adjusting (+)
Angle adjusting (-)
Auto search
Band/Channel switch
Disc load/eject
Volume control (+)
Volume control (-)
Audio mode
Mute
Video mode
Menu setup
Power switch
/Panel open
Direction/Enter button
4.2 Remote control buttons function
Radio playing
DVD playing
Number button
Angle adjusting (-)
CDC playing
5$',2
6HFWRU
&'&
'9'
$979
Up/Fast forward
Return button
Menu setup button
Band/Sound switch
9PR
5(7
GH
0(0
6HHN
6HWXS
0RGH
%$1'
0XWH
Video mode button
Righ/track changing
/select stations
Auto search
Enter button
Audio mode button
Volume control (+)
Mute
Volume control (-)
5HPRWHFRQWURO
9
Angle adjusting (+)
Panel open/close
Left/track changing
/select stations
Manual memorizing
Down
/Fast backward
AV/TV playing
Description of buttons
4.3 Description of button functions
|+/,|-/Angle adjusting button:Adjust the tilted angle of the display panel.
S/SEEK Auto search button:Search and memorize station channels
automatically under RADIO or TV mode.
A/BAND Band/channel switch button:Switch bands under RADIO mode
or switch left and right sound channels under CDC, DVD or AV mode.
Panle colose/open button:Under DVD mode, this button is used to take
out the disc inside the DVD core or to pull in the disc that stays in the inlet of
the DVD compartment.
Power switch button:When the player is turned on, this button is used to
draw back and reset the screen, and turn the power off when it is pressed and
held.
Direction/Enter button:The functions are the same as those of the
upward, downward, leftward and rightward buttons and the ENTER button
on the remote control.
SET/SETUP Menu button:Adjust system setup menu.
V-M/V-mode Video mode button:Quickly adjust the preset picture
brightness.
MUTE button:Press once to mute and press again to cancel the mute.
MODE Volume adjusting mode button:Adjust the menu for bass, treble
and volume menu.
/ /㨭 㨷 /+ Volume control button: Adjust the volume, and adjust the bass
and treble by combining the use of audio mode buttons.
RADIO playing button:Press this button to switch to radio playing from
other modes.
DVD playing button:Press this button to switch to DVD playing from other
modes.
CDC playing button:Press this button to switch to CDC playing from other
modes.
AV/TV playing button:Press this button to switch to AV playing from other
modes, and switch between AV and TV by pressing this button
continuously.
0-9 number button:Press a digit button to recall a preset station channel
directly under TV or RADIO mode, or select a CDC disc directly under CDC
mode, or to select a track under DVD mode.
Up/fast forward button:Fast forward under DVD or CDC mode, or fine
tune a station channel under TV or RADIO mode, or make a selection in a
menu.
10
Description of buttons
Down direction/Fast backward button:Fast backward under DVD or
CDC mode, or fine tune a station channel under TV or RADIO mode, or
make a selection in a menu.
Leftward/Track changing/Select stations:Select the previous track
under DVD or CDC mode, or select the previous station channel under TV or
RADIO mode, or make a leftward selection in a menu.
Rightward/Track changing/Select stations:Select the next track
under DVD or CDC mode, or select the next station channel under TV or
RADIO mode, or make a rightward selection in a menu.
RET/MENU return button:Return to the root menu during a disc with a
root menu playing under DVD mode.
MEM manual memorizing/Change disc button:Memorize a station
channel under RADIO or TV mode, or select the next disc under CDC mode.
SEEK auto search button:Search and memorize a station channel
automatically under RADIO or TV mode, or select the previous disc under
CDC mode.
ENTER button:The ENTER button under menu adjustment mode and DVD
directory mode (if it is unable to make a selection under the root directory of
some DVD discs, please press and hold this button to use the 2nd function
button), or the Pause and Play buttons under DVD playing mode.
Remote control reset button:Draw back and reset the screen.
11
System operation
5. System operation
5.1 Turning on/off the system
㨫!When this player is on for the first time, the system will be reset under
RADIO mode, and the screen is shown as the figure below:
㨫!When the player is off, press the POWER button to turn on the system.
㨫!Press and hold the POWER button for more than 2 seconds, the screen
will be drawn back and the system will be turned off.
㨫!The system will draw back the screen and turn the system power off
after detecting that ACC is off.
㨫!You can turn on the touch screen of the display by touching the screen
gently.
5.2 Adjustment of display angle
㨫!Turning on power supply for the system, you can adjust the viewing
angle of the display by pressing the angle adjusting buttons.
㨫!Press the POWER button or SCREEN OUT button gently, the screen
will be drawn back to the original position from the position set by the
user; gently press the POWER button or SCREEN OUT button again,
the screen will return to the position set by the user.
5.3 Audio adjustment
㨫!You can adjust the volume in the range of 0 to 40 by pressing the
volume adjusting button.
12
System operation
㨫!Press the audio adjusting mode button to enter into audio menu. You
can adjust the bass, treble and volume of the audio by combining the
use of the volume adjusting buttons.
VOLUME:
BASS
:
MID
:
TREBLE :
15
0
0
0
(0
(-7
(-7
(-7
--- 40)
--- +7)
--- +7)
--- +7)
! WARNING
This player is equipped with a touch screen which will show different
operating menus as the input function varies under DVD, CDC, TV, RADIO,
AV or CAM mode. Please operate in accordance with the menus, and enjoy
5.4 Video mode selection
㨫! Under radio status,press the VIDEO MODE button to select standard
and night mode in turn:
STANDARD
NIGHT MODE
㨫! Under other status, press the VIDEO MODE button to select as below
status in turn:
STANDARD
BRIGHTNESS
CUSTOM
NIGHT MODE
5.5 Menu setup
㨫! Press the menu button to adjust the menu,as below:
LCD SETUP
BALANCE
SYS SETUP
CLOCK ADJUSTMENT
DVD status
DVD SETUP
5.1CH:OFF (DVD 5.1-channel switch)
㨫! Operating the direction key to chooses an options for establishing,
pressing the ENTER button into the submenu.
13
System operation
5.5.1 Display adjustment
㨫!Select LCD SETUP,press ENTER button to adjust the display adjustment
submenu(as below:) with the direction button.
BRIGHT :
COLOUR:
CONTR :
ANGLE :
32
22
26
40
㨫! When the adjustment is done, press the ENTER button to return to the
main menu or the SETUP button to exit from the setup.
5.5.2 Adjusting sound channel balance
㨫! Select the BALANCE item, press the ENTER button to pull out the
submenu for adjusting sound channel balance (as shown in the figure
below), and conduct adjustment by combining the use of direction
buttons.
㨫!When the adjustment is done, press the ENTER button to return to the
main menu or the SETUP button to exit from the setup.
FRONT L
FRONT R
REAR L
REAR R
5.5.3 System setup
㨫! Select the SYS SETUP item, press the ENTER button to pull out the
submenu for adjusting system (as shown in the figure below), and
conduct adjustment by combining the use of direction buttons.
BEEP:
ON/OFF
TOME OSD:
ON/OFF
BACK VIEW:
ON/OFF
AUTO LIGHT: ON/OFF
LOUDNESS:
ON/OFF
SAP:
ZLEVEL
㨫! When the adjustment is done, press the ENTER button to return to the
main menu or the SETUP button to exit from the setup.
14
System operation
5.5.4 Clock adjusting
㨫!Select the CLOCK ADJ item, press the ENTER button to pull out the
submenu for clock adjusting (as shown in the figure below).
YEAR
2005
MON
01
DAY
18
HOU
12
MIN
00
㨫! When the adjustment is done, press the ENTER button to return to the
main menu or the SETUP button to exit from the setup.
5.5.6 DVD system setup
Select menu item DVD SETUP, and
press enter button to enter DVD
system setup.
See figure 1.
Setup menu--homepage
Common Settings
㩗㨲㩝㩍㩓㔈㨲
Speaker Settings
Sound Settings
Initial Settings
Exit Setup Menu
Common performance settings
Figure 1
5.5.6.1 Common settings
Select Common Settings on main
menu to enter Common Settings
menu. On the left is root catalogue
and on the right is the sub catalogue
of corresponding root catalogue
selected. Use left and right direction
buttons to switch between root
catalogue and sub catalogue and use
up and down direction buttons to
select items.Press Enter button to
execute corresponding operations.
See Figure 2.
㨬㩣 Set image mode
For setting image mode, we suggest
select Auto mode.
See Figure 2.
15
-- Common Settings Menu -Image㩗㨲㩝㩍㩓㔈㨲
Mode
Angle View
Language displaying
Hiding Caption
Screen Protection
Main Menu
Set Image Mode
Figure 2
Auto
㩗㨲㩝㩍㩓㔈㨲
High Definition
No Flicker
System operation
㨬㩤 Set angle view
DVD can record a scene shot by
multiple cameras from different
angles. You can select any viewing
angle thereof to view when playing.
On: To turn on Angle View;
Off: To turn off Angle View.
Note: The disc must contain
multi-angle viewing
information,otherwise this setting will
not be valid.
--
Common Settings Menu
Image Mode
Angle 㩗㨲㩝㩍㩓㔈㨲
View
Language Displaying
Hiding Caption
Screen Protection
--
On
㩗㨲㩝㩍㩓㔈㨲
Off
Main Menu
Set angle view
Figure 3
-- Common Settings Menu --
㨬㩥 Set displaying language
Selection of screen displaying
language under DVD.See Figure 4.
English: Screen displaying
language is English.
Chinese: Screen displaying
Language is Chinese.
Image Mode
Angle View
Language
㩗 㨲 㩝 㩍 㩓 㔈Displaying
㨲
Hiding Caption
Screen Protection
English
Chinese
㩗㨲㩝㩍㩓㔈㨲
Main Menu
Set Picture Displaying Language
Figure 4
㨬㩦 Set hiding caption
If the disc contains hiding caption
information, you can select:
On: To turn on hiding caption switch
Off: To turn off hiding caption switch
See Figure 5.
㨬㩧 Set screen protection
-- Common Settings Menu -Image Mode
Angle View
Language Displaying
Hiding㩗 㨲Caption
㩝㩍㩓㔈㨲
Screen Protection
On
Off㩗㨲㩝㩍㩓㔈㨲
Main Menu
Set Hiding Caption
If there is no disc or after playing stops
for a period of time, the system will
automatically start screen protection
function, and the screen will show
black screen with only the DVD logo
moving on screen. This function is to
protect screen from image pixel
damage caused by long time
displaying.
On: To turn on screen protection
Off: To turn off screen protection
See Figure 6.
Figure 5
-- Common Settings Menu -Image Mode
Angle View
Language Displaying
Hiding Caption
Screen㩗㨲㩝㩍㩓㔈㨲
Protection
On
Off㩗 㨲 㩝 㩍 㩓 㔈 㨲
Main Menu
Set Screen Protection
Figure 6
16
System operation
㨬㩨 Return to main menu
Select Main Menu box and press
ENTER button to return to Setup
Menu, or press SETUP button to exit
Setup Menu directly.
See Figure 7.
-- Common Settings Menu -Image Mode
Angle View
Language Displaying
Hiding Caption
Screen Protection
Main Menu
㩗㨲㩝㩍㩓㔈㨲
Return to Main Menu
Figure 7
5.5.5.2 Speaker settings
Select Speaker Settings on Main Menu
to enter Speaker Settings Menu:
See Figure 8.
㨬㩣 DOWNMIX mode
LT/RTWhen the disc you are playing is
-- Speaker Settings -provided with PROLOGIC
DOWNMIX
㩗 㨲 㩝 㩍 㩓 㔈 㨲 Mode
LT/RT
Dolby surround sound effect,
Center Speaker
Stereo
㩗㨲㩝㩍㩓㔈㨲
you can select this item. Then
Rear Speakers
On
Bass Speaker
the disc signal can represent
Center Delay
Rear Delay
realistc theater effect via DVD
Test Tone
internal decoding system.
When output 2-channel sound, Speaker Performance Settings
Stereo
the sound outputs stereo signals.
Figure 8
You can select the settings of
OFF
central and rear speakers and
subwoofer only if the item is set
to OFF. When you set it to ON,
you can enter 5.1 sound field.
㨬㩤 Return to main menu
Select Main Menu box and press
ENTER button to return to Settings
Menu Main Menu, or press Setup
button to directly exit setup status.
See Figure 9.
-- Speaker Settings -㩗㨲㩝㩍㩓㔈㨲
Center Speaker
Rear Speakers
Bass Speaker
Center Delay
Rear Delay
Test Tone
Home 㩗㨲㩝㩍㩓㔈㨲
page
Speaker Performance Settings
Figure 9
17
System operation
5.5.5.3 Audio settings
㨬㩣 Audio output
Select Audio Settings Menu on Main
Menu, and press Enter button to enter
operation interface.
See Figure 10.
Analog is default setting. The audio
output is analog format, and there is no
SPDIF output.
SPDIF /Source code If you need
digital sound output and the power
amplifier is provided with Dolby
decoding function, you can select it.
SPDIF/PCM code If you need digital
sound output and the power amplifier
is provided with Dolby decoding
function, you can select it.
-- Audio settings -Sound
Output
㩗㨲㩝㩍㩓㔈㨲
OP MODE
Left+Right
COMPRESSION
Sound Settings
LPCM Output
Analog
Spdif/Source Code
SPDIF/PCM
Main Menu
Set Audio
Figure 10
-- Audio Settings Menu -Sound Output
OP MODE
㩗㨲㩝㩍㩓㔈㨲
Left+Right
COMPRESSION
Sound Settings
LPCM Output
Line Output
RF Adjustmenu
Main Menu
Operational mode setup
Figure 11
㨬㩤 OP MODE output
As to select OP MODE output mode, it
is recommended to set to Line output
mode. See Figure 11.
㨬 㩥 LEFT+RIGHT
Select LEFT+RIGHT output mode. It
is recommended to set this mode to
STEREO mode.See figure 12.
LEFT CHANNEL: The sound is output
to left sound channel.
RIGHT CHANNEL: The sound is
output to right sound channel.
-- Audio Settings Menu -Sound Output
㩗㨲㩝㩍㩓㔈㨲
OP MODE
Left+Right
COMPRESSION
Sound Settings
LPCM Output
Stereo mode
Left channel
Right channel
Composite
Main Menu
Operational mode setup
Figure 12
-- Audio Settings Menu --
Sound Output
OP MODE
Left+Right
㨬 㩦 Compression adjustment
Set up dynamic compression ratio. The
default is FULL. It is adjustable and
recommended to set to FULL.
See Figure 13.
FULL
6/8
COMPRESSION
㩗㨲㩝㩍㩓㔈㨲
Sound Settings
LPCM Output
4/8
2/8
Main Menu
OFF
Dynamic range compression
Figure 13
18
System operation
㨬㩧 Audio setting
When the disc contains AC-3 D I DOLBY
GITAL
SURROUND
or dolby beamed logic DOLBY
P R O L O G I C
indicator,set this item to turn on dolby
beamed logic coder for a living
surrounding effect.See Figure 14
Off:Turn off the dolby surrouding.
On:Turn on dolby surrounding.
Auto:Auto output dolby surrounding.
When the disc does not contains AC-3
or dolby beamed logic indicator,set
this item as OFF,otherwise it will
possibly output noise.
㨬㩨 LPCM Output
This option is to select sampling
frequency for sound decoding, either
48kHz or 96kHz. It is recommended to
select 96kHz, which has a better sound
quality than 48kHz sampling
frequency. See Figure 15.
㨬㩩 Return to Home Page
Select the HOME PAGE selection box,
press the ENTER button to return to the
home page of setup menu, or you can
exit directly from the setup mode by
pressing the SETUP button.
5.12.6.4 Initial Settings
When the player is stopped or there is
no disc inside, open the home page of
setup menu and select the INITIAL
SETTING item, and press the ENTER
button to enter operation interface.
19
-- Audio Settings Menu -Sound Output
OP MODE
Left+Right
COMPRESSION
Sound
Settings
㩗㨲㩝㩍㩓㔈㨲
LPCM Output
Off
On
Auto
Main Menu
Set prologic on/off
Figure 14
-- Audio Settings Menu -Sound Output
OP MODE
Left+Right
COMPRESSION
Sound Settings
LPCM
Output
㩗㨲㩝㩍㩓㔈㨲
Main Menu
Set the LPCM output 48K/96K
Figure 15
LPCM 48K
LPCM 96K
System operation
㨬㩣 Set TV display mode
Select Normal/ Panorama to display
full screen picture, but the existing
picture portion on up, down, left and
right sides will be lost. Select
Normal/Boxed to display complete
picture. Select Normal/ Wide Screen
to display full screen picture, but the
existing picture portion on left and
right sides will be lost.
See Figure 16.
-- Initial Settings Menu -㩗㨲㩝㩍㩓㔈㨲
TV Mode
TV System
Sound
Caption
Disc Menu Language
Region
Age Control
Normal/Panorama
㩗㨲㩝㩍㩓㔈㨲
Normal/Boxed
Wide Screen
Set TV Mode
Figure 16
-- Initial Settings Menu --
㨬㩤 Set TV System
Set video output system: See Figure
17.
Auto Please select Auto if video
system setup is Auto.
NTSC Please select NTSC if video
system setup is NTSC.
PAL Please select PAL if video
TV Mode
TV System
㩗㨲㩝㩍㩓㔈㨲
Sound
Caption
Disc Menu Language
Region
Age Control
㩗 㨲Auto
㩝㩍㩓㔈㨲
NTSC
PAL
Set TV Mode
Figure 17
㨬㩥 Set sound output
-- Initial Settings Menu --
This option is related to the disc
playing. It is valid only if the disc
supports the multilanguage format.
For example: When a disc supports
English and Chinese language
formats, you can select to play the disc
in English or Chinese.See Figure 18.
TV Mode
TV System
Sound㩗 㨲 㩝 㩍 㩓 㔈 㨲
Caption
Disc Menu Language
Region
Age Control
㩗㨲㩝㩍㩓㔈㨲
English
French
Spanish
Chinese
Japanese
Set Sound
Figure 18
㨬㩦 Set caption display
This caption setting is valid only if the
disc supports multilanguage caption
function.
See Figure 19.
-- Initial Settings Menu -TV Mode
TV System
Sound
Caption
㩗㨲㩝㩍㩓㔈㨲
Disc Menu Language
Region
Age Control
Set Caption
English
㩗㨲㩝㩍㩓㔈㨲
French
Spanish
Chinese
Japanese
Off
Figure 19
20
System operation
㨬㩧 Set disc menu language
This option is valid only if the disc
supports multilanguage displaying
menu.
See Figure 20.
-- Initial Settings Menu -TV System
Sound
Caption
Disc Menu
English
㩗㨲㩝㩍㩓㔈㨲Language
Region
Chinese
Age Control
Spanish
㩗㨲㩝㩍㩓㔈㨲
Password
French
Default
Japanese
Set Disc Menu Language
Figure 20
㨬㩨 Set region
This option is region code setup of the
disc. For example: If you select
United States, then the system can
only play discs in accord with the
same region as United States.
See Figure 21.
- - Initial Settings Menu - TV System
Sound
Caption
Disc Menu Language
Region
㩗㨲㩝㩍㩓㔈㨲
Age Control
Password
China
French
Hong Kong
Japan
Tai Wang
U.K
㩗United
㨲 㩝 㩍 㩓 㔈 㨲 States
Default
Figure 21
㨬㩩 Set age control
When playing discs with parental lock
function, you can play discs that meet
the level in accord with the age of the
audience via Age Control. This
function is controlled by a password.
See Figure 22.
-- Initial Settings Menu -TV System
Sound
Caption
Disc Menu Language
Region
Age 㩗Control
㨲㩝㩍㩓㔈㨲
Password
Default
1
2
3
4
5
6
7
8
G
PG
PG 13
㩗㨲㩝㩍㩓㔈㨲
PG-R
NC-17
Aduit
Set audience Age Control
Figure 22
㨬! Set password
This option is to revise password,move
cursor to Password Revising and select
revising,press ENTER button to enter
password revising dialog box.
See Figure 23.
-- Initial Setting Menu --
TV System
Sound
Caption
Disc Menu Language
Region
Age Control
Password
㩗㨲㩝㩍㩓㔈㨲
Default
Revise Password
Figure 23
21
Revising
㩗㨲㩝㩍㩓㔈㨲
System operation
㨬! Amend the password
Input old password 3308 as prompted,
selection box will move to new
password box automatically. Input new
password and confirm new password,
and then press ENTER button to finish
revision.
See Figure 24.
- - Password Revising Box - Old Password
New Password
Confirm Password
Please input Old Password
Figure 24
㨬! Recover factory initial settings
The last option on initial settings is the
default setting.This option is to
recover all the settings of DVD system
to factory initial settings. Simply
select RECOVER.
See figure 25.
- - Initial Settings Menu - VIDEO OUTPUT
Sound
Caption
Disc Menu Language
Region
㩗㨲㩝㩍㩓㔈㨲
Age Control
Password
Default
Reset
㩗㨲㩝㩍㩓㔈㨲
Figure 25
11 Set SMARTNAVI
- - Initial Settings Menu - -
This setup is a type setting, which has
two options: with menu and without
menu.
See figure 26.
Sound
Caption
Disc Menu Language
Region
Age Control
Password
Default
SMARTNAVI
㩗㨲㩝㩍㩓㔈㨲
NO MENU
㩗 㨲 㩝 㩍MENU
㩓㔈㨲
WITH
SMARTNAVI TYPE
Figure 26
12 Return to home page
Select the HOME PAGE selection box,
and press the ENTER button to return
to the home page of setup menu, or you
can exit directly from setup mode by
pressing the SETUP button.
See figure 27.
- - Initial Settings Menu - Disc Menu Language
Region
Age Control
Password
Default
SMARTNAVI
Home㩗㨲㩝㩍㩓㔈㨲
page
Return to home page
Figure 27
22
System operation
5.5.6 5.1-channel switch
Select 5.1CH, press the right or left direction button to select the ON/OFF of
the 5.1 CH.
5.1CH ON: To output audio with 5.1-channel sound effect.
5.1CH OFF: To output standard 4 channel to external amplifier.
! NOTE
When 5.1-channel is set to on in 5.5.5.2 and in this menu, it can output
audio with 5.1-channel effect.
5.6 Radio operation
5.6.1 Select radio playing
When the player is off, press the POWER button to turn on the power of the
main unit, and then press the RADIO button on the remote control, or touch
the touch screen of the display to open touch screen menu and tap the
RADIO button with your finger, and now you can play the radio.
5.6.2 Select band
You can switch between FM1, FM2 and AM by pressing the band/channel
switching button on the remote control or the panel, or you can select FM1,
FM2 or AM directly from the touch screen of the display.
5.6.3 Select a station
Select a memorized station: Press the leftward or rightward arrow button on
the panel or remote control to select the previous or next station, or press a
digit button on the remote control or tap the symbols M1 to M8 in touch
screen menu with your finger.
5.6.4 Search a station automatically or semi-automatically
Press the AUTO SEARCH button twice and the system will search and
memorize stations automatically. Press and hold the upward or downward
arrow button for more than 3 seconds to enter semi-automatic search, and
press the MEM button on the remote control twice to memorize the station
detected (press the MEM button once, the MEM button in the screen will
flash, and press the MEM button again to confirm the operation and also exit
from MEM display).
23
System operation
5.6.5 Fine tune a station
Press the upward or downward arrow button to fine tune the station, and then
press the MEM button on the remote control to memorize it.
5.6.6 Volume and tone
You can adjust the volume directly by pressing the audio adjusting buttons
on the panel or remote control. Press the AUDIO mode button to pull out
audio menu and adjust the volume, treble,middel and bass by combining the
use of the audio adjusting buttons.
5.6.7 Turn off radio function
Press and hold the POWER button for more than 3 seconds to turn off the
player; Press other function buttons to turn off the radio and play other
functions.
5.7 AV function
5.7.1 Turn on AV
When the player is off, press the POWER button to turn on the power of the
main unit, and then press the AV/TV button on the remote control or touch
screen, and now you can play AV.
5.7.2 Turn off AV function
Press and hold the POWER button to turn off the player;Press other function
buttons to turn off AV and select other playing functions.
5.8 TV function
5.8.1 TV playing
When the player is off, press the POWER button to turn on the power of the
main unit, and then press the AV/TV button on the remote control, or touch
the touch screen of the display and select TV playing in the pop-up touch
screen menu, and now you can play the TV.
5.8.2 Select a memorized TV channel
Select a memorized channel: Press the leftward or rightward arrow button on
the panel or remote control to select the previous or next channel. You can
select a memorized channel on the touch screen of the display.
24
System operation
5.8.3 TV automatic search
Press the SEEK button on the panel or remote control twice within 3 seconds
to enter TV automatic search mode, and the detected channels will be
memorized in corresponding channel numbers. You can cancel the
automatic search by pressing the SEEK button again.
5.8.4 Select a TV channel
Select a memorized channel: Press the leftward or rightward arrow button
on the panel or remote control to select the previous or next channel. You
can select a memorized channel on the touch screen of the display.
5.8.5 Turn off the TV
Press and hold the POWER button to turn off the player;Press other function
buttons to select other functions.
5.9 DVD playing
5.9.1Type of compatible disc
The DVD player of this unit can smoothly play full region discs with 12cm
diameter, such as DVD-5, DVD-9, DVD-10, DVD-18, DVCD, VCD, MP3,
CD, CD-R, CD-RW and CD-DA.
Note:We suggest you use original discs for copy discs are not in standard
producing format and will damage lens after using for a long time. Some
copy discs contain different information formats and maybe judged as faulty
discs by the player.
5.9.2 Select DVD playing
When the player is off, press the POWER button to turn on the power of the
main unit, and then press the DVD play button on the remote control or touch
screen to play the disc in the disc compartment. If there is no disc in the disc
compartment, the screen will display 㨫㨺 NO DISC㨫㨻.
5.9.3 Load a disc
When the screen displays the symbol 㨫㨺 NO DISC㨫㨻, it means that there is
no disc in the player, you can now press the OPEN/CLOSE button to lower
the screen to the lowest position, and gently insert the disc into the inlet slot
of disc compartment with the printed side of the disc facing upward. The
system will pull in the disc automatically once it detects the disc inserted,
and will place the disc correctly on the player for reading and playing.
25
System operation
5.9.4 Play a DVD disc
㨬 㩣 Under playing menu mode, press the arrow buttons to select a menu
item, and then press the ENTER button or the PLAY button in the touch
screen to play.
! NOTE
In case that you cannot select a menu item directly for certain discs,
you can press and hold the ENTER button until a 㨫 㨺 2nd 㨫 㨻 symbol
appears at the lower right corner of the screen, and then carry out the
㨬 㩤 Under DVD track menu mode, press a digit button to select and play the
corresponding track.
㨬 㩥 When a DVD disc is playing, touch the MENU button in the touch
screen or the REM button on the remote control to return to playing
menu. You can select option A or B to play according to different
formats of the discs.
㨬 㩦 During playing, you can press the ENTER button to pause the playing
and press that button again to continue the playing.
! NOTE
The system will automatically play the tracks in order under non menu
status.
5.9.5 Select a Track
㨬 㩣You can select the previous or next track to play by pressing the
leftward or rightward button or the PRE or NEXT button in the touch
screen.
㨬 㩤 You can select the corresponding track to play by pressing a digit
button.
㨬 㩥 When playing a MP3 disc, you can, after the disc is read, select the
directory and track to play by pressing a digit button or navigate the
arrow buttons. Press the 㨫㨺 0㨫㨻 button during playing to return to the
main directory, and then you can select other tracks to play.
5.9.6 Fast Forward and Fast Backward
You can play the disc fast forward or backward at a multiplied speed by
pressing the upward or downward button. According to the type of a disc,
you can select 4 types of multiplied speeds to play, namely 2x, 4x, 6x and 8x.
26
System operation
5.9.7 Display of Caption
When playing a DVD disc recorded with multiple language captions, you
can select the display of different captions by pressing the TITLE button on
the touch screen or SEEK button on the remote control.
5.9.8 Switch Angles
When playing a DVD disc recorded with pictures shot in multiple angles,
you can switch the pictures in different angles by pressing the ANGLE
button on the touch screen or MEM button on the remote control.
5.9.9 Switch Sound Tracks
When playing a DVD disc recorded with multiple languages, you can switch
and select different languages by pressing the AUDIO button in the touch
screen.
5.9.10 Display of Information
Press the DVD button on the remote control to switch and select the time
elapsed and the time remained currently.
According to different discs, there are two types of display mode:
A Display mode
TITLE PLAYING TIME
DISPLAY TURN OFF
TITLE REMAIN
CHAPTER REMAIN
CHAPTER ELAPSED
B Display mode
SINGLE ELAPSED
DISPLAY TURN OFF
SINGELE REMAIN
TOTAL REMAIN
TOTAL ELAPSED
5.9.11 Switch of Sound Channel
㨬 㩣 You can switch and select the output audio as L/R (stereo), R/R (right
sound channel) or L/L (left sound channel) mode by operating the band/
channel switching button normally.
㨬 㩤 The setting of 5.1 channels mode is available only in DVD function.
When using 5.1 channels, besides operating in accordance with section
5.5.5.6 (setting of auxiliary switch of 5.1 sound channels), you also
need to set the DOWNMIX MODE to OFF and CENTRAL SPEAKER,
REAR SPEAKERS and SUBWOOFER to ON by referring to the
instructions specified in section 5.5.5.2 (setting of speakers), and only
by doing this can the effect of the original 5.1 sound field of a DVD
disc be truly represented.
27
System operation
㨬㩥 The effect of 5.1 sound field is available only with a disc marked with a
SURROUND), and a disc in
AC-3( D I DOLBY
)or Dobby Pro Logic symbol( DOLBY
P R O L O G I C
GITAL
other formats such as VCD, CD and MP3 has 2-channel music only.
When playing a disc without mark of a AC-3 or Dobby Pro Logic
symbol, please set the DOWNMIX MODE of the audio to STEREO in
accordance with section 5.5.5 (setting of auxiliary switch of 5.1 sound
channel) and section 5.5.4.2 (setting of speakers) and set 5.1CH
settings to OFF. Otherwise, a distortion will occur in the music output.
Under 5.1 channels mode, only the left/right track volume adjusting
function is available.
㨬㩦
5.9.12 Eject a disc
Press the OPEN/CLOSE button to lower the screen to the lowest position,
and the disc will drop out of the inlet slot of the disc compartment. You can
now take the disc out gently. 8 seconds later, the system will pull in the disc
automatically if it detects that the disc is still in the inlet slot of the disc
compartment, and will place the disc correctly on the player for reading and
playing.
5.9.13 Close the DVD
Press and hold the POWER button to turn off the player; Press other function
buttons to exit from DVD mode and select other functions.
5.10 CDC playing
5.10.1 Play a CDC
When the player is off, press the POWER button to turn on the power of the
main unit, and then press the CDC play button on the remote control or touch
the CDC play button in the touch screen to play a CDC. You can control the
ON or OFF of disc playing information (available only when a CDC has been
connected) by pressing the CDC button on the remote control. When disc
playing display is on, the upper edge of the screen is shown as the figure
below:
& +5
+5%㨭㨷
%㨭 㨷
&XUUHQWG LVF
6 4#%
4#%-㨭㨷
-㨭㨷
& XUUHQWWUDFN
3OD\LQJWLPH
28
System operation
5.10.2 Change a Disc Manually
㨬 㩣Press the SEEK button to play the next disc, and the screen displays 㨫㨺
NEXT DISC 㨫 㨻 .
㨬 㩤Press a digit button on the remote control directly to play the
corresponding disc in the disc changer. The disc number will be
displayed in the 㨫 㨺 DISC 㨫㨻 item in the screen.
! NOTE
When 10 discs are loaded, press the 㨫 㨺 0 㨫 㨻 button to select the tenth
㨬 㩥 Press the DISC button in the touch screen, the disc number will appear.
Press the corresponding button to play the corresponding disc in the
disc changer.
5.10.3 Change a disc automatically
The system will change another disc automatically when it finishes playing
a disc.
5.10.4 Change a Track
Press the leftward or rightward arrow button or touch the PRE or NEXT
button in the touch screen to play previous or next tract.
When the system finishes playing a track, it will play the next track
automatically.
5.10.5 Fast forward and fast backward
You can play fast forward or backward by pressing the upward or downward
arrow button or the FB or FF button in the touch screen, and press any button
to cancel the fast forward or backward function to return to normal playing
mode.
5.10.6 Disc changing operation on disc changer
5.10.6.1 Take out the CD box
㨫! Open the sliding door of the disc changer.
㨫! Press the EJECT button(
)and the disc box will be ejected out.
㨫! Pull out the disc box till the box is out of the disc changer.
㨫!If you cannot take the disc box out under special circumstances, press
the RESET button and then push the box in and release it, and then
press the EJECT button(
)and try to take the disc box out again.
29
System operation
5.10.6.2 Take out the disc
㨫! When taking out the disc, please pull out the desired disc tray from the
disc changer, then take out the disc by hand.
㨫! Carefully hold the disc changer, pay attention to the direction of the
disc changer, if the outlet of the disc changer is downwards, the disc
may possibly fall down.
5.10.6.3 Install Disc
㨫! Pull out the disc tray from the disc changer, and place the side with
marks of the disc upside into the tray, then push the tray into the disc
changer till it generates 㨫 㨺 click㨫 㨻 sound.
㨫! Please do not place more than one disc into one tray for avoiding
accident.
5.10.6.4 Install the Disc Box
㨫! Disc Door slides to the left and opens till it generates 㨫 㨺 click㨫 㨻 sound㨫
㨻 , check the direction of the disc box, then carefully push the disc box
till it generates 㨫 㨺 click㨫 㨻 sound, then completely shut the disc door till
hearing the 㨫 㨺 click㨫 㨻 sound.
! WARNING
Make sure the disc door is tightly closed, otherwise, dust and dirt will
fall into the disc box which may cause fault.
5.10.7 Turn off the CDC
㨫! Press and hold the POWER button to turn off the player.
㨫! Press other function buttons to turn off the CDC,and select other
function to play.
! NOTE
Do not use a disc with 8cm diameter.Tray should be placed in the
right postion before inserting disc box.
30
Accessories
6. Accessories
Disc changer installation-Optionin example of panasonic Dp88
6.1 Appearance
6.1.1 CD changer
C
B
A H
V
Door
Reset
Compact disc area
Angel Adjust Screw
There are two angel adjust
screws for both sides.
Eject
6.1.2 Compact disc and tray
Compact disc inserting direction
Tray
O
Dis
c
DI
G
I TA
L
AU
DI
CO
MP
AC
T
31
Accessories
6.1.3 Installation guidance
6.1.3.1 Installation location
When the temperature in car is too high, do not install this instrument
on rear undercarriage to avoid the problems, in case it is caused by the
contact with it.The following locations also should be avoided,
㨫㨮Direct sunshine㨭㨶hot air from heater or other high temperature
places.
㨫㨮Not safe or heavily vibration.
㨫㨮Too much humid, dirty or dusty.
6.1.3.2 Installation work
B
According to your selected installation angle, use a screwdriver to
adjust the angle- adjustment screw to a position of 㨫㨺V 㨫㨻or 㨫㨺H㨫 㨻 㨫 㨭
㨫㨮 When set to vertical position㨭㩄Choose 㨫㨺V 㨫㨻 position.
㨫㨮 When set to horizontal position㨭㩄Choose 㨫㨺H㨫㨻 position.
This equipment has 5 positions for your choice㨭㩄
H A
A)Horizontal
b) Vertical
c) A㨭㨲 22.5 degrees㨭㨳
V
d) B㨭㨲 45 degrees㨭㨳
Angel Adjust Screw
e) C㨭㨲 67.5 degrees㨭㨳
The following data is for your reference in installation.
C
A. Horizontal installation
The instrument should be placed as follows.
<10㨫 ! degrees
C
B
A H
V
H
A
<10㨫 ! degrees
B
C
V
Incline angle is less than 10 degrees. (As
shown in top figure.)
Place screws in same positions in both
sides (as shown in left figure).㨫㨫
320
Accessories
B.Vertical installation
Vertical installation Incline angel <10
degrees (as shown
as shown below㨫㨫
below)
Place screws in same
positions in both sides㨭㨲as
shown below㨭㨳㨫㨭
<10 㨫 ! degrees
A
H
B
C
V
6.1.3.3Typical horizontal installation
Use a hexagonal bolt with 2 washers(M4㨫㩋8mm) fix left and right installation trays
onto host instrument.
Right tray
Left tray
Hexagonal bolt with 2
washers(M4㨫 㩋8mm)㨫 㩋4
33
Accessories
Choose position to install㨭㨶fix trays with double sided adhesive tape.
B
A H
C
B
C
A H
V
V
Double sided
adhesive tape㨫 㩋 2
Tray㨫 㩋2
Cut a small cross on carpet in the position, which is right towards the M5 bolt
on tray.
Carpet
Tray㨫 㩋 2
Fix both tray and tape onto installation plate under carpet.
34
Accessories
Use 4 hexagonal bolts(M5) to install the equipment onto the 4 holes on carpet.
Exagonal bolts (M5)㨫㩋 4
B
A H
C
B
C
A H
V
V
Carpet
6.13.4 Typical vertical installation
Fix trays onto the both sides of equipment by using hexagonal bolt with 2
Washers (M4㨫㩋8mm)
Left tray
Right tray
Hexagonal bolt with 2
washers(M4㨫㩋 8mm)㨫㩋 4
35
Accessories
H
B
C
V
A
A
B
V
C
C
V
C
B
A
H
B
V
H
A
H
Right tray
Left tray
The above figure has explained clearly the relation between installation holes and
installation tray (left and right) angles. There are marks that show the installation
angles. Please choose proper holes according to your installation angle.
! WARNING
Our products are in series; there will be slightly differences in functions and
accessories according to the specific specifications, for example, GPS and backing
camera. So for your own interests, please check all the accessories and packing
6.2 Car backing sensor installation
6.2.1 Sensor's effective scope diagram
B
k
ra
i
o
Sl
a
ng
w
re
do
a.
wn
ar
W
ar
n
ni
ea
ga
re
a
36
Accessories
6.2.2 Sensor's installation position
30-35cm
50-70cm
60-80cm
According to the quantity installed, the positions can be as follows㨭㩄
25cm 25cm
30-35cm
63cm
2 probes
63cm
4 probes
! NOTE
The final installation position can be adjusted slightly according to your
car dimensions.
6.2.3 The requirements and method of installation
Sensors should be inserted vertically into rear bumper as the arrow's
direction. Any direction's inclination will affect the usage.
Vertical
Horizontal
6.2.4 Backing radar usage
When backing car signal cable is connected properly, radar function will be
started automatically when you backing your car.
6.2.5 Signpost display
㨬㩣When radar is not connected,
monitor can only display ordinary
signpost(yellow),Which as shown in
right picture.
37
NO-V
Accessories
㨬㩤 When radar backing car module is
connected and you only connect left
(right) sensor, monitor will only
display left (right) radar signpost, and
for right(left) (yellow), there is only
ordinary signpost.
㨬㩥 When radar is connected, all sensors
connected too㨭 㨶 monitor will display
radar signpost as The right picture.
0.8M
0.8M
6.2.6 Display of radar detection
㨬㩣 When the distance between radar sensor and barrier is more than 1.6m,
there will bea㨫㨺 FAR㨫㨻 on screen bottom.
㨬㩤 When the distance is less than 1.6m but more than 1.2m㨭㨶 the distance
alue will be displayed on screen bottom and buzzer does not work.
Sensor is now working in warning area.
㨬㩥 When the distance is less than 1.2m but more than 0.2m㨭㨶 the distance
is displayed on the screen bottom and buzzer beeps, the more closer, the
more frequent buzzer beeps. Sensor is now working in slow down area.
㨬㩦When the distance is less than 0.2m㨭㨶it will display㨫㨺STOP!㨫 㨻 on
screen bottom㨭㨶buzzer gives out continuous sound㨭㨶sensor is now
working in stop area.
! WARNING
When radar signpost is available㨭 㨶 with the decreasing of the distance
between radar sensor and barrier, red signpost goes down gradually.
When the distance increases, green signpost goes upward.
System takes out the data of four radar sensors, after calculation, the
Shortest distance will be displayed on top of screen.
! NOTE
The system is only designed to help you back your car㨭㨶our company
will not take any responsibilities for any accident. So, please pay
attention in driving.
38
Accessories/Precautions
6.3 Car backing camera installation
A The standard installation position
of the water-proof concave camera
is as shown in right figure.
B The ordinary camera can be
installed in any water-proof position
Camera
7. Precautions
7.1 Precautions when using the product
㨫! Don't operate this product when driving.
㨫! Don't insert the coins or some little things. Screw and other metal
things should be far away from the mechanism and discs.
㨫! Please don't try to repair. This player is composed of lots of precise
electronic components. They'll be broken or cracked if disassembled or
refitted. If the failure happens, please turn off the power supply
immediately and notify distributor.
㨫! Please don't let the display screen incur the pollution like dampness,
dust, stream, lampblack, etc.
㨫! Please don't use thinner or other chemical cleaner to wipe the surface of
the display screen. The dirt should be wiped off by using soft cloth.
㨫! Please don't let the display screen be disposed in insolation.
㨫! If water or other substances enters into the product, please turn off the
power supply immediately and contact the distributor.
㨫! Please turn off the power supply first when you plan to clean the
machine.
㨫! The working temperature of this product is 0oC㨭㨷60oC.
㨫! The product is specially designed for vehicle, which is equipped with a
12V Accumulator with its cathode grounded.
39
Precautions
7.2 Precautions for discs
㨫!Dirt, dust, scratches and bending on surface will cause malfunction.
㨫!Do not place a disc on sharp object lest it may be scratched.
㨫!Do not bend a disc.
㨫!When not used, a disc should be taken out.
㨫!The following places are not suitable to place a disc:
1. Under direct sunshine.
2. Dirty, dusty and damp places.
3. Near auto heater.
4. Seats or dashboard of a car.
㨫!
Do not use discs with a diameter less than 12 cm (not including 12 cm)
or discs with irregular shapes such as heart or octangular shape, etc.
㨫!
Disc cleaning use soft damp cloth to rub disc surface. If a disc is quite
dirty, use soft damp cloth with propyl alcohol to rub gently. Do not use
dissolvent such as gasoline, dilution or common disc cleanser, since
they may damage discs.
7.3 Precautions for using radar
㨫! Detection can be affected by:
㨫!When in a smooth slope,signal can
be reflected out.
㨫!When in the near of a smooth
spherical object,signal can be reflected
out.
㨫!When in the near of a sound
absorption cotton like object, signal
can be absorbed greatly.
Smooth
Smooth global object
Sound absorption
cotton like object
㨫! After installation, please first
Confirm the function, then use.
40
Trouble shooting
8. Trouble shooting
Before sending this player for service as required, please carry out inspection or
small adjustment according to possible causes of occurred problems stated on the
list below. It is possible that problems will be solved and this player will go back to
normal operation. If you have any doubt about the problems on the list or the
problem can't be solved effectively by following the remedy as instructed, please
contact with our company or professional service center.
! NOTE
This player is a very complicated mechanism. Do not dismantle it and try to fix
it by yourself, lest the mechanism may be damaged!
Problem
LCD screen no
any display
No sound
Can not play
pictures
Possible Cause
The power and ignition
switch are not switched on
Connection wire is loose
Fuse is burnt out
The system is in MUTE mode
Connection wire of the
speaker is loose
Speaker is damaged
The music is
skipping when
the car is shaking
41
Set the switches to ON
Reconnecting
Replace with new fuse
Cancel the MUTE mode
Reconnecting
Replace new speaker
the disc on tray with the
The disc is not correctly placed Place
side with label facing up ward
The disc is dirty or damaged
Sound skiping
once in a while
Remedy
The disc is dirty or damaged
The main unit is not
correctly installed
Installation screw of disc
changer are tightened in
wrong direction
Try other discs
Try other discs
Make sure the main unit is
fixed solidly
Place angle adjusting screw
with V or H marking in correct
installation direction
Packing list
9. Packing list
Sequence
Number
1
Name
Quantity
1 set
2
Main unit
Remote control
1 piece
3
Battery of remote control
1 piece
4
5
Power cord
1 piece
Audio output wire
1 piece
6
7
8
9
Audio& video input&output wire
Accessores(screws,etc.) for
main unit
Bracket for main unit
External trim for main unit
Note
1 piece
1 set
2 pieces
1 piece
10
User manual
1 copy
11
12
CD changer
1 set
Optional
Car-backing sensor
1 set
13
Rearview camera
1 piece
Optional
Optional
42