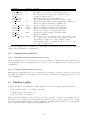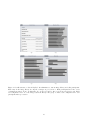
1
PsyPad User Manual
Introduction
PsyPad 2.0 has two modes of operation: Demo mode and Participant mode. Demo mode allows you to run
psychophysics experiments (both your own and the demonstration experiments in the public gallery) and view
their results on the iPad immediately. Participant mode allows you to configure experiments for participants
where multiple experiments can be presented sequentially with the results uploaded to the server on completion.
Running experiments from the public gallery requires no psychophysics expertise, though if you want to create
your own tests, this guide assumes you already know how to set up a psychophysics experiment. For example,
you know the difference between MOCS and a staircase, and you know about gamma correction.
Throughout we refer to a test as a sequence of stimuli (either MOCS, single or multiple staircases) resulting in
reversals or collection of “% correct” results. A collection of tests performed in sequence make up a session.
Document History
The initial draft of this manual was written by Andrew Turpin, David Lawson and Allison McKendrick in August
2013. Contact [email protected] for more information.
21 March 2014: Added citation to JoV paper, added Section 8.3, Infinite response window and one button doco,
added App Version 1.1, fixed a few typos.
20 April 2015: Updated for PsyPad 2.0
Citation
Please cite the following if you use PsyPad in your research.
PsyPad: A platform for visual psychophysics on the iPad
Andrew Turpin, David J. Lawson, and Allison M. McKendrick
J Vis March 11, 2014 14(3): 16; doi:10.1167/14.3.16
as Bibtex
@article{Turpin11032014,
author = {Turpin, Andrew and Lawson, David J. and McKendrick, Allison M.},
title = {PsyPad: A platform for visual psychophysics on the iPad},
volume = {14},
number = {3},
year = {2014},
doi = {10.1167/14.3.16},
URL = {http://www.journalofvision.org/content/14/3/16.abstract},
eprint = {http://www.journalofvision.org/content/14/3/16.full.pdf+html},
journal = {Journal of Vision}
}
1
Contents
1 Before starting
3
2 Demo mode
3
3 Gallery
3.1 Public gallery . . . . . . . . . . . . . . . . . . . . . . . . . . . . . . . . . . . . . . . . . . . . . . .
3.2 Private gallery . . . . . . . . . . . . . . . . . . . . . . . . . . . . . . . . . . . . . . . . . . . . . .
3
3
4
4 Participant mode
4.1 Pre-downloading participant configurations . . . . . . . . . . . . . . . . . . . . . . . . . . . . . .
4
5
5 Internet connection
5
6 Adding and configuring participants
6.1 Participant list . . . . . . . . . . . . . . .
6.2 Participant log list . . . . . . . . . . . . .
6.3 Participant configuration list . . . . . . .
6.4 Importing configurations from the gallery
6.5 Exporting configurations to the gallery . .
.
.
.
.
.
5
5
5
6
6
6
7 Creating your own test configurations
7.1 Things to consider for your test configurations . . . . . . . . . . . . . . . . . . . . . . . . . . . .
7.2 Submitting to the public gallery . . . . . . . . . . . . . . . . . . . . . . . . . . . . . . . . . . . . .
6
6
7
8 Image Stimuli
8.1 Single frame images . . . . . . . . . . .
8.2 Multiframe images (movies) . . . . . . .
8.3 Background Image . . . . . . . . . . . .
8.4 Gamma correction and Auto-brightness
8.5 Ramping . . . . . . . . . . . . . . . . . .
8.6 Timing . . . . . . . . . . . . . . . . . . .
8.7 Uploading the images . . . . . . . . . .
.
.
.
.
.
.
.
8
8
8
8
9
9
9
9
9 Test configuration options
9.1 MOCS . . . . . . . . . . . . . . . . . . . . . . . . . . . . . . . . . . . . . . . . . . . . . . . . . . .
9.2 Staircase . . . . . . . . . . . . . . . . . . . . . . . . . . . . . . . . . . . . . . . . . . . . . . . . . .
9
12
13
10 Session Configurations
13
.
.
.
.
.
.
.
.
.
.
.
.
.
.
.
.
.
.
.
.
.
.
.
.
.
.
.
.
.
.
.
.
.
.
.
.
.
.
.
.
.
.
.
.
.
.
.
.
.
.
.
.
.
.
.
.
.
.
.
.
.
.
.
.
.
.
.
.
.
.
.
.
.
.
.
.
.
.
.
.
.
.
.
.
.
.
.
.
.
.
.
11 Server Setup
11.1 The PsyPad.net.au Server . . . . . . . . . . . . . . . .
11.2 Your Own Server . . . . . . . . . . . . . . . . . . . . .
11.3 Communication with iPad . . . . . . . . . . . . . . . .
11.3.1 Automatic session transfer from Server to iPad
11.3.2 Log file transfer from iPad to Server . . . . . .
.
.
.
.
.
.
.
.
.
.
.
.
.
.
.
.
.
.
.
.
.
.
.
.
.
.
.
.
.
.
.
.
.
.
.
.
.
.
.
.
.
.
.
.
.
.
.
.
.
.
.
.
.
.
.
.
.
.
.
.
.
.
.
.
.
.
.
.
.
.
.
.
.
.
.
.
.
.
.
.
.
.
.
.
.
.
.
.
.
.
.
.
.
.
.
.
.
.
.
.
.
.
.
.
.
.
.
.
.
.
.
.
.
.
.
.
.
.
.
.
.
.
.
.
.
.
.
.
.
.
.
.
.
.
.
.
.
.
.
.
.
.
.
.
.
.
.
.
.
.
.
.
.
.
.
.
.
.
.
.
.
.
.
.
.
.
.
.
.
.
.
.
.
.
.
.
.
.
.
.
.
.
.
.
.
.
.
.
.
.
.
.
.
.
.
.
.
.
.
.
.
.
.
.
.
.
.
.
.
.
.
.
.
.
.
.
.
.
.
.
.
.
.
.
.
.
.
.
.
.
.
.
.
.
.
.
.
.
.
.
.
.
.
.
.
.
.
.
.
.
.
.
.
.
.
.
.
.
.
.
.
.
.
.
.
.
.
.
.
.
.
.
.
.
.
.
.
.
.
.
.
.
.
.
.
.
.
.
.
.
.
.
.
.
.
.
.
.
.
.
.
.
.
.
.
.
.
.
.
.
.
.
.
.
.
.
.
.
.
.
.
.
.
.
.
.
.
.
.
.
.
.
.
.
.
.
.
.
.
.
.
.
.
.
.
.
.
.
.
.
.
.
.
.
.
.
.
.
.
.
.
.
.
.
.
.
.
.
.
.
.
.
.
.
.
.
.
.
.
.
.
.
.
.
.
.
.
.
.
.
.
.
.
.
.
.
13
13
13
14
14
14
12 Handling Logfiles
14
13 Checking test results on the iPad
16
14 iPad Settings
16
15 Upcoming features
16
16 Known Bugs
16
2
1
Before starting
Before you begin, you will need to make some decisions about your setup.
1. Server location. In order to send images for stimuli to the PsyPad app, and to get test log files off the
iPad running PsyPad, a server is required. We provide http://server.psypad.net.au/ free for your use,
but perhaps you want to run your own (the server code is open source, but this is not recommended or
supported). Section 11 discusses the server in more detail.
2. Registration. You will need an account on the server you are using. All test configurations, images and
participants are associated with your login (see Figure 1). You can create an account directly on the iPad
app or at http://server.psypad.net.au/.
3. iPad app. You can download the iPad app by searching for PsyPad on the App Store on your iPad or
by visiting this link: https://itunes.apple.com/al/app/psypad/id735057966. After installing the app
you will need to open it and log in with your PsyPad account.
2
Demo mode
The default mode on the iPad app is Demo mode. Demo mode allows you to run pre-built psychophysics
experiments (both your own and the demonstration experiments we provide) and view their results on the iPad
immediately.
In this mode, three lists of test configurations are provided.
1. Downloaded configurations. Downloaded configurations can be run by pressing the [Play] button and
deleted by pressing the [Delete] button (only your local copy will be deleted).
2. Updates available. Configurations that have been updated on the server since you last downloaded them
are presented here. Press the [Update] button to download the updated configuration.
3. Available configurations. This is a list of test configurations available to you from the server. This
will include the tests in the public gallery (see Section 3.1) and the tests you have created (Section 7)
on the server which sit in your private gallery (Section 3.2). Press the [Download] button to download a
configuration.
Configurations (including test parameters and images) must be downloaded before they can be run. Some
tests have quite large image sets (sometimes up to 100M) and so consider downloading these before you
need to use them live.
At the end of a test in Demo mode, the test log will be displayed along with some options for automated log
analysis (see Section 13). The test log will also be uploaded to the server and is accessible by selecting the [Demo
Mode Logs] tab on the server.
3
Gallery
Figure 1 shows the overall structure of the PsyPad server. The collection of tests and stimuli are split into public
and private galleries.
3.1
Public gallery
We provide a collection of test configurations and image sets in the public gallery that you can download and
run in Demo mode (see Section 2), or add to your own participants (see Section 6.4). You can submit any
configurations you create (see Section 7) for consideration to be added to the public gallery (see Section 7.2).
The public gallery can be accessed on the server by going to the [Configuration Gallery] (for public configurations)
or [Image Sets] (for public image sets) tab and selecting the [Public Configurations] or [Public Image Sets] option.
3
Server'Account'
Demo'Mode'
Par.cipants'
Log'
Files'
''''…' '''' ''''
Config1'
Config2'
.'
.'
.'
Images'
'
'
'
Confign'
Configura.ons'
Private'Gallery'
Log'
Files'
Configura.ons'
Images'
'
'
Public''
Gallery'
Figure 1: Overall structure of data in PsyPad. Having a server account allows access to all of your own
participants, configurations and images, in addition to Demo Mode and the Public Gallery of images and
configurations. Each entry in the image library is a zip file of images as per Section 8. Each participant has
their own local copy of configurations named “Configx ” in this figure (see Section 9), which may or may not be
replicated in the either of the galleries. Log files (Section 12) are attached to participants, or the Demo Mode,
and never feature in the galleries. Each test configuration uses one of the image sets in the from either gallery.
3.2
Private gallery
Your private gallery can be accessed on the server by going to the [Configuration Gallery] (for configurations)
or [Image Sets] (for image sets) tab and selecting the [Private Configurations] or [Private Image Sets] option.
Configurations and image sets you upload to your private gallery can not be seen by other PsyPad users (see
Section 11 for security disclaimers).
4
Participant mode
As opposed to Demo mode, Participant mode allows you to configure experiments for participants where multiple
experiments can be presented sequentially with the results uploaded to the server on completion.
You can switch to Participant mode from Demo mode by pressing [Configure PsyPad] and pressing the green
toggle next to “Demo Mode”. When doing this, ensure you know the admin password (if it is set) so you can
return to the admin panel later.
To return to the admin panel from Participant mode, enter ’admin’ as the participant name followed by the
password (of it has been set in the admin panel). If you forget this password you will need to uninstall and
reinstall the iPad app.
Participants need to be configured on the server (see Section 6).
To run a test in Participant mode, close the admin panel if it is open, enter the participant username then press
[Login]. From there you will be able to press [Begin Test] or [Begin Practice Test] (visible if any practice tests
are configured). Once the test is completed, the logs will be automatically uploaded to the server if there is an
internet connection available.
4
When you press the [Login] button the latest version of the participant configuration will be downloaded if there
is an internet connection available.
4.1
Pre-downloading participant configurations
It is recommended to download participant configurations before beginning tests, especially if the configuration
uses large image sets. It is also necessary if there will be no internet connection available where the test is run.
To pre-download a participant’s configurations, open the admin panel, press [Load server participant list] then
press the [Download] button next to a participant.
You can also simply log in as a participant to ensure their configuration is downloaded.
5
Internet connection
All tests undertaken are logged in both Demo and Participant mode. If there is an internet connection present
at the end of a session, the the log file for that session, and any previous sessions that have not been uploaded,
will be uploaded to the server.
If an internet connection was not present at the end of a session, you can upload the logs at a later date by
pressing [Upload logs to server] in the admin panel, or wait until the end of another session performed by that
participant when an internet connection is present.
See Section 12 for more information on logs.
If an internet connection is present when a participant logs in to PsyPad, their configurations are downloaded
from the server. If there are new configurations that use images sets that are not already on the iPad, these are
also downloaded.
This allows remote altering of participants’ testing parameters when an iPad is ‘in the field’. You may want to
consider using an iPad with a SIM card on an active data plan if you need to ensure internet connectivity.
6
Adding and configuring participants
When the iPad app is in Participant mode, participants will need to enter in their username before each session.
You might want to choose usernames that are easy to type on the iPad. Participants have both configurations
and logs associated with them.
6.1
Participant list
You can view a list of participants on the server by selecting the [Participant] tab.
From there you can create a new participant by clicking [New Participant]. Choose a username and click [Create
Participant].
From the participant list you can click on the link in the Configurations column to access a participant’s
configurations and the link in the Logs column to access their test logs (Section 6.2). You can click on [Edit] to
change their username, and [Delete] to delete them.
6.2
Participant log list
Clicking on a link in the Logs column in the participant list will take you to a list of the participant’s logs. From
there you can [View] and [Delete] logs. You can filter the log list using the filter options on the right and you
can download the logs in various formats using the download links at the bottom left of the log list.
5
6.3
Participant configuration list
Clicking on a link in the Configurations column in the participant list will take you to a participant’s configuration
list. From there you can [Edit], [Delete], [Save to Gallery] and [Duplicate] configurations.
You can also create a [New Participant Configuration] (Section 7) or [Import from Gallery] (Section 6.4).
6.4
Importing configurations from the gallery
Clicking [Import from Gallery] in a participant’s configuration list will take you to the import screen. From here,
select the configurations you would like to import from the gallery. Select whether or not you want to overwrite
existing configurations then click [Import From Gallery].
Selecting “Yes” for “Overwrite existing configurations” will mean that any configurations that the participant
already has with the same name as a configuration you are importing will be overwritten. This allows you to
update a configuration in your gallery (see Section 3.2) and import the changes you make to multiple participants.
6.5
Exporting configurations to the gallery
Clicking [Save to Gallery] in a participant’s configuration list will take you to the export screen. You may be
presented with the option to overwrite existing configurations if there are any configurations in your private
gallery with the same name. To perform the export, simply click the [Save to Gallery] button.
To copy configurations from one participant to another, you should use the gallery as a “clipboard”. Copying
to the gallery also allows the configuration to be used in Demo mode.
7
Creating your own test configurations
Configurations can either be created in your private configuration gallery (see Section 3.2) or created for an
individual participant. Note that you can save participant configurations to your gallery, and you can import
configurations to a participant from the gallery. This mechanism allows you to create a configuration in your
gallery that can be imported and used by multiple participants.
Only configurations in the gallery will be accessible from Demo mode (see Section 2).
To create a configuration in your gallery, click on the [Configuration Gallery] tab then click [New Gallery
Configuration]. To create a configuration for an individual participant, click on [New Participant Configuration]
in a participant’s configuration list (Section 6.3).
There are two parts to creating your own test configurations. Firstly, you need to create or select an image set
to use. Secondly, you need to specify the test parameters.
There are pre-made image sets available in the public gallery (Section 3.1) that you can use, though you will first
need to understand the image set folder structure. For an explanation of the folder structure and instructions
on how to create your own image sets, see Section 8.
For a breakdown of the test configuration options, see Section 10.
Once you have selected the image set and set the configuration options, click [Create configuration] at the bottom
of the page to create the configuration.
7.1
Things to consider for your test configurations
1. Stimuli. All stimuli in PsyPad are precomputed 24- or 32-bit PNG images that are presented centred on
the screen, and written over a background image that is also a PNG. Dynamic stimuli are a sequence of
frames that are also PNG images. The filenames of the images must be in a specific format: see Section 8.
If you cannot precompute all the stimuli you might need in a test, then PsyPad will not work for you.
6
(a)
(b)
(c)
Figure 2: Folder and image filenames for (a) a staircase or MOCS procedure that has stimuli levels {0, 5, 10, 15};
(b) a MOCS with three levels low, med, and high; and (c) a movie stimulus with levels {39, 42, . . . , 54}. In (a)
and (b) the prefix of the filenames give the button number for a correct response (1 or 2), and (c) the same
is given by the prefix of the subfolder name. In (c), files are movie frames that are presented in lexicographic
sequence.
2. Buttons. What response buttons do you need for your test? Up to four rectangular buttons are allowed.
Where should they be placed on the screen? What color, width and height should they be?
3. Thresholding strategy: MOCS or staircase? If you choose a MOCS, you must decide on the stimuli
levels you want to test, and how many trials per level: see Section 9.1. For staircases, you must decide how
many to interleave; and for each the starting values, the number of reversals, and the step sizes between
each reversal. See Section 9.2 for more information.
4. How many tests in a session? Does a session (from participant login on the iPad to completion of all
tests) consist of just one test (a thresholding run for one stimuli type), or do you want more than one test
in a session? What order do you want the tests? Do you want different tests on different days of the week?
Do you want a different random seed for each test? See Section 10 for information on how to set up tests.
5. Do you want a practice session? If you mark some test configurations as “Practice configurations”,
then once a participant logs in to PsyPad, there are options to [Begin Test] and [Begin Practice Test].
The practice test session can be configured separately from the main test session, but otherwise shares all
features with main test sessions. Practice sessions are identifiable as such in log files.
7.2
Submitting to the public gallery
We would love to let you share configurations/image sets that you think would be helpful for other people to
use.
If you would like to submit a configuration (and its image set) for consideration to be added to the public gallery,
simply click on [Share to Public Gallery] on a configuration list. We will review any submitted configurations
and let you know via email if we add them to the public gallery.
7
8
Image Stimuli
All stimuli in PsyPad are 24-bit RGB PNG images (www.libpng.org/pub/png/) which are presented without
alteration in the centre of the screen. You can generate these any way you like (ImageMagick, Photoshop,
Matlab, R, custom C code, etc), but their folder/directory location and filenames are important. PsyPad will
also faithfully display 32-bit RGBA PNG images if you want to make use of the Alpha channel for transparency.
The thresholding algorithms in PsyPad identify stimuli using folder names (not image filenames). This allows
for different random images of the same stimulus level to be used by PsyPad. For example, when PsyPad is
asked to present a stimulus of level 33, it randomly selects an image from the folder named 33.
Each stimuli folder must be named in the correct format for the thresholding algorithm that you chose:
• any alphanumeric text, if a MOCS is to be used; or
• an integer corresponding to stimulus level, if a staircase thresholding algorithm is to be used.
Note that because PsyPad’s staircases work on integer stimuli levels, you may have to be a little creative in
mapping your thresholding domain onto an integer domain. For example, if you are thresholding in log units
with a step size of 0.2 log units, you might convert a stimulus level ` to the integer b1000 × 10−` c, giving stimuli
levels of {6, 10, 15, 25, 39, 63, 100, 158, 251, 398, 630, 1000}.
Inside each folder, the images themselves must be named in a specific format, as described in Sections 8.1 and 8.2.
8.1
Single frame images
Within the folder, individual images must be named as
b n.png
where b is the button number that would correspond to a “correct” response for this stimuli, and n is an integer.
See Figure 2(a) for an example. The button numbers are used to generate a test summary on the iPad for the
“admin” user (see Section 13), and to determine correctness for each step in staircase procedures. If you do not
follow this naming convention, staircases will not work, and on-iPad analysis will not work.
While folder names in the format for a staircase also match the requirements for a MOCS, the folder names for
a MOCS can be more general; for example as in Figure 2(b).
8.2
Multiframe images (movies)
Dynamic stimuli are achieved using a sequence of frames that are also 24-bit RGB PNG images (or 32-bit RGBA)
but in a subfolder named as for the single images without the .png suffix, with the individual frames named
in lexicographic order (for example, 11 comes before 2.) If you want numeric order, make sure you pad with
leading zeroes as in Figure 2(c), which shows stimulus level 48 consisting of 11 frames where a button press of
1 would be “correct”.
The time that each frame of the movie is displayed before the next frame is presented and the looping behaviour
is set as part of the test configuration; see Section 9.
8.3
Background Image
As of Version 1.1 of the PsyPad app, you can also include a background image that is displayed centred on the
screen throughout the entire test, with stimuli and buttons written over the top of that image. This is useful
for fixation targets, in particular, but could also be used in many creative ways. The background image must
be a PNG, and must be named background.png in the top directory/folder of images. The screen is always set
to the background color and overlaid with the centered background image, so if no background.png is present
the screen appears as the background color.
8
To avoid apparent flickering of buttons, the background image should either contain the buttons in the actual
image, or be small enough to not overwrite the buttons when the display is refreshed.
8.4
Gamma correction and Auto-brightness
There is no Gamma correction or look up table (LUT) capabilities in PsyPad. You need to do your own gamma
correction and luminance determination offline, and then choose the pixel values in your images accordingly.
For example, there is no guarantee that RGB= (127, 127, 127) is mean luminance on every device. If exact
luminance is important to you, you should use a photometer and measure different pixel levels, and make your
images accordingly.
PsyPad sets the iPad to maximum brightness at the beginning of a test session, but cannot control the “AutoBrightness” setting. You should make sure this is off, and instruct participants never to turn it on, if luminance
levels are important to your test.
For calibration, you can create an image set that contains a set of “blanks” which contains full size images all
of one pixel level. It might be easiest to annotate each corner of the image with the pixel value, too. You can
then set up a MOCS or staircase using this image set to aid in calibration.
8.5
Ramping
Images are not ramped, and are presented immediately after the inter-stimulus interval expires. If you want to
ramp your stimuli on and/or off, make a movie style image that contains the ramp you require.
8.6
Timing
We do not have program access to the “graphics clock” on the iPad, and so very precise frame presentation times
are not supported. If you require very fine timing control of stimuli presentations, then PsyPad is probably not
for you. We have endeavoured to be as accurate as possible with presentation and inter-stimulus interval timing,
and it should be sufficiently accurate for most tests.
8.7
Uploading the images
Image sets must be uploaded separately before you can associate them with a test configuration.
Once you have all the images you need for a single test, named correctly, you should zip them all into a single
zipfile without an enclosing folder (using zip on MacOS or Linux, or winzip on Windows) and upload them to
the server by selecting the [Image Sets] tab and clicking [Import Image Set].
They will then be automatically processed on the server and put in a suitable format (a single big file with an
index) for transfer to the PsyPad iPad app. When PsyPad is next started with an internet connection to the
server, and a participant using the image set logs in, the images will be transferred and stored on the iPad. This
might take a while, so it is recommended that you log in as at least one participant using the image set so that
this download is already done before the actual participants use the app.
9
Test configuration options
In order to define a test you need to choose an image set already uploaded to the server (see Section 8) and then
choose several options as described in this table. This table lists the options in the order they appear on the
server interface.
To preview the background colour, exit button and response buttons as they will appear on the iPad (not 100%
accurate), click [Show Preview] at the bottom right of the browser window.
9
General Settings
Name
Title
Description
Enabled
Is Practice Configuration
Order
Days of the week
Image Sets
Image Set
Loop animations
Animation frame rate
Staircase Method Parameters
Use staircase method
Number of staircases
Start level
Number of reversals
Floor/ceiling hits to finish
Minimum level
Maximum level
∆ values
Simply identifies the test configuration, for your organisational use
only. Does not have to be unique, but might be easier for you if it
is. When importing configurations from the gallery or exporting
to the gallery, this name affects the optional overwriting behaviour
(see Section 6.4).
This text appears on the iPad along with a Begin button before
the test. You might like to put something here that reminds the
participant of the task.
For your organisational use. Be descriptive here if you are considering submitting this to the public gallery.
If true, then this test is part of a participant’s session
If true, then this test is part of a participant’s practice session (if
also “Enabled”). Practice configurations are started by pressing
[Begin Practice Tests] instead of [Begin Tests] on the iPad.
This specifies the order in which this test will appear in the session
(if enabled). Any integer is fine: the tests are sorted by this
number to get their order for a session.
The test configuration will only be enabled on the selected days
of the week.
Choose from the image sets in the public and private image set
gallery.
Only relevant for images that are a sequence of frames (movie).
If true then the frames loop until a button is pressed.
This is the number of frame refreshes on the iPad for which each
image in the movie sequence should be displayed. Currently iPads
have a frame rate of 60Hz. For example, if you want a movie of 8
images to display for 400 ms, you would enter 3 here. (3/60 × 8 =
0.4.)
If Yes, then staircase is used, otherwise MOCS.
The number of staircases you wish to interleave (should be at least
one)
A list of start levels separated by a “/” character; one for each
staircase (each must match a filename of an image as per Section 8)
A list of the number of reversals before terminating the staircase
separated by a “/” character; one for each staircase.
A list of the number of times the minimum/maximum stimuli
are shown before terminating the staircase separated by a “/”
character; one for each staircase.
The minimum stimulus level separated by a “/” character; one
for each staircase (each must match a filename of an image as per
Section 8)
The maximum stimulus level separated by a “/” character; one
for each staircase (each must match a filename of an image as per
Section 8)
The step sizes before each reversal as a comma separated list separated by a “/” character; one for each staircase (must be the
same number as in “Number of reversals” for each staircase)
10
# wrong to get easier
# correct to get harder
MOCS Parameters
# questions per folder
Display Configuration
Background color
Show exit button
Exit button position
Exit button color
Button Configuration
Number of buttons
Button text
Button presentation delay
Button backgrounds
Button text colours
Button positions
General Test Parameters
Next button after each response
Time between each question
The number of “incorrect” responses before the stimulus level is
increased separated by a “/” character; one for each staircase.
Note that an incorrect response adds the current step size to the
current stimuli level.
The number of “correct” responses before the stimulus level is
reduced separated by a “/” character; one for each staircase. Note
that a correct response subtracts the current step size from the
current stimuli level.
A comma separated list of pairs of the form s : n, where s is the
stimulus level (matching the filename of an image in the chosen
image set) and n is the number of trials. For example, 16 : 40, 18 :
40, 20 : 40 is a MOCS over three stimuli levels 16, 18, and 20 using
40 trials for each level.
An RGB-hex string beginning with a #. For example, #FF0000
is red. This is the color of the screen when the Begin button is
displayed, between stimuli, if the Next button is used, and also as
the background for your images if they do not fill the entire screen
or contain transparent pixels.
If “Yes” then a small cross is displayed as per the exit position
given below.
(x, y) width and height of the exit button. All measurements are
in pixels, the top left of the screen is (0, 0), and the bottom right
is (1024, 768).
Background and foreground colors as RGB-hex strings. For example, #00FF00 is green. Ignored if “Show exit button” is “No”.
You can preview the position and colour of the exit button by
clicking [Show Preview] at the bottom right of the browser window (not 100% accurate).
The number of response buttons (maximum 4). From Version 1.1
onwards, if only one button is chosen, if it is pressed within the
response window this counts as a “correct” response, otherwise it
counts as an “incorrect” response.
The text to appear on each button
The amount of time (in seconds) before the buttons appear after
the stimuli has been presented (does not have to be an integer)
RGB-hex string specifying the background color of each button.
For example, #0000FF is blue.
RGB-hex string specifying the text color of each button. For
example, #888888 is grey.
For each button, (x, y) width and height. All measurements are in
pixels, and the top left of the screen is (0, 0), and the bottom-right
is (1024, 768) (even on iPad III). You can preview the position,
colour and text of the buttons by clicking [Show Preview] at the
bottom right of the browser window (not 100% accurate).
If “Yes” then a Next button appears after each response and must
be pressed before the next trial begins.
Specify the mean time between response button press and the
variation. The next stimuli is presented after mean ± δ where δ is
sampled uniformly at random from [−variation, variation].
11
Infinite presentation time
Infinite response window
(This option is not used in PsyPad App Version 1.0.)
Use specified seed
Attempt facial recognition
If “Yes”, stimuli are presented until a button is pressed; otherwise
if “No” you must specify the presentation time in seconds. In
the “No” case, the image is replaced with the background color
and background image (if present, Version 1.1 onwards) and the
buttons remain. This option can interact strangely with movie
stimuli. If you have chosen Yes, and have a movie stimuli that is
not looping, you will get the background color (and background
image if specified) once the movie runs out of frames. If you have
chosen “No” and a value that is shorter than the movie (number
of frames × frame rate/60) then the movie will be truncated.
If “Yes” then PsyPad will wait until a button is pressed before
proceeding to the next stimuli. If “No” you must specify a time
in seconds. If a button is pressed within this time (started from
stimulus onset), then PsyPad will proceed to the next stimuli,
checking the button number against the image file name for “correct” or “incorrect”. If there is only one button, and it is pressed
within the window, a “correct” response is recorded. If “No” and a
button is not pressed pressed within the time limit (from stimulus
onset), then an “incorrect” response will be recorded.
If “Yes” the provided number is used to seed the random number
generator (handy for testing so that you get the same image sequences); otherwise if “No” a random seed from /dev/urandom is
used.
If “Yes” then a picture is taken with the on-board camera at the
beginning of every stimulus presentation (beware of the camera
“noise” that can be turned off on the iPad Settings). The image is
processed to locate two eyes and a mouth. The three coordinates
are saved into the log file. If “No”, no picture is taken, and nothing
is logged.
After choosing all of your settings, don’t forget to save the configuration using the appropriate button at the
bottom of the screen.
9.1
MOCS
To set up a MOCS procedure you need the stimuli levels to test, and the number of trials per level. Once you
have chosen your image set to use as the basis for your test, the levels are defined by the folder names in your
image set. For example, if you used the image set from Figure 2(b), the test levels are low, med and high.
On the server, the number of trials per level to use is specified in a comma separated list as
`1 :n1 ,`2 :n2 , . . .
where `i is the stimulus level matching the folder names, ni is the number of trials at that level. On the iPad, the
interface for specifying these is a bit nicer as it lists all available levels, and you enter the number of trials next
to each level (leave blank for no trials.) Remember if you alter tests on the iPad to upload them to the server
before a participant logs in, otherwise the server version will overwrite your changes (if an internet connection
is present.)
For the example in Figure 2(c), if you want 10 trials per level you would use the following string.
low:10,med:10,high:10
The order of levels is chosen at random, and images within each level are chosen at random without replacement (unless the number of trials exceeds the number of images, in which case some images will be repeated
dimages/trialse times.)
12
9.2
Staircase
A correct response (as determined by matching the first character of the filename of the stimulus with the button
number pressed) will cause the current step size to be subtracted from the current stimulus level to determine
the next stimulus level to display. An incorrect response will cause the current step size to be added to the
current stimulus level.
Thus, PsyPad assumes “hard to see” stimuli have higher folder numbers than “easy to see” stimuli. If you prefer
working in a reverse scale (eg dB where a low number is “easy” and a high number “hard”) you can always
reverse the button labels on your images, so that when the participant press the correct button, you treat it as
incorrect for the purposes of the staircase.
A reversal is registered whenever the number of wrong/correct in a row is recorded followed by the number of
correct/wrong in a row. For example, in a 1-up, 1-down staircase (#wrong=1, #correct=1), a correct followed
by an incorrect or vice versa is a reversal. In a 1-up, 2-down staircase (#wrong=1, #correct=2), then reversals
would be triggered by responses incorrect-correct-correct and correct-correct-incorrect.
Each staircase terminates when its number of reversals is achieved, or if the count of minimum/maximum
stimulus value correct/incorrect reaches the specified number.
10
Session Configurations
A session is simply a list of enabled tests, which are executed in order. If you want different tests on different
days of the week, you should make sure that all the tests for all days are enabled, and then each test is configured
for the appropriate day.
Note that the practice session is separate from the test session, and so if you want the same test to appear in
both, you need to duplicate the test and set the Is practice configuration option in the duplicate.
11
11.1
Server Setup
The PsyPad.net.au Server
Note that while http://server.psypad.net.au/is password protected, and under normal circumstances your
log files are not available to any other users, we are not providing a state-of-the-art secure environment. Any
determined hacker will be able to get access to your logs in much the same way as they can access your personal
computer, iPad, etc, despite our best efforts. We also have administrator access to your logfiles. While we
have procedures in place to limit the use of this access, we may inadvertently view your logs while maintaining
or updating the system. As such, do not include any private or unethical data in your participant
identifiers or image file names that will appear in the log files.
Note that this standard level of security does not compromise your research as log files only contain sequences
of image names and button responses. There is no easy way for an outside observer to tell what the stimuli are,
or to which images filenames correspond.
While the server is currently backed up weekly, do not rely on this for your data persistence. Make your own
backups of log files using the Export all logs regularly.
11.2
Your Own Server
The source code for the server (implemented with Ruby on Rails) is available at https://www.github.com/
davidlawson/PsyPad-Server, but it requires some technical expertise to deploy. We do not plan to support
you in running your own server.
13
Identifier
button press
currentReversal
currentStaircase
exit test
image hidden
next question
next question
Data type
d (String)
d
d
–
–
d
d/d
presented buttons
presented image
reaction time
reversal
test begin
test finished
distance detection
String
String
d.ddms
–
String
–
String
Meaning
The number and text on the response button that was pushed.
The number of reversals seen so far. (Staircase only)
The current staircase being presented. (Staircase only)
Last line in a single test log.
Time image was replaced with background.
The question number in the current test. (Staircase only)
The question number in the current test (numerator) and the total
number of questions (denominator). (MOCS only)
Labels of each button presented for this question.
Filename of image that was presented at this time.
Time between image presentation and button push.
This response caused a reversal. (Staircase only)
Description of all test parameters in JSON format.
Time the test finished.
Result of face detection (if turned on). An example string
is
Question 5: Detected facial features: left eye
733.75/443.75, right eye: 932.50/482.50, mouth:
876.25/236.25, where each number pair is the x/y coordinate of the preceding feature.
Table 2: An example logfile for a staircase procedure (right), and a summary of that logfile (left). d indicates
an integer and d.dd indicates a decimal number.
11.3
11.3.1
Communication with iPad
Automatic session transfer from Server to iPad
When a participant logs on, and an internet connection is available to PsyPad, their session information is
checked against the server, and if updated the new version is downloaded. This allows remote altering of session
configurations.
11.3.2
Log file transfer from iPad to Server
This happens automatically at the end of a session if there is an internet connection, and is never repeated (if
successful). The “admin” user on the iPad can force the sending of all log files by pressing [Upload logs to server]
on the Admin Panel.
12
Handling Logfiles
Logfiles contain lines of text with three columns delimited by a vertical bar (pipe) symbol. The fields are
1. time stamp (in number of seconds since 1/1/1970);
2. identifier that describes the line; and
3. the data related to the identifier.
Figure 3 shows an example log file for a staircase procedure, and Table 2 describes each identifier. The log
file format has been designed for processing with script languages such as awk, Perl, Python, and so on. The
http://server.psypad.net.au/server offers the summary text. Example Python scripts for processing logfiles
can be found in the Gallery at http://server.psypad.net.au/.
14
Summary
Test date: 11/9/2013 13:24:11
Glass staircase
Practice: no
Staircase: 0
Not seen max: 0
Seen min: 0
Reversal 1: 58
Reversal 2: 54
Reversal 3: 58
Reversal 4: 52
Reversal 5: 54
Reversal 6: 52
Start time: 11/9/2013 13:24:11
End time : 11/9/2013 13:24:55
Duration : 0 minutes 44 seconds
1378869851|test_begin|...
1378869851|next_question|1
1378869851|currentStaircase|0
1378869851|currentReversal|0
1378869851|presented_image|50/2_005.png
1378869851|presented_buttons|Concentric
1378869852|image_hidden|(null)
1378869859|reaction_time|7711.23ms
1378869859|button_press|1 (Concentric)
1378869860|next_question|2
1378869860|currentStaircase|0
1378869860|currentReversal|0
1378869860|presented_image|58/2_003.png
1378869860|presented_buttons|Concentric
1378869860|image_hidden|(null)
1378869861|reaction_time|1820.66ms
1378869861|button_press|2 (Radial)
...
1378869890|reversal|(null)
1378869891|next_question|16
1378869891|currentStaircase|0
1378869891|currentReversal|5
1378869891|presented_image|52/1_002.png
1378869891|presented_buttons|Concentric
1378869891|image_hidden|(null)
1378869892|reaction_time|1424.79ms
1378869892|button_press|1 (Concentric)
1378869893|next_question|17
1378869893|currentStaircase|0
1378869893|currentReversal|5
1378869893|presented_image|52/1_001.png
1378869893|presented_buttons|Concentric
1378869893|image_hidden|(null)
1378869895|reaction_time|1773.27ms
1378869895|button_press|2 (Radial)
1378869895|reversal|(null)
1378869895|test_finished|(null)
1378869895|exit_test|(null)
Radial
Radial
Radial
Radial
Figure 3: An example logfile for a staircase procedure (right), and a summary of that logfile (left).
15
13
Checking test results on the iPad
Figure 4(a) shows the four choices (and the actual log file) for a participant’s test which can be reached by
logging in as “admin”, tapping the participant’s login name, “View Logs”, and then the log in which you are
interested. The choices reveal the following.
Reaction Time shows a bar graph of the mean reaction time for each of the stimuli levels shown in the test.
The mean is in text in the bar, and the standard deviation of each reaction time is show in parentheses as
σ. For example, Figure 4(b).
Correct Per Level shows a bar graph of the % correct for each of the stimuli levels shown in the test. For
example, Figure 4(c).
Reversals shows a bar graph of the stimulus level at each reversal (for staircase procedures). For example,
Figure 4(d).
Presentations Per Level shows a bar graph of the number of times each stimulus level was presented in the
test.
14
iPad Settings
There are several settings on the iPad that are not controlled by PsyPad.
Auto-Brightness
Sounds
Wi-Fi
Notifications
FaceTime
15
If contrast is important to your experiment, you have to turn
this off manually. PsyPad sets the brightness to maximum at the
beginning of each session.
You may like to set the “Ringer and Alerts” volume to 0 so that
there is not a sound when PsyPad uses the camera.
Obviously if you want participant sessions pulled from the server
to the iPad, or want logfiles to upload, you need to configure the
Wi-Fi connection so that the iPad is connected to the internet.
You probably want to make sure “Do Not Disturb” mode is active,
and that you are receiving FaceTime calls from “No One” and that
“Repeated Calls” are off.
Turn it off.
Upcoming features
• “Start screen” to appear with begin button before each test.
• Blocking of MOCS trials to ensure no two of the same level in a row?
• Interactive screen preview during test configuration in the server.
• Auto emailing of log files from server nominated email addresses.
• Audio support.
16
Known Bugs
• On-iPad analysis does not work for single button tests (App Version 1.1)
16
(a)
(b)
(c)
(d)
Figure 4: Overall structure of data in PsyPad. An administrator owns an image library and a list participants.
Each entry in the image library is a zip file of images as per Section 8. Each participant has a list of test
configurations named “Testx ” in this figure (see Section 9), and log files of previous tests (Section 12). Each
test configuration uses one of the image sets in the library. The group of enabled test configurations for each
participant make up a session.
17