1
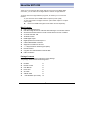
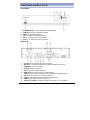
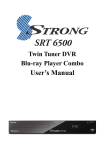
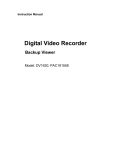
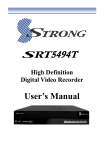
Twin Tuner DVR User’s Manual Table of Contents Table of Contents……………………………………………………….1 Safety Instructions……………………………….………………2 About the Twin Tuner DVR…………………...………………3 Front Panel and Rear Panel……………………………….……………4 Front Panel……………………………………………………………..4 Rear Panel………………………………………………………………4 Remote Control………………………………………………………..5-6 Using the remote control………………………………………………7 Connecting to Equipment…………………………………………8-10 Main Menu…………………………………………………11-15 Basic Operation………………………………………………16-21 Recording function………………………………………….22-27 Electronic Program Guide (E PG)……… …………… 29-31 Network …………………..………………………………………….32-43 Troubleshooting………………………………………………………44 Technical Specification……………………………………………45-46 Warranty Information……………………………………..………47 1 Safety Instructions • • • • • • Always read the safety instructions carefully. Keep this User's Manual for future reference. Keep this equipment away from humidity. Lay this equipment on a stable flat surface before setting it up. Do not place it on soft furnishings. If any of the following situation arises, get the equipment checked by a service technician: - The equipment has been exposed to moisture. - The equipment has been dropped and damaged. - The equipment has obvious signs of breakage. - The equipment has not been working well or you cannot get it to work according to the User's Manual. Warning • To prevent the risk of electric shock, do not open the cover or the back of the receiver. • Do not block the ventilation holes of the device. Leave appropriate gap above and around it to allow for adequate ventilation. • Do not place the device in an unventilated cabinet or on top of a unit which emits heat. • To reduce the risk of fire or electric shock, do not expose this apparatus to any liquids or extreme heat. Copyright Statement No part of this publication may be reproduced in any form by any means without the prior written permission. Other trademarks or brand names mentioned herein are trademarks or registered trademarks of their respective companies. Disclaimer Information in this document is subject to change without notice. The manufacturer does not make any representations or warranties (implied or otherwise) regarding the accuracy and completeness of this document and shall in no event be liable for any loss of profit or any commercial damage, including but not limited to special, incidental, consequential, or other damage. This symbol indicates that this product incorporates double insulation between hazardous mains voltage and user accessible parts. When servicing use only identical replacement parts. 2 About the SRT 6100 Thank you for choosing the SRT 6100. With its Twin Tuner’s and HDMI 1080i connection, you can watch all new digital DVB-T channels in High Definition. To get the best of the High-Definition programs, we advise you to connect the receiver: To your television with an HDMI cable for superior picture quality. To your home theatre via digital coaxial or optical cable output for a superior sound quality. Please note HDMI and digital coaxial cables are sold separately Main Features: z z z z z z z z z z z z z DVB-T Twin Digital Turners DVR Recording: Record two channels while watching a 3rd from same network Smart Series Record feature to record a whole series at a touch of a button 3.5” Sata Hard disk: 1TB Timeshift Function HDMI Digital Output Digital Optical and Coaxial output 5.1 CVBS/ YPbPr/SPDIF connectors Supports TV formats 4:3 and 16:9 7 + 1 Days Electronic Guide Program (EPG) Parental Control Copy files from internal HDD to external HDD USB 2.0 Interface Package Contents Before installation, please check the items of the package. The package should contain the following items: z z z z z z z HD DVR Remote Control User Manual Insert Card AV Cable Y/Pb/Pr Cable “AAA” Batteries (for remote) x1 x1 x1 x1 x1 x1 x2 3 Front Panel and Rear Panel Front Panel 1. 2. 3. 4. 5. 6. STANDBY button: To turn ON/OFF the Standby Mode. USB Slot: Connect for software upgrades. MENU: To enter the Main Menu. OK: To confirm the selected menu item. CH-/+ : To change the channel up/down. VOL-/+ : To control the level of the volume. Rear Panel 1. 2. 3. 4. 5. 6. 7. 8. 9. 10. 11. LOOP OUT: Loop Out RF signal to second tuner. ANT OUT: RF signal output to other reception equipment such as TV. ETHERNET: Connect to network. OPTICAL: Digital audio output. USB: Connect for software upgrades. HDMI: HDMI to connect to your TV in high definition. Y/Pb/Pr: Output Y/Pb/Pr video signal to TV (support high definition output). ANT IN: Ant In is where you connect the Antenna. LOOP IN: RF signal input to connect RF loopback cable. VIDEO: VIDEO output to connect to your TV. Audio(L/R) Outputs: Output left/right audio signal to TV or amplifier. 4 Remote Control Remote key functions: 1. 2. 3. 4. 5. 6. 7. 8. 9. 10. 11. 12. 13. 14. 15. 16. 17. 18. 19. 20. 21. POWER: To turn the standby mode ON/OFF. Numeric buttons (0-9): To enter numeric options in menus and to enter a channel number directly. INFO: To display the current program information. FORMAT:To switch between the different video resolution options (1080p, 1080i, 720P, 576i supported). VOL+/-: To control the level of the volume, up or down. S.REC: To select series recording ▲▼: To change the program up or down or to move the selection up/down in the menu mode. MENU:To enter into the main menu, Press again to return to previous menu. 4 COLOR KEYS: Used in DVR function. RECALL: To view the previous program. AUDIO: To display the Audio info of the selected program. TIMER: To add a new timer for recording. TIMESHIFT: To activate and cancel time shift feature. SKIP BACK: To skip back 30 seconds of a recorded program during playback (in time shift or DVR mode). REW: To rewind a recorded program during playback or time shift (supported 2X, 4X, 8X, 16X, 32X, 64X). PLAY: To play a recorded program or to resume time shift. PAUSE:To pause the current program and activate Timeshift or recorded program during playback. Press again to resume program or playback. MUTE: To mute the sound, press again to restore sound. EPG:To access Electronic Program Guide ASPECT: To change aspect ratio(16:9, 4:3 letter box, Pan Scan) CH+/-: To change the channel up or down. 5 Remote Control OK: To confirm the selected menu item or to open the program list. ◀▶: To control the level of the volume or to move left/right in menu mode. EXIT: To cancel an operation or exit the menu directly. PAGE UP: To move to the next or previous page. SUB:To switch the subtitles ON/OFF. PAGE DOWN: To move to the next or previous page. DVR: To enter the recorded programs list. SKIP FWD: To skip forward 30 seconds of a recorded program during playback (in time shift or DVR mode). 30. FF: To move forward a recorded program during playback or time shift (support 2X, 4X, 8X, 16X, 32X, 64X). 22. 23. 24. 25. 26. 27. 28. 29. 31. REC:To start an instant recording on current channel. 32. STOP: To stop playback of recorded program or to stop time shift. 6 Using the Remote Control 1. To use the remote control, point it towards the front of the SRT 6100. 2. The remote control has a range of up to 7 meters from the SRT 6100 at an angle of up to 60 degrees (30 degrees for left hand side, 30 degrees for right hand side). 3. The remote control will not operate if its path is blocked. Note: 1. Sunlight or very bright light will decrease the sensitivity of the remote control. 2. Old Batteries will decrease the sensitivity of the remote control. Installing the Batteries Remove the battery cover from the remote control and put two AAA size batteries inside the compartment. The diagram inside the battery compartment shows the correct way to install the batteries. Caution: 1. Keep batteries out of children’s reach. 2. Don’t attempt to recharge, short-circuit, disassemble, heat or throw the batteries into the fire. 3. Always replace both batteries at the same time. Never mix new and old batteries or batteries of a different type. 4. If you don’t intend to use the remote control for an extended period, remove the batteries to prevent possible leakage and corrosion. 5. Do not drop, apply shock or step on the remote control. 6. Do not spill water on the remote control. Notes: If the receiver does not operate when operating the remote control from a close range, you need to replace the batteries. 7 Connecting to Equipment How to get good reception • You do not need to change or replace your existing TV antenna to receive digital signal. However, if your antenna is not in a good condition it is recommended that you consider replacing it to ensure uninterrupted digital television viewing. • Viewers in areas of poor analog reception may need specialists’ advice about antenna requirements for digital reception in their area. • It’s recommended that viewers use quad shielded cable from the antenna to the receivers. Connections to a TV There are several ways of connecting this unit to the TV and Hi-Fi System. For High Definition viewing your TV must support either, 720p, 1080i, 1080p resolution. Also the connection between the unit and TV must be either YPbPr Component or HDMI. Other connections will provide Standard Definition viewing. Warning Please switch OFF the mains power before plugging or unplugging connected cables, otherwise, it may damage this unit! Connect the unit via Video and Audio (for Standard Definition viewing) 1. Connect the antenna with ANT IN of the unit. 2. Connect the RF loop cable via LOOP IN and LOOP OUT. 3. Connect the unit via Video/Audio L/R. 8 Connecting to Equipment Connect the unit via YpbPr output and Audio output (for high definition viewing) 1. Connect the antenna with ANT IN of the unit. 2. Connect the RF loop cable via LOOP IN and LOOP OUT. 3. Connect the unit to TV via YPbPr cable as below. Connect the unit via HDMI output (for high definition viewing) 1. Connect the antenna with ANT IN of the unit. 2. Connect the RF loop cable via LOOP IN and LOOP OUT. 3. Connect the unit to TV via HDMI cable as below. 9 Connecting to Equipment Audio connections via SPDIF/Mixed Audio L/R Output 1. Connect the antenna with ANT IN of the unit. 2. Connect the RF loop cable via LOOP IN and LOOP OUT. 3. Connect the unit to TV via AV cable as below. 10 MAIN MENU Press [MENU] to open MAIN MENU. Description of each item is listed below: Channels Press [OK]/[▶] to enter the Channel List. Electronic Program Guide Menu Press [OK]/[▶] to enter EPG List. z Vertical EPG z Horizontal EPG DVR Menu 11 Press [OK]/[▶] to enter DVR List. z Media Browser for playback of media files. Files supported- mpg,ts, trp, wmv, mp4, mkv, flv, avi, mov, vob, mp3, wav format. z Timer List To manage your timer recordings z Storage z To view the status of the Hard disk z Format the HDD (this will delete all files) z DVR Setting z Time Shift Function -Enable or Disable Timeshift z Time Shift Duration -To set the desired Time Shift time, 30 minutes to 2 hours is available. 12 MAIN MENU z z z Recording Storage -To select the storage device for recording. All related files for incoming recordings will be stored on the selected drive. -There are 3 options: Inner HDD (Built-in Hard disk), external HDD connected to either USB1 (rear USB slot) or USB2 (front USB slot). Playback Start Position -To select the start point for playing recorded programs -Available option: Beginning, Continuing (Continuing will begin playback from last viewed position) Auto Play Next Program -Available option: Enable or Disable -Selecting “Enable”, the SRT 6100 will play the next recorded program in the list once the current program is finished. -Selecting “Disable” the SRT 6100 will only play the program which was selected. NETWORK Menu Press [OK]/[▶] to enter Network Menu. z Internet Radio z Network Neighborhood z Weather z Network State 13 INSTALLATION Menu Press [OK]/[▶] to enter Installation Menu. z Auto Channel Search (please refer to page 15 for detailed instructions) z Manual Channel Search (please refer to page 15 for detailed instructions). SETTINGS Menu Press [OK]/[▶] to enter Setting Menu. MAIN MENU Audio & Video Output Setting z Video Resolution: Select video output resolution Available options: 1080p, 1080i, 720p, 576p and 576i z TV Aspect Ratio: Select the suitable aspect ratio for your TV Available options: 16:9, 4:3 z Aspect Ratio Conversions: Available options: Full, Letter Box, Pan Scan z Digital Audio Format Available options: PCM, Bit Stream z Standby Mode Available options: Passive, Active z Time z Mode z Display current date z Display current Time z Daylight Saving Time z Region 14 z Parental Control z Censorship z Installation Menu z Setting Menu z DVR Menu z New Password z Confirm Password Note: (1) If you select “Lock” in the Installation Menu/Setting Menu and DVR Menu, when you select these menu options in the future you will need to enter a password to gain access. (2) The Factory default password is “0000”. MAIN MENU OSD Settings z OSD Transparency z Info Box Display Time z System Information Press OK to view the system information of the unit. z Firmware Update -To upgrade the software of the unit. (Details please refer to page 18) 15 z Factory Default -Restore to factory default setting (Details please refer to page 18) Basic Operation Scanning for channels 1. Press [MENU] and then press [LEFT]/[RIGHT] and highlight [Installation]. 2. 3. Press [OK] /[▶] to enter [Installation] menu. Press [UP]/[DOWN] to select “Auto Search” and press [OK], the unit will start to scan all available channels. OR you can use the Manual Search option to search for specific channels. Once you have entered the [Installation] menu, use [UP]/[DOWN] to select and enter “DTV Manual Search”. a) Press [▲][▼] to view the channel frequency b) Press [OK] to confirm the channel frequency to search c) Press RED button to begin scan 4. 16 Changing Channels 1. 2. 3. 4. Open Channel List menu by pressing [OK] in Live TV Mode. Press [UP]/ [DOWN] key to navigate through available channels. Press [OK] key to view the selected channel. Channel Change can also be done by: z Press [CH+][CH-] in Live TV Mode. z Input the Channel number using the numeric keypad in Live TV Mode. 17 Note: When recording 2 programs, only channels associated with the 2 networks will be able to be viewed. A red square indicates channels being recorded. Basic Operation Channel Info Banner 1. 2. 3. 4. Open Info Banner by pressing [INFO] in Live TV Mode. Info banner shows the current and next program and the relative information of the program. To clear info banner press [EXIT]. When recording, the record status will be shown in the top right corner of the screen. Changing Volume 18 Press the [VOL+]/[VOL-] to increase or decrease the volume accordingly. The current volume level will be shown on the bottom of the screen. Subtitle Press [SUBT] to navigate between available subtitles of the currently viewed channel or to turn them off. Subtitle selection will be displayed on top right hand of screen. Aspect Press [ASPECT] to navigate between available options which are, 16:9 Full, 16:9 Letter Box, 16:9 Pan Scan, 4:3 Full, 4:3 Letter Box and 4:3 Pan Scan, your selection will be displayed on the top right hand corner of the screen. Audio Press [AUDIO] to Navigate between available sound tracks of currently viewed channel. Recall Press [Recall] to switch between current and the previously viewed channels. Mute Press [MUTE] to mute the sound. Press again to restore sound. 19 Basic Operation Time Shift Function 1. 2. 3. 4. 5. 6. 7. 8. Activate Time Shift by pressing [PAUSE] in Live TV Mode. Time Shift supports a record time of up to 2 hours. The Main Screen will be paused. The information displays the amount of time you are behind Live TV. Press [PLAY]/[PAUSE] to resume viewing. While playing in time shift mode, you can press [PAUSE] again to pause the main screen. Press [FF] to fast forward at 2X, 4X, 8X, 16X, 32X, 64X speeds Press [REW] to rewind at 2X, 4X, 8X, 16X, 32X, 64X speeds. Press [SKIP FWD] to skip forward 30 seconds Press [SKIP BACK] to skip back 30 seconds 20 9. Press [STOP] to stop time shift and return to Live mode. Auto Time Shift Function 1. 2. 3. 4. Press the [MENU] button to enter the main menu, select [DVR] ÆDVR SETTING. Select [ENABLE] to activate the auto time shift function. Auto Time Shift function mode will begin 30 seconds after channel change automatically Press [PAUSE] to activate time shift function. Standby Modes 1. 2. 3. Press the [POWER] button, the unit will enter passive standby mode. The unit will enter full standby mode after 10 seconds. While recording if [POWER] button is pressed, a dialog box will be displayedz Select [Yes]: Recording will be stopped and unit will enter passive standby mode, unit will enter full standby mode after 10 seconds. z Select [No]: Unit will continue recording and enter passive standby mode. When recording is complete, the unit will enter full standby mode. z Select [Cancel]: To cancel this operation. When a timer is set to begin while unit is in full standby mode, it will turn on automatically and enter passive standby mode and begin recording. Once recording is complete, the unit will re enter full standby mode. Basic Operation Firmware Update Upgrade software by inserting USB device into the USB port. Please visit the Software Updates section of the STRONG website at http://www.strong.com.au/software.html to download the latest software version for the SRT 6100. Once you have downloaded the software place it on a USB stick, please ensure that the USB stick has no other files stored on it other than the required software file. Then click on the “How to Install” link for a complete step by step instruction sheet on how to update your receiver to the latest software version. Factory Default Use this option if you encounter a problem after having changed some parameters. This option will reset the unit’s data to restore it to the factory default settings. 1. Press [MENU] to open MAIN MENU. 2. Press [UP]/[DOWN] to select “Setting” 21 3. 4. Press [OK] /[▶] to select “Factory Default”. Press [OK] and enter password to confirm. NOTE: Factory default password is “0000”. Parental Control 1. Press [MENU] to open MAIN MENU. 2. 3. Press [UP]/[DOWN] to select “Settings” Press [OK] /[▶] to select “Parental Control”. 4. Press [OK] and enter password to confirm (Default password is “0000”) There are 8 levels available in “Censorship”. Press [UP]/[DOWN] to select the rating level. ALL BLOCK: All programs are blocked. P: Pre-School C: Children G: General. PG: Parental guidance. M: Mature audience, 15+ year old. MA: Mature adult audience 15+ year old. R: Restricted, 18+ year old. AV: Adult audience, strong violence, 15+ year old. NOTE: Once censorship level has been selected you will need to enter a PIN number to view channels or access menus that have been locked. Recording Function Before recording, please select the storage destination (Internal HDD/Front USB/Rear USB) of the recorded program in DVR menu (please refer to page 12 – DVR Setting menu). The unit is set to record to the Internal HDD (Built-in Hard disk) as default if Front USB or Rear USB not selected. The unit supports External HDD’s or USB device’s in FAT,FAT32,NTFS,EXT2,EXT3 format. Instant Recording 1. 2. Activate Instant Recording by pressing [REC] in Live TV Mode. Currently viewed channel will begin recording, default recording time is 3 hours. 22 3. 4. To adjust recording duration press [REC] again. Here you can select 3 minutes to 24 hours using the numeric keys. Alternatively you can set the recording to end once current program or next program are finished. Press [STOP] to stop recording instantly, recorded programs can be viewed from the DVR menu. Manual Timer Recording/Reminder 1. 2. 3. 4. 5. 6. 7. 8. Press [Timer] key in Live TV mode. Press Red button to insert a new Timer. z Select Timer ON/OFF (default is ON) z Select Record or Remind function z Select the desired channel for timer recording by pressing [LEFT] or [RIGHT]. z Select the date for recording z Select the start time for recording z Select the length of recording time z Select the mode of recording (Once/Daily/Weekly/Weekday/Weekend) Press [OK] to save this Timer Press [OK] to edit the information of the Timer Press Green button to delete the set timer. Press Yellow button to delete all the set timers. Press the Blue button to re-arrange the sequence of the timer list by: a) Start time for the timer b) Created time of the timer Press [EXIT] to exit the screen. Recording Function Playback of recorded programs 1. 2. 3. 4. 5. 6. 7. Open DVR Menu by pressing [DVR] in Live TV Mode. The media file currently recording will have a Red square next to the title. Press [OK] to preview the media file in the preview screen, press [OK] again to view the file in full screen. Press Red button to copy the desire media file on the USB devices. Press Green button to select the media file which want to delete, a tick icon will show in the front of the name of selected media file. Press Yellow button to delete the selected media file (except the file which is currently playing or recording). Press Blue button to re-organize the sequence of the media file. (By 23 8. 9. Date/Name/Size) Press [LEFT]/[RIGHT] button to switch between difference screens. (All/Recording/ Media). -The screen “All” displays all the programs in Recording & Media List. -The screen “Recording” displays all the programs that have been recorded. (includes USB device and internal HDD recordings). -The “Media” displays all the media programs on any connected USB device and Internal HDD. Press [PLAY] to play the file in full screen. z Press [INFO] to check the status of playback z Press [LEFT] button to fast forward to desired point in recorded program. z Press [RIGHT] button to go back to desired point in recorded program z Press [UP]/[DOWN] button to skip to the next or previous recorded program z Press [PAUSE] button to pause playback z Press [FF] to cycle between 2X, 4X, 8X, 16X, 32X, 64X fast forward speeds, press [PLAY] to resume playback z Press [REW] to cycle between 2X, 4X, 8X, 16X, 32X, 64X fast rewind speeds, press [PLAY] to resume playback z Press [STOP]/[EXIT] to stop playback. If a program is being recorded while you are playing back a previously recorded program, when you press the [STOP]/[EXIT], a dialog will be displayed on screen to allow you to select to either stop playback or stop the recording. Editing recorded programs In this mode you can remove sections of the recorded program, so when playing back, these sections will be skipped and playback will continue after the removed section. 1. 2. 3. Open DVR Menu by pressing [DVR] in Live TV Mode. Select the recorded program you wish to edit using the UP and Down Arrow keys Begin playback of the selected program by pressing the OK button twice. Once playback has begun press the INFO button. This will display a playback progress banner and a number of options using the coloured buttons z Red Button-Mark A : Press the Red button during playback to set the start position of the section to be removed. An “A” will be placed on the progress banner. z Green Button-Mark B : Press the Green button to set the end position of 24 z z 4. the section to be removed. A “B” will be placed on the progress banner indicating the end of the section to be removed. Yellow Button-Remove A-B : Press the Yellow button once you have set the section of the recorded program to be removed. A dialog box will be displayed asking whether you wish to remove the selected section. Select Yes and press the OK button. The section will now be removed and will not be viewed during playback. This section will also change colour from blue to purple in the playback progress banner when Info button is pressed. Should you not wish to proceed with removing this section select NO to change the section to be cut or select Cancel to exit from this option completely and return to normal playback. Blue Button-Recovery : Press the Blue button should you wish to cancel the removed section of the recorded program. This will remove the all removed sections and program will now play in its entirety. Please Note: You can remove as many sections within the recorded program as you wish by simply following the above steps again. Recording Function EPG RECORDING 1. Display the EPG by pressing [EPG] in Live TV Mode. 2. 3. 4. 5. 6. Press [▲][▼] to select desired channel and press the [OK] button. Press [▶] right arrow button to access program list Press [▲][▼] to highlight the program you wish to record. Press [ ][ ] to scroll between pages. Press [RED] button to record the program. z Press [RED] button once, a “red square” icon will be displayed next to the program z Press [RED] button twice, to edit the Recording settings (such as: Mode/Advance Start/Delay and End 25 times). z Press [RED] button a third time, to cancel the set recording SERIES RECORDING Series recording allows you to record every episode in the series of the program you have selected with a single button press: z While viewing the program you wish to record the whole series, press [S. REC] button on the remote, the message “Series recording set successfully” will be displayed on the screen. z You can also set a series recording via the EPG. Select the program you wish to record the whole series, press [S. REC] button of the remote, the message “Series recording set successfully” will be displayed on the screen. z To cancel a set series recording press the Timer button on the remote control. Select the set series timer using the [▲][▼] buttons. Press the GREEN button to delete this timer 26 Recording Function COPY FILE TO EXTERNAL DEVICE 1. 2. 3. Open DVR Menu by pressing [DVR] in Live TV Mode. Press [▲][▼] to select the programs you wish to copy. Press the Red button to display the list of options. To copy a single file select Copy and press the OK button. Then select which storage device you wish to copy the file to. The options are HDD & USB. USB refers to the external USB device you have connected to the unit. You can also select all files to be transferred by selecting “Select All” and pressing the OK button. Once you have selected all files then press the Red button again and select Copy. Then select USB to transfer files to your external USB device. Note: Please ensure that the external USB storage device is connected to the unit prior to selecting files to be transferred. 27 *Please note- to play the files on your PC we recommend using GOM Media Player. This media player can be downloaded free form the GOM Lab website www.gomlab.com DVR Storage Filter Function 1. Open DVR Menu by pressing [DVR] in Live TV Mode. 2. Press [INFO] to pop the storage filter options list and press [OK] select one you wish to view (Such as : Inner HDD, Rear USB, Front USB and Net Disk ). 28 Electronic Program Guide (EPG) Access EPG by pressing [EPG] in Live TV Mode. EPG in Vertical Display Mode 1. 2. 3. 4. Press [▲][▼] [CH+][CH-] to highlight channel then press OK to access this channel. Press [ ▶ ] button to enter electronic program data list. Press [▲][▼] [CH+][CH-] to highlight program then press OK to view extended program information. Press [EXIT] button to quit and return to normal viewing. Once in the electronic program data list. 1. Press [▲][▼] to navigate the available programs. 2. Press [ ][ ] to scroll between pages. 3. Press [GREEN] button to set the remind function, the receiver will switch to selected channel when the selected program begins. 29 z 4. 5. 6. Pressing the [GREEN] button once will place , a “green square” icon next to the selected program z Pressing the [GREEN] button after setting the reminder will allow you to edit the reminder frequency from Once, Daily, Weekly, Weekday). z Pressing the [GREEN] button a third time will cancel the remind function. Press [YELLOW]/[BLUE] button to view the electronic program data list for previous or next day. Press [EPG] to enter Horizontal EPG display mode. Press [EXIT] button to quit. Electronic Program Guide (EPG) Access EPG by pressing [EPG] in Live TV Mode. EPG in Horizontal Display Mode 5. 6. 7. 8. Press [▲][▼] [CH+][CH-] to highlight channel then press OK to access this channel. Press [ ▶ ] button to enter electronic program data list. Press [◀][▶] to highlight program then press OK to view extended program information. Press [EXIT] button to quit and return to normal viewing. Once in the electronic program data list. 7. Press [◀][▶] to navigate the available programs. 8. Press [ ][ ] to scroll between pages. 9. Press [GREEN] button to set the remind function, the receiver will switch to 30 selected channel when the selected program begins. z Pressing the [GREEN] button once will place , a “green square” icon next to the selected program z Pressing the [GREEN] button after setting the reminder will allow you to edit the reminder frequency from Once, Daily, Weekly, Weekday). z Pressing the [GREEN] button a third time will cancel the remind function. 10. Press [YELLOW]/[BLUE] button to view the electronic program data list for previous or next day. 11. Press [EPG] to enter Horizontal EPG display mode. 12. Press [EXIT] button to quit. EPG Search (EPG) Access EPG by pressing [EPG] in Live TV Mode. EPG in Vertical/Horizontal Display Mode 3. 4. Press [FORMAT] button to display keyboard. Input your keyword and press [BLUE] to start EPG searching. Once in the electronic program data list. 13. Press [▲][▼] to navigate the available programs. 14. Press [ ][ ] to scroll between pages. 15. Press [GREEN] button to set the remind function, the receiver will switch to selected channel when the selected program begins. 31 z Pressing the [GREEN] button once will place , a “green square” icon next to the selected program z Pressing the [GREEN] button after setting the reminder will allow you to edit the reminder frequency from Once, Daily, Weekly, Weekday). z Pressing the [GREEN] button a third time will cancel the remind function. 16. Press [RED] button to set the recording function, the receiver will switch to selected channel when the selected program begins. z Pressing the [RED] button once will place , a “red square” icon next to the selected program z Pressing the [RED] button after setting the recording will allow you to edit the recording settings (such as: Mode/Advance Start/Delay and End times). z Pressing the [RED] button a third time will cancel the recording function. 17. You can also press the [S.REC] button to set series recording. 18. Press [EXIT] button to quit. Network In the Network menu you can listen to internet radio stations, access media files you have stored on your PC and view weather information. Please ensure you have the receiver connected to your internet connection via the Ethernet port on the rear panel. Once connected the receiver will detect your network settings automatically. To ensure that your receiver is connected to the internet via your network select “Network state” in Network menu. Here the status will state “Enable” and your networks IP Address will be displayed. Listen to Internet Radio Stations 1. Press [MENU] key in Live TV mode. 2. Select Network Æ Internet Radio and press the OK button. 3. Unit will scan the internet radio frequencies automatically. 4. Once autoscan is complete a list of Genre’s will be displayed on the left hand side of the screen. Select Genre by pressing the [OK] button. A list of stations from that genre will be displayed on the right hand side of the screen. Press the [▶] button, the cursor will switch to right hand side of the screen. 5. Using the [▲][▼] buttons select the station you wish to listen to and press [OK] to play 6. To change the genre press the Menu button to select a new genre by pressing 32 7. the [OK] button. Press [EXIT] key to exit to Live TV Please note: The performance of your home network will determine the quality and speed of delivery of internet radio. Network Network Neighbourhood (Share Information with PC) The Network Neighbourhood feature allows you to access media files that you have stored on your PC on the SRT 6100 such as video files, mp3 files and photos. Regardless of the operating system on your PC the first step required is to create a folder on the local hard drive. We recommend the folder be named Media. The files that you wish to access via your receiver need to be placed into this folder. If the files are not in this folder the receiver will not be able to access them. Once you have created the Media folder please follow the below steps to allow the files with this folder to be shared over your network. The Network Neighbourhood feature is compatible with Windows XP and Windows 7. Instructions for both systems are outlined below. Please Note: The SRT 6100 supports most multimedia files, we cannot guarantee that all file types and codecs will be supported. How to access PC media on Windows XP 33 1. Right click the “Media” directory, select “Sharing and Security…” 2. Select “Share this folder on the network” and “Allow network users to change my files” Network 3. Open “Control Panel” and turn on the guest account 4. Open “Control Panel” and double click “Administrative Tools” 34 5. Double click “Local Security Policy” 6. In the left menu tree, double click “User Rights Assignment” Network 7. Double click “Deny access to this computer from the network” 8. Select “Guest” account and click “Remove” button 35 9. Click “Apply” button. 10. Now you can add “Network Neighbourhood” on Set Top Box (for full instructions please refer to the Network instructions) Please enter the correct IP address and folder name. Enter the username and password of the computer you wish to connect to. 11. If connection is successful, you can access the media files under this sharing folder by pressing the DVR button on the remote control. 12. Once the DVR screen is displayed press the [◀][▶] buttons to display the Media or Photo headings. The corresponding files stored in the Media folder on your PC will be displayed here. Select the file you wish to play/view and press the OK button. Network How to access PC media on Windows 7 1. Right click the “Media” folder, select “Properties” 2. 36 Select “Sharing” page and “Share” 3. Select “Share” and “Done” Network 4. Select “Security” page and “Edit” 5. Select “Add” 37 6. Input “guest” or “everyone” to the box and select “Check Names”ΔApply” Network 7. Open “Control panel” ΔSystem and Security” 8. Select “Administrative Tools” 38 9. Double click “Computer Management” Network 10. Select “Local Users and Groups”ΔUsers”ΔGuest” 11. Unselect “Account is disabled” 39 12. Double click “Local Security Policy” Network 13. In left menu tree, double click “User Rights Assignment” 14. Double click “Deny access to this computer from the network” 15. Select “Guest” account and click “Remove” button 40 Network 16. Now you can add “Network Neighbourhood” on Set Top Box (for full instructions please refer to the Network instructions) Please enter the correct IP address and folder name. Enter the username and password of the computer you wish to connect to. 17. If connection is successful, you can access the media files under this sharing folder by pressing the DVR button on the remote control. 18. Once the DVR screen is displayed press the [◀][▶] buttons to display the Media or Photo headings. The corresponding files stored in the Media folder on your PC will be displayed here. Select the file you wish to play/view and press the OK button. 41 Network Once you have set up the Media folder on your PC follow the below instructions to connect the receiver to your PC over your network. To activate the Network Neighbourhood: 1. Press [MENU] key in Live TV mode. 2. Select Network Æ Network Neighborhood 3. Press the Red button to insert the required PC share information z IP Address: Enter the IP address of the PC you wish to share with using the numeric keys z Shared Name: Press the [▶] button to access the virtual keyboard to enter the shared folder name you created on your PC. The default in this menu is Media, we recommend the folder on the PC be named media as stated in the PC set up instructions z User: Press the [▶] button to access the virtual keyboard to enter the User name of the PC you are connecting to. Once you have entered the username press the Yellow button to save Password: Press the [▶] button to access the virtual keyboard to enter the Password of the PC you are connecting to. Once you have entered the password press the Blue button to save and exit Press [OK] button to connect to your PC. Once connected under the “State” heading it will display “Connect OK” If it displays Connect Fail, please follow the above steps again and re check your Media folder settings 42 z 4. Network Weather Information 1. 2. 3. Press [MENU] key in Live TV mode. Select Network Æ Weather Press [OK] to set the Continent, Country and City 43 Troubleshooting If you experience problems with this unit or its installation, please read carefully the relevant sections of this User Manual and this Troubleshooting section. 44 Warning: If you are still experiencing problems do not return this product to the place of purchase before contacting STRONG Technical Support on 1800 820 030 or visiting our website at www.strong.com,au and referring to the FAQ section. Problem Possible Cause What To Do Display on front panel not lit Main lead unplugged Check mains lead Main fuse blown Aerial is disconnected Aerial is damaged/misaligned Out of digital signal area Program not broadcasting now Check fuse Check aerial lead Check aerial Check with retailer Retune to another channel Aerial may not be compatible Check aerial Channel is scrambled Select an alternative channel Forgotten channel lock code Use the override code No signal found No picture or sound Mosaic blocks in picture or picture freezes Scrambled channel message Locked out of the channel Receiver off Handset not aimed correctly No response to remote control Front panel obstructed Remote control batteries are inserted incorrectly Handset batteries flat After moving the receiver to another room, the STB can’t receive the digital signal The aerial feed may now be reduced due to signal path Plug in and turn on receiver Aim handset at front panel Check for obstructions Check batteries direction Replace remote control batteries Try a direct feed from the antenna Technical Specifications Item Tuner Input Frequency Bandwidth Specification 174~230MHz (VHF) & 474~858MHz (UHF) 7MHz 45 Channel decoding Video Decoding Audio Decoding AV Output Demultiplexer Input Impedance 75 Ohms Input Level -80 ~ -20 dBm Waveform COFDM Demodulation QPSK,16QAM, 64QAM FEC 1/2, 2/3, 3/4, 5/6, 7/8 Guard 1/4, 1/8, 1/16, 1/32 Mode 2K, 8K Standard MPEG-2: MP@ML, MP@HL MPEG-4 ASP@L5 H.264/AVC: [email protected], [email protected] VC-1: AP@L3, L2 Aspect Ratio 4:3, 16:9 Video Format PAL/NTSC Video Video Resolution 576i/720p/1080i/1080p Standard MPEG-1 and –2, layer 1 and 2 MPEG-4 HE-AAC Output Mode Left, Right, Stereo Sampling Frequency 32,44.1,48KHz Video De-emphasis CCIR REC, 405-1, 625 Lines Video Bandwidth 5MHz Video Output Impedance 75 Ohms Video Level 1.0 Vp-p Output Audio Output Frequency 20Hz~20KHz Audio Output Impedance Low Standard Input Max. Stream Rate ISO/IEC 13818-1 Bit 60Mbps(Serial) / 7.5Mbps(Parallel) 46 Technical Specifications Rear Panel Front Panel/RCU Power/Ambient HDTV output ANT Input Loop Out VIDEO AUDIO Digital Audio Output USB IR Receiver Category Battery Input Voltage Power Consumption Operation Temperature HDMI 1.3 IEC-type, Female IEC-type, Male CVBS YPbPr L/R Coaxial & Optical USB2.0 38KHz IR(Carrier 38KHz) 2 x 1.5V AC 100-240V ~ 50/60 Hz 25W 0~40oC * Specifications and design are subject to change without prior notice. 47 Warranty Information This product comes with a 12 month manufacturer’s warranty from the date of purchase. This unit has a 30 day replacement warranty for manufacturing faults. Within this period please return the faulty product with all its supplied accessories to either the place of purchase or STRONG Australia accompanied by the original purchase receipt. After this 30 day period the unit must be returned to STRONG Australia for testing, and if deemed faulty, will be repaired or replaced at the discretion of STRONG Australia Pty Ltd. The faulty product can either be sent to STRONG Australia directly or via your place of purchase for evaluation. STRONG Australia will cover any costs incurred in returning the faulty product for evaluation should the product be deemed as genuinely faulty. If the product is found to have no fault, the costs incurred in delivering product to and from STRONG Australia will be incurred by the customer. Our goods come with guarantees that cannot be excluded under the Australian Consumer Law. You are entitled to a replacement or refund for major failure and for compensation for any other reasonably foreseeable loss or damage. You are also entitled to have the goods repaired or replaced if the goods fail to be of acceptable quality and the failure does not amount to a major failure. STRONG Australia PTY LTD. 60 WEDGEWOOD ROAD, HALLAM, VICTORIA 3803 PH: +61 3 8795 7990 FAX: +61 3 8795 7991 48 STRONG Australia PTY LTD. 60 WEDGEWOOD ROAD, HALLAM, VICTORIA 3803 PH: +61 3 8795 7990 FAX: +61 3 8795 7991 TECHNICAL SUPPORT: 1800 820 030 STRONG & CO. (FAR EAST), LTD. P.O. BOX 85, YOKOHAMA, KANAGAWA-KEN JAPAN 231-91 FAX: +81 45 651 1842 www.strong.com.au [email protected] ©Strong Technologies Pty Ltd., 2012 49