1
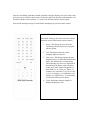
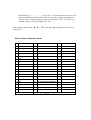
Multifunction Remote Control Messaging Display
MODEL NO. RMD-620
USER MANUAL
DIGITAL WORKS ENGINEERING PTY. LTD.
117 SPRINGVALE ROAD, SPRINGVALE, VIC. 3171 AUSTRALIA
Phone: + 61 3 9558 5880
Fax: + 61 3 9558 5889
Email: [email protected]
Website: www.rezap.com
DIRECT ALL TECHNICAL SUPPORT TO:
[email protected]
INTRODUCTION:
Thank you for purchasing the REZAP® AIROTEXT™ advanced messaging system,
Model RMD-620. Simply put, the REZAP® AIROTEXT™ is a multifunction remote
control messaging display device. It features:
• User programmable, animated electronic text messaging system,
• User programmable schedule reminder function,
• Built-in 100-year calendar function,
• Built-in digital alarm clock function,
• Advanced, dynamic multi-color LED, night and day lighting system.
• All built-in functions can be remote controlled.
REZAP® AIROTEXT™ represents one of the latest ranges of digital electronic devices
to hit the market that puts you in control. Here are just a few possible applications:
1. Use it in the bedroom as an alarm clock with date and personalized messages or
reminders that you program using the remote control. It can also be used as a
colourful bedside light which you can turn on and off using the remote.
2. Use it in the lounge or family room as a clock and family message board which
can also be used at family functions, parties and celebrations.
3. Provides an attention getting display! Businesses can use it on the shop counter,
shelf or in the shop window to promote their business. Businesses can also use it
to promote their products in shop outlets. The remote control makes it easy to
change the message even when it’s located in hard-to-reach places.
4. It also makes the perfect gift or souvenir for friends, relatives or lovers. Imagine
the recipient’s surprise when they switch it on and see your special preprogrammed message?
FEATURES:
1. Provides a modern design that’s easy and safe to operate.
2. A multi-functional device with multi-coloured lights, alarm clock, calendar and
personal message display using oscillating LED (Light Emitting Diode).
3. All functions set by remote control.
4. Five built-in messages to announce important days of the year.
5. Nine personal messages may be programmed by the user (up to a maximum of 98
characters per message) and displayed daily or on a selected day of the year.
6. Displays the time and date of 12 major cities around the world.
7. Numerous animated message display methods make an eye-catching display.
8. Backup batteries ensure that the time and date do not need adjusting when mains
power is lost.
9. Your personalized messages and settings are stored permanently in flash memory.
10. Uses an AC/DC power adapter approved to UL, CSA, GS, BS and SAA standards.
11. CE marking.
DISPLAY FORMAT:
Time: 24 hour format - 00:00:00 to 23:59:59
Date: MMM, DD, YYYY.
Where,
MMM = Jan, Feb, Mar, Apr, May, Jun, Jul, Aug, Sep, Oct, Nov, Dec.
DD = 01 to 31.
YYYY = 2005 to 2099.
Day of the Week:
Sunday, Monday, Tuesday, Wednesday, Thursday, Friday, Saturday.
Pre-programmed messages:
Jan, 01
- Happy New Year
Feb, 14
- Valentine!
Dec, 24
- Christmas Eve
Dec, 25
- Merry Christmas
Dec, 26
- Boxing Day
WARNINGS:
1. Read the user manual carefully before using the device.
2. The device must be placed on a sturdy level surface and must not be moved or
shaken whilst operating.
3. Do not shake, drop, strike or abuse this appliance.
4. Use alkaline batteries for back up and for the remote control for long life.
5. Do not open the device - there are no user serviceable parts inside.
6. Use only the supplied AC adapter. The adapter should be checked at regular
intervals for any signs of potential danger (such as damage to the cable, plugs or
to the casing). If any damage is found then it should not be used until replaced by
a new unit or repaired by a qualified technician.
SET UP:
1. Insert three AAA sized alkaline batteries into the display unit. Ensure that they are
inserted with the correct polarity.
2. Insert two AAA sized alkaline batteries into the remote unit. Ensure that they are
also inserted with the correct polarity.
3. Find a solid, level flat surface for the display unit. Plug the AC adapter into the
12V DC socket on the display unit.
4. When ready, plug the AC adapter mains plug into a suitable 240VAC 50Hz power
outlet and switch it on.
Once the oscillating wand has reached optimum swing the display will start. If the wand
does not start to oscillate, check power to the unit and check that the backup batteries are
inserted with the correct polarity. i.e. remove the backup batteries and try again.
Wait for the startup message to finish before attempting to use the remote control.
USING THE REMOTE:
Other than setting up the unit, four basic control
functions are provided on the remote control:
1. Power. This button powers down the
oscillating wand and powers it up again
when required.
2. Led. This button turns the colourchanging lights on and off.
3. Time zone. This button toggles the time
display between 12 different international
times. The default time is Hong Kong.
The following city times are displayed in
the following sequence with each press
of the ‘time zone’ button. Bangkok (-1),
New Delhi (-2.5), Cairo (-6), Paris (-7),
London (-8), Sao Paulo (-12), New York
(-13), Los Angeles (-16), Honolulu (-18),
Sydney (+2) and Tokyo (+1). In brackets
are the time differences in hours.
4. Clock. Interrupts what the display is
doing to display the time.
The other keys on the remote control are used only to set various functions on the unit.
This includes; time and date, alarm clock mode and time, automatic on/off times (recloser)
and messages.
1. Pressing the ‘Set’ key will sequence through the following setting options; time,
date, clock on/off, alarm on/off, recloser on/off and set messages.
2. To set the time, press the ‘Set’ key once then enter the time using the number
keys. Note, that this is a 24 hour clock (military style), where 1pm = 13:00, 11pm
= 23:00 and 12.30am = 00:30. If you press the wrong button, go back and change
the setting by pressing the left cursor key. To accept the new time setting press
‘OK’, to abort press ‘Set’.
3. The date is set next. Press the up cursor or down cursor to adjust the month. When
ready press the right cursor key. Then enter the day of the month using the
number keys and finally the year. If you make an error go back and correct it
using the left cursor key. To accept the new date press ‘OK’.
4. The clock on/off function is set next. Press the up or down cursor keys to change
the setting. Press the ‘OK’ button to accept the new setting. Note, with no user
messages programmed the time and date are always displayed. Only when user
messages have been programmed does ‘clock off’ operate and stop displaying the
time – only user messages and pre-programmed messages are displayed.
5. The alarm on/off function is set next. Use the up/down cursor keys to change this
setting and press ‘OK’. If set to ‘on’ the alarm time is entered using the number
keys. Press ‘OK’ again to accept.
6. The recloser on/off function is set next. This provides an automatic on/off
operation of your display. For example, set to recloser on time to the alarm time
and the display will start when the alarm goes off. Set the recloser off time to one
hour later and the display will automatically shut down after you go off to work –
for example. Use the up/down cursor keys to change the recloser setting and then
press ‘OK’. If set to ‘on’, the automatic turn-on time is entered and then the turnoff time.
7. The ‘set messages’ function comes next. To leave the messages as is, press the
‘Set’ key otherwise press the ‘OK’ key. ‘MSG1’ will be displayed. To skip
immediately to the message you wish to edit press a number key ‘1’ to ‘9’ or
press the right cursor key to edit the message currently indicated. Next program
the display option by pressing the up/down cursor keys. ‘DAILY’ means that the
message will always be displayed (i.e. every day). Otherwise enter the month and
day of the month you wish the message to be displayed and then press ‘OK’. You
will then be required to enter the message. Use the alpha keys (A...Z) or the
number keys (0…9) accordingly to enter your message of up to 98 characters.
Press the ‘Shift’ key to change between upper and lower case characters and use
the ‘Spacebar’ key to insert spaces or to delete characters or entire messages that
are not needed. Use the left/right cursor keys to move backwards and forwards
through the message noting that the current cursor position is highlighted. To
enter a special character, press the ‘Spec. character’ key. The ‘¥’ character is
displayed, pressing the up/down cursor keys can change this character to one of
the following: $ + - * / , . , : ; . ' ! ? @ # % & ↵. Press the right cursor key to move
to the next character position. Press ‘OK’ to accept the message and then select
‘ON’ or ‘OFF’ using the up/down cursor keys then press ‘OK’. To exit the ‘set
messages’ mode - keep pressing the ‘Set’ key.
Note, the keys marked ‘§’, ‘¨’, ‘©’, ‘ª’ are the left, right, up and down cursor keys
respectively.
Key Function of Remote control:
NO.
Description
NO.
Description
No.
Description
1
Power
19
O/o
37
← LEFT
2
LED Control
20
P/p
38
OK (Acknowledge)
3
Timer Zone
21
Q/q
39
→ RIGHT
4
Clock
22
R/r
40
/
5
A/a
23
S/s
41
0
6
B/b
24
T/t
42
/
7
C/c
25
U/u
43
↓Down
8
D/d
26
V/v
44
9
9
E/e
27
W/w
45
1
10
F/f
28
X/x
46
2
11
G/g
29
Y/y
47
3
12
H/h
30
Z/z
48
4
13
I/I
31
SHIFT
49
5
14
J/j
32
/
50
6
15
K/k
33
Spc cha.(Special character) 51
7
16
L/l
34
17
M/m
35
↑ UP
53
18
N/n
36
SET
54
SHIFT+UP/Down
/
52
8
¥ $ + - , ‧ 、:;。‘’! ﹖@ # % &