1
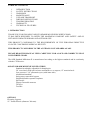
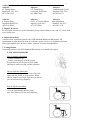
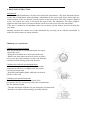
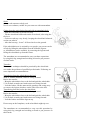
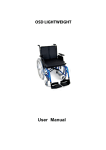
OSD STANDARD
MILLENIUM II
User Manual
TABLE OF CONTENTS
1.
2.
3.
4.
5.
6.
7.
8.
9.
2
INTRODUCTION
SAFETY INSTRUCTIONS
WARNINGS
MAINTENANCE
USE AND TRANSPORT
DRIVING INSTRUCTIONS
TROUBLESHOOTING
WARRANTY
TECHNICAL FEATURES
1. INTRODUCTION
THANK YOU FOR CHOOSING OSD STANDARD MILLENIUM WHEELCHAIR.
IT HAS BEEN DESIGNED TO OFFER THE MAXIMUM COMFORT AND SAFETY AND IS
SUITABLE FOR BOTH INDOOR AND OUTDOOR USE.
THIS PRODUCT CONFORMS TO THE REQUIREMENTS OF THE EUROPEAN DIRECTIVE
93/42/CEE CONCERNING MEDICAL DEVICES.
THIS PRODUCT CONFORMS TO THE AUSTRALIAN STANDARDS AS 3695.
PLEASE READ THIS MANUAL VERY CAREFULLY FOR A SAFE AND CORRECT USE OF
YOUR WHEELCHAIR.
The OSD Standard Millenium II is manufactured according to the highest standards and in conformity
with the CE Directive.
OSD STANDARD MILLENIUM II FEATURES
Standard seat height, adjustable for hemiplegics
24” rear wheels with quick release mechanism or, on request, 12” transit wheels
Low pressure 1 3/8” pneumatic tyres (with inner tube)
Aluminium handrims
Swing away removable legrests
Height adjustable separate footplates
Heel straps
Flip up removable armrests
Tilt lever
Tool Kit
OPTIONS
Elevating Legrests.
12" Transit Wheels (diameter 300 mm).
3
2. SAFETY INSTRUCTIONS
Please inspect your wheelchair before use, checking all components and making sure it is properly adjusted.
If you have not used your wheelchair for a long time, please verify if it needs any maintenance before using
again.
It is also necessary for you to periodically check all the parts which can be affected by tear and wear
(tyres, brakes, seat sling, legrests, etc).
Avoid using the wheelchair with poor light or poor visibility and equip your wheelchair with light reflectors.
For your own safety do not use the wheelchair on uneven surfaces, on sand, mud or snow which might
also cause damages to the wheelchair.
Avoid crossing water puddles. Should the wheelchair get wet, dry it as soon as possible.
When approaching an obstacle, for example some steps or a hump, make sure there are no risks
involved before proceeding.
3. WARNINGS
MAXIMUM WEIGHT CAPACITY: 100 Kg
NEVER EXCEED THIS WEIGHT LIMIT
Never lift the wheelchair up by using the legrests: use the frame only.
Never step on the footplates as the wheelchair might tip over.
Pay attention to your fingers when folding or opening the wheelchair.
Never use the wheelchair on escalators, even if accompanied by an assistant.
Maintenance and repairs must be carried out only by a qualified technician.
4. MAINTENANCE
Have the wheelchair checked by a qualified technician at least every two years.
The nylon seat and backrest upholstery can be removed by simply loosening some screws.
They can be washed with a wet sponge and a mild detergent. The metal parts can be cleaned
with a car detergent and if necessary with a grease remover.
Check the tyres condition and their pressure at least twice a month. The recommended
pressure is 200 or 250 kilopascals. Never exceed 450 kilopascals
WARNING: Over inflation of tyres above recomended value as indicated on the tyre may result in
damage to the tyre and tube.
Make sure the rear wheel spokes are not loose. Loosened rear wheel spokes may deform
the wheels. If necessary, have the spokes adjusted by a qualified technician.
Keep the rear wheels axles always as clean as possible.
Immediately replace the handrims in case they are badly scratched as they might hurt your hands.
Check the brakes on a regular basis. The braking function can be negatively
affected by an incorrect tyre pressure as well as by the presence of dirt or fluff.
Should you have any doubts about the correct functioning of the wheel
chair or of any of its components, please do not use it and contact Aidacare.
The tool kit provided will allow basic adjustments to the wheelchair, for further infomation on
repairs and service, refer to ‘Repairs & Service’ section.
Aidacare will not guarantee the safety and the correct functioning of the wheelchair in case
any of the original components have been changed and not replaced with original parts. If any faults
are detected upon recieving the wheelchair please phone Aidacare to arrange a replacement. Any
faults that are detected during normal use should be reported to Aidacare immediately to
determine if warranty conditions apply and organise repair and/or replacment as applicable. Replacment
units are avaliable on request if covered by warranty.
Packing & Shipping
When sending the chair back for service or repair please include all components of the chair like legrest
and armrests. Please ensure wheelchair is tagged appropriately with users name. To organise
pickup by Aidacare, please call 1300 133 120, standard pickup and delivery charges apply.
4
Authorised Service Facilities:
Aidacare
45 Tinning Street,
Brunswick, VIC 3057
(03) 9384 1242
Aidacare
347 Urana Road
Lavington, NSW 2641
(02) 6040 3444
Aidacare
18 Mertonvale Circuit
Kingston TAS 7050
(03) 6229 4733
Aidacare
4 Noonan Place
Ingleburn NSW 2565
(02) 9618 5000
Aidacare
Unit 3, 47 Learoyd Road
Algester, QLD 4115
(07) 3272 6900
Aidacare
664 South Road
Glandore, SA 5037
(08) 8293 1255
5. Repairs & Service
For all repairs and service to the wheelchair please contact Aidacare on 1300 133 120 to find
your closest store.
6. Replacement Parts
Aidacare stock replacment parts for the OSD Standard Millenium Wheelchair. All
replacement of parts should be done by Aidacare repairs service or a qualified technician.
These parts include tyres & tubes, brakes, armrests, footrests and upholstery.
7. Testing Results
All testing results for the OSD Standard Wheelchair are avaliable on request.
5. USE AND TRANSPORT
How to fold the wheelchair
- Lift the footplates up.
- Lift the seat sling up as in the picture.
Pay attention to the position of your hands
and fingers while carrying out this operation.
How to open the wheelchair
- Hold the seat and push down one of the seat
tubes onto the frame as in the picture. Make
sure to remove your hand from the seat tube to
prevent it from being caught up.
How to lift the wheelchair
- Lift the footplates up.
- Use the push handles and the front
part of the frame to lift the wheelchair up.
5
Car/taxi
Place the wheelchair in the boot of the car.
Should this not be possible, place the wheelchair
between the rear and the front seats in a stable
position to prevent it from sliding down or
tipping over. If possible, block the wheelchair
in place by using the car seat belt.
Minibus
The user must take a seat in one of the minibus
seats, while the wheelchair must be blocked in
such a way that it cannot tip over or slide.
Should the minibus be provided with a
special space for wheelchairs users, follow the
instructions below:
- for the user's safety, verify that the space on the
minibus is equipped with a three point safety belt
and a headrest (the wheelchair headrest is not enough).
- the wheelchair must be fixed from the sides, not
from the wheels. The fixing belts should be angled
between 0° and 30°.
In case of sudden braking, the wheelchair belt
(if available) will not guarantee the user's safety nor
prevent the user from being thrust forward.
6
6. DRIVING INSTRUCTION
Introduction
A correct weight distribution will affect the wheelchair performance. The most important factors
to take into consideration when adjusting a wheelchair are the user's body shape and weight, the
correct posture of the user and the correct position of the rear wheels. The more weight is applied
to the rear wheels, the easier it will be for the user to drive the wheelchair. The more weight is
applied to the front castors, the more difficult it will be for the user to drive the wheelchair.
If the user is assisted by an attendant, make sure to always put the brakes on before leaving the
user alone.
Parking: increase the contact area of the wheelchair by reversing 10 cm with the wheelchair to
make sure both castors are facing forward.
Climbing over a pavement
Climbing a pavement forward
Note: this technique is recommended only for expert
wheelchair users.
- Bring the wheelchair close to the pavement curb.
- Balance the wheelchair on the rear wheels in such a
way to raise the castors and go over the curb. Push the
rear wheels while leaning your body forward.
Climbing forward with an attendant's help
- The attendant must tilt the wheelchair backwards,
using also the tilt-lever, to slightly raise the castors
over the pavement curb.
- Hold the push handles tightly while the rear wheels
climb over the curb.
Climbing a pavement backwards
Note: this technique should be used only if the
pavement is low. It is necessary to take into consideration
also the footrests height.
- Turn the wheelchair with the rear part facing the pavement curb.
- Push the rear wheels while leaning your body forward.
7
Climbing backwards with an attendant's help
- The attendant must pull the wheelchair back until it touches the
pavement curb.
- Then tilt the wheelchair backwards, using also the tilt-lever, to
raise the castors off the ground.
- Finally pull the wheelchair up and pull it back. Make sure that
all four wheels have climbed over the obstacle, before “lowering”
the wheelchair.
Getting off a pavement
Getting off a pavement facing forward
Note: this technique is recommended only for expert wheelchair users.
- Bring the wheelchair close to the pavement curb.
- Balance the wheelchair on the rear wheels in such a way to slightly
raise the castors.
- Get slowly off the pavement and then “lower” the castors on the ground.
Getting off forward with an attendant's help
- The attendant must tilt the wheelchair backwards, using also the
tilt-lever, to raise the castors off the ground.
- Get off the pavement very slowly and then “lower” the castors on
the ground.
Getting off a pavement facing backwards
Note: this technique is NOT recommended when the curb is higher
than 10 cm.
- Pull back the wheelchair to the pavement curb.
- Pull back slowly and at the same time lean your body forward.
Pay the utmost attention while carrying out this operation to avoid
the risk of tipping over.
Getting off backwards with an attendant's help
- Reverse the wheelchair to the pavement curb.
- Get slowly off the pavement and reverse slowly until the castors
have cleared the obstacle.
- “Lower” all the wheels on the ground.
8
Slopes
Make sure to follow the instructions below, when going up or down a
slope, to avoid the risk of tipping over.
Do not change direction while driving up/down a slope.
Push the wheelchair in a straight line when going both uphill or downhill.
If you are in doubt when approaching a gradient, ask someone to help
you rather than running unnecessary risks.
Going uphill: lean your body forward to balance the centre of gravity.
Going downhill: lean your body backwards to balance the centre of gravity.
Use the handrims to adjust the speed, do not use the brakes.
Stairs
Always ask someone to help you!
Never use escalators, neither on your own nor with an attendant.
Going up the stairs facing backwards with an attendant's help
- Pull the wheelchair back to the first step.
- Tilt the wheelchair backwards on the rear wheels, also using the tilt-lever.
- Slowly pull the wheelchair up each step, one step at a time, balancing
it on the rear wheels.
- After the last step, pull the wheelchair back and make sure the castors
have cleared the obstacle before “lowering” all four wheels on the ground.
If the wheelchair user is assisted by two people, one person can be of
help by lifting the wheelchair from the fixed legrests or by removing
the legrests and lifting the wheelchair up from the frame.
The attendants are recommended to carry out these operations by using
their leg strength and avoiding to bend or put pressure on their backs.
9
Stairs
Always ask someone to help you!
Never use escalators, neither on your own nor with an attendant.
Going down the stairs facing forward with an attendant's help
- Push the wheelchair up to the first step.
- Tilt the wheelchair backwards on the rear wheels, also using the
tilt-lever.
- Go down each step very slowly, keeping the wheelchair balanced
on the rear wheels.
- After the last step, “lower” all four wheels on the ground.
If the wheelchair user is assisted by two people, one person can be
of help by lifting the wheelchair from the lockable legrests
or, should these not be available, by removing the legrests and
lifting the wheelchair up from the frame.
The attendants are recommended to carry out these operations
by using their leg strength and avoiding to bend or put pressure
on their backs.
Transfers
The transfer techniques should be practised by the wheelchair
user under the guidance of qualified professionals. Following are
some important recommendations.
Transferring from the wheelchair to the bed
With or without attendant, end user facing forward.
Before the transfer:
- Bring the wheelchair close to the bed and push the wheelchair
5-10 cm back to make sure both castors are facing forward.
- Lock the brakes, lift the armrest/side guard up and swing away
or remove the legrest which are on the side close to the bed.
Transferring from the bed to the wheelchair
With or without attendant, end user facing forward.
Before the transfer:
- Bring the wheelchair close to the bed and push the wheelchair
5-10 cm back to make sure both castors are facing forward.
- Lock the brakes and lift the legrests up.
Do not step on the footplates, as the wheelchair might tip over.
The attendants are recommended to carry out this operation by
using their leg strength and avoiding to bend or put pressure on
their backs.
10
Rear Wheels with Handrims
OSD Millenium II standard wheelchair is equipped with aluminium handrims.
The material and the distance between the handrims and the rear wheels can influence the user's
gripping capacity.
•
•
Be aware not to hurt your fingers when going through narrow corridors or to get your finger caught.
To avoid this risk, the use of a spoke guard is recommended.
7. TROUBLESHOOTING
The wheelchair tends to go on one side
- Inflate the tyres
- Make sure the rear wheels axle pins have been inserted correctly
- Make sure the end user is able to evenly distribute his/her weight on the wheelchair
- Make sure one handrim has not been mounted more tightly than the other one
The wheelchair moves slowly
- Inflate the tyres
- Make sure the rear wheels axle pins have been inserted correctly
- Remove any hair or dirt from the castor axles
- make sure there is not too much weight applied to the castors, otherwise adjust the centre of gravity
The wheelchair does not turn smoothly
- Inflate the tyres
- Make sure the front fork pins are not too tight
- Remove any hair or dirt from the castor axles
The brakes do not work properly
- Inflate the tyres
- Adjust the distance between tyres and brakes
The wheelchair cannot be opened or folded easily
- The upholstery is too tight
- Clean the crossbar under the seat and apply some grease
The wheelchair is unstable
- Inflate the tyres
- Make sure that all the screws on the wheelchair are tight correctly
These problems could also be caused by an incorrect adjustment of the wheelchair for the user.
Should any problem continue, make sure to contact the authorized assistance centre.
11
8. WARRANTY
OSD Standard Millennium II wheelchair has a warranty of 2 years.
Please make sure to keep the purchase invoice.
CUSTOM MODIFICATIONS
All wheelchair modifications or alterations made by the end users which do not conform with the
specifications set forth in this Manual will be considered as “custom” changes.
“Customized” wheelchairs will not comply with the CE regulations and consequently they will not be
covered by warranty.
ADDITIONAL INFOMATION
For further infomation or any queries on this product please call Aidacare on 1300 133 120 to
speak to a customer service representitive.
Distributed by:
9. TECHNICAL FEATURES
OSD STANDARD MILLENIUM II
Stable, foldable steel frame.
24” pneumatic rear wheels (diameter 600 mm) with aluminium handrims and quick release axles.
Padded flip up armrests, long.
Seat and backrest in durable, washable fabric.
Independent, removable and height adjustable legrests
Heel straps.
Height adjustable rear wheels and castors.
SIZES AND COLOURS
Seat Width 14” (cm 36)
Seat Width 16”. (cm 40).
Seat Width 18” (cm 45).
Seat Width 20”. (cm 50).
Colours: Chrome.
OPTIONS
Elevating Legrests.
12” Transit Wheels 12' (diameter 300 mm).
cm 41-46
cm 36/40
43/45/50
cm 28
cm 54/58
61/63/68
cm 40
cm105
cm 85/90
cm 40
cm 25
Kg 17,5