1
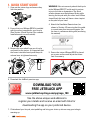
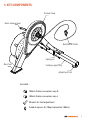
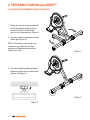
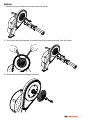
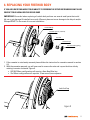
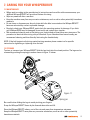
User’s
Manual
CODE: JBT-WHISPERDRIVE
1. QUICK START GUIDE
1. Open out the trainer legs and ensure they
lock into position
2. Ensure that your WhisperDRIVE is installed
with the correct cassette for your bicycle
(See Section 4.2 and Section 6 for cassette
installation and correct freehub).
3. Remove the rear wheel from your bicycle
and install on the trainer. It is important that
the frame is installed evenly and the quick
release lever is tightened securely.
1
2
WARNING: Failure to securely attach the bicycle
to the WhisperDRIVE™ could result in serious
injury to the rider or bystanders. The Quick
release skewer must be tightened firmly while
bracing the bicycle with your other hand. When
closed firmly the lever will leave a clear imprint
on the palm of your hand.
4. Attach the Handlebar Remote lever (as
shown in Section 4.2) ensuring that the cable
is curved away from any moving parts. Set
the lever in resistance setting one (one being
the easiest).
5. Ensure the trainer WhisperDRIVE is placed
on an even surface and adjust the trainer
feet if necessary.
3
4
5
6
7
Front Of Bike
6. Download the JetBlack premium app
DOWNLOAD YOUR
FREE JETBLACK APP
www.jetblackcycling.com/app/rego_180
Use the above unique web address to
register your details and receive an email with links for
downloading the app on your preferred device.
7. Climb aboard your bicycle, start pedalling and bring your chain up into an easy gear to begin
warming up.
i
Contents
1. QUICK START GUIDE i
2. SAFE USE GUIDELINES 2
1.1 WARNING 2
1.2 CAUTION 2
3. KEY COMPONENTS 3
4. PREPARING YOUR WhisperDRIVETM 4
4.1 ADJUSTING WhisperDRIVETM HEIGHT & LEVELLING 4.2 CASSETTE INSTALLATION & REMOVAL 5
4.3 BICYCLE AXLE WIDTH SETUP 8
4
5. USING YOUR WhisperDRIVETM 9
5.1 BICYCLE MOUNTING INSTRUCTIONS 9
5.2 HANDLEBAR MOUNTED RESISTANCE SHIFTER 10
TM
5.3 RIDING THE WhisperDRIVE
10
6. REPLACING YOUR FREEHUB BODY 11
7. CARING FOR YOUR WhisperDRIVETM 13
7.1 Maintenance 13
7.2 STORAGE 13
7.3. TROUBLE SHOOTING 14
8. SPECIFICATIONS 15
9. WhisperDRIVETM SPARE PARTS 16
10. WARRANTY 17
1
2. SAFE USE GUIDELINES
2.1 WARNING
• Read and follow all instructions concerning WhisperDRIVE™ setup and installation of your bicycle
onto the WhisperDRIVE™.
• Failure to securely attach the bicycle to the WhisperDRIVE™ could result in serious injury to the
rider or bystanders. The Quick release skewer must be tightened firmly while bracing the bicycle
with your other hand. When closed firmly the lever will leave a clear imprint on the palm of your
hand.
• Check your bicycles user manual to make sure use on bicycle trainers is not excluded.
• When using the WhisperDRIVE™ keep both hands on handlebar at all times.
• Always take care when training to prevent children or pets moving close to the WhisperDRIVE™.
2.2 CAUTION
• This WhisperDRIVE™ is intended for single-rider bicycles only.
• Read and follow all instructions.
• Be sure your bicycle is in good working order and fits you properly.
• Before beginning each workout, you must check the bicycle is securely attached to the WhisperDRIVE™.
• The WhisperDRIVE™ must always be used on a flat surface.
• Do not put fingers, feet or dangling objects near any moving parts.
• Do not attempt to dismount until all moving parts have stopped.
• Do not attempt to modify your JetBlack WhisperDRIVE™.
• Do not attempt to stop the resistance unit or flywheel manually.
• The resistance unit housing may become hot. Be careful not touch resistance unit housing until it
has had sufficient time to cool.
• Keep children and pets away from the WhisperDRIVE™ during use.
• Before you start any exercise program you should consult a physician. Should you become ill, feel
dizzy, light-headed or nauseous while riding the WhisperDRIVE™, stop riding immediately and seek
medical attention.
2
3. KEY COMPONENTS
Freehub body
Quick release lever
Resistance Shifter
Spring pin
Rear foot
Folding support leg
Adjustment foot
INCLUDED:
142mm Frame conversion cap R
142mm Frame conversion cap L
Wrench for foot adjustment
Freehub spacer for 10spd cassettes 1.85mm
3
4. PREPARING YOUR WhisperDRIVETM
4.1 ADJUSTING WHISPERDRIVE HEIGHT & LEVELLING
1. Setup your trainer on the ground and
unfold the legs for stability. Ensure
that each leg has clicked and is
secure in the open position. (Figure 1)
2. Level the trainer by adjusting the feet
left to right (Figure 2)
NOTE:. If the trainer axle needs to be
raised you can adjust the feet by a
maximum of 30mm raising the trainer
15mm at the axle.
Figure 1
3. Once the height has been adjusted,
tighten the upper nut to lock the feet
in place. See figure 3
Figure 2
Figure 3
4
4.2 CASSETTE INSTALLATION & REMOVAL
IF YOU ARE UNCERTAIN ABOUT YOUR ABILITY TO PERFORM THE SETUP ROCEDURE BELOW PLEASE
CONTACT YOUR LOCAL BICYCLE REPAIR SHOP
INSTALLATION:
1. Check the table below to find out which spacer configuration you will need for your cassette. The
WhisperDRIVE™ comes ready for a Shimano/SRAM cassette. If using Campagnolo or XX1 you
will need to change your freehub. See section 6. You will also need the correct cassette lock ring
removal tool for your groupset.
Freehub Body
Shimano/SRAM
11-speed
Campagnolo (9/10/11)
SRAM XD Driver
(11 Speed MTB)
Cassette Type
Spacer Required
Shimano 9
1.85mm
Shimano 10
1.85mm + 1mm*
Shimano 11
NO
SRAM 9
1.85mm
SRAM 10
1.85mm
SRAM 11
NO
All Campag
NO
SRAM MTB 11 (XD/XX1)
NO
*1mm spacers come supplied with 10spd cassettes
2. Install the spacer or spacers required behind the cassette onto the freehub body. Load the cassette sprockets onto the freehub body. See figures 5, 6. (Refer to the manufacturer’s instructions
if necessary)
3. Because there is no wheel to brace against when you are tightening the locking ring, you will need
to apply a chain whip onto the cassette in reverse to be able to tighten the locking ring. See figure
4.
5
4. Install the locking ring to the recommended torque value list on the locking ring
Figure 4
NOTE: Make sure that the cassette spins counter-clockwise freely. If the cassette does not spin
freely, remove the axle end cap, slide the freehub body off the spindle and check the freehub body
spacer is installed. Section 6.4
Figure 5
6
Figure 6
REMOVAL:
1. Release the quick release and remove from the trainer.
2. Use a chain whip and spanner to loosen the axle end cap and remove from the trainer.
3. Remove the cassette by sliding it outwards.
7
4.3 BICYCLE AXLE WIDTH SETUP
IF YOU ARE UNCERTAIN ABOUT YOUR ABILITY TO PERFORM THE SETUP ROCEDURE BELOW PLEASE
CONTACT YOUR LOCAL BICYCLE REPAIR SHOP
Follow the below instructions for converting between each axle system.
The WhisperDRIVE™ is compatible with:
130mm QUICK RELEASE:
The 5mm spacer on the quick release assembly goes on the outside of the bicycle frame.
Axle support cap L
5mm spacer
130mm
135mm QUICK RELEASE;
The 5mm spacer on the quick release assembly goes on the inside of the bicycle frame.
Axle support cap L
5mm spacer
135mm
12 x142mm THRU-AXLE:
You will need to install the 12x142mm thru-axle frame conversion caps.
1. Remove the quick release skewer assembly and axle end caps.
2. The drive side cap can be removed with a 5mm Hex/Allen Key. (The non drive side is loose and can
be removed by hand).
3. Drive side is installed with a 17mm wrench or cone spanner
4. Non drive side can be pressed onto the spindle by hand. It is held in place with an O-ring.
12x142mm
142mm Frame conversion cap R
142mm Frame conversion cap L
8
5. USING YOUR WhisperDRIVETM
5.1 BICYCLE MOUNTING INSTRUCTIONS
NOTE: The WhisperDRIVE™ is shipped from the factory equipped with a Shimano/SRAM
8/9/10/11-Speed cassette freehub body. If your bike is equipped with a Campagnolo or XX1 drivetrain
you will need to purchase a corresponding freehub body. Installation instructions for the freehub body
can be found section 6
Bicycle axles come in a range of sizes. Please make sure step 4.3 is completed before proceeding.
1. Shift the chain on your bicycle to the smallest sprocket on the rear cassette.
2. Open the rear brake callipers on your bicycle and remove wheel.
3. Be sure to position the 5mm spacer properly, based on the type of bicycle you are using. (See
section 4.3)
4. With the rear wheel removed guide the rear of your bicycle over the top of the WHISPERDRIVE™
and ensure that the chain rests on the smallest sprocket of the cassette.
Figure 7
Front Of Bike
5. Once the bicycle is sitting square on the trainer FIRMLY tighten close the quick release lever
IMPORTANT: Securely clamping the bike to the WhisperDRIVE with the quick release skewer takes
considerable force. You will need to brace the trainer bicycle with one hand as you do the lever up
with the other. The lever should leave a clear imprint in the palm of your hand. If it was not firm to
close then the bicycle may slip. Open the lever; turn the nut clockwise a quarter turn and then try
again.
6. Press the saddle down, and lift the front tyre from the ground to confirm that the frame has been
completely fixed to the machine
7. Visually inspect and confirm that the bicycle is vertical on the
WhisperDRIVE™ (See figure 8). If the bicycle seems to leaning
to one side, confirm the bicycle dropouts are resting on the
axle caps and the skewer is holding the bicycle in place. Also
check that the adjustable trainer feet are even.
WARNING: The above steps must be followed correctly and the
Quick Release skewer must be firmly closed. Failure to do so could
result in serious injury.
90 degrees
Figure 8
(bike verticle)
9
5.2 HANDLEBAR MOUNTED RESISTANCE SHIFTER
The handlebar mounted resistance unit can be installed on your
bicycle’s handlebars. The clamp is designed for 31.8mm handlebars. A plastic shim is provided for smaller diameter handlebars.
Please ensure it is securely tightened onto your handlebar
1
2
3
4
5
6
7
IMPORTANT: Ensure the cable and housing between the
resistance unit and the handle bar follows a continuous, smooth curve. Any kinks or bends must be
removed. Do not coil or bunch the cable and housing whilst using the trainer. This will cause false
cable adjustments and reduce the potential resistance of your trainer.
5.3 RIDING THE WhisperDRIVETM
Ensure bicycle is mounted correctly as per the mounting instructions in Section 4.
1. GETTING STARTED
Before beginning each workout, be sure to check that the bicycle is securely attached to the
WhisperDRIVE™. Position the shifter to resistance level one (the easiest setting) and start pedalling slowly when you first hop on the trainer. If it’s your first time on the WhisperDRIVE™, take
it easy for the first few minutes and begin to familiarise yourself with the shifting and resistance
settings. Be careful not to suddenly shift into resistance levels six and seven as it may put you off
balance. Shift through the gears to ensure clean and proper shifting. Most bikes will have perfect
gear alignment. However, occasional differences between bicycle wheels/hub brands may cause
the gears to be slightly out of alignment. See gear alignment section 7.1
2. CHANGING TRAINER RESISTANCE
This trainer has seven levels of resistance. Level one offers the least resistance while level seven
offers the most. Changing gears on your bike will also have an effect on your exertion levels.
CAUTION
Ensure the cable and housing between the resistance unit and the handlebar follows a continuous,
smooth curve. Any kinks or bends must be removed. Do not coil or bunch the cable and housing whilst
using the trainer. This will cause false cable adjustments and reduce the potential resistance of your
trainer.
The WhisperDRIVE™ has been designed for both seated and standing pedalling. However, please use
caution when sprinting in a standing position as the bike and trainer may tilt. Try to keep side to side
body movement to a minimum.
3. Before dismounting, allow the WhisperDRIVE™ to come to a complete rest.
NOTE: To make your indoor workout as quiet as possible, set the WhisperDRIVE on a JetBlack Trainer
Mat. The JetBlack Trainer App has a large number of training sessions and fitness application. We
recommend downloading this free app to get the most from your WhisperDRIVE™.
10
6. REPLACING YOUR FREEHUB BODY
IF YOU ARE UNCERTAIN ABOUT YOUR ABILITY TO PERFORM THE SETUP ROCEDURE BELOW PLEASE
CONTACT YOUR LOCAL BICYCLE REPAIR SHOP
IMPORTANT: Be careful when replacing a freehub body as there are several small parts that could
fall out or get damaged if installed incorrectly. Warranty does not cover damage to the bicycle and/or
WhisperDRIVE™ in the event of incorrect installation.
Freehub Body
Freehub Spacer (1.85mm)
Cassette
Axle End Cap
Cassette Locking Ring
1. If the cassette is not already removed please follow the instruction for cassette removal in section
4.2.
2. With the cassette removed, you will now need to remove the axle end cap on the drive side by
rotating it counter clockwise. Figure 9
• QR 130/135mm configuration will require a 5mm Hex/Allen key.
• 12x142mm configuration will require a 17mm wrench/cone spanner.
Axle End Cap
Figure 9
11
3. With the cap removed you will now be able to slide the freehub body off the spindle by gently
pulling outwards, in some cases it may require rotating the freehub body counter clockwise to
disengage the pawls. See figure 10
4. Check the freehub spacer remains on the spindle.
Freehub Spacer
Freehub Body
Figure 10
5. Now install the new freehub body onto the spindle. Twist the freehub counter clockwise to help
the pawls seat into the ratchet ring. You should not be able to see the pawls once the freehub is
installed.
6. Re-install the axle end cap (removed in section 6.2).
7. Torque the axle end cap to 7.4N.m.
CAUTION: Over-torqueing the axle end cap may cause damage to the bearings or thread
12
7. CARING FOR YOUR WHISPERDRIVE
7.1 Maintenance
• When used according to the manufacturer’s instructions and cared for with common sense, your
JetBlack WhisperDRIVE™ will provide a lifetime of training.
• Wipe any sweat off after a workout.
• Keep the machine away from any corrosive substances, such as salt or other potentially hazardous
materials.
• Do not clean or degrease your bicycle chain while the bike is mounted on the WhisperDRIVE™
because solvents may cause irreparable damage.
• Regularly check your WhisperDRIVE, particularly the mounting system, for damage. If you think
your WhisperDRIVE may be damaged, do not use it and contact your supplier.
• We recommend cleaning and re lubricating your freehub body at least once every two years. The
procedure is identical to servicing a bicycle freehub. If your freewheel has become noisy, we
recommend cleaning and then liberally lubricating the freehub body.
NOTE: If the belt begins to slip during seated training sessions please contact us for specific
instruction for tightening or replacing drive the belt.
7.2 STORAGE
To store or transport your WhisperDRIVE™ fold the legs back into the closed position. The legs can be
released by pressing the spring pin and as shown in figure 11 below:
Figure 11
Spring pin
Be careful when folding the legs to avoid pinching your fingers.
Grasp the WhisperDRIVE™ frame by the forward down tube and lift.
Store the WhisperDRIVE™ indoors, out of the rain and away from temperature extremes.
Keep the WhisperDRIVE™ away from any corrosive substances, such as salt or other potentially
hazardous materials. 13
7.3. TROUBLE SHOOTING
DIFFICULTY LOADING YOUR BIKE ONTO THE TRAINER
1. Loosen the quick release skewer and ensure that there is enough space for the dropouts to fit
onto the axle.
2. Check to make sure that the spacers are positioned on the correct side of the frame dropout.
See Section 5
THE TRAINER SEEMS UNSTABLE OR ROCKS WHILE RIDING
1. Make sure that the WhisperDRIVE™ is located on a level floor
2. Ensure that the levelling feet on the WhisperDRIVE base are adjusted and locked firmly
3. Check that the bicycle is mounted properly following the instructions in this manual. Section 5
4. If the unit still feels unstable please contact your nearest dealer.
EXCESSIVE VIBRATION WHILE RIDING
1. Check that the bicycle is mounted properly following the instructions in this manual. Section 5
2. If the vibration is still present please contact the nearest dealer.
REAR DERAILLEUR SKIPS SHIFTS WHILE RIDING
NOTE: The WhisperDRIVE is designed to be compatible with most bicycles. However, there are
some cases where the wheel/hub spacing on a bicycle may slightly vary causing the derailleur to
be misaligned.
1. If the bike/trainer skips or miss-shifts:
2. Check that the bicycle is mounted properly according to the instructions section 5.
3. Check that the correct spacers are used behind the cassette (cassette spacing table in section
4.2)
4. Check that the derailleur, shifters and cassette are the same speed and brand.
5. Check your drivetrain for wear
6. If the problem still persists you can make small adjustments on the gear cable barrel adjuster.
14
8. SPECIFICATIONS
Max Resistance (watts) at 60kph
1200
Resistance System
Magnetic
Resistance Levels
7
Resistance Adjustment
Handlebar Remote Lever
iOS & Android App Version
Premium App
Included Accessories / Adapters
QR Skewer
5mm Spacer 130/135mm
12x142mm Conversion Caps
Spacer For 10spd Cassette
Bike Axle Compatibility
130mm, 135mm (QR & Boltup)
12 X 142 with Trainer Axles
Drivetrain Compatibility
Shimano/SRAM10/11spd (10spd spacer
included)
(Campagnolo & XX1(XD) freehub bodies
sold separately)
Wheel Size Compatibility
26”, 27.5”, 29” 700c
(for 20“/ 24” riser may be block required)
Maximum load (excluding bicycle)
100kg (220 lbs)
Flywheel Weight
5.9kg (13lbs)
Coast down time from 30kph (18.6mph)
17+ Seconds
Noise Level
Ultra Quiet
Ready to Ride
Install your cassette and start training
Warranty
Lifetime
Size of trainer
700x552x490mm L*W*H
(27.6x21.7x19.3 inches)
Size after folding
257x552x490mm L*W*H
(10.1x21.7x19.3 inches)
Weight
15.4kg
15
9. WHISPERDRIVE SPARE PARTS
JBT-84
JBT-83
JBT-75 (A/B/C)
JBT-85
JBT- (78/79)
JBT-76
JBT-81
JBT-77
JBT-86
JBT-75A
JBT-75B
JBT-75C
JBT-76
JBT-77
JBT-78
JBT-79
JBT-80
JBT-81
JBT-82
JBT-83
JBT-84
JBT-85
JBT-86
16
WHISPERDRIVE SPARE PARTS
JBT-77
JB WhisperDRIVE Freehub body - Shimano / SRAM w' 10 speed Spacer
JB WhisperDRIVE Freehub body - Campagnolo 9 / 10 / 11 speed
JB WhisperDRIVE Freehub body - XD Driver for SRAM 11 Speed MTB Cassette
JB WhisperDRIVE Folding Leg Shim
JB WhisperDRIVE Adjustable Foot
JB WhisperDRIVE QR130 / 135mm Axle Assembly - (end caps spacer + skewer)
JB WhisperDRIVE 12x142mm Conversion Kit - (axle end caps L+R)
JB WhisperDRIVE SunRace Resistance Shifter Assembly - (Shifter & Cable)
JB WhisperDRIVE Rear Foot
JB WhisperDRIVE Drive Belt
JB WhisperDRIVE Drive Side Axle Housing
JB WhisperDRIVE Drive Side Housing
JB WhisperDRIVE Non Drive Side Housing
JB WhisperDRIVE Leg Pivot Nut Cap
10. WARRANTY
JetBlack aims to provide the highest possible quality at all times. However, should you have any
issues with your product please notify us immediately.
The JetBlack WhisperDRIVETM comes with a limited lifetime warranty.
This warranty is not applicable to damage caused by, misuse, abuse, neglect, accident. It does not
cover general wear and tear, unauthorised modification or failure to follow instructions or warnings in
owner’s manual. Units which use batteries or computer display units come with a one year warranty.
It is the responsibility of the purchaser to retain receipts for proof of purchase in the event that
warranty is required.
If you have any questions or would like to resolve an issue, please visit the JetBlack website for trouble shooting information, frequently asked questions and instructional videos. If you have any other
questions or issues please feel free to email us.
[email protected]
www.jetblackcycling.com
17
FREE JETBLACK TRAINING APP
New and exclusive to JetBlack!
Free app for iOS or Android with Multiple coaching sessions crafted by Olympic cycle coach
Murray Healey.
• Upload your workout to Training Peaks and Strava!
• Test and monitor yourself with an in built Fitness/Zone test and Training Zone calculator
• View: Gear Recommendations, Goal Cadence, Session Time, Session Profiles. Optional
accessories allow upgrades to include, Speed, Cadence, Heart Rate, Power (watts) and
Calories Burnt
DOWNLOAD YOUR
FREE JETBLACK APP
www.jetblackcycling.com/app/rego_180
Use the above unique web address to
register your details and receive an email with links for
downloading the app on your preferred device.
[email protected]
www.jetblackcycling.com