1
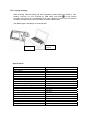
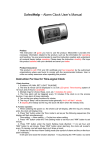
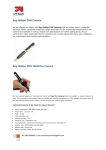
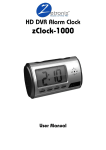
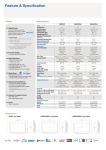
LCD Camera Alarm Clock
User Manual
Clock Instructions
I. Basic functions
1. 5 buttons: HR, MIN, SET, LIGHT, TALK/SNZ;
2. The time & minute can be displayed in a 3.5 bit LCD panel. Time-showing system of
12 hours and 24 hours is available;
3. Multiple rings for choice: Beep, cock, etc. 5 melodies for option.
4. The time alarm will be triggered every 10 minutes if the clock is on the snooze
function. It can alarm 6 times maximally.
5. Two on-the-hour alarm functions for choice;
6. The ring of “Beep” will be become louder generally. And it will last 1 minute;
7. If adopting the melody as the ring, the clock will alarm when the melody ends.
II. Operation
1. When switching the power on, the whole LCD will display; after the ring of a melody
ends, the clock will display time;
2. Press “Set” button under the Time mode to set as per the following sequences (the
display will flash simultaneously):
Time setting → Alarm setting → On-the-hour alarm setting
3. Press “HR” button under the Time Setting mode to set hour and “MIN” button to set
minute;
) to set hour and
4. Press “HR” button under the Alarm Setting mode (Symbol:
“MIN” button to set minute. Press “SNZ” button when alarming, the clock will re-alarm
every 10 minutes, and will send alarm by 6 times at most;
5. Under the On-the-hour Alarm Setting mode (the symbol of alarm and the on-the-hour
alarm will flash):
It will open and close the function (Symbol: ) by pressing the “HR” button, but send
alarm during the time from 7:00am to 9:00pm (Symbol:
the alarm ring by pressing “MIN” button (Symbol:
); it can activate the inactivate
).
6. Under the Time Mode and if the “HR” button is pressed, it can shift the hour system
(12/24 hour system); by pressing “MIN” button, it can select the alarm ring.
7. Under any modes, it can turn the background light off by pressing the “LIGHT” button.
8. Under any modes, it can report the time by pressing the “TALK” button.
I. Diagram
1. Alarm Clock
Time-telling button
Ti
Rotational cover
TF card
Lens
Turn off
Turn on
Electric Clock Function Button
Receiver
2. Remote Control
Sender
Switch button
Take a photo
Video
motion detection video
Sound recording
II. Product Introduction
This product is a high-resolution 30-frame (1280*960) remote video surveillance clock, with an external
Micro SD Card. As a multifunctional high-tech product, the product is available multiple functions, such as:
video, sound recording, induction video, take a photo, cyber chat, electric alarm clock and file storage;
with the high-capacity battery, it can last recording for about 12 hours continuously and audio recording for
25 hours continuously; besides, the product can replace the high-resolution video with 2 million pixels,
sound and file automatically, Meanwhile, the product is designed the multiple languages for telling the
time. It supports 32GB storage. Its Micro SD card can be used for a long time and remote controller can
be easy to handle. With the best imperceptibility, this product will be as your ideal assistant to prevent
theft and get evidence.
III. Handling Instructions
1. Open the rotational cover at the right side, insert the Micro SD card and turn “ON” to get ready.
2.
Use the remote controller to aim to the receiver of the clock and press "
is on and the clock is under the stand by mode.
3.
Press
" to start. When the blue lamp
to start recording video. After the blue lamp flashes 3 times and then turns off, it start recording.
stop pressing
, it will save the video file and return to the “holding state” , and the blue lamp will be on
(the default time length for video recorded is 20 minutes).
4.
Press
button to start recording a sound; after the blue lamp flashes 3 times and turns off, it will be put
into the working order; Press
again, it will save the sound file and return to the “holding state” , and
the blue lamp will be on (the default time length for sound recorded is 20 minutes);
5.
6.
7.
8.
9.
10.
11.
12.
13.
button to get in photo taking mode. It will take a photo if pressing this button again. When
Press
pressing this button, the blue lamp will flash; after taking the photo, it will return to the stand by.
button to get in motion detection mode, then the blue lamp will flash quickly. If a moving object
Press
is detected, the blue lamp will flash slowly by two times and the device will be start to record video. If there
is no moving object to be detected, the blue lamp will return to “Quick-flash: and get in motion detection
mode (the default length for the video file is 3 minutes);
Press
button, it will turn the device off and the blue lamp will be off.
button on the remote controller, the
When the switch is “ON”, insert the USB cable and then press
device will access to the U-disc mode.
PC camera function: Please install the driver software which is saved in the Compact Disc before
on the remote controller when the device is under the mode
operating; Turn on the device by pressing
of “ON”, insert USB cable to connect the computer; at this time, it will access to PC CAM mode;
Charging: Place the chief switch to “OFF” position, insert USB adapter, and the red lamp will be on; When
Please
it is full, the red lamp will be off. You can charge it too by connect this device to a computer (
use only the adapter provided with the device together; if the device getting hot or occurs other
unexpected situations whilst charging, please disconnect the adapter's power source);
Reset: If the product stops working under illegal operation or other unclear reasons, please place the
switch of the device to “OFF” position, and then to “ON” position. It will reset the product accordingly;
When the battery is low capacity, the blue lamp will keep flashing or the screen display will be unclear.
Then please charge it immediately. If it is used off, the file will be saved automatically;
Recorder date: Run the writertime file( in CD disc) when the camera connect with computer. And then ,the
video time is the same computer.
14. File update: please install “Network Installer” from the installation disc; use the remote controller to open
the clock, and then insert the USB cable in 10 seconds; afterwards, the computer will open an interface
automatically; click “Program Upgrade”, it will open a dialogue box; afterwards click “Update”.
When ① DRAM Timing, select 0X35
When ② DRAM Size, select “8M”; afterwards, press “OK” to upgrade; several minutes later, press
“Confirm” button.
15. When the program is lost, please install the software which is saved in the Compact Disc, and then click
“STK02NU Programme Upgrading Tool”, afterwards click “Update”;
Under DRAM Timing, select 0X35
Under DRAM Size, select “8M”; afterwards, press “OK” to upgrade; several minutes later, press
“Confirm” button.
File’s storage and play
When finishing video-recording and other operations, please place the switch to “ON”
on the remote
position, connect it to your computer by USB cable, and press
controller; copy the file or cut and paste it to the your computer to play; or you can remove
the Micro SD card and use the card reader to read the data inside.
The Media player / KM player is recommended.
USB data cable
USB port of
computer
Specifications:
Mega Pixel
Resolution
Video format
Frame number
Vision angle
Induction photographing
Minimal illumination
Battery capacity
Continuous recording time
Remote operating distance
Scope for sound recording
Power consumption
Storage temperature
working temperature
working humidity
Type of memory card
Capacity of memory card
Player software
USB Interface
Operating system
Charging time
2.0 mega pixels
1280x960
AVI
30fps
72°
6 meters for Straight-line distance
1LUX
800MA
Over 12 hours
15m
40m2
130MA / 3.7V
-20~80℃
-10~60℃
15~85% RH
Micro SD card
Up to 32GB
Media player / KM player
USB1.1/2.0
WIN 2000/ XP / Visat32 / 7
Approximately 3 hours
Troubleshooting
Trouble
Will not Turn on
Can Not charge the Device
Blue light flashes rapidly
Remote controller is hard to use
Cannot connect with computer
Clock’s screen flashes or character is
displayed incompletely
Sound is recorded with noise or video is not
clear
Troubleshooting
Remove the insulator
lock of Power, please charge accordingly;
Battery is not contact well, re-start
Replace the battery or adapter
re-start camera, low-power charging
reminder, delete redundant files from the
card, put in Micro SD Card or replacing The
Micro SD Card.
Align with the receiver’s head, remove the
insulator of remote controller, replace
battery or wait for reading the card
Replace the data cable or computer
Charging
Charging, replace Micro SD card
Warning
Application conditions: Please abide by the related national laws and regulations strictly; it is prohibited to
use the product for illegal purpose, otherwise you must be responsible for the consequences.
Software upgrade: In order to keep the device available a better performance, the manufacturer shall
improve the product software continuously. The device is designed the function to update by user itself,
please claim the latest software and upgrading method towards your local dealer.
Working temperature: Please use the device only at the natural temperature; never use the device at the
temperature that human body feels unconformable.
Working humidity: Please use the device only in the environmental humidity suitable for living; keep the
device faraway from the wet environment. This device is not designed the water-proof function.
Video luminance: Please use the device when the sufficient luminance is available; it is prohibited to use
the lens to aim to the sun or other intensive light source; otherwise it may damage the optical apparatus;
Cleanliness requirement: Please do not use the device in the environment full of dirt; otherwise it may
cause the lens or other parts to attach with dirt and influence video effect. It can use the lens wiping paper
or glass cloth to clean.
Other precautions:
This device is a precision electronic product; please keep it away intensive impact, shock, intense
magnetic field or electric field.