1
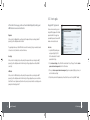
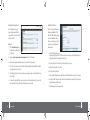
User Manual
Introducing BoB2TM
Table of Contents
Introducing BoB2 .................................................................................................................................................................................................. 3
TM
BoB2 Overview...................................................................................................................................................................................................... 4
TM
Get to know BoB2 ............................................................................................................................................................................................... 8
Developed by iiNet Labs, it connects your computer in your home or office
to the Internet. BoB2TM comes with its very own phone handset which
allows you to take advantage of cheap phone calls over your broadband
connection with iiNet’s Netphone service.
BoB2 comes equipped with all the software it needs to get you online. You’ll
be able to connect your computer using an ethernet cable or through a
wireless connection.
TM
TM
Talking to BoB2 manually.................................................................................................................................................................................. 10
TM
In addition to this manual, BoB2 comes with a Quick Install Guide - a step-bystep guide to get BoB2 plugged in and working, and a Wireless Setup Guide
- instructions on setting up your wireless connection.
TM
TM
BoB2 - how to guide.......................................................................................................................................................................................... 15
TM
BoB2 ’s in-built answer machine..................................................................................................................................................................... 19
TM
Registering the BoB2 handset...................................................................................................................................................................... 21
TM
Once you’ve followed the steps in the Quick Install Guide, iiNet will take care of
the rest. We’ll send your details to BoB2 as soon as it’s plugged in so you can
get online quickly.
TM
This manual will guide you through the process of manually connecting BoB2
and will help you get to know BoB2 and all his great features including the .
in-built answering machine and USB storage.
TM
Showing of BoB2 .................................................................................................................................................................................................22
TM
Troubleshootiong.................................................................................................................................................................................................26
TM
You’ll also be able to get your head around managing BoB2 ’s settings.
TM
Introducing BoB2
TM
3
BoB2TM Overview
This chapter will give you an overview of the capabilities of BoB2 .
DMZ Host Support
BoB2TM - 4 port integrated wireless modem
DMZ Host Support allows a networked computer to be fully exposed to the Internet. This function is used when
Network Address Translation (NAT) and firewall security prevent an Internet application from functioning correctly.
TM
Compatibility
BoB2 supports a variety of networking environments including Mac OS® 8.x, 9.x & v10.x, Linux®, Windows® 98SE, ME,
NT, 2000, XP and Vista and Windows 7. You will need an Internet browser and a network adapter that supports TCP/IP
(the standard language of the Internet).
TM
NAT IP Address Sharing
BoB2 employs Network Address Translation (NAT) to share the single IP address assigned to you by iiNet. This saves
the cost of adding additional IP addresses to your Internet service account.
TM
Internet Access
SPI Firewall
This device supports Internet access through an ADSL connection. Since many ADSL providers use PPPoE or PPPoA to
establish communications with end users, the modem includes built-in clients for these protocols, eliminating the need
to install these services on your computer.
BoB2 is equipped with a firewall that protects your network from a wide array of common hacker attacks.
TM
Universal Plug-and-Play (UPnP) Compatibility
UPnP (Universal Plug-and-Play) is a technology that offers seamless operation of voice messaging, video messaging,
games, and other applications that are UPnP-compliant.
Front-Panel LED Display
Light LED’s on the front of BoB2 indicate which functions are in operation. You’ll know at-a-glance whether BoB2 is
connected to the Internet. This feature eliminates the need for advanced software and status-monitoring procedures.
TM
TM
USB/3g/Charge Ports
BoB2 has three USB ports. The first USB port on the right hand side of the modem (labelled storage/charger) is for
charging USB devices such as mobile phones, or for plugging in a USB hard drive/thumb drive. This port is not designed
for a full Network Attached Service (NAS) storage function. It’s designed for backing up or sharing files around your
home network. The storage port currently supports FAT16/32 and NTFS USB Mass Storage Devices.
TM
Web-Based Advanced User Interface
You can set up BoB2 ’s advanced functions easily through your web browser, without having to install additional
software onto the computer. There are no disks to install or keep track of and, best of all, you can make changes and
perform setup functions from any computer on the network quickly and easily.
TM
The second USB slot, (labelled 3G), is situated under the cover on the back of BoB2 . It’s designed for 3G USB modems.
This port will supply a maximum 5V 500mA. Connecting a third party USB device which requires more than 500mA for
charging may result in damage to your equipment.
TM
Built-in Dynamic Host Configuration Protocol (DHCP)
Built-In Dynamic Host Configuration Protocol (DHCP) makes for the easiest possible connection. The DHCP server will
assign IP addresses to each computer automatically so there is no need for a complicated setup.
4
BoB2 Overview
TM
BoB2 Overview
TM
5
The third USB port is situated on the lower left hand side of BoB2 (labelled handset charger only). It’s a designated
port for charging the BoB2 handset and is not for any memory devices or third-party charging options.
TM
TM
QoS
QoS (Quality of Service) limits the traffic being sent from the modem (upstream) when using iiNet’s Netphone service
(VOIP) at the same time. If QoS is disabled, the quality of the phone call can suffer due to excessive traffic from
another source, such as a PC. When QoS is enabled, it limits the upstream traffic and sets it aside for phone calls, which
will maintain call quality.
Virtual Server
WEP, WPA and WPA2 Encryption protocols
BoB2 features WPA2, a higher level of wireless security. It combines advanced network authentication and stronger
Advanced Encryption Standard (AES) encryption methods. It also supports the legacy security standard called Wired
Equivalent Privacy (WEP) to allow you to activate security with any legacy devices you may have on your network.
TM
VLAN
VLAN (Virtual Local Area Network) adds the ability to manage multiple networks with the one modem. BoB2 is
designed to be placed on a desktop. All of the cables exit from the rear of the modem for better organisation and
utility. The LED indicators are easily visible on the front of the modem to provide you with information about network
activity and status.
TM
If you have a fixed IP address, you can set BoB2 to act as a virtual host for network address translation. Remote users
access various services at your site using a constant IP address. Then, depending on the requested service (or port
number), BoB2 can route the request to the appropriate server (at another internal IP address).This secures your
network from direct attack by hackers, and provides more f lexible management by allowing you to change internal IP
addresses without affecting outside access to your network.
TM
TM
Support for VPN Pass-Through
If you connect to your office network from home using a VPN connection, BoB2 will allow your VPN-equipped
computer to pass through to your office network. BoB2 supports one VPN session at any one time.
BoB2 supports three of the most commonly used VPN protocols – PPTP, L2TP, and IPSec.
TM
TM
TM
Computer Filter Rule
For added security, you can set up a list of MAC addresses (unique client identifiers) that are allowed access to your
network. Every computer has its own MAC address. Simply enter these MAC addresses into a list using the web-based
user interface and you can control access to your network.
6
BoB2 Overview
TM
BoB2 Overview
TM
7
Get to know BoB2TM
Front Panel
1. ADSL sync light
The adsl sync light indicates if iiNet is talking to your
BoB2
The Wireless status light shows you when BoB2 ’s
wireless is enabled.
On - ADSL link is up and connected
On - Wireless enabled
Off/flashing - No ADSL connection
Off - Wireless is disabled
TM
TM
2
5. Storage/3G light
2. Internet light
T he Internet light shows you when the router is
connected to the Internet
On – Connected to internet
Off/flashing – Not connected to Internet
3. LAN Status light
hen a computer is properly connected to the LAN
W
port on the rear of the router, this light will illuminate.
A solid light means computer or a network-enabled
device is connected. When information is being sent
over the port, the light will blink rapidly.
When a USB mass storage device is connected to
BoB2 , this light will illuminate to inform you the
attached storage device is ready for use. BoB2 also
accepts a 3G wireless USB modem service.
TM
On – Attached USB Mass Storage or 3G Device is
connected and ready for use
Off – No attached USB Mass Storage or 3G Device
5
The phone light indicates that your netphone
account has successfully registered on the network.
Off - Your computer is not connected.
Off - No Netphone activity
TM
4
6. Phone one & phone two status lights
On - Netphone registered successfully
Get to know BoB2
3
TM
On - Your computer is connected
Blinking - information transmission
8
1
4. Wireless Status light
6
Get to know BoB2
TM
9
Talking to BoB2 manually
TM
Before getting started on the following steps, it’s
a good idea to refer to BoB2 ’s Quick Install Guide
and Wireless Setup Guide to get him plugged in and
running.
TM
The image to the right shows BoB2 ’s homepage. Here
you can browse and manage BoB2 ’s settings manually.
Connecting to the Internet manually
1.
Log into BoB2 by entering http://10.1.1.1 into your browser’s
address bar. Press enter.
2.
Type in the password (default password is “admin” excluding
the quotation marks). Press Enter or click Login.
3.
Enter your ADSL username and password and click on “Save
Settings”.
TM
TM
How to browse to BoB2TM home page
1.
Open your computer’s web browser and in the
address bar type http://10.1.1.1 – (image 2). Make
sure, your computer is connected to BoB2 , either
wirelessly or with an ethernet cable, first.
TM
2. Once you’ve arrived at the homepage, type in the
default password - “admin”.
3. From here you can get a snap shot of the setup,
access his more advanced features or set up your
ADSL username and password.
10
Talking to BoB2 manually
TM
Talking to BoB2 manually
TM
11
What does the information on the home page mean?
TM
On BoB2 ’s home page, you’ll see nine points listed. The following information explains what these points mean.
TM
1.
6. The ADSL standard my modem is using is - There are various standards that BoB2 can use to connect to the
Internet. You may have signed up to iiNet for ADSL2 or ADSL1. Here’s a brief description of each of the standards
that BoB2 may be using. Automatic – the modem will determine the best speed to connect to the Internet
depending on your line quality and distance from the local telephone exchange.
The connection with my ISP is active? You will either see ‘yes’ or ‘no’ in this box. If ‘yes’ is displayed this means you
have an active ADSL line running and BoB2 is connected correctly and talking to your ISP. If ‘no’ is displayed either
your ADSL line is not active or BoB2 is not connected to your phone line.
TM
TM
2. Should I be able to surf the Internet? If you have a ‘yes’ displayed in the box and you have the correct ADSL user
name and password entered then you should be able to surf the Internet.
3. My Internet speed is approximately - Your connection to the Internet is displayed in this box. The speed of your
Internet connection is determined by the plan you sign up for with your ISP, as well as the distance your house
is from your local telephone exchange. Look at Image 2 on the previous page for an example. You can see the
numbers 2112/384kbps – this means your download speed is 2112kbps and your upload speed is 384kbps.
4. My modem is using firmware version - Software is loaded onto BoB2 and this shows you the latest version of
software currently running. From time to time, iiNet may send BoB2 updated versions of the software. This is
done automatically.
TM
•
•
•
•
G.992.1 (G.DMT) –ADSL1 speed, usually the lowest speed offered by an ISP
G.992.3 (ADSL2) – indicates your speed could be up to 12mbps
G.992.5(ADSL2+) - indicates that your speed could be up to 22mbps
G.992.5_M(ADSL2+M) - indicates you have access to faster upload speeds. It’s only offered in selected areas
and on selected plans.
7. My SIP sever is connected to which Australian state? iiNet’s Netphone service means you can take advantage
of making affordable phone calls over your Internet connection. We use a SIP server so you can make calls on our
network. The example in Image 2 shows that BoB2 is connected to a SIP server in NSW.
TM
8. My primary netphone account is set up correctly? If you’ve subscribed to Netphone and the service is ready to
go, you’ll see a ‘yes’ in this box.
TM
TM
9. My secondary Netphone account is set up correctly? Currently, secondary Netphone accounts are not
available. This box will say ‘no’ until we release this option.
5. My modem has been connected for this long - The time indicated in this box shows you how long BoB2 has
been connected to the Internet; the time format hh:mm:ss
TM
12
Talking to BoB2 manually
TM
Talking to BoB2 manually
TM
13
BoB2 - how to guide
TM
At the bottom of the home page, you’ll also see three tabs labelled Diagnostics, Security Log and
ASDL Status. Here’s a run down on their function:
Changing BoB2TM’s login password
For an even more secure setup, you can
change BoB2 ’s login password. The default
password is ‘admin’. We do suggest you
personalise this password to ensure BoB2
remains even more safe and sound.
TM
Diagnostics
When you click on the Diagnostics tab you will be prompted for a password. Unless you’ve changed your BoB2
password, type in the default password which is ‘admin’.
TM
The page displayed allows you to test BoB2 ’s Internet connection. For example, if you type in www.iinet.net.au and
click ‘execute’ - a test of your Internet connection will commence.
TM
TM
Here’s how:
1.
Login into BoB2 by launching a new
web page and typing http://10.1.1.1
into the address bar. Use the default
password ‘admin’ to login.
2.
Click on Advanced settings, which you’ll find in the menu list across the top of the page. Then click on Modem
password and remote management which is in the left menu bar.
3.
When you’re in Modem password and remote management, type in a new password (anything you choose) in
section 1 and click ‘save settings’.
4.
It’s important you remember this password as you’ll need it each time you need to login to BoB2 manually.
Security log
When you click on the Security log tab you will be prompted for a password. Unless you’ve changed your BoB2
password, type in the default password which is ‘admin’ and log in. The page displayed shows a history of BoB2 ’s
connectivity.
TM
TM
ADSL status
When you click on the ADSL status tab you will be prompted for a password. Unless you’ve changed your BoB2
password, type in the default password which is ‘admin’ and log in. The page displayed shows your connection’s line
status. This is often use to diagnose issues (if and when they occur) and you may be asked to access this page when
speaking with our friendly support staff.
TM
14
Talking to BoB2 manually
TM
TM
TM
BoB2 how-to guide
TM
15
Enabling remote management
Upgrading the firmware
Remote management means you
can access and manage BoB2 from a
computer that is in a remote location, for
example - your office.
From time to time, iiNet will release new
firmware to update BoB2 with that
lastest functionality. Firmware upgrades
are done automatically and usually
without you noticing. However, if you’re
super keen, you can install the latest
firmware yourself.
TM
TM
To do this:
1.
16
Click on Advanced settings, which
you’ll find in the menu list across the
top of the page.
1.
Login into BoB2 by launching a new
web page and typing http://10.1.1.1 into the address bar. Unless you have changed your BoB2 password, type the
default password ‘admin’ in the password field, and click ‘login’
TM
TM
2.
Then click on Modem password and remote management which is in the left menu bar.
3.
Enable remote management by ticking the box next to point number 4 – (image 3 above).
2.
Click on Handy Tools which you’ll find in the menu list across the top of the page.
4.
At the bottom of the screen you’ll see an IP address. This is the unique address for your BoB2 and it is required
when logging in remotely to the modem.
3.
Next to A. Firmware upgrade - click ‘continue’.
5.
When attempting to login from a remote computer, open a web page and type in your IP address (ie http://xxx.
xxx.xxx.xx:2420).
4.
Click on the link to iiNet’s freezone.
5.
You’ll see the latest firmware listed under BoB2 . Download the latest firmware file and save it to your computer.
6.
If you’re unable to access BoB2 from the remote computer, check the firewall settings on the computer in the
remote location as this may be preventing you from gaining access to your modem.
6.
Go back the the BoB2 ‘Handy Tools’ screen and browse for the firmware file you just saved. ‘Click open’ followed
by ‘upgrade firmware’ to start the process.
7.
Your firmware upgrade may take several minutes.
TM
TM
BoB2 how-to guide
TM
TM
TM
BoB2 how-to guide
TM
17
BoB2 ’s in-built answer machine
TM
Setup a file server
Answering Machine Overview
BoB2 comes with his very own in-built answering machine. The machine supports 10 minutes of message recording and is
operated by the touch key pad on the front of BoB2 .
TM
The file server function on BoB2 allows you to plug in an external USB drive into the USB port located on the right
hand side. You can then share the content on the hard drive with all the computers connected to your home or office
network.
TM
1.
18
Login to BoB2 by launching a new web page and typing http://10.1.1.1 into the address bar. Use the default
password ‘admin’, or your newly
TM
2.
Create password (see step 1) to login. Click on configure my USB port which you’ll find in the menu list across the
top of the page.
3.
Then click Set up my file server on the menu listed on the left hand side of the screen.
4.
Click on configure my USB port which you’ll find in the menu list across the top of the page.
5.
Then click Set up my file server on the menu listed on the left hand side of the screen.
BoB2 how-to guide
TM
TM
Touch key Overview
BoB2 ’s in-built answering machine is operated by a touch screen located on the front of BoB2 . By touching the
front of BoB2 (lower left) you’ll illuminate the screen. There are nine touch keys plus a light to show you if the answer
machine is turned on and how many messages are currently stored. The following picture represents the touch pad on
BoB2 ’s answer machine:
TM
TM
TM
TM
BoB2 in-built answer machine
TM
19
Registering the BoB2 handset
TM
On the handset
Using Your Answering Machine
Key
Function Description
To power on and off
Message Played
7 Segment Displayed
ON: Answering Machine on. Hello your call can not be taken at this moment, so
please leave the message after the tone.
1.
With the batteries in place, your BoB2 handset screen will begin flashing ‘Please register’.
2.
Press on the right side of the control key (it’s the one that looks like a square) to display the main
menu.
3.
Scroll down, using the control key, to ‘Settings’ and press OK using the display key to the bottom
right of the screen.
4.
Now with the ‘Settings’ sub menu open, scroll down and select ‘Handset’ and press OK.
5.
Scroll down again until you hit ‘Register H/Set’ and press OK.
6.
Enter the system PIN number (the default is 0000) and press OK.
7.
You should see a message on the screen that says ‘Regstr.Procedure Base 1’. This indicates that the registration
procedure has started.
OFF: Answering Machine off
Play or Pause the message. Play function will play new messages first and then
played messages
Move to the next message and play
Move to the last message and play
To stop a function.
Delete a single message
This key is used for extra functions, such as “delete all messages”
Answering machine volume up
Ringer tone volume increases
Answering machine volume down
Ringer tone volume decreases
Delete all messages
You have no more messages
Keypad light:
The keypad display will light up for 30 seconds after it’s pressed.
TM
On the BoB2 modem
TM
1.
Within 60 seconds of completing the above, press and hold the button on the back of BoB2 that’s labeled ‘add
extra hs/set’ for about three seconds.
2.
Following successful registration, the internal number of the handset is displayed, for example – Base 1.
3.
If the registration was unsuccessful, repeat the process.
TM
Led Status Overview
The message number will blink to let you know you have new messages! The display also shows the total number of
messages saved on the answering machine.
20
BoB2 in-built answer machine
TM
Registering the BoB2 handset
TM
21
Showing off BoB2
TM
BoB2TM is sleek and stylish so we don’t blame you for wanting to
show him off. There are a few different ways to display BoB2TM
and the BoB2TM handset.
1.
BoB2 connected to BoB2 handset and standing
up right using the supplied stand in the modem
box.
2.
Showing off BoB2 on his own and the handset
stood upright with its own stand that was
supplied in the handset box.
3.
BoB2 and the BoB2 handset stand together.
TM
TM
TM
TM
1.
L ay the modem and the handset charger face down (on a protective cloth - to prevent scratches). Slide out the
upper and lower connection points on the back left hand side of the charger, this will expose the USB charger point
and location pins (figure 1).
2.
Leaving the handset charger and BoB2 facing down, slide them together so you can locate the handset USB
charger into BoB2 as shown below (you may notice lower slider does not move all the way across – this is normal)
(figure 2).
TM
TM
The easiest way to set up the modem and handset
in this configuration is to first follow the steps in the
quick install guide and get online. Then you can turn
off BoB2 and follow these steps to attach the stand,
keep all the cables you are using in a convenient
place as you will need these in the steps detailed on
the next page.
TM
Showing off BoB2
TM
TM
TM
TM
Things are better when we’re together
22
To display BoB2 and the handset as one unit, they first need to be attached to each other. The handset will then get
its charge from the BoB2 USB port on the left hand side. This USB port is a dedicated charge port and not used for
anything other than charging the handset. You will not need the power adapter that came with your handset so keep
this in a safe place.
3.
ow take the large stand that was supplied in the modem box and pass the cables in the format below. The
N
example below shows the power cable, the ADSL phone cable and an ethernet LAN cable (figure 3).
4.
Next align the stand over the top of the handset and BoB2 (figure 4).
5.
Make sure all the pins on the stand are sitting inside the holes on the handset and BoB2 and apply a small amount
of downward pressure, whilst at the same time push the stand upward toward the top edge of the modem. You will
hear a small click as the pins interlock (figure 5).
TM
TM
Showing off BoB2
TM
23
Flat as a tack
BoB2 can sit flat on a desk or table. You won’t need the stand
that is supplied in the modem box so store it away in a safe
place. The BoB2 handset charger cradle can stand up on a desk
or table - just plug the supplied power cord into the handset
cradle and clip the stand into the back of the cradle (you may
need to apply a bit of pressure to clip in the handset stand). Just
drop in the handset when it needs to be charged. The charger
cradle will now stand upright, allowing the BoB2 handset to sit
tall and pretty.
TM
TM
TM
figure 1
figure 2
figure 3
BoB2TM and his handset stand tall
BoB2 comes with a stand that allows you to sit him up on a desk or
table. The image below shows you how to attach the stand and where
BoB2 ’s cables need to go.
TM
TM
When attaching the stand, remember to line up the pins on the stand
with the four outside holes on the back of BoB2 . Apply a small amount
of downward pressure and push the stand up to lock it in.
TM
figure 4
24
Showing off BoB2
TM
figure 5
Showing off BoB2
TM
25
Troubleshooting
This article is here to help you if your ADSL should stop working. It includes practical troubleshooting and explanations
about why things go wrong when they do.
Try BoB2 at another location where you know the connection is working. If it works there but not at your premises,
call us for further advice. If BoB2 is still not receiving a signal, contact our support line on 13 22 58 for further help.
No Internet connection
No dataflow (internet light off/flashing)
No modem sync (ADSL sync light off)
The next part of the connection process after synchronisation is authentication: your BoB2 sends a username and
password to us and if they match the details we have in our database, we allow you onto the Internet.
TM
TM
TM
First of all, your modem must synchronise with our equipment at the exchange through your telephone line. The “sync”
signal is a lot like a dial tone; without it, you can’t make a connection.
BoB2 shows that it’s “in sync” when the ADSL sync light is on.
TM
Things to check: (in order of priority)
If you’re in sync but can’t reach the Internet, it’s possible that the authentication stage has failed. The following checks
may help determine the cause of the problem:
•
Is BoB2 plugged into the Internet?
•
Change your details manually by using the instructions on page 7.
TM
•
Check that BoB2 has power - switch it off then back on
- Open your web browser and type http://10.1.1.1/ into the address bar
•
Check the ADSL phone cable is plugged in correctly (unplug it then plug it back in)
•
If your service is ADSL2+ or ADSL broadband, check the line for dial tone by plugging a telephone handset into the
cable the modem’s using and lifting the receiver (if you have Naked, there shouldn’t be a dial tone)
- This should take you to the modem’s login page where it asks for a password. The default password is admin - if
you’ve changed the password, you’ll need to put in whatever you’ve changed it to
•
Perform an Isolation Test
•
If possible, try a different phone cable to connect your modem to the wall
•
If possible, try BoB2 on a different wall socket
•
If possible, try a different modem
TM
•
If you’ve forgotten the password, hold a paperclip or similar into the pinhole reset on the back of the device for
ten seconds, then start again (using admin as the password)
•
Once you’ve entered the correct password, it should take you to a setup page
TM
Once you’re in the setup section of your modem, re-enter your username and password and check that other login
details are correct. Visit the ‘connecting to the Internet manually’ section in this manual.
After each of the above tests, switch BoB2 off and back on and give it a few minutes to settle. Any of these steps can
restore service.
TM
26
Troubleshooting
After you’ve saved the details, wait a couple of minutes and check to see if the internet light is on solid. If it is, the
Internet should work.
Troubleshooting
27
Your modem is connected to the Internet but still has no dataflow
Firewall/antivirus/browser settings
It may be that your modem shows a connection but you can’t browse websites, check email or do anything else
successfully. It’s possible your computer isn’t communicating properly. You can test this by trying to access the modem
as suggested in the previous step.
If BoB2 indicates that the connection speed is fine, the next thing to do is to disable all firewall or antivirus software
and check your Internet browser settings for things like popup blockers or spyware. There are several free anti-spyware
programs available on the net as well as some pretty good Anit-virus scanners too.
If you get through, there may be a problem with your firewall or antivirus software. It’s best to disable these to rule
them out as a problem.
Some firewalls cause computers to behave abnormally or very slow. the only way to determine this is the cause is to
remove the program altogether.
If you don’t get through to your modem, look into the physical side of things:
Note: iiNet does not assist in the installation or removal of third party software and this should only be done as a last resort and by someone who
•
Check that the yellow network cable is connected firmly and that the computer is registering a network
connection
•
Try using a different cable, especially if the current one is showing any signs of wear and tear
Limited dataflow
Sometimes not having a Internet service can be frustrating, however having an Internet service that’s very slow or
intermittent can be worse! Often the problems affecting your service to this extent are difficult to diagnose quickly
but there are some simple checks you can do.
Interference causing low sync speeds
The most common dataflow problem is from interference. In particular interference causing degredation of the quality
of your phone line, thereby reducing its capacity to transfer data to and from your modem. The most common issue
we find is from “unfiltered” devices.
TM
is fully aware of the implications of removing such software.
Contact iiNet on 13 22 58 for assistance with your browser settings if you suspect these may the cause of your
problem.
Sporadic browsing/email errors
Typical causes of this error are congestion in the local network, an outage in iiNet’s extended network and beyond or a
Maximum Transmissable Unit (MTU) overflow.
Local congestion
File sharing programs and viruses are usually the culprits in this situation. If you do not have a file sharing program such
as bit-torrent software, kazaa, iTunes etc. We suggest you get your computer scanned for viruses. If you do have any
of these file sharing services please ensure they are turned off completely, often you may close the window but the
program continues to run (it will usually show up as an icon in your system tray on the bottom right of your screen)
In order to rule out interference as the culprit it is suggested you perform an “isolation” test. See page 30.
28
Troubleshooting
Troubleshooting
29
Outage
3.
The modem does not need to be plugged into a computer at this point unless you’re testing speed problems.
Check iiNet’s network status page or call us on 13 22 58 to find out if we have an outage that may be affecting you.
4.
If the modem still hasn’t synchronised after a few minutes, connect a telephone to that socket and make sure
that the wall socket you’re using has dial tone. You may wish to try alternative telephone sockets.
Network congestion
Congestion is not a common issue with wireless connections, as a full wireless signal has more bandwidth available than
that which your internet connection can supply. However if your wireless signal is weak it may be affected in some
way. To avoid this you can ensure you remain quite close to BoB2 to keep the signal strong or you can purchase
accessories for your modem that can extend the reach of your wireless signal in a particular direction.
TM
Prior to reporting any faults to iiNet, please remember to reboot your computer and BoB2 , wait five minutes and if the
connection is still not working, then by all means call us.
TM
If BoB2 connects, you can start plugging your telephone equipment back in. Give BoB2 around a minute after each
device is plugged back in to see if the synchronisation light goes out. If it does, it’s possible you’ve found a device
which is interfering with your broadband.
TM
TM
If a piece of equipment is interfering with your broadband, it could be for any of the following reasons:
•
The equipment is not being filtered at all (please ensure you have filters on phone line devices)
•
The equipment’s filter is damaged (try swapping the filters between different devices to confirm this)
•
The equipment’s filter is being shared between too many devices and the filter can’t filter them out well enough
Broadband modem BoB2 isolation test
•
The equipment is overpowering the filter
Isolation tests are most commonly performed when your connection drops out, although they can also help when you
are experiencing slow speeds.
If you remain disconnected
Isolation test
TM
30
If connection resumes
1.
Start by unplugging everything you can around your premises that connects to a phone line. This includes
EFTPOS terminals, dialup modems, telephones, paytv boxes, fax machines and anything else which uses the same
telephone line as your broadband.
2.
Once you’ve unplugged everything, connect BoB2 directly into a telephone wall socket using a telephone cable
no longer than a metre in length. Give it a few minutes to connect.
Troubleshooting
If you remain disconnected despite these tests, it’s possible your broadband service has stopped working altogether,
in which case it’s a good time to call our support line on 13 22 58 to report a possible fault. Don’t forget to let them
know what you’ve already tried.
TM
Troubleshooting
31
32
BoB2 Header
TM
Having trouble?
iiNet Support
iiNet Business Support
If you’re still experiencing problems please
contact iiNet Support for assistance. iiNet
provide free technical support.
13 22 58
[email protected]
13 24 49
[email protected]