Transcript
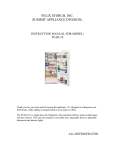
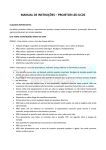
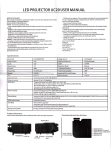
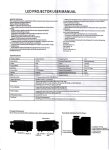
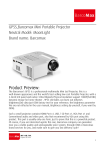
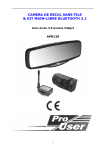
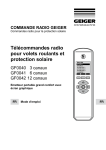
LED PROJECTOR USER MANUAL
IMPORTANT SAFEGUARDS:
•
When using electrical products, especially when children are present, basic safety precautions should
always be followed, including the following:
•
•
•
READ ALL INSTRUCTIONS BEFORE USING
DANGER - To reduce the risk of electric shock:
•
•
•
•
•
•
•
Always unplug the appliance from the electrical outlet immediately after using and before
cleaning.
DO NOT reach for an appliance that has fallen into water. Unplug it immediately.
DO NOT use while bathing or in shower.
DO NOT place or store appliance where it can fall or be pulled into a tub or sink.
DO NOT place in or drop into water or other liquid.
NEVER use pins or other metallic fasteners with this appliance.
Keep dry - DO NOT operate in a wet or moist condition
•
•
•
•
•
•
•
An appliance should never be left unattended when plugged in. Unplug from outlet when
not in use and before putting on or taking off parts or attachments.
Close supervision is necessary when this appliance is used by, on or near children, invalids
or disabled persons.
Use this appliance only for its intended use as described in this manual. Do not use
attachments not recommended by supplier; specifically any attachments not
provided with the unit.
LED projector
Power adaptor
Lens cover
Three-in-one AV cable
User manual
Using Guide
Powering ON and OFF
Stand-by status: Once the projector has been plugged into a 110V outlet, it enters
STANDBY mode (Power indicator light will flash). To power on, press and hold the power
button for 2 seconds. The indicator light will become solid and the projector will turn on.
To power off, press and hold the power button for 2 seconds. The projector will turn off
and the indicator light will flash, indicating that the projector is OFF, but still plugged in.
Focusing
The pficture sfize varfies ffrom 17” to 120” dependfing on how ffar away the projector fis ffrom
the wall
or screen it’s being projected on. Position the projector toward the desired projecting
surface
and turn the lens to focus the picture to desired clarity.
Packing List
WARNING - To reduce the risk of burns, fire, electric shock or injury to persons:
•
•
NEVER operate this appliance if it has a damaged cord or plug, if it is not working properly, if
it has been dropped or damaged, or dropped into water. Return it to SI Products Service
Center for examination and repair.
Keep cord away from heated surfaces.
NEVER drop or insert any object into any opening.
DO NOT operate where aerosol (spray) products are being used or where oxygen is being
administered.
DO NOT operate under a blanket or pillow. Excessive heating can occur and cause fire,
electric shock or injury to persons.
DO NOT carry this appliance by the power cord or use cord as handle.
To disconnect, turn all controls to the “off” position, then remove plug from outlet.
This appliance is designed for personal, non-professional use only.
DO NOT use outdoors.
DO NOT look directly into the projector lens while projector is turned on, doing so may
cause severe eye damage.
1 pc
1 pc
1 pc
1 pc
1 pc
Playing Music From USB/ SD
From the main menu, choose “Music” by using the Left and Right buttons (Fig. 3). Use the
Left and Right buttons again to toggle through music selections, then press Enter (Fig. 3)
to select.
Specifications
Playing Video From USB and SD
Model NO.
LCD PROJECTOR
Image System
Image system
LCD
Nominal Brightness
Lamp
LED
Color
Aspect Ratio
4:3
Operation Mode
Manual
Contrast
300:1
Projection Distance
3.54-12.7 feet
Picture Size
17–120 inches
Power Consumption
28W
Weight
0.83 lbs.
Supported External Storage
16G
Size
5’’x5’’x2.3’’
Power Adaptor
12V-2A
Input terminal
12V power input, AV IN, USB, SD Card
Output terminal
Speaker (1.0w x2), earphone
Audio play
Supported Audio Form: MP3, WMA, AAC, FLAC, APE
Multi audio-effect: 7 mode of audio-effect plus SRS WOW and SRS WOW HD
MP3 embed album art picture display supported
Synchronic LRC lyric display supported
Breaking point continuous play supported
Picture display
Supported static picture file: JPEG,BMP,GIF,PNG,TIF
Support multi PPT exchange effect: Chessboard, partition, effaces, etc.
Picture scaling, rotation supported
Video display
Supported video file format: RMVB/RM(Realvideo 2.0/3.0/4.0),AVI(XviD/H264),WMV(WMV 7/8/9),FLV(Sorenson H.263),
Breaking point continuous play supported
From the main menu, choose “Video” by using the Left and Right buttons (Fig. 3). Use the
Left and Right buttons again to toggle through video selections, then press Enter (Fig. 3)
to select.
400 lumen(max)
16770K
AVIN audio display
PAL & NTSC format
Text Read
TXT text file supported
Automatic page turning and manual turning supported
Breaking point continuous display & Background music supported
Energy saving mode
LCDI..image II
Videos being played from the USB or SD ports cannot exceed 640 x 480 resolution.
Videos exceeding 640 x 480 can be down-converted with most standard media software in order to be played.
Viewing Photos from USB and SD
From the main menu, choose “Photo” by using the Left and Right buttons (Fig. 3). From
the Photo menu, use the Left and Right buttons again to select photos in the Directory List
(Dir list). Use the Left and Right buttons again to select viewing options. From main Photo
menu, select Play Mode and, using the Left and Right buttons, toggle through the Mode
options. For Slide Show mode, select Slide Interval from the main Photo menu, then select
the desired length of time each photo will appear on the screen. Select Slide Effect from
the main Photo menu to select different Slide Show effects.
Using Projector through AV-Input
From the main menu, choose “AV In” by using Left and Right buttons (Fig. 3). Select
between PAL or NTSC format (check the device being connected to the projector to
determine which format to use). Press Enter to connect device to projector.
(Note: Please check which mode of signal format your player can output, and then choose
“PAL” or “NTSC”. )
Viewing eBooks from USB and SD
From the main menu, choose “EBook” by using the Left and Right buttons (Fig. 3). From
the EBook menu, use the Left and Right buttons again to select content from the Directory
List (Dir list). Viewing option can also be selected from the main eBook menu, including
font size, color, and viewing options.
Energy saving time setting and sleeping timing
Product Structure:
Function Introduction for Keys:
Notes: Please do not block the ventilation holes while using the projector.
SD interface
Headphone
12V DC in
Power indicator
1. Power button
USB
interface
AV input
Ventilation
hole
2. Select button
3. Left/Volume+/Forward
4. Right/Volume–/Backward
5. Volume select
6. Back/Return
Browser Function
The Browser function allows you to see all files (videos, pictures, music, etc.) that can
be accessed from various sources. This is helpful when you have more than one source
connected. To view all files, choose “Browser” from the main menu using the Left and
Right buttons (Fig. 3). Using the Left and Right buttons, toggle through all of the files from
the list and press Enter select desired file. Choose “Browser” in the main menu, and here
you can see all the files that you can play, and you can also choose to play them just as
described in the above. The “Browser” menu also allows you to Move, Copy, and Delete
files from your connected sources.
Desired Projector Settings
Customized viewing can be achieved under the Settings menu. To change the settings,
choose “Setting” from the main menu using the Left and Right buttons (Fig. 3). The Setting
menu allows you to customize viewing effects, set power saving options, select language,
customize installation modes, set audio preferences, and return the projector to the
default settings
PLEASE NOTE: Settings will only be saved when the projector is shut down properly.