1
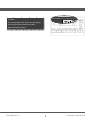
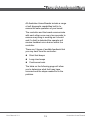
Australian Arrow Boards User Manual A Board AAB-AB / AAB -AB-DBL B Board AAB-BB / AAB-BB-DBL C Board FAS/5 N24440 AAB-CB Introduction Thank you for purchasing an Australian Arrow Boards product. For installation instructions please refer to the Australian Arrow Boards Installation & Repair manual. Australian Arrow Boards products conform to: Australian Standards AS4192-2006 NSW RTA FAS/5 A Board 1005-FAS5-01A B Board 1005-FAS5-01B C-Tick No. N24440 Lamps NATA Certified Report No. V080404/03 Australian Arrow Boards 2 June 2010 Contents Contents User Manual V1.1 Page Introduction 2 Contents 3 Arrow Board Components 4 Controller Components 5 Operation - Single Sided Board 6 Operation - Double Sided Board 10 Warranty Statement 12 Trouble Shooting Guide 13 Specifications 16 Installation Details 18 3 Australian Arrow Boards Arrow Board Australian Arrow Boards - - - - - - - - Integrated Handle Gas Ram Board Rack Assembly (Optional) Light Sensor Access Panel to Control Board Electric actuator (Optional) LED Lamp with Visor Board Housing 4 June 2010 Controller ARROW SEQUENCE as viewed by Traffic Approaching Board AUSTRALIAN ARROW BOARDS / FAULT - BUZZER SOUNDS - - - - - - - - - User Manual V1.1 see handbook Selected Sequence Display Left Arrow Both Arrows Hazard Right Arrow Board On/Off Actuator Tilt Down (Optional) Actuator Tilt Up (Optional) Beacons On/Off (Optional) 5 Australian Arrow Boards Operation - Single Sided Turn on Board Press once to activate arrow board & ARROW SEQUENCE as viewed by Traffic Approaching Board controller. (Illuminated LED indicates power on) AUSTRALIAN ARROW BOARDS Press again to turn board off. / FAULT - BUZZER SOUNDS NOTE: see handbook The controller will emit a feint beeping until it is turned on, if it senses a power supply. Tilt Board Up/Down - Rack Mounted Boards Only Electric operation (optional) Press once to activate electric ARROW SEQUENCE as viewed by Traffic Approaching Board actuator. (Flashing LED indicates actuator in operation) AUSTRALIAN ARROW BOARDS / FAULT - BUZZER SOUNDS (Steady on LED indicates actuator operation has stopped) see handbook NOTE: Pressing the Tilt Up or Down button whilst the actuator is in motion will stop the board in it’s current position. Recommence or change direction by pressing the desired button once. Caution: Always check to make sure there are no obstructions before tilting the board up or down. Australian Arrow Boards 6 June 2010 Tilt Board Up/Down - Rack Mounted Boards Only (cont.) Manual operation Tilt Up Using the handle integrated into the passenger side of the board, push with a steady motion until the gas strut takes the weight of the board and guide the board gently into it’s upright position. Tilt Down Using the handle integrated into the passenger side of the board, pull back with a steady motion until the gas strut releases the weight of the board and guide the board into it’s down position. Caution: DO NOT release the handle and let the board ‘crash’ into position. This will reduce the life expectancy of your arrow board and damage incurred by such operation will not be covered under warranty. User Manual V1.1 7 Australian Arrow Boards Operation - Single Sided (cont.) Beacons (Optional) Press once to activate beacon ARROW SEQUENCE as viewed by Traffic Approaching Board circuit. (Steady on LED indicates circuit is on) AUSTRALIAN ARROW BOARDS Press again to turn off beacon circuit. / FAULT - BUZZER SOUNDS see handbook Arrow Sequences Press once to activate required ARROW SEQUENCE as viewed by Traffic Approaching Board sequence. (Steady on LED indicates selected sequence) AUSTRALIAN ARROW BOARDS / Press again to turn off sequence. FAULT - BUZZER SOUNDS or see handbook Select a different sequence by pressing desired button once. Note: ARROW SEQUENCE as viewed by Traffic Approaching Board Selected sequence display flashes in real time with the corresponding lamps on the arrow board. AUSTRALIAN ARROW BOARDS / FAULT - BUZZER SOUNDS see handbook Australian Arrow Boards 8 June 2010 ARROW SEQUENCE as viewed by Traffic Approaching Board Caution: Arrow sequences are shown on the display as they would be viewed from traffic approaching the board. AUSTRALIAN ARROW BOARDS / FAULT - BUZZER SOUNDS User Manual V1.1 9 see handbook Australian Arrow Boards Operation - Double Sided Note: FRONT The BACK Board operation of a Double Sided board is the same as the operation of a Single Sided board. AUSTRALIAN ARROW BOARDS / FAULT - BUZZER SOUNDS see handbook ARROW SEQUENCE as viewed by Traffic Approaching Board Turn On FRONT Board Press once to activate FRONT board & the FRONT board controls. (Illuminated LED indicates power on) BACK Press again to turn off FRONT board. AUSTRALIAN ARROW BOARDS / FAULT - BUZZER SOUNDS see handbook FRONT Board Arrow Sequences Press once to activate required FRONT sequence. AUSTRALIAN ARROW BOARDS (Steady on LED indicates selected sequence) / FAULT - BUZZER SOUNDS Press again to turn off sequence. see handbook or ARROW SEQUENCE as viewed by Traffic Approaching Board Select a different sequence by pressing desired button once. BACK AUSTRALIAN ARROW BOARDS / FAULT - BUZZER SOUNDS see handbook Australian Arrow Boards 10 June 2010 Note: Selected sequence display flashes in real time with the corresponding lamps on the arrow board. FRONT AUSTRALIAN ARROW BOARDS / FAULT - BUZZER SOUNDS see handbook ARROW SEQUENCE as viewed by Traffic Approaching Board BACK AUSTRALIAN ARROW BOARDS / FAULT - BUZZER SOUNDS see handbook Caution: Arrow sequences on the FRONT & BACK board are shown on their displays as they would be viewed from traffic approaching the rear of your vehicle. FRONT AUSTRALIAN ARROW BOARDS / FAULT - BUZZER SOUNDS see handbook ARROW SEQUENCE as viewed by Traffic Approaching Board BACK AUSTRALIAN ARROW BOARDS / FAULT - BUZZER SOUNDS User Manual V1.1 11 see handbook Australian Arrow Boards Warranty Statement Australian Arrow Boards products are built to exacting standards and are covered by a component replacement / repair & return warranty against faulty workmanship and/ or material components.* 5 years on lamps Lamps will be replaced under warranty should 9 individual LEDs fail to illuminate. 2 years on electronics & hardware Board controller & electronics, housing & mounting hardware including the optional electric actuator, will be either repaired or replaced during this period. *Labour costs are not covered under warranty Caution: There are no user serviceable components in the controller or the board. Any repairs that are needed to wiring, connectors or internal components must be undertaken by a qualified auto electrician. Failure to do so may void your warranty. Australian Arrow Boards 12 June 2010 Troubleshooting All Australian Arrow Boards include a range of self diagnostic capabilities built in to ensure the safe operation of your board. The controller and the board communicate with each other once every two seconds to ensure everything is working as it should and if a fault is detected the operator will receive feedback via a buzzer within the controller. There are 3 types of audible feedback that you may hear from the controller: zz Short fast beeps zz Long slow beeps zz Continuous buzz. The table on the following page will allow you to determine what fault may have occurred and the steps needed to fix the problem. User Manual V1.1 13 Australian Arrow Boards Troubleshooting Buzzer Sound Board Condition Controller Condition Fast Arrow Sequence changes to Hazard pattern. Arrow sequence display shows Hazard pattern. Fast Arrow Board has no lamps working. Controller switched off. No LEDs illuminated. Slow Arrow Sequence missing lamp or lamps. Arrow Sequence display has LEDs not illuminated Continuous Board not fully in up or down position. Tilt Up or Down LED flashing. Continuous Board can be in any position. Currently selected Arrow Sequence remains in operation. Tilt Up or Down LED flashing. Unable to change Arrow Sequence. Continuous No lamps on board operational. May be possible to select a different Arrow Sequence. Continuous Board has switched automatically from selected pattern to Hazard pattern. Arrow Sequence display has automatically changed from selected pattern to Hazard pattern. - Board has switched automatically from selected pattern to Hazard pattern. Controller switched off. No LEDs illuminated. - Lamps dull during daylight operation. Full functions. - Lamps full brightness during night time operation Full functions. - Normal Arrow Board functions. Beacon/s not working. Beacon indicator LED illuminated. - Normal Arrow Board functions. Beacon/s not working. Beacon LED indicator fails to illuminate when activated. Australian Arrow Boards 14 June 2010 Fault Action Power supply has reached low voltage - 11.6V. zz If vehicle is not running. Start engine to bring voltage up to normal range. zz If condition persists have electrical system checked by auto electrician. Power supply has reached extreme low voltage 10.8V. or Power supply has reached over voltage - 15.7V. zz As Above. 1 or more lamps corresponding with the Arrow Sequence display have a faulty connection or have failed. zz Have lamp connectors checked by auto electrician. zz If condition persists replace affected lamp/s Arrow Board has been obstructed during Tilt Up or Down operation. (Power to actuator has been isolated to prevent further damage) zz Turn board off. zz If safe, remove obstruction & turn on board. Short circuit detected in actuator or actuator wiring. (Power to actuator has been isolated to prevent further damage) zz Have wiring & connection to actuator checked by auto electrician. zz If condition persists replace actuator. Short circuit in lamp or lamp harness. zz Have wiring checked by auto electrician. zz If condition persists replace affected lamp/s. Controller and Arrow Board have lost communication. Arrow Board has entered Fail Safe Mode. zz Disconnect board from power. Wait a minimum of 15 seconds then reconnect power. zz If condition persists have wiring & connection checked by auto electrician, controller or control board may need replacing. Controller and Arrow Board have lost communication. Arrow Board has entered Fail Safe Mode. zz As Above. Light sensor obstructed or malfunction. zz Clear obstructions, dirt etc from sensor. zz If condition persists have wiring checked by auto electrician. zz If condition persists replace light sensor. Light sensor malfunction. zz Have sensor connector checked by auto electrician. zz If condition persists replace sensor unit. Beacon/s wiring or connectors damaged or beacon/s faulty. zz If beacon/s are rotating but bulbs not working, replace bulb/s. zz If beacon/s are not rotating, have wiring & beacons checked by auto electrician. zz If condition persists replace beacon/s. Controller malfunction. zz Turn board off. Wait a minimum of 15 seconds then turn on again. zz If condition persists have wiring & connection checked by auto electrician, controller may need replacing. User Manual V1.1 15 Australian Arrow Boards Specifications Model Name AAB-AB AAB-AB-DBL AAB-BB AAB-BB-DBL AAB-CB Board Dimensions ∓ 2mm 1262mm (W) 160mm (D) 662mm (H) 1262mm (W) 270mm (D) 662mm (H) 1502mm (W) 160mm (D) 772mm (H) 1502mm (W) 270mm (D) 772mm (H) 2400mm (W) 270mm (D) 1200mm (H) Controller Dimensions 120mm (W) 31mm (D) 69mm (H) 120mm (W) 31mm (D) 138mm (H) 120mm (W) 31mm (D) 69mm (H) 120mm (W) 31mm (D) 138mm (H) 120mm (W) 31mm (D) 69mm (H) No. of Lamps 13 26 15 30 Current Draw 2.1 A 4.2 A 2.5 A 5.0 A 2.5A Operating Voltage 15 / 17 (Facility for 2 lamps on rear of board) 11.5 - 13.5 VDC Weight Board Only 16.0 Kg 18.7 Kg 21.6 Kg 25.3 Kg 80 Kg Weight Board including Rack & Electric Actuator 26.2 Kg 28.3 Kg 31.2 Kg 34.9 Kg N/A Power Harness 10 m Controller Harness 15 m Operating Temperature -10°C to +60°C IP Rating Board Lamp Dimming Levels Australian Arrow Boards IP45 Automatic 5 levels below 1100 lx - Full brightness at 1400 lx and above 16 June 2010 Notes User Manual V1.1 17 Australian Arrow Boards Installation Details Note: This User Manual is to remain with the vehicle to which the board has been installed. Installation Date : Installer Name : Address : City : State : Phone : Fax : Board Model : Board Serial Number : Postcode : Options Installed Rack Assembly : Yes / No Electric Actuator : Yes / No Beacons : Yes / No Voltage Reducer : Yes / No Vehicle Type : Vehicle VIN : Australian Arrow Boards 18 June 2010 This publication is copyright. All rights reserved. This publication may not be reproduced in full or in part by any means (electronic or mechanical) without the prior written permission of Australian Arrow Boards. User Manual V1.1 19 Australian Arrow Boards Australian Arrow Boards Unit 2/42-44 Whyalla Place, Prestons, NSW 2170 PO Box 314 Menai Central NSW 2234 Phone: 02 9607 5774 Fax: 02 9607 5589 Design - Supply Line (AUST) Pty Ltd www.roadrunnerparts.com.au